BTCD005 - Drill Batavia - Free user manual and instructions
Find the device manual for free BTCD005 Batavia in PDF.
User questions about BTCD005 Batavia
0 question about this device. Answer the ones you know or ask your own.
Ask a new question about this device
Download the instructions for your Drill in PDF format for free! Find your manual BTCD005 - Batavia and take your electronic device back in hand. On this page are published all the documents necessary for the use of your device. BTCD005 by Batavia.
USER MANUAL BTCD005 Batavia
natural_image
Exterior view of a Batavia electric drill with orange buttons and black body (no text or symbols on the device itself)Operating instructions
- a. Keyless Chuck b. Drill chuck ring
- Torque Setting Ring
- LED Work Light
- Battery Level Indicator LED
- Direction Switch
- ON/OFF Trigger
- Battery
- Battery Locking Clips (on both sides)
- Ventilation Slots
- Gear Switch
- a+b. Charger
- Charging LED - Red
- Power LED / Charging LED - Green
- Bitholder
ÜBERSICHT
Instruction manuals provide valuable hints for using your new device. They enable you to use all functions, and they help you avoid misunderstandings and prevent damage. Please take the time to read this manual carefully and keep it for future reference.
EXPLANATION OF THE SYMBOLS

Warning! To reduce the risk of injury, the user must read the instruction manual.

Denotes risk of personal injury, loss of life or damage to the tool in case of non-observance of the instructions in this manual.

Always wear hearing protection. The effects of noise can cause hearing loss.

Wear safety glasses. When working with electric power tools, sparks, splinters, chips and dust particles may be generated and these can cause loss of sight.

Electric power tool, protection class II. This sign symbolises that this unit corresponds to Protection Class II. This means that the unit is equipped with either reinforced or double insulation between the mains circuit and output voltage or metal housing respectively.


CE stands for “Conformité Européenne”, which means “In accordance with EU Regulations”. With the CE marking, the manufacturer confirms that this Electric tool complies with the applicable European directives.

Do not dispose of electric power tools with domestic refuse.
GENERAL SAFETY INSTRUCTIONS FOR POWER TOOLS

WARNING! Read all instructions.
WARNING: Always switch off the appliance when non-working.
Failure to follow all instructions listed below may result in electric shock, fire and/or serious injury.
The term “power tool” in all of the warnings listed below refers to your mains operated (corded) power tool or battery operated (cordless) power tool.
Save these instructions for future reference!
- Work area
a. Keep work area clean and well lit. Cluttered and dark areas invite accidents.
b. Do not operate power tools in explosive atmospheres, such as in the presence of flammable liquids, gasses or dust. Power tools create sparks which may ignite the dust of fumes.
c. Keep children and bystanders away while operating a power tool. Distractions can cause you to lose control.
- Electrical safety
a. Power tool plugs must match the outlet. Never modify the plug in any way. Do not use any adapter plugs which earthed (grounded) power tools. Unmodified plugs and matching outlets will reduce risk of electric shock.
b. Avoid body contact with earthed or grounded surfaces such as pipes, radiators, ranges and refrigerators. There is an increased risk of electric shock if your body is earthed or grounded.
c. Do not expose power tools to rain or wet conditions. Water entering a power tool will increase the risk of electric shock.
d. Do not abuse the cord. Never use the cord for carrying, pulling or unplugging the power tool. Keep cord away from heat, oil, sharp edges or moving parts. Damaged or entangled cords increase the risk of electric shock.
e. When operating a power tool outdoors, use an extension cord suitable for out-
English
door use. Use of a cord suitable for outdoor use reduces the risk of electric shock.
f. Always use tool in conjunction with a residual circuit breaker device. The use of a residual circuit breaker device reduces the risk of electric shock.
3. Personal safety
a. Stay alert, watch what you are doing and use common sense when operating a power tool. Do not use a power tool while you are tired or under the influence of drugs, alcohol or medication. A moment of inattention while operating power tools may result in serious personal injury.
b. Use safety equipment. Always wear eye protection. Safety equipment such as dust mask, non-skid safety shoes, hard hat, or hearing protection used for appropriate conditions will reduce personal injuries.
c. Avoid accidental starting. Ensure the switch is in the off position before plugging in. Carrying power tools with your finger on the switch or plugging in power tools that have the switch on invites accidents.
d. Remove any adjusting key or wrench before turning the power tool on. A wrench or a key left attached to a rotating part of the power tool may result in personal injury.
e. Do not overreach. Keep proper footing and balance at all times. This enables better control of the power tool in unexpected situations.
f. Dress properly. Do not wear loose clothing or jewellery. Keep your hair, clothing and gloves away from moving parts. Loose clothes, jewellery or long hair can be caught in moving parts.
g. If devices are provided for the connection of dust extraction and collection facilities, ensure these are connected and properly used. The use of these pieces of equipment reduce hazards caused by dust.
4. Power tool use and care
a. Do not force the power tool. Use the correct power tool for your application. The correct power tool will do the job better and safer at the rate for which it was designed.
b. Do not use the power tool if the switch does not turn it on and off. Any power tool that cannot be controlled with the switch is dangerous and must be repaired.
c. Disconnect the plug from the power source before making any adjustments, changing accessories, or storing power tools. Such preventive safety measures reduce the risk of starting the power tool accidentally.
d. Store idle power tools out of the reach of children and do not allow persons unfamiliar with the power tool or these instructions to operate the power tool. Power tools are dangerous in the hands of untrained users.
e. Maintain power tools. Check for misalignment or binding of moving parts, breakage of parts and any other condition that may affect the power tools operation. If damaged, have the power tool repaired before use. Many accidents are caused by poorly maintained power tools.
f. Keep cutting tools sharp and clean.
Properly maintained cutting tools with sharp cutting edges are less likely to bind and are easier to control.
g. Use the power tool, accessories and tool bits etc., in accordance with these instructions and in the manner intended for the particular type of power tool, taking into account the working conditions and the work to be performed. Use of the power tool for operations different from intended could result in a hazardous situation.
5. Service
a. Please use a qualified expert who uses original replacement parts to repair your power tool. This will ensure proper functioning of the power tool.
SAFETY INSTRUCTIONS FOR CORDLESS DRILL/DRIVERS
General
- The tool/charger is not intended for use by persons (including children) with reduced physical, sensory or mental capabilities, or lack of experience and knowledge, unless they have been given supervision or instruction concerning use of the tool/charger by a person responsible for their safety.
- Ensure that children do not play with the tool/charger.
- Ensure that the Forward/Reverse switch (5) is in the middle (locking) position before making any adjustments or changing accessories as well as when carrying or storing the tool.
- Do not work materials containing asbestos (asbestos is considered carcinogenic).
- Dust from material such as paint containing lead, some wood species, minerals and metal may be harmful (contact with or inhalation of the dust may cause allergic reactions and/or respiratory diseases to the operator or bystanders); wear a dust mask and work with a dust extraction device when connectable.
- Certain kinds of dust are classified as carcinogenic (such as oak and beech dust) especially in conjunction with additives for wood conditioning; wear a dust mask and work with a dust extraction device when connectable.
- Follow the dust-related national requirements for the materials you want to work with.
- When using the drill, use safety equipment including safety glasses or shield, ear defenders, and protective clothing including safety gloves. Wear respiratory protection suitable for the work being undertaken. A minimum rating of FFP2 is recommended. If operating the tool causes discomfort in any way, stop immediately and review your method of use.
-
Battery chargers are for indoors use only. Ensure that the power supply and charger are protected against moisture at all times.
-
Ensure that the lighting is adequate.
- Ensure that the drill bit is securely fixed in the chuck. Insecure drill bits can be ejected from the machine causing a hazard.
- Ensure that the drill bit is not in contact with the workpiece prior to starting up the tool.
- Before drilling, check that there is sufficient clearance for the drill bit under the workpiece.
- Drill bits get hot during operation, allow to cool prior to handling them.
- NEVER use your hands to remove saw-dust, chips or waste close by the bit.
- Examine the chuck regularly for signs of wear or damage. Have damaged parts repaired by a qualified service centre.
- ALWAYS wait until the drill has come to a complete stop before putting it down.
ADDITIONAL SAFETY INSTRUCTIONS FOR BATTERIES AND CHARGERS
Please note the included General Safety Notes and the following safety notes to avoid malfunctions, damage or physical injury:
Batteries
WARNING: Improper battery use may result in a fire, explosion, or other hazard.
WARNING: The battery fluid may cause personal injury or damage to property. In case of skin contact, immediately rinse with water. If redness, pain or irritation occurs seek medical attention. In case of eye contact, rinse immediately with clean water and seek medical attention.
- Never attempt to open for any reason.
- Do not expose the battery to water.
- Do not expose the battery to heat.
- Do not store in locations where the temperature may exceed 40 °C.
- Keep batteries away from children.
- Charge only at ambient temperatures between 10 °C and 40 °C.
- Charge only using the charger provided with the appliance/tool.
English
- Use power tools only with specifically designated battery packs. Use of any other battery packs may create a risk of injury and fire.
- When disposing of batteries, follow the instructions given in the section "Disposal".
- Do not damage/deform the battery pack either by puncture or impact, as this may create a risk of injury and fire.
- Do not charge damaged batteries.
- Take special care of the battery. Avoid dropping it onto any hard surface and do not subject it to pressure or any other form of mechanical stress. Keep the battery away from extreme heat and cold.
- Important Danger! Never short-circuit the battery or expose it to moisture. Do not store it together with any metal parts which could short-circuit the contacts. The battery could overheat, start burning or explode.
Under extreme conditions, battery leakage may occur. When you notice liquid on the batteries, proceed as follows: Carefully wipe the liquid off using a cloth. Avoid skin contact. In case of skin or eye contact, follow the instructions below.
Chargers
Your charger has been designed for a specific voltage. Always check that the mains voltage corresponds to the voltage on the rating plate.
WARNING:
- When not in use and before cleaning and servicing, disconnect the battery charger from the power supply.
- Never attempt to replace the charger unit with a regular mains plug.
- Use your charger only to charge the battery in the appliance/tool with which it was supplied. Other batteries could burst, causing personal injury and damage.
- Never attempt to charge non-rechargeable batteries.
- If the supply cord is damaged, it must be replaced by the manufacturer or an authorized Service Centre in order to avoid a hazard.
-
Do not expose the charger to water.
-
Do not open the charger.
- Do not probe the charger.
- The appliance/tool/battery must be placed in a well ventilated area when charging.
- The charger is intended for indoor use only.
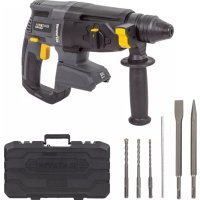
CONTENTS OF PACKING
1x Lithium-ion Cordless Drill
2x Battery
1x Bitholder
1x Charger
1x Instruction manual
BEFORE USE
- Avoid damage that can be caused by screws, nails and other elements in your workpiece; remove them before you start working.
- Use suitable detectors to find hidden utility lines or call the local utility company for assistance (contact with electric lines can lead to fire or electrical shock; damaging a gas line can result in an explosion; penetrating a water pipe will cause property damage or an electrical shock).
- Secure the workpiece (a workpiece clamped with clamping devices or in a vice is held more securely than by hand).
DURING USE
- Hold power tool by insulated gripping surfaces, when performing an operation where the cutting accessory or fastener may contact hidden wiring (cutting accessory and fasteners contacting a "live" wire may make exposed metal parts of the power tool "live" and could give the operator an electric shock).
- In case of electrical or mechanical malfunction, immediately switch off the tool or unplug charger from power source.
BEFORE FIRST USE
Remove the machine and the accessories from the packaging. Check the machine for transport damage and do not use the machine in case of damages. Keep the packing materials away from children, risk of suffocation!
INTENDED USE
The cordless drill/screwdriver is designed for tightening and undoing screws, for drilling in wood, metal and plastic, in each case when using the appropriate bits. The equipment is to be used only for its prescribed purpose.
OPERATION
Operation of Lithium-Ion Batteries
Lithium-ion batteries share many characteristics with conventional batteries. The major difference is that Lithium-ion batteries do not have a “memory” and do not require to be completely discharged periodically. It is recommended to charge Lithium-ion batteries after each use so they will be fully charged when needed.
Lithium-ion batteries perform best and deliver peak output power at room temperature. When operated in lower temperatures, the battery output will be reduced.
Note: A fully charged battery will loose about 2% of its charge per month during storage.
Before use
The battery must be charged before using it for the first time.
Removing the battery from the machine
- Push the battery release button (8) and pull the battery (7) out of the machine.
WARNING: Do not try to remove the battery without pressing the battery release button. The drill or battery could be damaged.
Inserting the battery into the machine
Ensure that the exterior of the battery is clean and dry before connecting to the charger or machine.
- Insert the battery (7) into the machine, push the battery further forward until it clicks into place.
Note: Make sure the battery and machine are lined up correctly. If the battery does not slide onto the machine easily, don't force it. Instead, remove the battery; check the top of battery and the machine slot are clean and undamaged and that the contacts are not bent.
Charging the Battery
WARNING: Failure to follow the correct procedure when charging batteries will result in permanent damage.
- Remove the battery pack (7) from the handle by pressing the battery locking clips (8) on the left and right side of the battery pack (7).
- Check that your mains voltage is the same as that marked on the rating plate. Plug the battery charger (11a) into the power socket and connect the charging cable to the charging adapter (11b). The green LED on the charging adapter (11b) will turn on.
- Place the battery pack (7) into the charging adapter. The green LED and the red LED will turn on to indicate that the battery pack is being charged.
- When the battery pack is fully charged after approx 3 – 5 hours, the red LED will go out again.
Note: Make sure the battery and battery charger are lined up correctly. If the Battery does not slide onto the battery charger easily, don't force it. Instead, remove the battery; check the top of battery and the battery charger slot are clean and undamaged and that the contacts are not bent.
Battery Charge Level
IMPORTANT: When a low charge level is indicated be aware the tool may stop operating while using the tool. In some instances this may be dangerous. It is recommended to always ensure the battery pack has a good charge level.
Notes about Battery Charging
- Let a hot battery cool down before charging it.
- The battery should be charged at ambient temperatures between 10 °C and 40 °C (ideally around 20 °C).
- After charging, allow 15 minutes for the battery to cool before use.
- Ensure that the charger is disconnected from the mains supply after use, and is stored correctly.
- Do not leave batteries on charge for extended periods and never store batteries on charge.
English
- The battery charger monitors battery temperature and voltage while charging. Remove the battery once charging has been completed to maximise charge cycles of the battery and not waste power.
- Do not store Lithium-Ion battery packs in a discharged state long term. This can damage the Lithium-Ion cells. For long-term storage, store batteries in a high charge state disconnected from the power tool.
- The capacity of batteries will reduce over time. After 100 charge cycles, the battery's operation time and the maximum torque performance of the tool will slightly reduce. This decline will continue until the battery has minimal capacity after 500 charge cycles. This is normal and not a fault with the battery pack.
Direction control
- The direction of rotation can be set using the Forward/Reverse Switch (5).
- For anti-clockwise rotation, push the switch to the right.
- For clockwise rotation, push the switch to the left.
Note: When the Forward/Reverse Switch is in the central position, the drill is locked and cannot be switched on. Use this setting as a safety feature to prevent the drill from being switched on accidentally.
Torque Selector
Rotate the Torque Selector (2) to select the desired setting: the higher the number displayed on the torque ring, the higher the torque produced by the tool.
Speed setting
The machine has 2 drill speeds, which can be adjusted by sliding the gear switch (10) forward or backwards. The number on the gear switch (10) shows which position is chosen.
Position 1: For slow drilling, large drilling diameter or screw driving. The machine has higher torque at a low speed.
Position 2: For fast drilling or small drilling diameter. The machine has lower torque at a high speed.
Selection:
| Torque selector Speed | ||
| Screwing 1 – 19* 1 | ||
| Drilling Wood | 1 or 2 | |
| Drilling Metal | 1 or 2 |
*
- Select a low setting for small screws or soft work material.
- Select a high setting for large screws, hard work materials and when removing screws.
- You should preferably choose a setting as low as possible when driving screws. Select a higher setting if the motor slips before the screw is fully tightened.
WARNING: If the power tool gets excessively hot in use, stop using the tool immediately and allow to cool before continuing work. The cooling period can be reduced by operating the drill at maximum speed with no load. Always make sure the Motor Vents (9) are not blocked and do not allow dust to enter the body of the
tool through the Motor Vents; dust, especially metallic dust, may damage or destroy the tool.
Switching the machine on and off
The on/off switch (6) is used for activating the machine and adjusting rotation speed.
- Pressing the on/off switch (6) will activate the machine, the further the switch is being pushed, the faster the drill will turn.
- Releasing the on/off switch (6) will stop the machine.
LED lamp
The LED lamp (3) will be lit automatically as soon as you press the ON/OFF switch (6).
Using the bitholder
To use the bitholder (14), you must remove the keyless chuck (1a).
- Hold the keyless chuck (1a) tightly from the front. Pull or push the drill chuck ring (1b) in the direction of the keyless chuck (1a).
- This unlocks the keyless chuck (1a) and it can be pulled off from the front.
- In order to put the keyless chuck (1a) back in position, pull the drill chuck ring (1b) in the direction of the keyless chuck. Push the keyless chuck (1a) on as far as it will go.
MAINTENANCE AND CLEANING
WARNING: Always disconnect from the mains power supply, before carrying out any maintenance/cleaning of the charger. Remove the battery before carrying out any maintenance/cleaning of the tool.
Maintenance
There are no inner parts of the tool which need maintenance.
Cleaning
- Keep safety devices, ventilation openings and the motor housing as free as possible from dirt and dust. Rub the electric power tool with a clean cloth or blow over it with low pressure compressed air.
- We recommend that you clean your electric power tool immediately after each use.
- Clean the electric power tool regularly with a damp cloth and somewhat soft soap.
Do not use any cleaning or solvent materials; these can attack the device's plastic components. Make sure that no water can get inside the electric power tool.
ACCESSORIES
Use only accessories with an allowable speed matching at least the highest no-load speed of the tool.
TECHNICAL DATA
| Speed | 0 - 350 / 1300 min ^1 |
| Chuck | 1 - 10 mm |
| Torque | 27 Nm |
| Weight | 1.09 kg |
| Sound Pressure Level L_pA | 63 dB(A) |
| Uncertainty KpA | 3 dB |
| Sound Power Level L_WA | 74 dB(A) |
| Uncertainty K_WA | 3 dB |
| Hand Arm Vibration | |
| (No Load) | 0.6 m/s ^2 |
| (In Metal) | 1.6 m/s ^2 |
| Uncertainty K. | 1.5m/s ^2 |
DISPOSAL

Do not dispose of electric power tools with domestic refuse.
The electric power tool is shipped in packaging to reduce transport damage. This packaging is a raw material and as such can either be reused or can be fed back into the raw material cycle. The electric power tool and its accessories are made from various materials such as metals and plastics. Take defective components to a special refuse collection point. Ask about these at your specialist shop or local council. The product and the user manual may be subject to changes. Technical data may be changed without prior notice.
Batteries
Think of the environment when disposing of batteries. Contact your local authorities to find out where your nearest disposal area is.
Do not dispose of batteries with domestic refuse.
Do not dispose of by burning, risk of explosion.
EC-DECLARATION OF CONFORMITY
We, the Batavia GmbH, Weth. Buitenhuisstraat 2a, NL-7951 SM Staphorst, declare by our own responsibility that the product Cordless Drill, Model BT-CD005, Item-No
7062864 is according to the basic requirements, which are defined in the European Directives Electromagnetic Compatibility
2014/30/EU (EMC), 2006/42/EC (Machinery),
2011/65/EU (RoHS), 2014/35/EU and their amendments. For the evaluation of conformity, the following harmonized standards were consulted:
EN 55014-1:2006+A1+A2,
EN 55014-2:2015,
EN 60745-1:2009+A11,
EN 60745-2-1:2010,
EN 60745-2-2:2010,
EN 60335-1:2012+A11,
EN 60335-2-29:2004+A2,
EN 62233:2008,
EN 61000-3-2:2014,
EN 61000-3-3:2013
Staphorst, 25 June 2017

text_image
Handwritten signature or scribble on a stylized oval shape, possibly a signature or signature mark.Meino Seinen, QA Representative
text_image
Handwritten signature or scribble on a white background, possibly a signature or artistic markCE-DÉCLARATION DE CONFORMITÉ
text_image
Handwritten signature or scribble on a plain backgroundThis product has got a 2 year warranty
Dear Client, if for any reason this product is not working, please ensure you contact our Client Service Centre. Ensure you have your original receipt of purchase. This warranty covers all defects in workmanship or materials in this Batavia product for a two year period from the date of purchase. The warranty does not cover any malfunction, or defect resulting from misuse, neglect, alteration, or repair.