Eco Elements - Fan CasaFan - Free user manual and instructions
Find the device manual for free Eco Elements CasaFan in PDF.

| Product type | Ceiling fan |
| Brand | CasaFan |
| Model | Eco Elements (103, 132, 180) |
| Dimensions (Ø x H) | 1030 x 335 mm / 1320 x 335 mm / 1800 x 335 mm |
| Weight | 6.4 kg / 6.6 kg / 7.2 kg |
| Rated voltage | 110 - 240 V ~ 50/60 Hz |
| Motor power (max) | 4 - 23 W (models 103/132) / 6 - 33 W (model 180) |
| Protection class | I / IP20 |
| Number of speeds | 6 |
| Ceiling-to-blade distance | approx. 300 mm or 200 mm (depending on installation) |
| Minimum height under blade | 2.30 m |
| Remote control | Yes, with 9V battery |
| Timer function | Yes, programmable in 1-hour increments |
| Rotation direction switch | Yes (summer/winter) |
| Optional lighting | Compatible (not supplied) |
| Blade material | Glass-coated wood, weight-sorted |
| Balancing kit included | 2 adhesive weights + 1 clip |
| Maintenance | Clean with a dry cloth, check fasteners every two years |
| Lubrication | Lubricated for life, not necessary |
| Installation | By a qualified electrician, power must be turned off |
| Warranty | Not specified in the manual |
Frequently Asked Questions - Eco Elements CasaFan
User questions about Eco Elements CasaFan
0 question about this device. Answer the ones you know or ask your own.
Ask a new question about this device
Download the instructions for your Fan in PDF format for free! Find your manual Eco Elements - CasaFan and take your electronic device back in hand. On this page are published all the documents necessary for the use of your device. Eco Elements by CasaFan.
USER MANUAL Eco Elements CasaFan
natural_image
Two views of a white and silver airship with five blades, one showing a control panel (no text or symbols visible)DECKENVENTILATOR
CEILING FAN
VENTILATEUR DE PLAFOND
VENTILATORE DA SOFFITTO
VENTILADOR DE TECHO
STROPNÍ VENTILÁTOR
CE
Radio frequency 433,92 MHz
Maximum transmitting power:<10dBm
Eco Elements 180
Eco Elements 132
Eco Elements 103
About this operating instructions
Before using the CasaFan fan, read the operating instructions carefully. Keep the operating instructions within reach. Never pass the fan onto another person without the operating instructions.
| Explanation of symbols: | |||
| Dangerous electric voltage | Careful | ||
| Warn the user of the dangers caused by electricity | Particular note for the user. | ||
| Describing the CasaFan-VentilatorThe fan is for circulating room air. Their use in machines which are outside and unprotected, in garages, in moist or wet rooms or rooms in danger of fire or explosion, is not permitted. | |||
| Technical data: | |||
| Type | Eco Elements 103 | Eco Elements 132 | Eco Elements 180 |
| Mains voltage: 110 - 240 V^ | 50/60 Hz | ||
| Power motor (W): 4 - 23 Watt (max.) 4 - 23 Watt | (max.) 6 - 33 Watt (max.) | ||
| Protection clas: I/IP20 | |||
| No of speeds: 6 | |||
| Dimensions ∅ x H (mm) ca | 1030 x 335 ca. 132 | 0 x 335 ca. 1800 x 335 | |
| Dist. ceiling - blades (mm) | approx. 300, or approx. 200 | ||
| Weight (kg): | ca. 6,4 kg | ca. 6,6 kg | ca. 7,2 kg |

Caution! Only operate the unit when completely assembled!
| - Unpack the CasaFan fan, check if everything is present (see page 3) and for visible signs of damage. | ||
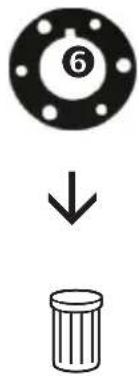
| 1. Motor block | 6. mounting ring | 11. Bladeholder arms (5x) |
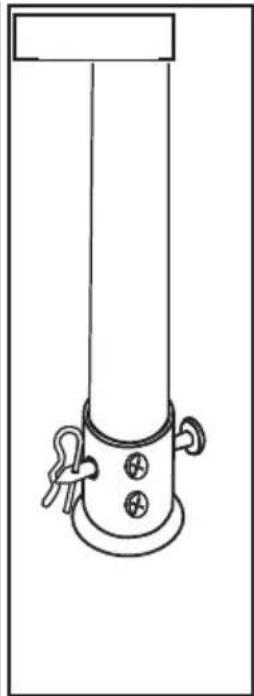
| 2. Assembly rod | 7. Lower cover | 12. Screw for bladeholder (10x) |
| 3. Mounting bracket | 8. Screw for blade (15x) | 13. Remote control |
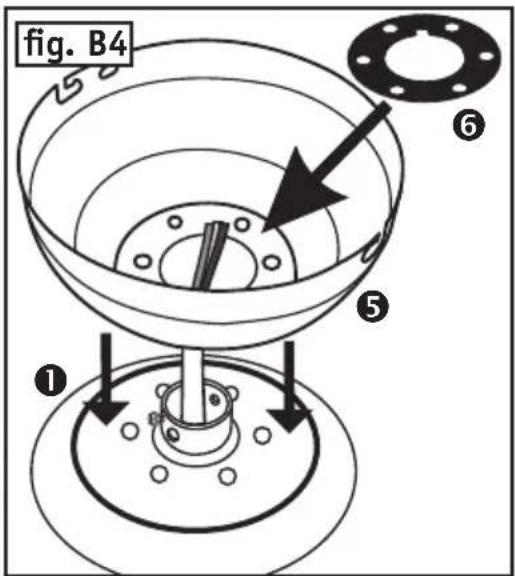
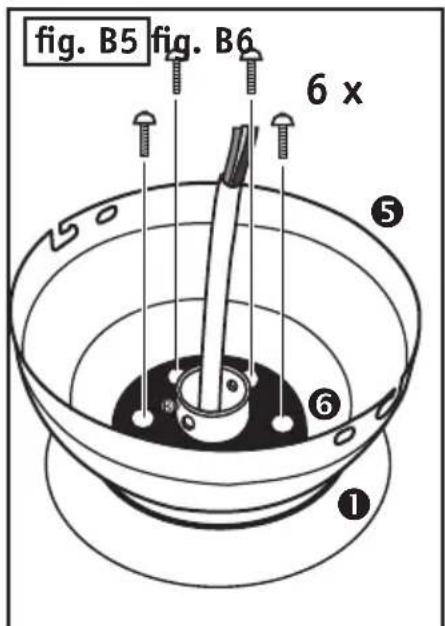
| 4. Ball assembly | 9. Blade (5x) | 14. Screw for canopy (4x) |
| 5. Canopy | 10. Screw (2x) | 15. Transprt locks |

- Dispose of packaging taking the environment into account and keep out of the reach of children.
Assembly
Please proceed as per figures 1 - 11 at Page 22 - 25 of these operating instructions.

When dealing with electricity, just conforming to all the safety and precautionary measures can not describe every danger situation. They do not replace sensible procedures and care, which you have to take into account when first initiating and then running your fan.
When using any electric units, several basic rules have to always followed, as detailed below:
GB
General

- The voltage details on the nameplate are to conform with the available mains voltage.
- The building mains must be earthed!
- Only operate the unit when completely assembled!
Important

- It is recommended that a specialist electrician is used for making the electrical connection to this fan.
Safety instructions

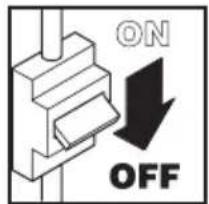
Before accessing the connection, all current carrying conductors are to be isolated.
The mains connections to which you are connected is to comply with current specifications.

The fixed wire connection is to be provided with a multi-pole isolator with contact gaps of at least 3 mm. We recommend that the connection be made by a qualified electrician.
The construction of the holder and the output box is to be able to bear the weight of the fan when being moved, ie, about 25 kg minimum. Chose a secure, safe location. None

of the fan blades are to be less than 2.30 m from the ground. The fan is to be correctly earthed.
Before first using the setup, all electrical connections are to be checked in order to prevent any fall, fire or electric shock.
Installing your ventilator
Ascertain that a mounting bracket is available at the intended mounting point.
If this not the case, then fix the mounting bracket directly to the ceiling using wood screws having a diameter of 6 mm and, if necessary, 8 mm diameter concrete anchors or special plugs suitable for plaster boards.

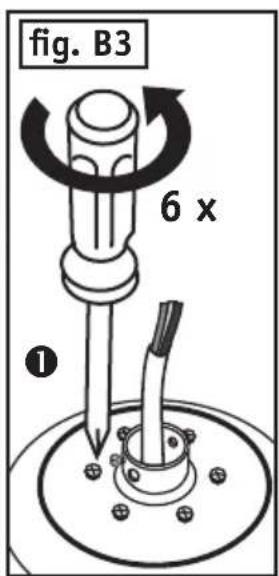
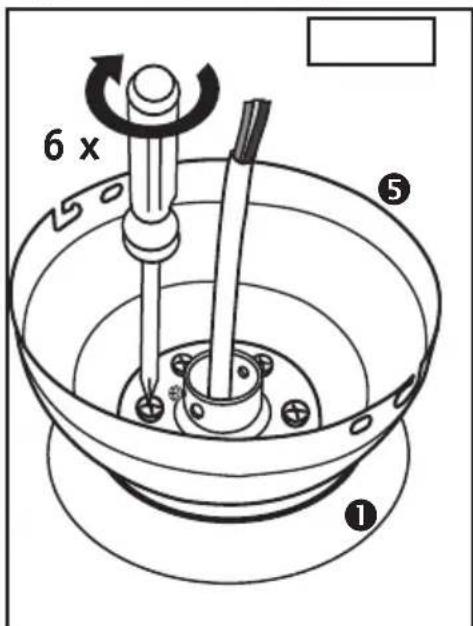
Proceed as per fig. 1 - fig. 11 shown on page 22 - 25
- Unpack the ventilator and check the contents. All the parts shown in the drawing are to be present.
- The mounting plate is separate from the fan.
Assemble the mounting plate using the screws and washers to the ceiling outlet.

In order to assure a safe operation of your fan, make sure that the mounting plate is firmly seated and is level.
-The attached part is to be vertical.
- Fix the support hook to the ceiling.
- Disconnect the electricity before working on the electrics.
- Make the electrical connection to your fan as per Figure on pages 24/25 in fig. 8.
- Fix the blades to the motor using the bolts.
- If you are installing several fans, make sure that the various blades are not mixed up,
- The blades are grouped according to weight, in order to avoid vibration.
- After finishing assembling the fan, make sure that all connections are in order and that all nuts and bolts are tightened.

Operating your fan
Make sure that the assembly has been completely finished.
Only use the enclosed remote control to control the fan fuctions.
Never use a stepped transformer for controlling the speed. Never use a dimmer or a pha-
se angle or phase inverse angle controller. This would damage your fan.
Important
Even if your fan is more that 2.30 m above the ground, care must still be taken care that the blades are free to turn and no objects can enter their radius of action.
Maintaining you fan
You increase the life of your fan by heeding the following notes:
-
Check the various ceiling fixing parts and bracket twice a year.
Some of the parts on the fan components can have play. -
Never use water for cleaning the motor or other electrical parts; this would lead to a short circuit.
-
Use a soft cloth for cleaning the blades and housing.
-
Greasing the bearings is not necessary, the bearings are permanently lubricated.
Do not forget to check that the earth connection lead has been correctly connected to the output terminal block and between all metal parts (connect the push-on contact to every earth symbol).
| Notes for removing faults | |
| Fault Remedy | |
| The fan does not start. | Check the fuses/trips at the main box and other connections. |
| Check the fan connection to the mains. | |
| Check that fuses/trips in the connection box are correctly inserted. | |
| The fan is noisy. | Check that all bolts and screws have been tightened. |
| Run in the fan and the bearings for 24 hours. Most noises disappear after this time. | |
| If your ceiling is made of plasterboard or wood, please make sure that it does not cause resonance noise. This is not covered by the warranty. | |
| The fan vibrates too much. | All blades have been weighed and grouped according to weight. Their density can vary and therefore cause vibration even when all blades are of the same weight. The following methods can contribute to preventing most vibrations. Check the vibration before each procedure. Please note that a small amount of vibration is normal and does not pose a problem. |
| Most vibrations occur when one of the blades is not in alignment with the others. Aligning the blades is simply carried out with the aid of a flat ruler. Place the ruler vertically upwards against the ceiling and alongside the blade tip. Mark the distance between the blade side and ceiling.Turn the blades slowly by hand and carry out the same measurements with the other blades. If one of the blades is not correctly aligned, it can be remedied by lightly pressing their holders upwards or downwards in order to align them with the others. | |
| Check that the mounting plate is firmly anchored to the ceiling. | |
| Important: Opening up and repairing the unit may only be carried out by a specialist! | |
natural_image
Simple line drawing of a brick wall with a support structure at the base (no text or symbols)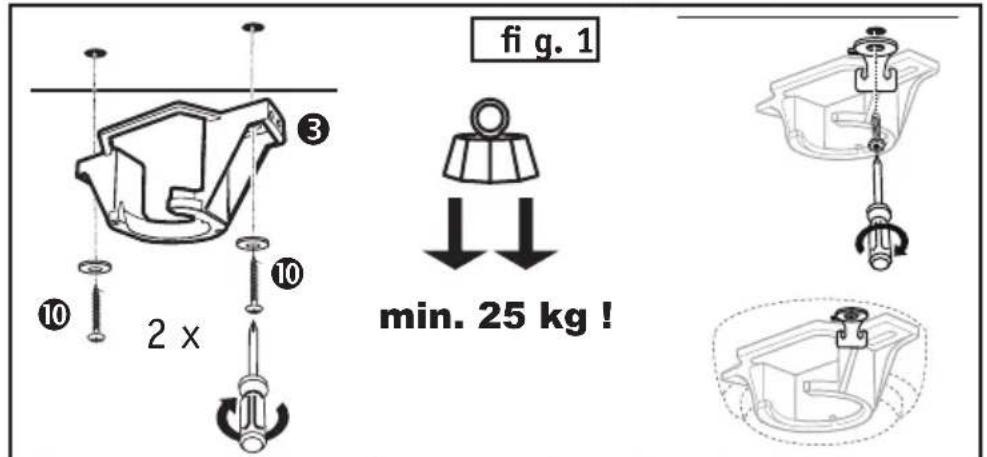

natural_image
Line drawing of a vertical cylindrical device with four circular ports and two side handles (no text or symbols)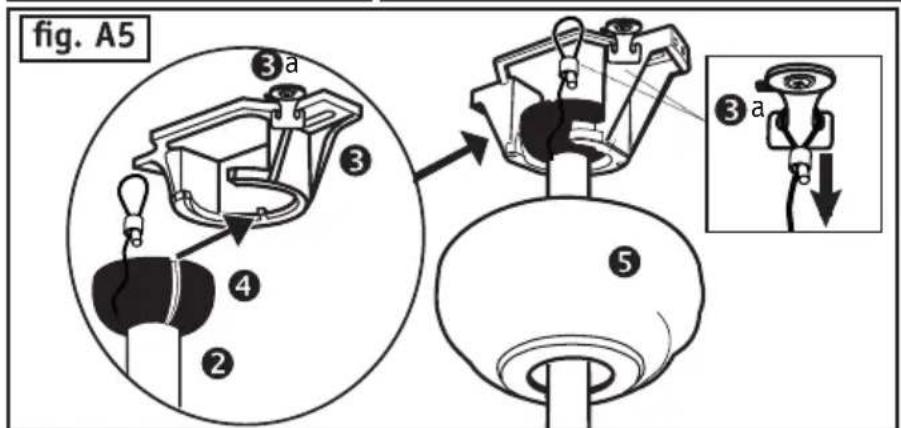
natural_image
Diagram of a ceiling-mounted fan with a conical component and two blades, labeled B: (no text or symbols on the diagram itself)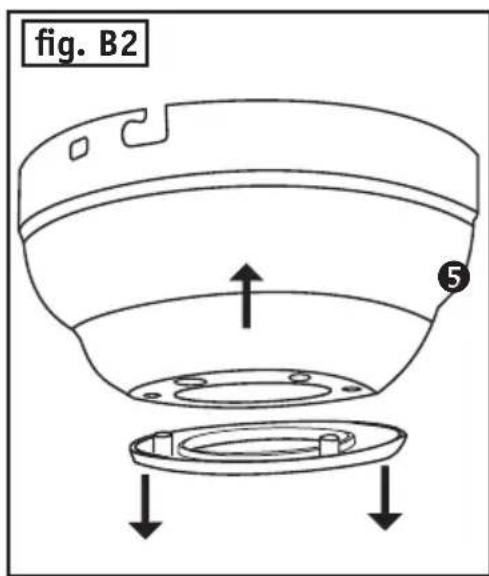
DE Elektr. Anschluss Hausnetz
GB Electric wiring diagramm
FR Raccord réseau électrique
IT Allacciamento elettrico
ES Conexión a la red doméstica
CZ Připojení k domácí síti
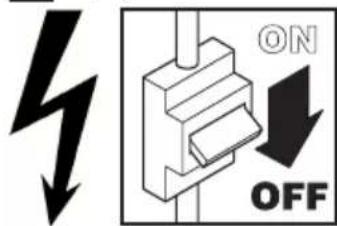
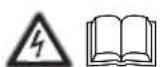
fig. 8
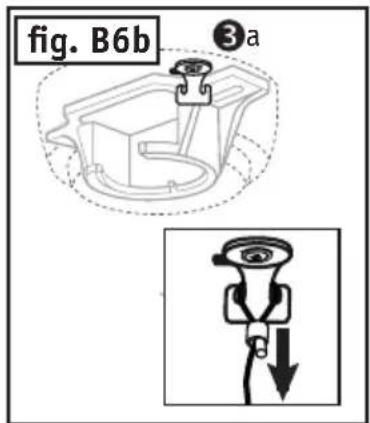
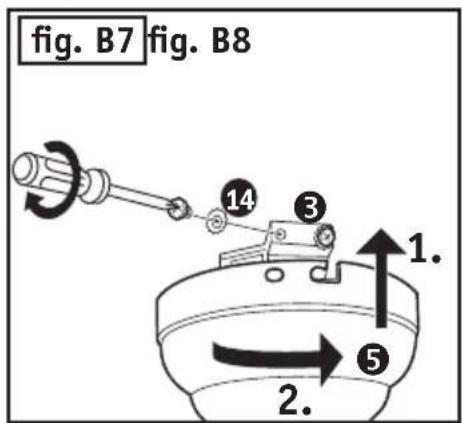
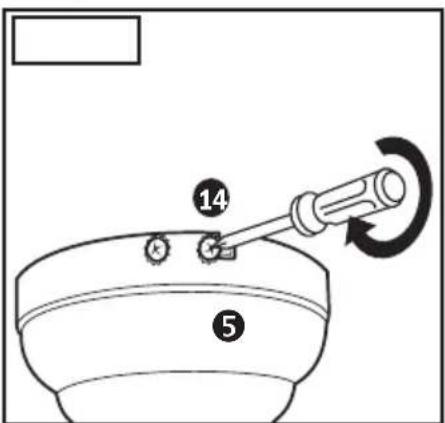
fig. 8
natural_image
Diagram showing two mechanical components connected by a double-headed arrow, no text or symbols present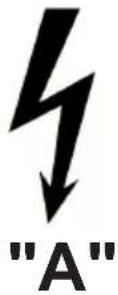
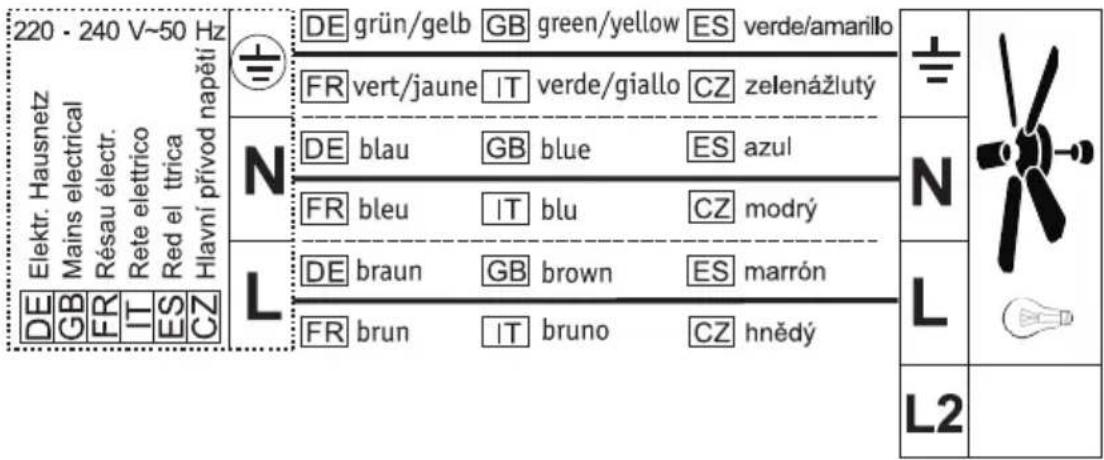
GB If you want to switch the light of the fan with the remote control, connect the fan according to circuit diagram "A".
If you have an additional phase switched by an external switch and you want to switch the light of the fan via this external switch, then proceed according to circuit diagram "B". ATTENTION: Even if the external switch is switched off, the light can be switched on with the remote control!
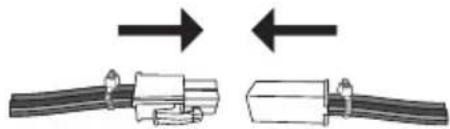
GB Insert 1 9V / 6F22 batteries into the transmitter of the remote control. Do not press any button yet!
natural_image
Diagram of two electronic devices with battery and plug, showing internal components and directional arrows (no text or symbols)GB Switch the voltage of all fans within the radio range to be programmed with the room fuse.
GB Within first 180 seconds after power on: Press the "OFF" button until you hear two BEEP tones until confirmed.
natural_image
Simple diagram showing a windmill symbol above an arch and a vertical line with a light source (no text or labels)GB Press the „F/R“ button to change the direction of rotation.
natural_image
Simple diagram showing a windmill symbol above an arch and a vertical line with a light source (no text or labels)GB While the motor is running, press the button to set the shutdown timer. When the set time has elapsed, the fan switches off.
GB Each press on the button increases the time of the shutdown timer by an hour.
natural_image
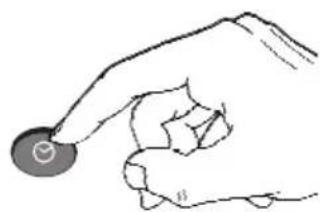
Hand holding a circular object with a small symbol, no text or labels present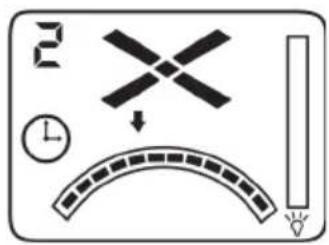
natural_image
Line drawing of a hand holding a circular object with a small circle on the finger (no text or symbols)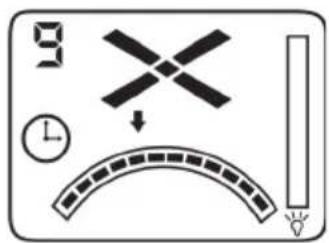
natural_image
Pure diagram of a helicopter and arc without any text, numbers, or symbolsGB Press the „LIGHT“ button again to turn off the optional light kit. NOTE: The luminaire is optional and is not supplied with your ceiling fan.
natural_image
Simple diagram with a cross, curved line, and vertical bar (no text or symbols)natural_image
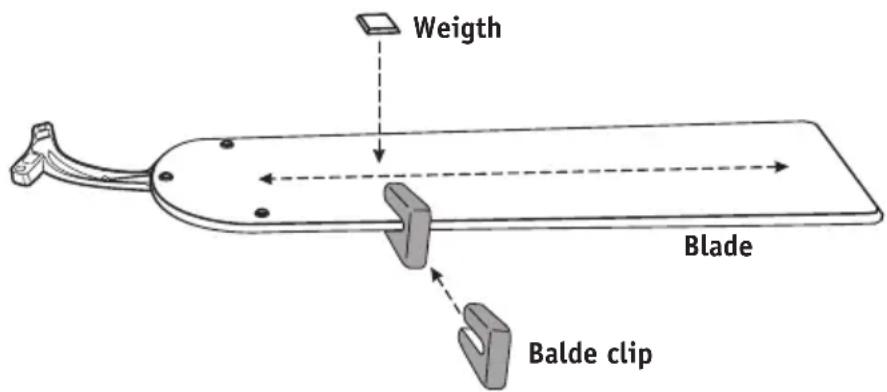
Simple diagram showing a cross-shaped object with an arrow pointing downward, and a curved line below with a vertical bar (no text or symbols)Auswuchtset
The balancing kit contains 2 weights at 5 grams each as well as a blade clip with 5 grams weight. If your ceiling fan is running after accurate and complete installation unbalanced (“wobbling”), please follow step 1 to 6:
- Switch your ceiling fan on and find out the speed setting at which the wobble is the greatest.
- Turn off your ceiling fan and allow it to come to a complete stop. Select one blade and place the balance clip on it, halfway between the bladeholder and the blade tip on the trailing edge of the blade.
- Turn the fan on and select the speed setting at which the wobble was greatest. Note whether the wobble has increased or decreased. Turn the fan off, move the clip to the next blade and retest. Repeat this procedure on all blades noting the blades on which the greatest improvement is achieved.
- Move the clip back to the blade that showed the greatest improvement. Move the clip inward and outward on this blade and operate the fan to find the position where the clip gives the greatest improvement.
- Remove the clip and glue the balancing weight on top of the blade along the centerline at the point where the clip was positioned.
- If the fan wobble problem has not been corrected finally you can improve the balancing further by repeat the procedure with additional weights. The weight can be easily devided in two parts with a cutter.
Where does "wobbling" come from?
The blade of a ceiling fan could run at the blade tip with a speed of up to 10 m/sec. If the density or the compound varies, an imbalance towards the weightly blade occurs.
Especially wooden blades which are made from a natural material often have different densities, resulting in an imbalance.
All blades of CasaFan ceiling fans are weighted by a accurate scale and ordered by weight. A set of blades contents always 5 blades of the same weight. The atmospheric humidity changes the density of the wood. By this reason the edge and the surface of CasaFan blades are sealed against normal atmospheric humidity. For damp or wet locations we recommend acrylic blades which are non-sensitive against humidity and water.
Please consider that a fall of the packing from a low height could cause a transformation of the compound. Hence a small imbalance up to 5 mm (measured at the switch cup of the ceiling fan) is no quality defect. It can be eliminated as aforementioned with the balancing kit.
Lot d'équilibrage
This product conforms to EU Directive 2012/19/EC. This appliance bears the symbol of the barred waste bin. This indicates that, at the end of its useful life, it must not be disposed of as domestic waste, but must be taken to a collection centre for waste electrical and electronic equipment, or returned to a retailer on purchase of a replacement.
It is the user's responsibility to dispose of this appliance trough the appropriate channels at the end of its useful life. Failure to do so may incur the penalties established by laws governing waste disposal. Proper differential collection, and the subsequent recycling, processing and environmentally compatible disposal of waste equipment avoids unnecessary damage to the environment and possible related health risks, and also promotes recycling of the materials used in the appliance. For further information on waste collection and disposal, contact your local waste disposal service, or the shop from which you purchased the appliance. Manufacturers and importers fulfil their responsibilities for recycling, processing and environmentally compatible disposal either directly or by participating in collective systems.
IT
IMPORTANTE
GB Declaration of Conformity in accordance with the Radio Equipment Act (FuAG) and Directive 2014/53/EU (RED)
GB Manufacturer and empowered to compile the relevant
technical documentation:
CasaFan GmbH
Senefelderstr. 8
63594 Hasselroth
Identification: Elements/FB Elements/LCD6
GB Above product complys at designated use with the basic requirements of Radio Equipment Act (FuAG) and Directive 2014/53/EU (RED)