YT85208 - Lawn mower Yato - Free user manual and instructions
Find the device manual for free YT85208 Yato in PDF.

| Product Type | Electric Lawn Mower |
| Brand | Yato |
| Model | YT85208 |
| Rated Voltage | 230 V~ |
| Rated Frequency | 50/60 Hz |
| Rated Power | 2000 W |
| Cutting Width | 430 mm |
| Cutting Height | 20 / 30 / 40 / 50 / 60 / 70 mm |
| Rotation Speed | 3300 min⁻¹ |
| Sound Pressure Level | 83.6 dB(A) ± 3.0 |
| Sound Power Level | 94.6 dB(A) ± 1.80 |
| Vibration Level | 3.45 m/s² ± 1.5 |
| Insulation Class | II |
| Protection Degree | IPX4 |
| Weight | 13.4 kg |
| Grass Bag Capacity | 50 L |
| Power Supply | Mains (external cable not supplied) |
| Safety | Switch lock, protection against projections |
| Main Functions | Centralized cutting height adjustment, foldable handle, large diameter wheels |
| Maintenance | Clean after each use, replace blade every 2 years or 50 h |
| Spare Parts | Original blade, internal cables (replacement at authorized center) |
| General Information | Use for lawns, wide range of cutting heights |
Frequently Asked Questions - YT85208 Yato
User questions about YT85208 Yato
0 question about this device. Answer the ones you know or ask your own.
Ask a new question about this device
Download the instructions for your Lawn mower in PDF format for free! Find your manual YT85208 - Yato and take your electronic device back in hand. On this page are published all the documents necessary for the use of your device. YT85208 by Yato.
USER MANUAL YT85208 Yato
text_image
Labeled diagram of a lawn mower with numbered parts for identification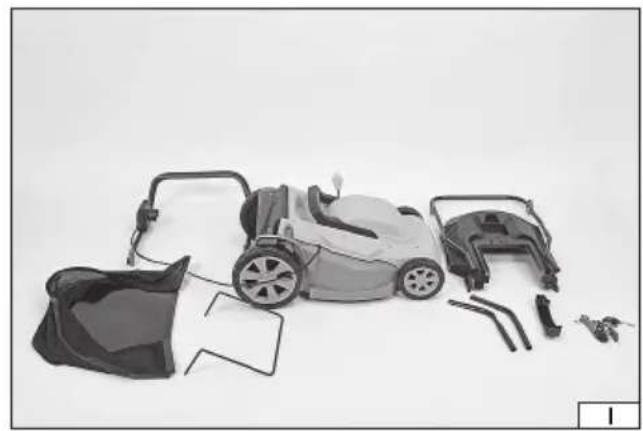
natural_image
Disassembled lawn mower components laid out on a plain surface (no text or symbols visible)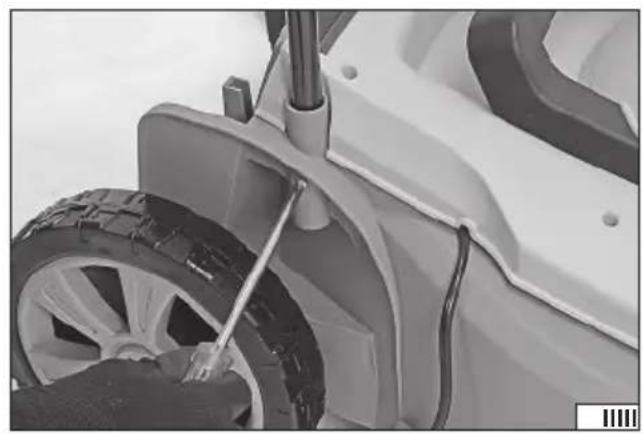
natural_image
Close-up of a car wheel assembly with visible tire and suspension components (no text or symbols)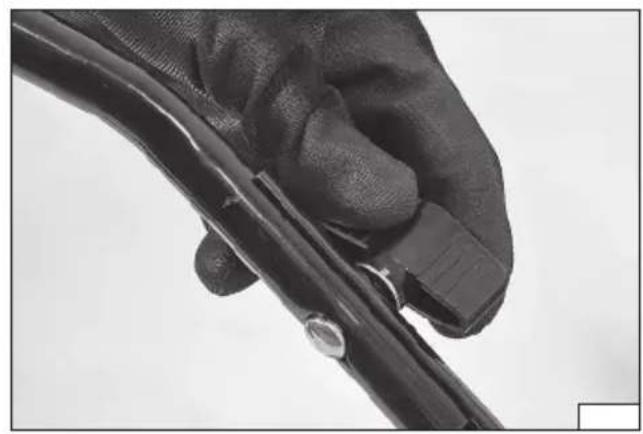
natural_image
Close-up of a hand holding a black cable with a small inset showing a ring detail (no text or symbols visible)
natural_image
Close-up of a hand holding a pair of pliers with metal bands, no visible text or symbols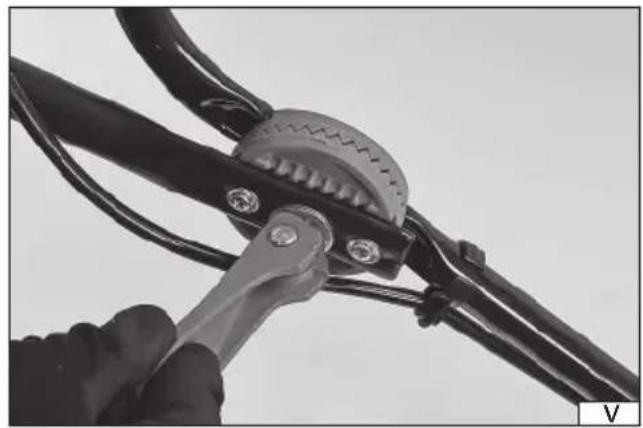
natural_image
Close-up of a hand using a tool to adjust a bicycle wheel (no text or symbols visible)
natural_image
Close-up of mechanical clamps and brackets, showing structural details (no text or symbols visible)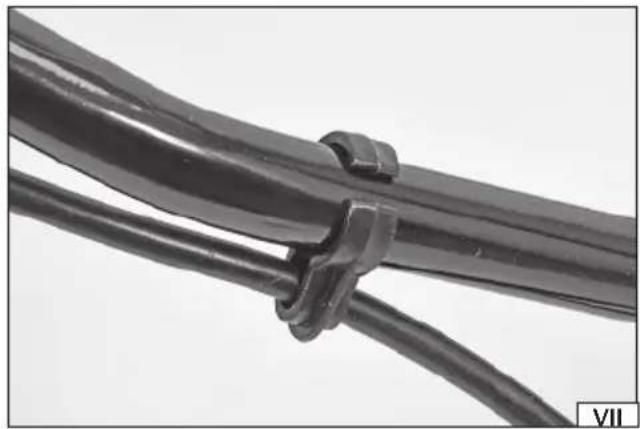
natural_image
Close-up of black metal pipes with connectors, no visible text or symbols2018
natural_image
Close-up of a hand holding a bicycle tire with attached cable (no visible text or symbols)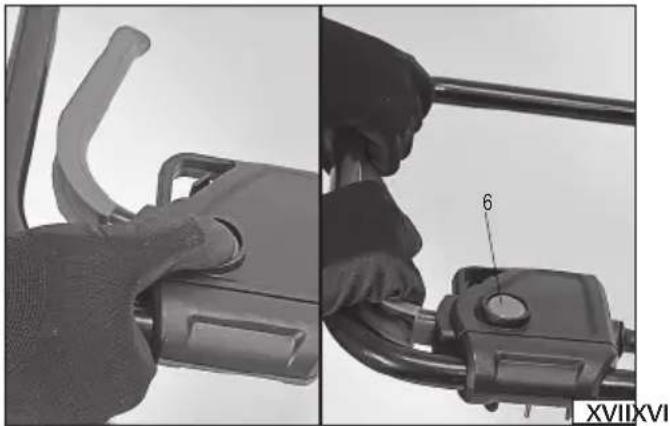
natural_image
Close-up of hands adjusting a bicycle brake lever, showing handle and grip details (no text or symbols visible)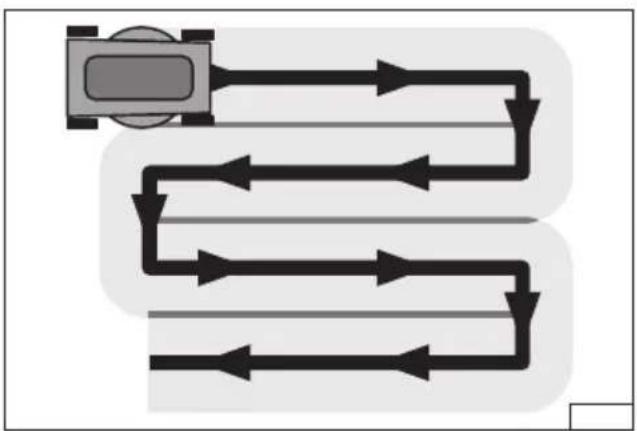
flowchart
graph TD
    A["Device"] --> B["Path 1"]
    A --> C["Path 2"]
    A --> D["Path 3"]
    A --> E["Path 4"]
    A --> F["Path 5"]
    B --> G["End"]
    C --> G
    D --> G
    E --> G
    F --> G
natural_image
Close-up of hands operating a mechanical component with a tool, no visible text or symbolsPL
- engine cover
- blade cover
- wheel
- handle
- switch
- switch lock
- adjustment of cutting height
- cover of the outlet opening
- basket/container for grass
- handle for transportation
- blade
D
Read the operating instruction
Wear protective goggles
Schutzbrille tragen
Wear hearing protectors
Stay away from bystanders
Beware of the discarded items
Keep the flexible power cord away from the cutting tools. Before adjusting or cleaning, in case of cable braiding or damage, switch off the device and pull the plug out of the socket.
Do not expose to precipitation
Attention - Do not touch the rotating blade!
Mains voltage and frequency
Second class of insulation
WYPOSAŻENIE PRODUKTU
PRODUCT CHARACTERISTICS
The electric mower is used for lawn care. The wide range of cutting height allows for the versatile use of this device. Wheels with a large diameter make it easy to move the mower. Thanks to the mains supply, the mower is much quieter than it is in the case of devices powered by an internal combustion engine. Correct, reliable, and safe operation of the device is dependent on its proper use, therefore:
Before starting the work: it is necessary to read the whole manual and keep it around.
For any damages or injuries caused by the product misuse, noncompliance with safety regulations and recommendations included in this manual, the supplier does not accept any liability. The tool misuse causes the loss of user rights to the guarantee and warranty.
EQUIPMENT OF THE PRODUCT
The product is supplied in a complete state but before starting work it requires preparatory activities, described later in this manual. The mower is not supplied with a power supply cable.
TECHNICAL DATA
| Parameter Unit Value | ||
| Catalog number YT-85208 | ||
| Rated voltage [V~] 230 | ||
| Rated frequency [Hz] 50\60 | ||
| Rated power [W] 2000 | ||
| Cutting width [mm] 430 | ||
| Cutting height [mm] | 20/30/40/50/60/70 | |
| Rated revs | [min ^-1 ] | 3300 |
| Noise level | ||
| - acoustic pressure L_nA ± K | [dB(A)] | 83.6 ± 3.0 |
| - acoustic power L_mA ± K | [dB(A)] | 94.6 ± 1.80 |
| Level of vibrations a_h ± K | [m/s ^2 ] | 3.45 ± 1.5 |
| Electric insulation class | II | |
| Degree of protection | IPX4 | |
| Weight | [kg] 13.4 | |
| Capacity of the grass basket | [1] | 50 |
INSTRUCTIONS FOR SAFETY OF USE OF THE GRASS MOWER
IMPORTANT! READ CAREFULLY BEFORE USE STORE FOR A FUTURE USE
Guidelines
Read the instructions carefully. Familiarize yourself with the control systems and the proper use of the device. If you will be passing the device to another person, always attach the instruction manual to the device.
Never allow for operation of the device by children or persons who are not familiar with the device's operating instructions. National regulations may exactly specify the age of an operator.
Never mow, when other people, especially children or pets, they are nearby. Before starting work SET out a safety zone, which will not be possible to access by unauthorized persons and pets.
Remember, that the operator is responsible for accidents or a threat presented to other persons or to the environment.
Preparation
When mowing, always wear sturdy shoes and long trousers. Do not operate the device with bare feet or in open sandals. Avoid damaged clothes, which is too loose or which has hanging straps or ribbons. Loose parts of clothing can be caught by moving parts of the device which can cause injuries.
Check thoroughly the area, on which the device will work and remove all objects that could enter into the device. Caught objects can damage the device, they can also be thrown out at high speed, which poses a threat to the operator and the environment.
Before use always check whether knives, the bolts, and accessories of the knife assembly are not worn or damaged. Replace worn or damaged parts by sets, in order to preserve the balance. Replace damaged or unreadable plates.
Before use, check the power cord and extension cord for damage or wear. If the cord has been damaged during use, it should be
GB
disconnected from direct power supply. DO NOT TOUCH THE CABLE BEFORE DISCONNECTING THE POWER supply. Do not use the device, when the cable is damaged or destroyed.
Usage
Mow only in daylight or in the good artificial light. Improper lighting of the workplace can cause accidents.
Avoid mowing of wet grass.
Always make sure that your legs on a slope are firmly standing.
Walk, never run.
Mow across the slope, never up or down. It will be much easier to control the device.
Be especially careful when changing movement direction on a slope.
Do not mow on overly inclined slopes.
Pay special attention when you are pulling back or pulling the device towards you.
Turn off the drive of the cutting element(s), when the device should be tilted during its moving on surfaces other than grass and when it is transported to the place of mowing and back.
You should not use the device with damaged covers or casings and without a safety device, eg attached covers and/or grass containers.
Carefully start the engine as instructed, paying attention, whether the feet are away from the cutting element.
You should not tilt the device when starting the engine, except when it requires tilting during start. In this case, you should not tilt the device more, than it is necessary and left up to the part, which is away from the operator.
You should not start the device standing in front of the discharge hole. If the device is designed to work only with a grass container, you should always properly mount the container before starting operation.
Do not keep your hands and feet close to rotating parts. Take care, so that all the time the discharge hole is not clogged. The filling level of the grass container must be constantly monitored to avoid overfilling the container.
Do not transport the device with its engine running.
Stop the device and pull out the plug from the mains socket. Make sure, that all moving parts are not moving.
Stop the device and remove the blocking assembly. Make sure, that all moving parts are stationary
- every time, when you leave the device,
- before cleaning or forcing through the outlet,
- before checking, cleaning or repairing the device,
- after striking by a foreign object. Check whether the device is damaged and if it is necessary, repair it before restarting and operating the device.
If the device begins to vibrate excessively (you should check immediately).
- check for damage,
- replace or repair every damaged part,
- check and tighten the loose parts.
Maintenance and storage
Maintain in proper condition all nuts, screws, and bolts, to be sure that the device will work safely.
Check the grass container often, whether it is worn or damaged. Objects caught by the blade can be thrown Inside the container at high speed. It can damage the container.
For multi-knife devices, be especially careful, because the rotation of one cutting element can cause the rotation of other knives.
Be careful when you are adjusting the device, to avoid getting your fingers between moving knives, and fixed parts of the device. Always leave the device to cool down before the next start-up.
You should be careful when you are handling knives, although the drive is turned off because the knives can still keep turning.
Always wait for the knives to stop completely before proceeding.
Replace worn or damaged parts in order to maintain security. Use only original spare parts and accessories.
Recommendations for class II devices
The device should be powered by a residual current device (RCD) with the operating current not more than 30 mA.
Risks related to noise and vibrations
The device has been designed to reduce as much as possible the risks associated with the user's exposure to noise and vibration. However, it is not possible to completely eliminate these threats. In addition, people staying in the work environment are also exposed to noise hazards.
However, you can reduce the risks associated with the above hazards by following these guidelines:
- the product should be used as intended in compliance with its instructions,
- you should make sure, that the device is in good condition and is regularly maintained,
- you should use proper and well-sharpened cutting tools,
- you should use a firm grip on the product handle,
- plan a job to allow frequent breaks.
GB
Residual risk
Even when all safety precautions are observed at work, there is still a potential risk of injury. Due to the product structure, the following risks remain.
Injuries associated with vibrations caused by the device being operated for too long, work in an inappropriate way or with a poorly maintained device.
Injuries caused by an unexpected hit from hidden, thrown items.
PRODUCT SERVICE
Preparation for operation
The product should be unpacked from its packaging and all packaging elements should be removed. It is recommended to keep the packaging, which may be useful for transporting or storing the product.
Check whether any part of the product has been damaged during transport, any damage observed, e.g. cracks or deformations, disqualify the product from further use until damaged parts are repaired or replaced.
It is recommended to place all parts on a flat, hard and clean ground.
During assembly you should apply the personal protection equipment, such as protective gloves, eye shield, and protective suit.
Attention! Before installing the mower, make sure that the mower has not been connected to the power supply. The power cable must be disconnected from the mower switch.
the lower part of the handle bracket should be inserted into the hole near the rear wheel and secured with the screws (II). Repeat these operations on the other side of the mower housing. Adjust the upper part of the handle bracket to the lower parts and connect with screws and knobs (III). The knobs should be directed to the outside of the handle bracket. The upper part of the handle bracket should be connected to the middle part with a toothed connection, which will allow you to adjust the height of the handle, the handle should be directed upwards. The bracket is equipped with two toothed couplings on each side. Join the connector halves so they latch, and then secure the position by clamping the levers on both sides of the bracket (IV).
The levers pressure level can be adjusted by tightening them (by increasing the pressure) or unscrewing them (by decreasing the pressure) after opening (V). The levers should be tightened with such a force, that they will not open automatically during work, and the handle will not change its position.
Attention! You should ensure that the handle is always parallel to the ground.
Fasten the switch cable to the handle bracket with a clamp (VI). The position of the bracket should be adjusted that the cable will not be strained, but at the same time, it will not protrude too much from the bracket. A cable that is too protrusive can catch an obstacle (eg a bush) during operation, which may be the cause of its damage and constitute a risk of electric shock.
Mount the basket handle to the top wall of the basket using screws (VII).
Turn over the top cover and fix the frame of the flexible part of the basket (VII) with screws and washers. The flexible part of the basket should be attached to the frame and the top wall of the basket. The front edge of the elastic part has clamps, which should be put on the frame (IX). The upper edge of the elastic part has stiffening and latches, which should be fixed in the holes of the upper wall of the basket (X).
Grab the basket by the handle and lift it, checking the correctness of assembly (XI).
Mount the grass basket to the mower housing. Raise the cover of the outlet opening, hold the lid in its maximum upper position and mount the basket on the hooks on the back wall of the mower housing (XII). Leave the lid so that it covers the hole in the upper wall of the basket (XIII).
Disassembly of the basket can be carried out in reverse order.
The mower with the mounted basket is ready for operation.
Setting the cutting height (XIV)
The mower has been equipped with a lever, which allows changing the cutting height in an easy and fast way. The lever should be moved to the side, sliding it out of the guide socket. Then you should move it forward or back and after setting the desired height, move the lever to the side, blocking its position in the guide slot.
Moving the lever towards the front of the mower will increase the cutting height, and moving in the opposite direction reduces the cutting height.
Warning! If it is necessary to change the height during operation, you should always switch off the mower first, wait for the knife to stop, disconnect the mower from the power cord and then start working on changing the cutting height. Accidental operation of the knife during a height setting can result in serious injury.
Connecting the mower to the power supply
The mower is not equipped with a traditional plug attached to the power cable. The plug is rigidly attached to the switch, therefore, a mower with a mains socket must be connected by using an external cable. Due to the nature of the mower work, you should always use cables designed for outdoor operation. The power cable should have a single socket that matches the plug in the
GB
mower. It is forbidden to modify the plug or socket to match them. The electrical parameters of the power cable should correspond to the electrical parameters of the device, which are listed on the nameplate. Please pay attention, that the size of the wires cross-section area of the power cable depends on the length of the cable. You should observe the following recommendations regarding the cross-section area of the power cable:
- 1.0 mm ^2 - cable length no more than 40 m.
- 1.5 mm ^2 - cable length no more than 60 m,
- 2.5 mm ^2 - cable length no more than 100 m.
When preparing for work and during work, pay attention to the power cable. Protect the power cable from water, moisture, oils, heat sources and sharp objects. You should lay the cable in such a way, that it cannot to get into the operating range of the mower blade. Cutting the cable may cause an electric shock which can lead to serious injury or death. Please pay attention, to do not get tangled in the cable. It may cause a fall and may lead to serious injuries.
Do not overload the power cable, do not lead to the condition when the cable will be tensioned on any section. Do not pull on the cable while moving the device. Always disconnect the plug and the cable socket by pulling the plug and the socket case, never pull by the cable.
The mower switch housing has been equipped with a catch, which protects the power cord socket against being pulled from the switch plug. You should prepare a loop about 30 cm long near the cable socket, put it through the hole in which the hook is located and attach it (XV).
Connect the cable socket to the switch plug (XVI).
Please pay attention, that the cable does not break down, nor it is stretched. If necessary, disconnect the cable from the plug, extend the loop and connect again.
Starting and stopping the mower
The mower should be placed on a flat, even and hard ground. Make sure, that there are no obstacles under the mower that the blade can come into contact with. Make sure, that the power cord will not come into contact with the blade when the device will be started.
The switch has been equipped with a lock, which prevents accidental switching on of the device when pressed on the switch. Press and hold the lock button (XVII), and then pull the switch lever to the handle. This will start the rotation of the blade. Release the pressure on the switch lock and grip the handle (XVII) with both hands.
Releasing the pressure on the switch lever will cause the mower to stop working. The blade can still spin for some time.
Working with a mower
Before starting work, the place to mow grass should be prepared. Check that the mowing area does not contain any obstacles, which, caught by the blade, could damage the mower or be thrown out and pose a threat to the operator or bystanders.
Check that there are no electric wires in the workplace, which can be cut by the blade. Damage to the electric cable constitutes a risk of electric shock, which can lead to serious injury or death.
You should make sure that no unauthorized persons or domestic animals remain in the workplace. In the event of such persons appearing while working, you must stop the mower immediately, and then warn people about the threat.
Check the length of the grass and select the cutting height. Never cut more than 1/3 of the length of the grass. If the grass is very high, it should be cut in stages. Mowing should be carried out regularly, making sure that the height of the grass does not exceed the capacity of the mower.
Never cut wet grass. Wet grass tends to stick to the inside of the product, which disturbs its accumulation in the basket. Wet grass can also cause slipping and falling.
Check all mower parts before starting work. If damages are noticed do not start the mower operation before fixing damages or replacing damaged items with new ones. Check the patency of the ventilation openings. If it is necessary, you should clean them with a soft brush or paintbrush. Do not use sharp or metal objects to clean the mower ventilation openings.
Check screw connections for looseness. Tighten if it is necessary.
Check whether the handles are clean, free of grease and other contaminants. If it is necessary, clean them with a soft cloth.
You should take regular breaks at work, to avoid fatigue and overwork. This will allow to achieve better product control and reduce the risk of an accident.
Attention! The mower should always be pushed during work, never pulled towards its operator. Pulling the mower causes that the operator walks back, what causes, that she/he does not control the area behind her/him. In addition, when pulling back the mower, the blade can catch the power cord.
The mower should be slowly pushed, always walk, never run. This will give you more control of the mower and reduce the response time for unexpected events.
When mowing, you should move by rows (XVIII). The rows should be kept equal width, slightly overlapping so that any place will be left. You should take special precautions when you are changing the mowing direction.
You should ensure that you start mowing from the side of the electrical connection. This will reduce the risk of running on the power cord.
When you are cutting grass near flowerbeds, you should move around the flower beds.
During work, you should regularly empty the basket.
GB
After finishing work, turn the mower off, wait until the blade stops, then disconnect the power cable and wait for the mower to cool down, then proceed to maintenance.
Attention! If a foreign object strikes the mower while it is working. You should turn the mower off immediately, wait until the blade stops, then disconnect the power cable and wait for the mower to cool down. Then you should check that the mower is not damaged. If damages are detected, further work is prohibited before they are fixed. Excessive vibration during operation can be caused by mower damage. You should stop working, disconnect the power cord and check the product.
MAINTENANCE OF THE PRODUCT
Attention! Before starting every maintenance, you should make sure that the product has been disconnected from the power supply. The power cable must be disconnected from the mower.
During all maintenance operations, always use protective gloves.
If any maintenance operation is not described in the instructions, this means that it should be carried out at the authorized service of the manufacturer.
The product should be cleaned after each use. Remove grass residue with a soft brush, brush or cloth. Clean the ventilation holes to ensure their patency.
Any dirt, which is difficult to remove can be removed with a stream of air with a pressure of not more than 0.3 MPa.
You should never use chemicals, alkaloids, abrasive or aggressive detergents for cleaning the product. The product cannot be cleaned with a water stream or by submerging it in water.
Check the degree of wear and the presence of damages of the mower blade. If excessive wear or damage is observed, the blade should be replaced with a new one.
Always replace the blade with original one, identical to that which has been mounted in the factory on the mower. Only the use of original spare parts will allow you to keep the product safe. The replacement of the blade should be carried out by an experienced user. If you are in doubt, please contact the authorized service center of the manufacturer.
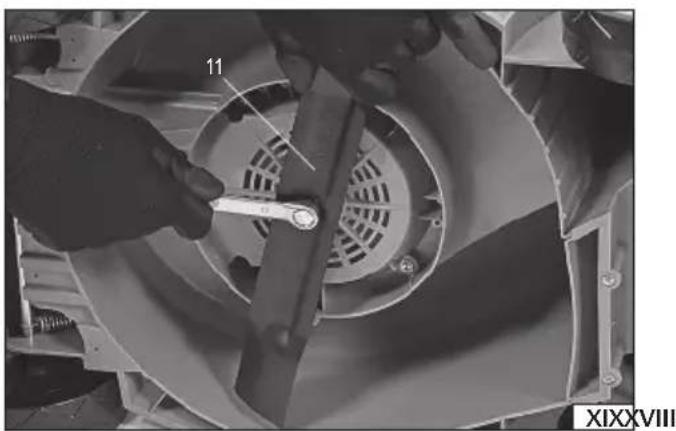
Use a wrench to unscrew (counter-clockwise) the blade fixing screw (XIX) and to disassemble it together with the washer.
Remove the old blade. If it is necessary, clean the blade holder. Install a new blade paying attention to the direction of the blade.
The arrow indicating the direction of rotation of the blade should correspond to the direction of rotation of the motor.
Mount the blade by tightening the screw (clockwise) with a torque of 55-60 Nm.
After each use and cleaning of the blade, cutting edges should be covered with a thin layer of light machine oil. This will reduce corrosion and prolong the life of the blade.
The blade should be replaced every two years or every 50 hours of work.
After each work, remove the grass catcher and empty it from the grass. The basket can be cleaned with lukewarm soapy water.
After cleaning, leave it to dry in the working position.
If the internal cable, which is connecting the product switch to the motor, breaks down it should be replaced at the authorized service workshop of the manufacturer. The cable may not be repaired, it should be replaced. It is forbidden to work with a damaged cable.
STORAGE AND TRANSPORT OF THE PRODUCT
Attention! Always unplug the product from the power supply before storage or transport. Clean according to instructions.
Store in dark, dry, free of frost and well-ventilated rooms. The storage place should protect against access by children. The product should be stored at a temperature between 10, and 30 °C. It is recommended to store the product in a factory packaging or in a different packaging that will protect it from dust.
The highest cutting height must be set before transporting the product. Transport the product by carrying it by its handles. During transport, the product should be protected against impacts and strong vibrations. Protect the product against slipping or tipping over during transport.
CHARAKTERISTIK DES PRODUKTES
PRODUKTA RAKSTUROJUMS
PRODUKTA APKALPOŠANA
Darba sagatavošana
PRODUKTA KONSERVÄCIJA
SERVICE PENTRU PRODUS
CARACTÉRISTIQUES DU PRODUIT
EQUIPEMENT DU PRODUIT
DECLARATION OF CONFORMITY
0418/YT-85208/EC/2018
We declare and guarantee with full responsibility that the following products:
Electric lawn mower; 230 V\~; 50 Hz; 2000 W; 3300 min ^-1 ; 430 mm; item no. YT-85208
meet requirements of the following European Standards / Technical Specifications:
EN 60335-1:2012 + A11:2014
EN 60335-2-77:2010
EN 62233:2008
EN 55014-1:2006 + A1:2009 + A2:2011
EN 55014-2:2015
EN 61000-3-2:2014
EN 61000-3-11:2000
and fulfill requirements of the following European Directives:
2006/42/EC Machinery and safety elements
2014/30/EU Electromagnetic compatibility (EMC) Directive
2011/65/EU Restriction of the Use of Certain Hazardous Substances
Serial number: concern all serials numbers of item(s) mentioned in this declaration
The last two digits of the year in which the CE marking was affixed: 18
Year of production: 2018
The person authorized to compile the technical file:
Tomasz Zych
(Place and date of issue)
text_image
TOYA SPÓŁKA AKCYA DYREKTORDS. ZAKUROW DARIUSZ HAYEK (Name and signature of authorized person)TOYA S.A.
DECLARATION OF CONFORMITY
0418/YT-85208/Noise/2018
We declare and guarantee with full responsibility that the following products:
Electric lawn mower; 230 V\~; 50 Hz; 2000 W; 3300 min ^-1 ; 430 mm; item no. YT-85208
fulfil requirements of the following European Directive: 2000/14/WE
Conformity assessment procedure:
Manufacturer quality-control system, examination of the manufacturer's technical file and periodical inspection by notified body
Notified body:
TÜV SÜD Industrie Service GmbH; notification no. 0036
Westendstraße 199, 80686 München, Germany
Measured sound power level on an equipment representative for this type: 94,6 dB(A)
Guaranteed sound power level for this equipment: 96 dB(A)
conformity and references of the other Community Directives applied:
2006/42/EC Machinery and safety elements
2014/30/EU Electromagnetic compatibility (EMC) Directive
2011/65/EU Restriction of the Use of Certain Hazardous Substances
Wrocław, 2018.04.03
(Place and date of issue)
text_image
TOYA SPÓŁKA AKCYA DYREKTORDS. ZAKUROW DARIUSZ HAYEK (Name and signature of authorized person)TOYA S.A.