Jumbo JM889NR - Clock OREGON SCIENTIFIC - Free user manual and instructions
Find the device manual for free Jumbo JM889NR OREGON SCIENTIFIC in PDF.
| Product type | Radio-controlled wall clock |
| Brand | Oregon Scientific |
| Model | Jumbo JM889NR |
| Dimensions (W × H × D) | 234 × 220 × 23 mm |
| Weight (without batteries) | 426 g |
| Power supply | 2 AA 1.5 V batteries |
| Operating temperature | 0 °C to 40 °C |
| Radio frequencies | DCF (EU), MSF (UK), WWVB (US) |
| Time display | 12h/24h format with AM/PM |
| Date display | MM:DD or DD:MM |
| Day display | French, English, German, Spanish, Italian |
| Indoor temperature | Display range: -5 °C to 50 °C |
| Alarm duration | 2 minutes, with snooze after 8 minutes |
| Main functions | Automatic radio reception, manual setting, alarm, snooze, calendar, time zone, region selection |
| Installation | Wall or tabletop (stand included) |
| Maintenance and cleaning | Wipe with a soft, dry cloth. Do not use abrasive products. |
| Safety | Do not expose to water, shocks, or extreme temperatures. Use only new batteries. |
| Spare parts and repairability | Not specified. Contact customer service for any repairs. |
| General information | Radio-controlled wall clock with LCD display, indoor temperature, alarm, and manual setting. |
Frequently Asked Questions - Jumbo JM889NR OREGON SCIENTIFIC
User questions about Jumbo JM889NR OREGON SCIENTIFIC
0 question about this device. Answer the ones you know or ask your own.
Ask a new question about this device
Download the instructions for your Clock in PDF format for free! Find your manual Jumbo JM889NR - OREGON SCIENTIFIC and take your electronic device back in hand. On this page are published all the documents necessary for the use of your device. Jumbo JM889NR by OREGON SCIENTIFIC.
USER MANUAL Jumbo JM889NR OREGON SCIENTIFIC
About Oregon Scientific 6
FCC Statement 6
Declaration Of Conformity 7
Disposal Information For Users 8
EU-Declaration Of Conformity 8
CONTENTS
Introduction 2
Overview 2
Front View 2
Back View 2
LCD Display 3
Getting started 3
Insert Battery 3
Placement Of Unit. 3
Clock 3
Clock Reception 3
Set The Clock Manually 4
Alarm 4
Basic Functions 4
Displaying Alarm Time 4
Set The Alarm 4
Enable/Disable The Alarm 5
Reset 5
Precautions 5
Specifications 6
INTRODUCTION
Thanks for purchasing the Oregon Scientific™ Jumbo Wall Clock (JM889NR).
NOTE Please keep this manual handy as you use your new product. It contains practical step-by-step instructions, as well as technical specifications and warnings you should know about.
OVERVIEW
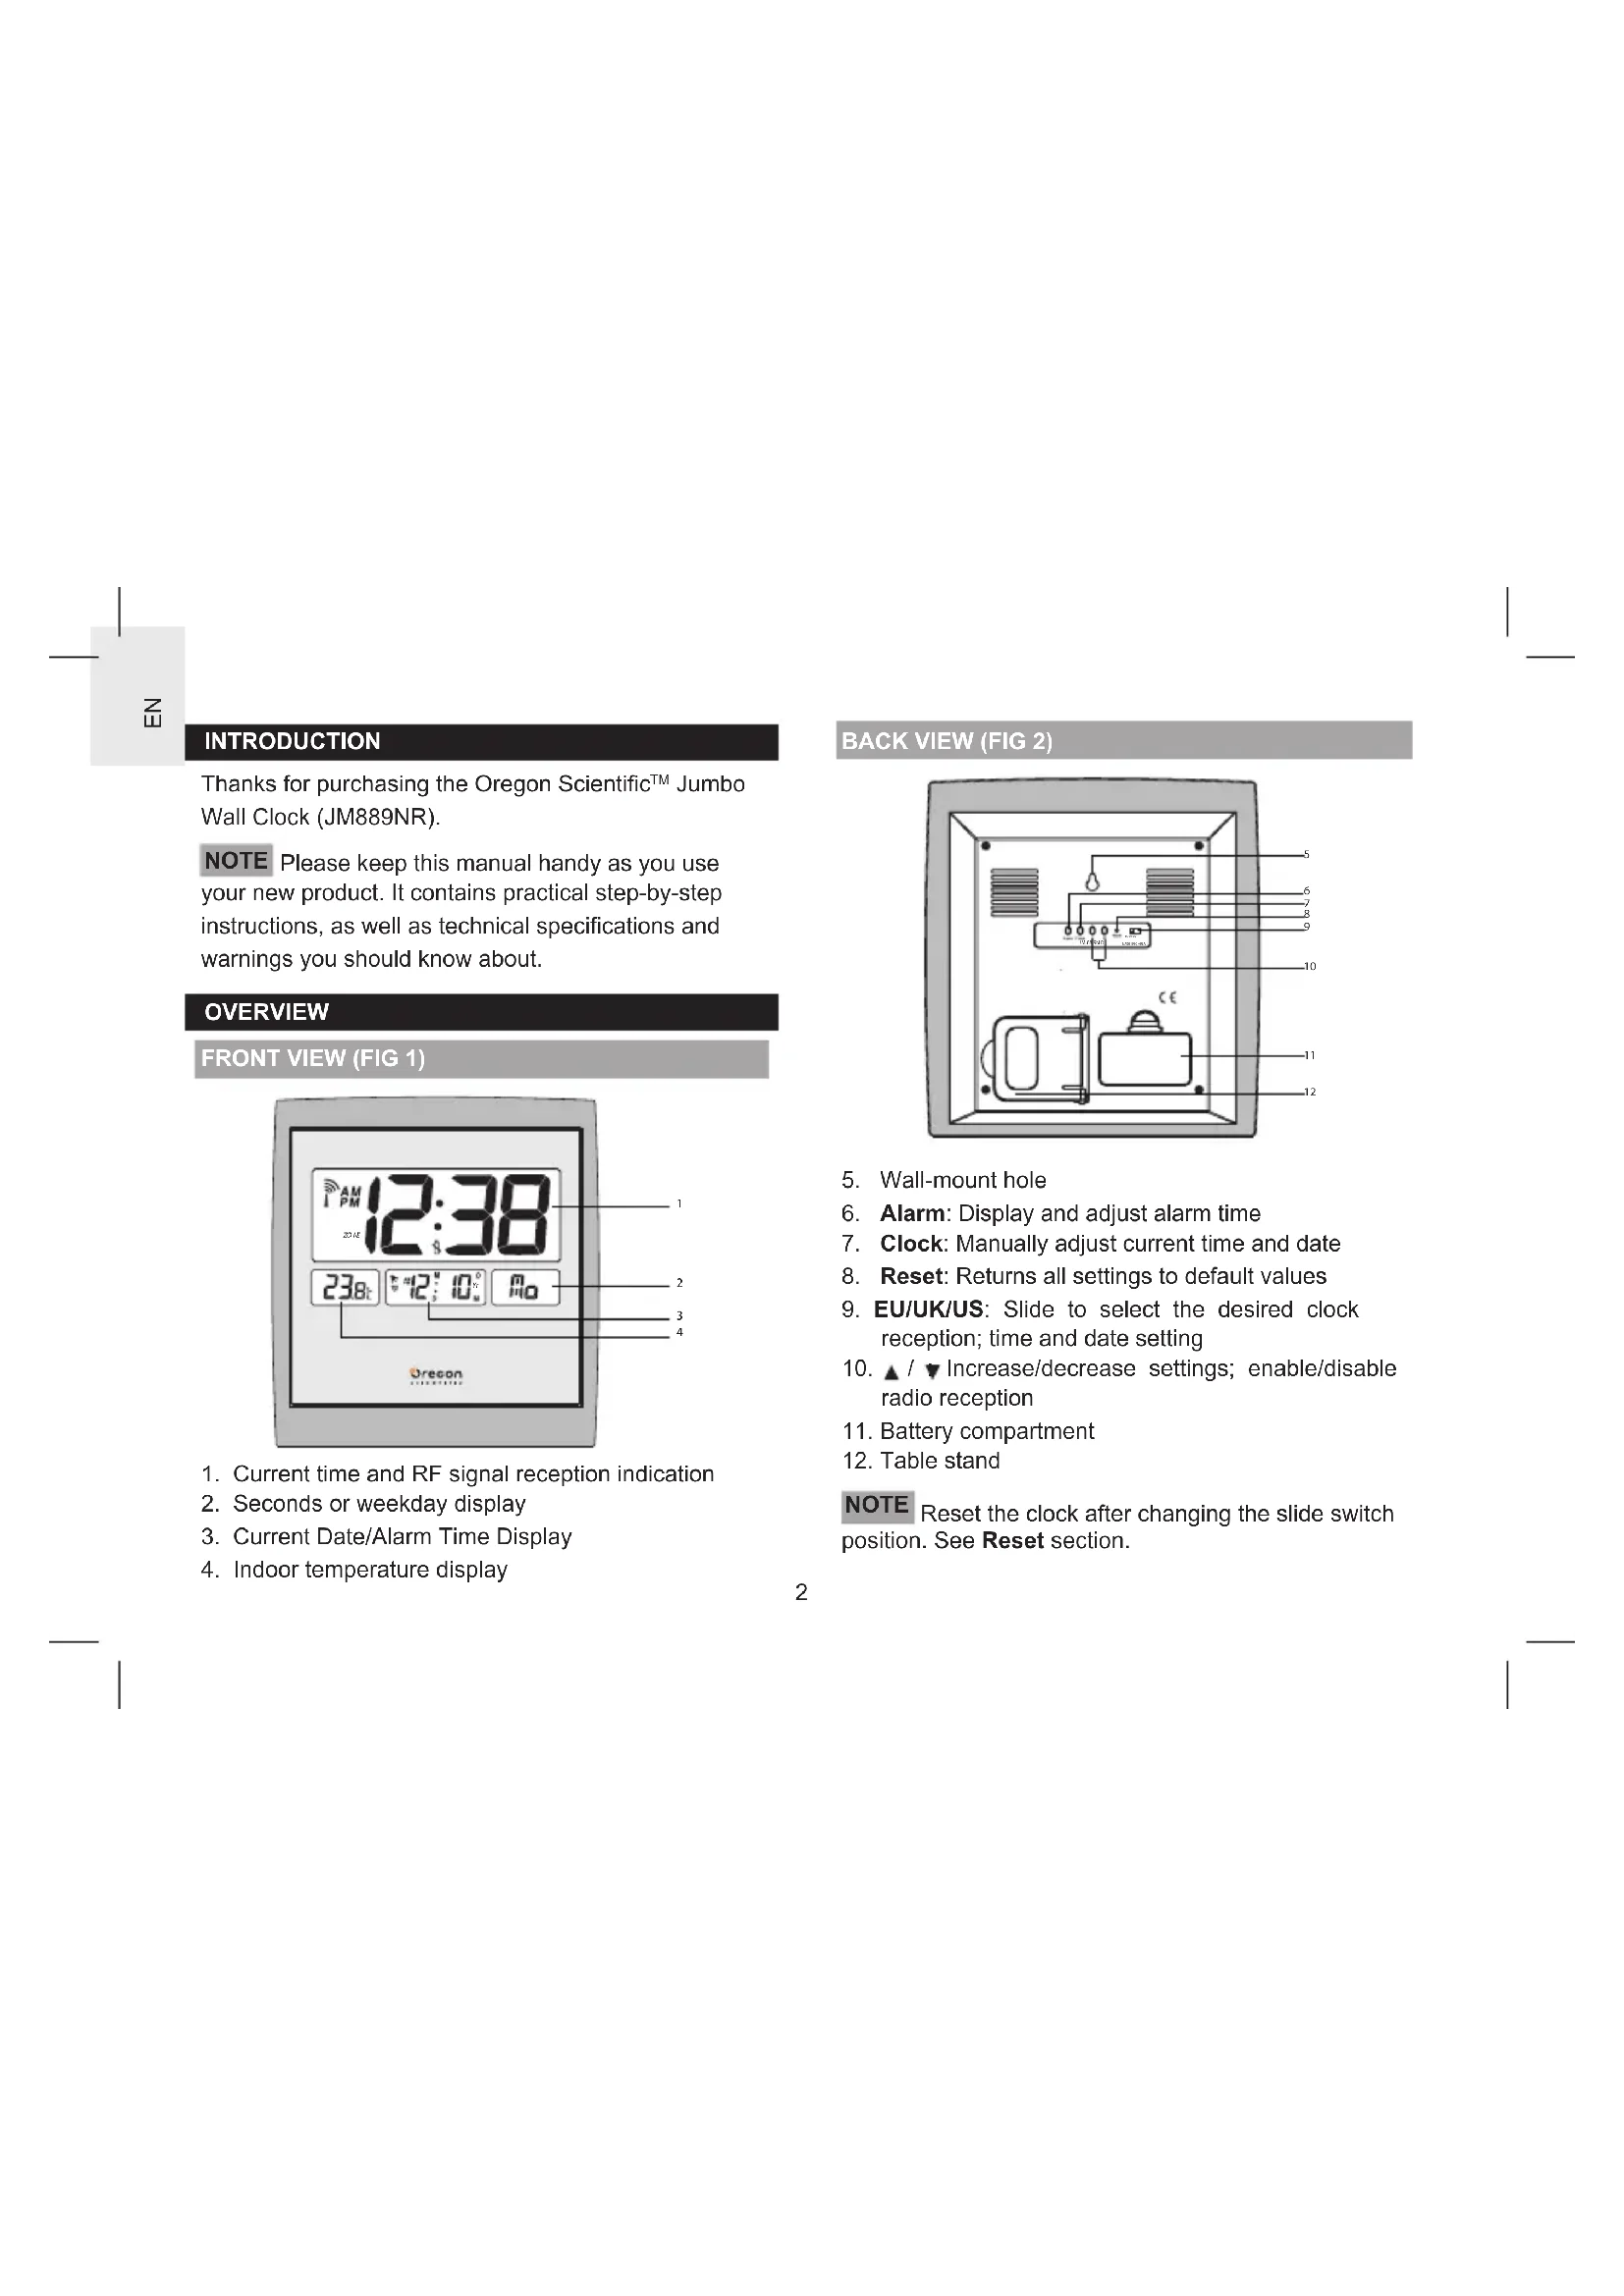
FRONT VIEW (FIG 1)
text_image
12:38 AM I PM 238t 12' 10' Ao Oregon- Current time and RF signal reception indication
- Seconds or weekday display
- Current Date/Alarm Time Display
- Indoor temperature display
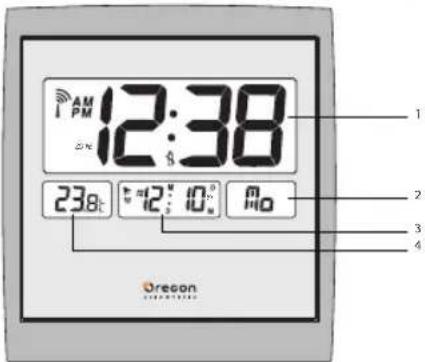
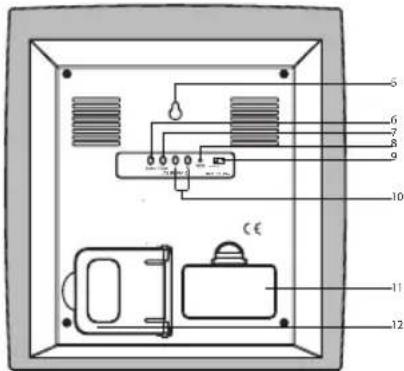
BACK VIEW (FIG 2)
text_image
Diagram of an electronic device with labeled components, including a control panel and speaker base- Wall-mount hole
- Alarm: Display and adjust alarm time
- Clock: Manually adjust current time and date
- Reset: Returns all settings to default values
- EU/UK/US: Slide to select the desired clock reception; time and date setting
- ▲ / ▼ Increase/decrease settings; enable/disable radio reception
- Battery compartment
- Table stand
NOTE Reset the clock after changing the slide switch position. See Reset section.
LCD DISPLAY
| Icon Description Explanation | ||
| Clock signal reception | Indicates the condition of radio reception. | |
| Low Battery Appears when power is low. | ||
| Alarm-on Appears when alarm is activated. | ||
| (••) | Alarm Time Indicator | Appears when alarm time is displayed. |
GETTING STARTED
INSERT BATTERY
- Remove the battery compartment cover (see FIG 2).
- Install the batteries, matching the polarities.
- Press Reset after each battery replacement.
NOTE Replace the batteries when displays, or when the display is dim.
PLACEMENT OF UNIT
The clock can be mounted on a wall or stand on a flat surface.
| Method Instruction | |
| Table Stand | Pull out the table stand (see FIG 2) at the back of unit, then place the main unit on a flat surface. |
| Wall Mount | a) Position and insert the screw into the desiredposition.b) Leave ample space between the wall and the screwhead. Check the screw is securely inserted.c) Fit the unit's Wall mount hole onto the screw head. |
CLOCK
CLOCK RECEPTION
This clock is designed to synchronize its clock automatically with a clock signal. Slide to select the desired region (EU/UK/US).
| Region Signal | |
| EU DCF | |
| UK MSF | |
| US WWVB |
Clock signal reception indicator:
| Strong signal | Weak signal | No signal | Receiving signal |
NOTE It takes 2-10 minutes to receive the clock signal. If the signal is weak, it could take up to 24 hours to receive a valid signal.
To enable/disable signal reception:
Press and hold ▲and ▼
SET THE CLOCK MANUALLY
- Press and hold ▲ to disable signal reception.
- Press and hold Clock. The screen displays ZONE and the number flashes.
- Press once or press and hold ▲/▼to adjust the setting. For EU/UK, the time-zone offset sets the clock up to +/- 23 hours from the received clock signal time. For US, the time-zone setting is 0(P), 1(M), 2(C), 3(E).
- Press Clock to confirm.
- Press once or press and hold ▲/▼to adjust the setting for 12/24h hour format, hour, minute, year, calendar format (month-day/day-month), month, date, language and temperature unit (°C/°F).
- Press Clock to confirm.
NOTE The language options are English (E), German (D), French (F), Italian (I), and Spanish (S).
To select the display mode:
Press Clock to select between seconds and weekday display.
NOTE When the temperature is lower than (29.0°F), the screen displays LL.L. When the temperature is higher than 50 °C (122.0 °F), the screen displays HH.H.
ALARM
BASIC FUNCTIONS
- When the daily alarm goes off, press Alarm to stop.
- The alarm will stop after 2 minutes. Then it will go off again after 8 minutes unless Alarm is pressed.
DISPLAYING ALARM TIME
- Press Alarm when the screen displays the current date.
- To display the current date, press Clock when the screen displays the alarm time.
SET THE ALARM
- Press and hold Alarm. The hour of alarm display flashes.
- Press once or press and hold ▲/▼ to change the settings.
- Press Alarm to confirm. displays.
ENABLE/DISABLE THE ALARM
When the LCD displays the alarm time set. Press Alarm to enable or disable the daily alarm. 🖼displays when the alarm is enabled.
To disable the alarm, press Alarm when the clock is in idle. The disappears.
NOTE When you press Alarm while the alarm goes off, it only stops the alarm. To disable the alarm, make sure the clock is in idle.
RESET
Press Reset at the back of the clock using a pointed object. All settings restore to default.
PRECAUTIONS
- Do not subject the unit to excessive force, shock, dust, temperature or humidity.
- Do not cover the ventilation holes with any items such as newspapers, curtains etc.
- Do not immerse the unit in water. If you spill liquid over it, dry it immediately with a soft, lint-free cloth.
- Do not clean the unit with abrasive or corrosive materials.
-
Do not tamper with the unit's internal components This invalidates the warranty.
-
Only use fresh batteries. Do not mix new and old batteries.
- Images shown in this manual may differ from the actual display.
- When disposing of this product, ensure it is collected separately for special treatment and not as normal household waste.
- Placement of this product on certain types of wood may result in damage to its finish for which Oregon Scientific will not be responsible. Consult the furniture manufacturer's care instructions for information.
- The contents of this manual may not be reproduced without the permission of the manufacturer.
- Do not dispose old batteries as unsorted municipal waste. Collection of such waste separately for special treatment is necessary.
- Please note that some units are equipped with a battery safety strip. Remove the strip from the battery compartment before first use.
SPECIFICATIONS
| TYPE DESCRIPTION | |
| L x W x H 234 x 220 x 23 mm | |
| Weight 426g | (without battery) |
| Operation range 0 | °C to 40 °C (32 °F to 104°F) |
| Default temperature unit | °C (EU/UK)°F (US) |
| Radio frequency System | DCFMSFWWVB |
| Time format 24/12 Hour with AM/PM | |
| Date format MM:DD/DD:MM | |
| Day-of-week display English/French/German/Spanish/Italian | |
| Alarm duration 2 minutes | |
| Power 2 x UM-3 (AA) | 1.5 Vbatteries |
ABOUT OREGON SCIENTIFIC
Visit our website (www.oregonscientific.com) to learn more about Oregon Scientific products.
For any enquiry, please contact our Customer Services at info.oregonscientific.com.
Oregon Scientific Global Distribution Limited reserves the right to interpret and construe any contents, terms and provisions in this user manual and to amend it, at its sole discretion, at any time without prior notice. To the extent that there is any inconsistency between English version and any other language versions, the English version shall prevail.
FCC STATEMENT
This device complies with Part 15 of the FCC Rules. Operation is subject to the following two conditions: (1) This device may not cause harmful interference, and (2) This device must accept any interference received, including interference that may cause undesired operation.
WARNING Changes or modifications not expressly approved by the party responsible for compliance could void the user's authority to operate the equipment.
NOTE This equipment has been tested and found to comply with the limits for a Class B digital device, pursuant to Part 15 of the FCC Rules. These limits are designed to provide reasonable protection against harmful interference in a residential installation.
This equipment generates, uses and can radiate radio frequency energy and, if not installed and used in accordance with the instructions, may cause harmful interference to radio communications. However, there is no guarantee that interference will not occur in a particular installation. If this equipment does cause harmful interference to radio or television reception, which can be determined by turning the equipment off and on, the user is encouraged to try to correct the interference by one or more of the following measures:
• Reorient or relocate the receiving antenna.
- Increase the separation between the equipment and receiver.
- Connect the equipment into an outlet on a circuit different from that to which the receiver is connected.
- Consult the dealer or an experienced radio / TV technician for help.
This Class B digital apparatus complies with Canadian ICES-3(B)/NMB-3(B)
DECLARATION OF CONFORMITY
The following information is not to be used as contact for support or sales. Please call our customer service number (listed on our website at www.oregonscientific.com), or on the warranty card for this product) for all inquiries instead.
We Name: Oregon Scientific, Inc. Address: 10778 SW Manhasset Dr. Tualatin, Or 97062 USA
Telephone No.: 1-800-853-8883
declare that the product
Product No.: JM889NR
Product Name: Jumbo Wall Clock Manufacturer: IDT Technology Limited
Address: Block C, 9/F, Kaiser Estate, Phase 1, 41 Man Yue St., Hung Hom, Kowloon, Hong Kong
is in conformity with Part 15 of the FCC rules. Operation is subject to the following two conditions: (1) This device may not cause harmful interference, and (2) This device must accept any interference received, including interference that may cause undesired operation.
DISPOSAL INFORMATION FOR USERS
Pursuant to and in accordance with Article 14 of the Directive 2012/19/EU of the European Parliament on waste electrical and electronic equipment (WEEE), and pursuant to and in accordance with Article 20 of the Directive 2006/66/EC of the European Parliament on batteries and accumulators and waste batteries.
The barred symbol of the rubbish bin shown on the equipment indicates that, at the end of its useful life, the product must be collected separately from other waste.
Please note that the batteries / rechargeable batteries must be removed from the equipment before it is given as waste. To remove the batteries / accumulators refer to the specifications in the user manual. Therefore, any products that have reached the end of their useful life must be given to waste disposal centres specialising in separate collection of waste electrical and electronic equipment, or given back to the dealer when purchasing a new WEEE, pursuant to and in accordance with Article 14 as implemented in the country.
The adequate separate collection for the subsequent start-up of the equipment sent to be recycled, treated and disposal of in an environmentally compatible way contributes to preventing possible negative effects on the environment and health and optimises the recycling and reuse of components making up the apparatus.
Abusive disposal of the product by the user involves application of the administrative sanctions according to the laws in force.
EU-DECLARATION OF CONFORMITY
Hereby, Oregon Scientific, declares that this Jumbo Wall Clock (Model: JM889NR) is in compliance with EMC directive 2004/108/EC. A copy of the signed and dated Declaration of Conformity is available on request via our Oregon Scientific Customer Service.


COUNTRIES RTTE APPROVED COMPLIED
All EU countries, Switzerland CH
and Norway N
Orologio da parete Jumbo
Modello: JM889NR
Manuale utente
text_image
Diagram of an electrical enclosure with labeled components and wiring connectionstext_image
12:38 238t 12:10" No Oregontext_image
Diagram of a refrigerator interior with numbered components and labeled partstext_image
Diagram of an electrical enclosure with labeled components and wiring connections| Region Signal | |
| EU DCF | |
| UK MSF | |
| US WWVB |
text_image
12:38 23.8°C 12° 10° Ao Oregontext_image
Diagram of an electronic device with labeled components, including a control panel and labeled parts 5 to 12.Reset(Restabelecer) 5
Precauções 5
Especificações 6
INTRODUÇÃO
text_image
12:38 AM PM 238Ω 4Ω; 10Ω MΩ Oregontext_image
Diagram of an electrical enclosure with labeled components and wiring connectionstext_image
12:38 AM PM ZOMI 23.8t 12:10 10 M0 Oregon 4text_image
Diagram of an electrical enclosure with labeled components and wiring connectionsPLAATSING VAN HET APPARAAT
text_image
Diagram of an electronic device with labeled components, including a refrigerator, alarm unit, and control panel.| Region Signal | |
| EU DCF | |
| UK MSF | |
| US WWVB |
Mottagning klocksignal:
| Stark signal | Svag signal | Ingen signal | Tar emot signal |
text_image
12:38 23.8t 12:10" Ao Oregontext_image
Diagram of an electrical enclosure with labeled components and wiring connectionstext_image
Diagram of an electrical enclosure with numbered components and labeled partsOregon Scientific Inc.
Tualatin, Oregon USA
欧西亚中国授权制造商
展科电子(深圳)有限公司
制造地:中国深圳宝安臣田工业村

© 2014 Oregon Scientific. All rights reserved.
P/N.: 300100696-00010-10