
VTLAN7 - Measuring equipment VELLEMAN - Free user manual and instructions
Find the device manual for free VTLAN7 VELLEMAN in PDF.
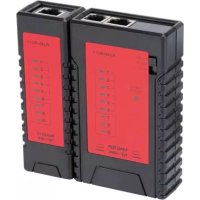
| Product type | 5-in-1 network cable tester |
| Brand | Velleman |
| Model | VTLAN7 |
| Main functions | Continuity test, detection of open, shorted, and crossed wiring for RJ45, RJ11, BNC, USB cables |
| Power supply | 1 battery 9 V 6LR61C (not included) |
| Max. testable cable length | 200 m |
| Supported cable types | RJ45 (8P8C), RJ11 (6P2C), RJ12 (6P6C), RJ10 (4P4C), BNC (25 Ω, 50 Ω, 75 Ω), USB-A to Mini-B |
| Result display | Numbered LEDs and status indicators (SHORT, CONNECTED, NON-PARALLEL, NO CONNECTION) |
| Dimensions (approx.) | Approximately 150 x 80 x 30 mm |
| Weight (approx.) | Approximately 200 g (without battery) |
| Low battery indicator | Yes, via LED indicator |
| Safety instructions | Never use on live wires; protect from moisture and shocks; indoor use only |
| Maintenance and cleaning | Clean the housing with a soft cloth and mild detergent; do not use abrasive solvents |
| Repairability / Spare parts | No user-serviceable parts; order parts from the dealer |
| Warranty | 24 months for manufacturing defects (conditions apply) |
| General information | Compliant with safety standards; manual available in multiple languages; manufacturer: Velleman NV |
Frequently Asked Questions - VTLAN7 VELLEMAN
User questions about VTLAN7 VELLEMAN
0 question about this device. Answer the ones you know or ask your own.
Ask a new question about this device
Download the instructions for your Measuring equipment in PDF format for free! Find your manual VTLAN7 - VELLEMAN and take your electronic device back in hand. On this page are published all the documents necessary for the use of your device. VTLAN7 by VELLEMAN.
USER MANUAL VTLAN7 VELLEMAN
natural_image
White remote control device with ports and a blue internal panel (no visible text or symbols)4P4C (R J10)
6P2C (R J11)
6P6C (R J12)
8P8C (R J45)
BNC
USB A/Mini-B
USER MANUAL 3
GEBR UIKER SHANDLEIDING 10
MODE D'EMP LOI 17
MANUAL DEL USUARIO 24
To all residents of the European Union Important environmental information about this product
This symbol on the device or the package indicates that disposal of the device after its lifecycle could harm the environment. Do not dispose of the unit (or batteries) as unsorted municipal waste; it should be taken to a specialize d com pany for re cycling. This device should be returned to your distributor or to a local recycling service. Respect the local environmental rules.
If in doubt, contact your local waste disposal authorities.
Tha nk you for choo sing Velleman! Please read the manual tho roughly before bringing this device into service. If the device was dama ged in transit, don't install or use it and contact your dealer.
2. Safety Instructions

Never use the tester on live wires; this will damage tester.

There are no user-serviceable parts inside the device. Re fer to an a authorized dealer for service and/or spare parts.
Refer to the Velleman® Service and Quality Warranty on the last pages of this manual.
- Indoor use only. Keep this device away from rain, moisture, splashing and dripping liquids. Never put objects filled with liquids on top of or close to the device.
- Keep this device away from dust and extreme temperatures.
- Protect this device from shocks and abuse. Avoid brute force when operating the device.
- Familiarise yourself with the functions of the device before actually using it.
- All modifications of the device are forbidden for safety reasons. Damage caused by use r modifications to the de vice is not co vered by the warranty.
VTLA N7
- Only use the device for its intended purpose. Using the device in an unauthorised way will void the warranty.
- Damage caused by disregard of certain guidelines in this manual is not covered by the warranty and the dealer will not accept responsibility for any ensuing defects or problems.
- Keep this manual for future reference.
3. Features
- LED indication
- advanced design for easy testing
- ability to test cables from a distance and in places that are not easily accessible
- automatically runs all tests and checks for continuity, open, shorted and crossed wire pairs.
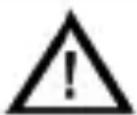
4. Overview
Refer to the illustrations on page 2 of this manual.
| Mast er | Remote | ||
| 1 | Test button | 7 | RJ45 socket |
| 2 | Display | 9 | RJ11 socket |
| 3 | BNC socket | 9 | USB socket (A) |
| 4 | RJ45 socket | ||
| 5 | RJ11 socket | ||
| 6 | USB socket (Mini-B) | ||
5. Operation
Supported ca bles
- The device tests common LAN and computer cables.
- It tests installed cables or patch cords with USB-A-to-Mini-B, BNC, RJ45 (8P8C), RJ12 (6P6C), RJ11 (6P2C), RJ10 (4P4C) connectors.
- It is intended to test cables with straight through connections, not cables with reversed or transposed co nnections like some LAN crosso ver cables or reverse wired telephone cables.
VTLA N7
Test conditions
To a void test errors:
- Do not test near strong magnetic fields (magnets, loudspeakers, transformers, motors, coils, relays, contactors, electromagnets, etc.).
- Do not test near strong electrostatic fields (high voltage power lines, televisions, computer monitors, etc.).
- Do not test near strong RF fields (radio or television transmitters, walkie-talkies, cellular phones etc.).
5.2 Testing an RJ45 cable
Never use the ester on live wires; this may cause shock or damage the meter.
Notes
- Only one cable can be tested at a time. For example, a coaxial cable and a n RJ45 cable cannot be tested simultaneously.
- The tester is intended to test complete cables. It may no find faults in cables that are intentionally incomplete. For example, the standard EIA/TIA 568 RJ45 terminated Ethernet cable is expected to contain 8 conductors. If only 4 conductors are used between the RJ45 connectors, the device may not properly identify the faults.
To test a cable:
- Insert one end of the cable under test into the appropriate socket in the master.
- Insert the other end of the cable into the corresponding socket in the remote.
- Press and release the Test button [1]. The power LED will light up for at least 5 seconds, indicating the device is testing the cable. If the power LED does not light, replace the battery.
5.3 Test result
The tables below describe the test results (LEDs that light up and number of beeps) for various error types.
VTLA N7
Good connection
| Visible LEDs | Beeps | Note |
| • CO NNECT ED• All numbered LEDs | 2: low-high | The numbered LEDs do not indicate that a good connection exists, only that a connection exists. |
Open fault
| Visible LEDs | Beeps | Note |
| • CO NNECT ED• Co rrect connections | 2: lo w-high | The LEDs of the inte rrupted conne ctio ns do not light up. |
Short circ uit
| Visi ble LEDs | Beeps | Note |
| SHORTFaulty connections | 3 bee ps | The cable has a short circuit.The num be r LED indicates the location of the short. |
V. 01 - 30/10/2013
6
©Velleman nv
VTLA N7
Crossed connections
| Visible LEDs | Beeps | Note |
| NON-PARALLELAll numbered LEDS | 2 beeps | Cables are crossed.The numbered LEDs indicate connections but do not indicate the location of the cross. |
No connection
| Visi ble LEDs | Beeps | Note |
| NO CO NNECT ION | 1 bee p | There is no cable between the remote and the main unit.The cable has no intact conductors. |
5.4 Testing an RJ 11 cable
Testing RJ11 cables is similar to RJ45 cables.
An RJ11 cable can have 2, 4, or 6 connections.
Depending on the number of connections, the LEDs will light as follows (provided the cable is OK):
• 2 co nnections: LED 3 - 4
• 4 connections: LED 2 - 3 - 4 - 5
- 6 connections: LED 1 - 2 - 3 - 4 - 5 - 6.
5.5 Testing a coaxial cable (BNC)
The device can test 25 Ω, 50 Ω, and 75 Ω cables.
- Connect one end of the cable to the BNC connector.
- Attach a suitable terminator to the other end of the cable.
- Press the Test button.
The LED corresponding to the error lights up.
Results
- SHORT: short circuit
• CONNECTED: cable is OK.
• NON-PARALLEL: crossed connection. - NO CONNECTION: cable has no terminator or is defective.
VTLA N7
5.6 Testing a USB cable
- Connect the Mini-B end to the socket on the master and the USB A end to the remote.
- Press the Test button. The LED next to CONNECTED and the numbered LEDs 1 to 4 light up if the cable is OK.
6. Battery
Warning g
- Do not puncture batteries or throw them in fire as they may explode.
- Do not attempt to recharge non-rechargeable batteries (alkaline).
- Dispose of batteries in accordance with local regulations. Ke ep batteries away from children.
- Remove the battery from the device if it will not be for a long time. Old batteries can begin to leak and damage the device.
Notes
- The device has a battery low indicator. Replace the battery as soon as the indicator lights up. A low battery power may produce false readings.
-
To replace the battery:
-
Slide open the battery cover at the back and replace with a correct battery (see Technical Specifications). Respect the polarity.
-
Close the battery cover.
7. Cleaning and Maintenance
- The tester is a precision test instrument and, when used as described in this manual, should not require maintenance.
- Calibration is not required.
- To clean the outside of the tester, use a cloth dampened with a mild detergent solution. Do not use any abrasive cleansers or chemical solvents that may damage the case of the tester.
VTLA N7
8. Technical Specifications
| 5-in-1 cable tester | USB, RJ45, 10BASE-T, token ring, RJ11/12 cables, BNC cable s |
| power supply | 9 V battery 6LR61C (not incl.) |
| max. cable length for testing 200 m | |
Use this device with origina I a ccessor ies on ly. Velleman nv cannot be held responsible in the event of damage or injury resulting from (incorrect) use of this device. For more info concerning th is pro duct and the latest version of th is ma nua l, please visit our website www.velleman.eu. The information in this manua l is subject to change with out prior notice.
© COPYRIGHT NO TICE
The co pyright to this manual is o wned by Velleman nv. A ll
worldwide rights reserved. No part of this manual may be copied, rep reduced, transla ted or re duced to a ny electronic medium or otherwise without the prior written consent of the copyright holder.
GEBRUIKERSHANDLEIDING
1. Inleid in g
© D RO I TS D 'A U TEU R
natural_image
Simple line drawing of a trash bin with crossed lines indicating no waste or discharge (no text or symbols)natural_image
Simple line drawing of a trash bin with crossed lines indicating no waste or discharge (no text or symbols)© D I REITOS D E A U TOR
Velleman® Service and Quality Warranty
Since its foundation in 1972, Velleman® acquired extensive experience in the electronics world and currently distributes its products in over 85 countries.
All our products fulfil strict quality requirements and legal stipulations in the EU. In order to ensure the quality, our products regularly go through an extra quality check, both by an internal quality department and by specialized external organisations. If, all precautionary measures notwithstanding, problems should occur, please make appeal to our warranty (see guarantee conditions).
General Warranty Conditions Concerning Consumer Products (for EU):
- All consumer products are subject to a 24-month warranty on production flaws and defective material as from the original date of purchase.
- Velleman® can decide to replace an article with an equivalent article, or to refund the retail value totally or partially when the complaint is valid and a free repair or replacement of the article is impossible, or if the expenses are out of proportion.
You will be delivered a replacing article or a refund at the value of 100% of the purchase price in case of a flaw occurred in the first year after the date of purchase and delivery, or a replacing article at 50% of the purchase price or a refund at the value of 50% of the retail value in case of a flaw occurred in the second year after the date of purchase and delivery.
- Not covered by warranty:
- all direct or indirect damage caused after delivery to the article (e.g. by oxidation, shocks, falls, dust, dirt, humidity...), and by the article, as well as its contents (e.g. data loss), compensation for loss of profits;
- consumable goods, parts or accessories that are subject to an aging process during normal use, such as batteries (rechargeable, non-rechargeable, built-in or replaceable), lamps, rubber parts, drive belts... (unlimited list);
- flaws resulting from fire, water damage, lightning, accident, natural disaster, etc....;
- flaws caused deliberately, negligently or resulting from improper handling, negligent
maintenance, abusive use or use contrary to the manufacturer's instructions;
- damage caused by a commercial, professional or collective use of the article (the warranty validity will be reduced to six (6) months when the article is used professionally);
- damage resulting from an inappropriate packing and shipping of the article;
- all damage caused by modification, repair or alteration performed by a third party without written permission by Velleman®.
- Articles to be repaired must be delivered to your Velleman® dealer, solidly packed (preferably in the original packaging), and be completed with the original receipt of purchase and a clear flaw description.
- Hint: In order to save on cost and time, please reread the manual and check if the flaw is caused by obvious causes prior to presenting the article for repair. Note that returning a non-defective article can also involve handling costs.
• Repairs occurring after warranty expiration are subject to shipping costs. - The above conditions are without prejudice to all commercial warranties.
The above enumeration is subject to modification according to the article (see article's manual).
NL


- To all residents of the European Union Important environmental information about this product
- If in doubt, contact your local waste disposal authorities.
- Safety Instructions
- VTLA N7
- Features
- Overview
- Operation
- Supported ca bles
- Test conditions
- Testing an RJ45 cable
- Notes
- Test result
- Good connection
- Open fault
- Short circ uit
- Testing an RJ 11 cable
- Testing a coaxial cable (BNC)
- Results
- Testing a USB cable
- Battery
- Warning g
- Cleaning and Maintenance
- Technical Specifications
- © COPYRIGHT NO TICE
- GEBRUIKERSHANDLEIDING
- Inleid in g
- © D RO I TS D 'A U TEU R
- © D I REITOS D E A U TOR
- Velleman® Service and Quality Warranty
- General Warranty Conditions Concerning Consumer Products (for EU):
- - Not covered by warranty:
- NL
Brand : VELLEMAN
Model : VTLAN7
Category : Measuring equipment