 — Television — Mode d'emploi PDF")
LIFE P15025 (MD 20410) - Television MEDION - Free user manual and instructions
Find the device manual for free LIFE P15025 (MD 20410) MEDION in PDF.
| Product type | LCD Television |
| Brand | Medion |
| Model | LIFE P15025 (MD 20410) |
| Screen diagonal | 75 cm (30 inches), 15:9 format |
| Resolution | 1280 x 768 pixels (WXGA) |
| Number of colors | 16.7 million |
| Viewing angle | 170° (horizontal and vertical) |
| Brightness | 450 cd/m² |
| Contrast ratio | 500:1 |
| Response time | 25 ms |
| Dimensions (H × W × D) | 535 × 870 × 140 mm |
| Weight | 17 kg |
| Power supply | 220-240 V AC, 50 Hz |
| Power consumption (operating) | 140 W typical |
| Power consumption (standby) | 5 W |
| TV standards | PAL (B/G, I, D/K, M, L/L'), SECAM, NTSC |
| TV reception | VHF, UHF, Hyperband (47-861 MHz) |
| Video connectors | 2 × SCART, 1 × S-Video, 1 × CVBS, 1 × DVI-I (analog and digital) |
| Audio connectors | Stereo input (3 × RCA, 2 × SCART), stereo output (1 × RCA) |
| Built-in speakers | 2 × 7 W |
| Remote control | Infrared, range 6 m, batteries LR03 AAA |
| Operating temperature | 5 °C to 35 °C |
| Operating humidity | 20% to 85% (non-condensing) |
| Care and cleaning | Unplug before cleaning; use a soft, slightly damp cloth; avoid chemical products |
| Safety | Do not open the device; unplug during storms or prolonged absence; keep batteries out of reach of children |
Frequently Asked Questions - LIFE P15025 (MD 20410) MEDION
User questions about LIFE P15025 (MD 20410) MEDION
0 question about this device. Answer the ones you know or ask your own.
Ask a new question about this device
Download the instructions for your Television in PDF format for free! Find your manual LIFE P15025 (MD 20410) - MEDION and take your electronic device back in hand. On this page are published all the documents necessary for the use of your device. LIFE P15025 (MD 20410) by MEDION.
USER MANUAL LIFE P15025 (MD 20410) MEDION
This symbol signifies a possible danger to your life and health, if specific requests to take action are not complied with or if appropriate precautionary measures are not taken.
This symbol warns against wrong behavior that will have the consequence of environmental damage.
This symbol provides information about handling of the product or about the relevant part of the operating instructions to which particular attention should be paid.
Inhaltsverzeichnis
- Satelliten-Receiver
- Satelliten-Receiver
text_image
TV VIDEO L/?3.1 Scope of supply 4
3.2 Connection sockets 5
3.3 Remote control buttons and functions 6
3.4 Control buttons on the unit 6
- Initial operation 7
4.1 Unpacking and installing 7
4.2 Connecting and switching on 8
4.3 OSD menu Operator Control 10
4.4 Basic settings OSD menu 11
4.5 Settings for initial operation 11
- Everyday operator control 13
5.1 Switching on / off 13
5.2 Setting the volume 14
5.3 Setting the picture 15
5.4 Television mode 16
5.5 PC mode 16
5.6 Operation with additional devices 16
5.7 Special functions 17
- Troubleshooting 19
- Technical specifications 20
1. Standards
This display is an information device and complies with the following directives and standards of the European Union:
- 89/336/EEC of 3 May 1989 with subsequent modifications (Directive 92/31/EEC of April 1992 and Directive 93/68/EEC of 22 July 1993)
- 73/23/EEC of 19 February 1973 with subsequent modifications (Directive 93/68/EEC of 22nd July 1993)
●EN55013, EN55020, EN61000-3-2/-3 (ElectroMagnetic Compatibility)
●EN60065 (Safety Requirements).
Conformity with the requirements is certified by the designation on
CE the product.
The manufacturer cannot be held liable for operation outside of the operating conditions as described in these operating instructions. Your product liability and warranty claims shall also lapse due by this.
2. Important information
Read and take heed of the directions so that when used in compliance with the intended use there is no danger to your health. Installation and connection errors can damage the unit or any devices connected to it. Take heed of the warnings on the unit and in the operating instructions. Never allow children to use electrical appliances without supervision.
GENERAL
The display you have purchased meets the highest quality requirements in this product segment and has been checked for pixel defects. Despite taking the greatest care during production of these units, for technological reasons it cannot be excluded absolutely that there are some pixels with defects.
Certain conditions can cause your display to hum. The humming generally comes from the mains voltage supply and can occur through the connection of different earth conductors. You can provide a remedy by putting a so-called sheath current filter between the incoming aerial lead and the aerial input socket on the display. Sheath current filters are available in the retail trade in the form of a small inline plug.
For technical reasons the unit can generate noise inside itself. However, this must not exceed the value specified in the appliance specification.
If your display is connected to an external aerial, the latter must be earthed as protection against electric shocks and static charging. The earthing must comply with the valid regulations.
ENVIRONMENTAL CONDITIONS
Never operate the display in environmental conditions that differ from the technical specifications in this manual. Differing conditions can cause an electrical hazard, fire or failure of the unit.
Protect the display against moisture. This includes continuous high levels of air humidity, proximity to water, dripping water, spray water and rain. Do not put any vessels that are filled with water, e.g. vases, on the unit. If you connect an external aerial, please ensure that no water can penetrate the cable infeed.
There is a risk of electric shock and irreparable damage to the unit.
Protect the unit from exposure to heat and direct sunlight. Avoid proximity to fire, heat sources and ovens. Protect the unit against heat accumulation. Do not cover over the ventilation slits. Maintain sufficient space above and below the ventilation slits and on the sides away from furniture and the ceiling. Do not drape curtains over the unit.
This will cause overheating and a risk of fire.
MAINS CONNECTION AND OPERATOR CONTROL
To disconnect the display from the mains voltage, switch off the mains switch and remove the mains cable from the mains input module. Connect the display only to a plug receptacle that has been installed in compliance with regulations with earthing contacts, the mains voltage of which complies with the technical specifications of the unit. Ensure that the mains plug and plug receptacle are accessible at all times.
Differing conditions can cause an electrical hazard, fire or failure of the unit.
Lay the mains cable so that nobody can get caught on it.
Should the display fall, it can injure people and cause irreparable damage to the unit.
Use only the mains cable supplied. Protect it against damage and do not modify it. Never use a damaged mains cable. If the mains cable or plug are damaged the display must not be operated any longer.
There is a danger of electric shock, fire or failure of the unit.
Never touch the mains switch or mains cable with wet hands.
There is a danger of electric shock.
Never remove the plug by pulling the mains cable out of the receptacle. Avoid laying the mains cable in the vicinity of hot objects.
There is a danger of fire and an electrical hazard.
If absent for a long period of time or if there is lightning, for safety reasons pull the mains plug out of the receptacle and the building's aerial plug out of the aerial socket.
A precautionary measure to prevent a possible fire, avoid damage to the unit and the danger of an electric shock.
Always switch off the display and the signal source before connecting the two units.
There is a danger of electric shock.
FAULTS
If the display or mains cable is damaged, immediately pull the mains plug out of the plug receptacle.
Pull out the mains plug, if the unit gives off smoke, an unpleasant odour or any unusual noises. Proceed in the same way if the display is no longer able to display an image after switching on or during operation. Never attempt to continue operating the display in this situation.
Under no circumstances should you attempt to open the unit and/or repair it yourself. Inside the display there are no parts that can be serviced or replaced by you. Contact our service hotline or another suitable technical workshop.
CLEANING AND CARE
Before installation, cleaning or care, switch off the unit and pull the mains plug out of the plug receptacle. Wait for several minutes so that the capacitors in the unit can fully discharge.
For cleaning use only a slightly moistened soft cloth. You should avoid chemical solvents and cleaning agents because they can damage the surfaces.
Immediately pull out the mains plug, if foreign bodies such as water, other liquids, metal parts etc. get into the display. Never attempt to reach into the unit with any objects or with your hands.
There is a danger of electric shock or an accident.
BATTERIES
Batteries can represent a fatal danger, if swallowed. Therefore keep batteries where they are inaccessible for children. If a battery has been swallowed, medical assistance should be sought immediately.
Always take used batteries out of the remote control immediately, because they will leak and can therefore cause damage.
The enclosed batteries must not be charged or reactivated by any other means and must not be taken apart, thrown into fire or short-circuited.
Do not put dead batteries in your household waste. The batteries must be disposed of at collection points provided for this purpose.
OTHER DIRECTIONS
If the display has been switched to standby mode, it is still connected to the mains supply. For complete disconnection you must switch the mains switch to the position "O" or pull the mains plug out of the plug receptacle.
For ergonomic reasons it is recommended that you avoid the use of red or blue fonts or symbols on dark backgrounds. On account of the poor contrast such a display causes poor legibility and causes early eye fatigue. Therefore please use displays that are rich in contrast, e.g. black font on a white background.
To avoid aching eyes and obtain an optimized viewing distance, the distance from the unit should be five to six times the display's diagonal dimension. In your television room it should be so light that you could also read. The contrast is lost with too much brightness. Too little light strains the eyes due to the alternation between light and dark on the display.
Packing and auxiliary packaging that is no longer required is recyclable and should always be sent for recycling, if no longer required.
3. Overview
The TFT display offers a broad range of connection facilities for PCs, DVD players, video recorders, video cameras, etc. No matter whether it's a question of TV, video or PC images, they all displayed with a very sharp outline and distortion-free on an absolutely flat display surface, and the pictures have an excellent degree of brightness and unusual brilliance. Other important features are the display's large screen diagonal of 75 cm with a aspect ratio of 15:9 and a very slim overall depth. For TV viewing it is necessary to connect the unit to a terrestrial aerial, SAT receiver or cable TV box.
Operator control is interactive via the remote control provided and the on-screen menu (OSD). A wide range of picture quality settings can be effected with these.
A new type of cooling system enables operation of the TFT display without any disturbing fan noise. Being as quiet as a conventional television set the TFT screen is excellently suited for accommodation rooms and conference rooms.
Equipment
●High-quality aluminium enclosure
●Fanless design
●Display diagonal 75 cm
●15:9 format
- Viewing angle horizontal/vertical 170 degrees
●Integrated stereo loudspeaker system
- Setting facilities on the unit
- Digital comb filter
●Compatible with PAL, SECAM and NTSC
●Compatible with VGA, SVGA, WXGA, XGA and SXGA
-Video text
●Automatic channel identification and channel sorting
- Sleep timer
- Screen saver
- 2 x SCART connections
- 1 x S-video
- 1 x FBAS
- 1 x DVI (I) (analogue and digital)
3.1 Scope of supply
After unpacking please check the TFT display for possible transportation damage and completeness of the delivery. The supplier can recognize claims for transportation damage only if you advise them of this prior to initial operation of the unit. If any part of the scope of supply is missing, please contact our service hotline. Please keep the original packing for a possible return of the display.
Standard scope of supply
3.2 Connection sockets
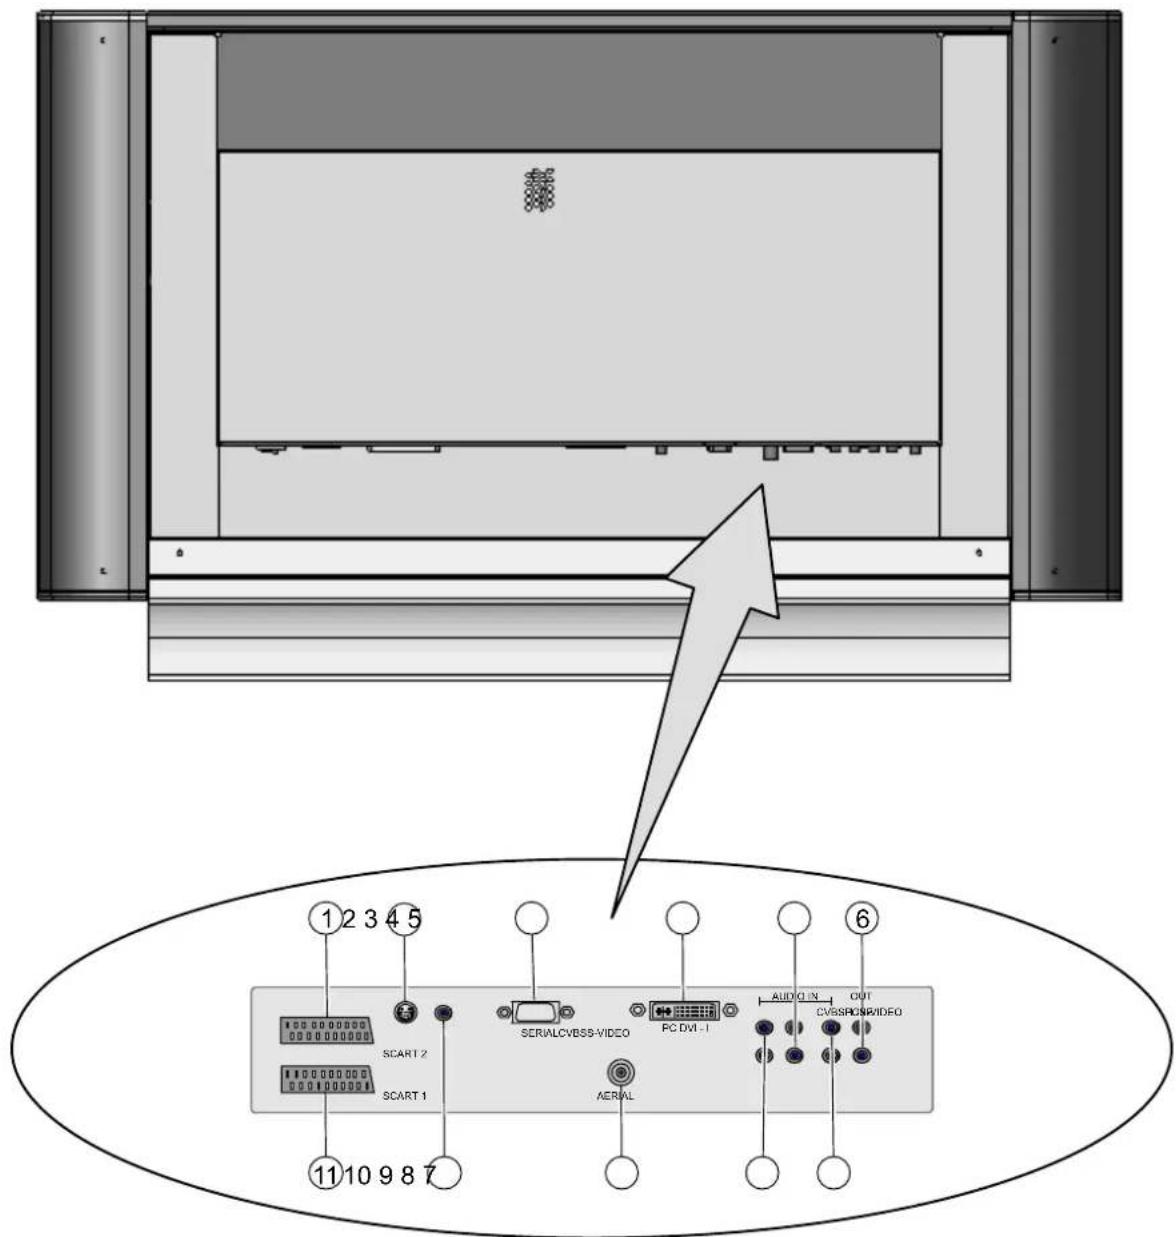
text_image
Diagram of a device rear panel with labeled buttons and an arrow pointing to a screen, showing internal components like SCARTs, serial video, and audio control.[1] SCART 2 - e.g. video recorder socket
[2] S-VIDEO (Y/C) - e.g. camcorder socket with S-video jack
[3] SERIAL - RS232 socket for service purposes
[4] PC DVI-I - PC socket (RGB for analogue signals, DVI for digital signals)
[5] AUDIO IN PC - e.g. connection of a PC via the line-out socket
[6] OUT LINE - e.g. audio amplifier or DVD receiver socket
[7] AUDIO IN CVBS - e.g. socket for camcorder with video-out jack
[8] AUDIO IN S-VIDEO - e.g. socket for camcorder with S-video jack
[9] AERIAL - socket for TV aerial signal (terrestrial aerial or cable connection)
[10] CVBS - e.g. socket for camcorder with video-out jack
[11] SCART 1 - e.g. satellite receiver socket
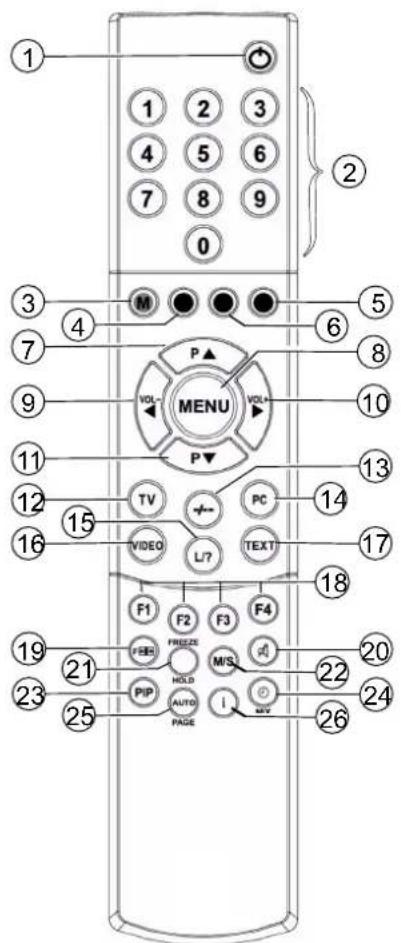
3.3 Remote control buttons and functions
To be able to control the TFT display with the remote control, the mains plug must be plugged in and the mains switch must be switched on.
The infrared remote control functions only if there are no obstructions between the control and the infrared sensor on the front side (bottom) of the display. The range of the remote control is approx. 6 m.
When the batteries get weaker the range of the remote control is reduced. In this case please change the batteries. You must use only 2 batteries of the type LR03 AAA 1.5 V.

Do not put dead batteries in your household waste. They must be disposed of at a collection point for used batteries (e.g. the battery collecting box at your retail dealer's premises) or at your centre for special waste.
text_image
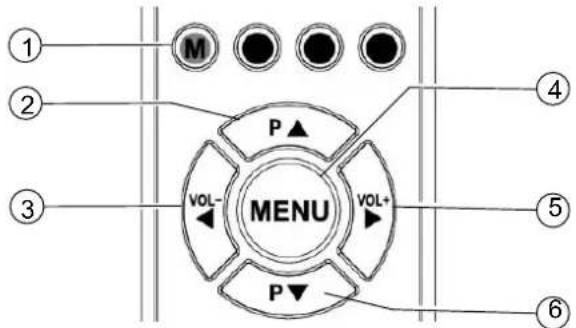
1 2 3 4 5 6 7 8 9 0 ② ③ ④ M P ▲ VOL- MENU VOL+ 6 ⑤ ⑦ ⑧ ⑨ ⑩ ⑪ ⑫ ⑬ ⑭ ⑮ ⑯ ⑰ ⑱ ⑲ ⑳ ⑴ ⑵ ⑶ ⑷ ⑧ ⑨ ⑩ ⑪ ⑫ ⑬ ⑭ ⑮ ⑯ ⑰ ⑱ ⑲ ⑳ ⑪ F1 F2 F3 F4 FREO FREEZE M/S 20 21 HOLD 22 23 PIP AUTO 24 25 PAGE 26[1] Standby button
[2] Programme buttons 1-9, 0
[3] M (memory) button, red
[4] Greenbutton
[5] Bluebutton
[6] Yellowbutton
[7] Button for programme selection up
[8] Menu button
[9] Button for reducing the volume / direction button left
[10] Button for increasing the volume / direction button right
[11] Button for program selection down
[12] Button for direct selection of TV mode
[13] Button for alternation between single and multi-digit programme number
[14] Button for direct selection of PC mode
[15] Button for function programme list in TV mode or functions in teletext mode
[16] Button for direct selection of video mode
[17] Button for direct selection of teletext
[18] F2 = FREEZE button (teletext mode) F1 - F4 = Function buttons for configuration-dependent allocation
[19] Selection button for picture format
[20] Volume Off
[21] HOLD button
[22] M/S button
[23] PIP button (Picture In Picture)
[24] Button for time display / MIX button
[25] AUTO or PAGE button
[26] Info button

The design of the supplied remote control may differ from the remote control illustrated here.
3.4 Control buttons on the unit
The functions of the buttons on the unit match those on the remote control!
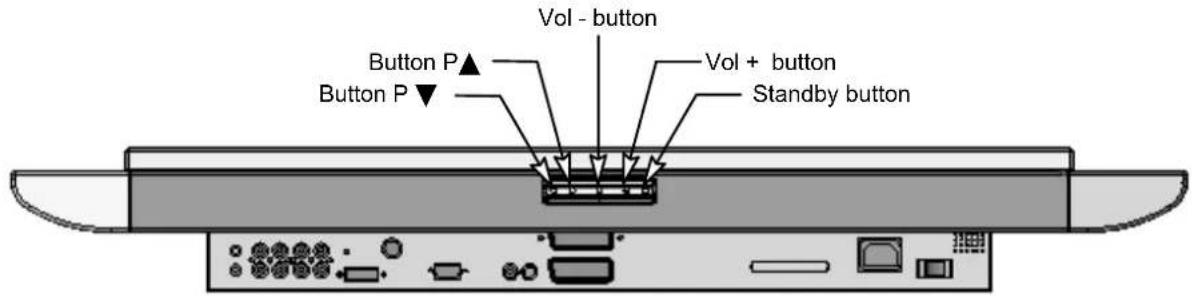
text_image
Vol - button Button P▲ Button P▼ Vol + button Standby button4. Initial operation

Before you make any connections switch off all the appliances involved including the TFT display.
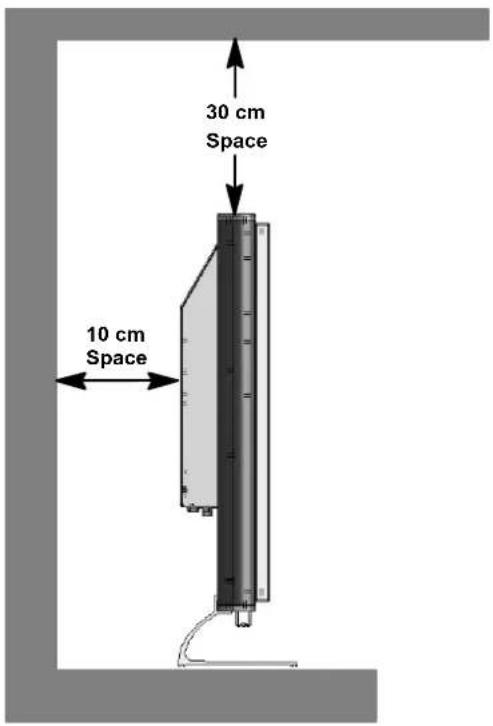
4.1 Unpacking and installing
- Despite the large viewing angle the TFT display provides its best performance when viewed directly from a vertical direction. Align the display with the most frequent viewing direction.
Location
●Light reflection
Avoid locating the unit opposite windows or other light sources.
- Access to the mains input
The mains input and mains switch should be easily accessible at all times.
●Air supply
Leave a space of at least 10 cm on the side and to the rear from any furniture. The distance upwards should be at least 30 cm from furniture or from the ceiling.
●Ambient temperature
For safe and reliable operation the ambient temperature must be between 5 °C and 35 °C.
text_image
30 cm Space 10 cm SpaceUNPACKING
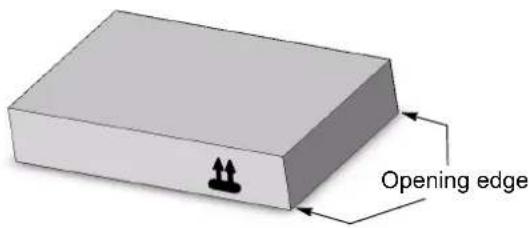
text_image
Opening edgePlace the carton with the underside on a firm base. You will recognize the top side by the direction of the arrow tips on the long side of the carton.
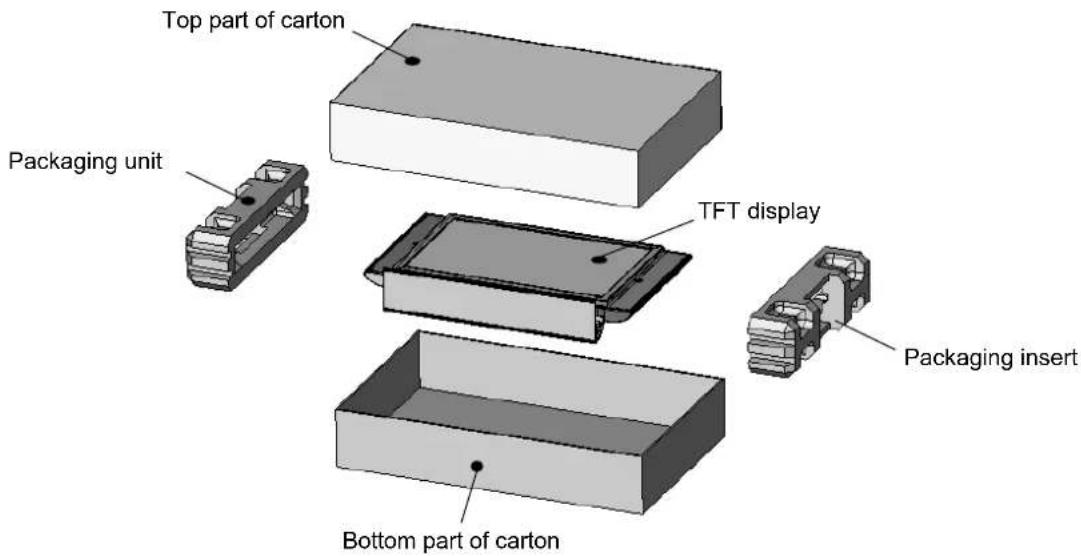
Cut through the packaging tape along the opening edges and take off the top part of the carton upwards.
To lift out the TFT display, grip the two packaging inserts in the middle.

It is recommended that the TFT display be lifted out by two people.
text_image
Top part of carton Packaging unit TFT display Bottom part of carton Packaging insert4.2 Connecting and switching on
Connecting (for an overview of the connections see illustration on page 5)
Insert the mains cable into the mains input socket on the display and the mains plug into a plug socket.
●Cable connection / terrestrial aerial
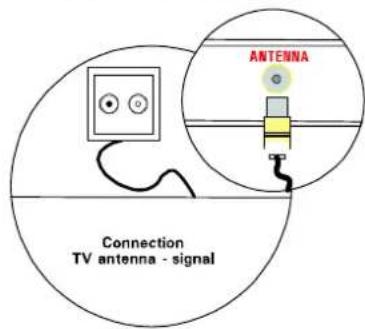
text_image
ANTENNA Connection TV antenna - signalIf you would like to connect a cable or terrestrial aerial, use the ANTENNA socket for this purpose.
- Satellite receiver
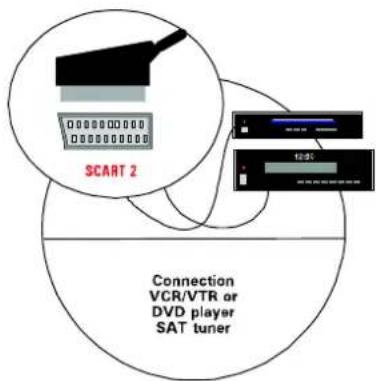
text_image
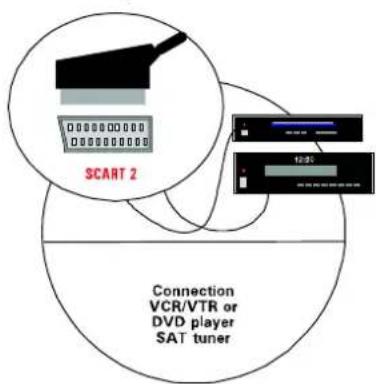
SCART 2 10:35 Connection VCR/VTR or DVD player SAT tunerIf you receive your TV channels via satellite, connect your receiver by means of a SCART cable to the SCART 1 or SCART 2 socket. In addition SCART 1 has a connection for RGB sources such as a DVD player.
•PC
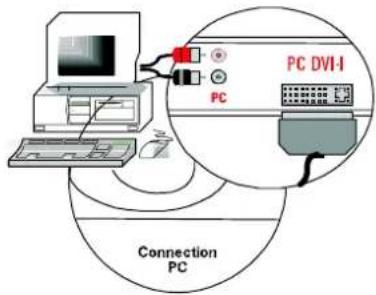
text_image
PC DVI-I PC Connection PCUse the PC DVI-I socket to connect your PC to the TFT display. If your PC has an analogue VGA output port, use a DVI-I cable on a 15 Pin HD-Sub to connect it.

On older PC graphic boards it can happen that pin 9 is barred. Should this be the case, please contact the service hotline.
Preparation
- Remote control
Open the battery compartment on the rear side of the remote control and insert the two batteries provided (type LR03 micro AAA). Pay attention to the polarity as specified on the bottom of the battery compartment. Close the battery compartment again.
Switching on
Switch the mains switch on the rear side of the display to position "I". The display is now in standby mode and can be switched on by means of the remote control.
●Cable connection / terrestrial aerial
text_image
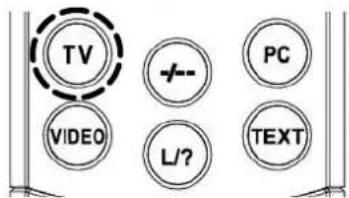
TV VIDEO +-- L/?Switch on the display with the TV button on your remote control.
- Satellite receiver
text_image
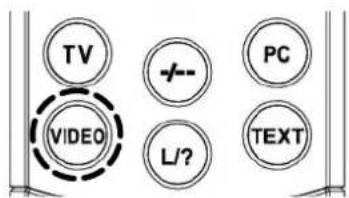
TV +-- PC VIDEO L/? TEXTSwitch on your satellite receiver and switch on the display via the VIDEO button on your remote control. Please take note that you may have to press the VIDEO button several times depending on which SCART socket your receiver is connected to.
•PC
text_image
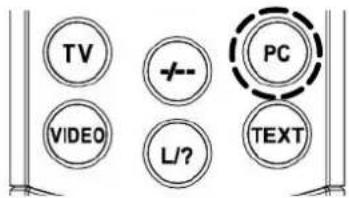
TV VIDEO L/? PC TEXTSwitch on the display with the button PC on your remote control and select the appropriate signal input (PC(RGB) or PC(DVI)). To do so call up your display's OSD menu via the remote control button MENU and select your input signal in the submenu INPUTS.
4.3 OSD menu Operator Control
Your TFT display can be set and operated with the aid of the simple OSD menu control. 6 buttons are at your disposal on your remote control for this purpose:
text_image
① ② ③ M P ▲ VOL- MENU P▼ VOL+ ④ ⑤ ⑥[1] M button
Stores any changes made.
[2] P ▲ button
Upward movement on the OSD menu. The selected menu or selected function appears against a coloured background.
If functions are shown as a value or bar chart, you can increase the value with this button.
[3] ▶ button
Back to the previous menu. Quits the selected submenu or the selected function.
[4] MENU button
Displays the OSD main menu. The main menu appears on the top left edge of the display. Exit OSD menu.
[5] ▶ button
Activates the selected submenu or the selected function. The selected menu option appears against a green background and can be altered.
[6] P ▼ button
Downward movement on the OSD menu. The selected menu or selected function appears against a coloured background.
If functions are shown as a value or bar chart, you can decrease the value with this button.
STORE CHANGES
The changes effected by you are stored by pressing the M button on your remote control (see illustration above) or by quitting the OSD menu.
4.4 Basic settings OSD menu
CHANGING THE OSD LANGUAGE
Your display has a 6-language OSD menu (German, English, French, Italy, Dutch and Spanish). To change the preset language, select the menu option SET UP in the main menu. Activate the menu option LANGUAGE in the submenu and select the desired language:
| Inputs > | |
| Picture > | |
| Display > | |
| Sound > | |
| Set Up > | Display Source Info: On |
| Info > | Language: English |
| OSD Set Up: > | |
| Pwr Down/Stand-By: > | |
| Reset to factory Defaults: > | |
| Sleep Timer: Off |
CHANGING THE OSD MENU PROPERTIES
To change the display or the display time (time after the last actuation up to display exit) of the OSD menu, select in the main menu the menu option SET UP. In the submenu OSD SET UP another submenu with the menu options TIME OUT (selection options: 5, 10 and 15 seconds) and TRANSPARENCY (selection options: On and Off) are at your disposal:
| Inputs > | ||
| Picture > | ||
| Display > | ||
| Sound > | ||
| Set Up > | Display Source Info: On Language: English | |
| OSD Set Up: > | Time Out: 5 s | |
| Pwr Down/Stand-By: > | Transparency: Off | |
| Reset to factory Defaults: > | ||
| Sleep Timer: Off |
RESETTING TO DEFAULT SETTINGS
You have the option of resetting all changes made in the OSD menu back to the original default setting. To do so select in the main menu the menu option SET UP and activate in the submenu the menu option RESET TO FACTORY DEFAULTS:
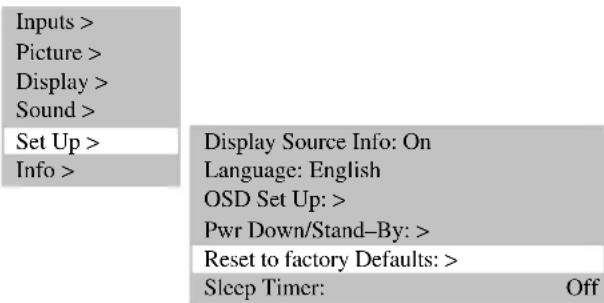
text_image
Inputs > Picture > Display > Sound > Set Up > Info > Display Source Info: On Language: English OSD Set Up: > Pwr Down/Stand-By: > Reset to factory Defaults: > Sleep Timer: Off4.5 Settings for initial operation
TV MODE
• Automatic channel search
If you receive your channels via satellite only, you do not have to perform the automatic channel search. To start the automatic channel search, proceed as follows:
Switch on the display via the TV button on your remote control.
☐ Call up the OSD menu via the MENU button on your remote control and select the menu option INPUTS. A submenu opens.
In the submenu select the menu option SOURCE SETTINGS. Another submenu opens.
Now select the menu option AUTO SEARCH and activate the submenu option START SEARCH. The automatic channel search starts.

flowchart
graph LR
    A["Inputs >"] --> B["Select: TUNER"]
    C["Picture >"] --> D["Source Settings > Auto Search >"]
    E["Display >"] --> F["Manual Search > Sort > Delete >"]
    G["Sound >"] --> F
    H["Set Up >"] --> F
    I["Info >"] --> F
    J["TV Standard: PAL BG Search Form: All programs Start Search: Program Start Point: 01"] --> F
SORT TV CHANNELS
| Inputs > | Select: TUNER | |
| Picture > | Source Settings > Auto Search > | |
| Display > | Manual Search > | |
| Sound > | Sort > | |
| Set Up > | Delete > | |
| Info > |
| 1 ARD | 2 | 3 | 4 | 5 | 6 | 7 | 8 | 9 | 10 |
| 11 ZDF | |||||||||
| 21 WDR | |||||||||
| 31 _ _ | |||||||||
| 41 | |||||||||
| 51 | |||||||||
| 61 | |||||||||
| 71 | |||||||||
| 81 | |||||||||
| 91 | 99 | ||||||||
| (Green)_: Selection of a channel. Current: 31 MENU: Finish | |||||||||
| (Blue)_: Insertion of a vacant channel location | |||||||||
| (Yellow)_: Relocate selected channel to current position | |||||||||
Changing the channel name
If the TFT display can detect the channel name from the television signal, the detected name is stored against the preset programme number. If the channel name is not detected, the programme number appears in the name (e.g. PR02). Proceed as follows to change the channel name:
Move the marker with button ▼ or ▲ to the menu option Name.
Now press the ▶ button to select the first character position.
With buttons ▼ and ▲ you can scroll through the character set until the desired character appears in the selected character position.
Use the ▶ button to select the next character position.
- Repeat the previous 3 steps until you have entered the name. A maximum of 5 characters is possible.

text_image
Inputs > Picture > Display > Sound > Set Up > Info > Select: TUNER Source Settings > Auto Search > Manual Search > Sort > Delete > Programme: 01 TV Standard: PAL BG Frequency: 055.25 MHz Name: SW3Select PC MODE
- signal input
Switch on the display via the PC button on your remote control.
Call up the OSD menu via the MENU button on your remote control. The menu option INPUTS appears against a coloured background.
In the submenu SELECT select the corresponding signal input (PC (RGB) or PC (DVI)).
| Inputs > | Select: PC (RGB) |
| Picture > | Source Settings > |
| Display > | |
| Sound > | |
| Set Up > | |
| Info > |
AUTO-ADJUST FUNCTION
The TFT display always automatically executes the auto-adjust function upon first use of an analogue PC video format (RGB). During this time period the image moves slightly back and forth to reach the optimal position and image reproduction.

The H/V (horizontal/vertical) position and the picture size have to be set manually for several unfavourable PC sizes. The auto-adjust function depends intensely on the picture display. The display of a full screen white picture is very suitable.
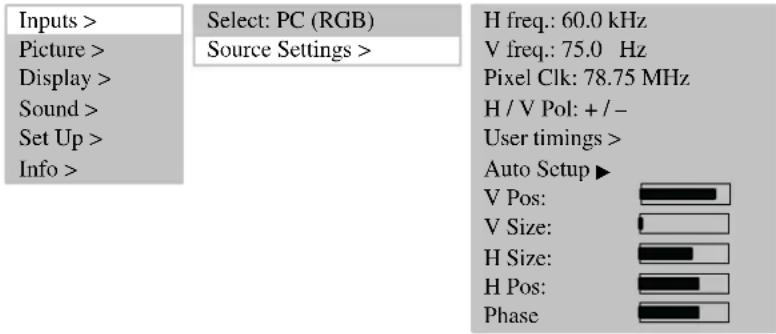
text_image
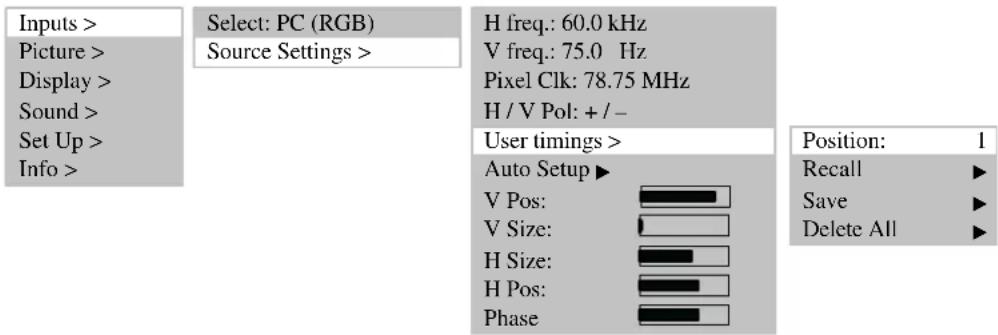
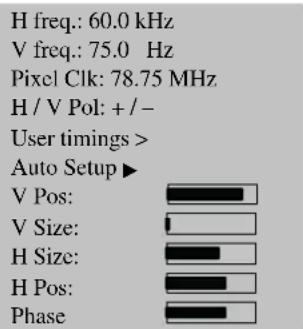
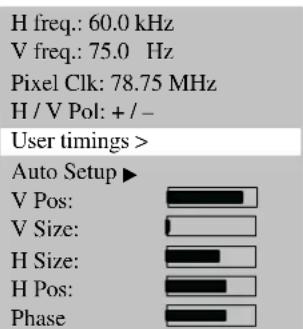
Inputs > Picture > Display > Sound > Set Up > Info > Select: PC (RGB) Source Settings > H freq.: 60.0 kHz V freq.: 75.0 Hz Pixel Clk: 78.75 MHz H / V Pol: + / - User timings > Auto Setup ▶ V Pos: V Size: H Size: H Pos: PhaseYou have the option of storing frequently used formats as user formats. The display recognizes the stored formats and immediately displays them correctly without execution of the auto-adjust function.
In the main menu select the menu option INPUTS and call up the submenu SOURCE SETTINGS. Another submenu opens.
Activate the menu option USER TIMINGS.
With the menu option RECALL determine the currently set user format. You can now store the user format, for example, in position 1 (8 positions are possible) with the menu option SAVE.
text_image
Inputs > Picture > Display > Sound > Set Up > Info > Select: PC (RGB) Source Settings > H freq.: 60.0 kHz V freq.: 75.0 Hz Pixel Clk: 78.75 MHz H / V Pol: + / - User timings > Auto Setup ▶ V Pos: V Size: H Size: H Pos: Phase Position: 1 Recall ▶ Save ▶ Delete All ▶5. Everyday operator control
5.1 Switching on / off
TO SWITCH ON
To switch on the TFT display put the mains switch in position "I".
- The standby LED on the infrared sensor lights up orange.
Now press one of the numeric buttons on the remote control to put the TFT display into operation. - The OPERATING LED on the infrared sensor lights up green.
TO SWITCH OFF
Press the standby button on the remote control, the TFT display switches back to standby mode.
- The standby LED on the infrared sensor lights up orange.
To switch off the TFT display again completely, put the mains switch in position "0".
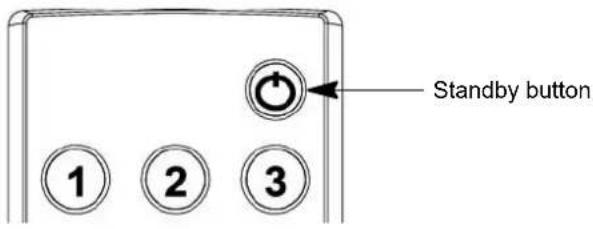
text_image
Standby button 1 2 35.2 Setting the volume
SETTING THE VOLUME
Press button ◀ (Vol -) or ▶ (Vol +) on the remote control to set the desired volume.
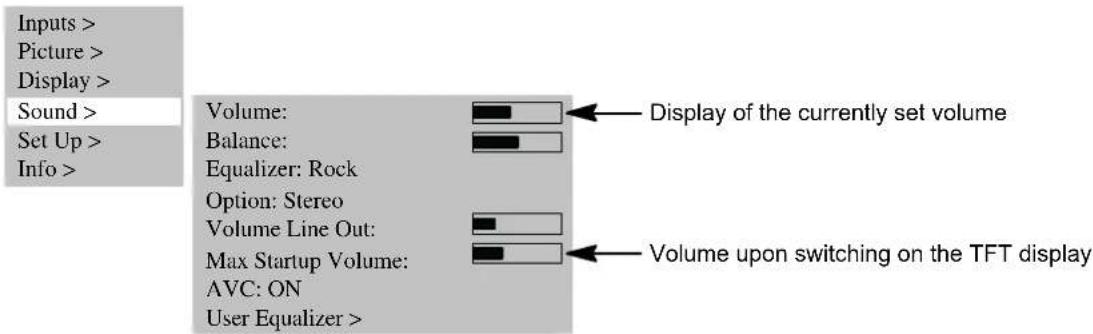
text_image
Inputs > Picture > Display > Sound > Set Up > Info > Volume: Balance: Equalizer: Rock Option: Stereo Volume Line Out: Max Startup Volume: AVC: ON User Equalizer > Display of the currently set volume Volume upon switching on the TFT displaySOUND SETTING
Against the menu option EQUALIZER you can set predefined acoustic patterns.
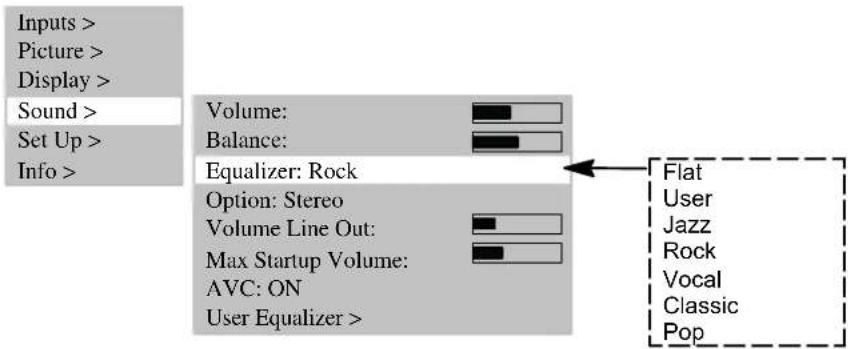
text_image
Inputs > Picture > Display > Sound > Set Up > Info > Volume: Balance: Equalizer: Rock Option: Stereo Volume Line Out: Max Startup Volume: AVC: ON User Equalizer > Flat User Jazz Rock Vocal Classic PopSelect the menu option USER EQUALIZER to create your individual acoustic pattern.
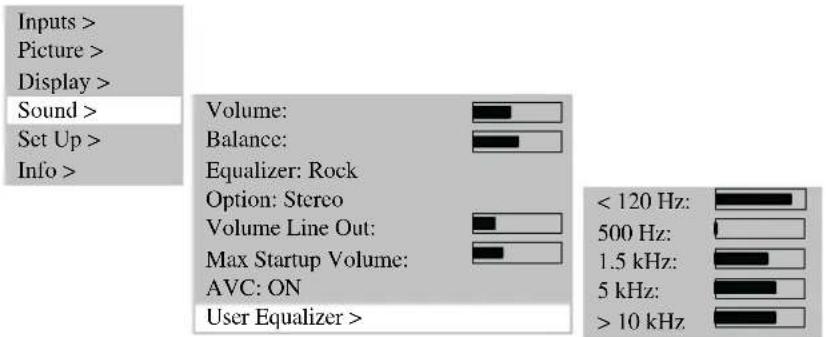
text_image
Inputs > Picture > Display > Sound > Set Up > Info > Volume: Balance: Equalizer: Rock Option: Stereo Volume Line Out: Max Startup Volume: AVC: ON User Equalizer > < 120 Hz: 500 Hz: 1.5 kHz: 5 kHz: > 10 kHzVOLUME OFF
Press the button 📋 on the remote control. The volume is turned off and the following info window appears on the display for approx. 3 seconds:
TUNER: 2 ZDF MUTE
The sound is switched back on, when you press the button ⏻, ◀ (Vol -) or ▶ (Vol +) on the remote control. The following info window appears on the display for approx. 3 seconds:
TUNER: 2 ZDF STEREO
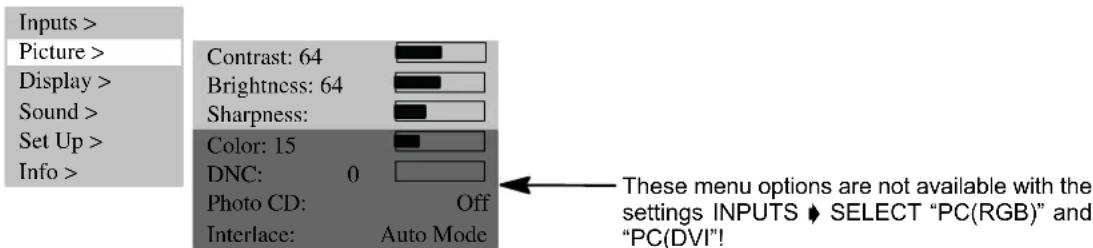
5.3 Setting the picture
You have the option of setting the contrast, brightness, picture sharpness and colour to the desired values.
CONTRAST / BRIGHTNESS / PICTURE SHARPNESS / COLOUR
Press button ▲ to increase the values or ▼ to reduce the values.
●Display of the picture can be improved with the setting PICTURE SHARPNESS.
- Menu option COLOUR allows the colour balance to be changed:
Press button ▲, the picture becomes greener. Press button ▼, the picture becomes redder.
text_image
Inputs > Picture > Display > Sound > Set Up > Info > Contrast: 64 Brightness: 64 Sharpness: Color: 15 DNC: 0 Photo CD: Off Interlace: Auto Mode These menu options are not available with the settings INPUTS ➔ SELECT "PC(RGB)" and "PC(DVI)!PICTURE FORMAT
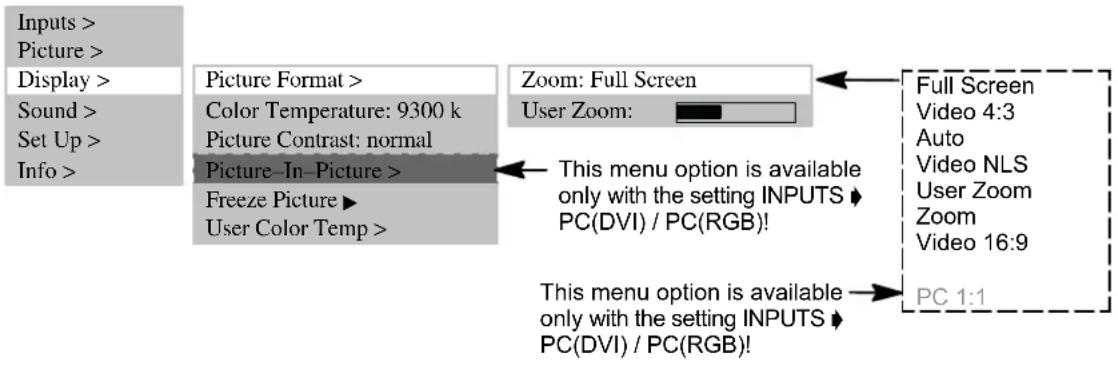
In the menu option DISPLAY ➤ FORMAT ➤ ZOOM you can select the preset formats.
The menu option USER ZOOM offers you the option of creating your own user format. To activate your user format, select the USER ZOOM in the menu option ZOOM.
●Full screen
In this format setting the picture is adapted in horizontal and vertical directions so that a full screen display is always visible.
-Video 4:3
This format setting displays a PAL 4:3 picture with the correct aspect ratio. Dark stripes are visible on the left and right-hand side of the picture.
●Auto
This format setting always scales the input signal automatically in horizontal and vertical directions to a full screen display. It recognizes 16:9 film formats and scales them with the predetermined factors.
-Video NLS
This format setting scales the input signal automatically in horizontal and vertical directions so that it is screen-filling, but not linearly, i.e. the picture contents in the centre of the screen are displayed as the original and towards the edges more intense scaling takes place.
-User zoom
With this format setting you can display an individual picture format within the range 40 % to 140 % of the original picture size.
- Zoom
Manual changeover from the size setting video 4:3 to zoom stretches the picture in vertical and horizontal directions by approx. 20 % beyond the full screen display. Due to this, when viewing films in 4:3 format, the dark stripes are reduced at the top and bottom edges of the picture.
●Video 16:9
This format setting displays a PAL 4:3 picture so that no dark stripes are visible on the right or left-hand sides of the picture.
To change over the formats, repeatedly press button F ⊕ on the remote control.
text_image
Inputs > Picture > Display > Sound > Set Up > Info > Picture Format > Color Temperature: 9300 k Picture Contrast: normal Picture-In-Picture > Freeze Picture ▶ User Color Temp > Zoom: Full Screen User Zoom: This menu option is available only with the setting INPUTS ▶ PC(DVI) / PC(RGB)! This menu option is available only with the setting INPUTS ▶ PC(DVI) / PC(RGB)! Full Screen Video 4:3 Auto Video NLS User Zoom Zoom Video 16:9 PC 1:15.4 Television mode
The TFT display is in standby mode.
To switch on, press one of the numeric buttons 0...9 or the TV button on the remote control.
- During initialization the company logo is displayed.
- Then the television channel last selected (programme number) appears on screen. At the same time the following info window is displayed for approx. 3 seconds:
TUNER: 2 ZDF STEREO
Press the button P▲or P▼ to increase or reduce the programme number by 1 at a time.
- You can directly select each programme number with the numeric buttons on the remote control.
TELETEXT
Your TFT display can receive and display TOP/FLOF teletext information.
Select a television channel with teletext.
Press the button TEXT on the remote control to display the teletext.
- For the direct selection of teletext pages use the numeric buttons.
- The red, green, yellow and blue buttons on the remote control have different functions depending on the type of teletext, these being displayed in the lower area of the teletext.
5.5 PC mode
Switch off the TFT display and the PC.
Connect your PC and the TFT display by means of a video cable, which is commonly available in the retail trade (DVI plug to display and HD-Sub connector to PC).
Switch ON the TFT display and PC again.
- PC (RGB) must be set in the menu option INPUTS SELECT. Upon switching on, the TFT display automatically detects the picture format set on the PC. This information is displayed in an info window.
RGB-1024x 768 Full picture
5.6 Operation with additional devices
VIDEO RECORDER
Switch OFF the TFT display and video recorder.
There are 3 possibilities for connecting your video recorder to the TFT display:
- via the aerial lead, read the operating instructions for the video recorder on this subject
- by means of a scart cable either to SCART1 or SCART2
- if your video recorder has an S-video output, connect this to the Y/C input.
Switch the TFT display and video recorder back ON.
To switch over to the connected input (e.g. SCART1) press repeatedly the VIDEO button on the remote control.
SCART 1 Full screen
DVD PLAYER
Switch OFF the TFT display and DVD player.
- Connect your DVD player by means of SCART1 or the Y/C input, if it has an S-video output socket.
Switch the TFT display and DVD player back ON.
To switch over to the connected input, press the VIDEO button on the remote control.
YC Full screen
5.7 Special functions
MANUAL CHANNEL SEARCH
Against the menu option CHANNELS you enter a programme number that is not yet in use.
In the menu option FREQUENCY you must directly enter the frequency of the television channel that you are searching for.
- If the picture is not optimal, in small increments increase or reduce the frequency entered.
- If the television station does not transmit a name, you can enter one under the menu option NAME.

flowchart
graph LR
    A["Inputs >"] --> B["Select: TUNER"]
    C["Picture >"] --> D["Source Settings > Auto Search >"]
    E["Display >"] --> D
    F["Sound >"] --> D
    G["Set Up >"] --> H["Manual Search >"]
    I["Info >"] --> J["Sort >"]
    I --> K["Delete >"]
    L["Programme: 11"] --> M["TV Standard: PAL BG"]
    L --> N["Frequency: 168.25 MHz"]
    L --> O["Name: HR"]
COLOR TEMPERATURE
You can select the colour temperature from 3 predefined values or define a value yourself via the menu option USER COLOR TEMPERATURE.
A lower value of the color temperature increases the proportion of red in the picture and gives it a "warmer" appearance. The proportion of blue light increases with an increasing colour temperature, the picture has a "colder" effect.

flowchart
graph TD
    A["Inputs >"] --> B["Picture >"]
    B --> C["Display >"]
    C --> D["Sound >"]
    D --> E["Set Up >"]
    E --> F["Info >"]
    G["Picture Format"] --> H["Color Temperature: 9300 k"]
    G --> I["Picture Contrast: normal"]
    G --> J["Picture-In-Picture"]
    G --> K["Freeze Picture"]
    G --> L["User Color Temp"]
    M["7500K"] --> N["9300K"]
    M --> O["11000K"]
    P["Users"] --> Q["User"]
    R["Inputs >"] --> S["Picture >"]
    S --> T["Display >"]
    T --> U["Sound >"]
    U --> V["Set Up >"]
    V --> W["Info >"]
    X["Picture Format"] --> Y["Color Temperature: 9300 k"]
    X --> Z["Picture Contrast: normal"]
    X --> AA["Picture-In-Picture"]
    X --> AB["Freeze Picture"]
    X --> AC["User Color Temp"]
    AD["Red: 128 Green Blue: 110"] --> AE["Blue: 110"]
STILL PICTURE
You can create a still picture with the FREEZE button or under the menu option FREEZE PICTURE.

text_image
Inputs > Picture > Display > Sound > Set Up > Info > Picture Format > Color Temperature: 9300 k Picture Contrast: normal Freeze Picture ▶ User Color Temp >PICTURE-IN-PICTURE
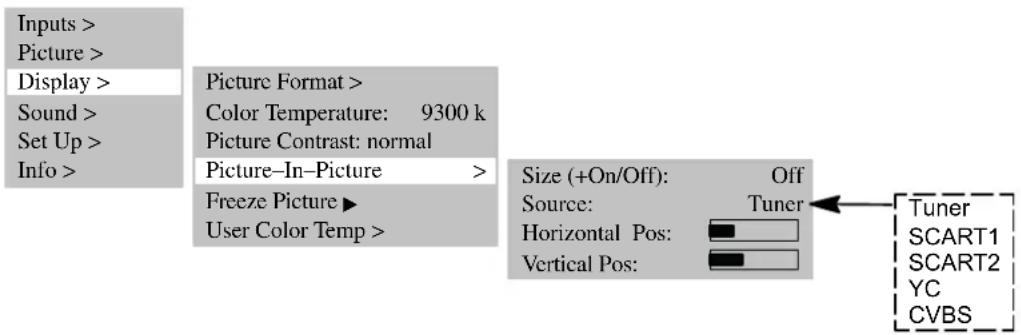
The function PICTURE-IN-PICTURE provides the possibility when displaying PC signals of superimposing video pictures.
- The menu option PICTURE-IN-PICTURE is superimposed only with the settings INPUTS ➕ SOURCE ➕ PC(DVI) / PC(RGB) or the PIP button is active.
Press the PIP button, the picture from the input set in menu option DISPLAY ◆ PICTURE-IN-PICTURE ◆ SOURCE (e.g. tuner) is superimposed on the current picture.
- If no signal is pending at this input port, the superimposed window remains dark.
- Position and size of the window can be set. To activate your individual settings, you must set the menu option SIZE to ON.
text_image
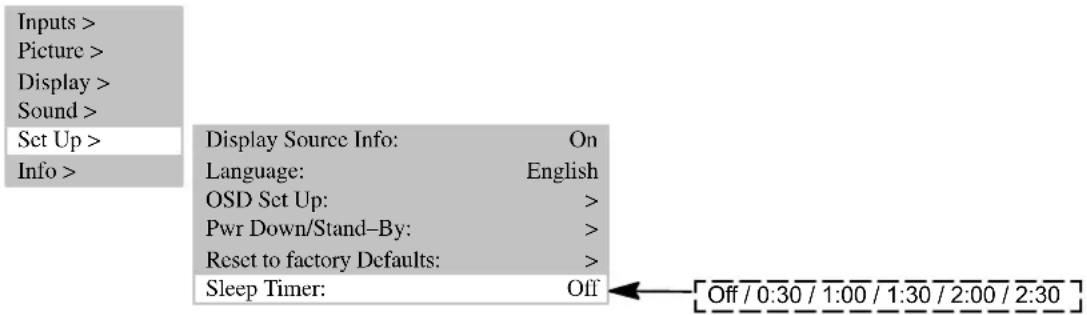
Inputs > Picture > Display > Sound > Set Up > Info > Picture Format > Color Temperature: 9300 k Picture Contrast: normal Picture-In-Picture > Freeze Picture ▶ User Color Temp > Size (+On/Off): Off Source: Tuner Horizontal Pos: Vertical Pos: Tuner SCART1 SCART2 YC CVBSAUTOMATIC SWITCH-OFF
You can set the TFT display so that it is switched off automatically after a certain amount of time.
In the menu option SLEEP TIMER select one of the predetermined times.
- Upon expiry of the time period the TFT display is switched off automatically.
text_image
Inputs > Picture > Display > Sound > Set Up > Info > Display Source Info: On Language: English OSD Set Up: > Pwr Down/Stand-By: > Reset to factory Defaults: > Sleep Timer: Off Off / 0:30 / 1:00 / 1:30 / 2:00 / 2:30SWITCHING OVER TO DUAL CHANNEL SOUND
Dual channel sound is the designation for films giving the viewer the possibility of changing between the synchronized version and the original language.
If films are transmitted with dual channel sound, channel A is active first of all.
Press the button M/S on the remote control to switch over to channel B.
6. Troubleshooting
If a defect occurs when using your TFT display, please read through the following list of defects and remedies before you send in your appliance for repair. You may be able to remedy the defect yourself very easily. For example, if the mains plug of the display is not plugged into the plug receptacle or if there are problems with the receiver system (aerial), you could mistakenly assume that the screen display is defective.

If the information provided for troubleshooting does not prove successful, switch OFF the unit via the mains switch and pull the mains plug out of the plug receptacle.
Never attempt to repair the unit yourself and under no circumstances should you remove the rear cover from the unit.
| DEFECT POSSIBLE CAUSE POSSIBLE REMEDY | ||
| No picture and no sound, although the mains plug is inserted and the unit is switched on. | ●Mains switch in position “0” (OFF).●Mains plug of unit is not inserted into the socket.●Defective mains cable. | ●Shift mains switch to position “I”.●Insert the mains cable plug into the socket.●Call the service hotline. |
| Screen dark. | ●Contrast setting too low.●No input signal, wrong input selected. | ●Set brightness and/or contrast correctly.●Check the connection cable; assign correct input to source. |
| Weak or excessive colours. | ●Colour not correctly set.●Connection cable not correctly connected. | ●Set the colour (under menu option PICTURE).●Connect the cable correctly. |
| The picture is cut off or the picture is not centred. | ● Picture position not correctly set. | ● Correct the picture position. |
| The picture is too large or too small. | ● Picture format set wrongly. | ● Repeatedly press button F⊕ until picture is displayed as full screen. |
| The remote control is not working. | ●The batteries are flat.●There is an obstruction between the remote control and the sensor.●The remote control is located outside of its operating range. | ●Insert the new batteries.●Remove the obstruction between the remote control and the sensor.●Operate the remote control within the specified range. |
| The displayed picture is too dark. | ● The picture quality is not set correctly. | ● Correct the picture brightness and contrast. |
| The picture is displayed, but there is no sound. | ●Volume off is switched on.●Set volume to minimum. | ●Press the 📋button on the remote control.●Increase the volume. |
| Individual letters are not displayed (PC mode). | ●Set the phase correctly.●Check the setting for the picture width.●Execute auto-adjust. | |
| Horizontal stripes with TV or video signals. | ●Signal source is set up before the display.●Screening of the video cable is insufficient. | ●Always place the signal sources on the side of or behind the display.●Use only a high-grade signal cable with a high screening attenuation. |
| To put all settings back to basic status, use the menu option SETTINGS ♦ CALL DEFAULT SETTINGS! | ||
Temperature warning
If the TFT display overheats, a red warning window is displayed in the top left corner of the display (see Fig. on left). If you do not then provide suitable ventilation, the display may be switched automatically to standby mode.
7. Technical specifications
DISPLAY
| Size / diagonal: 75 cm (30"), 15:9 format | |
| Active screen size: 643 mm (horizontal) x 386 mm (vertical) | |
| Resolution: 1280 x 768 pixels | |
| Colour display: 16.7m colours simultaneously | |
| Viewing angle: 170° typical | |
| Contrast ratio: 500:1 typical | |
| Luminance: 450 cd/m | ^2 typical |
| Response time: 25 ms | |
| Pixel defect: | light and dark dots in minimum distance b |
VIDEO STANDARDS
| TV / Video: PAL (BG, I, DK/K', M, L/L') / SECAM / NTSC |
| TV tuner: PAL / SECAM, 47 - 861 MHz (VHF, UHF, Hyperband) |
| PALplus, Cinescope: Automatic format detection (full screen) |
| Formats: 4:3, 16:9, Video NLS, full screen, zoom, user zoom (40%-140%) |
PC FREQUENCY RANGE
| Horizontal frequency: | 30 - 80 kHz |
| Vertical frequency: | 50 - 90 Hz |
| Clock frequency: | max. 140 MHz |
| Resolutions: | DOS: 640 x 480 @ 60 Hz, 720 x 400 @ 70 Hz,VGA: 640 x 480, SVGA: 800 x 600; XGA: 1024 x 768 50 Hz - 90 HzWXGA: 1280 x 768 @ 60 Hz,SXGA: 1280 x 1024 50 - 75 Hz |
| Recommended resolution: | 1280 x 768 @ 60 Hz |
Formats: 1:1, full screen, format-filling, zoom, user zoom
INPUTS / CONNECTIONS / SYNCHRONIZATION
| PC / Video input port: | RBG analogue and automatic sync detection | |
| Video connectors | TV tuner: | IEC, 75 ohms input resistance |
| SCART1: | RGB, CVBS input, CVBS output, | |
| SCART2: | CVBS input, CVBS output, | |
| SCART1/SCART2: | Audio input/output | |
| CVBS: | RCA cinch | |
| Y/C: | MiniDIN (HOSIDEN) | |
| PC analogue/digital connections: | DVI-I | |
| Audio connectors | Integrated loudspeakers: | 2 x 2 broadband with 2 x 7 W sinusoidal |
| Stereo input: 3 x cinch 1 Vrms (CVBS, Y/C, PC), | ||
| 2 x SCART 1 Vrms | ||
| Stereo output: | 1 x cinch, controllable | |
| Synchronization: | Sync on green, composite sync with automatic detection, Separate H and V sync | |
| Operator controls: | Mains switch, IR remote control (OSD menu 6 languages) | |
| OPERATING CONDITIONS | ||
| Temperature: | 5 °C - +35 °C (in operation), -20 °C - +60 °C (storage) | |
| Air humidity: | 20 % - 85 % (non-condensating) | |
| Elevation: | max. 2,000 m (7,000 ft) | |
| DATA MAINS CONNECTION | ||
| Voltage supply: | 220 V - 240 V AC | |
| Mains frequency: | 50 Hz ± 10 % | |
| Power consumption: | 140 W typical, 5 W in standby mode | |
| DIMENSIONS AND WEIGHT | ||
| Display H x W x D: | 535 mm x 870 mm x 140 mm | |
| Weight: | 17 kg | |
Table des matières
- Normes ...... 2
- Remarques importantes .... 2
- Aperçu 4
text_image
Antenna Connection TV antenna - signaltext_image
SCART 2 Connection VCR/VTR or DVD player SAT tunertext_image
PC PC DVI-I PC Connection PCtext_image
ANTENNA Connection TV antenna - signaltext_image
SCART 2 Connection VCR/VTR or DVD player SAT tunertext_image
PC DVI-I PC Connection PCBÚSQUEDA DE PROGRAMA MANUAL
text_image
Diagram showing a device rear panel with labeled components including SCARTs, audio/ground lines, and video output ports.text_image
ANTENNA Connection TV antenna - signaltext_image
SCART 2 12:35 Connection VCR/VTR or DVD player SAT tunertext_image
PC DVI-I PC Connection PCH Freq.: 60.0 kHz
V Freq.: 75.0 Hz
Orol. pixel 78.75 MHz
H / V Pol: + / -
RICERCA DEI PROGRAMMI MANUALE
text_image
Diagram of an electronic device rear panel with labeled ports and a lightning bolt pointing to a central display unit.[23] PIP toets (picture-in-picture)
text_image
ANTENNA Connection TV antenna - signalflowchart
graph TD
    A["SCART 2"] --> B["Connection VCR/VTR or DVD player SAT tuner"]
    A --> C["Sat tuner"]
text_image
PC DVI-I PC Connection PCtext_image
Diagram of an electronic device rear panel with labeled ports and a lightning bolt pointing to a central display unit.[1] SCART 2 - f.eks. tilslutning for videorecorder
[2] S-VIDEO (Y/C) - f.eks. tilslutning for Camcorder med S-Video stik
[3] SERIAL - RS232 grænseflade for servicefunktioner
[4] PC DVI-I - PC-tilslutning (RGB ved analoge signaler, DVI ved digitale signaler)
[5] AUDIO IN PC - f.eks. tilslutning for PC med Line-Out stik
[6] OUT LINE - f.eks. tilslutning for audioforstærker eller DVD-receiver
[7] AUDIO IN CVBS - f.eks. tilslutning for Camcorder med Video-Out stik
[8] AUDIO IN VIDEO - f.eks. tilslutning for Camcorder med S-Video stik
[9] ANTENNA -tilslutning for TV-antennesignal (luftantenne eller kabeltilslutning)
[10] CVBS - f.eks. tilslutning for Camcorder med Video-Out stik
[11] SCART 1 - f.eks. tilslutning for satellitmodtager
[2] Programknapper 1-9, 0
[3] M-knap (memo), rød
[4] Grøn knap
[5] Blå knap
[6] Gul knap
[7] Knap for programvalg, opad
[8] Menu-knap
text_image
ANTENNA Connection TV antenna - signalNår der tilsluttes til kabel-TV eller til luftantenne, anvendes indgangen ANTENNA.
- Satellitmodtager
flowchart
graph TD
    A["SCART 2"] --> B["Video Player"]
    B --> C["Sat Tuner"]
    style A fill:#f9f,stroke:#333
    style B fill:#ccf,stroke:#333
    style C fill:#cfc,stroke:#333
text_image
PC DVI-I PC Connection PCtext_image
Inputs > Picture > Display > Sound > Set Up > Info > Select: PC (RGB) Source Settings > H freq.: 60.0 kHz V freq.: 75.0 Hz Pixel Clk: 78.75 MHz H / V Pol: + / - User timings > Auto Setup ▶ V Pos: V Size: H Size: H Pos: Phasetext_image
Inputs > Picture > Display > Sound > Set Up > Info > Select: PC (RGB) Source Settings > H freq.: 60.0 kHz V freq.: 75.0 Hz Pixel freq. 78.75 MHz H / V pol: + / - User timings > Auto alignment V pos: V size: H size: H pos: Phase Position: 1 Recall ▶ Save ▶ Delete All ▶5. Normal betjening
5.1 Tænd / sluk
TÆND
INDSTLLING AF LYDSTYRKE
RGB-1024x 768 Full picture
MANUEL PROGRAMS∅GNING
text_image
Inputs > Picture > Display > Sound > Set Up > Info > Format > Colour temperature: 9300 k Contrast: normal Picture In Picture > Still picture ▶ User colour temperature > Size (+On/Off): Off Source: Tuner Horizontal Pos : Vertical Pos : Tuner SCART1 SCART2 YC CVBSAUTOMATISK SLUKNING
text_image
Diagram showing a device rear panel with labeled components and an arrow pointing to a central display board with numbered labels.text_image
ANTENNA Connection TV antenna - signaltext_image
SCART 2 10:35 Connection VCR/VTR or DVD player SAT tunertext_image
PC DVI-I PC Connection PCSelect: PC (RGB)
Source Settings >
FUNÇÃO DE AUTO-AJUSTE
Select: PC (RGB)
Source Settings >
text_image
H freq.: 60.0 kHz V freq.: 75.0 Hz Pixel Clk: 78.75 MHz H / V Pol: + / - User timings > Auto Setup ▶ V Pos: V Size: H Size: H Pos: PhaseSelect: PC (RGB)
Source Settings >
text_image
H freq.: 60.0 kHz V freq.: 75.0 Hz Pixel Clk: 78.75 MHz H / V Pol: + / - User timings > Auto Setup ▶ V Pos: V Size: H Size: H Pos: PhasePosition: 1
Recall ▶
Save ▶
Delete All ▶
BUSCA MANUAL DE PROGRAMAS
text_image
Diagram of an electronic device rear panel with labeled ports and a lightning bolt pointing to a central control panel.text_image
ANTENNA Connection TV antenna - signaltext_image
SCART 2 10:21 Connection VCR/VTR or DVD player SAT tunertext_image
PC PC DVI-I PC Connection PCtext_image
Inputs > Picture > Display > Sound > Set Up > Info > Select: PC (RGB) Source Settings > H freq.: 60.0 kHz V freq.: 75.0 Hz Pixel Clk: 78.75 MHz H / V Pol: + / - User timings > Auto Setup ▶ V Pos: V Size: H Size: H Pos: Phasetext_image
Inputs > Picture > Display > Sound > Set Up > Info > Select: PC (RGB) Source Settings > H freq.: 60.0 kHz V freq.: 75.0 Hz Pixel Clk: 78.75 MHz H / V Pol: + / - User timings > Auto Setup ▶ V Pos: V Size: H Size: H Pos: Phase Position: 1 Recall ▶ Save ▶ Delete All ▶5. Normal betjening
5.1 Slå på / av
TENN
TFT-skjermen blir slått på när strømbryteren settes i posisjon "I".
- STANDBY-LED-en ved den infrarøde føleren lyser rødt.
Når du nå trykker på en av tall-tastene på fjernkontrollen, slår du på TFT-skjermen.
- DRIFT-LED-en ved den infrarøde føleren lyser grønt.
SLÅ AV
INNSTILLING AV VOLUM
text_image
Diagram of an electronic device rear panel with labeled ports and a lightning bolt pointing to a central display unit.text_image
ANTENNA Connection TV antenna - signaltext_image
SCART 2 Connection VCR/VTR or DVD player SAT tunertext_image
PC PC DVI-I PC Connection PCtext_image
Inputs > Picture > Display > Sound > Set Up > Info > Select: PC (RGB) Source Settings > H freq.: 60.0 kHz V freq.: 75.0 Hz Pixel Clk: 78.75 MHz H / V Pol: + / - User timings > Auto Setup ▶ V Pos: V Size: H Size: H Pos: Phasetext_image
Inputs > Picture > Display > Sound > Set Up > Info > Select: PC (RGB) Source Settings > H freq.: 60.0 kHz V freq.: 75.0 Hz Pixel Clk: 78.75 MHz H / V Pol: + / - User timings > Auto Setup ▶ V Pos: V Size: H Size: H Pos: Phase Position: 1 Recall ▶ Save ▶ Delete All ▶5. Vanliga funktioner
5.1 Till- / fränkoppling
TILLKOPPLING
text_image
Stand-by-knapp 1 2 3MANUELL PROGRAMSÖKNING
text_image
painike Vol - painike Vol + painike Vol + painike P▲ painike P▼ Stand-By-painiketext_image
ANTENNA Connection TV antenna - signaltext_image
SCART 2 12:00 Connection VCR/VTR or DVD player SAT tunertext_image
PC DVI-I PC Connection PCtext_image
Inputs > Picture > Display > Sound > Set Up > Info > Select: PC (RGB) Source Settings > H freq.: 60.0 kHz V freq.: 75.0 Hz Pixel Clk: 78.75 MHz H / V Pol: + / - User timings > Auto Setup V Pos: V Size: H Size: H Pos: Phasetext_image
Inputs > Picture > Display > Sound > Set Up > Info > Select: PC (RGB) Source Settings > H freq.: 60.0 kHz V freq.: 75.0 Hz Pixel Clk: 78.75 MHz H / V Pol: + / - User timings > Auto Setup V Pos: V Size: H Size: H Pos: Phase Position: 1 Recall ▶ Save ▶ Delete All ▶text_image
Stand-By-painike 1 2 35.2 Äänen säätö
ÄÄNENVOIMAKKUUDEN SÄÄTÖ
Manual Search >
Sort > Delete >

Programme: 11
TV Standard: PAL BG
Frequency: 168.25 MHz
Name: HR