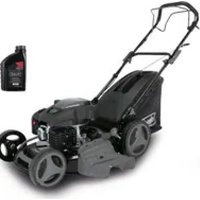
MR19661 - Lawn mower SCHEPPACH - Free user manual and instructions
Find the device manual for free MR19661 SCHEPPACH in PDF.
| Product type | Ride-on lawn mower |
| Brand | Scheppach |
| Model | MR19661 |
| Engine type | 4-stroke engine, air-cooled |
| Displacement | 196 cm³ |
| Power | 4.8 kW (6.5 hp) |
| Engine speed | 3000 rpm |
| Fuel | Unleaded petrol (max 5% bioethanol) |
| Fuel tank capacity | 1.0 L |
| Engine oil | SAE 30 / 10W40 |
| Oil sump capacity | 0.6 L |
| Cutting width | 61 cm |
| Cutting height | 35 to 75 mm |
| Cutting height adjustment | 5 levels |
| Grass catcher volume | 150 L |
| Forward speeds | 4 (1.5 / 2.0 / 3.0 / 4.6 km/h) |
| Reverse speed | 2.3 km/h |
| Weight | 115 kg |
| Front wheels | 10x4.00-4, pressure 1.3 bar |
| Rear wheels | 13x5.00-6, pressure 1.8 bar |
| Battery | Lead-acid 12 V, 7 Ah |
| Guaranteed sound power level | 98 dB(A) |
| Safety devices | Parking brake, ignition switch, engine stop, anti-tip protection |
| Routine maintenance | Oil change, air filter cleaning, spark plug check, blade sharpening |
| Wear parts | Blade, V-belt, battery, spark plug, filters, tires |
Frequently Asked Questions - MR19661 SCHEPPACH
User questions about MR19661 SCHEPPACH
0 question about this device. Answer the ones you know or ask your own.
Ask a new question about this device
Download the instructions for your Lawn mower in PDF format for free! Find your manual MR19661 - SCHEPPACH and take your electronic device back in hand. On this page are published all the documents necessary for the use of your device. MR19661 by SCHEPPACH.
USER MANUAL MR19661 SCHEPPACH
natural_image
Black electric mobility scooter with visible branding and a QR code (no text or symbols on the vehicle itself)
text_image
https://www.scheppach.com/de/service scheppachMR196-61
| DE | AufsitzrasenmäherOriginalbedienungsanleitung | 13 |
| GB | Riding lawn mowerTranslation of original instruction manual | 36 |
| FR | Tacteur a gazonTraduction des instructions d'origine | 56 |
| IT | Rasaerba con conducente sedutoTraduzione delle istruzioni originali | 78 |
| ES | Tractor cortacésped con asientoTraducción de las instrucciones originales de funcionamiento | 100 |
text_image
19/6cc 20 19 18 24 Soblyned
text_image
22 21 17 16
natural_image
Close-up of a mechanical device with labeled component '23' (no readable text or symbols beyond label)3
4
text_image
hijk lm n o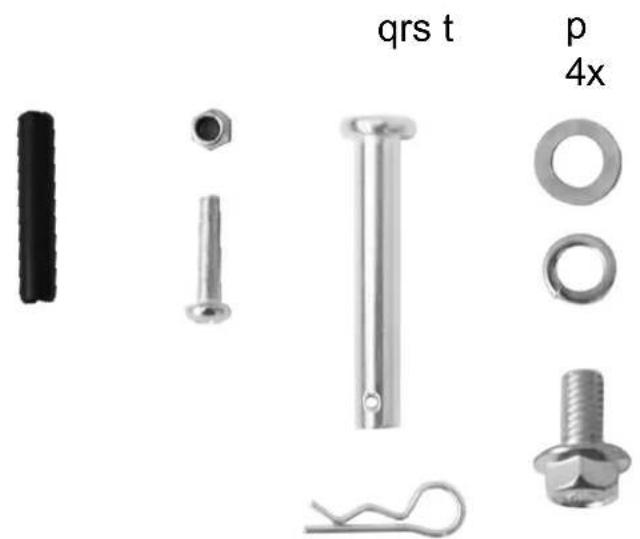
text_image
qrs t p 4x
natural_image
Close-up of a vehicle tire mounted on a vehicle chassis, with a tool inserted and an arrow pointing to the wheel (no visible text or symbols)
text_image
6 p 4x
text_image
7 e →
text_image
8 r
text_image
9 d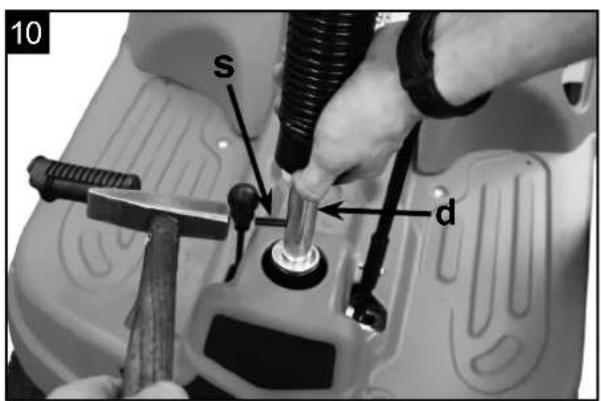
text_image
10 s d
natural_image
Close-up of a mechanical component with arrows indicating movement or force direction (no text or symbols visible)
natural_image
Close-up of a mechanical component with arrows pointing to a detail (no visible text or symbols)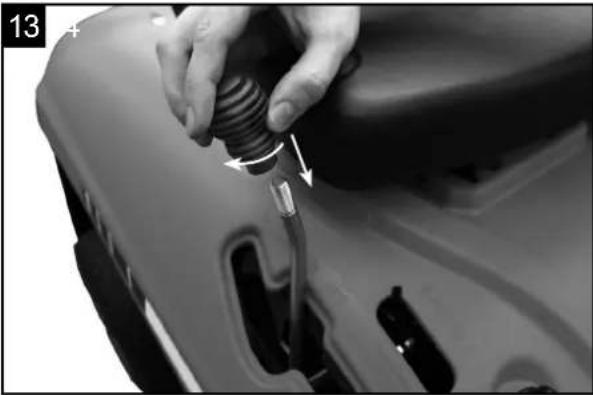
natural_image
Close-up of a car hood with a hand adjusting a spring component, showing no text or symbols
text_image
max. min.
natural_image
Close-up of hands performing maintenance on a mechanical component, with an inset showing a tool and a numbered label '15 16' (no readable text or symbols)
natural_image
Close-up of a mechanical component with a labeled inset showing a hanging hook and a tool, no readable text or symbols present.
natural_image
Close-up of a mechanical assembly with visible gears and springs (no text or symbols)
natural_image
Close-up of a person adjusting a mechanical component with directional arrows (no visible text or symbols)
natural_image
Close-up of a mechanical engine component with visible fan and valve (no text or symbols)
natural_image
Close-up of a car's front engine compartment showing internal components and a spring-loaded housing (no text or symbols visible)
text_image
21 196-cc 10 STOP Z ON START steeprock
text_image
22 196cc 8 6 P
text_image
23 24 6 STOP 8
text_image
196-cc 11
text_image
25 26 12 796cc 4 3 2 1 R N
text_image
5 0
text_image
27 1 35mm 2 40mm 3 65mm 4 80mm 5 75mm 2 GOXX
natural_image
Close-up of a hand using a screwdriver to adjust or install a component on a vehicle (no visible text or symbols)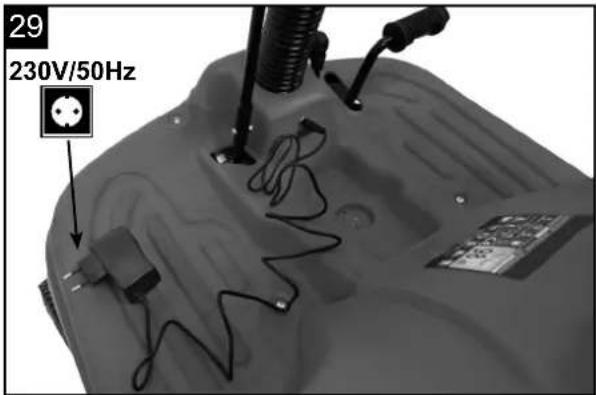
text_image
29 230V/50Hz
text_image
30 31 - + +
text_image
Diagram of a medical or laboratory procedure showing labeled connectors with annotations (- and +)
natural_image
Close-up of a hand adjusting a mechanical component with a tool, no visible text or symbols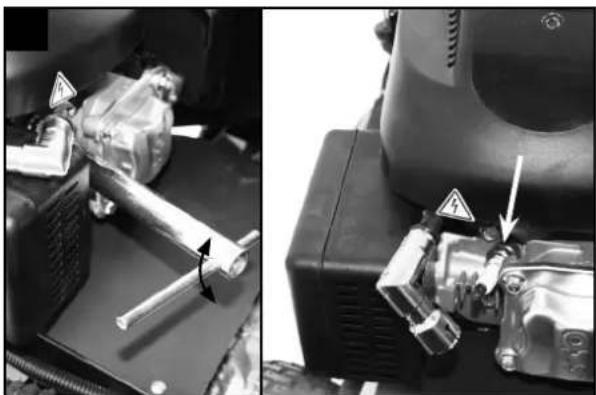
natural_image
Close-up of mechanical components with warning symbols, no visible text or labels
text_image
34 10 A
natural_image
Close-up of a grassy tractor chassis with visible motors, tires, and structural components (no text or symbols)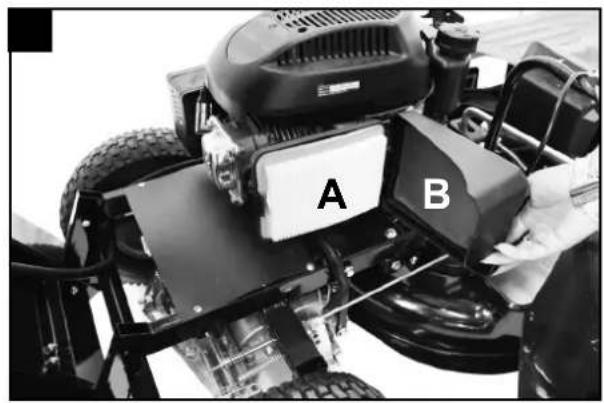
natural_image
Close-up of a small wheeled vehicle with labeled components A and B, showing mechanical parts and wiring (no readable text beyond labels)
natural_image
Silhouette of a person riding a motorized electric scooter with a bag open, no text or symbols visible
natural_image
Person installing or adjusting a car body panel, no visible text or symbols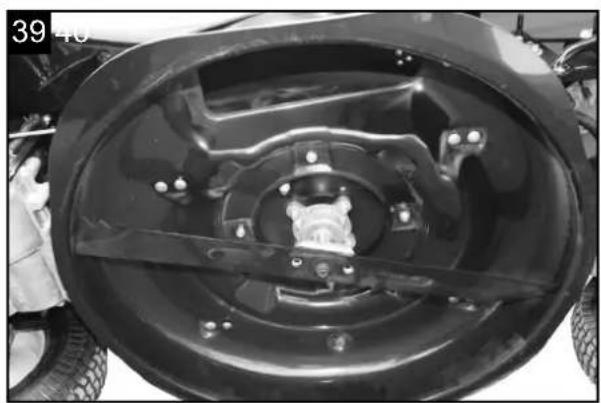
natural_image
Close-up of a mechanical component with visible gears and mounting holes (no text or symbols)
text_image
E D CGünzburger Straße 69
D-89335 Ichenhausen
Verehrter Kunde,
text_image
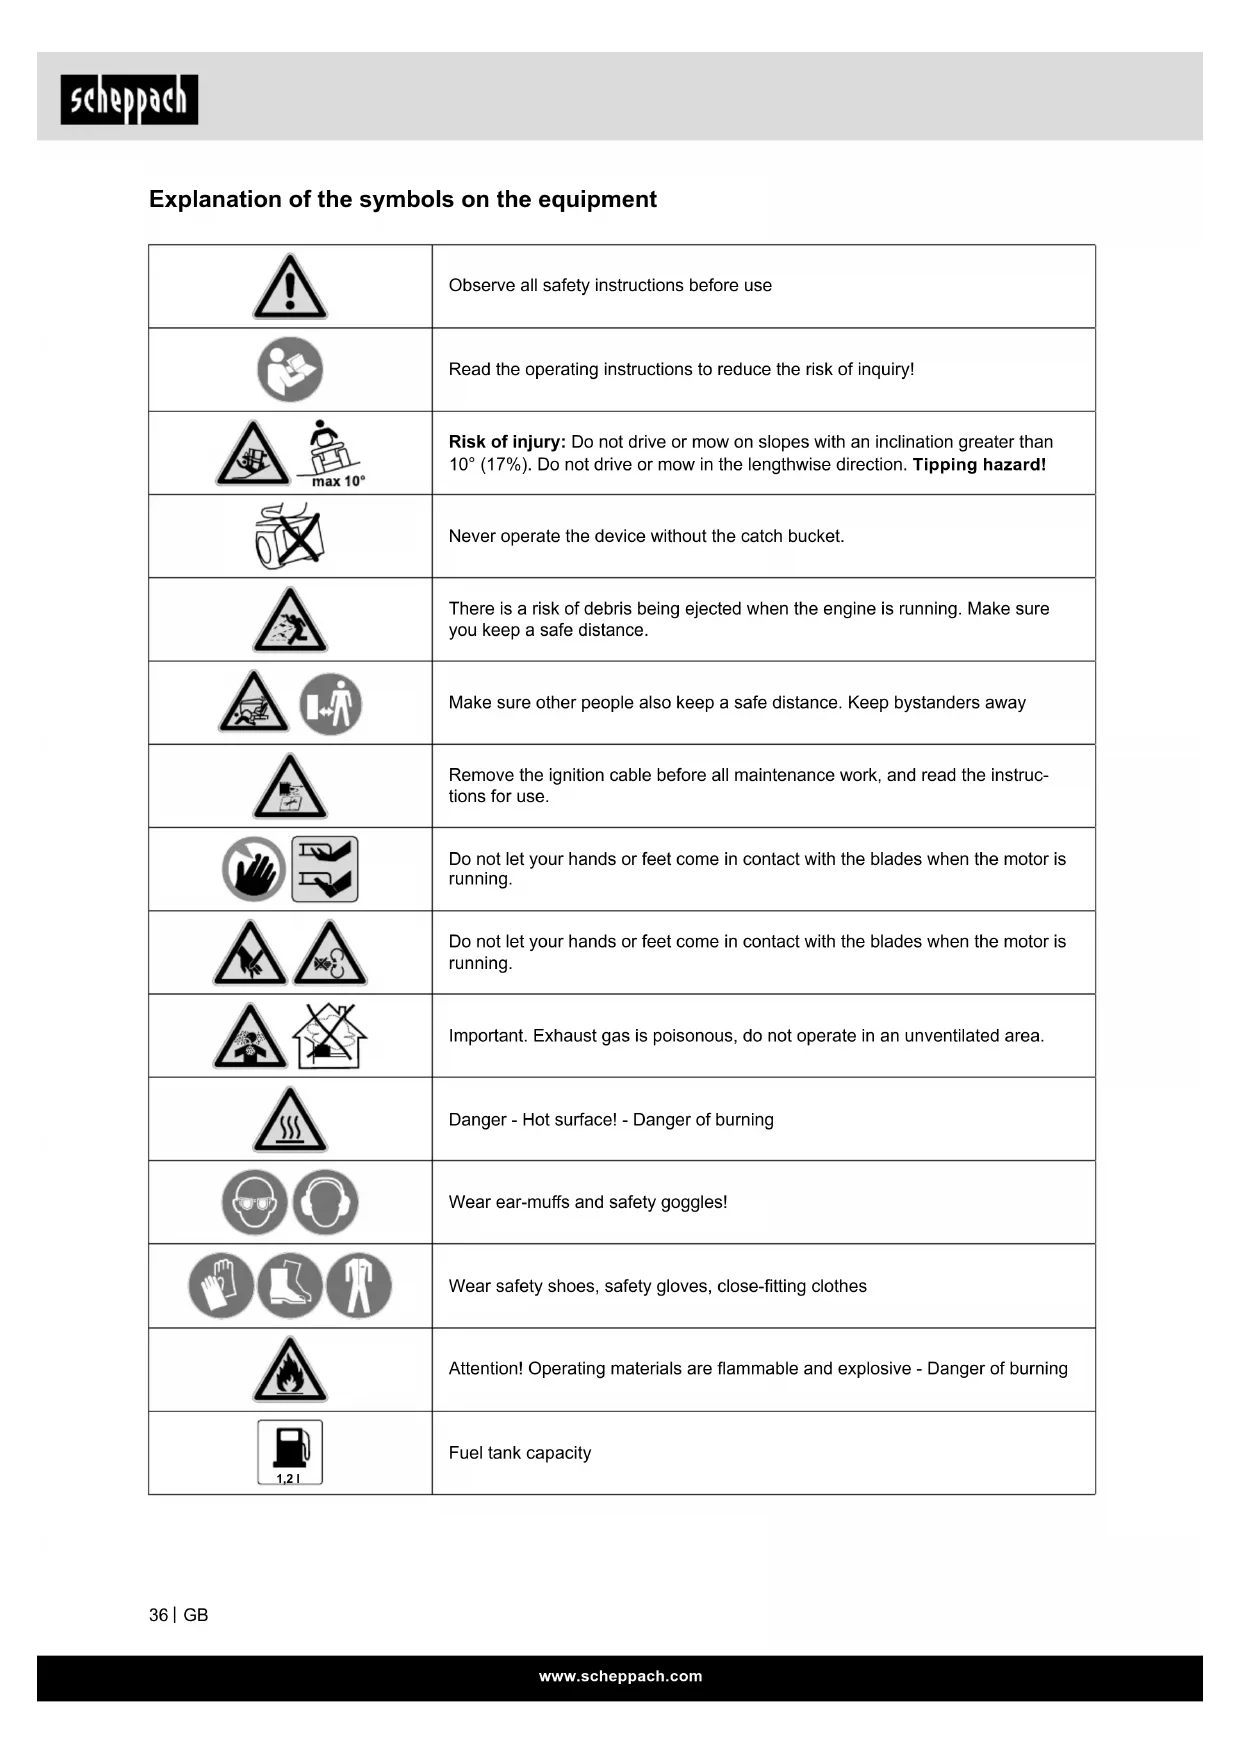
https://www.scheppach.com/de/service scheppachExplanation of the symbols on the equipment
 | Observe all safety instructions before use |
 | Read the operating instructions to reduce the risk of inquiry! |
 | Risk of injury: Do not drive or mow on slopes with an inclination greater than 10° (17%). Do not drive or mow in the lengthwise direction. Tipping hazard! |
 | Never operate the device without the catch bucket. |
 | There is a risk of debris being ejected when the engine is running. Make sure you keep a safe distance. |
 | Make sure other people also keep a safe distance. Keep bystanders away |
 | Remove the ignition cable before all maintenance work, and read the instructions for use. |
 | Do not let your hands or feet come in contact with the blades when the motor is running. |
 | Do not let your hands or feet come in contact with the blades when the motor is running. |
 | Important. Exhaust gas is poisonous, do not operate in an unventilated area. |
 | Danger - Hot surface! - Danger of burning |
 | Wear ear-muffs and safety goggles! |
 | Wear safety shoes, safety gloves, close-fitting clothes |
 | Attention! Operating materials are flammable and explosive - Danger of burning |
 | Fuel tank capacity |
 | Power | |
 | Displacement | |
 | Speed | |
 | Catch basket volume | |
 | Min. - max. cutting height adjustment | |
 | Max. speed | |
 | Max. slope angle | |
 | Max. width | |
 | Weight | |
 | Engine oil | |
 | Do not fill with fuel while the motor is hot or running | |
 | Length knives. Max. Cutting width | |
 | Guaranteed sound power | |
 | Warning against hazardous electrical voltage | |
 | The product complies with the applicable European directives and an evaluation method of conformity for this directives was done. | |
 | Before working on the device, remove the ignition key and observe the instructions in this manual |
 | Charging socket 12V direct voltage |
 | STOP: Shut off motorON: Operation (manual start)START: Start (electrical start) |
 | Locking brake |
 | Choke/speed controller |
 | Forwards gear shift |
 | Neutral |
 | Reverse gear |
 | 5-level cutting height adjustment |
 | Mower on/off |
 | Device fuse |
 | Protection class II |
 | Do not dispose of batteries with your domestic waste. |
Table of contents: Page:
- Introduction......40
- Layout (Fig. 1-2) 40
- Scope of delivery (Fig. 3-4)....40
- Proper use 41
- Safety instructions....42
- Technical data 45
- Before first use 46
- Operation....47
- Maintenance and cleaning 50
- Storage....53
- Disposal and recycling 53
- Troubleshooting....54
1. Introduction
Manufacturer:
scheppach
Günzburger Straße 69
D-89335 Ichenhausen
Dear customer,
We hope your new tool brings you much enjoyment and success.
Note:
According to the applicable product liability laws, the manufacturer of the device does not assume liability for damages to the product or damages caused by the product that occurs due to:
- Improper handling,
• Non-compliance of the operating instructions, - Repairs by third parties, not by authorized service technicians,
- Installation and replacement of non-original spare parts,
• Application other than specified,
We recommend:
Read through the complete text in the operating instructions before installing and commissioning the device.
The operating instructions are intended to help the user to become familiar with the machine and take advantage of its application possibilities in accordance with the recommendations..
The operating instructions contain important information on how to operate the machine safely, professionally and economically, how to avoid danger, costly repairs, reduce downtimes and how to increase reliability and service life of the machine.
In addition to the safety regulations in the operating instructions, you have to meet the applicable regulations that apply for the operation of the machine in your country.
Keep the operating instructions package with the machine at all times and store it in a plastic cover to protect it from dirt and moisture. Read the instruction manual each time before operating the machine and carefully follow its information. The machine can only be operated by persons who were instructed concerning the operation of the machine and who are informed about the associated dangers. The minimum age requirement must be complied with.
In addition to the safety requirements in these operating instructions and your country's applicable regulations, you should observe the generally recognized technical rules concerning the operation of identical constructed machines.
We accept no liability for damage or accidents which arise due to non-observance of these instructions and the safety information.
2. Layout (Fig. 1-2)
- Seat
- Cutting height setting
- Steering wheel
- Water connection
- Mower on/off
- Locking brake
- Battery charging socket
- Brake clutch pedal
- Front tyres
- Ignition lock
- Throttle
- Gear switching
- Mower (protection)
- Rear wheels
- Catch basket
- V-belt
- Battery cable
- Pull cable starter
- Tank cover
- Air filter
- Oil tank cover
- Exhaust pipe
- Spark plug
- Ejector chute
- Battery
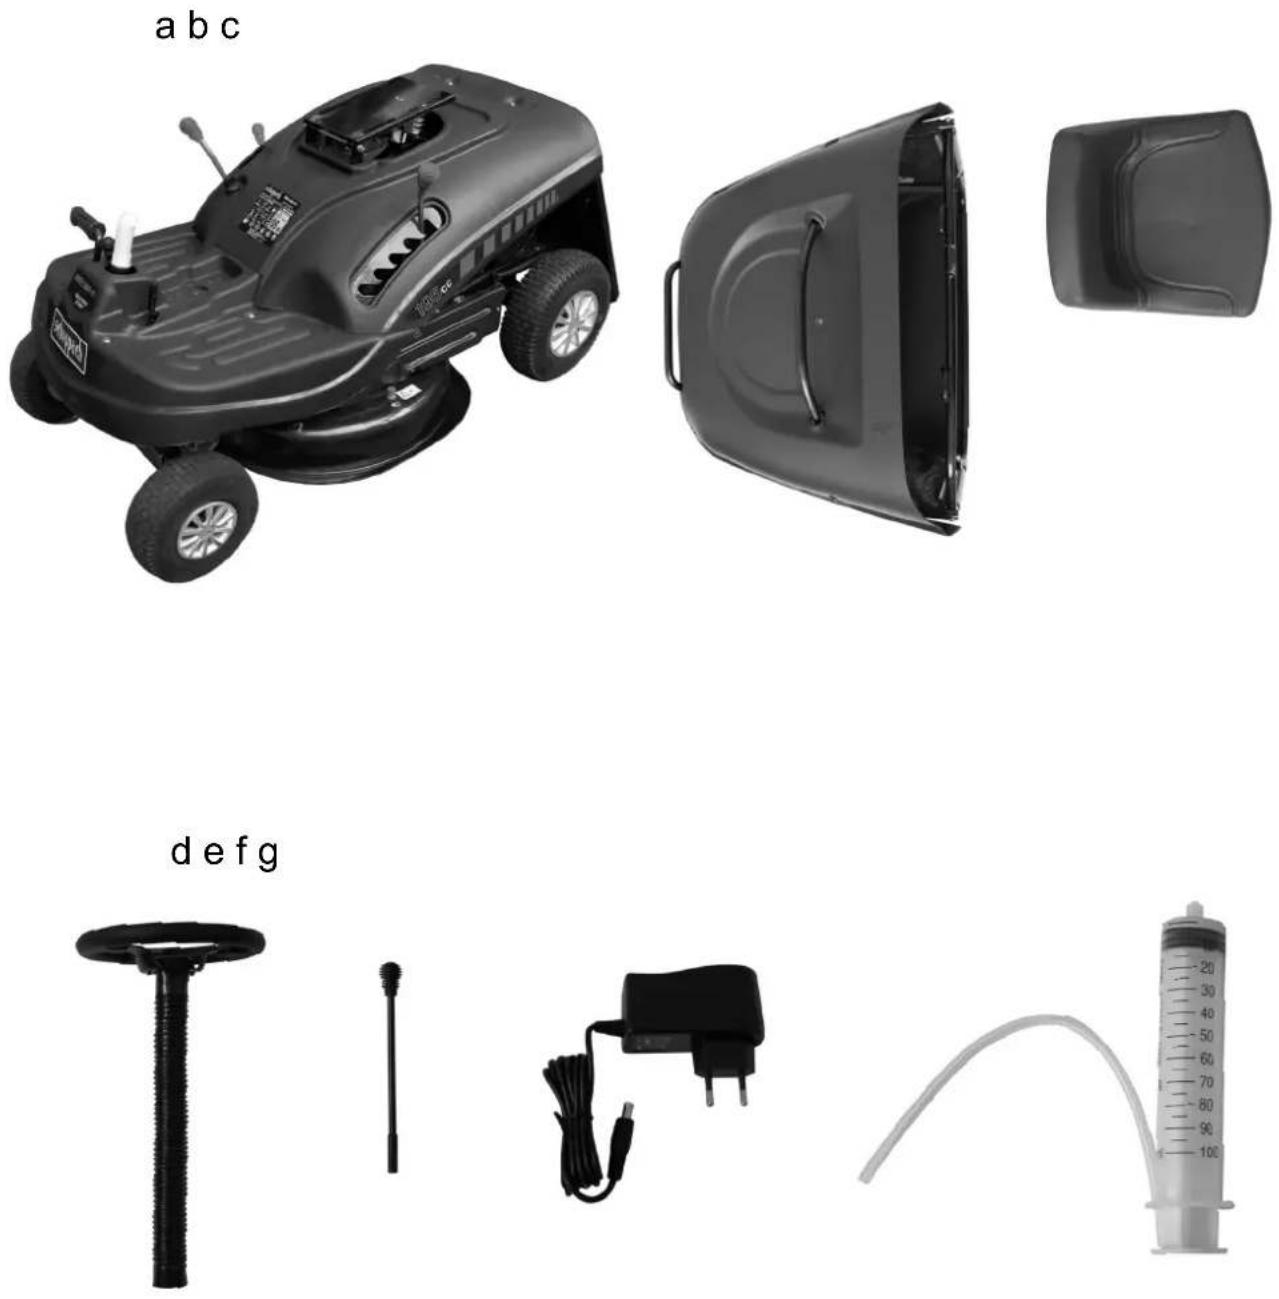
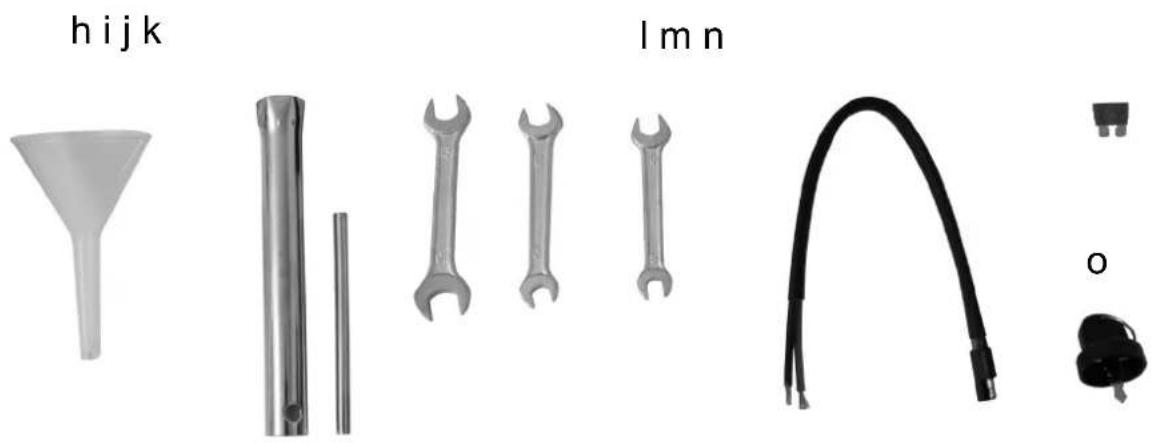
3. Scope of delivery (Fig. 3-4)
- Open the packaging and remove the device carefully.
- Remove the packaging material as well as the packaging and transport bracing (if available)
- Check that the delivery is complete.
- Check the device and its spare parts for possible damage caused by transportation. In the event of complaints, you must contact the distributor without delay. Claims at a later stage will not be accepted.
- If possible, store the packaging until the warranty period has expired
- Before handling the device, make yourself familiar with it by reading the operating instructions.
- For accessories, consumables and spare parts, only use original parts. Spare parts are available from your stockist.
- Include our item number, the device model and year of manufacture in your order.
a. Basic device
b. Catch basket (15)
c. Seat (1)
d. Steering column with steering wheel (3)
e. Mower shift lever (5)
f. Charging unit
g. 100 ml injector needle for extracting oil with hose
h. Funnel
i. Spark plug wrench
j. Open-ended spanner 16/13
k. Open-ended spanner 12/10
I. Open-ended spanner 10/8
m. Charging cable for car charging device
n. Fuse 10 A
o. Ignition key 2x
p. 4x hexagonal screws M8 x 16 with washers for seat attachment
q. 1x Bolt ∅8 with spring pin for tilt protection
r. 1x lenticular head screw M3 x 20 with not for mower shift lever
s. 1x clamping sleeve ∅ 6 x 35 for steering column
t. Operating manual
⚠ Attention!
The device and packaging materials are not toys! Children must not be allowed to play with plastic bags, film and small parts!
There is a risk of swallowing and suffocation!
4. Proper use
The machine meets the currently valid EU machine directive.
Caution – risk of accident:
The ride-on mower is only intended for mowing lawns; its use for other purposes is not permitted.
Before starting any work, all protective and safety devices must be in place.
- The machine has been designed to be operated by one person.
- The operator is responsible for third parties in the area of operations.
- All safety and hazard notices on the machine must be observed.
- All safety and hazard notices on the machine must be kept in a completely legible condition.
- Use the machine in a technically flawless condition only, as well as for its intended purpose, in a safe manner and being aware of dangers, in compliance with the operating instructions!
- Disruptions which can affect safety in particular must be eliminated straight away!
- The manufacturer's safety, operation and maintenance instructions as well as the technical data given in the calibrations and dimensions must be adhered to.
-
Relevant accident prevention regulations and other generally recognized safety and technical rules must also be adhered to.
-
The machine may only be used, maintained or repaired by trained persons who are familiar with the machine and have been informed about the dangers. Unauthorized modifications of the machine exclude a liability of the manufacturer for damages resulting from the modifications.
- The machine is intended for use only with original spare parts and original tools from the producer.
- Any other use is considered to be not intended. The manufacturer excludes any liability for resulting damages, the risk is exclusively borne by the user.
- The device must not be used for commercial, technical or industrial applications.
- If you are not sure whether working conditions are safe or unsafe, do not work with the machine.
- The petrol lawn mower is intended for private use i.e. for use in home and gardening environments. Private use of the lawn mower refers an annual operating time generally not exceeding that of 50 hours, during which time the machine is primarily used to maintain small-scale, residential lawns and home/hobby gardens. Public facilities, sporting halls, and agricultural/forestry applications are excluded.
Due to the physical danger to the user or other persons, the machine must not be used, for example, for the following applications:
• for cutting creepers,
- for shredding or chopping tree or hedge cuttings,
• for clearing paths (vacuuming, blowing),
• for snow clearing using the mowing deck,
• for the care of lawn roofs,
• for levelling earth mounds, e.g. mole hills.
- for transporting clippings, except in the grass catcher box intended for this purpose.
- The machine is not approved for use on public roads.
- The carrying of persons (especially children) and animals is not permitted.
- Never climb onto the mowing deck, and in particular the gauge wheels.
- For safety reasons, the lawn mower may not be used as a drive unit for other work tools or toolkits of any kind.
⚠ WARNING
For your own safety, please thoroughly read this manual and the general safety instructions before turning the device on. If you give the device to third parties, always include these instructions.
5. Safety instructions
These operating instructions provide places concerning your safety which are marked with this indication:
CAUTION
When using the equipment, a few safety precautions must be observed to avoid injuries and damage. Please read the complete operating instructions and safety regulations with due care. Keep this manual in a safe place, so that the information is available at all times. If you give the equipment to any other person, hand over these operating instructions and safety regulations as well. We cannot accept any liability for damage or accidents which arise due to a failure to follow these instructions and the safety instructions.
The following must not use the machine:
Children, persons with impaired physical, sensory or mental faculties or those lacking the appropriate experience, or persons who are not familiar with the instructions, must never be allowed to use the machine.
Never allow children under the age of 16 to use the machine. Local regulations may specify a minimum age for users.
The machine must only be operated by persons who are well rested and in good physical and mental condition. If your health is impaired, you should consult your doctor to determine whether working with the machine is possible. The machine should not be operated after the consumption of alcohol, drugs or medications which impair reactions.
⚠ Safety of personnel
Caution! Danger to health due to vibrations.
Excessive exposure to vibrations can result in damage to the cardiovascular or nervous system, particularly in persons with cardiovascular problems. Please consult a physician if you experience symptoms that may have been caused by vibrational loads.
Symptoms of this kind principally affect the fingers, hands or wrists and include
- numbness,
- pain,
- muscular weakness,
- skin discolouration,
- unpleasant tingling sensation.
Hold the handlebar tightly, but not tensed, with both hands in the designated locations during operation. Plan your working times so that more severe physical strains over a longer period are avoided.
Warning! This electric tool generates an electromagnetic field during operation. This field can impair active or passive medical implants under certain conditions. In order to prevent the risk of serious or deadly injuries, we recommend that persons with medical implants consult with their physician and the manufacturer of the medical implant prior to operating the electric tool.
Clothing and equipment
Always wear sturdy footwear with high-grip soles when working. Never work barefoot or, for example, in sandals.
Always wear long trousers and tight-fitting clothing when operating the machine.
Never wear loose clothes which may become caught on moving parts (control levers) – do not wear jewellery, ties or scarves.
Also always wear sturdy gloves and tie up and secure long hair (headscarf, cap, etc.) when performing maintenance and cleaning work or when transporting the machine.
Wear suitable safety glasses when sharpening the mowing blade.
Working with your machine
Never work in the vicinity of other persons, particularly children, or animals. Ensure that the grass is never discharged in the direction of other persons.
Do not operate the machine in the rain or during thunder storms, particularly when there is a risk of lightning strike.
Exhaust gases:
Danger to life through poisoning!
In the case of nausea, headache, impaired vision (e.g. decreasing field of view) hearing disorder, dizziness, decreasing power of concentration, stop working immediately. These symptoms may be caused by excessively high exhaust gas concentrations.
The machine generates poisonous exhaust gases when the engine is running. The gases contain poisonous carbon monoxide, a colourless and odourless gas, as well as other pollutants. The engine must never be operated in closed or poorly ventilated spaces.
The engine exhaust is released into the air in front of the left rear wheel. When working with the machine, ensure that this area is always kept clean and is never covered in order to prevent the accumulation of exhaust gasses.
⚠ Workplace safety
Carefully inspect the complete area on which the machine is to be used and remove any stones, sticks, wires, bones and other foreign objects which could be thrown up by the machine. Obstacles (e.g. tree stumps, roots) can be easily overlooked in long grass. For this reason, mark all foreign objects (obstacles) which are hidden in the lawn and cannot be removed before commencing work with the machine.
Beware of depressions (holes) in the terrain and other invisible points of danger. Obstacles can be easily overlooked in long grass.
Use the machine with great care when working near slopes, terraces, ditches and embankments. In particular, ensure that you maintain sufficient distance to such danger areas.
Particular care must be taken at points of poor visibility, bushes, trees and other obstacles, behind which persons, especially children, or animals may be hidden.
Bring the ride-on mower to a standstill immediately and stop the mowing blade if someone moves into the area to be mown.
Always monitor the area in front of the vehicle. Be-ware of obstacles, in order to be able to evade them in time.
Before reversing, always check the area behind the ride-on mower and, if present, disengage the attachment. Never mow in reverse, if it is not absolutely necessary. When mowing in reverse, take particular care and before beginning to mow, thoroughly check the entire area behind the ride-on mower.
When working together in a group, always inform the others in advance of what you intend to do. Maintain a safety distance!
The vehicle speed must be reduced before each change of direction, so that the user retains control of the machine at all times and also that the ride-on mower cannot tip over.
When operating near to roads and when crossing roads, other road users must be taken into account.
Take particular care when mowing near roads, cycle paths and footpaths. Objects which are thrown up by the mower can cause severe injury and damage.
Handling petrol
⚠ Danger to life! Petrol is poisonous and extremely inflammable.
Petrol must only be stored in appropriate, tested containers (canisters). Always screw on the fuel tank and canister caps properly and tightly. Defective caps must be replaced for safety reasons.
Keep petrol away from sparks, naked flames, pilot lights, heat sources, and other ignition sources. Do not smoke!
Refill the tank out-of-doors and do not smoke during refilling.
Before refilling the tank, stop the engine and allow it to cool.
Refilling with petrol must be performed before the engine is started. When the engine is running or is hot, the tank cap must not be removed and the tank must not be refilled with petrol.
Open the fuel tank cap slowly and carefully. Wait for pressure compensation and only then remove the tank cap completely.
Use a suitable funnel or filling pipe for refilling the tank, so that no fuel can spill onto the engine and housing or the lawn.
Do not overfill the fuel tank!
To give the fuel room to expand, never fill the fuel tank past the lower edge of the filler neck. Observe the additional instructions in the engine instruction manual.
If petrol is spilled, the engine must only be started after the petrolcontaminated area has been cleaned. All attempts at starting must be avoided until the petrol fumes have dispersed (wipe dry).
Any spilt fuel must be wiped up immediately.
Clothing must be changed if it comes into contact with petrol.
Following each refilling of the tank, the fuel tank cap must be properly screwed on and tightened. The machine must not be operated without the original tank cap.
For safety reasons, the fuel line, fuel tank, tank cap and connections must be checked regularly for damage, ageing (brittleness), firm seating and leaks. Replace if necessary.
If it is necessary to drain the tank, this must be done out of doors.
Never use beverage bottles or similar for disposal or storage of fuels and lubricants. Persons, particularly children, could be tempted to drink out of them.
Never store the machine with petrol in the tank inside a building. The resulting petrol fumes could come into contact with naked flames or sparks and could be ignited.
Do not leave the machine and the fuel tank close to heating systems, radiant heaters, welding equipment and other sources of heat. Explosive hazard!
If, during operation, a defect in the tank, tank cap or in the fuel-carrying components (fuel lines) is detected, the engine must be stopped immediately. A specialist dealer must then be contacted.
Battery safety
In order to prevent sparks due to short circuiting, the negative (−) cable must always be disconnected from the battery first and reconnected last.
Never smoke when working on the battery. Sparks, naked flames and other heat sources must be kept away from the battery.
Particular care is necessary when using battery jump leads. Observe the relevant instructions in order to prevent damage to the ride-on mower (in particular, actuate the starter for a maximum of 10 seconds).
Never open the battery and do not drop it.
Always charge the battery in an enclosed, well-ventilated room which is dry and weather-protected.
Do not short circuit the battery connections.
Deformed or faulty (leaking) batteries must not be used and must be replaced and disposed of in an environmentally-friendly manner. Observe country-specific legislation.
Fluid may escape from faulty batteries. Avoid contact! In the case of inadvertent contact, rinse with water. Seek medical attention if the fluid contacts the eyes. Escaping battery fluid can cause skin irritation and burns.
Visually inspect the battery connection cables for damage at regular intervals. Have damaged cables replaced by a technician.
Never bypass the fuses. Never use a fuse with a value that differs from the specified rating (ampere).
⚠ Safety information for ride-on mowers
Starting:
The machine must only be started from the driver's seat.
Start the machine on level ground, not on a slope.
The engine may only be started in a well ventilated working area, sufficient ventilation must be ensured, particularly in garages.
Before starting the engine, disengage the cutting tool, attachments and drive and press down the brake pedal fully.
When starting, it must be ensured that there is sufficient clearance between the feet and the cutting tool.
Do not start the motor is you are standing in front of the ejector chute.
Never lift or carry a lawnmower while the motor is running.
Operating the machine with excessive speed can increase the risk of accidents.
Never start the engine by short-circuiting the starter terminal. If the normal starter circuit is bypassed, the ride-on mower may suddenly be set in motion.
Never start the engine if the smell of petrol can be detected – Explosive hazard!
Working:
⚠ Warning – Risk of injury!
Observe the working area of the mowing blade. Never put hands or feet on or underneath rotating parts. Never touch the rotating mowing blade. Always keep away from the discharge opening. An adequate safety distance must always be maintained.
Only work during the day or with good artificial light.
When driving off the lawn or when not mowing, the mowing blade must be disengaged and the mowing deck must be set to the highest cutting position.
Objects hidden in the turf (lawn sprinkler systems, posts, water valves, foundations, electrical wires, etc.) must be avoided. Never run over any such foreign objects.
Always hold the steering wheel firmly with both hands when driving.
Particular care must be taken when driving on lawns and other uneven surfaces, as the steering wheel can be made to turn due to holes, mounds, impacts, etc. Risk of injury to hands and fingers!
Always drive at a reasonable speed.
Only empty the grass catcher box from the driver's seat.
Before emptying the grass catcher box, always disengage the mowing blade and wait until it has come to a standstill.
Switch off the drive, stop the engine and wait until the mowing blade has come to a complete standstill, engage the parking brake and remove the ignition key:
- before remedying blockages, including those in the discharge chute,
- before checking, cleaning or working on the ride-on mower,
- if the mowing blade has hit an obstacle. Inspect the machine and the cutting tool for damage and have any necessary repairs performed before re-starting.
- if the machine begins to vibrate excessively. It must be checked immediately.
- when abandoning or when transporting the machine.
Stop the engine and wait until the mowing blade has come to a complete standstill:
• before filling with fuel,
- before removing the grass catcher box.
Residual risks and accident prevention standards
Neglect of ergonomic principles Negligent handling of personal protective equipment (PPE)
Negligent handling or omission of the personal protective equipment may cause serious injuries.
- Wear prescribed personal protection equipment.
Human behaviour, misbehaviour
- For any work be fully concentrated.
⚠️ Residual risks - Cannot be entirely excluded.
Danger from noise
hearing damage
Prelonged unprotected work with the device may cause hearing damage.
- Always wear ear-muffs.
In case of emergency
In case of a possibly occurring accident take the necessary first aid steps as appropriate and obtain qualified medical aid as quickly as possible.
- Technical data
| Type engine | four stroke engine/air cooled |
| Cubic capacity 196 cm3 | |
| Rotation speed 3000 min | -1 |
| Power 4,8 kW/ 6,5 PS | |
| Fuel | Regular grade petrol/lead-free max. 5% bioethanol |
| Capacity tank | 1,0 l |
| Motor oil | SAE 30 / 10W40 |
| Capacity tank/oil | 0,6 l |
| Cutting height adjustment | 5-steps |
| Grass catcher box capacity | 150 l |
| Cutting width | 61 cm |
| Cutting height | 35-75 mm |
| Weight | 115 kg |
| Driving speed V | 1,5, 2,0, 3,0, 4,6 km/h |
| Driving speed R | 2,3 km/h |
| Front wheels | 10x4,00-4 |
| Tyre pressure, front wheels | 1,3 bar |
| Rear wheels | 13x5,00-6 |
| Tyre pressure, rear wheels | 1,8 bar |
| Battery type | Lead |
| Rated voltage | 12V |
| Capacity | 7 Ah |
Subject to technical changes!
Information concerning noise emission measured according to relevant standards:
Sound pressure level L_PA = 79.6 dB(A)
Uncertainty K = 2,5 dB(A)
Sound power level L_WA = 94,34 dB(A)
Uncertainty K = 1,08 dB(A)
Wear ear-muffs.
The impact of noise can cause damage to hearing.
Vibration a_h (left/right) = 4.969 m/s ^2
Uncertainty K = 1,5 m/s ^4
Reduce noise generation and vibration to a minimum!
- Use only equipment that is in perfect condition.
- Maintain and clean the equipment regularly.
- Adopt your way of working to the equipment.
- Do not overload the equipment.
- Have the equipment checked if necessary.
- Switch off the equipment when not in use.
- Wear gloves.
When using the petrol lawn mower for extended periods, vibration-induced circulatory problems may occur (white finger disease).
We cannot give exact details about the duration of use in this case because it is different for each individual.
The following factors can influence the condition:
- Circulatory problems in the user's hands
- Low outside temperatures
- Extended periods of use
We therefore recommend you wear warm work gloves and take regular breaks.
7. Before first use
Times of use
Please comply with statutory regulations, which may vary from location to location.
Make sure that you are familiar with the controls and operation of the machine. In particular, the user must know how the work tools and engine can be stopped quickly.
The machine must only be used by persons who have read the instruction manual and are familiar with operation of the machine. The user should seek expert and practical instruction prior to initial operation. The user must receive instruction on safe use of the machine from the vendor or another expert.
During this instruction, the user should be made aware
- that the utmost care and concentration are required for working with the machine.
- that a ride-on mower which is sliding down a slope cannot be brought under control by applying the brake.
The main causes for the loss of control over the ride-on mower include:
- inadequate adhesion of the wheels,
- driving too fast,
- inappropriate braking,
- incorrect use (sport events, etc.),
- inadequate knowledge of the effects associated with ground conditions, especially on slopes (see section „For your safety“, „Working on slopes“),
- incorrect attachment of loads and poor load distribution.
Check the fuel system (particularly visible parts such as e.g. tank, tank cap, hose connections) before operating the machine. In the event of any leaks or damage, do not start the engine – fire hazardl Have the machine repaired by a specialist dealer prior to operation.
Defective and all other worn or damaged parts must be removed before using the machine. Replace any illegible or damaged danger signs and warnings on the machine.
The screwed-on discharge port (discharge chute on mowing deck) must always be securely fastened to the mowing deck. It must not be damaged and, if necessary, it must be replaced by a technician.
The braking function must be checked before each use.
Before each use, check whether:
- the cutting tool and the entire cutting unit (mowing blade, blade clutch, blade brake, retaining pin, mowing deck housing) are in good condition. Particularly check for secure fastening, damage and wear.
- the tank cap is securely attached.
- the tank and fuel-carrying parts, as well as the tank cap are in good condition.
- the safety devices are in good condition and function correctly.
- the tyres (inflation pressure, damage, wear) and frame are in good condition. Check that all screw connections are securely fastened. In particular, all maintenance operations listed in the maintenance schedule under the heading "Before each use" must be carried out.
If necessary, consult a specialist dealer.
Preparing the area to be mowed
Before mowing, carefully examine the area. Remove stones, sticks, bones, wires, toys and other objects that may be ejected.
Ensure that no other people are present on the surface to be mowed
Montage
Some parts of the mower come disassembled. For quick and easy assembly, read and follow the instructions below.
Important!
You will need the following additional tools (not supplied) for assembly, and also for maintenance work:
• A 1 liter measuring jug (oil/petrol resistant)
- A petrol can (5 liters is sufficient for approx. 6 operating hours)
- A funnel (suitable for the tank's petrol filler neck)
- Household wipes (to wipe up oil/petrol residue; dispose of these at a filling station)
- A petrol suction pump (plastic, available from DIY stores)
• 0,6 liter of engine oil (SAE 30)
- Small hammer
-
Remove the lawnmower and attachments from the packaging and check if all parts are available.
-
Remove the fastening hooks and take the lawn-mower off of the palette. (Fig. 5)
-
Fasten the seat (1) with 4 hexagonal screws M8 x 16 including washers (p) (fig. 6). Adjustment of the seat position to the corresponding body size is possible.
-
Mount the shift lever (e) for the mower with the included lenticular head screw M3 x 20 (r) (fig. 9 + 10)
-
Insert the steering column with steering wheel (d) into the steering socket. Knock the dowel pin in with a hammer (fig. 8 + 9).
-
Loosen the screws on the catch basket and screw this together with the reinforcement struts on the catch basket (fig. 11 + 12).
-
Fill up motor oil. In this case, buttons 12 and 2 must be unscrewed (fig. 13) and set to position N or 5. Fold the body (fig. 2) upwards. Open the cover (21) and fill the tank with oil (SAE 30). Note the max. filling capacity. Afterwards, close the lid again.
-
Fill up petrol. (Fig. 19 + 20) Unscrew the fuel tank lid (19) and fill the tank with petrol (Super/E10). Note the max. filling capacity and the safety instructions when handling petrol. Afterwards, close the opening again.
-
Connect the two battery cables (fig. 15) with each other.
-
Fold the body down again and screw buttons 12 and 2 on again.
-
Tighten the locking screw. (fig. 16)
-
Mount the start cable (fig. 17)
-
Mount the catch bucket (fig. 18)
8. Operation
CAUTION!
The engine does not come with oil in it. Therefore, ensure that you add 0,45 liters of oil before starting it up. Use normal, multigrade oil (SAE30). The oil level in the engine must be checked each time before mowing.
You will also need to fill in petrol, as this is also not supplied upon delivery.
⚠ WARNING
Whenever you need to perform any kind of adjustment and/or repair work on your lawn mower, wait until the blade has come to a complete stop. Always switch off the engine before carrying out any adjustments, maintenance or repairs.
Refuelling Fig. 19 + 20
⚠️ Risk of injury! Petrol is explosive!
- Switch off the engine and allow it to cool!
- Wear safety gloves!
- Avoid skin and eye contact!
- You must observe "safety instruction, handling petrol".
- Only refuel the tank outdoors or in sufficiently ventilated rooms.
- Fold the seat over.
- Clean the area surrounding the filling area. Impurities in the tank lead to operational faults.
- Carefully open the tank cap (19) so that any possible excess pressure can be relieved.
- Carefully fill the petrol up to the lower edge of the filler neck.
- Close the tank cap (19) again. Ensure that the tank cap is tightly sealed.
- Clean the tank cap and the surroundings.
- Check the tank and fuel lines for leaks.
- Move at least three meters away from the refueling area before starting the engine.
⚠ WARNING
Only use a safety petrol can. Do not smoke when refueling. Remove any oil or petrol residues. Switch off the engine before refueling and allow the engine to cool down for a few minutes.
Start the engine with the e-start (fig. 21 - 24)
- Check the motor oil level. See "oil level check" section.
- Engage the catching bag (15).
- Depress the brake clutch pedal (8) completely and activate the locking brake (6).
• The mower (5) must now be shut off. - Set the desired cutting height (2)
-
Set the gear lever (12) to neutral "N"
-
Set the gas lever (11) to the "choke" position in case of lower temperature, and in case of warmer temperatures or if the motor is warm, set to "rabbit", full throttle.
- Turn the ignition key (10) to "start" until the motor starts, then leave it at the "on" position.
- Move the gas lever (11) from the position “choke or rabbit” to a lower speed, “turtle”.
Start the engine with the start cable (Fig. 22-24, 28)
- Check the motor oil level. See "oil level check" section.
- Engage the catch bucket (15).
- Depress the brake pedal (8) completely and activate the locking brake (6).
• The mower (5) must now be shut off. - Set the desired cutting height (2)
- Set the gear lever (12) to neutral "N"
- Set the gas lever (11) to the "choke" position in case of lower temperature, and in case of warmer temperatures or if the motor is warm, set to "rabbit", full throttle.
- Turn the ignition key (10) to "ON"
- Fold the seat up and pull the start cable (fig. 28)
- Attention: In case of cool weather, it may be necessary to repeat the starting process numerous times.
- Do not permit the start cable to slam back into place.
- Fold the seat closed
- Move the gas lever (11) from the position "choke or rabbit" to a lower speed, "turtle".
Driving without the mower (Fig. 23 - 25)
- At low speed "turtle", depress the brake pedal (8) completely, and the locking brake (6) unlocks itself.
- Engage the desired gear.
- Release the brake pedal (8) slowly to mobilise the lawnmower slowly.
- Move the gas lever (11) in the "rabbit" direction to increase the throttle.
- Attention! Only change gears while stopped.
Driving with mower (Fig. 23 - 27)
- At low speed "turtle", depress the brake pedal (8) completely, and the locking brake (6) unlocks itself.
- Slowly move the mower switch lever (5) to the left and forward, and when the mower is clutched, move to the right until it engages. (Fig. 26)
- Engage the desired gear.
- Release the brake pedal (8) slowly to mobilise the lawnmower slowly.
- Move the gas lever (11) in the "rabbit" direction to increase the throttle.
- Attention! Only change gears while stopped.
Shut off the lawnmower: (Fig. 21 - 26)
- Depress the brake pedal (8) completely and activate the locking brake (6) by pulling the lever back.
- Switch off the mower by pulling the lever (5) to the right and back
- Set the gas lever (11) to the "turtle" stationary throttle
- Turn the ignition key (10) to the "stop" position.
- Always remove the ignition key (10) when leaving the lawnmower.
Setting the cutting height (Fig. 27)
⚠ Attention! The cutting height may only be adjusted when the mower is shut off.
Tips for proper mowing
Working on slopes:
Slopes are one of the major causes of accidents in which control over the ride-on mower is lost causing it to tip over, which can result in severe or even fatal injuries.
There is no „safe“ slope! Driving on grassy slopes requires special concentration. For safety reasons, the machine must not be used on slopes with an inclination of more than 10^ (17.6%). Risk of injury!
A slope inclination of 10^ corresponds to a vertical height increase of 17.6 cm for a 100 cm horizontal distance.
Starting off or stopping on a gradient must be avoided.
Do not use the machine in places (slopes, ditches, etc.) where the ride-on mower can tip over or slide.
The danger of tipping over or sliding increases if the ground is soft or damp.
Slopes must be driven on in a longitudinal direction. Driving transversely increases the danger of tipping over.
Do not change speed or direction abruptly when driving on slopes. Work in this type of situation requires calm, cautious and even operation of the ride-on mower.
Changes of direction on slopes must be avoided. Only turn on slopes if this is unavoidable. If possible, drive slowly and in a large curve in the down-slope direction.
Do not mow wet grass, particularly on slopes, as wheel grip is reduced on wet grass. The ride-on mower could slide and become uncontrollable for the user.
The gearbox must never be disengaged via the gearbox freewheel when driving on slopes.
Special care must be taken when operating attachments on slopes (altered weight distribution of the machine).
If the wheels start to slip or if the vehicle becomes stuck in the up-slope direction when driving on an incline, the mowing blade or the attachment must be disengaged. Then leave the slope by driving slowly downhill in a straight line.
Never try to stabilise the ride-on mower by pressing on the ground with your foot.
The weight of the grass catcher box increases the danger of the ride-on mower tipping over, particularly when it is full.
Never empty or lift the grass catcher box on an incline.
Stopping and parking:
The ride-on mower must only be parked on a level surface.
Make sure that the ride-on mower has come to a complete standstill before you dismount.
Beware of the cutting tool running on for several seconds before coming to a standstill.
Before leaving the driver's seat, disengage the mowing blade or the drive to the attachments, lower the mowing deck and all attachments, set all control levers to the neutral position, engage the parking brake, stop the engine and remove the ignition key.
Keep the ignition key in a place where only authorised persons can access it.
Tips for proper mowing:
- Pay attention to ensure that you do not run into or over anything that could damage the mower. The lawn mower could be damaged and/or the machine could inflict bodily injury.
- A hot engine, exhaust or drive unit can burn the skin if touched. Thus, do not touch these parts unless the mower has been switched off for a while and you know that they have cooled down!
- Insufficient daylight or even a sufficient level of artificial light is one reason not to mow.
- Check the mower, the blade and other parts if they have struck a foreign object or if the machine vibrates more than usual.
-
Do not make any adjustments or repairs until the engine has been switched off. Pull the plug boot. (Fig. 33).
-
Pay special attention if you are mowing directly next to a street or are close by one (traffic). Always keep the grass chute pointed away from the street.
- Avoid mowing in places where the wheels have trouble gripping or mowing is unsafe in any other way.
- Before you back up, ensure that nobody is standing behind you especially little children, who are more difficult to see.
- When mowing over thick, high grass, select the highest cutting level and mow at a slower speed.
- Before you remove any grass or blockages of any kind, switch off the engine and pull the plug boot.
- Never remove any safety-related parts.
- Never fill the engine with petrol when it is hot or is running.
Mowing
Only use a sharp blade that is in good condition. This will prevent the grass blades from fraying and the lawn from turning yellow.
Try to mow in straight lines for a nice, clean look. Insodoing, the mowing swaths should always overlap each other by a few centimeters in order to avoid bare strips.
Keep the underside of the mower housing clean and remove grass build-up. Deposits not only make it more difficult to start the mower; they decrease the quality of the cut and make it harder for the machine to bag the grass. Always mow along inclines (not up and down). Slightly turning the front wheels up the hill while mowing will prevent the mower from sliding out of the straight line. Select the cutting height according to the length of the grass. If the lawn has grown quite a bit, mow over it several times so that no more than 4 cm of grass are cut at one time.
Switch off the engine before doing any checks on the blade. Keep in mind that the blade continues to rotate for a few seconds after the engine has been switched off. Never attempt to manually stop the blade.
Regularly check to see if the blade is securely attached, is in good condition and is sharp. If the contrary is the case, sharpen the blade or replace it. In the event that the blade strikes an object, immediately switch off the lawn mower and wait for the blade to come to a complete stop. Then inspect the condition of the blade and the blade mount. Replace any parts that are damaged.
Empty the catch bucket (15) while seated (fig. 36):
- Drive to the location where you would like to empty the catch bucket.
- Depress the brake pedal (8) completely.
- Shut off the mower (5).
- Lift the catch bucket (15) by the handle so that it empties.
- Lower the catch basket (15) again
Disengage the catch bucket (15) for emptying (Fig. 37):
- Press the brake pedal (8) completely and activate the locking brake (6).
- Shut off the mower (5).
- Set the gas lever (12) to neutral "N"
- Disengage the catch basket (15) and empty it.
- Engage the catch basket (15) again.
After mowing
- Always allow the motor to cool off before parking the lawnmower in an enclosed room.
- Remove grass, leaves, grease, and oil before storage. Do not store other objects on the mower.
- Check all screws and nuts before the next use. Tighten all loose screws.
• Empty the catch basket (15) before the next use. - Remove the ignition key
- Make sure that the mower is not parked next to a source of danger. Escaping gas can cause explosions.
- Only original parts or parts approved by the manufacturer may be used for repairs (see address on guarantee certificate).
- In case of longer idle periods of the mower, empty the petrol tank with a petrol suction pump.
• Oil and service the device
9. Maintenance and cleaning
Maintenance and repairs
Before beginning cleaning, adjustment, repair and maintenance operations, park the machine on firm, level ground, engage the parking brake, stop the engine, allow it to cool down and remove the ignition key.
Allow the machine to cool down before working on or around the engine, exhaust manifold or muffler; this also applies in particular to all maintenance operations on the mowing deck. Temperatures of 80 °C and above can be reached.
Danger of burns!
Direct contact with engine oil can be dangerous. Engine oil must not be spilled.
Cleaning:
Following operation, the entire ride-on mower and the attachments must be cleaned. In particular, all grass residues must be removed because the moisture these contain leads to damage in the long term.
SCHEPPACH does not recommend the use of high pressure cleaners.
Clean the device with water as follows.
- Place the hose connection piece onto the water connection (4) of the mower and open the tap.
- Start the mower and switch off again after about 30 seconds. The rotating blade bar throws the water onto the bottom of the mower and thus cleans it.
- Turn off the tap and remove the hose connection.
- Clean the top with a cloth (do not use any sharp objects).
Note: Dirt and grass is easiest to remove immediately after you have finished mowing the grass. Dried on grass and dirt can result in poorer mowing performance. Check that the grass chute is free of any residual grass. Remove any such residue.
Never clean the lawn mower with a water jet or high-pressure cleaner. The engine must remain dry.
Do not use aggressive cleaning agents such as cold cleaner or petroleum ether.
Never drive close to an edge or a ditch for the purpose of cleaning (e.g. the frame of) the ride-on mower.
In order to prevent fire hazards, keep the engine, cooling ribs, battery compartment, area around the fuel tank and exhaust free from grass, leaves or escaping oil (or grease).
Always clean the grass catcher box.
Maintenance operations:
Only maintenance operations described in this instruction manual may be carried out. Have all other work performed by a specialist dealer. If you do not have the necessary expertise or auxiliary equipment, please always contact a specialist dealer.
We recommend: Have maintenance work and repairs completed by specialist dealers only.
Only use tools, accessories or attachments approved for this machine by SCHEPPACH or technically identical parts. Otherwise, there may be a risk of accidents resulting in personal injury or damage to the machine. If you have any questions, please consult a specialist dealer.
The characteristics of original SCHEPPACH tools, accessories and spare parts are optimally adapted to the machine and the user's requirements.
The ride-on mower and all attachments should be inspected once annually by a specialist dealer.
Always keep warning and information stickers clean and readable. Damaged or missing stickers must be replaced by new, original plates. If a component is replaced with a new component, ensure that the new component is provided with the same stickers.
For safety reasons, fuel-carrying components (fuel line, fuel cock, fuel tank, tank cap, connections, etc.) must be checked regularly for damage and leaks and replaced by a technician if necessary.
Before starting work on or near electrical components, the negative (−) cable must be disconnected from the battery.
The machine is equipped with numerous safety devices. These devices must not be removed or modified (bypassed, etc.) and must be checked at regular intervals. Operations on the safety devices must only be carried out by a technician.
Ensure that all nuts, pins and screws, especially the blade fastening screw, are securely tightened, so that the machine is in a safe operating condition.
For safety reasons, worn or damaged parts must be replaced immediately.
Check the grass catcher unit (e.g. grass catcher box, discharge chute) regularly for wear, damage or loss of functionality.
Particular care is required when working under the machine, due to the weight of the ride-on mower. If necessary, contact a specialist dealer.
Check the secure fastening of the front and rear wheels.
Always maintain the ride-on mower and the attachments in perfect operating condition. All safety devices must be present and be in perfect operating condition.
Ensure that the tyres have the correct tyre pressures. The tyre pressures specified in the instruction manual must not be exceeded.
Only perform work on the cutting unit when wearing thick work gloves and exercising extreme care.
Check the function of the brakes at regular, short intervals and, if necessary, have the required adjustments or maintenance operations performed by a technician.
⚠ WARNING
Never work on or touch conducting parts on the ignition unit with the engine running. Always pull the spark plug boot from the spark plug before starting any work of care or maintenance. Never perform any work on the machine while it is running. Any work not described in these Operating Instructions must be performed by an authorized service workshop only.
Wheel axles and wheel hubs
These should be lightly greased once a season.
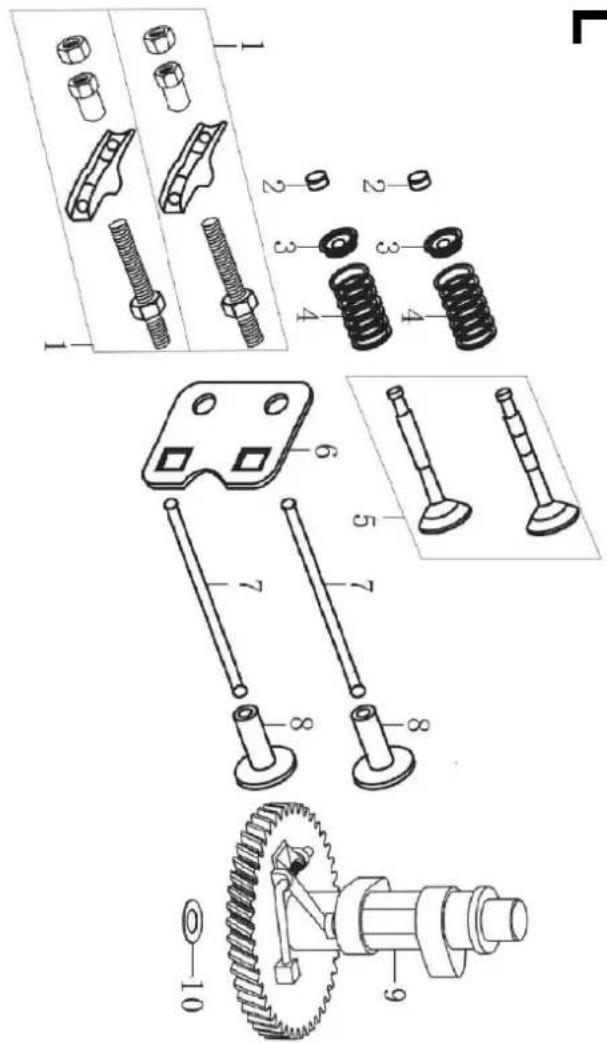
Blade
For safety reasons you should only ever have your blade sharpened, balanced and mounted by an authorized service workshop. For optimum results it is recommended that the blade should be inspected once a year.
Change the blade (Fig. 39 + 40)
When changing the cutting tool, only use original replacement parts.
Wear gloves to avoid cut injuries while changing the blade.
Never install another blade.
- Remove the ignition key.
- Remove the screw (C) to replace the blade (E).
- Install everything as described in fig. 39. Fasten the screw correctly. The fastening torque in 65 Nm. Replace the screw C and washer D, as well, if you replace the knife.
Checking the oil level
⚠ CAUTION! Never run the engine with no or too little oil. This could cause severe damage to the engine. Use only SAE30 engine oil.
Check the oil level (Fig. 14):
- Position the lawnmower on a straight, level surface.
- Remove the ignition key (10)
- Unscrew buttons 12 and 2
- Remove the tilt protection (fig. 16)
- Fold the body up (fig. 2)
- Remove the oil dipstick (21) by turning it to the left, then wipe off the dipstick.
- Screw in the dipstick up to the limit stop again in the filling nozzle.
- Pull out the dipstick and read the oil level horizontally. The oil level must be positioned between the max and min of the oil dipstick (21).
Oil change (Fig. 32)
- The motor oil change should be completed annually before the start of the season while the motor is at operating temperature and shut off.
- Only use motor oil (SAE 30).
- Position the lawnmower on a straight, level surface.
- Remove the ignition key (10)
- Unscrew buttons 12 and 2
- Remove the tilt protection (fig. 16)
- Fold up the body (fig. 2)
- Remove the oil dipstick (21) by turning it to the left
- Use the included injector needle (g) and hose to extract motor oil through the filling nozzle.
- Fill with fresh motor oil and check the oil level
Dispose of the used oil in accordance with applicable regulations.
Air filter maintenance (Fig. 35 + 36)
Fouled air filters (20) diminish the motor performance due to reduced air supply to the carburettor. Regular inspection is therefore essential.
The air filter should be checked every 25 operating hours and cleaned as required. The air filter must be checked more often in case of very dusty air.
- Fold the body up as described while checking the oil.
- Fold out the ejector chute. (Fig. 35)
• Take off the air filter cover (fig. 36) and remove the air filter (A and B). - Wash off the sponge filter (B) with water and dry it completely.
- Clean the paper filter (A) with compressed air only or by knocking them out.
Important: Never clean the air filter with petrol or inflammable cleaning agents. Clean the paper filter with compressed air or simply by knocking out any soiling.
Maintenance of the spark plug (Fig. 33)
Check the spark plug for dirt and grime after 10 hours of operation and if necessary clean it with a copper wire brush. Thereafter service the spark plug after every 50 hours of operation.
Pull off the spark plug boot with a twist. Remove the spark plug (23) with a spark plug wrench.
Using a feeler gauge, set the gap to 0.75 mm(0.030").
Refit the spark plug (23)taking care not to overtighten.
Replace fuse (Fig. 34)
- The electrical start is protected with a 10 A fuse.
- Never use another fuse or bypass the fuse.
Charge the battery (Fig. 29)
The battery is charged during operation. In any case, frequent starting may make it necessary to charge the battery with the included charging device (f):
- Plug the connector into the charging socket (7) and the charging device (f) into a plug socket. 230 V 50 Hz
- Charge the battery for min. 5 hours.
Charge the battery with a car charging device (Fig. 30 + 31)
- You may also charge the battery with the included charging cable (m) on an industry-standard car charging device for 12 V lead batteries.
- Unplug the battery in this case (fig. 15).
- Connect the included charging cable (m) to the battery and connect the black cable with the - pole and the red cable with the + pole of the charging device (fig. 30 + 31).
Attention! Never exchange the + and - poles.
Always store the lawnmower with a fully loaded battery.
Tyre pressure:
Check the tyre pressure prior to starting!
The correct tyre pressure is 1.8 bar in the front wheels and 1.3 bar in the rear wheels.
Important: If the tyre pressure is too low, the risk of damage to the valves and therefore the hoses increases.
Repairs
After any repair or maintenance work, check that all safety-related parts are in place and in proper working order. All parts which may cause injury must be kept where they are inaccessible to children or others.
Important: In accordance with product liability legislation we are not liable for any damages caused by improper repairs or the use of spare parts that are not original spare parts or parts approved by us.
In addition, we are also not liable for any damages arising from improper repairs. Such work should be performed by a customer services workshop or authorized specialist. The same applies to accessory parts.
Important hint in case of sending the equipment to a service station:
Due to security reasons please see to it that the equipment is sent back free of oil and gas!
Ordering replacement parts
Please quote the following data when ordering replacement parts:
- Type of machine
• Article number of the machine
Spare parts/accessories
Lawn mower blade - Article no.: 7911200616
Service information
Please note that the following parts of this product are subject to normal or natural wear and that the following parts are therefore also required for use as consumables. Wear parts*: Spark plug, air filter, petrol filter, blade, v-belt, battery, blade, tyres
* Not necessarily included in the scope of delivery
10. Storage
Storage for prolonged periods without operation
Allow the engine to cool before storing the machine in an enclosed space.
Store the ride-on mower with empty fuel tank and the fuel reserve in a lockable and well-ventilated room.
Never store the machine with petrol in the fuel tank inside a building in which the petrol fumes could come into contact with naked flames or sparks.
If the tank has to be emptied (e.g. immobilisation before the winter break), the fuel tank must be emptied out of doors only (empty the tank by running the engine out of doors, for example).
Store the machine in good operational condition.
The ignition key must always be removed and kept in a safe place, to prevent unauthorised or improper use by children or other persons.
Thoroughly clean the ride-on mower before storage (e.g. winter break). Dry grass residues and leaves near to the muffler may ignite.
Danger of combustion!
Allow the machine to cool down completely before covering it.
Perform all the necessary maintenance operations before storing the machine.
The battery cables must be disconnected if the ride-on mower is immobilised for longer periods. SCHEP-PACH recommends removing the battery and storing it in a dry and locked place.
Ensure that batteries are protected from unauthorised use (e.g. by children).
Charge the battery during the winter 1-2 times to ensure that the full charging capacity is maintained. Incorrect storage can damage the battery and is excluded from the guarantee.
Transport
Transporting the ride-on mower
On account of its own weight, the ride-on mower can cause severe crush injuries. Particular care must be taken when loading or unloading the ride-on mower onto/from a vehicle or trailer for transport purposes.
This ride-on mower must not be towed. For transporting on public roads, a suitable vehicle or a suitable trailer must be used.
Secure the ride-on mower on a loading area during transport. Always engage the parking brake.
Prior to transporting or storage, disengage the drive to the mowing blade or attachments.
When transporting the machine, always observe regional legislation, especially regarding load security and the transport of objects on load floors.
Allow the machine, in particular the engine and muffler, to cool down completely after loading and before further transport. The load floor and the area around the muffler and engine must be kept free of combustible materials such as straw, leaves or dry grass residues.
Always remove the ignition key
11. Disposal and recycling
Notes for packaging


The packaging materials are recyclable. Please dispose of packaging in an environmentally friendly manner.
Notes on the electrical and electronic equipment act [ElektroG]
![SCHEPPACH MR19661 - Notes on the electrical and electronic equipment act [ElektroG] - 1](/content/2026/04/622981/images/ba6eb64b4946f5b04bf69e085dcc86cb0b502533b108c507619da3679e3d4682.jpg)
Waste electrical and electronic equipment does not belong in household waste, but must be collected and disposed of separately!
- Used batteries or rechargeable batteries that are not installed permanently in the old appliance must be removed non-destructively before disposal. Their disposal is regulated by the battery law.
- Owners or users of electrical and electronic devices are legally obliged to return them after use.
- The end user is responsible for deleting their personal data from the old device being disposed of!
-
The symbol of the crossed-out dustbin means that waste electrical and electronic equipment must not be disposed of with household waste.
-
Waste electrical and electronic equipment can be handed in free of charge at the following places:
- Public disposal or collection points (e.g. municipal works yards)
- Points of sale of electrical appliances (stationary and online), provided that dealers are obliged to take them back or offer to do so voluntarily.
- Up to three waste electrical devices per type of device, with an edge length of no more than 25 centimetres, can be returned free of charge to the manufacturer without prior purchase of a new device from the manufacturer or taken to another authorised collection point in your vicinity.
- Further supplementary take-back conditions of the manufacturers and distributors can be obtained from the respective customer service.
- If the manufacturer delivers a new electrical appliance to a private household, the manufacturer can arrange for the free collection of the old electrical appliance upon request from the end user. Please contact the manufacturer's customer service for this.
- These statements only apply to devices installed and sold in the countries of the European Union and which are subject to the European Directive 2012/19/EU. In countries outside the European Union, different regulations may apply to the disposal of waste electrical and electronic equipment.
Information on the battery act [BattG]
![SCHEPPACH MR19661 - Information on the battery act [BattG] - 1](/content/2026/04/622981/images/5ce47a4ca34a8e78d38817e7728d4d444098dec61e869b93c4529b4760393727.jpg)
Old batteries and rechargeable batteries do not belong in household waste, but must be collected or disposed of separately!
- For safe removal of primary batteries or rechargeable batteries from the electrical appliance and for information on their type or chemical system, please refer to the additional information in the operating or assembly instructions.
- Owners or users of primary batteries and rechargeable batteries are legally obliged to return them after use. The return is limited to household quantities.
- Old batteries may contain pollutants or heavy metals that can harm the environment or human health. Recycling old batteries and using the resources they contain helps to protect these two important issues.
- The symbol of the crossed-out dustbin means that primary batteries and rechargeable batteries must not be disposed of with household waste.
- If the signs Hg, Cd or Pb are also located below the dustbin symbol, this stands for the following:
- Hg: Battery contains more than 0.0005% mercury
- Cd: Battery contains more than 0.002% cadmium
-
Pb: Battery contains more than 0.004% lead
-
Rechargeable batteries and primary batteries can be returned free of charge to the following places:
- Public disposal or collection points (e.g. municipal works yards)
- Sales points for primary batteries and rechargeable batteries
- Take-back points of the common take-back system for old device batteries
- Take-back point of the manufacturer (if not a member of the common take-back system)
- These statements are only valid for rechargeable batteries and primary batteries sold in the countries of the European Union and subject to the European Directive 2006/66/EC. In countries outside the European Union, different regulations may apply to the disposal of rechargeable batteries and primary batteries.
Removing the rechargeable battery before disposing of the device
- The integrated rechargeable battery must be removed and disposed of separately in an environmentally friendly manner before disposing of the device.
- Mask off the contacts and package the rechargeable battery such that it cannot move in the packaging. Please also observe any further national regulations.
You can find out how to dispose of the disused device from your local authority or city administration.
Fuels and oils
- Before disposing of the unit, the fuel tank and the engine oil tank must be emptied!
- Fuel and engine oil do not belong in household waste or drains, but must be collected or disposed of separately!
- Empty oil and fuel tanks must be disposed of in an environmentally friendly manner.
12. Troubleshooting
Troubleshooting
The table shows potential failures, their possible cause and removal options. However, if you are unable to remove the problem, contact a professional to assist you.
CAUTION!
Always switch off the engine and pull the ignition cable before starting any inspection or adjustment work.
CAUTION!
If, after making an adjustment or repair to the engine, you let it run for a few minutes, remember that the
exhaust and other parts will get hot. Thus, do not touch parts that emanate heat, as these may burn you.
| Fault Possible cause Remedy | ||
| Loud while running, machine vibrates heavily | Screws are looseBlade fasteners are looseBlade is unbalancedV-belt damaged.Discharge chute blocked. | Check screwsCheck blade fastenersReplace bladeReplace V-belt.Clean discharge chute. |
| Engine does not start | Incorrect start sequenceChoke setting incorrectBrake lever not pressedSpeed lever in wrong positionSpark plug is defectiveFuel tank is emptyBowden cables too longpoor fuel, storage without emptying the petrol tank, incorrect petrol typespark plug fouled (carbon residue on the electrodes), electrode distance too largeThe spark plug is wet from the petrol (motor flooded).Engine faulty | Check start processCheck choke settingPress brake leverCheck settingReplace spark plugRefill with fuelAdjust the Bowden cables using the union nuts.Empty the fuel tank and carburettor. Fill with fresh fuel.Clean the plug, check the heat value of the plug, replace the spark plug as required, set to 0.6 - 0.8 mmDry the spark plug and insert it again.Contact authorised customer service |
| Engine overheating. | Dirty cooling ribs.Engine oil level too low.V-belt worn. | Clean cooling ribs.Check the engine oil level and top up the engine oil if necessary.Replace the V-belt. |
| Machine does not drive. | Gearbox disengaged.V-belt (gearbox) detached.V-belt (gearbox) worn or defective.Missing feather key between rear axle and rear wheels. | Engage the gearbox (freewheel lever).Fit V-belt (gearbox).Replace V-belt (gearbox).Install feather key. |
| Engine runs unsteadily | Air filter is soiledSpark plug is soiled | Clean the air filterClean the spark plug |
| Poor cut, lawn turns yellow after mowing. | Blade is bluntCutting height is too low | Sharpen the bladeSet correct height |
| The discharge of grass clippings is unclean | Cutting height is too lowBlade is wornBasket is cloggedChute blockedGrass too wetDriving speed too high | Set correct heightReplace the bladeEmpty the basketClean the ejector chuteMow during dry weatherChoose a lower gear |
| The mower does not start with the electrical start | Battery has dischargedFuse burnt out | Charge the batteryReplace the fuse |
| Motor output drops during mowing | The driving speed in relation to the cutting height is too high | Reduce the driving speed and increase the cutting height |
| Braking power insufficient | The brake is no longer set correctly | Contact the specialist merchant/customer service |
Günzburger Straße 69
D-89335 Ichenhausen
Cher client,
Günzburger Straße 69
D-89335 Ichenhausen
Egregio cliente,
Günzburger Straße 69
D-89335 Ichenhausen
Estimado cliente,
Günzburger Straße 69
D-89335 Ichenhausen
Geachte klant,
Marge K = 1,08 dB(A)
Draag oordoppen.
Günzburger Straße 69
D-89335 Ichenhausen
Vážený zákazníku,
Günzburger Straße 69
D-89335 Ichenhausen
Vážený zákazník,
Günzburger Straße 69
D-89335 Ichenhausen
Tisztelt vásárló!
text_image
Technical diagram of a mechanical assembly with numbered components, likely for engineering or manufacturing documentation.Z
text_image
Technical diagram of mechanical assembly with numbered parts and exploded viewsL

text_image
Technical diagram of an electric motor assembly with numbered components and labeled partsO

text_image
1 2 3 4 3 4 3 M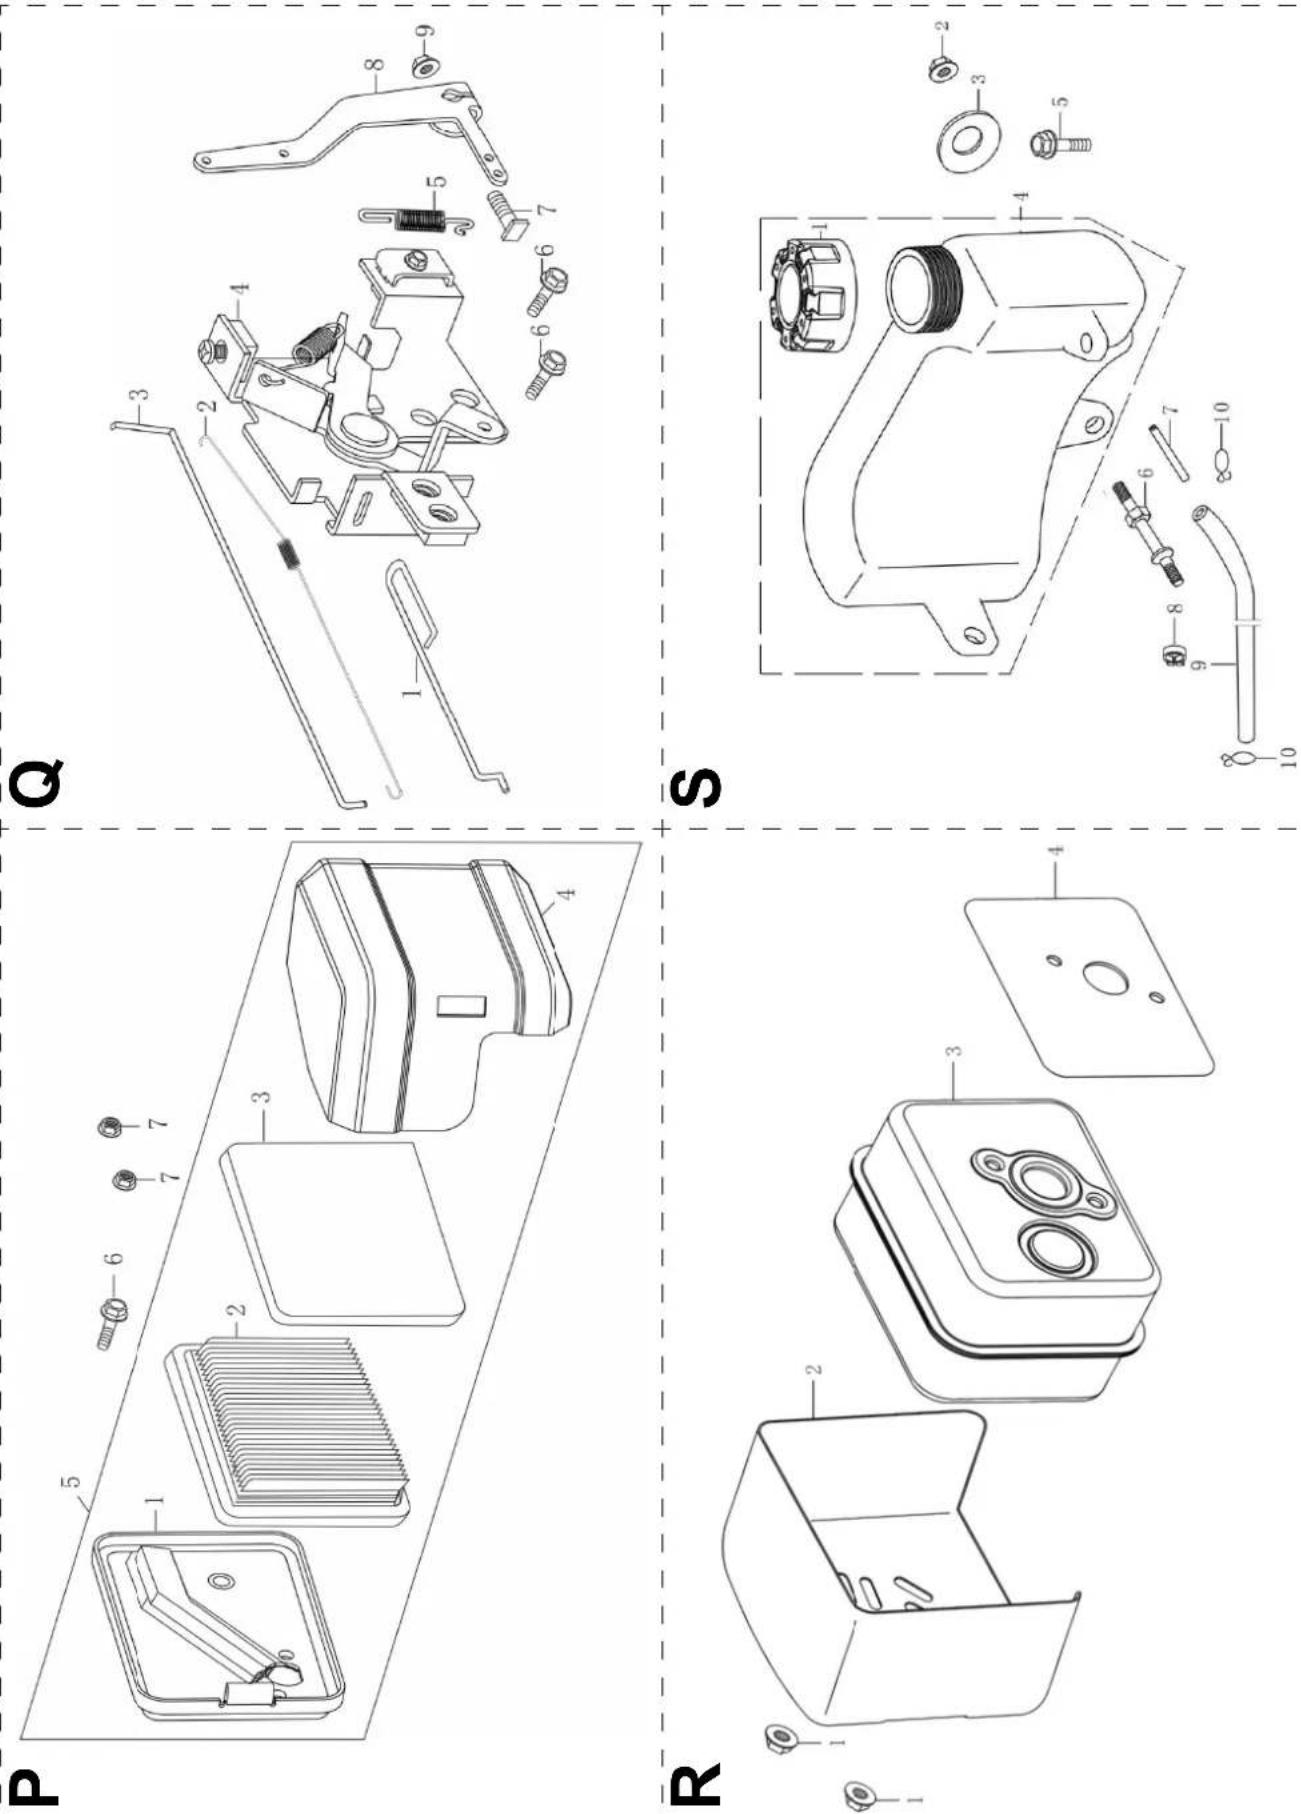
CE - Declaration of Conformity
Standard references:
EN ISO 5395-1:2013+A1, EN ISO 5395-3:2013+A1+A2
This declaration of conformity is issued under the sole responsibility of the manufacturer.
The object of the declaration described above fulfils the regulations of the directive 2011/65/EU of the European Parliament and Council from 8th June 2011, on the restriction of the use of certain hazardous substances in electrical and electronic equipment.
Subject to change without notice
Documents registrar: Stefan Hartinger
Günzburger Str. 69, D-89335 Ichenhausen
Garantie DE
Apparent defects must be notified within 8 days from the receipt of the goods. Otherwise, the buyers rights of claim due to such defects are invalidated. We guarantee for our machines in case of proper treatment for the time of the statutory warranty period from delivery in such a way that we replace any machine part free of charge which provably becomes unusable due to faulty material
or defects of fabrication within such period of time. With respect to parts not manufactured by us we only warrant insofar as we are entitled to warranty claims against the upstream suppliers. The costs for the installation of the new parts shall be borne by the buyer. The cancellation of sale or the reduction of purchase price as well as any other claims for damages shall be excluded.