Babyline 6.2 - Baby monitors Lionelo - Free user manual and instructions
Find the device manual for free Babyline 6.2 Lionelo in PDF.
| Product Type | Baby monitor with camera and LCD screen |
| Brand | Lionelo |
| Model | Babyline 6.2 |
| Power supply | Included power adapter (2 units), USB-C and micro-USB cables; rechargeable battery for the monitor |
| Transmission frequency | Wi-Fi 2.4 GHz |
| Operating temperature | 0 to 40 °C |
| Operating humidity | <85 % |
| Maximum number of cameras | 4 |
| Recording resolution (camera) | 1920 × 1080 pixels (on microSD card) |
| Recording resolution (monitor) | 800 × 480 pixels |
| Main functions | Two-way audio communication, sound detection with 3 levels, VOX mode (energy saving), temperature alarm (18-30 °C), feeding alarm, lullabies (8 melodies and nature sounds), video recording on microSD card (max 64 GB), night vision (light detector), image rotation |
| Care and cleaning | Clean with a soft, dry cloth. Do not use abrasive products or solvents. |
| Safety | Do not place near water or heat sources. Use only the supplied adapter. Keep out of reach of children (minimum distance of 1 m). Do not disassemble the device. |
| Spare parts and repairability | Contact customer service at help@lionelo.com. Do not repair yourself. |
| General information | CE certifications, compliant with EU directives. Warranty: detailed conditions on the manufacturer's website. |
Frequently Asked Questions - Babyline 6.2 Lionelo
User questions about Babyline 6.2 Lionelo
0 question about this device. Answer the ones you know or ask your own.
Ask a new question about this device
Download the instructions for your Baby monitors in PDF format for free! Find your manual Babyline 6.2 - Lionelo and take your electronic device back in hand. On this page are published all the documents necessary for the use of your device. Babyline 6.2 by Lionelo.
USER MANUAL Babyline 6.2 Lionelo
natural_image
Close-up of a smiling baby lying on a white blanket (no text or symbols visible)
lionelo
natural_image
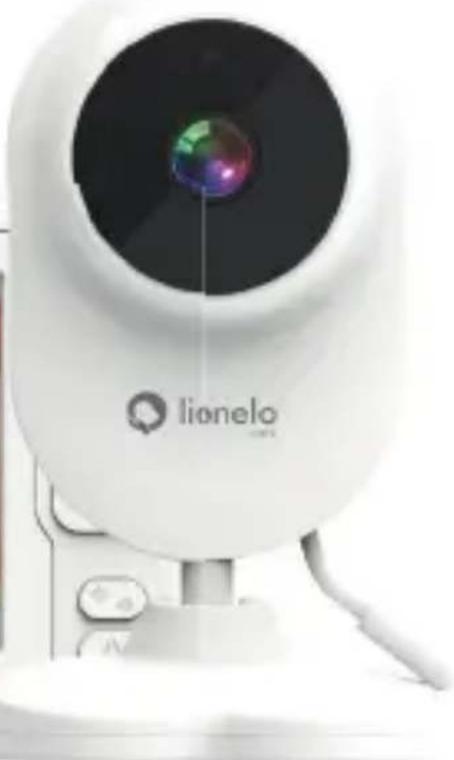
White lionelo medical device with lens and control buttons (no visible text or symbols on body)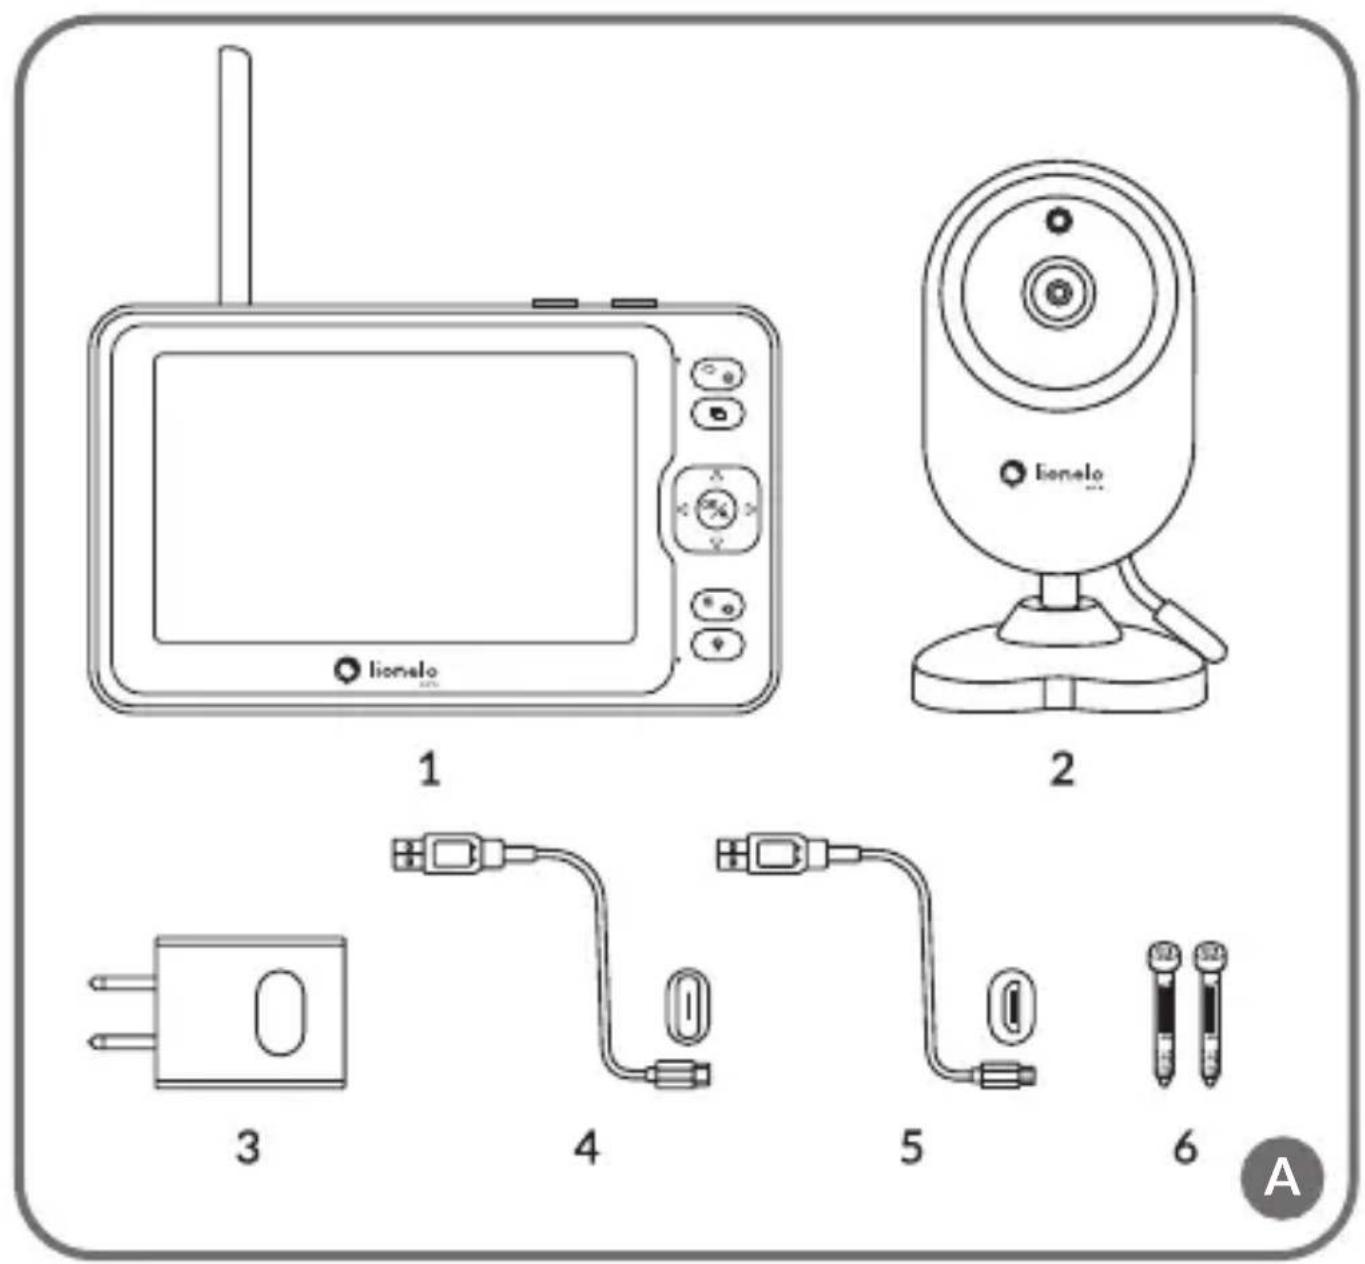
A
text_image
2 1 3 4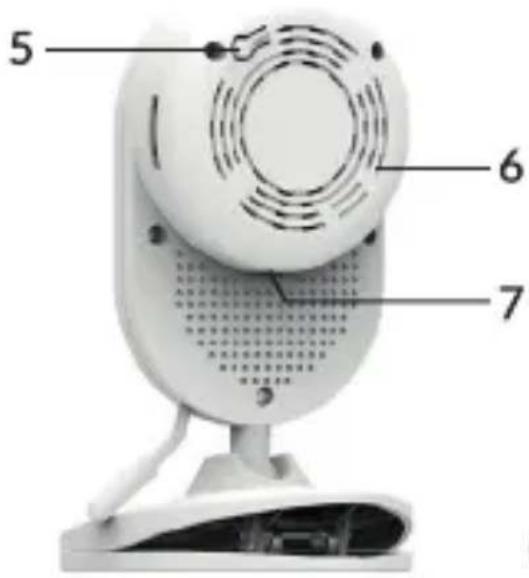
text_image
5 6 7B
text_image
1 2 3 4 5 6 7 8 9 10 11 12 13 14 15 C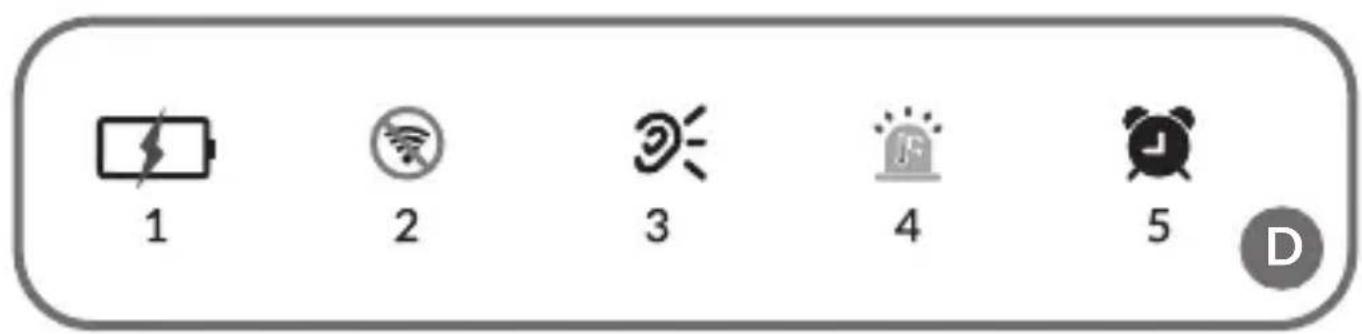
text_image
1 2 3 4 5 D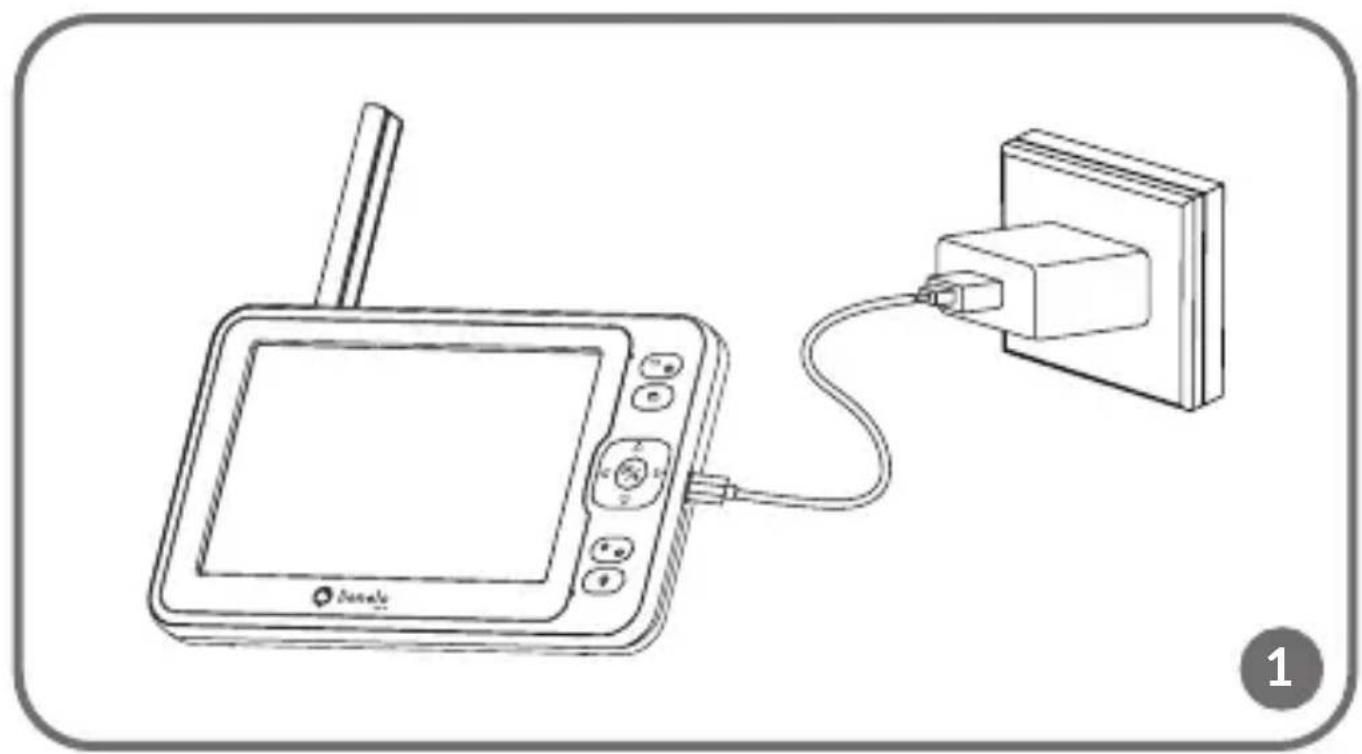
natural_image
Line drawing of a digital display connected to a wall-mounted device (no text or symbols)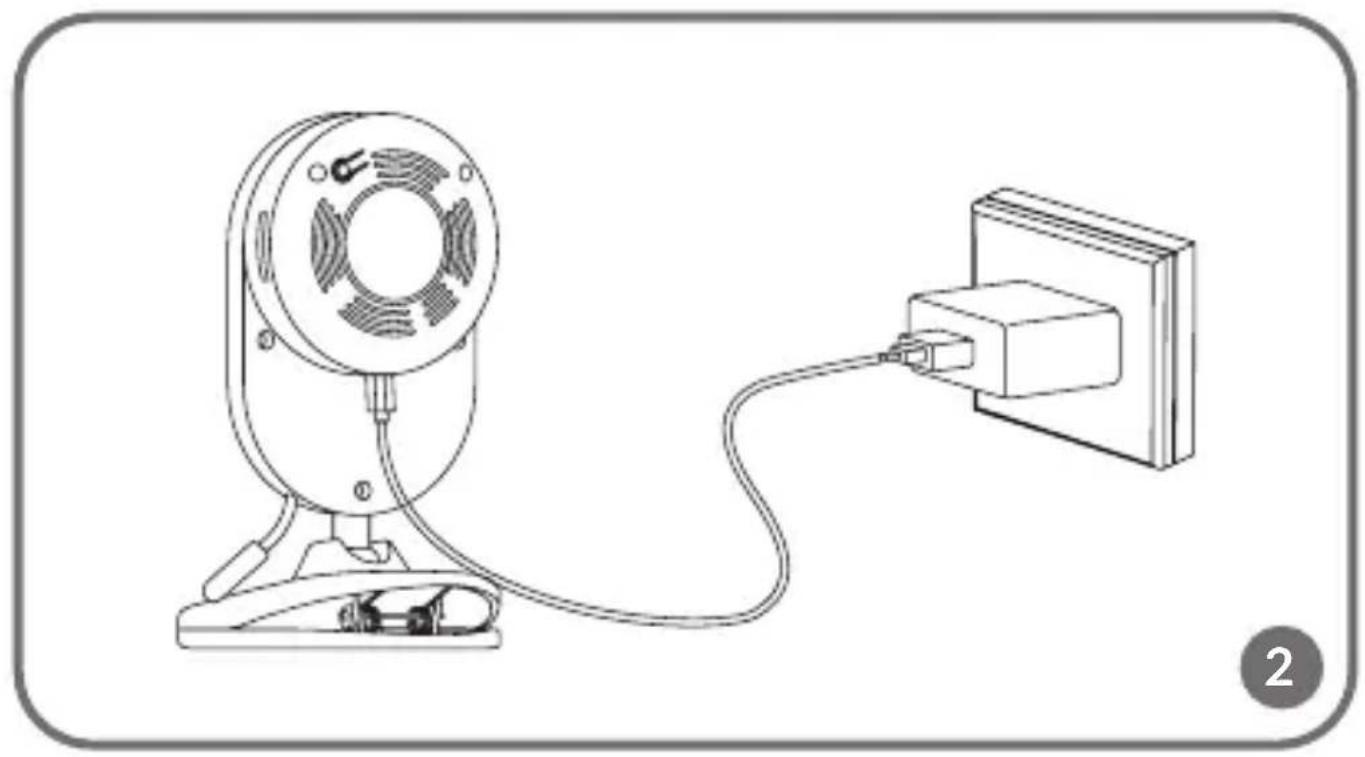
natural_image
Line drawing of a computer monitor connected to a wall-mounted power strip (no text or symbols)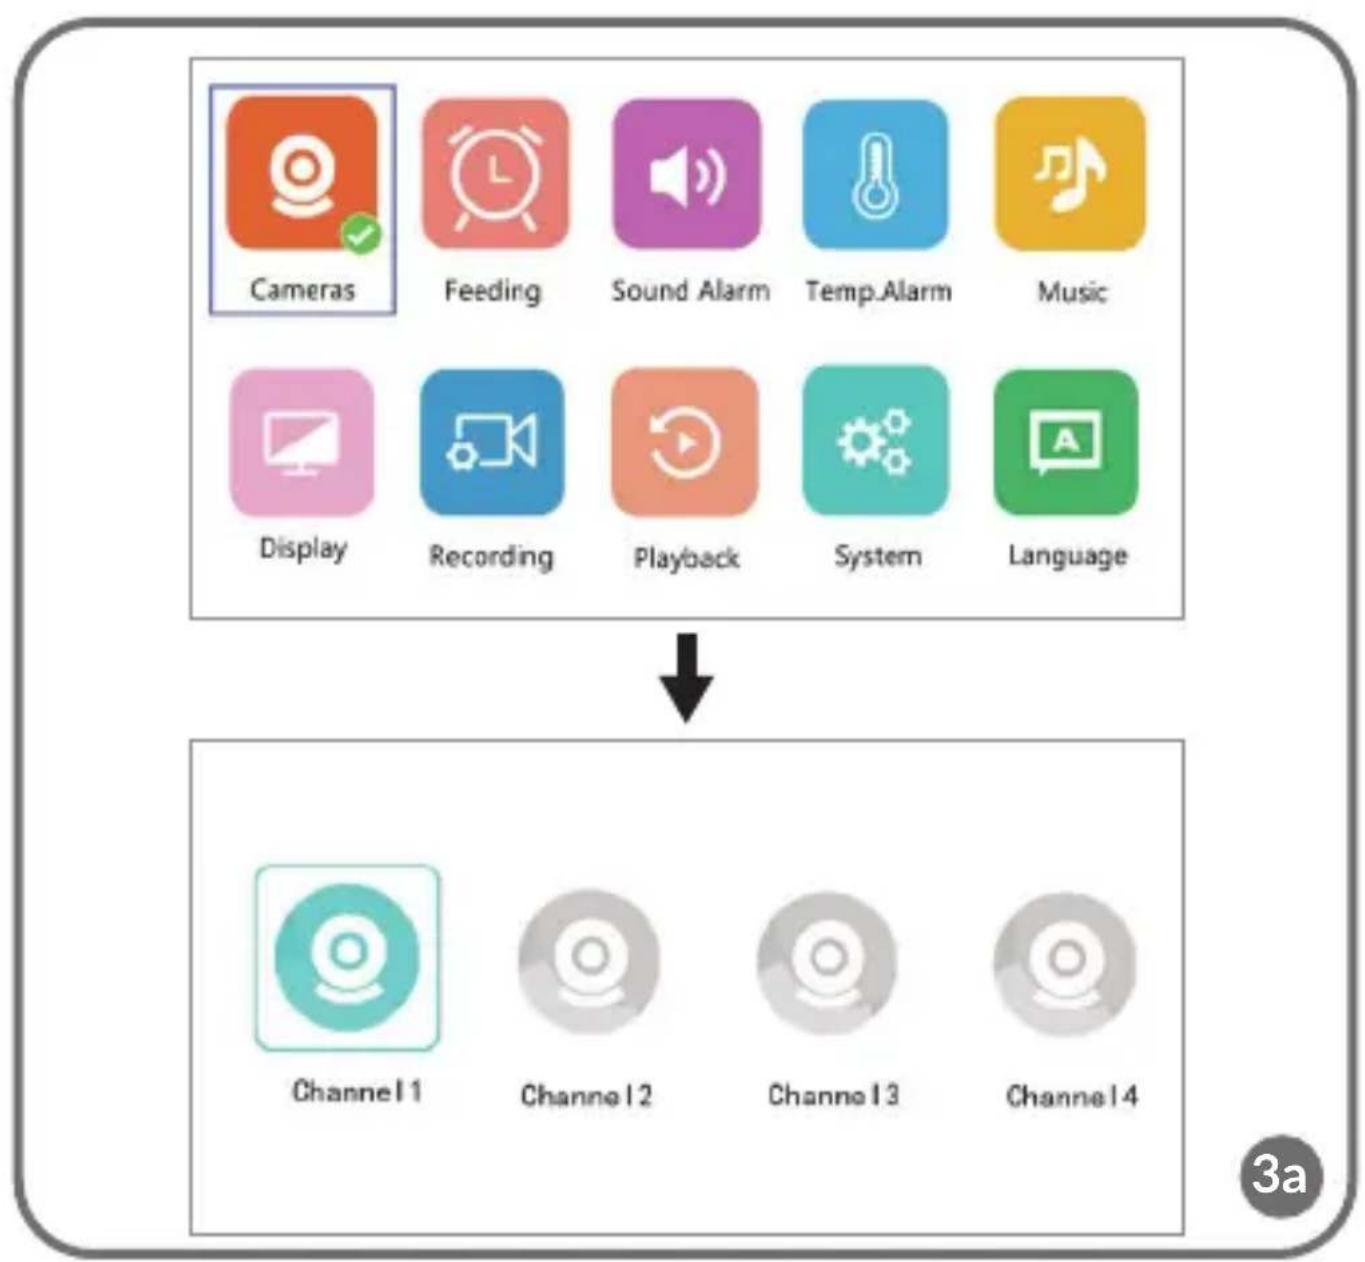
flowchart
graph TD
    A["Cameras"] --> B["Feeding"]
    B --> C["Sound Alarm"]
    C --> D["Temp.Alarm"]
    D --> E["Music"]
    F["Display"] --> G["Recording"]
    G --> H["Playback"]
    H --> I["System"]
    I --> J["Language"]
    K["Channel 1"] --> L["Channel 2"]
    L --> M["Channel 3"]
    M --> N["Channel 4"]
text_image
Pairing,please wait...
text_image
Paired!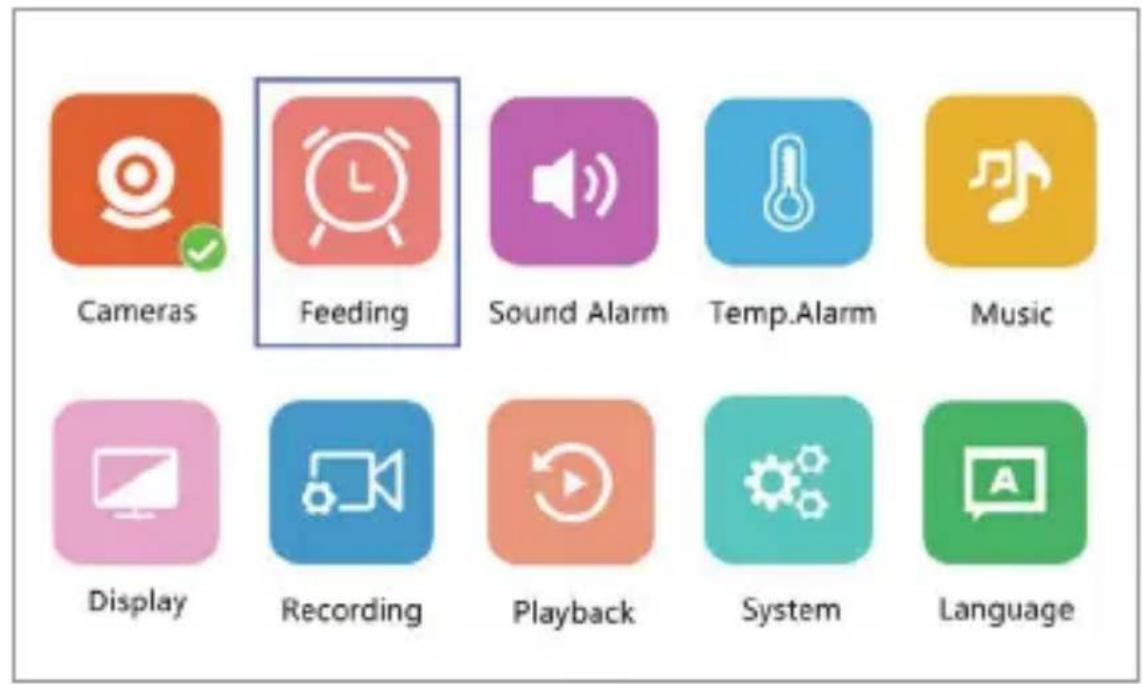
text_image
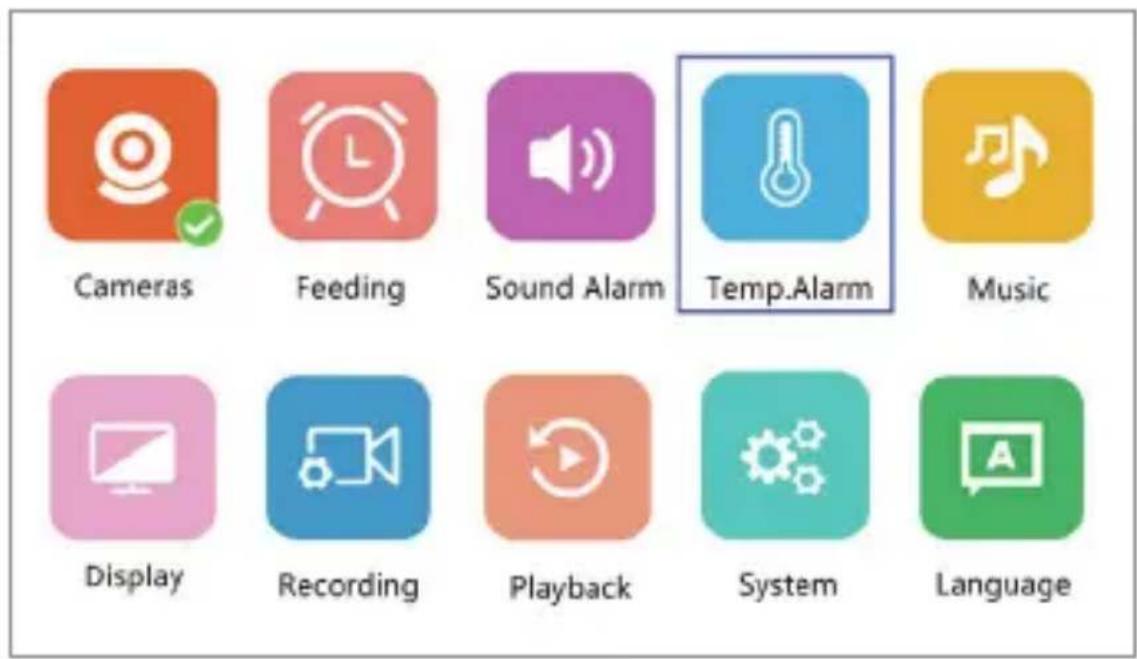
Cameras Feeding Sound Alarm Temp.Alarm Music Display Recording Playback System Language
text_image
A Time Interval OFF 2.5H 3H 3.5H 4H 4.5H 5H 5.5H B Repeat 1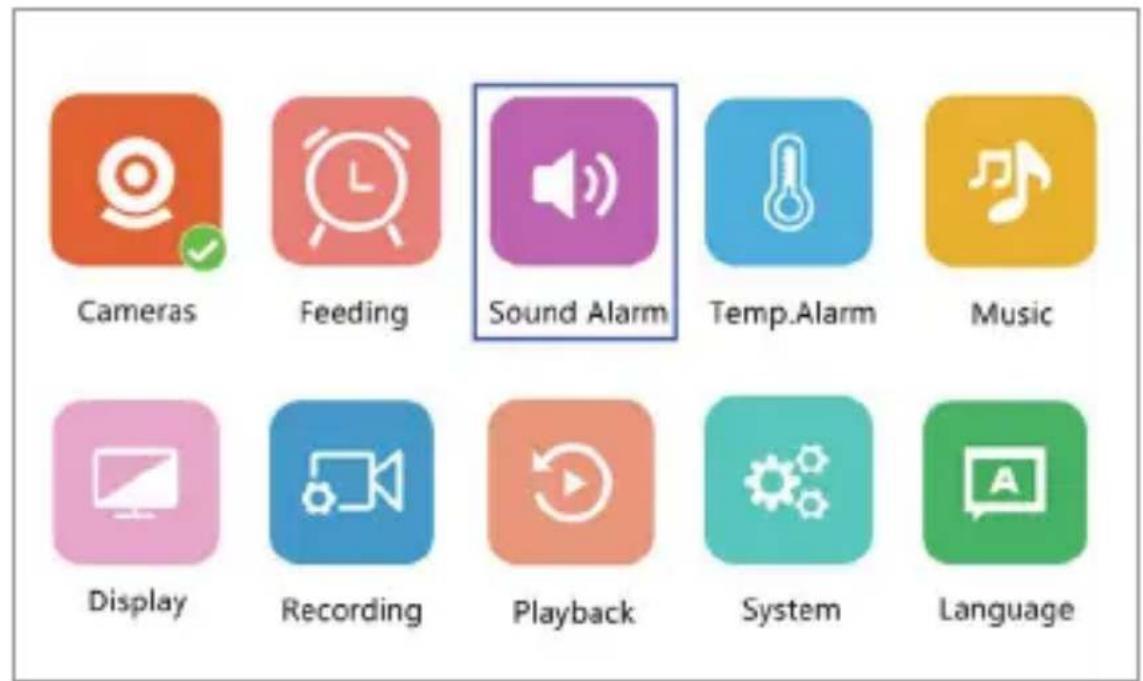
text_image
Cameras Feeding Sound Alarm Temp.Alarm Music Display Recording Playback System Language


Tips: 1、Set sensitivity for sound detection.
2、LOW:the alarm threshold is a shouting cry.
3、MEDIUM:the alarm threshold is a loud Voice.
4、HIGH:the alarm threshold is normal speech.
A
text_image
Cameras Feeding Sound Alarm Temp.Alarm Music Display Recording Playback System Language
B
text_image
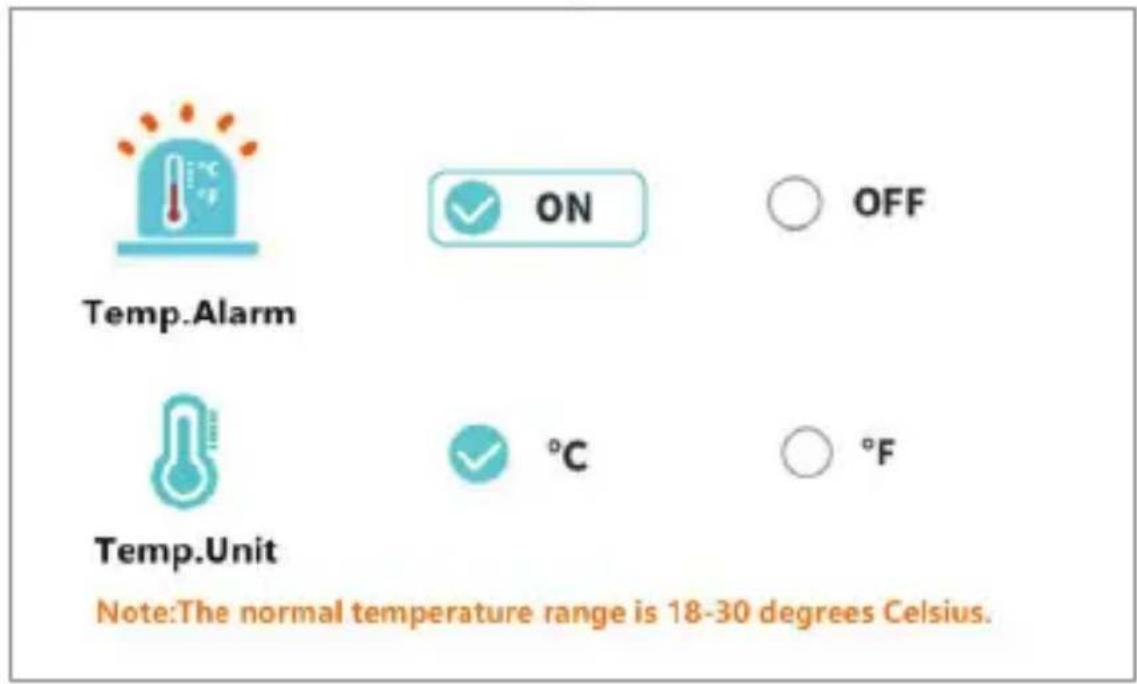
Temp.Alarm ON OFF Temp.Unit Note:The normal temperature range is 18-30 degrees Celsius.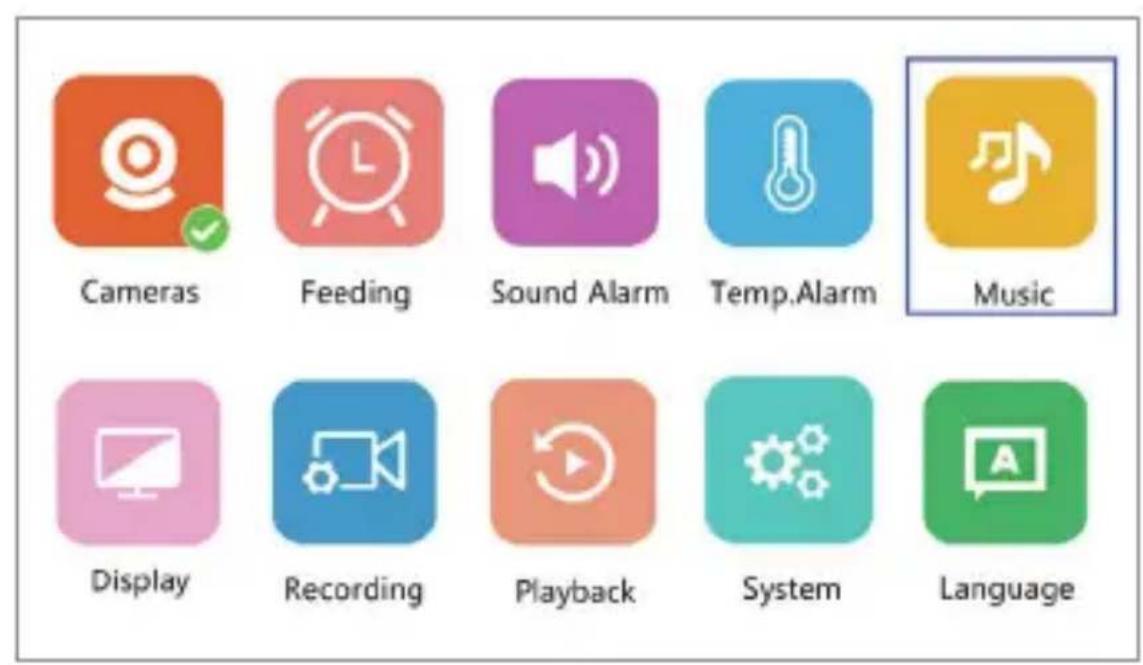
text_image
Cameras Feeding Sound Alarm Temp.Alarm Music Display Recording Playback System Language
text_image
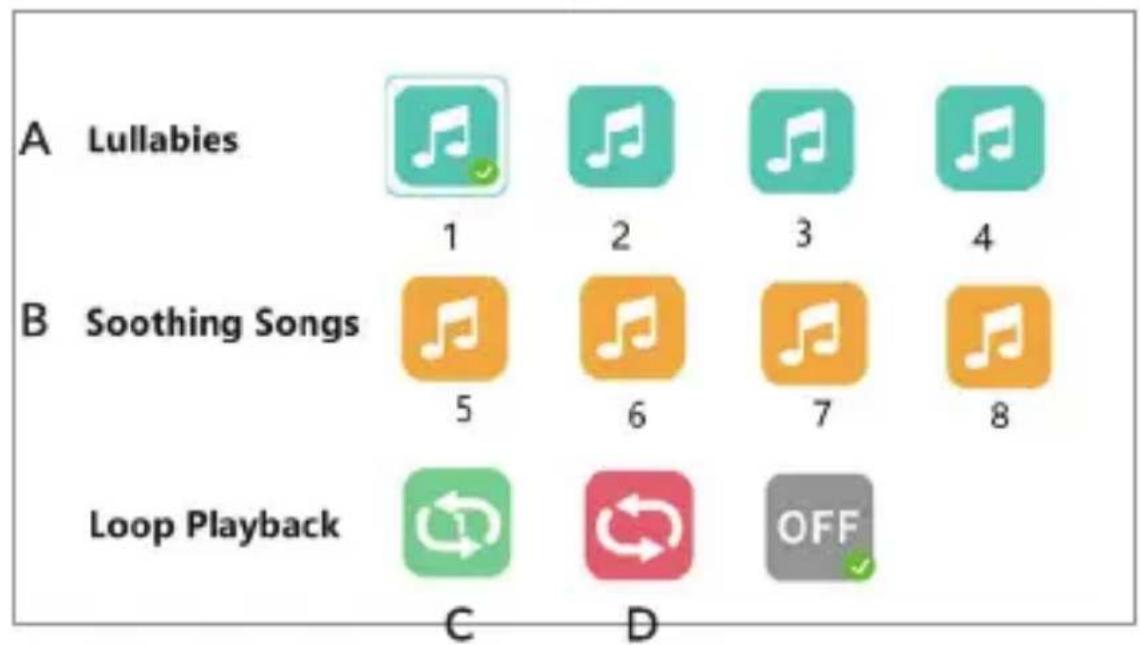
A Lullabies 1 2 3 4 B Soothing Songs 5 6 7 8 Loop Playback C D OFF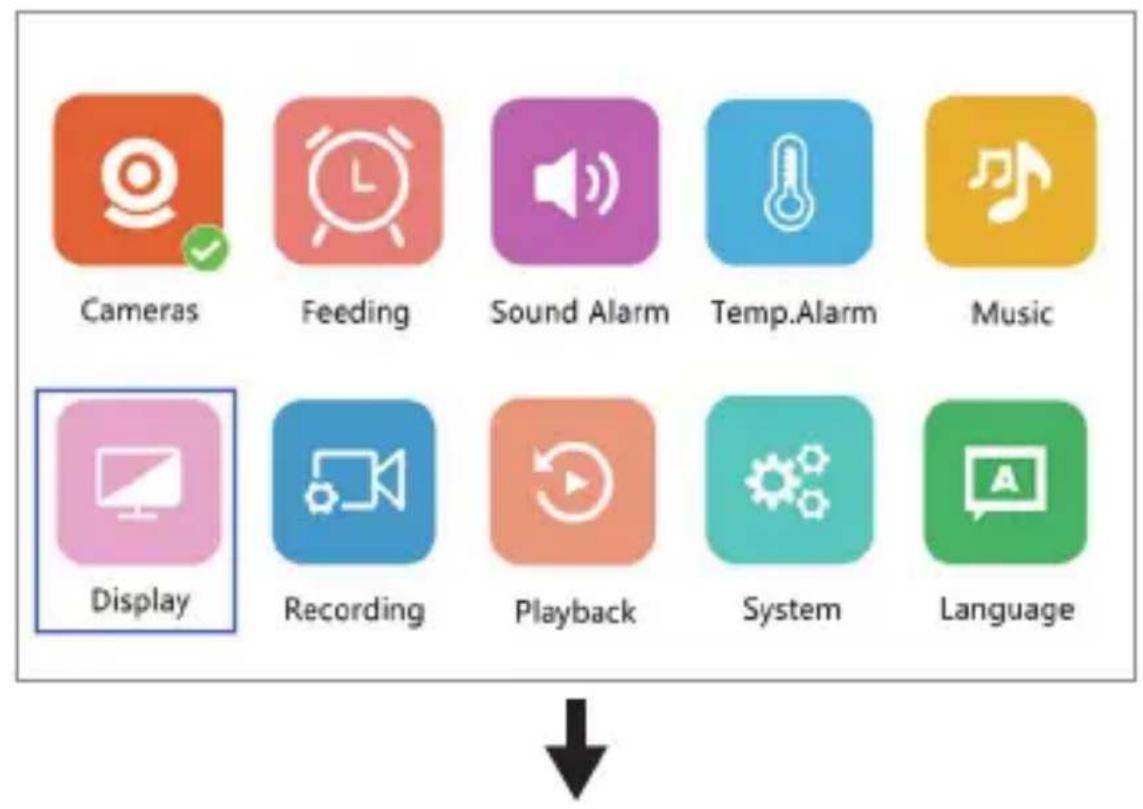
Sleep Timer


text_image
Cameras Feeding Sound Alarm Temp.Alarm Music Display Recording Playback System Language

text_image
Record by Monitor Resolution:480P Record by Camera Resolution:1080P Channel 1 ON OFF Channel 2 ON OFF Channel 3 ON OFF Channel 4 ON OFF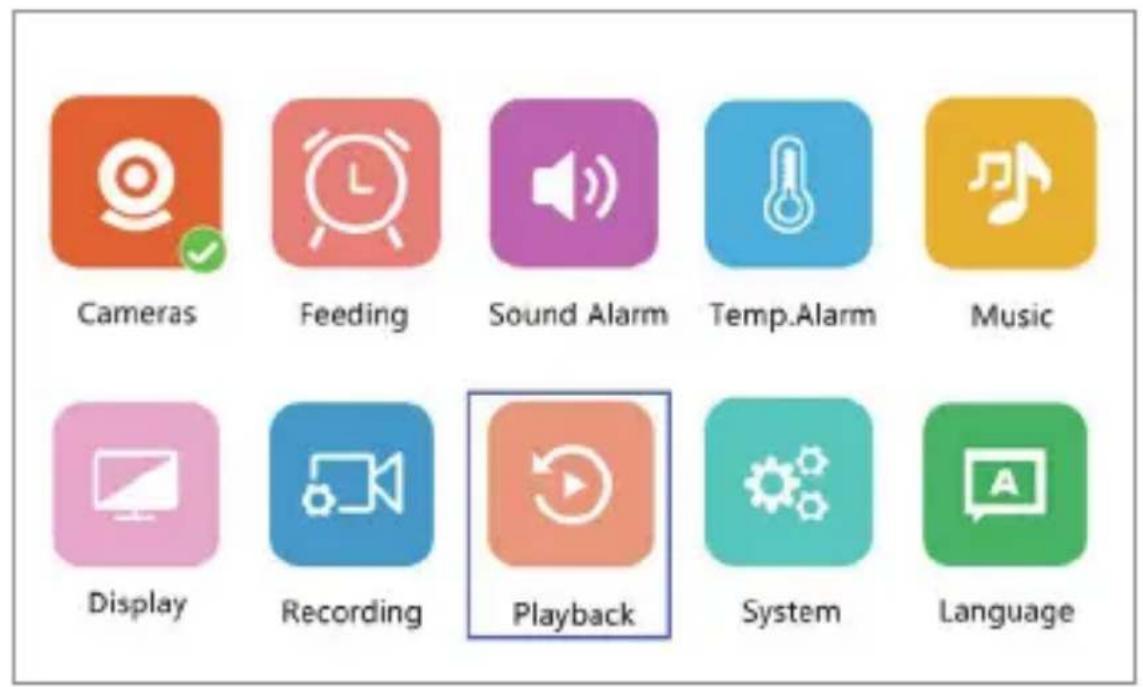
text_image
Cameras Feeding Sound Alarm Temp.Alarm Music Display Recording Playback System Language
text_image
Date: 2020 : 09 : 05 Channel: Cancel Search Current Channel:1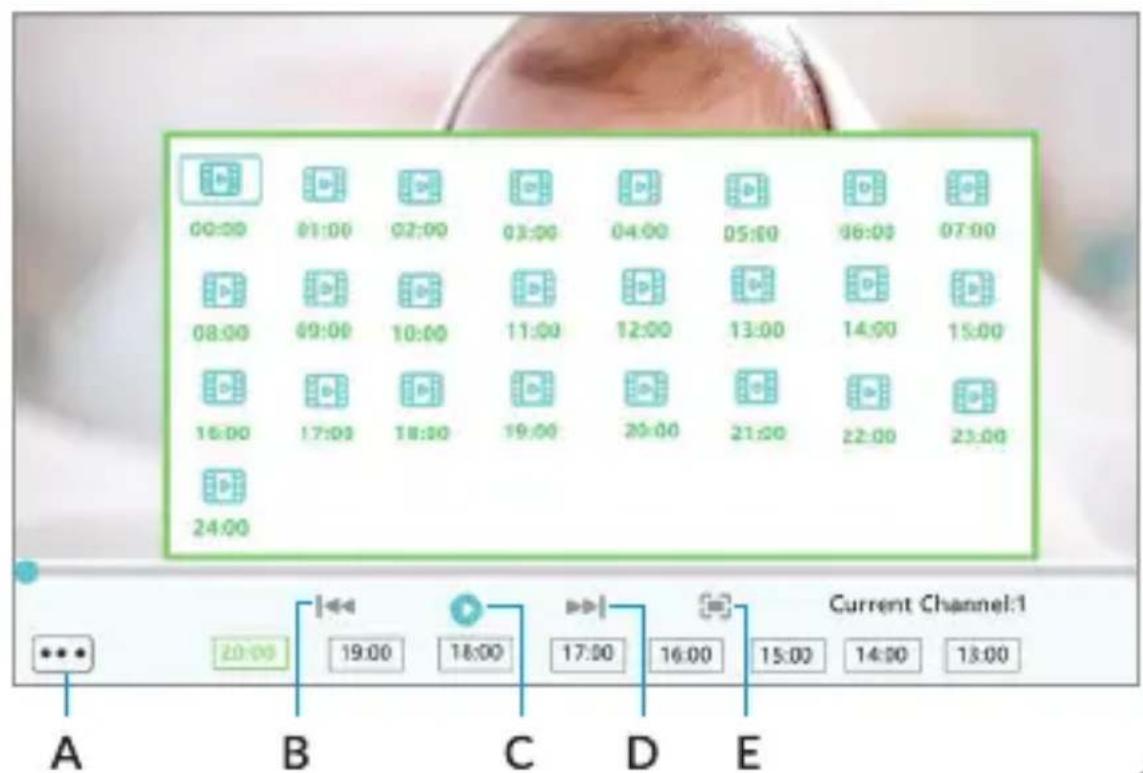
text_image
00:00 01:00 02:00 03:00 04:00 05:00 06:00 07:00 08:00 09:00 10:00 11:00 12:00 13:00 14:00 15:00 16:00 17:00 18:00 19:00 20:00 21:00 22:00 23:00 24:00 Current Channel:1 A B C D E10b
text_image
Cameras Feeding Sound Alarm Temp.Alarm Music Display Recording Playback System Language11

text_image
Date/Time
Factory Reset

Advance Settings

Version

| Capacity | Available | Picture Flip | |
| Monitor | 29GB | 24GB | |
| Channe1 | 14GB | 0GB | OFF ON |
| Channe2 | / | / | OFF ON |
| Channe3 | / | / | OFF ON |
| Channe4 | / | / | OFF ON |

Date/Time

Factory Reset

Advance Settings

text_image
i Version
Version XM530_BMS50X20_WVGA_16M_2C200911
Release Date 2020-09-11
Serial Number f6717b9d62713370
Channel 01
Version XM530_RA50X20_BMC-H_8M
Release Date 2020-07-22
Serial Number 8b5f3ecd3bcc8b5b
text_image
Cameras Feeding Sound Alarm Temp.Alarm Music Display Recording Playback System Language

text_image
ENGLISH 日本語 简体中文 PORTUGUE ITALIAN FRANCAIS ESPAHOL DEUTSCH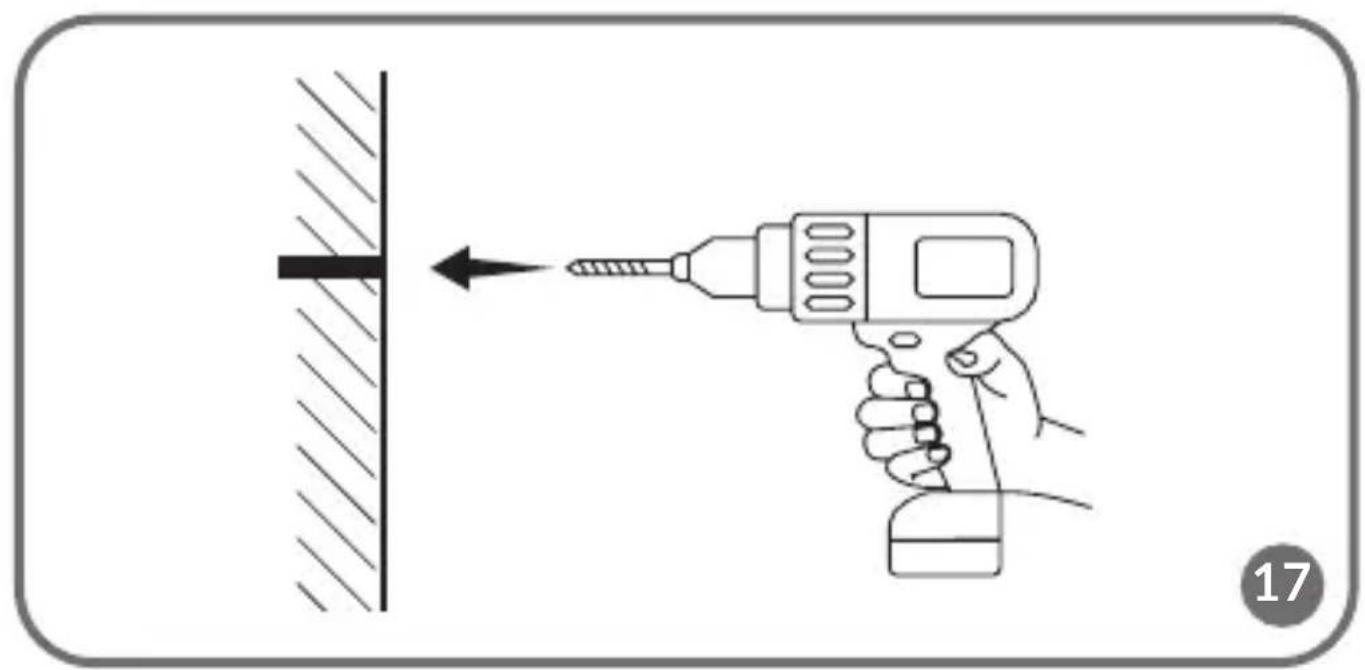
natural_image
Illustration of a hand using a drill pen to apply material to a surface, with no text or symbols present.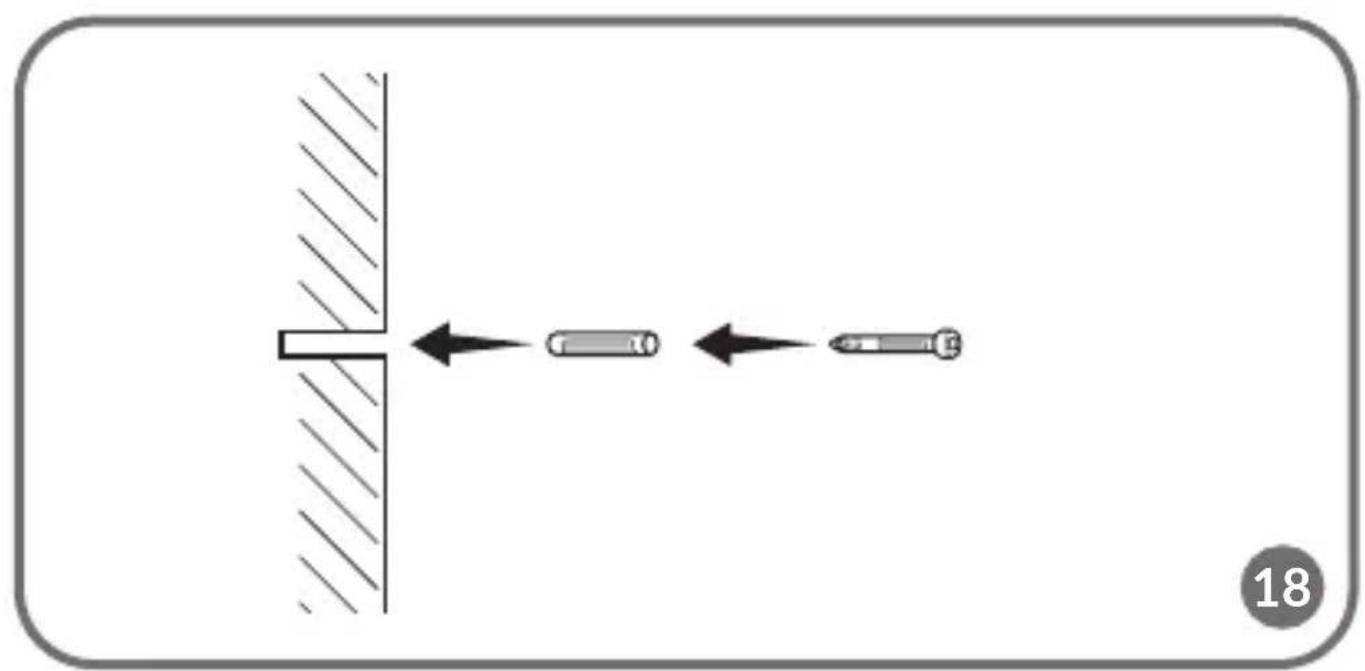
natural_image
Diagram showing a mechanical or optical setup with two elongated components and directional arrows, no text or symbols present.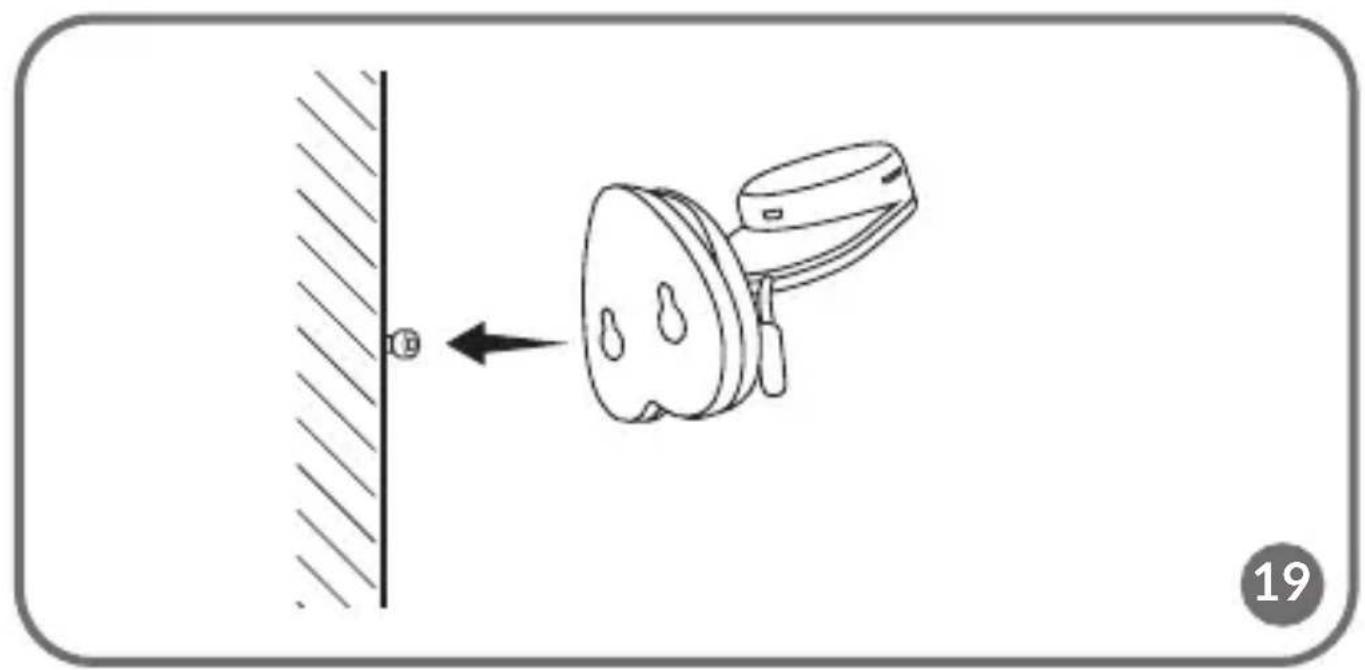
text_image
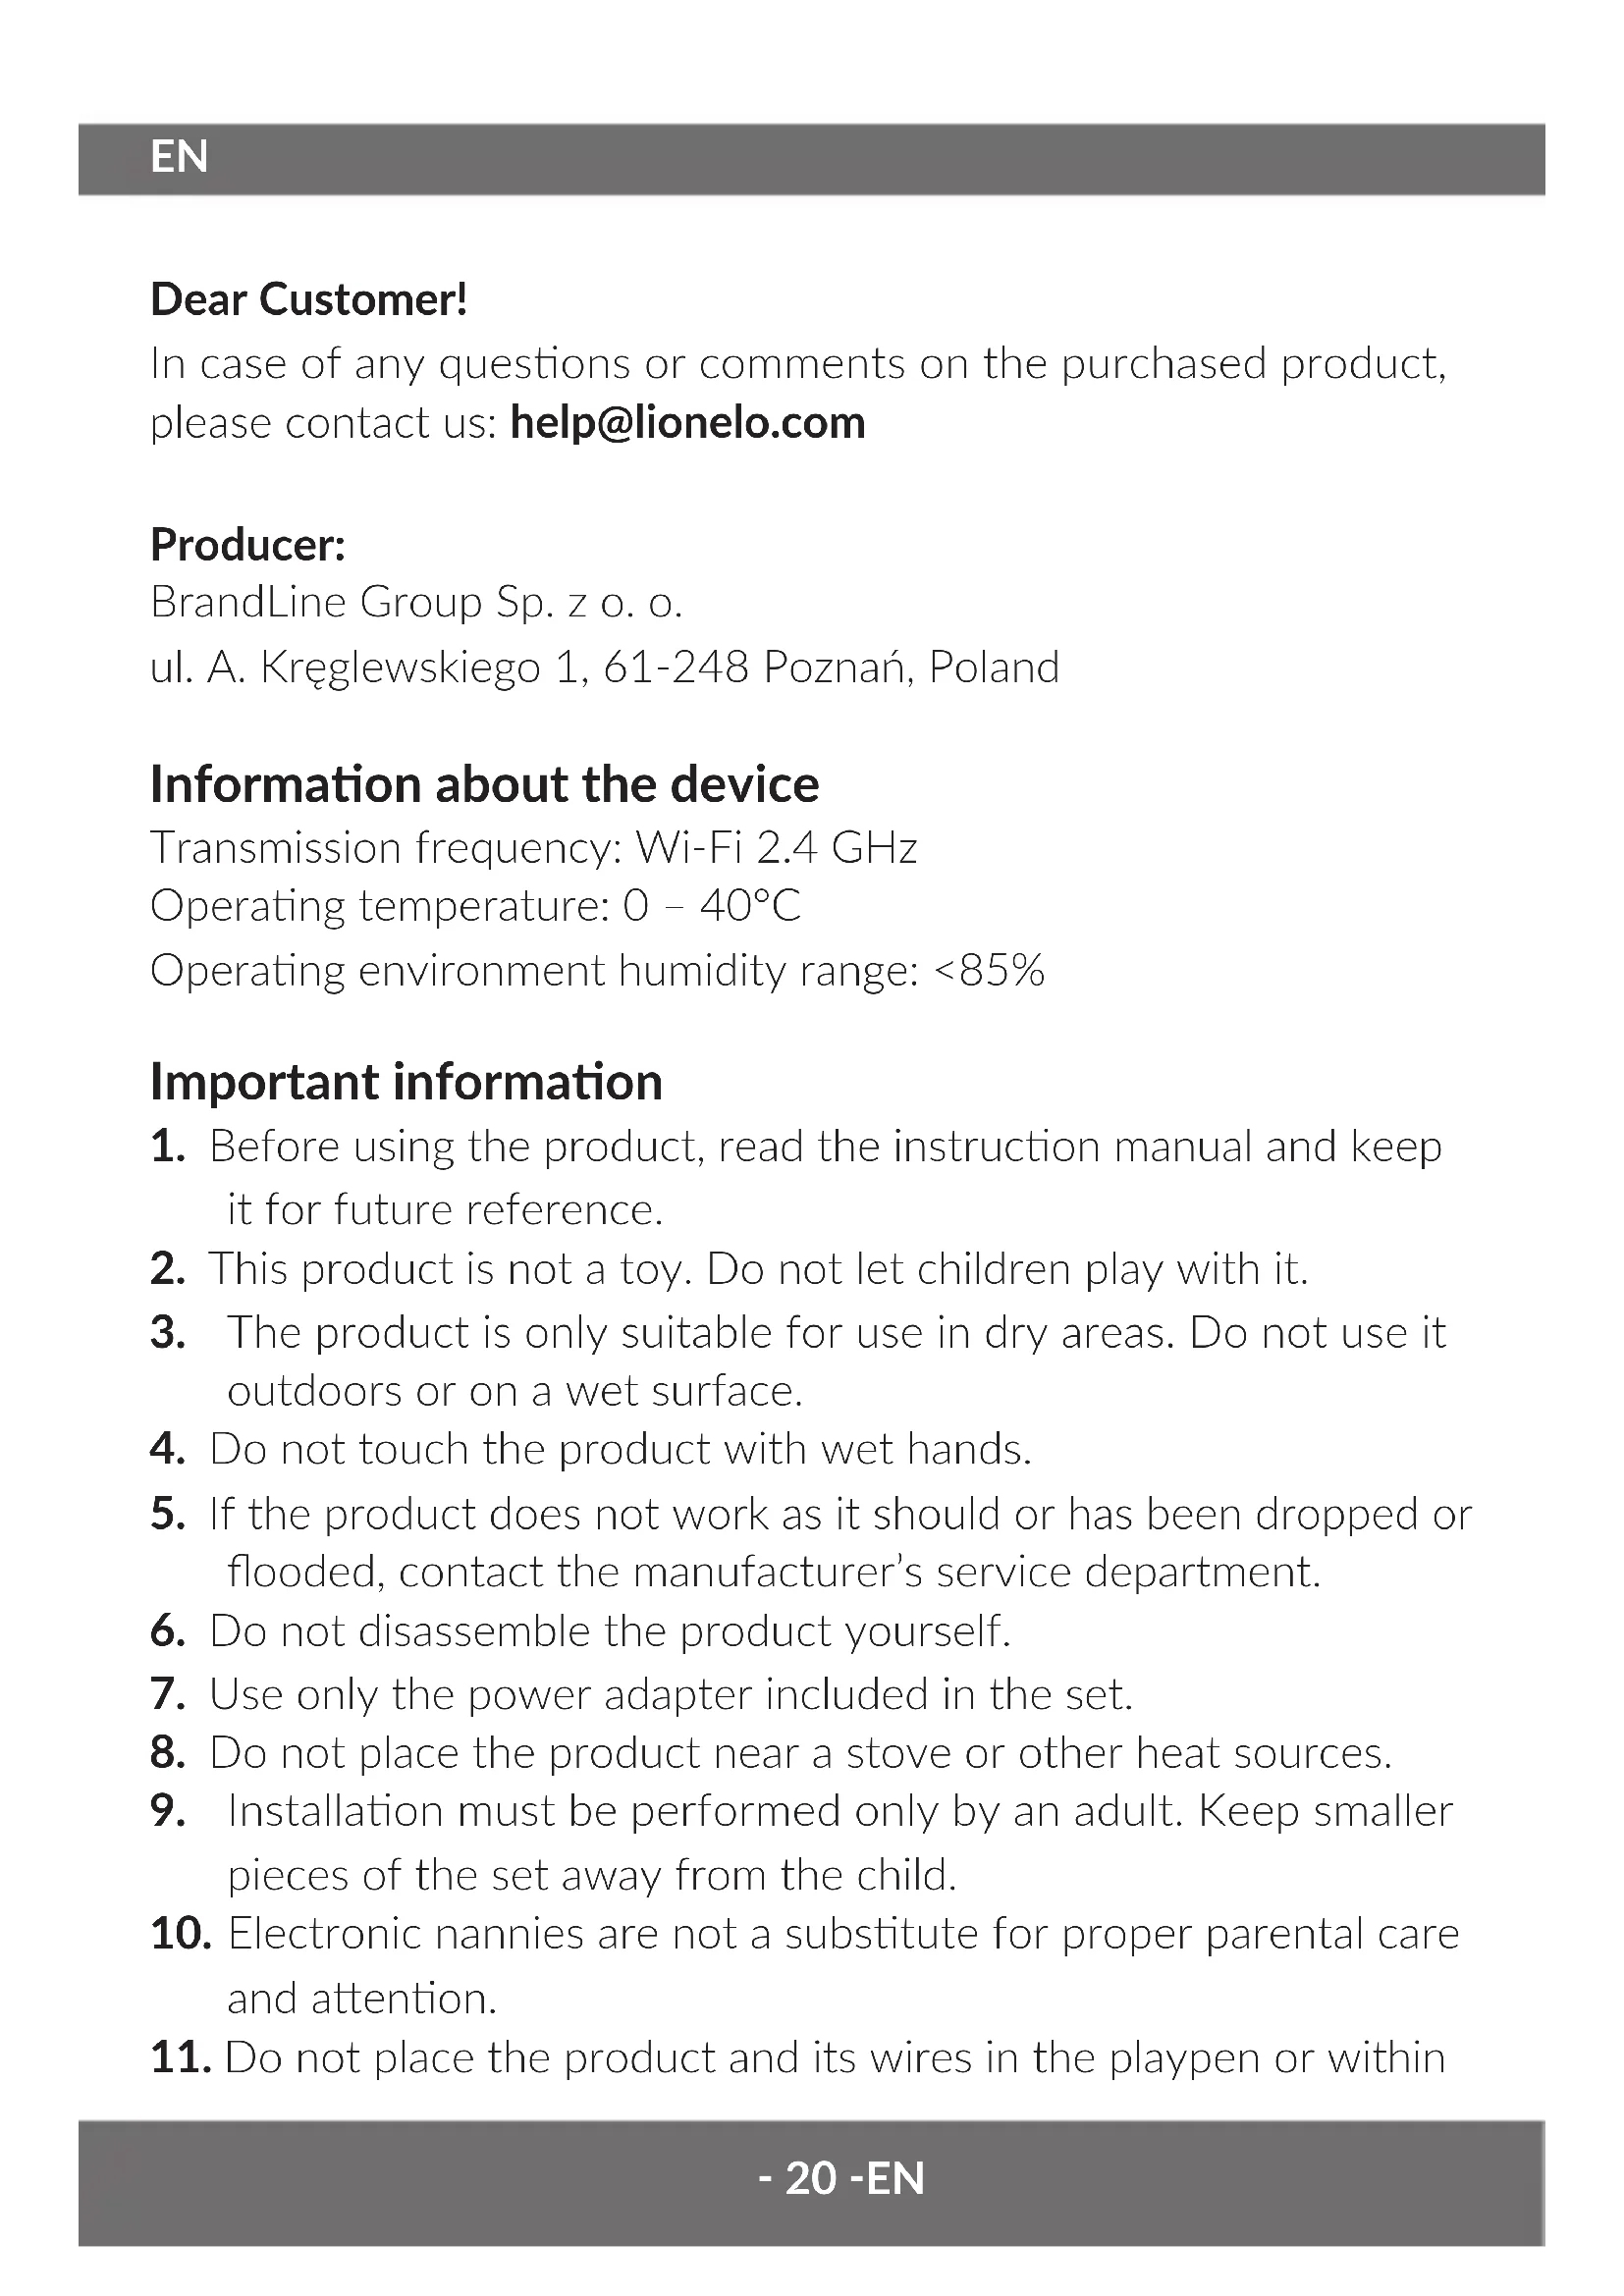
B 19Dear Customer!
In case of any questions or comments on the purchased product,
please contact us: help@lionelo.com
Producer:
BrandLine Group Sp. z o. o.
Information about the device
Transmission frequency: Wi-Fi 2.4 GHz
Operating temperature: 0 - 40°C
Operating environment humidity range: <85%
Important information
- Before using the product, read the instruction manual and keep it for future reference.
- This product is not a toy. Do not let children play with it.
- The product is only suitable for use in dry areas. Do not use it outdoors or on a wet surface.
- Do not touch the product with wet hands.
- If the product does not work as it should or has been dropped or flooded, contact the manufacturer's service department.
- Do not disassemble the product yourself.
- Use only the power adapter included in the set.
- Do not place the product near a stove or other heat sources.
- Installation must be performed only by an adult. Keep smaller pieces of the set away from the child.
- Electronic nannies are not a substitute for proper parental care and attention.
- Do not place the product and its wires in the playpen or within
reach of the child. Place them at a distance of at least 1 m.
- Do not place the product near water or a fire source.
- Do not touch the contacts of the plug with sharp or metal objects.
- Do not use the device if the cable or plug is damaged.
- To unplug the device grab the plug, not the cord.
- If the device will not be used for an extended period of time, unplug it from the power supply.


The product complies with the requirements of European Union directives.
In accordance with Directive 2012/19/EU, this
product is subject to separate collection. The product should not be disposed of with municipal waste as it may pose a risk to the environment and human health. Return the used product to the recycling centre for electrical and electronic equipment.
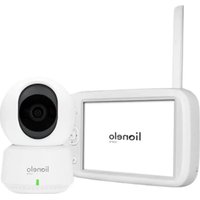
The set (fig. A)
- LCD monitor
- Camera
- Power supply x 2
- USB-C cable
- Micro-USB cable
- Screws
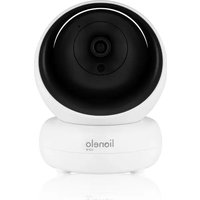
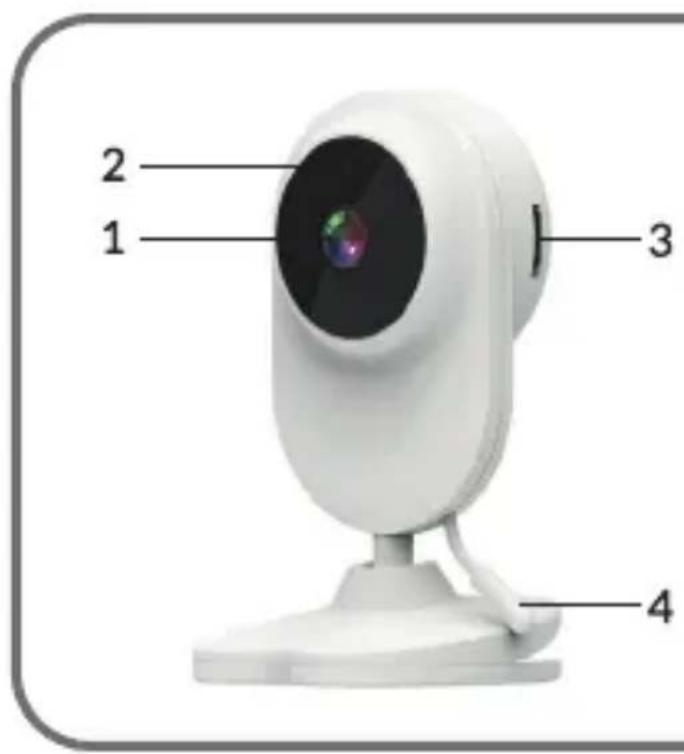
List of camera parts (fig. B)
- Lens
- Light sensor
- MicroSD card port (max. 64 GB)
- Temperature sensor
- Reset button
- Speaker
- MicroUSB port
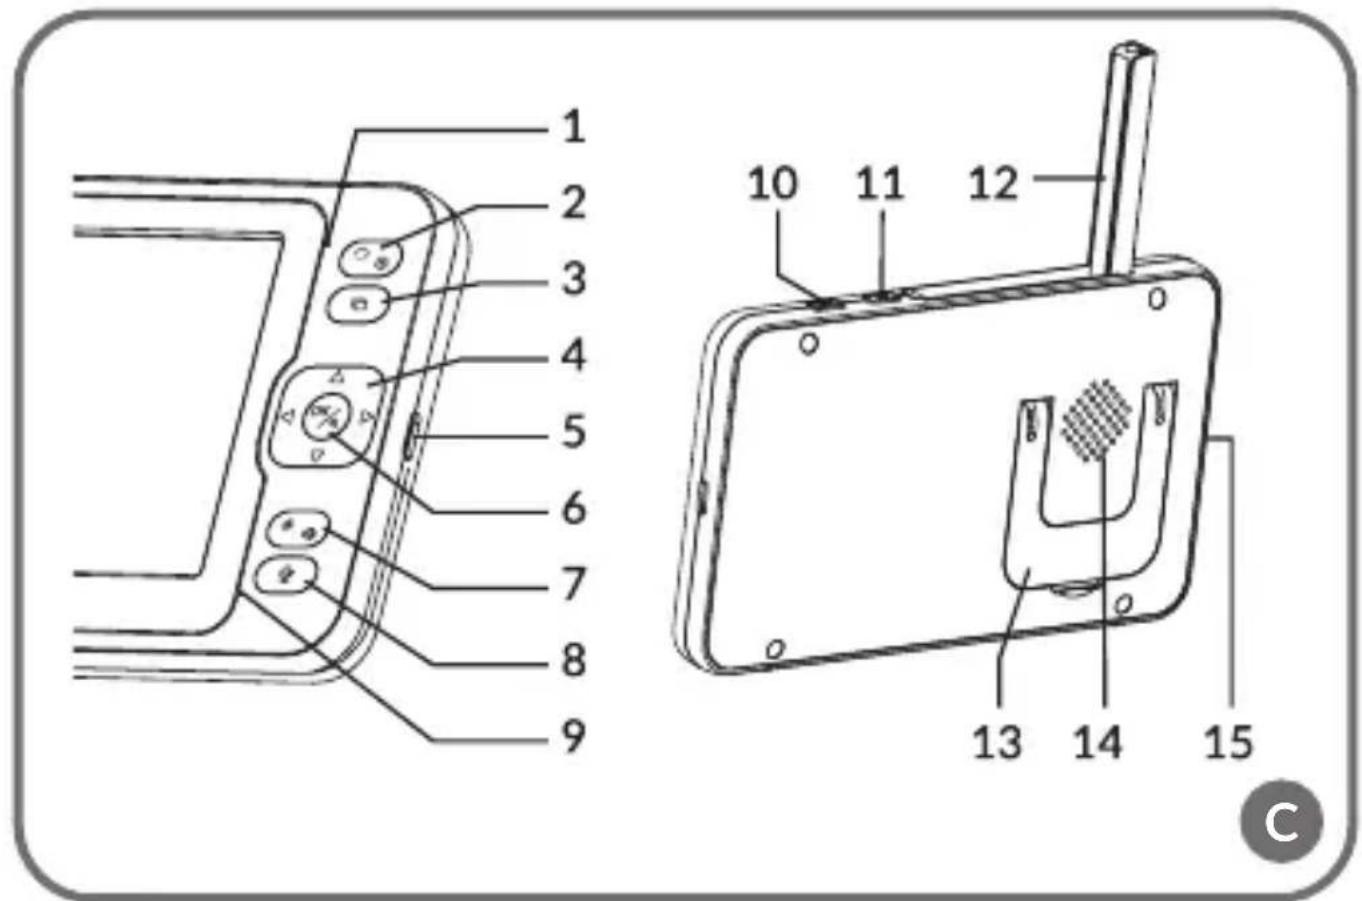
List of monitor parts (fig. C)
1. Diode
The diode glows green when the device is running and red when it is charging. When fully charged, the diode turns green again.
2. Menu button
In monitoring mode, press this button to enter the main menu. In the main menu, press the button to go to the previous page.
3. Camera switch button
Press this button to switch the camera. The status bar shows which camera is currently working.
4. Direction buttons
In the menu, buttons are used to move around the screen.
5. USB-C port
6. OK button
In the main menu, press this button to confirm the selected option or action.
7. Brightness and volume settings button
8. Two-way audio communication button
9. Microphone
10. VOX mode button
11. Monitor on/off switch
Press and hold to turn the monitor on or off. Press briefly to activate standby mode.
12. External antenna
Place the antenna up for the best signal.
13. Bracket
14. Speaker
15. MicroSD card port (max. 64 GB)
Monitor icons (fig. D)
1. Low battery level
2. No signal
- VOX mode / Audible alarm enabled
- Temperature alarm
- Feeding time alarm
Instructions for use
Power supply
- It is recommended to fully charge the monitor before use.
- Connect the plug of the power cord to the monitor and the other end to the power supply. Connect the power supply to the power outlet (fig. 1).
NOTE: Use only the power supply included in the set.
Device operation
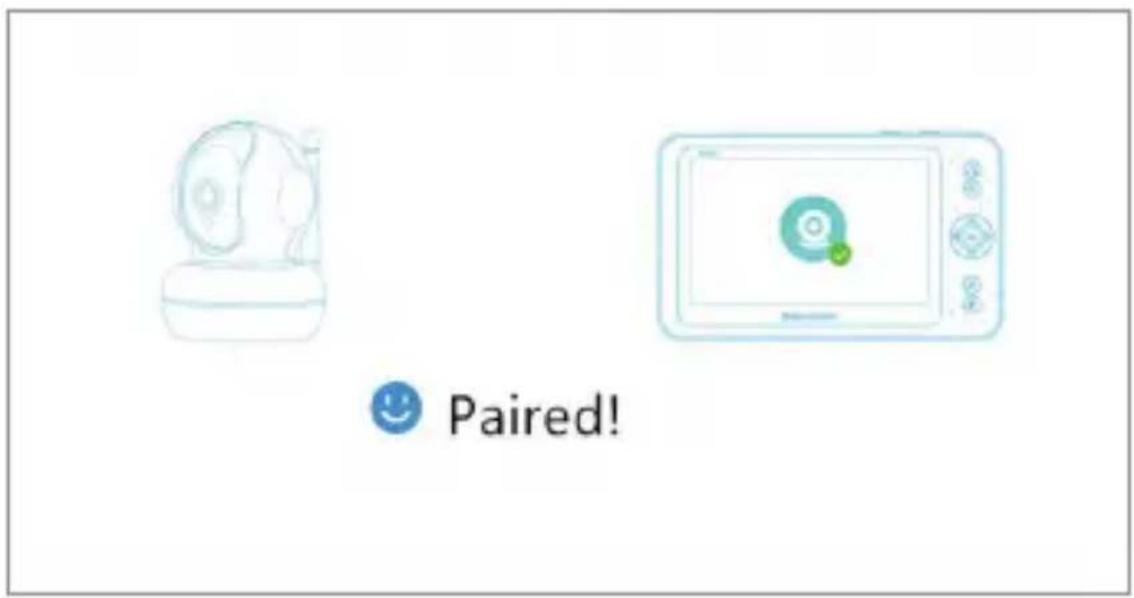
NOTE! The monitor and camera are paired by default. No re-pairing is necessary.
- Connect the plug of the power cord to the camera and the other end to the power supply. Connect the power supply to the power outlet (fig. 2). The device will beep.
- Press and hold the switch (11, fig. C) for 3-5 seconds to turn the monitor on. After about 10 seconds, the camera image will be displayed on the monitor.
- Place the camera in a convenient location and point it in the direction you want to monitor.
NOTE
Do not place the camera or wires in the baby's crib or within reach of the baby (min. 1 meter distance) due to the risk of injuring or suffocating the baby. In the event of image or sound interference, place the devices in a different location and make sure they are not near other electrical devices.
Adding a camera
It is possible to pair a total of 4 cameras.
-
Press the back button (2, fig. C) to enter the main menu.
-
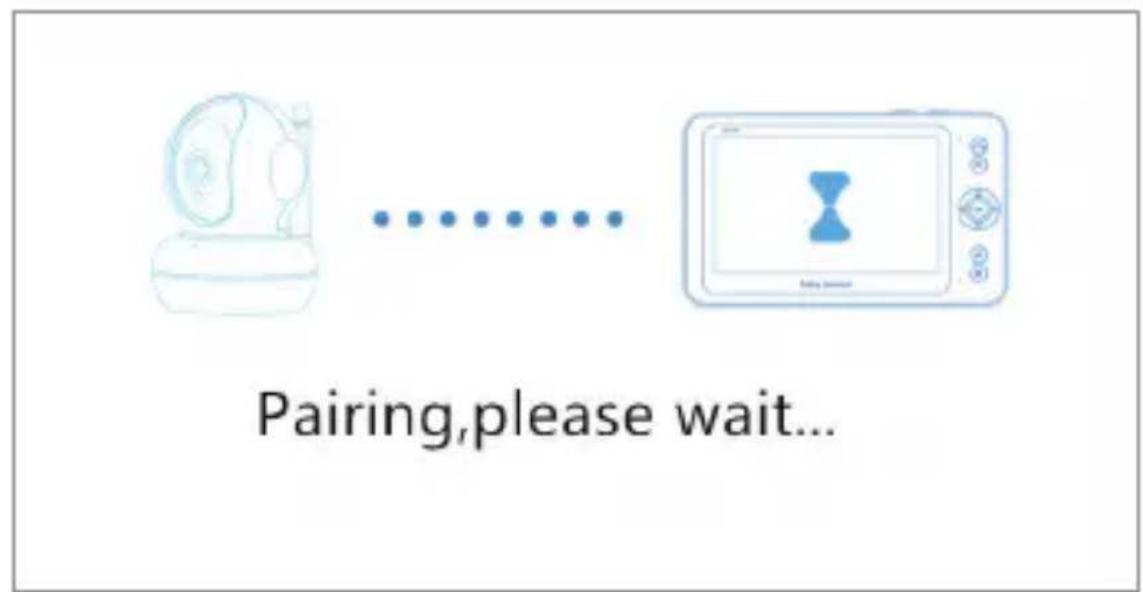
Select the "Cameras" option, then select the channel to which the new camera is to be added (fig. 3a) and press the OK button. The camera was paired with the monitor (fig. 3b).
- If you have problems adding a camera, make sure the camera is connected to a power source. If so, reset the camera by pressing the reset button (5, fig. B), then add the camera manually (see: Adding a Camera) and make sure the camera and monitor are within 2 meters of each other.
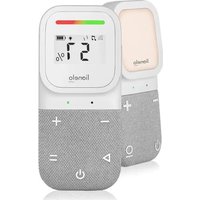
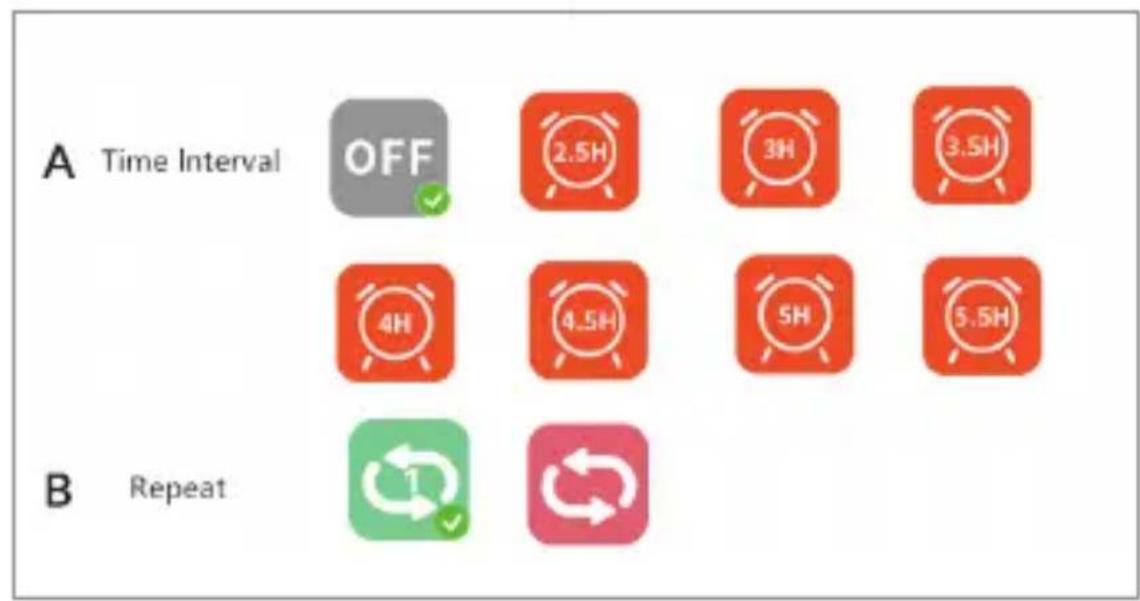
Feeding time alarm settings
- In the main menu, select the "Feeding" option (fig. 4).
- Select the time after which the alarm should be triggered (A, fig. 4). Select whether the alarm is to be triggered once or in a loop (B, fig. 4).
- To turn off the feeding time alarm function, select OFF.
Sound detection
Select “Sound alarm” in the main menu, then choose the sound detection sensitivity level: low, medium or high, or turn off the sound alarm completely by selecting OFF (fig. 5).
- Low level: the device detects the baby's crying.
- Medium level: the device detects a loud voice.
- High level: the device detects normal speech.
If the receiver detects sound above the set volume level, the screen will display the icon (💡) and beep for about 30 seconds. Press any button to turn off the sound alarm.
Sound detection in energy-saving VOX mode
Before enabling VOX mode, sound detection must be enabled (see: Sound detection).
To enable VOX mode, press the VOX button (10, fig. C), an icon will appear in the upper left corner ( ). The screen in sleep mode will
wake up automatically when sound is detected. To turn off VOX mode, press the button again.
Temperature alarm settings
- In the main menu, select "Temperature alarm" (A, fig. 6).
- Select the unit in which the room temperature is to be displayed – degrees Celsius or Fahrenheit (B, fig. 6).
- If the temperature exceeds or falls below a value in the default range of 18 - 30°C (64 - 86°F), an alarm lasting about 30 seconds will be triggered and an icon will appear on the screen ( ).
- To turn off the temperature alarm, select OFF (B, fig. 6).
Melodies
- In the main menu, select "Music" (fig. 7). Select one of the eight available lullabies (A, fig. 7) or nature sounds (B, fig. 7) and press the OK button.
- It is possible to play a selected melody in continuous mode (C, fig. 7) or all melodies in a loop (D, fig. 7).
The selected melody will play on both the camera and the monitor.
Display settings
- In the main menu, select the "Display" option.
- Select the time after which the display should go into sleep mode (fig. 8): 1 minute, 10 minutes, 30 minutes, or continuously on (fig. 8).
Brightness and volume settings
Press the button (7, fig. C), then adjust the brightness of the screen with the upper and lower direction buttons, and the volume with the right and left buttons.
Two-way audio communication
Press and hold the two-way communication button (8, fig. C) to start audio transmission, release to abort.
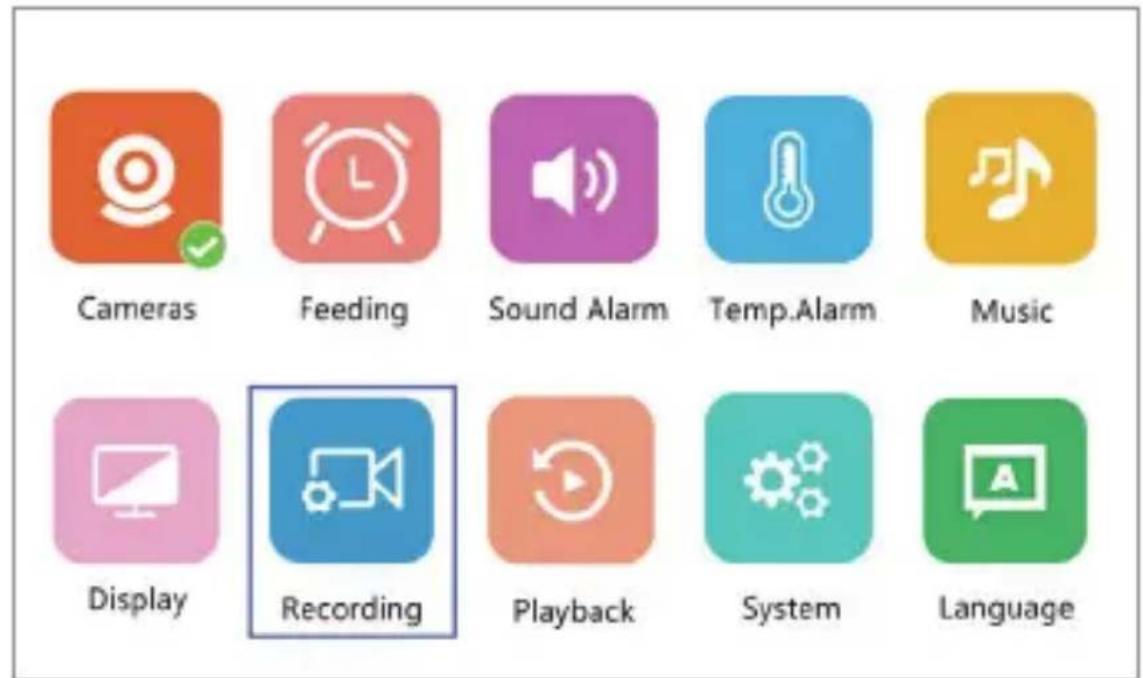
Video recording
- Insert the microSD card into the port on the monitor (15, fig. C) or the port on the camera (3, fig. B).
- In the main menu, select the "Recording" option (fig. 9). Make sure the date and time are up to date before recording.
The camera with a microSD card can record 1920*1080 resolution video, which is not playable directly on the monitor.
The monitor with a microSD card can record video at 800*480 resolution, which can be played directly on the monitor.
Video playback
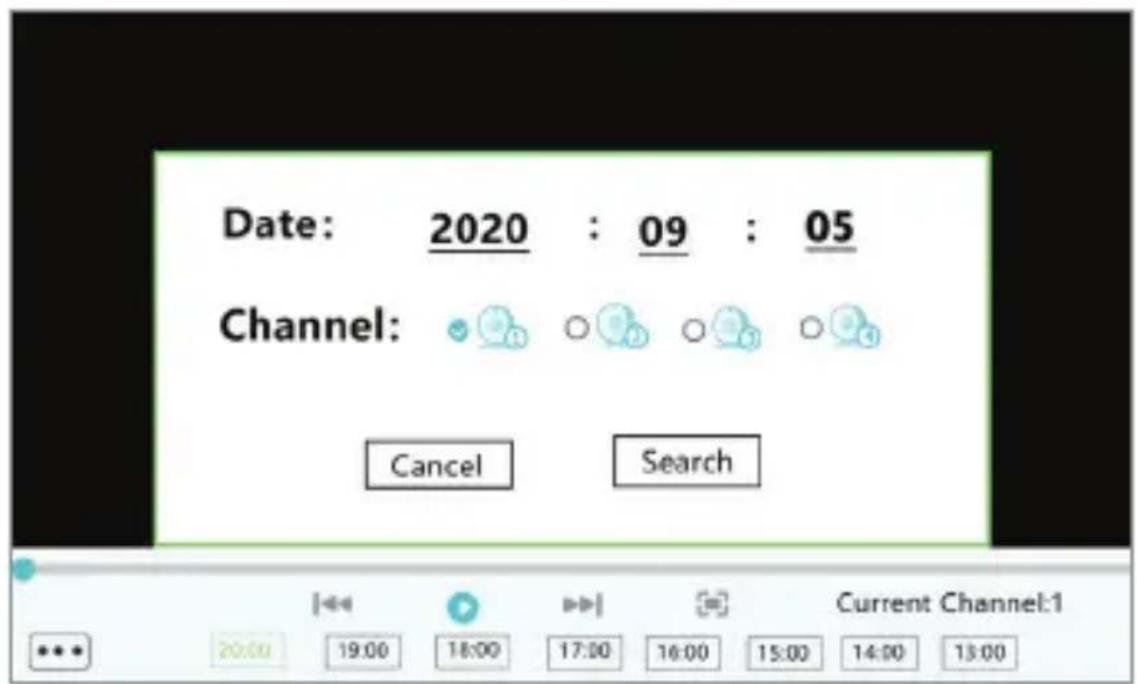
Select “Playback” from the main menu, then find the video you want to play by selecting the date or channel (fig. 10a).
Options available during playback (fig. 10b):
A. Search
B. Rewind
C. Playback / pause
D. Scroll forward
E. Full screen
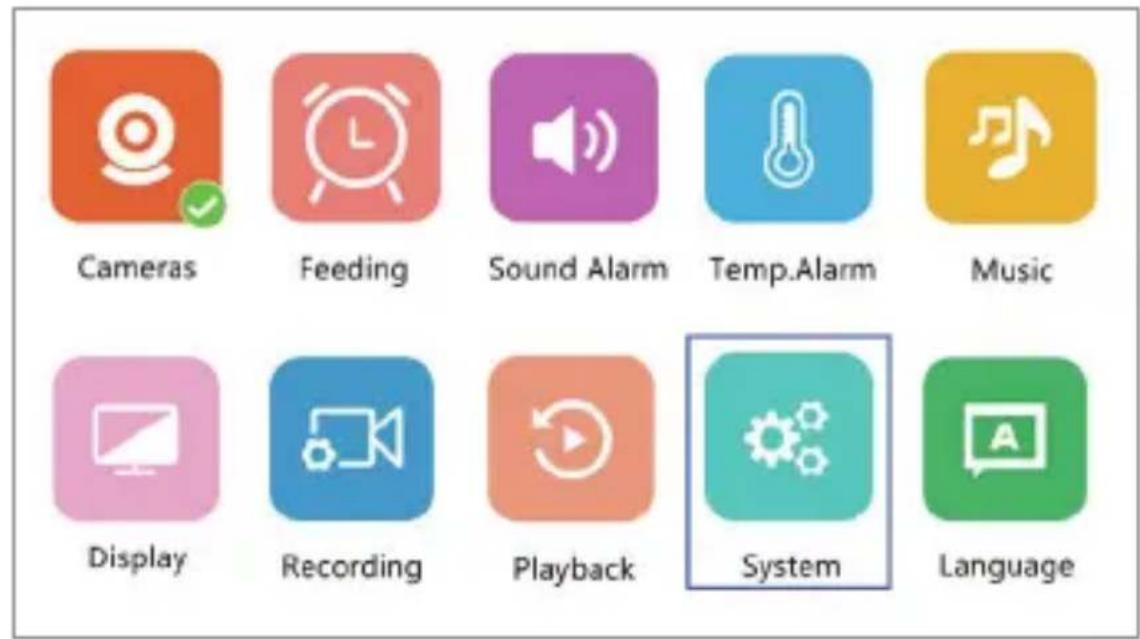
Settings
- In the main menu, select "System" (fig. 11). Available options include date and time settings, reset, advanced settings and system information.
- Select the current date and time and the time format (fig. 12).
- To return to the factory settings, select "Factory settings" and then OK (fig. 13).
- To enter advanced settings, select "Advanced settings" (fig. 14). You can check the total and remaining capacity of the card, as well as enable or disable image rotation.
- To view device information, select "Version" (fig. 15).
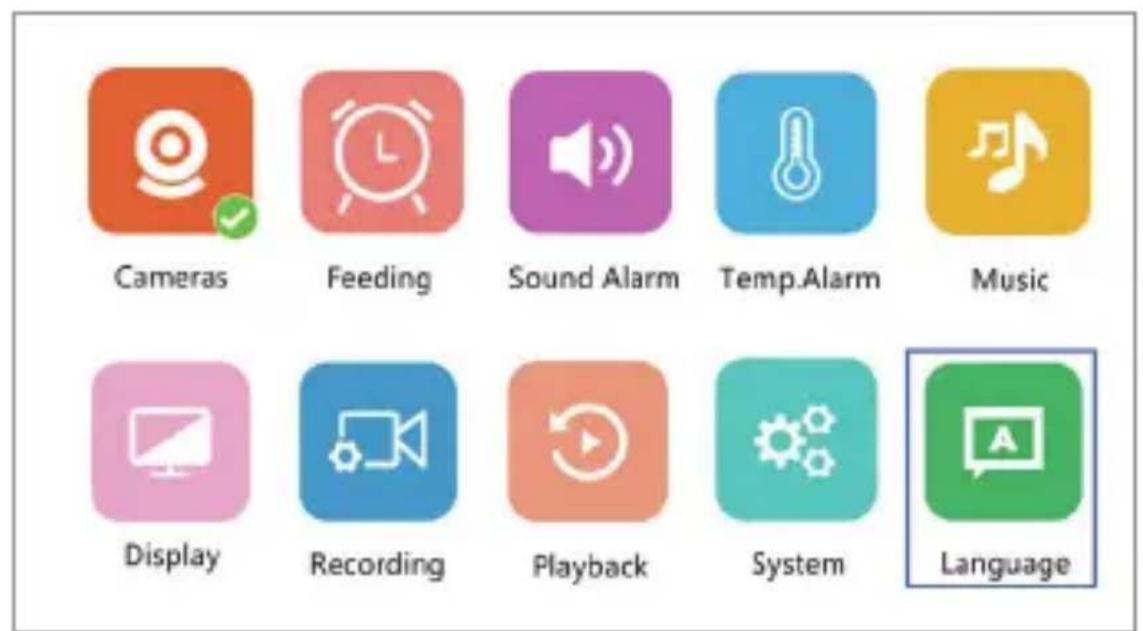
Language selection
English is the device's default language.
In the main menu, select the “Language” option (fig. 16). Select one of the available languages. The device will restart automatically.
Mounting
Drill two holes in the surface where you want to mount the device (fig. 17), and then insert the wall plugs and screws into them (fig. 18). Attach the camera to the screws, hooking them through the holes in the bottom of the device (fig. 19).
Troubleshooting
| Problem Possible solution | |
| Monitor does not display camera image | Make sure the camera is turned on.Reset the camera by pressing the reset button (5, fig. B), and then add the camera manually (see: Adding a camera). |
| Audio interference in two-way audio communication | Unwanted sound may occur when using the monitor at a distance of less than 2 meters from the camera. In this event:Reduce the volume of the monitor.Increase the distance between the monitor and the camera. |
| The monitor's battery drains quickly | It is recommended to enable sleep mode (see: Display settings). |
| The device loses range Place | the antenna (12, fig. C) up to improve signal quality.Indoor use can be disrupted by factors such as thick walls or too many electronic devices. |
The photos are for reference only, the actual look of the products may differ from the ones shown in the pictures.
PL
Drogi Kliencie!
EN: Simplified EU declaration of conformity
BrandLine Group Sp. z o. o. hereby declares that the “BABYLINE 6.2” product complies with the directive: 2014/53/EU - RED Directive, 2014/30/EU - EMC Directive, 2014/35/EU - LVD Directive, 2011/65/EU - RoHS Directive. Full content of EU declaration of conformity is available on the following website:
Detailed warranty conditions are available on the website:
Thank you for purchasing our product