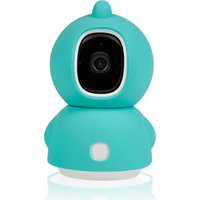
Babyline 2.3 - Baby monitors Lionelo - Free user manual and instructions
Find the device manual for free Babyline 2.3 Lionelo in PDF.

| Product type | Baby video monitor |
| Brand | Lionelo |
| Model | Babyline 2.3 |
| Operating frequency | 2.4 GHz (2402-2480 MHz) |
| RF output power (baby unit) | 0.58 dBm |
| RF output power (parent unit) | 5.34 dBm |
| Outdoor range | Up to 400 meters |
| Indoor range | Up to 70 meters |
| Power supply | Rechargeable batteries and mains adapter 5 V DC 1 A |
| Display | LCD with connection, temperature, humidity, sound level indicators |
| Main functions | Talk-back, lullabies/noises/nature sounds, night light, vibration mode, volume adjustment, temperature/humidity display |
| Operating temperature | Not specified (dry indoor use) |
| Maintenance and cleaning | Wipe with a dry cloth. Do not use harsh chemicals. |
| Safety | Do not place within 1 m of the child. Do not use outdoors or near water. Do not disassemble. |
| Spare parts and repairability | Batteries included. Contact customer service for any repairs. |
| General information | Compliant with directives 2014/53/EU and 2011/65/EU. Manufacturer: BrandLine Group, Poland. |
Frequently Asked Questions - Babyline 2.3 Lionelo
User questions about Babyline 2.3 Lionelo
0 question about this device. Answer the ones you know or ask your own.
Ask a new question about this device
Download the instructions for your Baby monitors in PDF format for free! Find your manual Babyline 2.3 - Lionelo and take your electronic device back in hand. On this page are published all the documents necessary for the use of your device. Babyline 2.3 by Lionelo.
USER MANUAL Babyline 2.3 Lionelo
If you have any comments or questions about the product you have purchased, contact us: help@lionelo.com
Manufacturer:
BrandLine Group Sp. z o.o.
A. Kriegewskiego 1, 61-248 Poznan, Poland
Baby Unit:
Operating frequency range: 2402 MHz- 2480 MHz
RF output power: 0.58 dBm
Parent Unit:
Operating frequency range: 2402 MHz- 2480 MHz
RF output power: 5.34 dBm
IMPORTANT INFORMATION
NOTE
- Before using the product, read the instruction manual and keep it for future reference.
- This device is not a toy. Do not allow children to play with it.
- The receiver and transmitter are suitable for use in dry places only. Do not use on a wet surface. The transmitter must not be used outdoors.
- Do not touch the product with wet hands.
- If the product does not work as it should or has been dropped or flooded, contact the manufacturer's service department.
- Do not remove the product yourself.
-
We recommend using the batteries included in the set.
-
We recommend using a power supply with a maximum rating of 5.0V DC 1.0A.
- Do not place the product near a cooker or other heat sources.
- The product must be installed by an adult.
- Keep smaller pieces of the set away from the child.
- An electronic nanny is not a substitute for proper parental care and attention.
- Do not place the product and its cords in the playpen or within reach of the child. Place them at least 1 m apart.
- Do not place the product near water or a fire source.
- Do not touch the plug contacts with sharp or metallic objects.
- Do not use the device if the cable or plug is damaged.
- To disconnect the appliance from the power supply grab the plug, not the cable.
- If the appliance will not be used for an extended period of time, unplug it and remove the batteries.
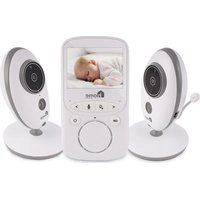
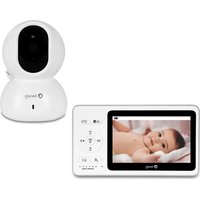
RECEIVER DESCRIPTION (to be placed next to the parent, fig. 1)
- Visual intensity indicator.
- LCD display
- Indicator light
- Microphone
- Volume up button
- Volume down button.
- Speaker
- Button to activate lullabies, noises
and nature sounds
- Power button / night light
- Button to activate vibration mode
- Rotating belt clip
- Talk Back button
- USB-C port
- Battery compartment
LCD DISPLAY DESCRIPTION (fig. 2)
-
Connection status icon
-
Displays when the receiver is connected to the transmitter, but flashes when it is disconnected.
-
Icon indicating the playback of lullabies, noises or nature sounds
-
Vibration mode icon
- Night light activity icon
-
Battery status icon
-
Displays the current battery level and flashes when close to empty
-
Humidity indicator / Temperature indicator
-
Temperature and humidity in the device are detected in real time. Readings are displayed alternately for 5 seconds
-
Temperature unit indicator.
TRANSMITTER DESCRIPTION (to be placed next to the child, fig. 3)
- Microphone
- Bedside lamp button
- Indicator light
- USB-C port
- Volume down button.
- Bedside lamp panel
- Volume up button
- Speaker
- Power button ON / OFF
INSTRUCTIONS FOR USE:
Note
Make sure the devices are placed on a flat and stable surface.
Powering up and switching on the electronic nanny receiver (fig. 1)
NOTE: It is recommended to fully charge the device before first use
- Insert the supplied batteries into the receiver's battery compartment (14, fig. 1) then connect the cable plug to the device and the other end to the power source. Remember the correct polarity when inserting the batteries.
- Press and hold the power button (9, fig. 1) to switch on the receiver. The device will beep and the indicator light will flash, indicating that the device has entered pairing mode.
- To switch off the receiver, press and hold the power button.
The receiver operates on battery and mains power. To continuously monitor your child, use both the battery and mains power at the same time. With the battery alone, the receiver can only operate wirelessly for a limited time.
Powering up and switching on the electronic nanny transmitter (fig.2 3)
- Connect the power cord to the receiver and the other end to the power source.
- The indicator light will illuminate red.
- Press and hold the power button to switch on the transmitter.
- The device will beep and the indicator light will alternately flash red and green, indicating that the device has entered pairing mode.
- To switch off the transmitter, press and hold the power button.
When the receiver and the electronic nanny transmitter are switched on, they will be automatically paired and the device will notify this with an audible signal.
If the device is not paired for 10 minutes, it will automatically exit pairing mode and switch off.
Set-up and operation
Place the transmitter anywhere (e.g. on a table) and point it in the direction you want to monitor. When the transmitter detects sound, a message will be shown on the receiver.
NOTE
Do not place the transmitter or cords in or within reach of the baby's cot (min. 1 metre distance), as there is a risk of injuring or strangling the child!
In case of sound interference, place the devices in a different location and make sure they are not near other electrical devices.
Range
The operating range of the electronic nanny is up to 400 metres outdoors or 70 metres indoors. The operating range may vary depending on ambient conditions and other
interferences such as walls, doors and other obstacles.
Night light mode
To activate the night light, press the night light button on the receiver (9, fig. 1) or the transmitter (6, fig. 3). The light can be activated and deactivated from both the transmitter and the receiver. Pressing the button again will switch the light off.
Lullabies, noises and sounds mode (8, fig. 1)
Press to activate sound playback mode. Pressing the button again will change the recording. To deactivate the mode, press and hold the button again.
Vibration mode
Press to activate the vibration mode. The receiver will start vibrating when the transmitter detects a high sound level. This mode works independently of the volume level of the device, providing an alternative way of alerting the carer. To deactivate the mode, press the button again.
Temperature unit change
Press and hold the volume up button (5, fig. 1) to change the temperature unit to the Celsius scale, while pressing and holding the volume down button (6, fig. 1) will change the temperature unit to the Fahrenheit scale.
Speaking function
To start a conversation with your child, press and hold the Talk Back button on the receiver (12, fig. 1).
Volume control
During playback, press the - volume button to decrease the volume or the + volume button to increase.
Note
The default volume of the receiver is level 3 and the maximum volume is level 5. If the nanny emits a high-pitched, squeaking sound during operation, make sure the transmitter and receiver are more than 1 metre apart or turn down the volume of the receiver.
When the volume reaches the minimum or maximum setting, the receiver emits two beeps with different tones.
RECEIVER ALARM SOUNDS
Low battery - Beeps twice every 10 minutes when the battery level is low.
Disconnection with transmitter - Double beep emitted for 10 seconds when there is no connection between the transmitter and the receiver, or when the receiver is out of range of the transmitter.
TROUBLESHOOTING
| Problem Possible solution | |
| The indicator light is not illuminated. | Make sure the device is connected to the power supply, and has been started up. Remember the correct polarity when inserting the batteries. |
| Sound interference. | Unwanted sound may occur if the receiver is used at a distance of less than 1 metre from the transmitter. In this case: • Turn down the receiver volume, • Increase the distance between devices. |
| Problem with device pairing. | Ensure that the receiver and the transmitter are within range. Press and hold the on/off power button on both the receiver and the transmitter simultaneously for 8 seconds. Repeat the procedure two more times. If the problem persists, consult an authorised service centre. |
| The connection is broken. | Indoor use can be disrupted by factors such as thick walls or too many electronic devices. |
| The electronic nanny is not responding. | Reset the device by switching it off and on (during this time, the power cable should be disconnected and the batteries removed). If the problem persists, consult an authorised service centre. |
| No sound from the receiver. | Ensure that the devices are paired and that the volume level of the receiver is not too low. |
Photos are for reference only, the actual appearance of the products may differ from that shown in the photos.
Drogi Kliencie!
BrandLine Group Sp. z o.o.
A. Kreglewskiego 1, 61-248 Poznan, Polen
Babyeinheit:
UyMOB N 3ByKOB npnpOdbI.
- Khonka nItaHn/NoHnKa.
- KhoIIka BkJIoueHnpeXIma Bn6paun.
11.ПоворотьиЗжIMдяpeMHЯ. - KhoNka «OTBeTnTb»
- NopT USB-C
- BaTapeHbI OTeK.
ONICAHNE JKKN (pnc. 2)
-
3HaOK COCTOHNI NOKJIUeHnI.
-
OTo6paJaEcTc, KOrda npHemHK nOdkJIouHeN K nepeDaTuKy, N MnraeT, Korda OH OTKJIouHeN.
-
3NaOH, INHΦOpMnpyUOιN O BOCnpon3BeDeHn KOLbI6eJIbHbIX, CTaTnuecknx 3ByKOB nII N 3ByKOB npnpObl.
- 3naokpekmaBn6paun.
- 3NaOH aKTINBHOCTN HOHOrO OCBeueHnA.
-
3naok coctoHn6aTapei.
-
ŠтображаетTekуши уровень заразада батари и мигаet, Когда сатаря разржега.
6.ИнданkaTOpВлжноTN/инданkaTOpTeMpepaTypbI.
- TemnepaTypa n BlaJxHocTb B yCTpoIcTBe onpeJeIyOTcB peKIme peaIbHOro BpeMeHi. Poka3aHnA oTo6paJkaHTcI nonepMeHHO B TeueHne 5 cekyHd.
7.Индikatop edHnCbI n3Mepenr TempepaTpybl.
ONICAHNE IEPEDATUKA (pa3meaetcra paoom c pe6eHkom, pnc. 3)
- MinkpofoH
- NopT USB-C
- CnHaJIbHbI JNOd
- Панель Ночник.
- Khonka ymehbweHnra pomKocTn.
- Гомковорптуль
- Khonka yBelenuHnI rPOMKocTn.
- KhoNka BkIIOueHn/ BbIKIOueHn nITaHn.
- Khonka HouHnKa.
INHCTPYKcI INO NcPOnb3OBAHnIO:
Bнманne
Y6eIITecb, yTO yCTpOiCTBa paCnOJKeHbI Ha nloCKoN uYcToUHBOI NOBepXHOCTN.
OMSCHRIJVING LCD-SCHERM (afb. 2)
POPIS LCD DISPLEJE (obr. 2)
SUNET ALARMÄ RECEPTOR
EN: The product complies with the requirements of European Union directives. In accordance with Directive 2012/19/EU, this product is subject to separate collection. The product should not be disposed of with municipal waste as it may pose a risk to the environment and human health. Return the used product to the recycling centre for electrical and electronic equipment.
EN: Simplified EU declaration of conformity
BrandLine Group Sp. z o. o. hereby declares that the "BABYLINE 2.3" product complies with the directive: 2014/53/EU - RED Directive, 2011/65/EU - RoHS Directive. Full content of EU declaration of conformity is available on the following website: