Babyline 8.2 - Baby monitors Lionelo - Free user manual and instructions
Find the device manual for free Babyline 8.2 Lionelo in PDF.

| Brand | Lionelo |
| Model | Babyline 8.2 |
| Product type | Video baby monitor |
| Components | Camera + Monitor (screen) |
| Camera power supply | USB AC adapter (included) |
| Monitor power supply | Rechargeable battery (USB AC adapter included) |
| Monitor charging time | Approximately 3.5 hours |
| Range | Not specified (standard range for video monitor) |
| Number of supported cameras | Multiple (add/remove possible) |
| Main functions | Video and audio surveillance, lullabies, VOX mode, cry detection (Cry Alert), temperature alarm, feeding reminder |
| VOX mode | Yes (energy saving, automatic screen activation on sound) |
| Lullabies | 5 built-in lullabies |
| Temperature alarm | Yes (high/low, adjustable in °C or °F) |
| Temperature sensor | Yes (on the camera) |
| Intercom | Yes (button on monitor, long press to talk) |
| Time/date display | Yes (adjustable, OSD display) |
| Language setting | Yes (multilingual menu) |
| Safety | Do not place within baby's reach, minimum distance 1 m, do not use near water or heat sources |
| Maintenance and cleaning | Clean with a dry cloth, do not use chemical products |
| Spare parts and repairability | Contact manufacturer service in case of malfunction |
| General information | Compliant with EU directives (RED, EMC, LVD, RoHS) |
Frequently Asked Questions - Babyline 8.2 Lionelo
User questions about Babyline 8.2 Lionelo
0 question about this device. Answer the ones you know or ask your own.
Ask a new question about this device
Download the instructions for your Baby monitors in PDF format for free! Find your manual Babyline 8.2 - Lionelo and take your electronic device back in hand. On this page are published all the documents necessary for the use of your device. Babyline 8.2 by Lionelo.
USER MANUAL Babyline 8.2 Lionelo
In case of any questions or comments on the purchased product, please contact us: help@lionelo.com
Producer:
BrandLine Group Sp. z o. o.
ul. A. Kriegewskiego 1, 61-248 Poznan, Poland
Important
- This product is not a toy. Do not let children play with it.
- The product is intended for use in dry places only. It is forbidden to use it outdoors or on wet surfaces.
- Do not touch the device if your hands are wet.
- Do not use the device if the cable or plug is damaged.
- If the device acts up or has been dropped or flooded, contact the manufacturer's service center.
- To unplug the device, grab the plug, not the cable.
- If you do not use the device for a long time, unplug it.
- Please use the power adapter supplied only.
- It is forbidden to place the product near a cooker or other sources of heat. Battery explosion risk.
- Only an adult is allowed to assemble the product. Keep small items of the set out of reach of children.
- The baby monitor cannot substitute for suitable parent's care and attention.
- Do not place the baby monitor and its cables in the playpen or within child's reach. Place them at least 1 m away.
- Do not place the baby monitor near water or sources of heat.
- Do not touch plug terminals.


The product complies with requirements of EU directives.
Pursuant to the Directive 2012/19/EU, this product is
subject to selective collection. The product must not be disposed of together
with domestic waste as it may pose a threat to the environment and human health. The worn-out product must be handed over to electronics and electronics recycling point.
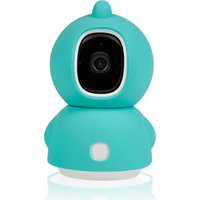
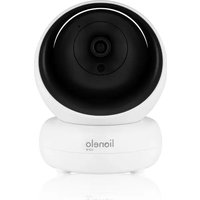
Set (fig. A)
- Camera
- Display unit
- Power cable USB x2
- Adapter x2
- Operating manual
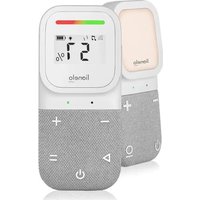
Description of the device (fig. B, C)
- Light-sensitive detector
- Lens
- Camera microphone
- Camera LED light
- Camera power port
- Temperature sensor
- SET key
- Aerial
- ON/OFF/ECO mode
- Menu/return key
- Up/down keys
- Left/right keys
- Play music key
- Display charging port
- Intercom (long press)/change settings (short press)
- Charging/sounds volume indicator
- Display microphone
- Reset key
Explanation of icons on the screen

No connection between the camera and display unit
| Signal strength | |
| 27°C | Room temperature |
| Battery status | |
| Temperature alarm active | |
| Baby feeding reminder active | |
| Sound alarm active | |
| Camera not paired/camera unplugged | |
| Temperature alarm | |
| Baby feeding reminder | |
| Low battery | |
| SOUND LEVEL | Sound volume - five LEDs flash in green Charging - the first LED on the right glows in red |
How to use
Put the camera in a desired place (e.g. on the table or shelf) and point the lens at the area you want to monitor (fig. 1).
NOTE! Do not place the camera within child's reach.
In case of any sound or image interference, reposition the camera and make sure there are no other electric devices nearby.
How to switch the camera on
-
Connect the USB power cable to the camera (fig. 2) and adapter (fig. 3), and then plug the camera in.
-
The camera will activate automatically after you have supplied it with power. The camera LED light will turn green.
How to charge the display unit
- If it is necessary to charge the device, connect the USB power cable to the display unit (fig. 4) and adapter, and then connect the display unit to the source of power.
- Full charging takes about 3,5 hours. The battery level icon on the display will stop flashing.
How to switch the display unit on
- Switch the display unit on by pressing the on/off key (9, fig. C).
- The display unit has been paired with the camera in the factory. If there is no image on the display unit despite connecting the camera to the source of power, please retake the pairing procedure as described in the subchapter - How to add and delete the camera.
- To gain access to the menu, press the menu key (fig. 5).
How to add and delete the camera
How to add the camera
- In the menu, select icon and press OK.
- From the list, select the camera which is to be added and press OK. Next choose camera adding (fig. 6).
- When you can see a command on the screen (fig. 7), press SET on the camera (7, fig. B).
- When you have successfully paired the camera, the display unit will display image from the camera in real time.
- While using the device, the camera must be connected to the source of power.
How to delete the camera
- In the menu, select the icon and press OK.
- From the list select the camera which is to be deleted and press OK. Next choose camera deleting (fig. 8).
Lullabies
-
In the menu, select icon and press OK.
-
The camera allows you to play five lullabies (fig. 9). Select the lullaby you want to play and press OK. To stop playing, press OK again.
- Select icon to play all lullabies one after another.
- In the lullaby selection interface (fig. 9) you can use left/right keys ( ) to change the lullaby, and up/down keys ( ), to change the volume.
- You can enter the lullaby selection interface also by pressing the music playing key (13, fig. C).
VOX mode
- VOX mode, a default mode in the device, allows you to save a battery.
- If the child is sleeping and the device cannot detect any sound in 30 seconds, the display unit will switch into the standby mode, and the image broadcast will be terminated. When the device can detect the sound, the image broadcast will be resumed. No sound alarm.
- When VOX mode is inactive, the image broadcast can be activated and deactivated manually through a switch. When the image broadcast is inactive, the display unit serves only to transmit sounds. No sound alarm.
- Cry alert function is available when VOX mode is active (fig. 12).
Cry alert
- The device can activate the alarm on the display unit and sound signal in case your child starts crying.
- In the menu, select icon and press OK.
- Select one of three cry sensitivity levels.
Low , medium , or high .
- Select "ON" and next press OK (fig. 10).
- When the device can detect the child crying, the image broadcast will be resumed and the flashing icon will pop up in the screen, sound alarm will also be activatred.
How to set the date and time
- In the menu, select icon and press OK.

- Select icon and press OK to set the date and time. Set the date and time and then press OK (fig. 11).
- OSD (on screen display): decide if the date and time are to be showed on the display screen (ON/OFF, fig. 11).
How to set the language
- In the menu, select icon and press OK.

- Select icon and press OK to set the language. Select the language and then press OK.
How to set alarms
- In the menu, select icon and press OK.

- Select icon and press OK to set alarms. Activate or deactivate the sound alarm (fig. 12).
- If the sound alarm is inactive, the temperature/feeding alarm will be displayed only on the screen, with no sound signal.
Temperature alarm
- The device can sound the alarm on the display unit when the temperature in the child's room is too low or too high.
- In alarm settings, select the temperature alarm (fig. 13).
- Choose the temperature unit (Celsius or Fahrenheit degrees) and press OK.
Baby feeding reminder
-
The device can sound the alarm on the display unit in order to remind you about the scheduled baby feeding.
-
In alarm settings, select the baby feeding reminder (fig. 14).
- Select alarm/alarms time and press OK.
How to restore the factory settings

- In the menu, select icon and press OK.
- Select icon and press OK.
- The message on the screen will ask you to restore default settings. Choose "YES" and press OK (fig. 15).
- NOTE! If you restore default settings, you will delete all previous values.
How to reset the device
If the display unit does not work properly, use a needle to press the reset key, located on the left side of the rear cover (18, fig. C). The device will activate again in a moment.
Information on the device
- In the menu, select icon and press OK.
- Select icon and press OK to see information on the device (fig. 16).
The pictures are for reference only. The real design of the products may differ from the pictures presented.
Drogi Kliencie!
B clyuae nOBLeHnB BOpocOB nI IN KOMMeHTapNeB K npOyKTy, KOToPbI Bbl npNo6peiN, noXaLyNCtA CBxKNTecb C hAmN: help@lioneo.com
Pon3BODnteIb:
BrandLine Group Sp. n3 o.o.
yI. A. Kreglewskiego 1, 61-248 P03HaHb, P0JIbSha
BaxknaHΦopMaζη
- ΘTOT npodukT He yBlaetc nrgykoH. He no3BoJrTe deTm ngpaTb c HIM.
- Даньй подукт поховдя IncpoьбOBаня ТольКВ cyxnxnomeшенyx. He IncpoьзуITE erO Ha OTKpbITOM BO3dYxe nIi Ha BlaЖHо NOBepxHocTn.
- He npikacaiTecb K n3deJIIno MOKpbIMn pykamn.
- He n cnoIb3yIe ycIpoIcTBo, ecn Ihyp nIIN BnIka nobpeKJeHbl.
- Ecnn yctpoicTBO He pa6oTaet TaK, KaK doJxHo, nn erO yrhoHnI, nn OHO 6bIIO 3aJInto BOIo, o6paTnteB B cepBnCHyU clyX6y npOn3BoDnteJia.
- BbHmMaTe BnIky n3 po3eTKn 3a camy BnIky, a He 3a shHyp.
- EcIn Bbl He 6yndeTe nCnoIb3OBaTb yCTpO'cTBo B TeueHne IJIteIbHOBVPeMeHN, OTKJIIOHTe eRo OT cETn.
- Истору щител Толбко 6лok петаши, постовся с даньим усторов.
- He cTaBbTe npi6Op pIaOM C PJIHTOJ IJI N DpyrIMN nCTOuHnKaMn TeIJa. OnacNoctb B3PbIBa aKKyMyJrTopa.
- MoNTaJX DoJIxKeH BbIIOJIHЯTbCra TOLbKO B3PocIbIM. DepeKInTe MeJIKne DeTaJI N PoJaIbWe ot pe6eHka.
- Θл ekтpoHHa HЯн He 3aMeHr T aDeKBaTHoI pOДnteJIbCKoI 3a6Otby N BHNMaHn.
- He pa3meuTe 3JIeKTPoHHyH NO HAnHIO I ee Ka6eIIN B DeTcKOM MaHeJKe IIN B IIpeJeIax DoCraemocTn pe6eHka. Pa3MeuaIte INx Ha pacCTOJHn He MeHee 1 MeTa.
- He pa3MeuTe 3JIeKToHHyH HAnH B6JIn3N BoDbl Nn INCTOCHNa OrHa.
- He npinkacaiTecb K KOHTaKTam 7Tekepa OCTpbIMN IIN MeTaJIInuecknIMN npedMeTaMn.
B coOTBeTCTBnC DnpeKTHBOI 2012/19/EU daHbI IpoDyKT POnJIeKHT pa3dJIbHOMy c6OpY Mucopa. IpoDyKT He cIeJyET yTIJIIN3IupoBaTb BMeCTe C 6bITOBbIMN OTXODaMn, TaK KaK OH MOKeT IpeIcTaBJIaTb YrPoO3y dJa OKpyKaIOUSei CpeDbI N 3IDOpOBbI YeLOBeka. IooKaIyIcTa, BepHInTe OTCnyKINBNI IpoDyKT B UcHTp yTIJIIN3aCmN eJIeKTPnueCKOTo I eJIeKTPoHHOrO o6OpyIDobAHnI.
KoMnJIeKT (pnc. A)
- Kamepa
- MoHntOp
- Ka6eIb nITaHnI USB x2
- Адаптетх2
- RykoBoDcTBO no 3KcPnyatauN
Описане устpoиства (pnc. B, C)
- CBeToUyBCTBnTeIbHbI DaTUnK
2.ObbeKTNB - Minkpofoh kamepbI
4.ДиODKaMepbI - Pa3bem nItaHnKaMepbl
6.ДатчИК TemпераТурьI - Khonka SET
- AHTeHHa
- BkIIOuATEJIb/BbIKIOUATEJIb/3KO peKIM
- Khonka MeHIO/BO3BpaTa
- KhoPkn Habnraun BBepx/Bn3
- Khonkн Habiracn BJIeBO/BnpaBO
- KhoIGNka BocnpOn3BedeHnMy3bIKN
- Pa3bem Дя Зардк MOHITOPa
- Interkom (Длптелов удерхан(e)/ Habсторь параметров (Коротковудерхан(e)
16.Индikatop coCToHn 3apdKn/rgomKocTn npHnMaemoro 3Byka - Minkpooh MOHITOPa
- Khonka nepe3arpy3kn
EN: Simplified EU declaration of conformity
BrandLine Group Sp. z o. o. hereby declares that the "BABYLINE 8.2" product complies with the directive: 2014/53/EU - RED Directive,2014/30/EU - EMC Directive, 2014/35/EU - LVD Directive, 2011/65/EU - RoHS Directive.
Full content of EU declaration of conformity is available on the following website:
Directive, 2014/35/EU - LVD Directive, 2011/65/EU - RoHS Directive.
Detailed warranty conditions are available on the website: