SS16180 - Vacuum Cleaner Sogo - Free user manual and instructions
Find the device manual for free SS16180 Sogo in PDF.
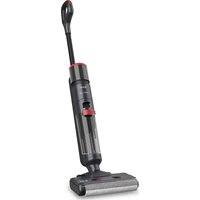
| Product type | Cordless 2-in-1 stick and hand vacuum |
| Model | SS16180 |
| Brand | Sogo |
| Power supply | Lithium-Ion battery 29.6 V, 2500 mAh |
| Battery life | 60 min (Eco mode), 40 min (Auto mode), 25 min (Max mode) |
| Charging time | 4 to 5 hours |
| Suction power | 22 kPa |
| Dust capacity | 0.7 L |
| Noise level | 78 dB |
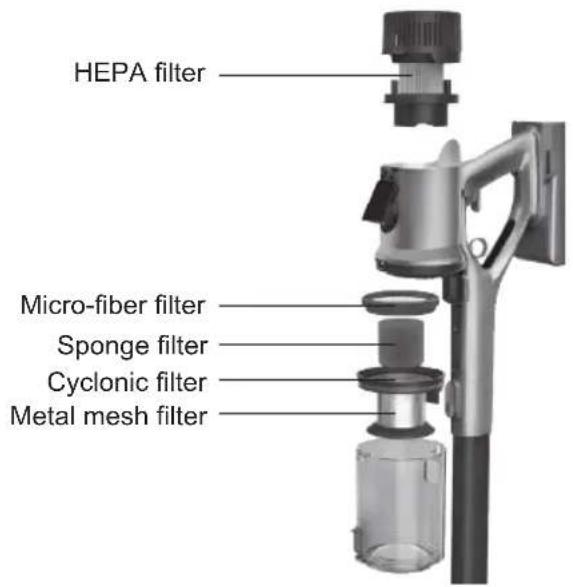
| Filtration | 5-stage system: HEPA filter, microfiber, sponge, cyclone, metal mesh |
| Suction modes | Eco, Auto, Max (touch) |
| Smart functions | Dust sensor, full dust bin indicator, brush blockage detection |
| Motorized brush | With 4 LED lights, 180° swivel rotation |
| Included accessories | Power adapter, 2-in-1 crevice tool, upholstery brush, hair brush, wall mount, flexible tube, HEPA filter, motorized brush, carpet roller, hard floor roller |
| Power and voltage | 350 W, 100-240 V ~ 50/60 Hz |
| Maintenance | Clean the dust bin and filters after use; wash the filters with water and mild detergent, dry completely before reuse |
| Safety | Do not use outdoors, do not vacuum liquids, unplug before cleaning |
| Country of manufacture | People's Republic of China |
| Importer | Sanysan Appliances S.L, Valencia, Spain |
Frequently Asked Questions - SS16180 Sogo
User questions about SS16180 Sogo
0 question about this device. Answer the ones you know or ask your own.
Ask a new question about this device
Download the instructions for your Vacuum Cleaner in PDF format for free! Find your manual SS16180 - Sogo and take your electronic device back in hand. On this page are published all the documents necessary for the use of your device. SS16180 by Sogo.
USER MANUAL SS16180 Sogo
natural_image
Exterior view of a black and gray vacuum cleaner (no text or symbols visible)
ASPIRADOR INTELIGENTE Y RECARGABLE 2 EN 1 RECHARGEABLE SMART VACUUM CLEANER 2 IN 1 ASPIRATEUR INTELLIGENT 2 EN 1 RECHARGEABLE ASPIRADOR DE PÓ INTELIGENTE E RECARREGÁVEL 2 EM 1 INTELLIGENTER WIEDERAUFLADBARER 2-IN-1-STAUBSAUGER ASPIRAPOLVERE INTELLIGENTE E RICARICABILE 2 IN 1
Caution: please read and preserve these important instructions
IMPORTANTE:
text_image
Technical diagram showing a vacuum cleaner with labeled parts and two views of the component being processed.SISTEMA DE PANTALLA INTELIGENTE
text_image
Diagram illustrating the process of a food processing machine, showing step-by-step transformation from a container to a bowl with granular material.LIMPIEZA DEL SISTEMA DE FILTRADO
text_image
Three circular icons with crossed-out symbols: a water droplet, a hand holding a tool, and a mouthwash with a funnel.
text_image
Technical diagram illustrating the assembly of a spray gun with labeled components and directional arrows indicating process flow.CÓMO LIMPIAR EL CEPILLO GIRATORIO
text_image
Diagram illustrating the step-by-step assembly of a mechanical device, showing tool positioning and component disassembly.MONTAJE DEL CEPILLO GIRATORIO
text_image
Diagram illustrating eye manipulation process with labeled steps: adding a sensor to a device, adding an eye to a screen, and adjusting the lens.• Always read the instruction book carefully before using.
- This manual can be downloaded from our web page www.sogo.com
- Keep these instructions for future reference.
SAFETY INSTRUCTIONS FOR THE USER
- This product is intended for indoor, non-industrial, non-commercial; household use only household waffle maker. Do not use the item outdoors or for any other purpose. Misuse or improper handling may cause problems in the appliance and cause injury to the user.
- Ensure that the voltage indicated on the nameplate matches the mains voltage before plugging in the appliance.
- Do not use or store the appliance outdoors.
- Always remove the plug from the power socket when the appliance is not in use. Do not leave the appliance unattended when switched on.
- Before cleaning or storing your appliance, always unplug the appliance from the power supply and let it cool down.
- The appliances are not intended to be operated by means of an external timer or separate remote-control system.
- Do not place or operate this appliance near water sources.
- Never immerse the appliance or the plug-in water or any other liquid. In the event of the appliance falling in water, disconnect immediately from the mains supply and take it to an authorized service agent for repair before reusing.
- Do not place or operate the appliance and its power cord on or near hot surfaces (e.g., stove plates) or open flames.
- Do not leave the power cord hanging from sharp edges and keep away from hot objects and flames. Do not wind the cord around the appliance and do not bend it.
- Do not use the appliance if the cable or plug is damaged. In case of the cord be damaged, it must be replaced only by the manufacturer, its service agent or similarly qualified persons in order to avoid Hazard.
- In case of appliance malfunction, or if it has been damaged in any manner, return the appliance to the nearest authorized service facility for examination, repair or adjustment.
- In case of hardware problems, do not attempt to repair the product yourself. Repairs should only be carried out by qualified technicians.
- Never use accessories that are not recommended by the manufacturer.
- The use of accessories not recommended or sold by the appliance manufacturer may result in fire, electric shock or injury to persons.
• Always place the appliance on to the flat and even surface.
- Do not use the appliance for any other
purpose than described in this manual.
- Do not let the appliance operate unattended.
- When you want to remove the plug from the wall contact, please do this at the plug itself and not by pulling on the cable or the appliance itself.
- Make sure your hands are dry before plug or unplugging.
- This appliance is not to be used by persons(including children) with reduced physical, sensory or mental capabilities or lack of experience and knowledge, unless they have been given supervision or instruction.
• Children shall not play with the appliance.
- This appliance can be used by children aged from 8 years and above and persons with reduced physical, sensory or mental capabilities or lack of experience and knowledge if they have been given supervision or instruction concerning use of the appliance in a safe way and understand the hazards involved.
- Cleaning and user maintenance shall not be made by children without supervision.
- Children should be supervised to ensure that they do not play with the appliance.
- Cleaning and user maintenance shall not be made by children unless they are older than 8 and supervised.
- Keep the appliance and its cord out of reach of children less than 8 years.
Things to remember while using the appliance
- To avoid a circuit overload when using this product, do not operate another high-wattage product on the same electrical circuit.
- Makesure to unplug the appliance before cleaning the rotating brushes, trash cans or filters.
- It may cause a fire and injury to persons if the cleaner vacuums the following items:
A. Heat source: coal fire, cigarette butts
B. Big Sharp Shard - Broken Glass Piece
C. Liquid: hazardous artical (solvent,
corrosive), acid agent, cleaner and water.
D. Flammable and explosive goods: gasoline and alcohol products.
E. Construction and cement waste
- This vacuum cleaner can only be used for dry purposes. Water, liquid and other wet objects must not be absorbed by the product. Do not spray or spill liquid on the vacuum cleaner. If that happens, the risk of electric shock will increase. In order to replace the damaged battery make sure to replace by authorised persons or after sales service.
- Please keep the air outlet of appliance away from hair, loose clothing, fingers or other parts. Do not use suction tube, tube extension handle or other tool point at the eyes, ears or put in the mouth.
- If large pieces of paper, paper balls, plastic sheets or sharp objects are found, and anything that is thicker than a straw, please
remove them in advance in case that the suction tube is blocked to affect the use of the product.
- Please stop using it at once when the electric leakage or high motor temperature and abnormal sound are found. For example, high temperature in a machine body part, abnormal sound and smell, weak suction.
- Please check the dust cup regularly, if the dust cup is full, please clean it in time.
- keep the air outlet unblocked to avoid loss of suction power, motor heating that may lead to the reduction of vacuum cleaner service life,
- Please check the aluminium alloy tube regularly in order to prevent the blockage, if there is a blockage, please clean it up in time to avoid the reduction of suction and affect the performance of appliance.
Battery use instructions
- It is recommended to use the supplied charger. Check the voltage of the machine and the charger, making sure it is consistent.
- Never use any other charger than the one provided.
- Do not throw away the battery unit, it must be recycled safely.
- The battery unit can only be used for this vacuum cleaner, do not use it for other purposes. And it can only be charged with the adapter inside the vacuum cleaner package. Do not disassemble the battery unit to avoid damage or short circuit. Do not place the
battery unit near high temperature objects or fire. Do not insert sharp objects into the battery unit or the battery will break in case of electric shock.
- To replace the damaged battery, make sure to replace it by authorized person or after-sales service.
- Do not immerse the motor part or battery in the water as it may cause short circuit or property damage.
- WARNING: In case of replacing the damaged battery always use the batteries recommended or sold by the manufacturer, The use of batteries not recommended or sold by the appliance manufacturer may result in fire, electric shock or injury to persons.
natural_image
Technical line drawings of a vacuum cleaner assembly (no text or symbols present)
text_image
Diagram showing 11 labeled technical components including a battery, cable, and plug assembly with numbered labels.COMPONENTS
- Hand held unit
- Battery pack
- Flexible tube
-
Motorised floor brush
-
Wall mounted support
- Long crevice
- Sofa brush
-
Hair brush
-
AC Adaptor
- Carpet roller
- Hard floor roll
Thanks to the 5-level filtration system, this appliance gives you the satisfaction of maximum cleaning with minimum efforts.
text_image
HEPA filter Micro-fiber filter Sponge filter Cyclonic filter Metal mesh filterSMART VACUUM CLEANER FEATURES
• Cyclonic (bagless) system with cordless Smart technology
• 2 in 1, Stick and Hand held Vacuum cleaner
• Digital touch screen panel with interchangeable 3 suction modes:
Eco: for energy saving and long duration of the battery
Auto: for automatic change in suction power according to dust quantity
Max: for suction with maximum power and Deep cleaning
- Battery power and Dust full indication on digital display panel for maximum use of Vacuum cleaner
- Smart dust sensor to detect and change the suction power, according to the need
- Flex tube to reach bottom of the furniture's for thorough cleaning
• Intelligent charger: to detect the battery power level and protect from Overcharging and Over-heating
- On /Off Trigger switch for easy operation and battery saving
• Big motorised floor brush with 4 LED lights
- Runs on 29.6V - Lithium Ion batteries 2500mAh
• Average Running time: 60 min (Eco Mode) 40 min (Auto Mode) 25 min (Max Mode)
- Charging time 4 - 5 hours
• Capacity of dust tank: 0.7L
• Vacuum power: 22Kpa
- Noise level comparatively lower than other vacuum cleaners: 78db
• 180° Swivel rotation of the brush
- Easy disassembling design for easy cleaning and storage
- Accessories: AC Adaptor, 2 in 1 crevice nozzle, sofa brush, hair brush, wall hanger, Flexible tube, Hepa filter, Motorized brush, Carpet roller
• Power and voltage: 350W, 100–240V\~ 50/60Hz
SMART FUNCTIONS
The Multiple smart functions of this Vacuum cleaner not only helps you to perform the daily cleaning without any hassle and with maximum efficiency, but also helps you to maintain the long life of appliance and reduce the cleaning costs.

Smart suction

Smart battery management

Smart noise optimization

Digital display screen

Smart dust sensor Smart dust indicator

Brush roller block sensor
CHARGING:
Note: Make sure to turn off the vacuum cleaner before charging!
AC adaptor or charger: This appliance contains an smart AC adaptor in order to prevent the battery getting damaged from the overheating or overcharging
Battery charging symbol on the display: After connecting the battery pack to the charger, the display automatically recognise and display start to show the battery charging sign!
Smart charging: This function consists that, once the appliance get fully charged, the charger automatically stop charging the vacuum cleaner in order to protect the battery. So that charger can be connected to the battery for a long time and that also without damaging the battery.
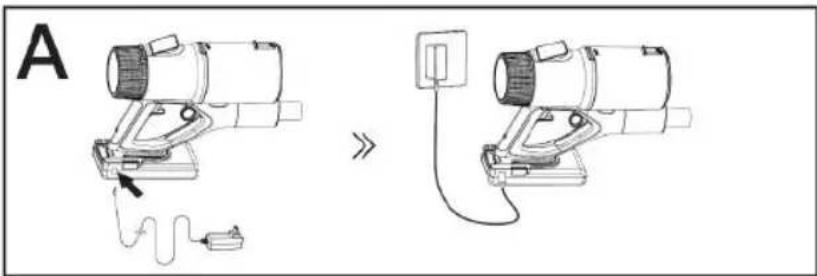
Charging method: There are 3 ways to charge the vacuum cleaner battery.
A: As shown in the figure A, plug in the power adaptor into the wall outlet, make sure that wall outlet voltage and power adaptor voltage is same, connect with the vacuum cleaner. It starts charging immediately and battery light turns on into the Red colour and once fully charged turns into the green colour light.
text_image
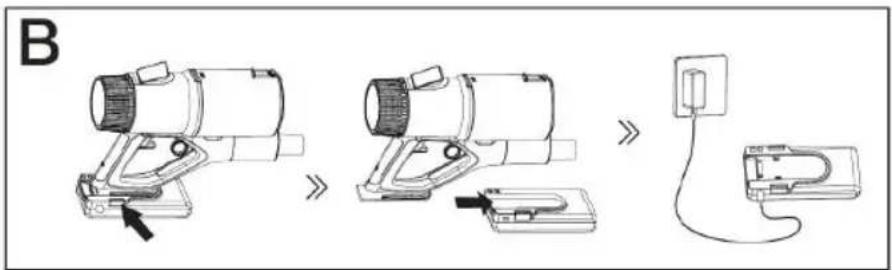
A >B: As shown in the Figure B, the battery can be removed from the appliance and charged directly. To detach the battery slide it towards down side and remove it completely. Connect the battery to the charger, immediately the battery light turns on in the red colour, which means it is in charging mode and once fully charged, the light turns into the green color.
text_image
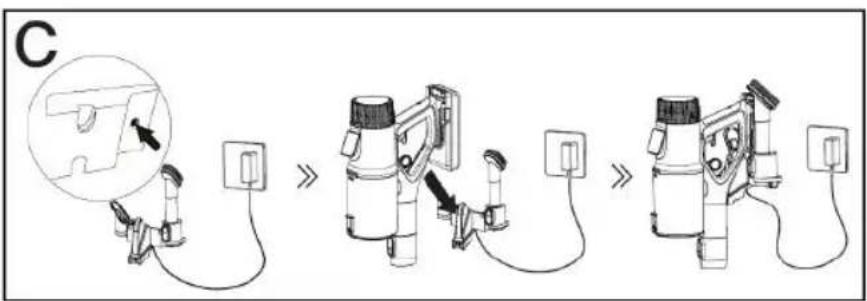
BC: As per the figure C, it can be charged on the wall mount as well. Hang the vacuum cleaner on to the wall support and connect the power adaptor and it starts charging.
text_image
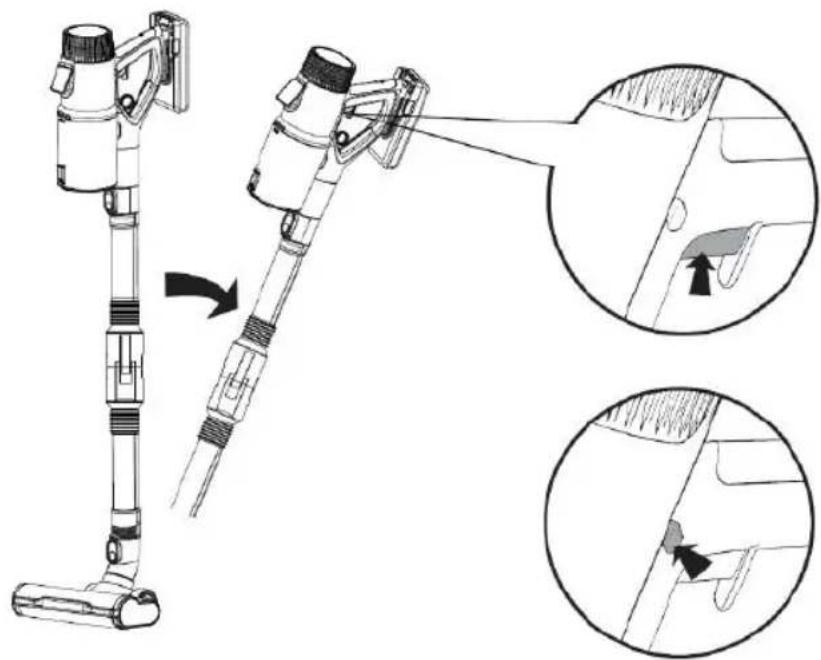
COPERATIONAL INSTRUCTION
Mount the Motor unit on to the flexible tube and connect motorized brush with the bottom part of the tube.
- Step on the floor brush and pull down the vacuum cleaner to start cleaning work. The flexible tube helps you to clean thoroughly bottom part of the furniture.
- Turn on the trigger switch, as shown in the figure 1 given below, with the help of trigger button you can switch on the vacuum cleaner whenever you want, without spending the battery power. To work continuously, you can press the upper button as shown in the figure 2 to keep the trigger in the on position and to switch off the machine just press the same upper button from the opposite side.
text_image
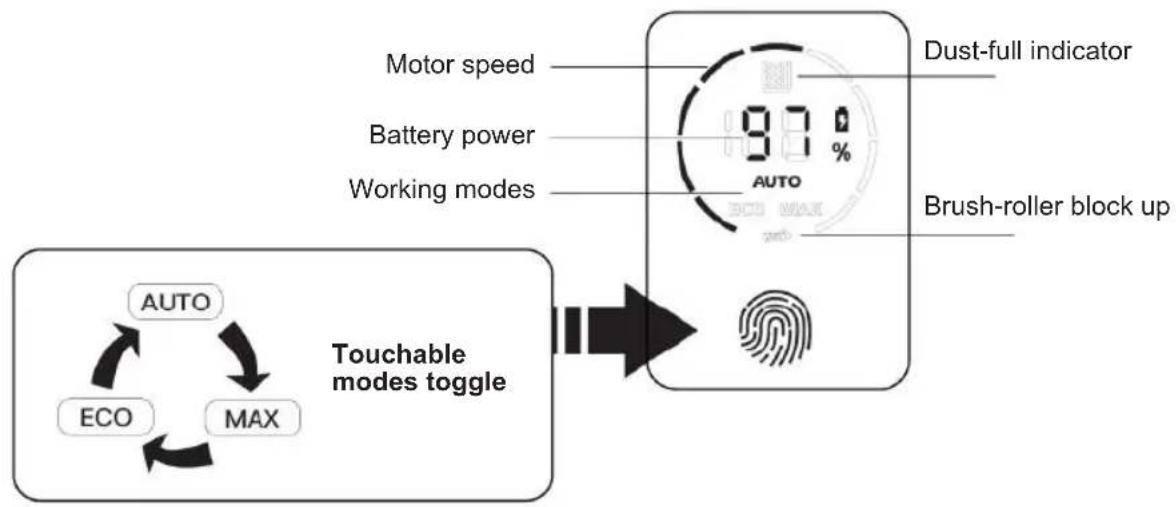
Technical diagram showing a vacuum cleaner with labeled parts and two views of the component being processed.SMART DISPLAY SYSTEM
This appliance has a special feature of Digital touch display.
The digital touch display provides information about some key performance parts of the appliance.
Some of the key features are:
a) Motor speed
b) Battery remaining power
c) Working modes operation
d) Dust full indicator (in the dust container)
e) Brush roller block up.
Motor speed: This function shows on which speed the appliance is working.
Battery remaining power: This is an important indicator which shows how much of the battery have been spent and when the appliance is to be charged. So this function helps in increasing the battery life and avoid overcharging.
Working modes: its Digital touch screen panel has interchangeable 3 suction modes, which can be changed by touching mode toggle in the form of finger prints as given below on the picture:
flowchart
graph TD
    A["Motor speed"] --> B["3.7%"]
    C["Battery power"] --> B
    D["Working modes"] --> B
    E["Dust-full indicator"] --> B
    F["Brush-roller block up"] --> G["Fingerprint Icon"]
    H["Touchable modes toggle"] --> I["AUTO"]
    I --> J["ECO"]
    I --> K["MAX"]
- Eco Mode: This mode is for energy saving and long duration of the battery as it works on the low speed and with low suction power.
- Auto Mode: This mode is for automatic change in suction power according to dust quantity. If the dust quantity is less, then appliance works with the less suction power and on the contrary if the dust quantity is more it works with high suction power.
- Max mode: This mode is used for working with maximum power and Deep cleaning. In this mode the battery will last for lesser duration
Dust full indicator: When the digital display shows the dust full indicator symbol it means this is the time to remove the dust from the dust container, clean it up and fit it back to the main unit
Brush roller block up: This vacuum cleaner has the function if the brush roller is not fitted well to the motorized brush compartment, it blocks the roller brush from moving and brush roller block sign appears on the digital display. So when this symbol appears, you need to take out the brush roller and re-fit it back in its place properly until this symbol stops appearing.
Dust sensor: This appliance has the dust sensor which helps the appliance to change the power and speed as per the dust quantity.
Note: This dust sensor only works in the auto mode
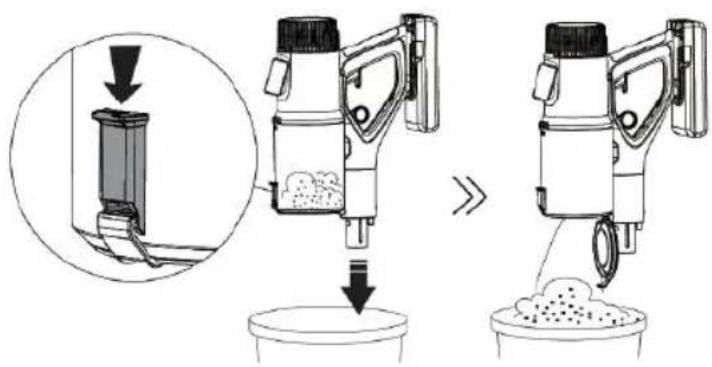
CLEANING AND MAINTENANCE
Make sure the unit is switched off, and not charging and its charger unit is disconnected from the mains socket before doing any Cleaning and maintenance.
How to clean dustbin container: Switch off the appliance and remove the battery. Bring the dust container to your thrash bin. Push the release button, the lid of the dust container will open and all the dust will fall off. You can use again the vacuum cleaner once the dust container is vacant completely and closed firmly and fitted into its place on the unit.
text_image
Diagram illustrating the process of a food processing machine, showing step-by-step transformation from feeding into feeding with waste.CLEANING THE FILTER SYSTEM
- Switch off the appliance and remove the battery before cleaning.
- Pull the release ring as in the figure given below and remove the dust container, remove the filters by rotating in anticlockwise and then clean it.
- Wash with the clean water and soft detergent and then clean it with soft and smooth cloth. Do not try to immerse the vacuum cleaner into the water, and do not pour the water into the vacuum cleaner body otherwise it will damage the appliance.
- After cleaning, make sure not to place under sun light or in a damp place. Store in cool and dry place.
- Do not use abrasive agents or hard scrubbers only use the soft and damp cloth.
- Make sure to dry the filters before using it again.
Caution:
The filter element and the screen can't be wash in the washing machine. Do not attempt to dry the machine with the help of hair dryer. Do not use the brush to clean the filter as it can damage the filter element.

text_image
Three circular icons with crossed-out symbols: a water droplet, a hand holding a tool, and a mouthwash with a funnel.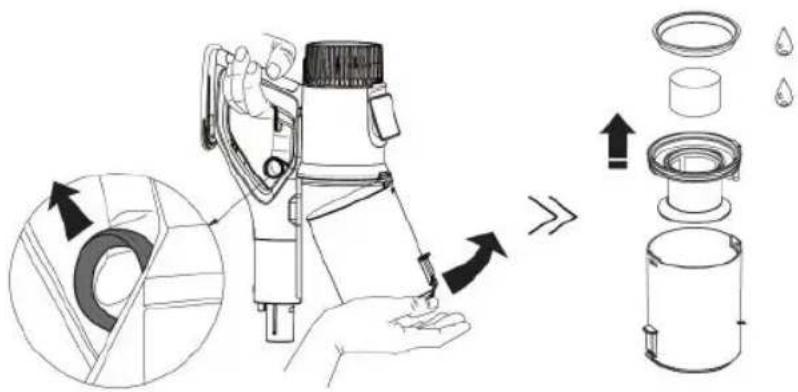
text_image
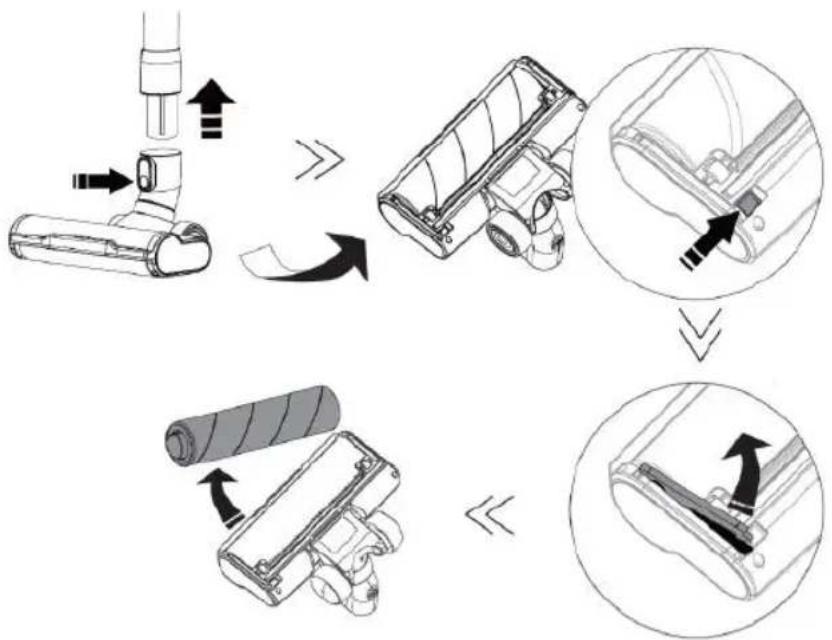
Technical diagram illustrating the assembly of a spray gun with labeled components and directional arrows indicating process flow.Make sure the power of the appliance is turned off.
Remove the brush as per the steps shown in the pictures given below, firstly remove the detachable flexitude, then turned down the motorized brush and press the button of the underneath as shown in the picture. Remove the roller floor brush.
text_image
Diagram illustrating the step-by-step assembly of a mechanical device, showing tool positioning and component disassembly.To mount the roller brush into the floor brush box and the installationn must be accurate and in case of the roller brush is not mounted properly the roller brush will get blocked and will not move and on the digital display screen brush roller block up sign appears.
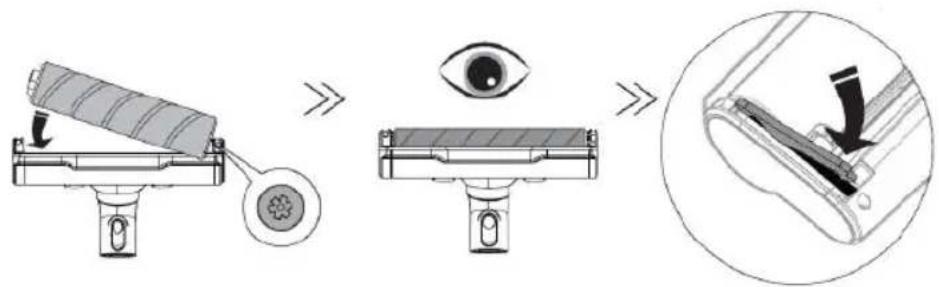
text_image
Diagram illustrating eye contact technique with labeled parts and magnified detail viewTROUBLE SHOOTING
| Common problems Causes Solutions | ||
| The product does not work | Battery has no power Charge the | battery |
| Battery aging Buy one new battery | and replace it | |
| Motor abnormal Take the product | to the after sales center for repair | |
| Vaccum cleaner cannot suck properly or has very low suction power | Filter blocked Wash the filter and | clean it with the water and soft detergent. Dry thoroughly before use, to prevent breeding the baterias |
| Dust bin with full dust Clean the dust bin | ||
| Dust bin is not installed properly | Install the dustbin properly | |
| Roller brush blocked Clean the roller | brush and install it correctly | |
| Filter used for too long Buy a new filter and replace it every six months | ||
| Roller brush stopped working during cleaning | Roller brush blocked Clean the roller brush | |
| Battery does not charge | Poor contact of connectors on the charging base | Do not bump or move the charging stand before the charging indicator light is turned on |
| Poor contact of shrapnel on the chargin base | Toggle shrapnel by hand | |
| The charging indicator does not light up | Charging base circuit is damaged | Take the product to the qualified technician or after sales serivce |
| Charging dock power is not plugged into the socket | Check properly if the adaptor cord is plugged into the wall outlet | |
| Air outlet of the vacuum cleaner has smell | Filter is not cleaned Wash the filter | and clean it with water and soft detergent. Dry well before using again. |
| Buy New filter | ||
| Vacuum cleaner has plastic smell | New product The plastic smell will go away after some uses | |
IMPORTANT:
text_image
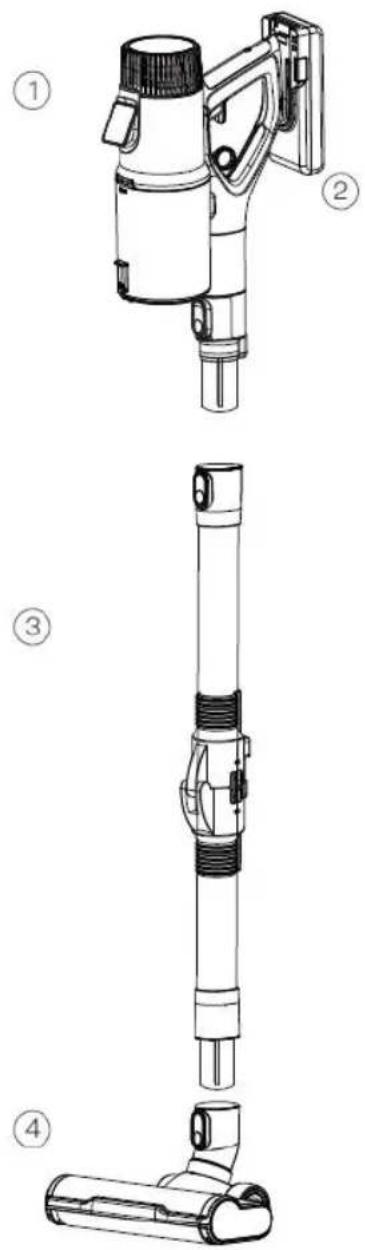
Technical diagram showing four views of a vacuum cleaner with labeled parts ① to ④.
text_image
Diagram showing 11 labeled technical components including a pump, tool, cable, and battery discharge.COMPOSANTS
text_image
Technical diagram showing a vacuum cleaner with labeled parts and two views of the component being processed.SYSTÈME D'AFFICHAGE INTELLIGENT
text_image
Diagram illustrating the process of a food processing machine, showing step-by-step transformation from raw material to processed food.NETTOYAGE DU SYSTÈME DE FILTRAGE
text_image
Three circular icons with crossed-out symbols: a water droplet, a hand holding a tool, and a mouthwash with a funnel.
text_image
Technical diagram illustrating the assembly of a spray gun with labeled components and directional arrows indicating process flow.text_image
Diagram illustrating the step-by-step assembly of a mechanical device, showing tool positioning and component disassembly.MONTAGE DE LA BROSSE ROTATIVE
text_image
Diagram illustrating the step-by-step procedure for inserting a device into a device, with magnified views showing eye and mechanical components.DÉPANNAGE
natural_image
Technical line drawings of a vacuum cleaner assembly (no text or symbols present)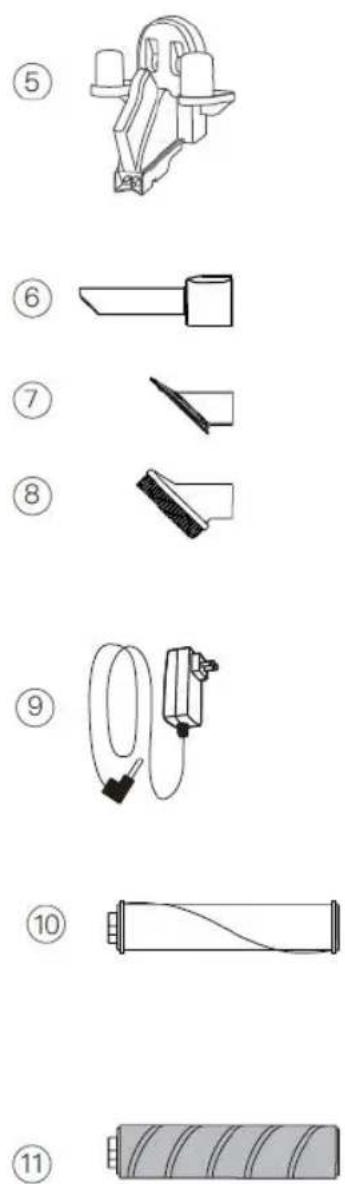
text_image
Diagram showing 11 labeled technical components including a battery, cable, and plug assembly with numbered labels.COMPONENTES
- Unidade portátil
- Bateria
- Tubo flexible
-
Escova motorizada para piso
-
Suporte montado na parede
- Fenda longa
- Escova de sofá
-
Escova de cabelo
-
Adaptador AC
- Rolo de carpete
- Rolo de piso duro
SISTEMA DE FILTRAGEM DE 5 NÍVEIS
text_image
Technical diagram showing a vacuum cleaner with labeled parts and two views of the component being processed.text_image
Diagram illustrating the process of a food processing machine with a container being inserted, showing step-by-step assembly and final product.LIMPANDO O SISTEMA DE FILTRO
text_image
Three circular icons with crossed-out symbols: a water droplet, a hand holding a tool, and a mouthwash with a funnel.
text_image
Technical diagram illustrating the assembly of a spray gun with labeled components and directional arrows indicating process flow.COMO LIMPAR A ESCOVA GIRATÓRIA
text_image
Diagram illustrating the step-by-step assembly of a vacuum cleaner, showing component positioning and disassembly steps.MONTAGEM DA ESCOVA GIRATÓRIA
text_image
Diagram illustrating eye manipulation process with labeled steps: slicing, eye view, and disassemblytext_image
Technical diagram showing four views of a vacuum cleaner with labeled parts ① to ④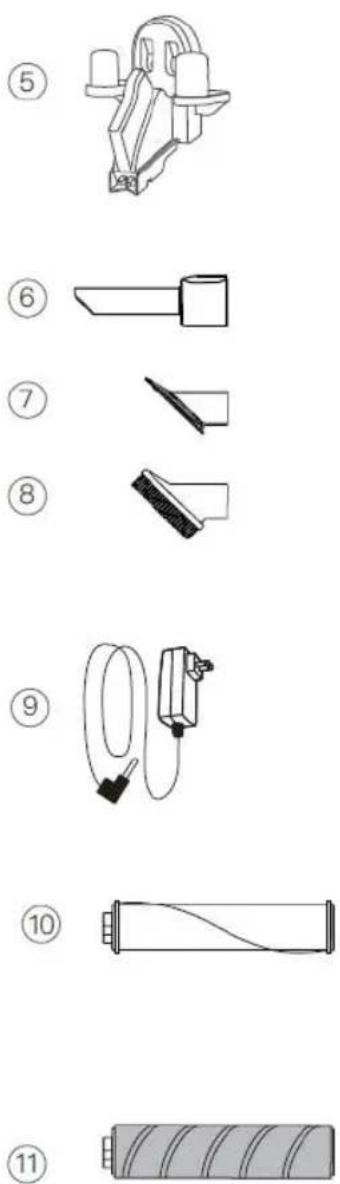
text_image
Diagram showing 11 labeled technical components including a motor, cable, and battery with numbered labels.KOMPONENTEN
Bürstenrollenblocksensor
AUFLADEN
text_image
Technical diagram showing a hand-operated vacuum cleaner with labeled parts and two views of the component being processed.INTELLIGENTES ANZEIGESYSTEM
text_image
Diagram illustrating the process of a precision grating tool, showing step-by-step assembly from feeding to adding granular material.REINIGUNG DES FILTERSYSTEMS
text_image
Three circular icons with crossed-out symbols: a bottle, a glass of water, and a tube, all marked with 'No' in black.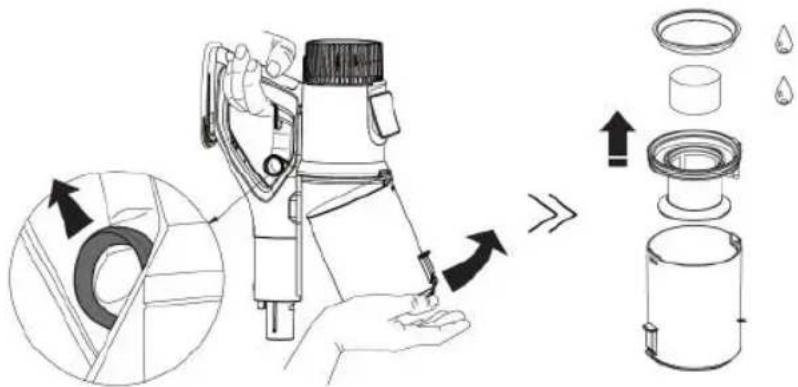
text_image
Technical diagram illustrating the assembly of a mechanical device with labeled parts and directional arrows indicating process flow.SO REINIGEN SIE DIE WALZENBÜRSTE
text_image
Diagram illustrating the step-by-step assembly of a mechanical device, showing component positioning and disassembly.MONTAGE DER BÜRSTENWALZE
text_image
Diagram illustrating the step-by-step procedure for inserting a device into a device, with magnified views showing eye and mechanical components.FEHLERBEHEBUNG
natural_image
Technical line drawings of a vacuum cleaner assembly (no text or symbols present)
text_image
Diagram showing 11 labeled technical components including a battery, cable, and plug assembly with numbered labels.COMPONENTI
text_image
Technical diagram showing a device being adjusted for a cable or cable assembly, with close-up insets highlighting the component detail.SISTEMA DI VISUALIZZAZIONE INTELLIGENTE
text_image
Diagram illustrating the process of a food processing machine with a container being inserted, showing step-by-step assembly and final product.PULIZIA DEL SISTEMA DI FILTRAGGIO
text_image
Three circular icons with crossed-out symbols: a water droplet, a hand holding a tool, and a mouthwash with a funnel.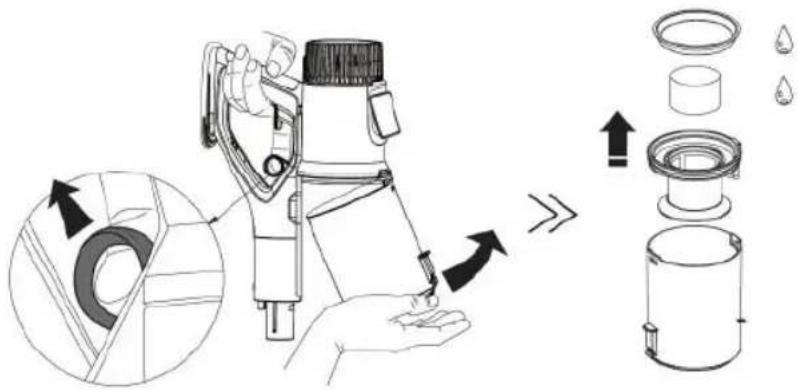
text_image
Technical diagram illustrating the assembly of a spray gun with labeled components and directional arrows indicating process flow.COME PULIRE LA SPAZZOLA A RULLO
text_image
Diagram illustrating the step-by-step assembly of a mechanical device, showing tool positioning and component disassembly.MONTAGGIO DELLA SPAZZOLA A RULLO
text_image
Diagram illustrating eye manipulation process with labeled steps: slicing, eye view, and disassemblyDECLARATION OF CONFORMITY
This device complies with Low Voltage Directive 2014/35/EC, Electromagnetic Compatibility Directive 2014/30/EU, Directive 2015/863/EU on the restriction of the use of certain hazardous substances in electrical and electronic equipment and Directive 2009/125/EC on the eco-design requirements applicable to energy-related products.
DÉCLARATION DE CONFORMITÉ
This symbol means that in case you wish to dispose of the product once its working life has ended, take it to an authorised waste agent for the selective collection of waste electrical and electronic equipment (WEEE).

Imported by:
Sanysan Appliances S.L, NIF: B98753056, C/ Barcas 2, 2
46002 Valencia, Spain Product made in P.R.C. – Designed by SOGO based on the European Quality Standards
Customer Service: www.sogosat.com / sogosat@sogosat.com / 0034 902 222 161