
45268 - Lamp Fixpoint - Free user manual and instructions
Find the device manual for free 45268 Fixpoint in PDF.

| Product type | LED magnifier lamp |
| Brand | Fixpoint |
| Model | 45268 |
| Power supply | 220-240 V ~ 50/60 Hz |
| Number of LEDs | 90 |
| Rated power | 7.5 W |
| Luminous flux | 520 lm |
| Color temperature | 6500 K (cool white) |
| Beam angle | 120° |
| Energy efficiency class | A+ |
| Protection rating | IP20 |
| Protection class | II |
| Dimming | Not dimmable |
| Rated lifetime | 20000 h |
| Lens diameter | 127 mm |
| Magnification | 3 dpt (1.75×) |
| Color | White |
| Clamp | For panels up to 60 mm thickness |
| Dimensions (∅ × L) | 210 × 900 mm |
| Weight | 2640 g |
| Replaceable light elements | No |
| Replaceable magnifier | No |
| Maintenance and cleaning | Soft dry cloth; stubborn stains: slightly damp cloth |
| Safety | Do not open the housing; close the cover when not in use |
Frequently Asked Questions - 45268 Fixpoint
User questions about 45268 Fixpoint
0 question about this device. Answer the ones you know or ask your own.
Ask a new question about this device
Download the instructions for your Lamp in PDF format for free! Find your manual 45268 - Fixpoint and take your electronic device back in hand. On this page are published all the documents necessary for the use of your device. 45268 by Fixpoint.
USER MANUAL 45268 Fixpoint
natural_image
Illustration of a simple desk lamp with adjustable arm and stand (no text or symbols)
BETRIEBSANLEITUNG
Inhalt
flowchart
graph TD
    A["1: Initial Procedure"] --> B["2: Branch"]
    B --> C["3: Branch"]
    C --> D["4: Branch"]
    D --> E["5: Treatment"]
    E --> F["6: Treatment"]
    F --> G["7: Control Unit"]
    G --> H["8: Treatment"]
    H --> I["9: Treatment"]
    I --> J["55666, 55667"]
Fig.1: Bedienelemente
natural_image
Simple line drawing of a mechanical lifting or lifting operation with a circular component and a block (no text or symbols)natural_image
Close-up of a medical device with a circular arrow overlay, showing internal components (no text or symbols visible)natural_image
Pure mechanical diagram of a rotating component with a circular base and shaft, no text or symbols presentFig.5: Anschließen
natural_image
Close-up of a mechanical clamp or bracket component (no visible text or symbols)natural_image
Simple diagram showing a power outlet connected to a device (no text or symbols)flowchart
graph LR
    A["1"] --> B["2"]
    B --> C["3"]
flowchart
graph TD
    A["0"] --> B["1"]
    B --> A
natural_image
Simple graphic with a sun icon and three triangular arrows pointing toward it, no text or symbols present.heller

dunkler
Fig.13: Model 45273
Modell 55667:

dunkler

heller
Fig.14: Model 55667
natural_image
Two views of a small mechanical component with a hand holding the top part, showing a circular opening and a magnified view of its internal structure (no text or symbols visible)1 Safety Instructions....13
1.1 General....13
1.2 Warning levels 13
- Description and Function....14
2.1 Product 14
2.2 Scope of delivery....14
2.3 Operating elements and product parts.... 14
2.4 Specifications....15
3 Intended Use....16
4 Installing and Operating....16
4.1 Preparing 16
4.2 Attaching the table clamp....16
4.3 Connecting the single parts....17
4.4 Connecting 17
4.4.1 Model 45268, 45271 and 45273.... 17
4.4.2 Model 55666 and 55667 18
4.5 Adjusting....18
4.5.1 Modell 45268, 45271 und 45273....18
4.5.2 Model 55666 und 55667 19
4.6 Switching on and off 19
4.6.1 Model 45268, 45271, 45273....19
4.6.2 Model 55666 with touch sensor 19
4.6.3 Model 55667 with touch sensor 19
4.7 Adjusting the brightness 20
4.8 Adjusting the colour temperature 20
4.9 Replacing the illuminants 20
4.10 Replacing the magnifying lense 20
4.10.1 Model 45273, 55666 and 55667 ......20
4.10.2 Model 45268 und 45271....20
5 Maintenance, Care, Storage and Transportation 21
6 Liability Notice....21
7 Disposal Instructions 21
1 Safety Instructions
1.1 General
- Read the user manual completely and carefully before use.
The user manual is part of the product and contains important information for correct use.
- Keep this user manual.
The user manual must be available for uncertainties and passing the product.
- Use product, product parts and accessories only in perfect condition.
• Compare the specifications of product, power supply and peripherals. They must be identical.
- In case of questions, defects, mechanical damage, trouble and other problems, non-recoverable by the documentation, contact your dealer or producer.

Risk of electric shock
• In case of emergency, during thunderstorms and after use, pull the product on its plug housing!
- Do not open the housing.
- Do not modify product and accessories.
- Maintenance and repair work must be carried out only by trained electrical specialists.
- Do not short-circuit connectors and circuits.
Target group information
Not recommended for children and people with physical and / or mentally limited capabilities.
- Secure packaging, small parts and insulation against accidental use.
Risk of Fire due to open cover flap
With open cover flap sun rays can be bundled uncontrollably and so burning objects.
• ALWAYS Close cover flap when not in use.
Risk of injury by inappropriate ambient conditions
Extreme conditions can injure persons.
- Do not install the product to places with direct sunlight or bright light. This contributes to eye fatigue.
• Do not use in explosive environments.
Risk of injury by moving product parts
Moving product parts can pinch or squeeze limbs.
- Do not keep limbs between shearing parts.
Operation and storage conditions
- Place, install and transport product, product parts and accessories in a safe way.
- Avoid stresses such as heat and cold, moisture and direct sunlight, microwaves, vibrations and mechanical pressure.
- Keep enough space around product and to the whole system to ensure proper ventilation and mobility.
- Check the stability of the system periodically after installation.
1.2 Warning levels

Warnings against hazards that may result in serious injuries or death in case of nonobservance.


against hazards that may result in injuries in case of non-observance.

against hazards that may result in material damage in case of non-observance
2. Description and Function
2.1 Product
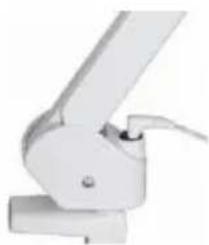
Your LED Magnifying lamp is an energy saving lamp for illuminating work areas and magnifiy details. It is ergonomically shaped and adjustable, space saving and constructed for mounting on stable horizontal surfaces.
2.2 Scope of delivery
| Article number Package content | |
| 45268, 45271, 45273 | LED magnifying lamp, table clamp, user manual |
| 55666, 55667 LED | magnifying lamp, table clamp, power supply, user manual |
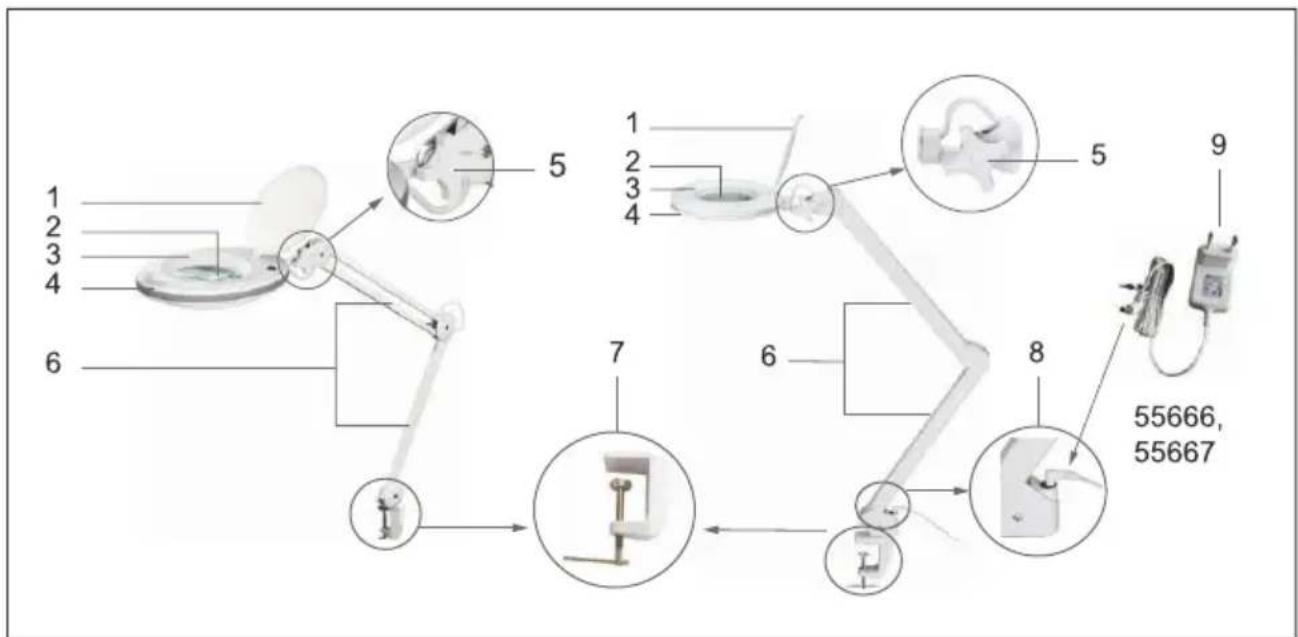
2.3 Operating elements and product parts
flowchart
graph TD
    A["Patient Monitor"] --> B["1-6"]
    B --> C["2-3"]
    B --> D["4"]
    B --> E["5"]
    B --> F["6"]
    B --> G["7"]
    G --> H["8"]
    H --> I["9"]
    I --> J["55666, 55667"]
Fig.16: Bedienelemente
1 Self looking cover flap 2 Magnifying lens
3 Magnifying lens fixation 4 Handle
5 Locking screw 6 Swivel arms
7 Table clamp 8 DC input
9 Power supply
2.4 Specifications
| Modell 45268 45271 45273 55666 55667 | |||||
| Input voltage 220-240 V @ 50/60 Hz 20 V ~ | --- | ||||
| Numbers of LEDs 90 60 | |||||
| Power (W) 7,5 8,5 4/8 1-9 | |||||
| Power factor >0,5 | |||||
| Nominal luminous flux (lm) | 520 | 83-800 | 400/760 | 860 max. | |
| Colour temperature (K) | 6500 | 6400 | 6500 | 3500-6500 | |
| Light colour | white | ||||
| Beam angle (°) | 120 | ||||
| Energy efficiency class | A+ | ||||
| Protection level | IP 20 | IP 20 | |||
| Protection class | II | III | |||
| Dimmability |  not dimmable not dimmable |  6 steps 6 steps |  2 steps 2 steps |  6 steps 6 steps | |
| Nominal life time (h) | 20000 | ||||
| Lense diameter (mm) | 127 | ||||
| Magnification (dpt) | 3 (1,75 x) | ||||
| Colour | white | ||||
| Clamping support for panels up to 60 mm thick | |||||
| Dimensions (∅ x L) | 210 x 900 | 230 x 900 | 205 x 900 | ||
| Weight (g) | 2640 | 2600 | 2590 | 2232 | |
| Power supply | X | ✓ | |||
| Input voltage (V~) | 100-240 @ 50/60 Hz | ||||
| Input current(A) | 0,35 | ||||
| Output voltage (V---) | 20 | ||||
| Output current (A) | 0.6 | ||||
| Protection class | II | ||||
| Polarity | positive ◇C◇ | ||||
| Dimensions (mm) | 58 x 38 x 63 | ||||
| Weight (g) | 72 | ||||
| Cable length (m) | 1.50 | ||||
Tab.3: Specifications

3 Intended Use

We do not permit using the device in other ways like described in chapter scription and Function" and „Safety Instructions". Use the product only in dry interior rooms.
Not attending to these regulations and safety instructions might cause fatal accidents, injuries, and damages to persons and property.
4 Installing and Operating
4.1 Preparing
- Check the scope of delivery for completeness and integrity.
- Compare the specifications of product, power supply and peripherals. They must be identical.
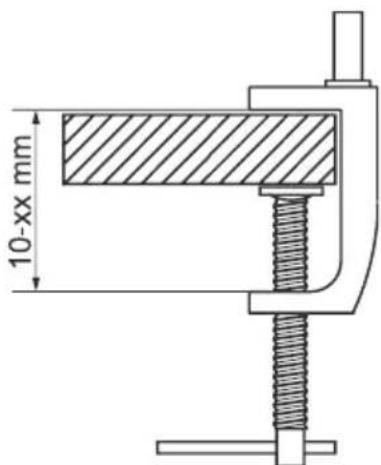
4.2 Attaching the table clamp

CAUTION
Risk of injury due to inappropriate ambient conditions
- Do not install the product to places with direct sunlight or bright light. This contributes to eye fatigue.
NOTICE
Risk of material damage by inappropriate ambient conditions and clamping supports
- Avoid stresses such as heat and cold, moisture and direct sunlight, microwaves, vibrations and mechanical pressure.
- Keep enough space around product and to the whole system to ensure proper ventilation and mobility. Not suitable are fiber, plastic and hollow profile plates, because they can yield over time.
text_image
10-xx mmAttach the table (7) clamp to a horizontal and sufficiently sturdy table or work surface with a thickness of 10-60 mm.
Fig.17: Attaching the table clamp
4.3 Connecting the single parts

CAUTION
Risk of injury by stumbling and falling
- Place, install and transport product, product ts and accessories in a safe way.
natural_image
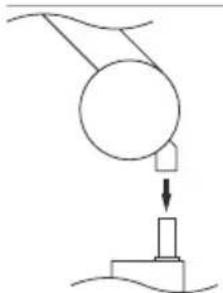
Simple line drawing of a pulley system with a weight and load, no text or symbols presentFig.18: Connecting the single parts - putting on
- Plug the LED Magnifying lamp onto the table clamp.
When adjusting the LED Magnifying lamp, always make sure that the connection to the table clamp is only plugged.
natural_image
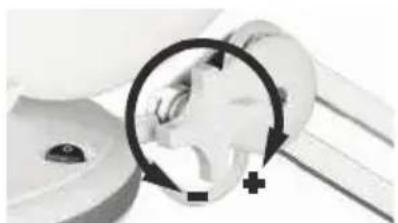
Close-up of a mechanical component with circular arrows indicating rotation or movement (no visible text or symbols)Fig. 19: Connecting the single parts - adjusting
- Adjust the locking screw at the upper side of the LED magnifying lamp as needed.
4.4 Connecting

CAUTION

Risk of injury by stumbling and falling
- Mind placing cables in a way, nobody will be disabled and the cable not be damaged.
• Install the system and devices attached to it in a way that persons
cannot be injured, or objects not be damaged for example by drop-
ping or stumbling.
4.4.1 Model 45268, 45271 and 45273
natural_image
Pure mechanical diagram of a rotating component with a circular base and shaft (no text or symbols)Fig.20: Connecting
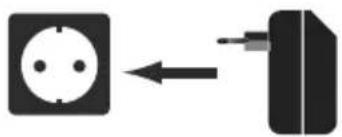
- Connect the LED Magnifying lamp to a mains socket.

4.4.2 Model 55666 and 55667
NOTICE
Risk of material damage due to incorrect power supply
• Use only the supplied power supply.
natural_image
Close-up of a mechanical clamp or bracket component (no visible text or symbols)Fig.21: Connecting the power supply
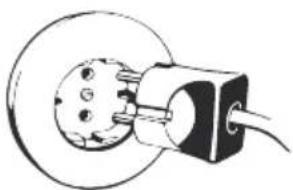
- Insert the plug of the power adapter into the DC connector (8) of the LED magnifier lamp.
natural_image
Simple diagram showing a power outlet connected to a device (no text or symbols)- Connect the power supply to a mains socket.
End of installing. To remove, proceed in reversed order.
4.5 Adjusting
CAUTION
Risk of injury by moving product parts
- Do not hold limbs between shear parts during use.
- Adjust the LED Magnifying lamp as necessary.
- When adjusting the LED Magnifying lamp, always
make sure that the connection to the table clamp is only plugged.
4.6 Switching on and off

Risk of Fire due to open cover flap
• ALWAYS Close cover flap when not in use!
4.6.1 Model 45268, 45271, 45273
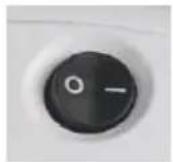
$$ I = O N $$
$$ 0 = \text { OFF } $$
Fig.25: Switching on and off
4.6.2Model55666 with touch sensor

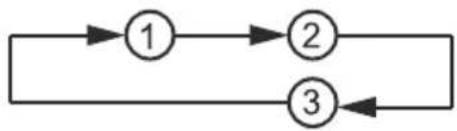
flowchart
graph LR
    A["1"] --> B["2"]
    B --> C["3"]
    C --> A
Fig.26: Switching on and off
$$ 1 = \text { ON / 1st brightness level } $$
$$ 2 = 2 \text { nd brightness level } $$
$$ 3 = \text { OFF } $$
4.6.3 Model 55667 with touch sensor

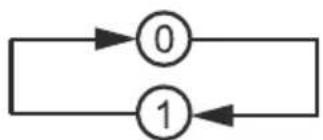
flowchart
graph TD
    A["0"] --> B["1"]
    B --> A
Fig.27: Switching on and off
$$ 0 = \text { ON } \quad 1 = \text { OFF } $$
Disconnect the LED Magnifying lamp when not in use for longer time.


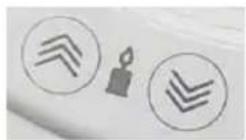
4.7 Adjusting the brightness
Models 45273 and 55667 offer a touch sensor, controlling the brightness within 6 brightness levels.
Model 45273

natural_image
Simple graphic with a sun icon and four triangular shapes on a light background (no text or symbols)brighter

darker
Fig.28: Adjusting the brightness
Model 55667

darker

brighter
Fig.29: Adjusting the brightness
4.8 Adjusting the colour temperature
Modell 55667 offers an touch sensor, controlling the colour temperature within 6 brightness level.
Adjusting the colour temperature

warmer

colder
4.9 Replacing the illuminants
The illuminants are NOT replaceable.
4.10 Replacing the magnifying lens
4.10.1 Model 45273, 55666 and 55667
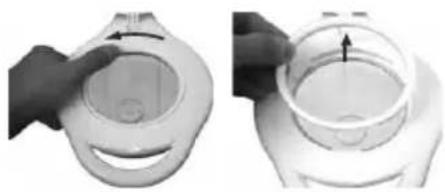
natural_image
Two views of a small electronic device with a handle, showing internal components and an arrow indicating rotation (no text or symbols present)order.
- Switch off the LED Magnifying lamp.
- Set the LED Magnifying lamp horizontally with cover flat upwards
- Turn the magnifying lens fixation anti-clockwise by hand until loosened and take it off.
For reassembling, follow steps 1-3 in reversed
The magnifying lens is not replaceable.
5 Maintenance, Care, Storage and Transportation

CAUTION
Risk of injury by moving product parts.
- Do not keep limbs between shearing parts.
NOTICE
Material damage
• Regularly check the tightness of product/screws.
- Do not over-tighten the screws.
Threads can be damaged.
- Protect the angles from dirt and grease them regularly with light machine oil.
- Be careful to avoid scratches.
- Only use a dry and soft cloth for cleaning.
Use a slightly moist and soft cloth for heavy stains.
- Do not use detergents or chemicals.
- Store cool and dry.
- Store the product out the reach of children and in a dry and dust-protected ambience when not in use.
- Keep and use the original packaging for transport
- When disassembling, pressure points and spots may remain on the surface.
6 Liability Notice
§
We reserve the right to printing errors and changes to product, packaging or product documentation.
• See our terms of warranty. These are available in their current form under the given contact details.
7 Disposal Instructions
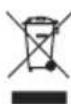
According to the European WEEE directive, electrical and electronic equipment must not be disposed with consumers waste. Its components must be recycled or disposed apart from each other. Otherwise contaminative and hazardous substances can damage the health and pollute the environment.
As a consumer, you are committed by law to dispose electrical and electronic devices to the producer, the dealer, or public collecting points at the end of the devices lifetime for free. Particulars are regulated in national right. The symbol on the product, in the user manual, or at the packaging alludes to these terms. With this kind of waste separation, application, and waste disposal of used devices you achieve an important share to environmental protection.
WEEE No: 82898622

MODE D'EMPLOI
Contenu
Risk of electric shock
natural_image
Simple line drawing of a mechanical lifting or lifting process with a circular component and a block, no text or symbols present.Fig.32: Montage des composants - Monter
natural_image
Close-up of a hand holding a small object with circular arrows indicating rotation or movement (no text or symbols visible)Fig.33: Montage des composants - Serrer
natural_image
Pure electrical circuit lines without any symbolsFig.34: Branchement
natural_image
Close-up of a white mechanical clamp or bracket component (no visible text or symbols)natural_image
Simple diagram showing a power outlet connected to a device via an arrow (no text or symbols)Fig.36: Raccordement de l' bloc d'alimentation
$$ I = \text { Marche } $$
$$ \mathbf {0} = \text { Arrêt } $$
flowchart
graph LR
    A["1"] --> B["2"]
    B --> C["3"]
flowchart
graph TD
    A["0"] --> B["1"]
    B --> A
natural_image
Simple graphic with a sun icon and three triangular shapes on a light background (no text or symbols)plus clair

plus sombre
natural_image
Two grayscale images showing a hand holding a circular device and another holding a transparent container with an arrow indicating direction (no text or symbols)natural_image
Simple line drawing of a mechanical lifting or lifting operation with a pulley and block (no text or symbols)natural_image
Close-up of a mechanical component with circular arrows indicating rotation or cycle (no text or symbols visible)natural_image
Pure mechanical diagram showing a rotating component with a shaft and housing (no text or symbols)natural_image
Close-up of a white mechanical clamp or bracket component (no visible text or symbols)natural_image
Simple diagram showing a socket connected to a device via an arrow (no text or symbols)flowchart
graph LR
    A["1"] --> B["2"]
    B --> C["3"]
    C --> A
flowchart
graph TD
    A["0"] --> B["1"]
    B --> A
natural_image
Simple graphic with a sun icon and three triangular arrows pointing toward it, set against a plain background (no text or symbols)natural_image
Two views of a small mechanical component with an arrow indicating direction (no text or symbols)natural_image
Simple line drawing of a mechanical lifting or lifting device with a circular component and a block, no text or symbols present.natural_image
Close-up of mechanical components with circular arrows indicating rotation or cycle (no text or symbols)natural_image
Pure mechanical diagram of a circular component connected to a rectangular block with wires (no text or symbols)Fig.63: Conexión
natural_image
Mechanical clamp or bracket component (no visible text or symbols)flowchart
graph LR
    A["1"] --> B["2"]
    B --> C["3"]
flowchart
graph TD
    A["0"] --> B["1"]
    B --> A
0 = encender 1 = apagar
natural_image
Simple line drawing of a sun with three triangular shapes on a light background (no text or symbols)natural_image
Two views of a hand holding a small transparent container with a circular lid and a handle, showing internal movement (no text or symbols visible)natural_image
Simple line drawing of a mechanical lifting or lifting operation with a pulley and block (no text or symbols)natural_image
Close-up of a mechanical component with circular arrows indicating rotation or cycle (no text or symbols visible)natural_image
Pure mechanical diagram showing a circular component connected to a rectangular block with wires (no text or symbols)Fig.78: Aansluiten
natural_image
Close-up of a white mechanical clamp or bracket component (no visible text or symbols)natural_image
Simple diagram showing a plug-in socket connected to a device (no text or symbols)flowchart
graph LR
    A["1"] --> B["2"]
    B --> C["3"]
    C --> A
$$ 1 = \text { aan } / 1 e \text { helderheidsniveau } $$
$$ 2 = 2 e \text { h e l d e r h e i d s n i v e a u } $$
$$ 3 = \text { u i t } $$
flowchart
graph TD
    A["0"] --> B["1"]
    B --> A
natural_image
Simple graphic with a sun icon and triangular shapes, no text or symbols present.Fig.86: Helderheid instellen

helderder

donkerder
Model 55667

Fig.87: Helderheid instellen

donkerder

helderder
natural_image
Two views of a white plastic container with a hand holding the lid, showing internal structure and an arrow indicating direction (no text or symbols)flowchart
graph TD
    A["1: Initial Procedure"] --> B["2: Treatment"]
    B --> C["3: Treatment"]
    C --> D["4: Treatment"]
    D --> E["5: Treatment"]
    E --> F["6: Treatment"]
    F --> G["7: Treatment"]
    G --> H["8: Treatment"]
    H --> I["9: Treatment"]
    I --> J["55666, 55667"]
natural_image
Simple line drawing of a mechanical lifting or lifting operation with a pulley and block (no text or symbols)natural_image
Close-up of mechanical components with circular arrows indicating rotation or refresh (no text or symbols visible)natural_image
Pure mechanical diagram of a rotating component with no text or symbolsFig.93: Podłączanie
natural_image
Close-up of a mechanical clamp or bracket component (no visible text or symbols)natural_image
Simple diagram showing a power outlet connected to a device with an arrow indicating direction (no text or symbols)flowchart
graph LR
    A["1"] --> B["2"]
    B --> C["3"]
flowchart
graph TD
    A["0"] --> B["1"]
    B --> A
natural_image
Simple line drawing of a sun with four triangular arrows pointing outward (no text or symbols)natural_image
Two views of a hand holding a transparent container with an arrow indicating direction (no text or symbols)© by Wentronic Deutschland
(0.14 € / minute from German landline)
