51098 - Welding machine Fixpoint - Free user manual and instructions
Find the device manual for free 51098 Fixpoint in PDF.

User questions about 51098 Fixpoint
0 question about this device. Answer the ones you know or ask your own.
Ask a new question about this device
Download the instructions for your Welding machine in PDF format for free! Find your manual 51098 - Fixpoint and take your electronic device back in hand. On this page are published all the documents necessary for the use of your device. 51098 by Fixpoint.
USER MANUAL 51098 Fixpoint
Lötstation | soldering station Art.No. 51098
EP 5 digital
Bedienungsanleitung
Manual
ATTENTION! Please read the user manual completely and carefully. It is part of the product and includes important information for proper installation and use. Keep this guide to have it available, when there are uncertainties, or the product will be passed on.
Content:
Page:
1 Description and Function 10
2 Intended Use 10
3 Notes on Safety 11 Changing the Fuse 12
4 Parts Package 12
5 Operating- and Adjusting Elements, Connecting 13
6 Operating 13
6.1 Preparing 13
6.2 Connecting 13
6.3 Adjusting the Temperature 13
6.4 Handling 14
6.5 Notes on Application 15
7 Care, Maintenance, Storage, and Transport 15
8 Troubleshooting 16
9 Warranty and Liability 16
10 Specifications 17
11 Notes on Waste Disposal 17
12 CE-Declaration 17
1 Description and Function:
The Soldering Station EP 5 is made for using in hobby-electronics, production and workshops. It comes with soldering iron, stand for the soldering iron with contact protection and pull-out sponge tray with viscose-cleaning sponge, as well as a digital LCD temperature display, displaying desired and instantaneous value. A compact, stable and protective-insulated housing, as well as electronic sensor temperature control with optic and acoustic malfunction message is included. The high-power 48 Watts soldering iron heats up quickly and is driven by safety-low voltage. An exact and stepless adjustment is possible between 150 - 450^ .
2 Intended Use:
Your product is made for household use and soft-soldering use only. It means you may only use it for soldering / unsoldering of electric and electronic components in printed circuits and modules, for tin coating of conductor paths and cable ends as well as making cable connections. Another use is not allowed.
Use the product only in dry interior rooms. If not attending to these regulations and notes on safety, it might causes fatal accidents, injuries and damages to persons and property. Never use this product for heating up liquids, such as water, bases, solvents, etc. or plastic parts because of producing toxic smoke and there is a danger of burning!
3 Notes on Safety:
ATTENTION! Only skilled electricians may assemble and disassemble the housing of the product. There is a risk of electric shock, short circuit and burning!
- Your product is not a toy and is not meant for children, because it contains small parts which can be swallowed and injured when used inappropriately!
- Warning: this tool must be placed on its stand when not in use.
- This appliance is not intended for use by persons (including children) with reduced physical, sensory or mental capabilities, or lack of experience and knowledge, unless they have been given supervision or instruction concerning use of the appliance by a person responsible for their safety.
- Children should be supervised to ensure that they do not play with the appliance.
- If the supply cord is damaged, it must be replaced by the manufacture, its service agent or similar qualified persons in order to avoid a hazard
- Please install and store the product and its accessories in a way persons cannot be injured, or objects not be damaged for example by dropping or stumbling.
- Please remove or store the packing materials well, because children may cut themselves on them while playing. Furthermore, there is a risk of swallowing and inhaling of incidentals and insulating material.
- By using in schools the soldering station must be supervised by a teacher.
-
The soldering station may only be used in case of an assured operation. In the following cases you CANNOT expect an assured operation:
-
visible damages (e.g. faults of isolation, damage of the housing)
- no function
- long storing under bad conditions
-
improper transport
-
A defective soldering station may not be put into operation, but must be disconnected from mains and protected against further use. Repairing, such as assembling and disassembling the housing is only allowed to skilled professionals. By repairing it yourself you will lose all warranties and there is a risk of electric shock, short circuit and burnings.
- Drive the product only with 230V (220-240V ) / 50 Hz a.c. networks.
- Unplug the mains cable when not in use and during thunder storms.
- Avoid places with high humidity, or places which might come into contact with water.
- Do not use the device next to flammable material or gases.
- Only work in well ventilated rooms or under applicable exhaust hoods, because soldering smoke is harmful.
- Soldering work may only be done with current- and voltage-free parts.
- Mind and follow the terms of law and health care for using the device in industry.
- The soldering iron reaches temperatures of more than 160^ . Touching the heated metal parts can cause fatal burning injuries to people and animals.
- Switch off the soldering station during longer working breaks.
- Never dunk soldering iron or soldering station into water for cooling!
- Never expose the product to high mechanical pressure.
- The soldering station heats up very much during operating. So only place it on solid, fixed and fire resistant bases.
- Do not modify or change the product or its accessories! Also mind chapter "warranty
and liability".
- Do not use damaged parts.
- The soldering station may only be installed and used in dry interior rooms.
- Do not let the soldering station out of view.
- Do not plug things like metal parts and unfitting cables into ventilation slots or ports. There is a risk of electric shock and short circuit!
- Keep enough space around all devices for a good ventilation and free motion and to avoid damages.
- Take care of protecting the conducting blank metal of cables and contacts from contact by suitable means like covering, insulation with non combustible material.
- Please observe the recommendations of the manufacturer regarding the application of suitable soldering material such as solder paste, solder tincture, etc.
Changing the Fuse: Replace the fuse with a fuse of the same type (T 1A / 250V, 5 × 20 ~mm ). Never bypass a fuse or replace it by a stronger one! Replace the fuse only after switching off and disconnecting the device from mains. Let the device cool down before. Open the safety switch at the back of the device with a suitable screwdriver and remove the burnt out fuse from the holder cap. Relock the safety switch entirely after replacing the fuse.
- During transport, observe the details listed in the Chapter "Specifications", and implement measures suitable for transport, e.g. use the original package.
- For questions, defects, mechanical damages, malfunctions, and other functional problems which cannot be resolved by this guide, please contact your dealer for repair or replacement, as described in the Chapter "Warranty and Liability".
Mind chapter "Specifications". - Please also observe the terms of use described in the Chapter "Intended Use".
4 Parts Package:
1 pc. soldering station EP 5
1 pc. soldering iron 48 Watts with solder tip
1 pc. user's manual
5 Operating- and Adjusting Elements, Connecting:
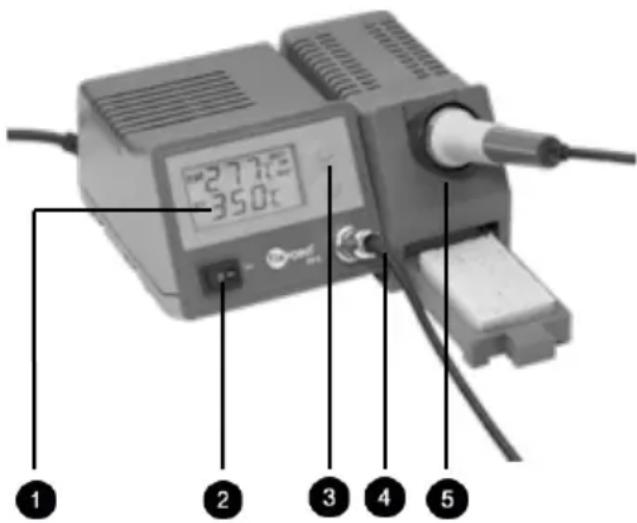
- Digital LC-Display- for set and actual soldering temperature
- Mains switch for switching the device on and off.
- UP/DOWN keys to set the desired soldering temperature
- 4-pole diode plug for connecting the soldering station to the soldering iron
- Stand for the soldering iron with contact protection and pull-out sponge tray.
6 Operating:
6.1 Preparing:
- Insert the spiral-shaped metal holder into the corresponding opening of the soldering iron stand and fix it with the holder screws.
- Soak the viscose cleaning sponge with clean water and drain it well before replacing it in the sponge tray.
- The soldering tip is mounted to a ceramic heating element and fixed by a safety socket to the soldering iron. Change the soldering tip only at the cooled down soldering iron. In order to do so, unscrew the union nut at the soldering iron and push off the safety socket. Now the soldering tip is exposed and you can pull it off carefully. Prerequisite for an exact sensor-temperature control is the close contact of the carrier tube, heating element and soldering tip. Loosed screw connections cause interruptions in the control unit. Therefore the screw connections should be inspected regularly regarding their tight fitting and, if required, be tightened accordingly.
- Fix the soldering stand to the right side of the soldering station. (plug-in slit connection)
The soldering iron may not be operated without the soldering tip in any case, because the heating element and the temperature sensor could be damaged or destroyed.
6.2 Connecting:
- Connect the soldering iron to the corresponding connection socket at the front side of the soldering station by inserting the connection switch of the iron wiring (4-pole diode plug with guide notch). Fix it with the union nut.
- Connect the mains plug of the soldering station with the 220 - 240 V AC / 50 Hz mains socket, while the mains switch is turned off to the 0-status.
Now the soldering station is ready to use.
6.3 Adjusting the Temperature:
- Switch on the soldering station by turning the mains switch into the I-status. Now the LC-Display flashes on. The appearing indication of 350^ PRESET indicates the soldering station is set to a soldering temperature of 350^ and it is heating up to it now.
-
By using the two temperature adjusting keys the soldering station can be adjusted step by step to a soldering temperature of 150 - 450^ . Every short individual pressing of the adjusting keys increases, or respectively, decreases the temperature by a value of 1^ . For a continuous adjustment keep the respective adjusting key pressed until the desired temperature is displayed.
-
The display shows the adjusted temperature value SET and the actual operating temperature of the soldering tip TEMP. When the soldering iron is being heated, the display shows "HEAT ON WAIT". By means of the SET keys changing the set-value temperature is possible at every time.
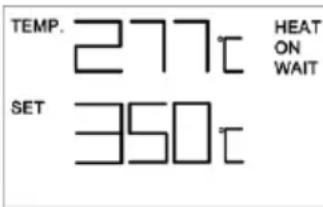
NOTE: The adjusted temperature value will be saved when switching off the soldering station. The EP 5 selects the last given temperature when being switched on again. The desired soldering temperature doesn't have to be entered again for the next soldering operation.

In case of failures in operation e.g. the defect of the temperature sensor, interruption of the mains supply between soldering iron and soldering station or increasing of the temperature of the soldering tip to more than 460^ the indication ERROR is displayed. Moreover, the integrated Piezo-buzzer releases an acoustic alarm. In this case the soldering station has to be switched off immediately, disconnected from mains and checked regarding possible causes of the error.
6.4 Handling:
Use suitable soldering wires and handle the soldering station in a correct way. This is prerequisite for impeccable soldering operation. We recommend electronics soldering wires with colophony solder core. In no case solder cores should contain halogens. The solder core within the solder wire liberates the soldering spot from solder-inhibiting contaminations and oxides and prevents the producing of new oxide during soldering. The most commonly applied electronics solder is the Fixpoint lead free solder wire of Fixpoint solder wire L-SN 60 Cu 2 (DIN EN ISO 12224-1) with a tin content of 60% (60/40 solder). This solder is available in different wire diameters (0.56 - 1.5 mm). We recommend a solder wire diameter of 1 mm for electronics.
NOTE: Before using the soldering station the first time, burn the soldering tip free of production residues and tin-coat it. Therefor switch on the soldering station and let some soldering tin deliquesce at an approx. temperature of 200^ to a thin connected film on the soldering tip.
The correct soldering temperature is crucial for the quality of the soldered spots. In electronics the common soldering temperature is 300 - 380^ . Too low soldering temperatures lead to cold solder joints. At too high soldering temperatures the solder core burns in a way interrupting the solder flow. Moreover, there is a danger of damaging the circuit board and other components caused to these high soldering temperatures. Wipe the soldering tip directly before soldering with the moist cleaning sponge. Remains of incompletely vapourised solder cores, oxides and other contaminations will be removed this way and disappear from the soldering spot. Before replacing the soldering iron to the stand after work, the soldering tip has to be cleaned again and be tinned with some new solder. It is important to hold the soldering tip always tinned because otherwise it will become passive after a while and disable to absorb solder anymore.
- Hold the cleaned and well tinned soldering tip, heated up to the set soldering temperature, to the soldering wire and to the spot being soldered. Now the solder core flows and cleans the surface of the metal parts being soldered and then the soldering tip in order to make the electrically conducting connection. The soldering time in electronics is not
longer than 2 seconds. A good soldering spot in cooled status looks smooth and shiny after the removal of the soldering iron. Poor, defective soldering spots look dull, uneven and brittle after cooling-down. Beside the application of unsuitable solder or a too high soldering temperature set, defective soldering spots often occur due to too short or too long soldering times. A soldering spot may not be heated too long. On the other hand do not take away the soldering iron from the soldering spot too early, but only when the soldering tin flows like bare silver.
- After finishing the soldering, leave some solder at the soldering tip before placing it into the holder and switch off the soldering station. The remaining solder will then be wiped off the hot soldering tip by the moist cleaning sponge before starting the next soldering operation.
6.5 Notes on Application:
The easy handling and the short heating time might lead to careless handling of the soldering station. Avoid this behavior absolutely! In order to ensure risk free soldering for users and protecting the soldering station from damages, follow the safety instructions and warning notes in this manual as well as the valid national or European directives.
7 Care, Maintenance, Storage and Transport:
ATTENTION! There is a risk of electric shock, short circuit and burnings!
- Always disconnect the mains plug from mains and let the device cool down!
- Use a dry linen cloth to clean your product, or use a slightly moist cloth for heavy stains. Look out for live cables of your device during cleaning! Do not use any cleaning supplies and avoid liquid entry to the device.
- Make sure there is sufficient space around the system to ensure proper ventilation during working breaks and cooling down.
- Avoid places with high temperatures, humidity, or places which can become wet, also during care, maintenance, storage, and transport.
- Mind the notes on safety also regarding care, maintenance, storage and transport.
- Keep the product away from children!
- Deposit the original packaging as protection from dust and humidity for transporting.
- Follow the safety symbols on the packing during transport.
- In case of transporting the soldering station from cold to warm rooms the sudden change of temperature may lead generating condensation water causing negative effects or damages to the electronics of the device. Only switch on the soldering station when having adapted to room temperature.
8 Troubleshooting:
| Problem Help | |
| The soldering station does not heat up. | Check the mains connection. Check the fuse of the device after separating and cooling-down of the device (chapter 3). |
| ERROR and humming signals Disconnect the device from mains immediately and consult your dealer (also look at chapter 6.3). | |
| No good soldering joint is practicable. | Read chapter 6.4. |
| The temperature is not adjustable. | Read chapter 6.3 or consult your dealer. |
9 Warranty and Liability:
- The producer grants a 2 years warranty to a new device.
- As the manufacturer has no influence on installation, warranty of the product only applies to the product.
- If any fault or damage is detected on your device, please contact your dealer and provide your sales slip or invoice as evidence of the purchase, if necessary. Your dealer will repair the fault either on site, or send the device to the manufacturer. You make the work of our technicians considerably easier, describing possible faults in detail – only then you can be assured that faults, occurring only rarely, will be found and repaired with certainty! If your dealer cannot be contacted, you can also contact us directly.
- The manufacturer is not liable for damages to persons or property caused by improper installation or operation not described in this guide. This includes, among others, any alteration and modification of the product and its accessories.
- Any use other than described in this user's guide is not permitted, and causes loss of warranty, loss of guarantee, and non-liability.
We reserve our right for misprints and changes of the device, packing, or user manual.
10 Specifications:
| Input voltage 220 - 240 V AC / 50Hz | |
| Power of the soldering iron 48 W | |
| voltage of the soldering iron 24 V ~ AC | |
| Mains fuse of the device | T 1A / 250 V (5 x 20 mm glass tube) |
| Temperature adjusting range | 150 - 450 °C |
| Temperature display | 3-digits LC-Display (30 x 60 mm) |
| Display range | 1 - 460 °C |
| Exactitude of indication | +/- 5% |
| Ambient temperature | +5 to +40 °C |
| relative air humidity | less than 85 % (non-wetting) |
| Air pressure | 600 - 1000 hPa |
| Dimensions | 185 x 100 x 165 mm (without soldering iron) |
| Weight | 1,8 kg Net Weight, 2 kg Gross Weight |
| time for heating up to 330°C | 1.5 min. |
Table to convert the temperature from ^ C to ^ : T(^)^*9 + 32 = T(^) 5
NOTE:
11 Note on Waste Disposal:
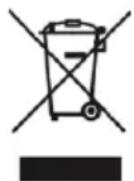
In according to the European WEEE directive, electrical and electronic equipment must not be disposed with consumers waste. The consumer is committed by law to deposit electrical and electronic devices to public collecting points or to the dealer at the end of the devices lifetime for free. Particulars are regulated in national right. The symbol on the product, in the manual or at the packaging
alludes to these terms. With this kind of application of used devices you achieve an important share to environmental protection.
12CE-Declaration:

This device corresponds to EU directives 2004/108/EC and 2006/95/EC: With the CE sign Fixpoint, a registered trademark of the Wentronic GmbH ensures, that the product is conformed to the basic standards and directives.
These standards can be requested online on www.wentronic.com. The
mentioned directives replace all former national permissions in the European Union. All trademarks and registered brands are the property of their respective owners.
SOLDERING STATION EP 5 DIGITAL MODEL: 51098