
Flach - Lamp HAYWARD - Free user manual and instructions
Find the device manual for free Flach HAYWARD in PDF.
| Product type | LED pool light |
| Brand | Hayward |
| Model | Flach |
| Bulb type | LED PAR-56 |
| Supply voltage | 12 V AC, 50/60 Hz |
| Power consumption (RGB) | 30 W |
| Power consumption (White) | 17.5 W |
| Protection rating | IP68 |
| Maximum operating temperature | 35 °C |
| LED type (RGB) | Power LED |
| LED type (White) | Power LED |
| Number of LEDs (RGB) | 9 |
| Number of LEDs (White) | 30 |
| RGB color control | By remote control or on/off |
| Operating modes | 11 fixed colors and 7 automatic sequences |
| Installation | Sealed niche, max depth 60 cm under coping |
| Warranty | 2 years against manufacturing defects |
| Recommended spare parts | Original Hayward parts |
| Maintenance | Clean with a soft cloth, replace the complete LED bulb in case of failure |
Frequently Asked Questions - Flach HAYWARD
User questions about Flach HAYWARD
0 question about this device. Answer the ones you know or ask your own.
Ask a new question about this device
Download the instructions for your Lamp in PDF format for free! Find your manual Flach - HAYWARD and take your electronic device back in hand. On this page are published all the documents necessary for the use of your device. Flach by HAYWARD.
USER MANUAL Flach HAYWARD
natural_image
Abstract geometric logo with stylized letter H inside a circular frame (no text or symbols)HAYWARD®
natural_image
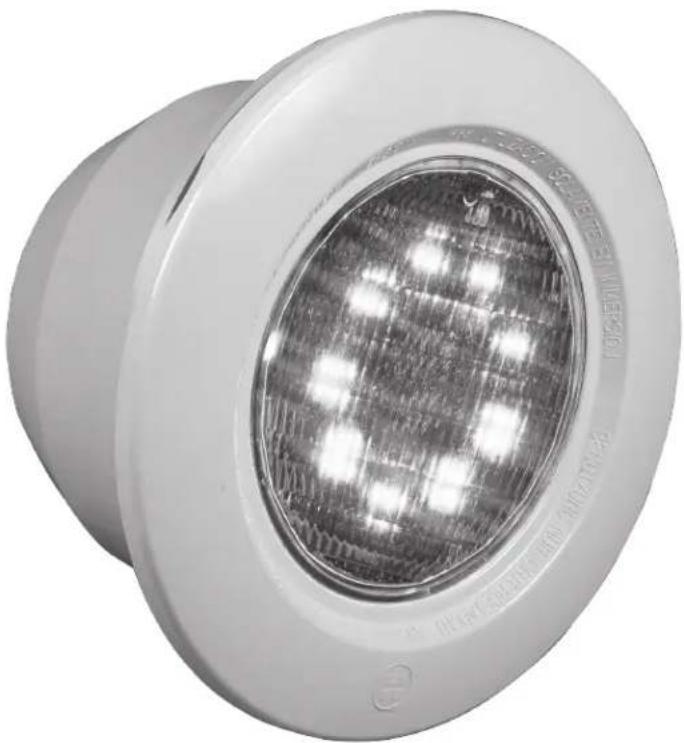
Close-up of a white LED ceiling light fixture with recessed and reflective components (no visible text or symbols)
GUIDE DE L'UTILISATEUR
OWNER'S MANUAL
MANUAL DEL USUARIO
MANUAL DO UTILIZADOR
ANWENDER - HANDBUCH
GEBRUIKERSHANDBOEK
MANUALE PER L'USO
natural_image
Abstract geometric logo with stylized letter H inside a circular frame (no text or symbols)HAYWARD®

natural_image
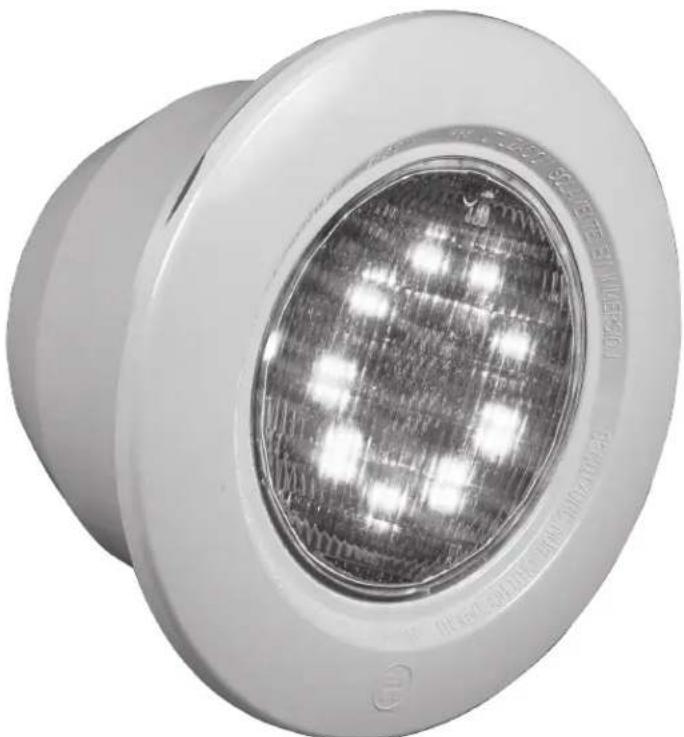
Close-up of a white LED ceiling light fixture with illuminated grid pattern (no text or symbols visible)
PROJECTEUR LED COLORLOGIC II / CRYSTALOGIC
GUIDE DE L'UTILISATEUR
CONSERVEZ CE MANUEL POUR UNE CONSULTATION ULTÉRIEURE

natural_image
Abstract geometric logo with stylized letter H inside a circular frame (no text or symbols)HAYWARD®

natural_image
Close-up of a white LED ceiling light fixture with illuminated grid pattern (no text or symbols visible)
LED LIGHTS COLORLOGIC II / CRYSTALOGIC
OWNER'S MANUAL
SAVE THIS OWNER'S MANUAL

- WARNING - Read and follow all instructions in this owner's manual and on the equipment. Failure to follow instructions can cause injury.
- WARNING – This document should be given to the owner of the swimming pool and must be kept by the owner in a safe place.
- WARNING – This appliance is not intended for use by persons (including children) with reduced physical, sensory or mental capabilities, or lack of experience and knowledge, unless they have been given supervision or instruction concerning use of the appliance by a person responsible for their safety.
- WARNING – Children should be supervised to ensure that they do not play with the appliance.
- WARNING – Use Only Genuine Hayward Replacement Parts.
- WARNING – All electrical connections must be done by a qualified electrician according to local electrical standard.
| F N F C 15-100 GB BS7671:1992 | |||
| D D IN VDE 0100-702 EW EVHS-HD 384-7-702 | |||
| A | ÖVE 8001-4-702 | H | MSZ 2364-702:1994 / MSZ 10-533 1/1990 |
| E | UNE 20460-7-702 1993, REBT ITC-BT-31 2002 | M | MSA HD 384-7-702.S2 |
| IRL | Normas de cableado + IS HD 384-7-702 | PL | PN-IEC 60364-7-702:1999 |
| I | CEI 64-8/7 | CZ | CSN 33 2000 7-702 |
| LUX | 384-7.702 S2 | SK | STN 33 2000-7-702 |
| NL | NEN 1010-7-702 | SLO | SIST HD 384-7-702.S2 |
| P R SIUEE | TR T$ IEC 60364-7-702 | ||
- WARNING – If the supply cord is damaged it must be replaced by the manufacturer, service agent, or similarly qualified persons in order to avoid a hazard.
- WARNING – Always switch off the electricity supply upstream before handling the electrical equipment.
- WARNING – Never operate the spotlight out of the water.
Technical features:
| Type of LED bulb | PAR-56 |
| Supply voltage | 12 V~ 50Hz / 60Hz |
| Consumed power RGB | 30W |
| Consumed power white | 17,5W |
| Protection index | IP 68 |
| Maximum operating temperature | 35°C |
| Type of RGB LEDs | POWER LED |
| Type of white LEDs | POWER LED |
| Number of RGB LEDs | 9 |
| Number of white LEDs | 30 |
| RGB colour control | By RC or On/Off |
INSTALLATION
The spotlight must shine in the opposite direction to the house or terrace to avoid the lighting being too harsh.
The spotlight must be positioned 60cm maximum under the rim of the pool, measured from the axis of the bulb. The spotlight recess is supplied with two 3/4" outputs. The rear output is generally used for brick-built pools and the vertical output for panel-built pools. The junction block is not included. The installation may require the advice of a qualified person.
Brick and liner structure
• Install the construction protection on the front of the recess.
- Seal the spotlight recess in the brickwork. Finish the plaster flush with the front surface, making sure the recess is orientated upwards. Block the unused outlet using the plug.
• Install the seal on the front of the spotlight recess.
• Install the seal on the spotlight recess flange.
- Attach the sealing flange after the liner has been installed.
- Cut the liner
Panel and liner structure
- Use the template to drill the panel
- Install the spotlight recess from inside the pool. Screw it onto the panel after installing the foam, placing the spotlight unit fastening grooves in a horizontal position.
- Seal the liner, the sheath and the cable and install the spotlight unit in the same way as the liner spotlight.
Brick structure without liner
- Seal the spotlight recess into the brickwork, with the front part set back to allow the finishing plaster or tiling to be installed.
- Seal the liner, the sheath and the cable and install the spotlight unit in the same way as the liner spotlight.
Installing the spotlight
• Pass the spotlight unit cable through the cable gland. Ensure the cable gland fitting is correctly positioned.
- Push the spotlight unit cable through the sheath to the terminal box.
- Seal the cable with the cable gland. Ensure the cable gland fitting is in the correct position. (the 30^ end is positioned in the bottom of the cable gland body).
- Hold the spotlight in front of the recess, winding the extra cable into it.
- Ensure the spotlight is in the right position in the recess by aligning the marker on the glass vertically, with the arrow pointing upwards.
• Fit the spotlight into the recess, placing the prongs into the grooves.
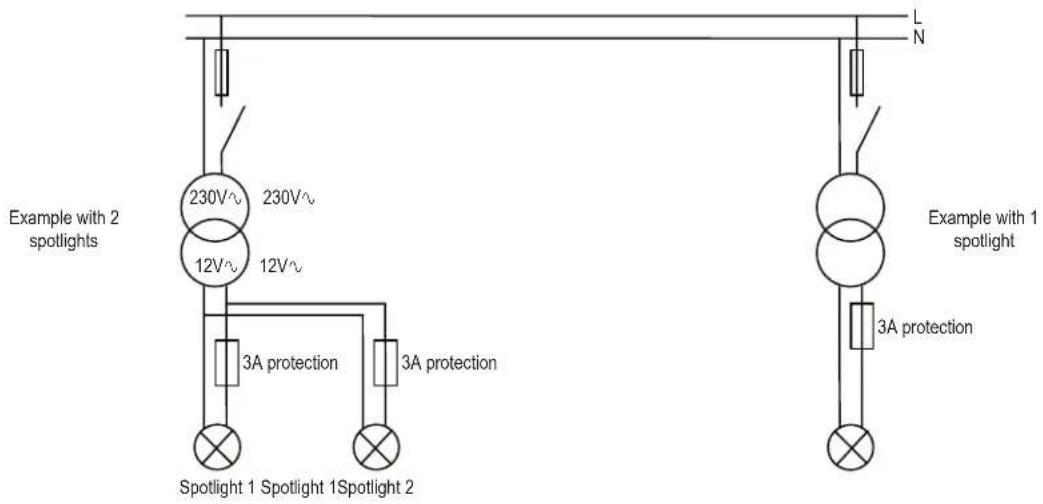
Transformer power
The transformer to be used must have a secondary voltage of 12V\~ (12.5V\~ depending on the model). The power must be suitable for the power of the spotlight(s) to be connected.
In all cases, the total power of the spotlights must be less than or equal to the power of the transformer.
Each spotlight requires individual protection. Protection must be provided for the transformer secondary winding using 3A or 5A fuses or circuit breakers (see wiring diagram below).
USE ONLY HAYWARD GENUINE REPLACEMENT PARTS
USAGE
Autonomous mode (RGB colour spotlight only).
If there is no RC unit, the spotlights operate independently and the user can choose between 18 modes: 11 fixed colours and 7 automatic colour change sequences (see sequence table below).
| Sequence Colour / Programme Sequence Colour / Programme | ||
| 1 Colour: White 10 Colour: Green | ||
| 2 Colour: Blue 11 Colour: Emerald green | ||
| 3 Colour: Blue Lagoon 12 Programme: fast colour change | ||
| 4 Colour: Cyan 13 Programme: slow colour change | ||
| 5 Colour: Purple 14 Programme: 11 fixed colors | ||
| 6 Colour: Magenta 15 Programme: Psychedelic | ||
| 7 Colour: Pink 16 Programme: Blue/Cyan/White | ||
| 8 Colour: Red | 17 Programme: Random colours 1 | |
| 9 Colour: Orange | 18 Programme: Random colours 2 | |
The colour change can be obtained by switching off the power to the spotlights for a very short time (<1s).
The 18 operating modes can be run through successively by switching the power on and off in this way. After mode 18, the spotlights return to the first automatic sequence (mode 1).
To synchronise the spotlights by bringing them all back to mode 2 simultaneously, switch off the power supply for 2s.
When the spotlight is switched on after being switched off for several seconds (>4s) the spotlight lights up white for 15s, then starts the mode it was in when it was last switched off: this allows you to obtain maximum lighting if anyone accidentally falls into the pool.
Safety (RGB colour spotlight only).
If the temperature inside the bulb rises abnormally, a safety mechanism stops the lighting and the bulb flashes red. As soon as the temperature returns to normal, the bulb starts operating again.
If the voltage detected is too low (>11V ^v ) or too high (>15V ^v ) the bulb stops working and flashes green. The power supply to the spotlights must be switched off to return to normal operation.
MAINTENANCE
Parts must only be replaced with genuine spare parts.
You are advised to change all the sealing parts when a bulb and/or the cable are changed.
If a fault occurs, the complete LED bulb must be replaced. Do not try to open or repair it.
If the power cord or the sheath is damaged, it must be replaced by the manufacturer, an approved service centre or a qualified technician to avoid any risk of accident.

natural_image
Abstract geometric logo with stylized letter H inside a circular frame (no text or symbols)HAYWARD®

natural_image
Close-up of a white LED ceiling light fixture with illuminated grid pattern (no text or symbols visible)
PROYECTORES LED COLORLOGIC II / CRYSTALOGIC
MANUAL DEL USUARIO
CONSERVE ESTE MANUAL DE INSTRUCCIONES

natural_image
Abstract geometric logo with stylized letter H inside a circular frame (no text or symbols)HAYWARD®
natural_image
Close-up of a white LED ceiling light fixture with illuminated grid pattern (no text or symbols visible)
PROJECTORES LED COLORLOGIC II / CRYSTALOGIC
MANUAL DO UTILIZADOR
GUARDE ESTE MANUAL DE INSTRUCCÕES

natural_image
Abstract geometric logo with stylized letter H inside a circular frame (no text or symbols)HAYWARD®

natural_image
Close-up of a white LED ceiling light fixture with illuminated grid pattern (no text or symbols visible)
LED SCHEINWERFER COLORLOGIC II / CRYSTALOGIC
ANWENDER - HANDBUCH
natural_image
Abstract geometric logo with stylized letter H inside a circular frame (no text or symbols)HAYWARD®

natural_image
Close-up of a white LED ceiling light fixture with illuminated grid pattern (no text or symbols visible)
LED SCHIJNWERPERS COLORLOGIC II / CRYSTALOGIC
GEBRUIKERSHANDBOEK
BEWAAR DEZE HANDLEIDING

natural_image
Abstract geometric logo with stylized letter H inside a circular frame (no text or symbols)HAYWARD®

natural_image
Close-up of a white LED ceiling light fixture with recessed and reflective components (no visible text or symbols)
PROIETTORI LED
COLORLOGIC II / CRYSTALOGIC
MANUALE PER L'USO
CONSERVARE ACCURATAMENTE IL PRESENTE MANUALE D'USO

natural_image
Abstract geometric logo with stylized letter H inside a circular frame (no text or symbols)HAYWARD®

natural_image
Close-up of a white LED ceiling light fixture with illuminated grid pattern (no text or symbols visible)
ПРОЖЕКТОР
COLORLOGIC II / CRYSTALOGIC
All of the HAYWARD products are guaranteed against all manufacturing or material faults for a period of two years from the date of purchase. Any warranty claim must be accompanied by the proof of purchase (date). We therefore encourage you to keep your invoice.
The warranty is limited to the repair or replacement of the faulty parts, as HAYWARD sees fit, on condition that the equipment has been used normally according to the instructions given in the corresponding user manuals, has not been modified and has only been fitted with genuine HAYWARD spare parts. The warranty does not cover damage due to frost or chemical products. All other charges (transport, labour) are excluded from the warranty.
HAYWARD cannot be held responsible for direct or indirect damage due to incorrect installation, connection or usage of the product.
For all warranty claims, and applications for repair or replacement of an article, please contact your dealer.
Returning the equipment to the factory will only be accepted after prior agreement.
Worn parts are not covered by the warranty.
The product must be connected according to the electrical standards required in the manual. Any damage, faults, malfunctions or other failure of your equipment due to non-compliance with the requirements regarding the electrical supply will be excluded from the warranty.
Faults, malfunctions, failure or damage of the product due to incorrect, unreasonable, imprudent or abusive use by the customer are also excluded from the warranty.
If any repairs are performed by anyone other then the authorised people (qualified staff) without prior permission from the factory, HAYWARD may unilaterally decide not to apply the warranty and not to reimburse the repair due to non-compliance with the instructions specified by the company.
GARANTÍA LIMITADA
BESCHRÄNKTE GARANTIE

- HAYWARD®
- PROJECTEUR LED COLORLOGIC II / CRYSTALOGIC
- LED LIGHTS COLORLOGIC II / CRYSTALOGIC
- INSTALLATION
- Brick and liner structure
- Panel and liner structure
- Brick structure without liner
- Installing the spotlight
- Transformer power
- USAGE
- MAINTENANCE
- PROYECTORES LED COLORLOGIC II / CRYSTALOGIC
- PROJECTORES LED COLORLOGIC II / CRYSTALOGIC
- LED SCHEINWERFER COLORLOGIC II / CRYSTALOGIC
- LED SCHIJNWERPERS COLORLOGIC II / CRYSTALOGIC
- GARANTÍA LIMITADA
- BESCHRÄNKTE GARANTIE
Brand : HAYWARD
Model : Flach
Category : Lamp