GN 9061 - Hand blender KRUPS - Free user manual and instructions
Find the device manual for free GN 9061 KRUPS in PDF.
| Brand | Krups |
| Model | GN 9061 |
| Product Type | Multifunction hand blender with accessories |
| Power Supply | 220-240 V, frequency not specified |
| Main Functions | Beat, mix, knead, emulsify, whisk, blend, slice, grate, crush, shred, chop |
| Included Accessories (depending on model) | Wire whisks, whisk bands, kneaders, multi-strand whisk, blender arm, vegetable cutter with drums (slicing, coarse grating, fine grating, shredding, crushing), mini chopper 150 ml, stand with rotating bowl 2.75 L, bowl 1 L, bowl 2.5 L, spatula |
| Speeds | Variable speed control with On (M) and Turbo positions |
| Maximum Capacity (dough) | 2 kg (all ingredients included) for yeast dough, 750 g flour for shortcrust pastry |
| Safety | Anti-overload microprocessor, automatic shut-off in case of excessive temperature or load, anti-splash function |
| Body Maintenance | Damp sponge, do not immerse, do not put in dishwasher |
| Dishwasher-safe Accessories | Whisks, kneaders, multi-strand whisk, bowl 1 L, bowl 2.5 L, rotating bowl, spatula, blender arm (blades facing up), drum holder, drums, locking ring, pusher, mini chopper bowl, knife, lid counterweight |
| Non-dishwasher-safe Accessories | Mini chopper lid, vegetable cutter adapter, stand and beater (damp cleaning) |
| Maximum Usage Time | Whisks/kneaders: 5 min at max speed or Turbo; mini chopper: 10 seconds |
| Usage | Domestic, indoor, food preparation |
Frequently Asked Questions - GN 9061 KRUPS
User questions about GN 9061 KRUPS
0 question about this device. Answer the ones you know or ask your own.
Ask a new question about this device
Download the instructions for your Hand blender in PDF format for free! Find your manual GN 9061 - KRUPS and take your electronic device back in hand. On this page are published all the documents necessary for the use of your device. GN 9061 by KRUPS.
USER MANUAL GN 9061 KRUPS
natural_image
Mechanical device with two cylindrical components and coiled spring-like structures (no text or symbols visible)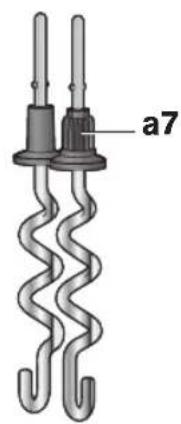
natural_image
Illustration of a coiled spring with two connectors and label 'a7' (no text or symbols on the spring itself)
natural_image
Technical line drawing of a whisk with a labeled part 'a8' (no other text or symbols)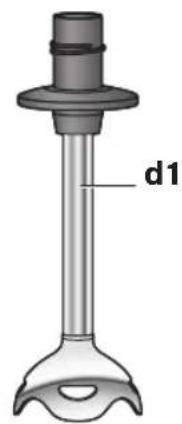
B

natural_image
Hand pressing a button on a device (no text or symbols visible)
natural_image
Illustration of a kitchen mixer with a bucket and tool, showing a close-up view of the mixing handle (no text or symbols present)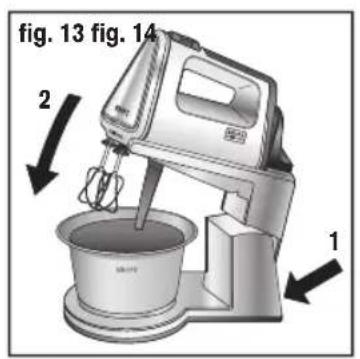
natural_image
Illustration of a kitchen mixer with a bowl and whisk, showing motion arrows (no text or symbols)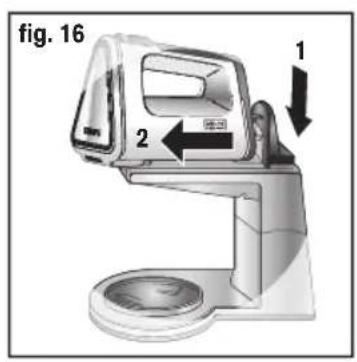
natural_image
3D diagram of a mechanical device with a pipe fitting and lever mechanism, labeled 'fig. 18' (no text or symbols on the diagram itself)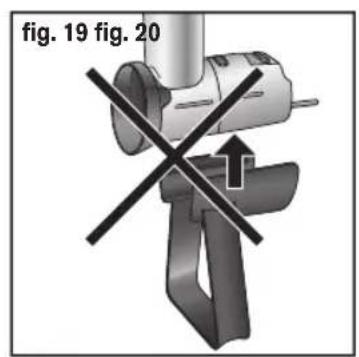
natural_image
Illustration of a handwashing brush tool with a close-up view of its handle (no text or symbols visible)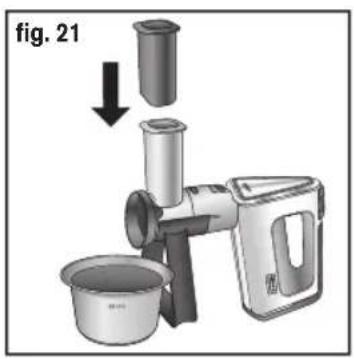
natural_image
3D mechanical component diagram labeled 'fig. 24' showing a pipe fitting with a directional arrow (no text or symbols on the object itself)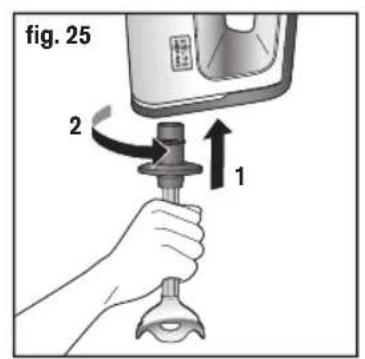
natural_image
Cross-sectional diagram of a mechanical assembly with no visible text or symbols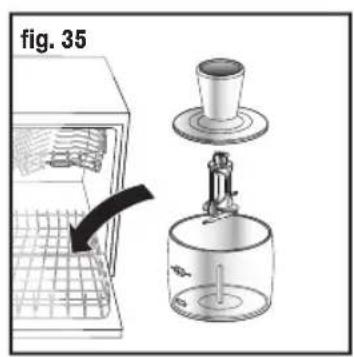
Thank you for choosing an appliance from the KRUPS range, which is exclusively designed for preparing foods, for domestic use in the home.
DESCRIPTION
a Mixer
a1 Appliance body
a2 Turbo control
a3 Speed selector
a4 Whisk ejector
Blender attachment on/off switch
a5Rearhatch
a6 Whisks
a6a Wire whisks
a6b Beaters (depending on model)
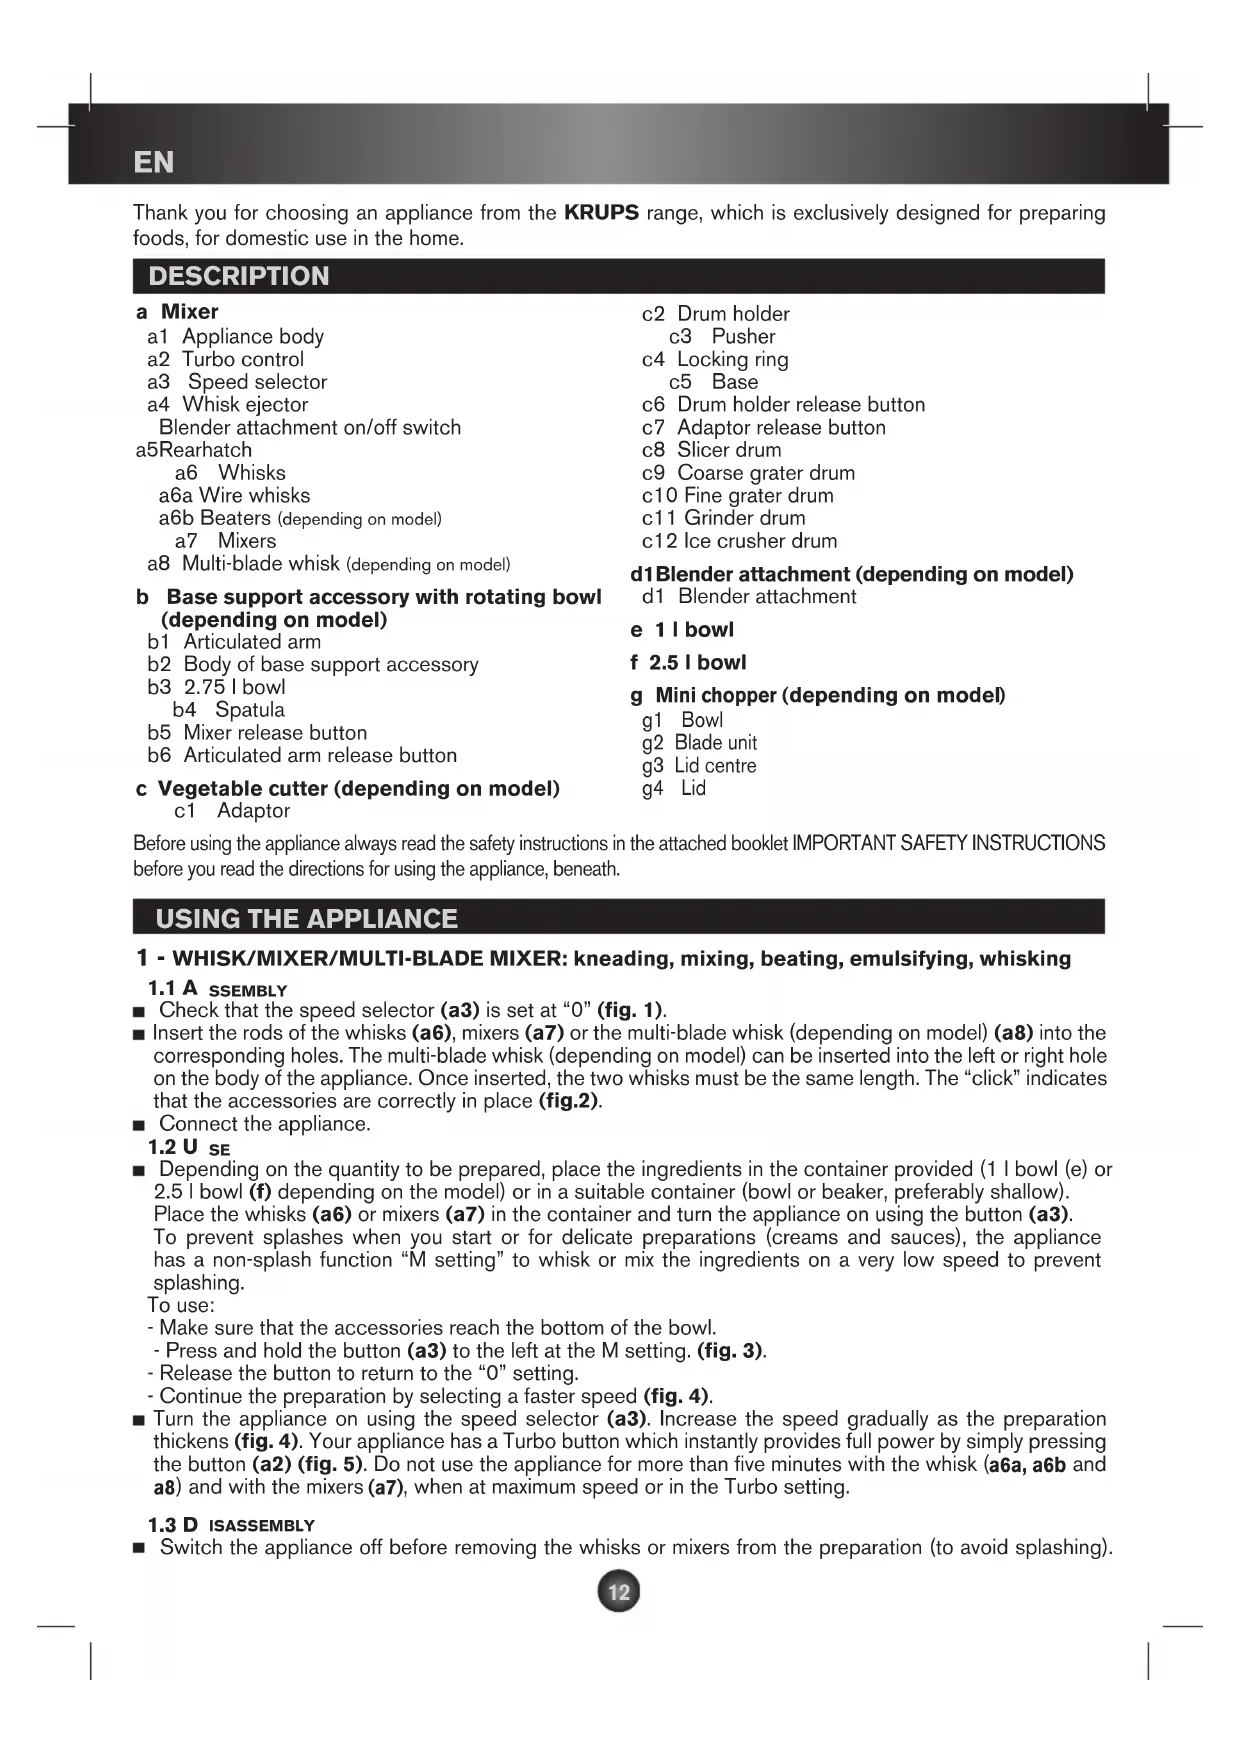
a7 Mixers
a8 Multi-blade whisk (depending on model)
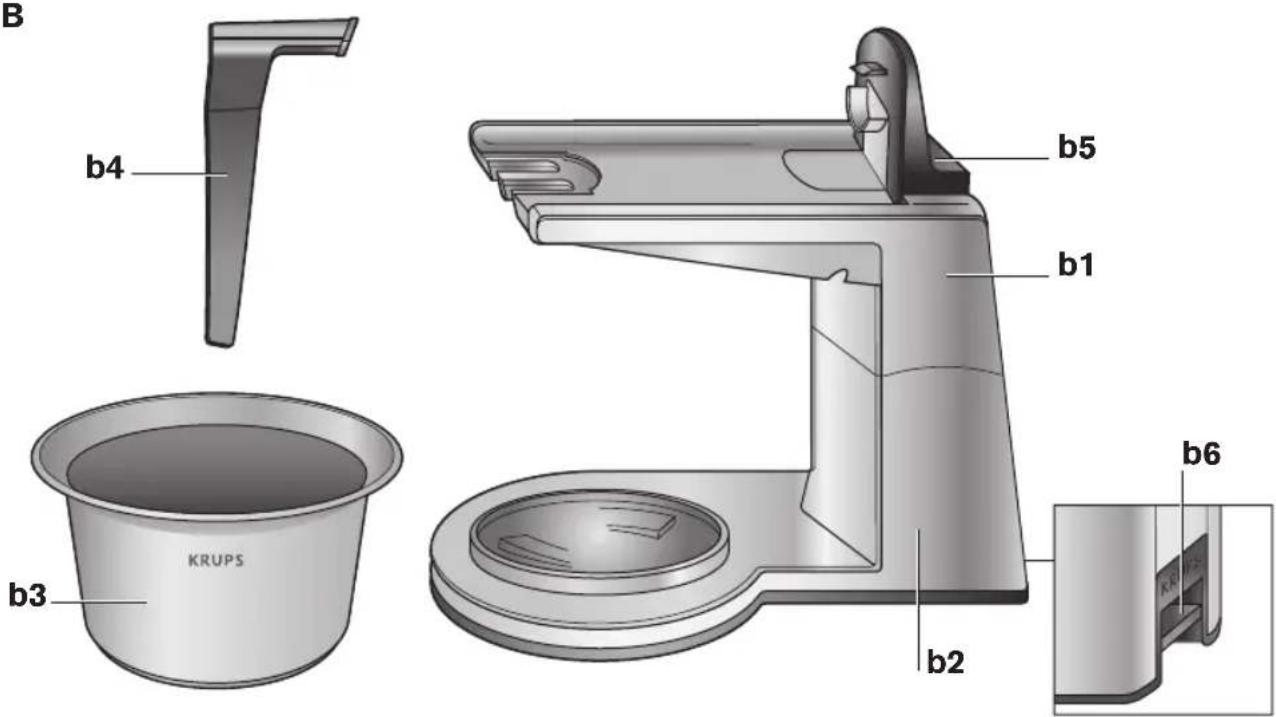
b Base support accessory with rotating bowl (depending on model)
b1 Articulated arm
b2 Body of base support accessory
b3 2.75 | bowl
b4 Spatula
b5 Mixer release button
b6 Articulated arm release button
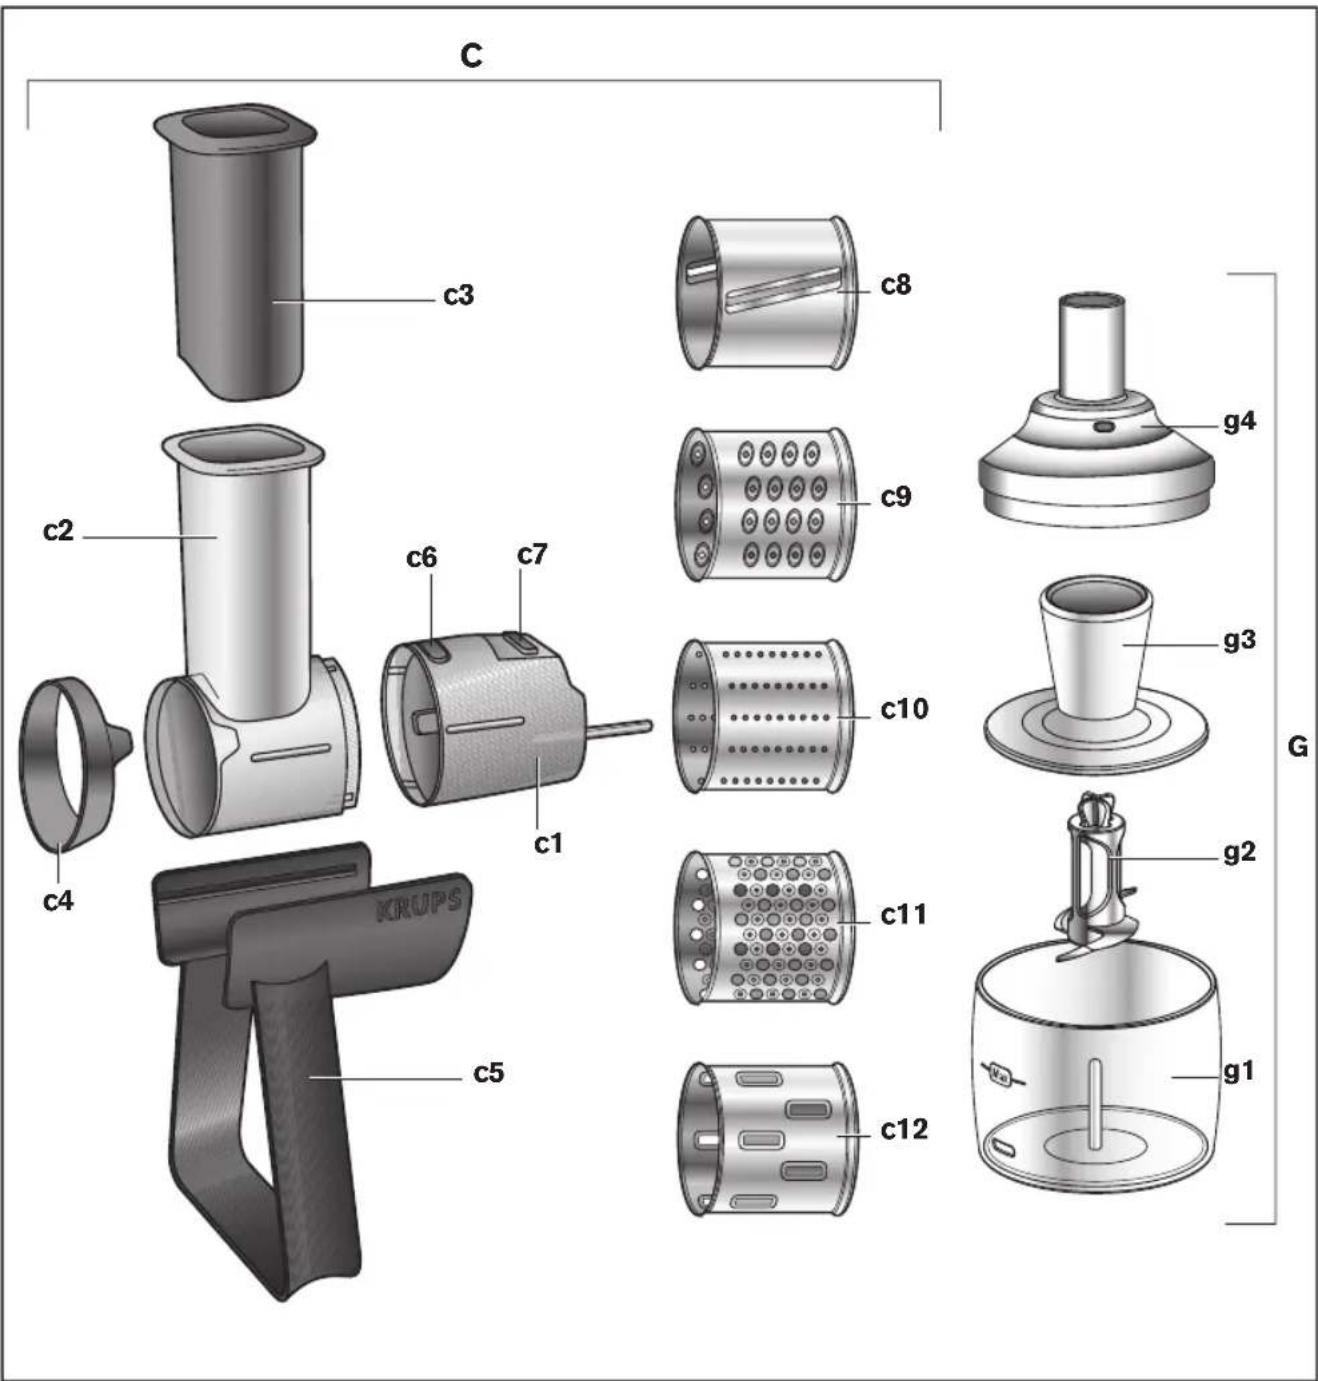
c Vegetable cutter (depending on model)
c1 Adaptor
c2 Drum holder
c3 Pusher
c4 Locking ring
c5 Base
c6 Drum holder release button
c7 Adaptor release button
c8 Slicer drum
c9 Coarse grater drum
c10 Fine grater drum
c11 Grinder drum
c12 Ice crusher drum
d1 Blender attachment (depending on model)
d1 Blender attachment
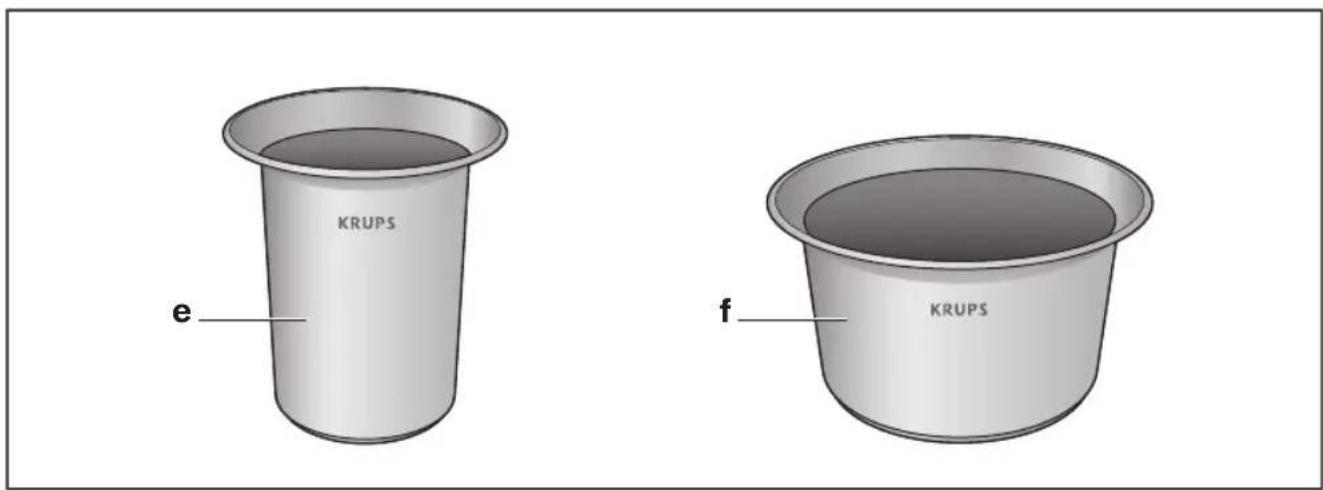
e 1 l bowl
f 2.5 | bowl
g Mini chopper (depending on model)
g1 Bowl
g2 Blade unit
g3 Lid centre
g4 Lid
Before using the appliance always read the safety instructions in the attached booklet IMPORTANT SAFETY INSTRUCTIONS before you read the directions for using the appliance, beneath.
USING THE APPLIANCE
1 - WHISK/MIXER/MULTI-BLADE MIXER: kneading, mixing, beating, emulsifying, whisking
1.1 A SSEMBLY
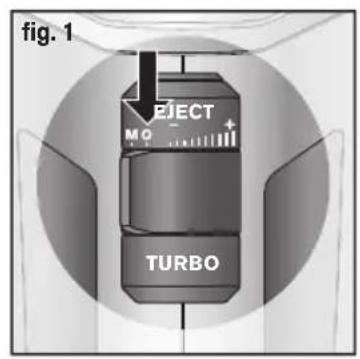
- Check that the speed selector (a3) is set at "0" (fig. 1).
■ Insert the rods of the whisks (a6), mixers (a7) or the multi-blade whisk (depending on model) (a8) into the corresponding holes. The multi-blade whisk (depending on model) can be inserted into the left or right hole on the body of the appliance. Once inserted, the two whisks must be the same length. The “click” indicates that the accessories are correctly in place (fig.2).
■ Connect the appliance.
1.2 U SE
■ Depending on the quantity to be prepared, place the ingredients in the container provided (1 l bowl (e) or 2.5 l bowl (f) depending on the model) or in a suitable container (bowl or beaker, preferably shallow).
Place the whisks (a6) or mixers (a7) in the container and turn the appliance on using the button (a3).
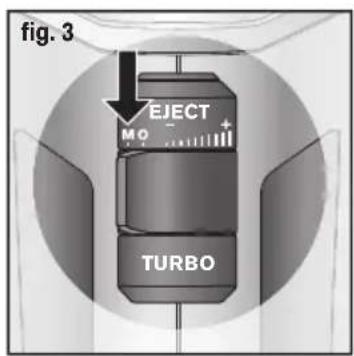
To prevent splashes when you start or for delicate preparations (creams and sauces), the appliance has a non-splash function “M setting” to whisk or mix the ingredients on a very low speed to prevent splashing.
To use:
- Make sure that the accessories reach the bottom of the bowl.
Press and hold the button (a3) to the left at the M setting. (fig. 3).
- Release the button to return to the "0" setting.
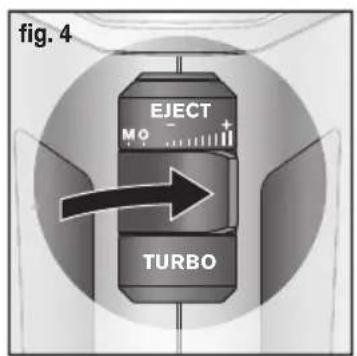
- Continue the preparation by selecting a faster speed (fig. 4).
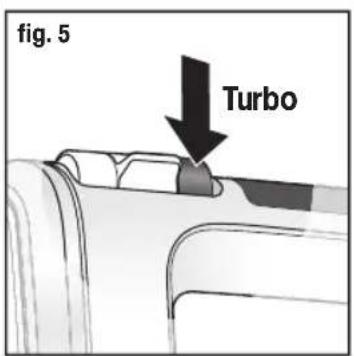
■ Turn the appliance on using the speed selector (a3). Increase the speed gradually as the preparation thickens (fig. 4). Your appliance has a Turbo button which instantly provides full power by simply pressing the button (a2) (fig. 5). Do not use the appliance for more than five minutes with the whisk (a6a, a6b and a8) and with the mixers (a7), when at maximum speed or in the Turbo setting.
1.3 D ISASSEMBLY
■ Switch the appliance off before removing the whisks or mixers from the preparation (to avoid splashing).
Return the button to the "0" setting (fig. 1).
■ Disconnect the appliance.
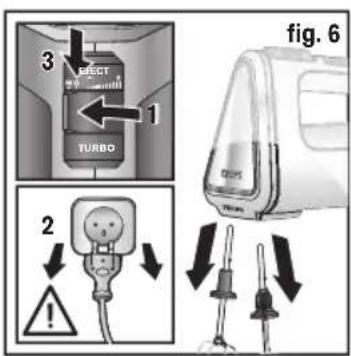
■ Release the whisks, mixers or the multi-blade whisk (depending on the model) by pressing the ejection button (a4) (fig. 6).
1.4 C LEANING
■ Disconnecttheappliance.
■ The whisks, mixers or the multi-blade whisk (depending on the model) must be removed before cleaning (fig. 6).
■ Clean the whisks, mixers or multi-blade whisk (depending on model) immediately after use to prevent any remaining egg or oil mixture sticking or drying.
■ You can clean the whisks, mixers or the multi-blade whisk (depending on model) with a sponge and washing up liquid. They are also dishwasher-safe.
■ Clean the body of the appliance using a damp sponge only and dry carefully.
■ Never place the appliance in the dishwasher.
■ Do not use scouring pads or objects containing metal parts.
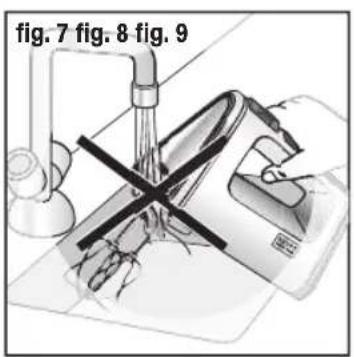
■ Never immerse the body of the appliance in water (fig. 7).
2 - BASE SUPPORT ACCESSORY WITH ROTATING BOWL: kneading, mixing, beating, emulsifying, whisking (depending on model)
2.1 A SSEMBLY
■ The base support is used with the mixer equipped with whisks or mixers. To use these accessories, refer to section 1 – WHISK/MIXER/MULTI-BLADE MIXER
■ Never use the multi-blade whisk with the base support.
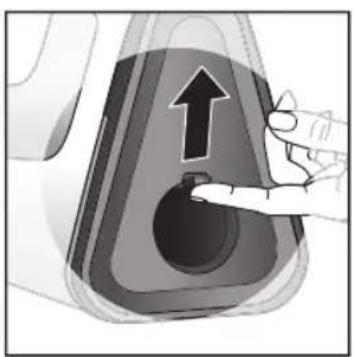
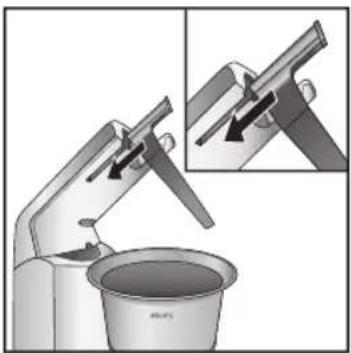
■ To place the mixer on the base support, open the rear hatch (a5) (fig. 8) and attach the product to the articulated arm until it clicks (fig. 9).
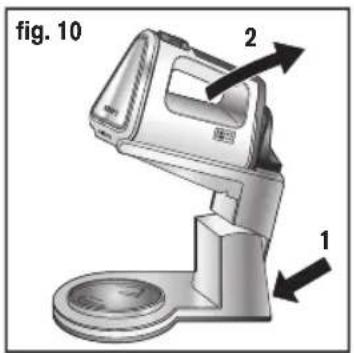
■ Press the button (b6) at the rear of the base support to release the articulated arm (b1) and tip it in the raised position using the mixer handle (fig. 10).
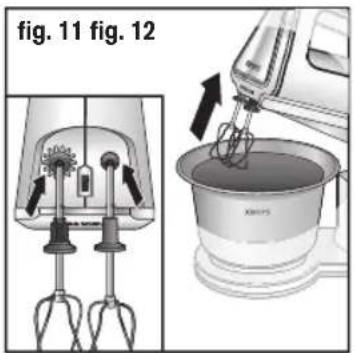
■ Insert the whisks or mixers until they are completely locked, placing the toothed accessory into the toothed opening (fig. 11).
■ Insert the spatula handle (b4) into the slot on the articulated arm. This spatula scrapes the ingredients to the mixing area of the bowl (fig. 12).
■ Positionthebowl.
■ Release the articulated arm (b1) by pressing the button (b6) on the rear of the base and lower it until it locks (fig. 13).
■ The incline and rotation of the bowl ensures optimum mixing.
■ Connect the mixer to the mains socket.
2.2 U SE
■ Depending on the quantity to prepare, place the ingredients in the container provided (bowl (b3)).
■ Turn the appliance on using the speed selector (a3). Increase the speed gradually as the preparation thickens (fig. 4). Your appliance has a Turbo button which instantly provides full power by simply pressing the button (fig. 5).
Note:
- Do not turn the mixer on with the articulated arm (b1) raised.
- Do not use the appliance for more than five minutes with the mixers (a7) or five minutes with the whisk (a6a, a6b or a8), when at maximum speed or in the Turbo setting.
- The maximum quantity of dough, including all ingredients, is 2 kg on the basis of 1 kg of bread flour for a leavened dough and 750 g of flour for a shortcrust pastry.
2.3 DISASSEMBLY
■ Disconnect the mixer after use.
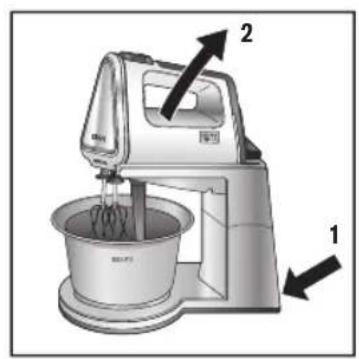
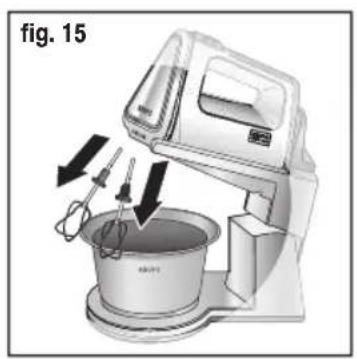
■ Press the button (b6) at the rear of the base support to release the articulated arm (b1) and tip it in the raised position using the mixer handle (fig. 14).
■ Release the whisks or mixers (fig. 15). Remove the bowl.
■ To remove the mixer, press the button (b5) and release it (fig. 16).
2.4 C LEANING
■ The bowl, spatula, whisks and mixers are all dishwasher safe.
■ The base support and the mixer must be washed with a damp cloth.
3 - VEGETABLE CUTTER ACCESSORY: grate, slice, crush and grind (depending on model)
3.1 A SSEMBLY
EN
- Choose one of the following drums depending on the type of food and the desired result:
Drum c8: Slices: potatoes, red beetroot, carrots, cucumber, cabbage / Drum c9: Grates coarsely: potatoes, red beetroot, carrots, cheese / Drum c10: Grates finely: cheese, carrots / Drum c11: Grinds: dry foods (almonds, walnuts, hazelnuts, parmesan); Makes into strands: potatoes / Drum c12: Crushes: ice
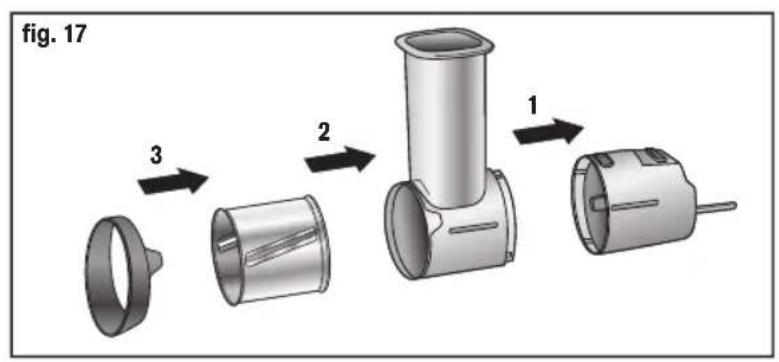
■ Clip the adaptor (c1) onto the drum holder (c2) and insert the chosen drum into the drum receptacle turning slightly so that it lodges correctly into its housing. Then position the drum locking ring (c4) (fig. 17).
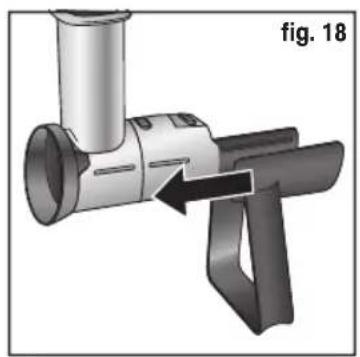
■ Insert the base on the runners located on each side of the adaptor (c1) then the drum holder (c2) (fig. 18).
■ Do not clip on the base (c5) from below (fig. 19).
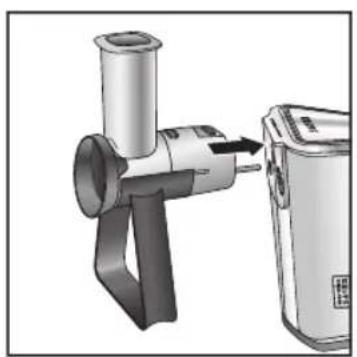
■ Position your mixer vertically then insert the adaptor (c1) into the corresponding holes turning slightly until it locks completely (fig. 20).
■ Place the 2.5 l container under the vegetable cutter to collect the food (fig. 21).
■ Connect the appliance to the mains socket.
3.2 U SE
■ Place the food into the feeder tude, guiding them using the pusher (c3) (fig. 21).
■ Set the button to maximum speed.
3.3 D ISASSEMBLY
■ Disconnect the appliance.
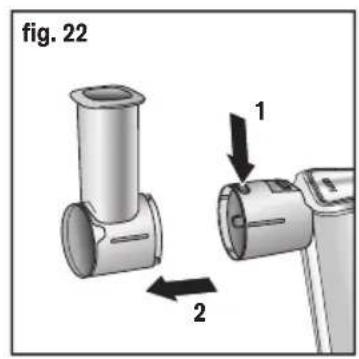
■ To disassemble the drum holder (c2), press the button (c6) located at the front of the adaptor and remove the feeder tube (fig. 22).
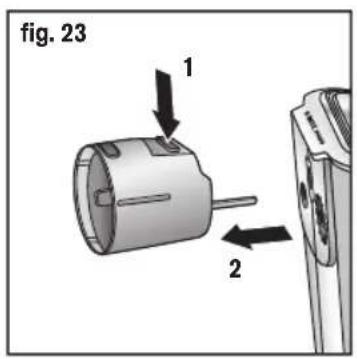
■ Press the button (c7) at the rear to release the adaptor (c1) from the mixer (fig. 23).
■ Remove the base (c5) by sliding it along the runners located at each side of the adaptor (c1) then the drum holder (c2).
3.4 C LEANING
■ The drum holder (c2), drums (c8 c9 c10 c11 c12), drum locking ring (c4) and the pusher (c3) are dishwasher safe.
■ The mixer and the adaptor must be washed with a damp cloth.
Note:
- Always use a the pusher (c3) to guide the food into the feeder tube, never your fingers, nor a fork, spoon, knife or any other object.
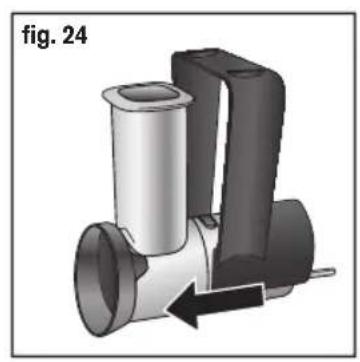
- When putting away your vegetable cutter, you can slide the base over the feeder tube. (fig. 24).
4 - BLENDER ATTACHMENT ACCESSORY: mix, emulsify (depending on model)
4.1 A SSEMBLY
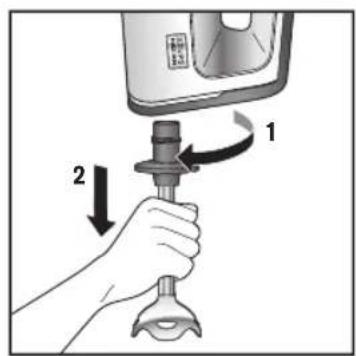
■ To insert the blender attachment (d1), open the rear hatch (a5) (fig. 8).
■ Insert the blender attachment and screw tightly (fig. 25).
■ Connect the appliance.
4.2 U SE
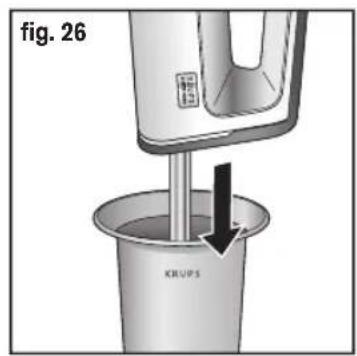
■ Depending on the type of preparation, place the ingredients in the container provided (1 l bowl (e) or 2.5 l bowl (f) (depending on the model) or in a suitable container (bowl or beaker, preferably deep).
■ When you blend directly in a container, remove the container from the heat source when mixing hot preparations.
■ The food must cover at least the lower part of the blender attachment to guarantee effective functioning.
■ The container must be filled to the maximum or two-thirds full to prevent spilling.
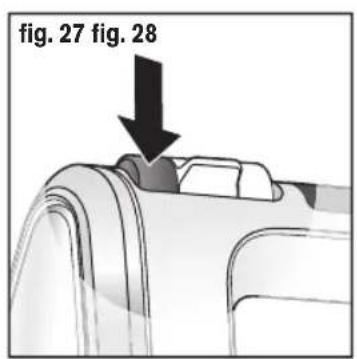
■ To start, press the 'whisk ejection' button (a4) (fig. 27).
■ Release the button (a4) before removing the blender attachment (d1) from the preparation to prevent splashes.
■ Practical advice:
- Never operate the blender attachment when empty.
- For fruit preparations, chop and deseed/destone the fruit first.
- Do not use the blender attachment with hard food such as ice, sugar, coffee grains, cereals and chocolate.
4.3 D ISASSEMBLY
■ Disconnect the appliance.
■ Unscrew the blender attachment (fig. 28).
4.4 C LEANING
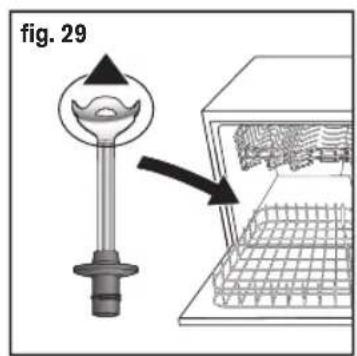
■ The blender attachment can be washed in the dishwasher, in the lower basket with blades facing upwards (take care as the blades are extremely sharp) (fig. 29).
5 - 150 ml Mini Chopper (E) (available as an additional accessory)
5.1 Assembly
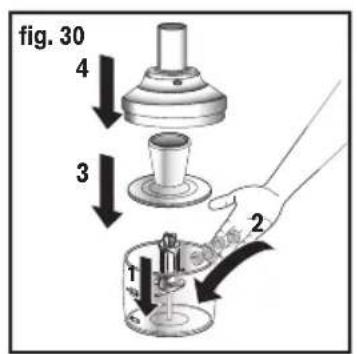
■ Place the blade unit (g2) on bowl (g1) (fig. 30).
5.2 U SE
■ Place the food in the bowl (g1), then fit the lid centre (g3), then the lid (g4).
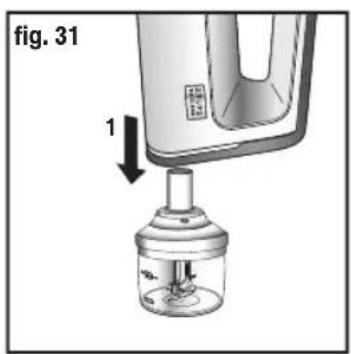
■ Connect the motor unit to the mini chopper (g) and press the Start or Turbo button (a4) (fig. 31).
■ After use, remove the food.
5.3 Dismantling
Be careful not to touch the sharp blades when dismantling the appliance.
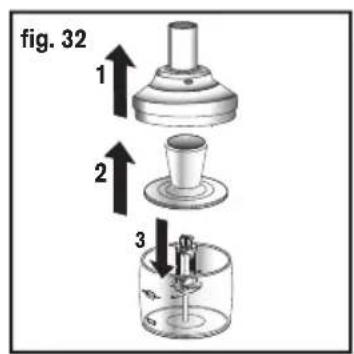
■ Remove the motor unit, then the lid (g4) and then the lid centre (g3).
■ Remove the blade unit (g2) taking it by its plastic part as it is extremely sharp.
■Do not use this appliance for over 10 seconds if it is empty.
5.4 Cleaning
■The blades are very sharp.
■ Always unplug the appliance before cleaning it.
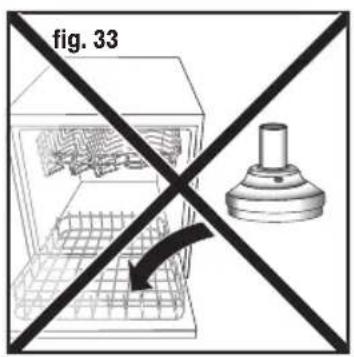
■ Never put the mini chopper lid in the dishwasher. (g4) (fig. 33).
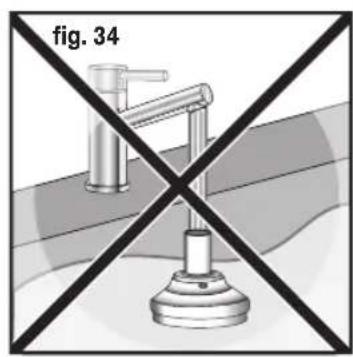
■ Never immerse these parts in water or place them under running water. Clean them with a damp sponge. (fig. 34).
■ The other parts of the mini chopper (g1, g2 and g3) are dishwasher friendly (fig. 35)
■ You may wash the body, the blades and the blade holder with a moist sponge and some washing-up liquid.
RECOMMENDATIONS
| RECIPES | ACCESSORIES*depending on model | INGREDIENTS SPEED MAX TIME | ||
| WHIPPED CREAM | MULTI-BLADE WHISK a8/ WHISKS a6a | 250 g UHT cream. | 1 min 30 sec' at minimum speed then 1 min 30 sec' at maximum speed. | 3 min. |
| WHIPPED EGG | MULTI-BLADE WHISK a8/ WHISKS a6a | 4 egg whites +1 pinch of salt. | Maximum speed. 3 | min. |
| WIRE WHISKS / BEATERS a6a a6b (depending on model) | 6 egg whites | minimum 30 secs maximum 1 min | 30 secs 1 min | |
| MAYONNAISE | MULTI-BLADE WHISK a8/ WHISKS a6a | 1 egg yolk, 1 teaspoon mild mustard, 1 tablespoon wine vinegar, salt, pepper, 250 ml olive or sunflower oil. (All ingredients should be at room temperature). | 1 min 30 sec' at minimum speed then 1 min 30 sec' at maximum speed. | 3 min. |
| WHITE BREAD DOUGH | MIXERS WITH OR WITHOUT ROTATING BOWL | 1 kg strong white bread flour, 3 level teaspoons salt, 3 level teaspoons fast action or easy bake dried yeast, 4 teaspoons sugar, optional (for added flavour and thicker crust), 600 ml lukewarm water. | Gradually increase the speed for 2 min, then maximum speed for 2 min 50 sec'. | 4 min 50 sec'. |
| GERMAN BREAD DOUGH | MIXERS a7 | 250 g strong white bread flour, 550 g rye flour, pinch of each of the following ground coriander, Cayenne pepper, ground cumin, 100 g dry leaven*, 2 teaspoons salt, 1 sachet active dried yeast (granular type), 1 teaspoon sugar, 500 ml warm water.* Dry leaven may not be available in all countries. | Gradually increase the speed for 2 min, then maximum speed for 2 min 50 sec'. | 4 min 50 sec'. |
| WHITE BREAD DOUGH | MIXERS WITH OR WITHOUT ROTATING BOWL | 625 g flour, 375 g water, 1 packet of yeast, 25 g salt. | Gradually increase the speed for 2 min, then maximum speed for 2 min 50 sec'. | 4 min 50 sec'. |
| RECIPES | ACCESSORIES*depending on model | INGREDIENTS SPEED MAX TIME | ||
| SOUP BLENDER BASE | 100 g leeks, 100 g carrots, 100 g potatoes, 300 g water.Cook vegetables in salted water for 20-25 minutes or until tender. | Normal speed for blender base (button a4). | 2 min. | |
| «SLICE» | VEGETABLE CUTTER c8 | Potatoes, red beetroot, carrots, cucumber, cabbage. | Maximum speed. 2 min. | |
| «COARSE GRATING» | VEGETABLE CUTTER c9 | Potatoes, red beetroot, carrots, cheese. | Maximum speed. 2 min. | |
| «FINE GRATING» | VEGETABLE CUTTER c10 | Cheese, carrots. Maximum speed. 2 min. | ||
| «GRINDING TO A POWDER»«CUTTING IN STRANDS» | VEGETABLE CUTTER c11 | Dry foods (almonds, walnuts, hazelnuts, parmesan).Potatoes. | Maximum speed. 2 min. | |
| «CRUSHING ICE» | VEGETABLE CUTTER c12 | Ice. Maximum speed. 1 min. | ||
| «CHOPPING» MIN | CHOPPER | Garlic, herbs, onions, 70g of beef cut up into 1x1x1 cm cubes | Standard speed of the mixer function a4 | 3 sec'. |
TROUBLESHOOTING
| PROBLEM CAUSE SOLUTION | ||
| The appliance has stopped working. Your | appliance is installed with a micro-processor which controls the power of the appliance. For safety reasons, if the functioning time is too long and/or if there is too much food in the bowl, the appliance will stop working. | To restart your appliance, turn the button (a3) to position ‘0’. Remove part of the food.Allow your appliance to cool down for a few minutes. Then you can continue to prepare your recipe. |
| My appliance does not turn on. | Your appliance is not plugged in. Check the plug, power cable and power supply. | |
| The safety lock is on. Turn the speed setting to ‘0’ and then turn on the appliance. | ||
| The turbo does not work You have already | reached the maximum speed with the speed setting (a3) | The turbo allows you to directly reach the maximum speed without using the speed setting. (a3) |
| I am unable to attach the whisks (a6) and dough hooks (a7) | Incorrectly attached | Ensure the accessories are correctly attached (fig. 2). |
| The mixer attachment does not work. | Incorrect use: you have used the speed setting instead of the ‘whisk ejection’ button. | Use the button (a4) to operate the mixer attachment function (fig.27). |
RECYCLING

■ Think of the environment!
① Your appliance contains valuable materials which can be recovered or recycled.
Leave it at a local civic waste collection point.
b6 Låseknapp for vippearm
5.3 T A ISÄR DELARNA
LITHUANIA HOTLINE:64708888
MACEDONIA HOTLINE: (0)2 20 50 022
MALAYSIA HOTLINE: 6 565 508 900
MEXICO HOTLINE: (01800) 505 45 00
MOLDOVA HOTLINE: (22) 929249
NEDERLAND HOTLINE: 0318 58 24 24
NEW ZEALAND HOTLINE: 800 700 711
NORGE (NORWAY) HOTLINE: 44 663 155
PERU HOTLINE: 5 114 414 455