
Perfect Mix 9000 Pro+ HZ5081 - Hand blender KRUPS - Free user manual and instructions
Find the device manual for free Perfect Mix 9000 Pro+ HZ5081 KRUPS in PDF.
User questions about Perfect Mix 9000 Pro+ HZ5081 KRUPS
0 question about this device. Answer the ones you know or ask your own.
Ask a new question about this device
Download the instructions for your Hand blender in PDF format for free! Find your manual Perfect Mix 9000 Pro+ HZ5081 - KRUPS and take your electronic device back in hand. On this page are published all the documents necessary for the use of your device. Perfect Mix 9000 Pro+ HZ5081 by KRUPS.
USER MANUAL Perfect Mix 9000 Pro+ HZ5081 KRUPS
* Seton modèle : According to Model - Je naom Model - Athankelik van het model - Athengigt af modellen - Rippius mailista - Avhengig av model - Beroende på model - Secondo il modello - Según modelo - Consante o modelo - Awkonya yar tojavitko - حسبان التويّن E : disponible en accessoire - E : depending on model. Available es an additional accessory- E : als Zubehör erfältlich E : beschikbaar in accessorees - E : flas som tilbehör - E : sastavilla lisatärivikkenna - E : tijzigjeng som tilbehör - E : som tilbehör - E : disponibile come accessorie- E : disponible como accessorie - E : disponível nos accessores - E : 6793820000 e 4419940000
EN....P. 1-5
FR....P.6-10
DE P 11-15
NI P 16-20
04 P 21-25
Fl. P. 28-30
NO P 31-35
SV R 26-10
IT P 41-15
ES P 46-50
PT P 51-55
EL....P. 56-60
AP....P. 65-61

natural_image
Cross-sectional diagram of a bathroom sink with faucet, showerhead, and toilet (no text or labels)
We thank you for having chosen a KRUPS appliance exclusively designed for domestic indoor cooking.
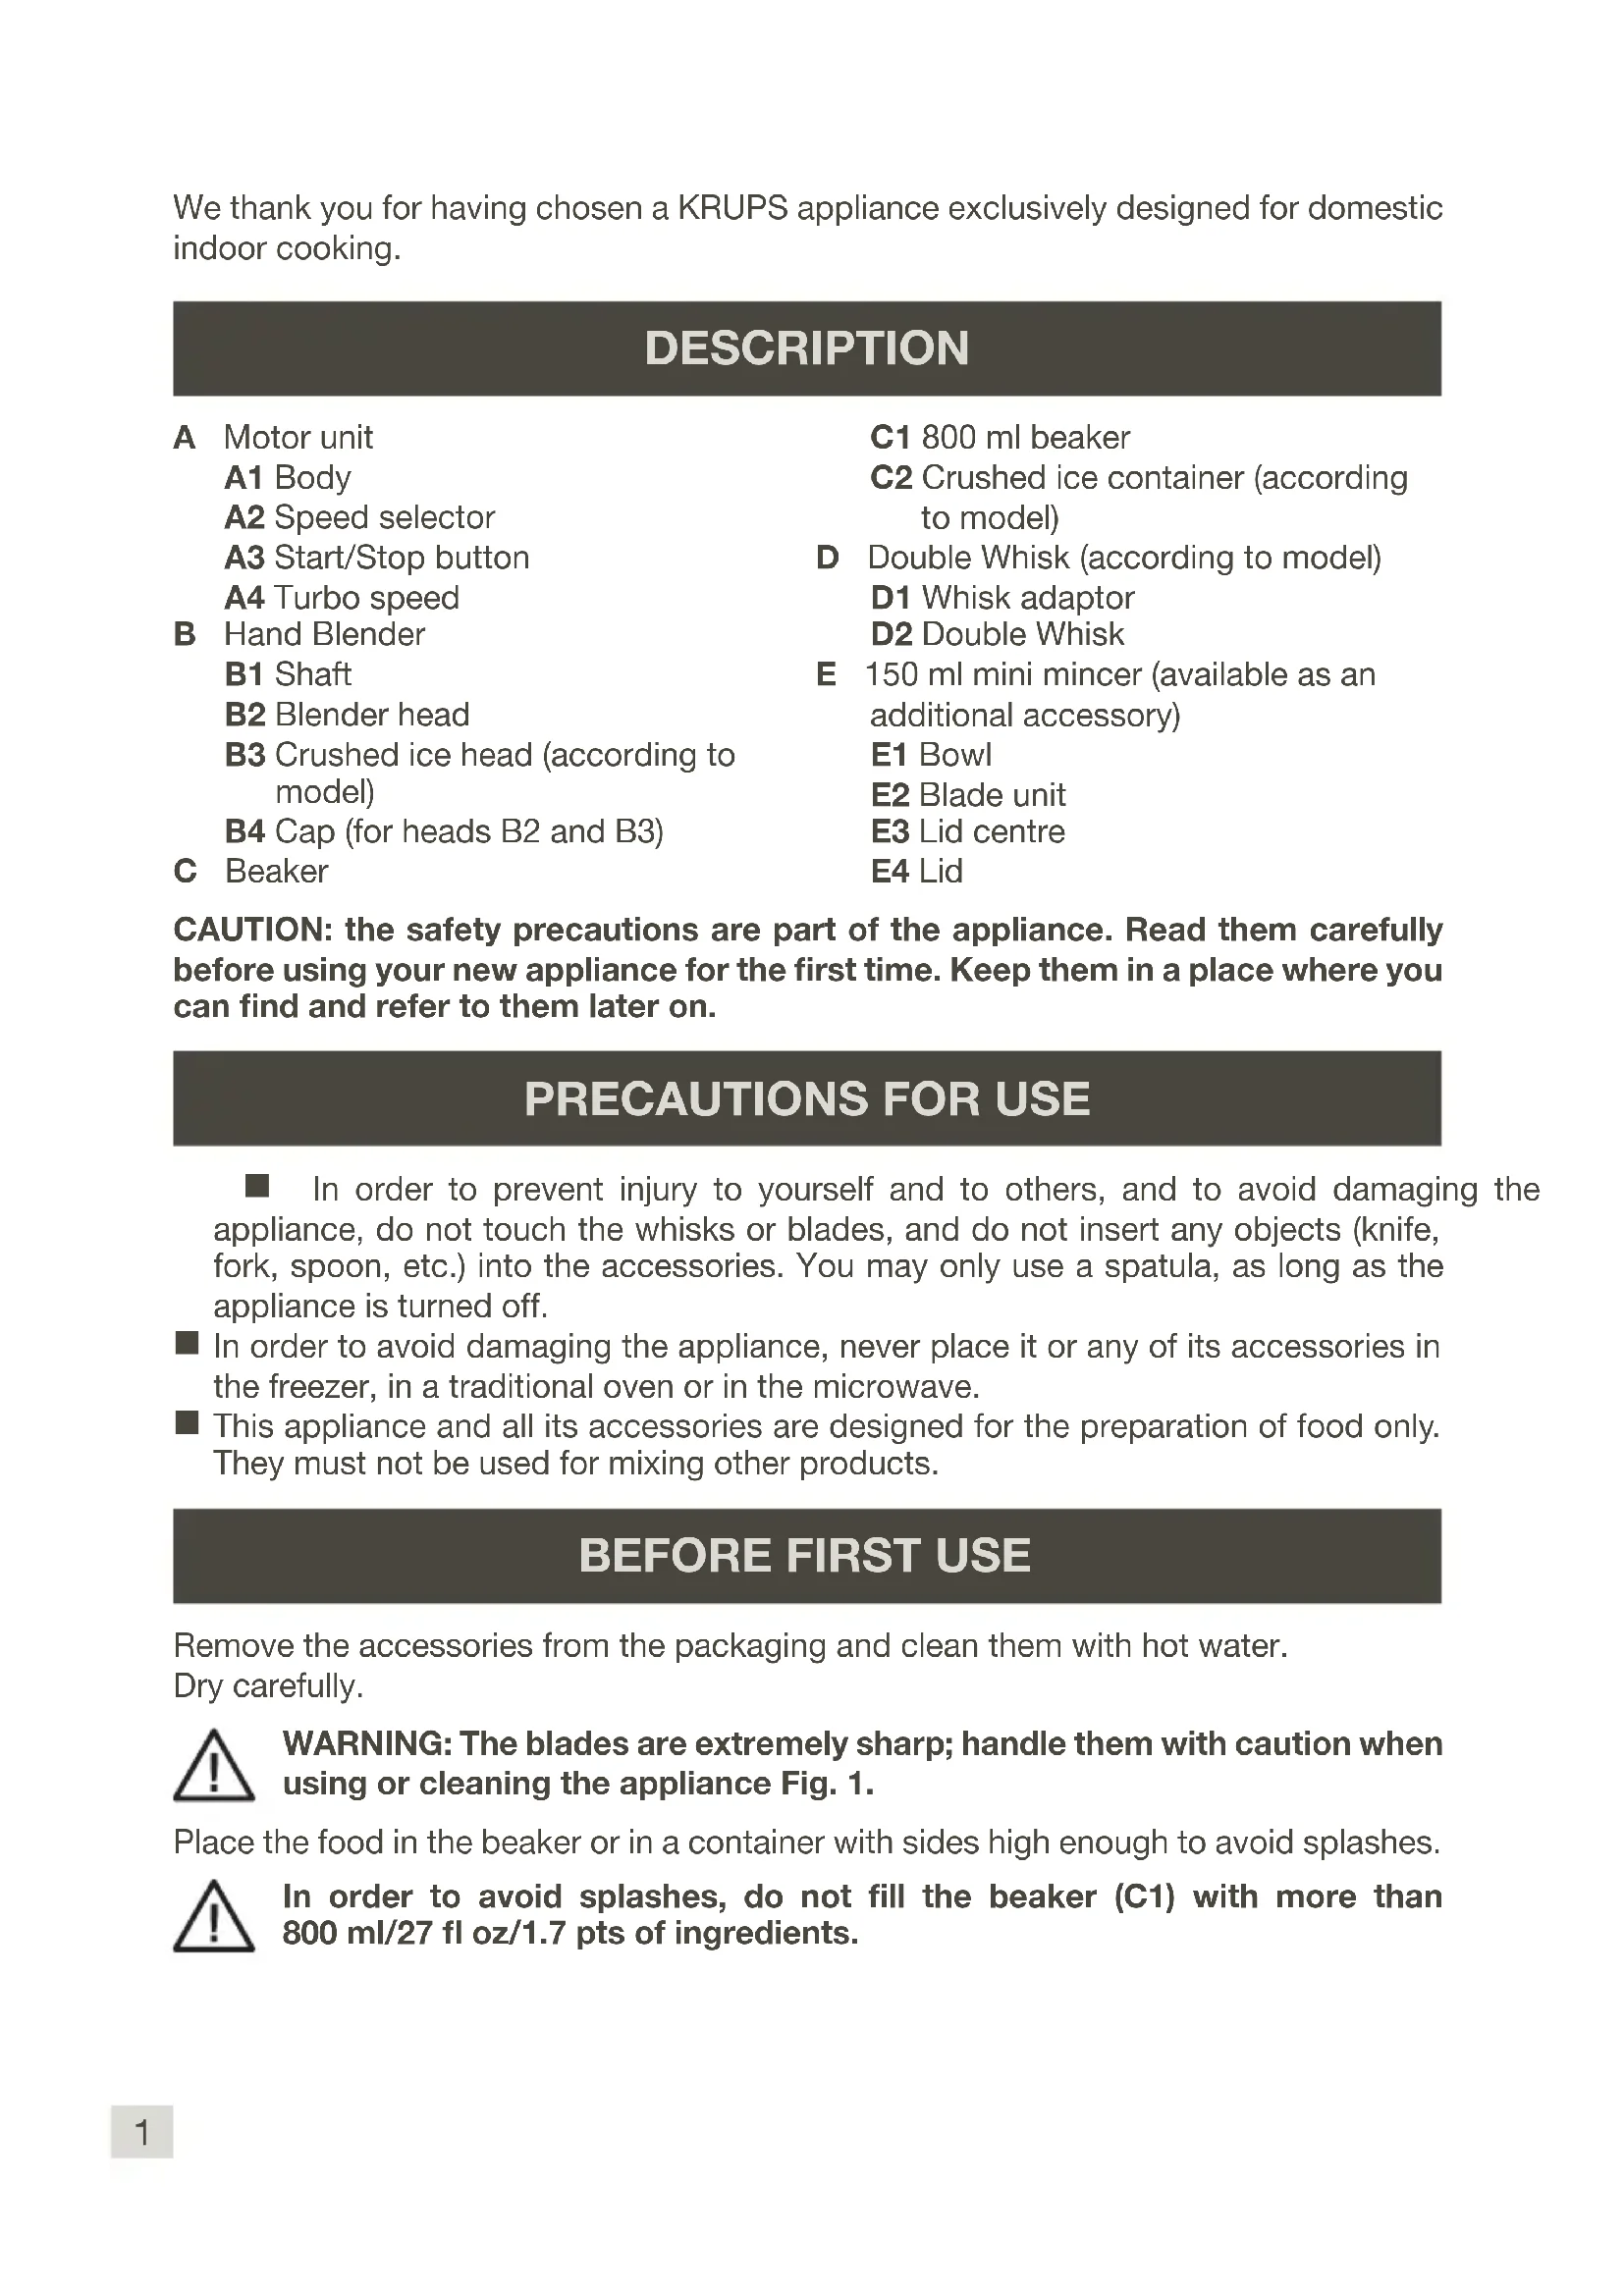
DESCRIPTION
A Motor unit
A1 Body
A2 Speed selector
A3 Start/Stop button
A4 Turbo speed
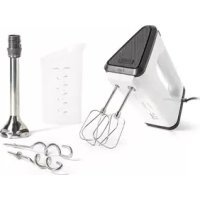
B Hand Blender
B1 Shaft
B2 Blender head
B3 Crushed ice head (according to model)
B4 Cap (for heads B2 and B3)
C Beaker
C1 800 ml beaker
C2 Crushed ice container (according to model)
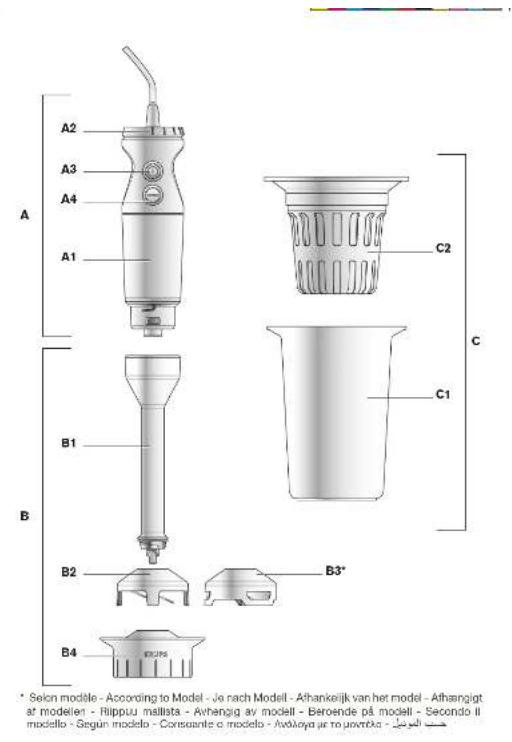
D Double Whisk (according to model)
D1 Whisk adaptor
D2 Double Whisk
E 150 ml mini mincer (available as an additional accessory)
E1 Bowl
E2 Blade unit
E3 Lid centre
E4 Lid
CAUTION: the safety precautions are part of the appliance. Read them carefully before using your new appliance for the first time. Keep them in a place where you can find and refer to them later on.
PRECAUTIONS FOR USE
In order to prevent injury to yourself and to others, and to avoid damaging the appliance, do not touch the whisks or blades, and do not insert any objects (knife, fork, spoon, etc.) into the accessories. You may only use a spatula, as long as the appliance is turned off.
In order to avoid damaging the appliance, never place it or any of its accessories in the freezer, in a traditional oven or in the microwave.
This appliance and all its accessories are designed for the preparation of food only. They must not be used for mixing other products.
BEFORE FIRST USE
Remove the accessories from the packaging and clean them with hot water.
Dry carefully.

WARNING: The blades are extremely sharp; handle them with caution when using or cleaning the appliance Fig. 1.
Place the food in the beaker or in a container with sides high enough to avoid splashes.

In order to avoid splashes, do not fill the beaker (C1) with more than 800 ml/27 fl oz/1.7 pts of ingredients.
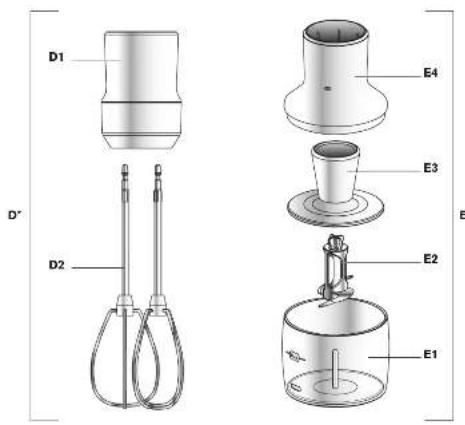
1. Blender shaft: Fig. 2 to 4
1.1 Assembly
■ Insert the blender head (B2) or the crushed ice head (B3) (according to model) in the Cap (B4) Fig. 2.
■ Screw the shaft (B1) onto the head making sure it is fitted properly and secure Fig. 3.
■ Screw the shaft (B) onto the motor unit (A) making sure it is fitted properly and secure, then plug in the appliance. Fig. 3 and 4.
1.2 Use
■ Insert the shaft (B) in the beaker to mid-height Fig. 5, then select speed 1 using button A2 and press the Start button (A3).
■ Remove the cap (B4).
■ Use the speed selector A2 to increase the speed progressively if necessary.
- Your appliance is equipped with a Turbo function that allows you to use it in full power mode by pressing button A4. Fig. 6.
In order to avoid splashes, insert the shaft (B) in your preparation before turning on the appliance Fig. 7.
If you mix hot ingredients directly in a cooking container, withdraw the container from the heat source before doing so Fig. 8.
■ The food must cover the lower part of the blender base to guarantee effective functioning.

WARNING: Do not turn on the appliance when the head is not immersed in food.
■ Moving the shaft up and down inside the beaker will not make the hand blender more effective. Leave it at mid-height and towards the centre of the container.
In order to avoid splashes, stop pressing the Turbo speed button (A4) or Start/Stop button (A3) before taking the hand blender shaft (B1) out of your preparation. Fig. 9.
Practical tips
For fruit-based preparations, remember to slice the fruits and remove any stones before putting them in the mixing container.
Do not use the blender head (B2) for hard food products such as ice cubes, sugar, coffee beans, grains, or chocolate.
If you wish to make crushed ice, use the crushed ice head (B3) (according to model).
1.3 Dismantling
■ Disconnect the appliance.
■ Unscrew the shaft and then the head using the cap (B4) Fig. 10.
2. Double whisk (D) (according to model): Fig. 11
2.1 Assembly
■ Attach the double whisks (D2) to the whisk adaptor (D1).
Place the whisk adaptor (D1) on the motor unit.
■ Screw on completely Fig. 11.
2.2 Use
- Insert the double whisks in a high sided container, select speed 1 with the A2 button and turn on the appliance by pressing A3.
In order to avoid splashes, insert the shaft (B) in your preparation before turning on the appliance Fig. 12.
As your preparation becomes thicker, use the speed selector button A2 to increase the speed progressively.
- Your appliance is equipped with a Turbo function that allows you to use it in full power mode by pressing button A4. Fig. 12.

Warning: Do not use the double whisks continually for over 3 minutes.
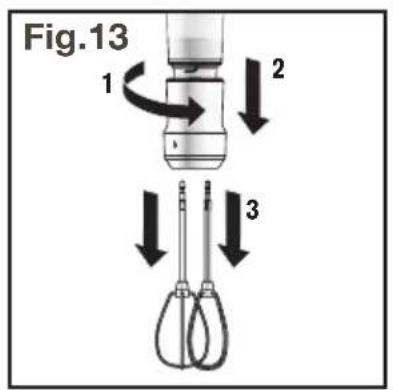
2.3 Dismantling
■ Switch the appliance off before removing the whisks from the preparation (to avoid splashing).
■ Disconnect the appliance.
■ Unscrew the whisk adaptor (D1) anti-clockwise and then remove the double whisks (D2) Fig. 13.

NOTE: All the parts and accessories of your hand blender can go in the dishwasher except the motor unit (A1), the whisk adaptor (D1), the heads (B2 and B3), and the shaft (B1) which you can clean by placing under running water from a tap.
Disconnect the appliance from the power supply before cleaning.
Do not use scouring pads or objects containing metal parts.

Never immerse the motor unit (A1) in water. Dry with a dry or slightly damp cloth. If the plastic parts become stained by foods such as carrots or oranges, rub the affected areas with a cloth soaked in vegetable oil and then clean as normal. Handle the blades with caution; they are extremely sharp.
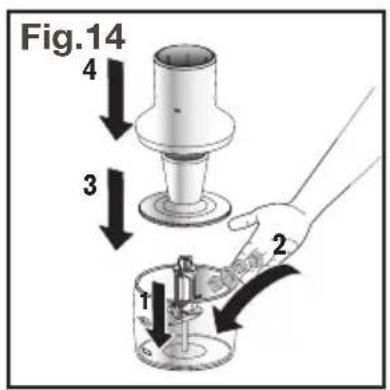
3. 150 ml Mini Mincer (E) (available as an additional accessory): Fig. 14
3.1 Assembly
Place the blade unit (E2) on bowl (E1) Fig. 14.
3.2 Use
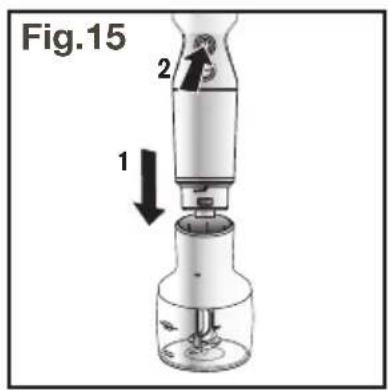
Place the food in the bowl (E1), then fit the lid centre (E3), then the lid (E4).
■ Connect the motor unit (A) to the mini mincer (E) and press the Start or Turbo button (A3 or A4) Fig. 15.
■ After use, remove the food.
3.3 Dismantling
■ Remove the motor unit (A1), then the lid (E4) and then the lid centre (E3).
■ Remove the blade unit (E2) taking it by its plastic part as it is extremely sharp.

Do not use this appliance for over 10 seconds if it is empty.
CLEANING

WARNING: the blades are very sharp.
■ Always unplug the appliance before cleaning it.
■ Never immerse the appliance, the power cord or the plug in water or any other liquid.
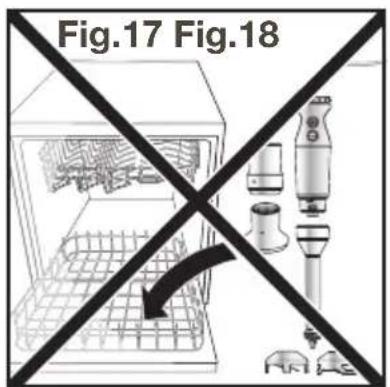
■ Never put the motor unit (A), the whisk adaptor (D1), the shaft (B1), the heads (B2 and B3), or the mini mincer lid (E4) in the dishwasher. Fig. 17.
■ Never immerse these parts in water or place them under running water. Clean them with a damp sponge. Fig. 18.
The double whisks (D2) (placed upwards), the beaker (C), the blade unit (E2), the lid centre (E3), and the mini mincer bowl (E1) can go into the dishwasher. Fig. 19.
We recommended that you clean the blender shaft immediately after each use for easier cleaning. If the plastic parts become stained by foods such as carrots, rub the affected areas with a cloth soaked in vegetable oil and then clean as normal.
Practical tip: To clean the blender shaft (B1) and the heads (B2 and B3), turn the appliance on for a few seconds in soapy water. After this, the heads can be removed and rinsed under running water.
RECIPES
Blender shaft (B):
Head (B2)
Vegetable Soup
500 potatoes (peeled & cut into pieces), 400 carrots (peeled & sliced), 1 leek (sliced), 1.8 litres water or vegetable stock. Steam the vegetables for 10 minutes. Blend them for 45 seconds with 1.8L of water or vegetable stock. Speed 3 to 5.
Mayonnaise
Put 1 egg (yolk and white), 2 teaspoons Dijon mustard, 2 teaspoons white wine vinegar, salt, pepper, and 250 ml olive oil or sunflower oil in the 800mL beaker. Mix for 20 seconds. Speed 5. Heat and serve.
Crushed Ice Head (According to Model) (B3)
Crushed ice:
Place the crushed ice container (C2) in the 800 ml beaker (C1), put a maximum of 3 ice cubes in the container and pound strongly using speed 5. Repeat the procedure until you reach the desired amount.
Whisk mixer (According to Model) (D):
Whipped egg whites.
Beat 4 egg whites for 3 minutes. Turbo speed.
150 ml mini mincer (available as an additional accessory) (E):
With this accessory, you can mince: Garlic, fresh herbs, onion. 70 g of beef meat cut in 1x1x1 cm cubes in 3 seconds. Turbo speed.
With this 1200W accessory, you can mince: garlic, fresh herbs, onions. 90 g of beef meat cut into 1 cm x 1 cm x 1 cm cubes in 3 seconds. Turbo speed.
WHAT TO DO IF YOUR APPLIANCE DOES NOT WORK
Make sure
That your appliance is well connected to the wall outlet.
That the cord is in good condition.
Your appliance is equipped with an anti-overheating system. In case of overheating, your appliance will turn off automatically. In this instance, let your appliance cool down for about 20 minutes and then resume use.
Your appliance still doesn't work?
Go to an authorised service centre (see list of after-sales services).
ACCESSORIES
At your retailer store or at one of our authorised centres (see the list in the service booklet), you can purchase the following items:
150ml mini mincer: ref. XJ713810 Double Whisk : ref. XJ712810
Blender head and crushed ice head: ref. XJ711D10
Attention, in order to help us provide you with the accessory you need, please bring these instructions with you or write down the type code of your appliance, which is visible on the motor unit (HZ50).
RECYCLING

Disposal of packaging materials and of the appliance.
The wrapping includes exclusively environment-safe materials that can be disposed of according to current recycling regulations. If you wish to throw away the appliance, please go to the appropriate service centre in your area.
END-OF-LIFE ELECTRIC OR ELECTRONIC PRODUCTS:
Your appliance is expected to last for many years. However, when the time comes to replace it, do not throw it in the bin or in a dump, but take it to the recycling centre in your town (or to a waste reception centre where applicable).

Think of the environment!
i Your appliance contains a number of materials that may be recovered or recycled.
Leave it at a local civic waste collection point.
If you have any further problems or queries, please call our Customer Relations Team first for expert help and advice:
Helpline:
0345 330 6460 - UK
01 677 4003 - ROI
Or consult our web site: www.krups.co.uk
Rührbesen: Ref. XJ712810
UW APPARAAT WERKT NIET. WAT NU?
Controleer:
A3 Start/stopp-knapp
A4 Turbofart
B Mikserfot
B1 Fot
B2 Endestykke mikser
Minihakker 1,5 dl: Ref. XJ713810 Dobbel visp: Ref. XJ712810
A3 Start-/stoppknapp
A4 Turbo
B Mixerstav
B1 Fot
B2 Mixerkniv
The image contains no text or characters.
Retailer name & address:
/Nom et adresse du vendeur / Nombre y dirección del minorista / Nome e endereço do revendedor / Nome e indirizzo del negozzio / Name und Anschrift des Händlers / Naam en adres van de dealer / Forhandler navn & adresse / Återförsäljarens namn och adress / Forhandler navn og adresse / Jälleenmyyjän nimi ja osoite / Nazwa i adres sprzedawcy / Numele şi adresa vânzătorului / Parduotuvės pavadinimas ir adresas / Müüja kauplus ja aadress / Naziv in naslov trgovine / Tipusszám / Názov a adresa predajcu / Veikala nosaukums un adrese / Naziv i adresa maloprodaje / Naziv i adresa prodavca / Naziv i adresa prodajnog mjesta / Nume și adresă vânzător / Název a adresa prodejce / Nama dan alamat peruncit / Nama Toko Penjual dan alamat / Tên và địa chỉ cửa hàng bán/ Saticı firmanın adı ve adresi / Название и адрес продавца / Назва і адреса продавця / Търговки обект / Назив и адреса на продавницата / Сатушының, аты және мекен-жайы / Епшвүμία και διεύθυνση καταστήματος / ۴.ωδωπηħ wɪψωίπιμρ l u hωugtû / शื่อและที่อยู่ของห้าง/ร้านที่ซื้อ /零售商的店名和地址/販売店の名前、住所/소매점 이름과 주소/ نام وادرس خرده فروش / اسم بائع التجزئة و عنوانه
Distributor stamp ....../Cachet distributeur /Sello del distribuidor / Carimbo do revendedor / Timbro del negozzio / Händlerstempel / Stempel van de dealer / Forhandler stempel / Återförsäljarens stämpel / Forhandler stempel / Jälleenmyyjän leima / pieczęć sprzedawcy / Štampila vânzătorului / Antspaudas / Tempel / Žig trgovine / Eladó neve, címe/ Razítko predajcu / Zīmogs / Pečat maloprodaje/ Pečat prodavca / Pečat prodajnog mjesta / Štampila vânzătorului/ Razítko prodejce/ Cap peruncit / Cap dari Toko Penjual / Cüra hàng bán đóng dâu/ Saticı Firmanın Kaşesi / Печать продавца / Печатка продавця / Печат на търговския обект / Печат на продавницата / Сатушының мөрі / Σφραγίδα καταστήματος / Φωάωπηħ lfúhrp / ตราประทับของห้าง/ร้านที่ชื่อ / 零售商的蓋印 /販売店印/소매점 직인/ مهر خرده / ختم بائع التجزئة فروش


- DESCRIPTION
- PRECAUTIONS FOR USE
- BEFORE FIRST USE
- Blender shaft: Fig. 2 to 4
- Assembly
- Use
- WARNING: Do not turn on the appliance when the head is not immersed in food.
- Practical tips
- Dismantling
- Double whisk (D) (according to model): Fig. 11
- Assembly
- Use
- Dismantling
- 150 ml Mini Mincer (E) (available as an additional accessory): Fig. 14
- Assembly
- Use
- Dismantling
- CLEANING
- WARNING: the blades are very sharp.
- RECIPES
- Blender shaft (B):
- Head (B2)
- Vegetable Soup
- Mayonnaise
- Crushed Ice Head (According to Model) (B3)
- Crushed ice:
- Whisk mixer (According to Model) (D):
- Whipped egg whites.
- ml mini mincer (available as an additional accessory) (E):
- WHAT TO DO IF YOUR APPLIANCE DOES NOT WORK
- Make sure
- Your appliance still doesn't work?
- ACCESSORIES
- RECYCLING
- Disposal of packaging materials and of the appliance.
- END-OF-LIFE ELECTRIC OR ELECTRONIC PRODUCTS:
- Think of the environment!
- UW APPARAAT WERKT NIET. WAT NU?
- Controleer:
- B Mikserfot
- B Mixerstav
- Retailer name & address:
Brand : KRUPS
Model : Perfect Mix 9000 Pro+ HZ5081
Category : Hand blender