3 Mix 5500 - Hand blender KRUPS - Free user manual and instructions
Find the device manual for free 3 Mix 5500 KRUPS in PDF.

| Product type | Hand blender |
| Brand | KRUPS |
| Model | 3 Mix 5500 |
| Use | Domestic, indoor use |
| Number of speeds | 5 speeds + Turbo button |
| Included accessories | Multi-wire whisks, beaters, stainless steel blending foot, 150 ml mini-chopper (depending on model) |
| Blending foot material | Stainless steel |
| Mini-chopper capacity | 150 ml |
| Functions | Whisk, beater, blender, chopper |
| Cleaning of accessories | Whisks, beaters, blending foot, bowl, blade and counter-cover of mini-chopper: dishwasher safe; mini-chopper lid: hand wash |
| Cleaning of body | Damp sponge, do not immerse |
| Safety | Read safety instructions before use; do not immerse the body in water; do not use the blending foot on a heat source or to chop ice or raw meat |
| Repair | Contact an authorized service center (see list in service booklet) |
Frequently Asked Questions - 3 Mix 5500 KRUPS
User questions about 3 Mix 5500 KRUPS
0 question about this device. Answer the ones you know or ask your own.
Ask a new question about this device
Download the instructions for your Hand blender in PDF format for free! Find your manual 3 Mix 5500 - KRUPS and take your electronic device back in hand. On this page are published all the documents necessary for the use of your device. 3 Mix 5500 by KRUPS.
USER MANUAL 3 Mix 5500 KRUPS
natural_image
White KRUPS 3 MIX 5500 hand mixer with a metal whisk, shown against a neutral background (no text or symbols on the device body)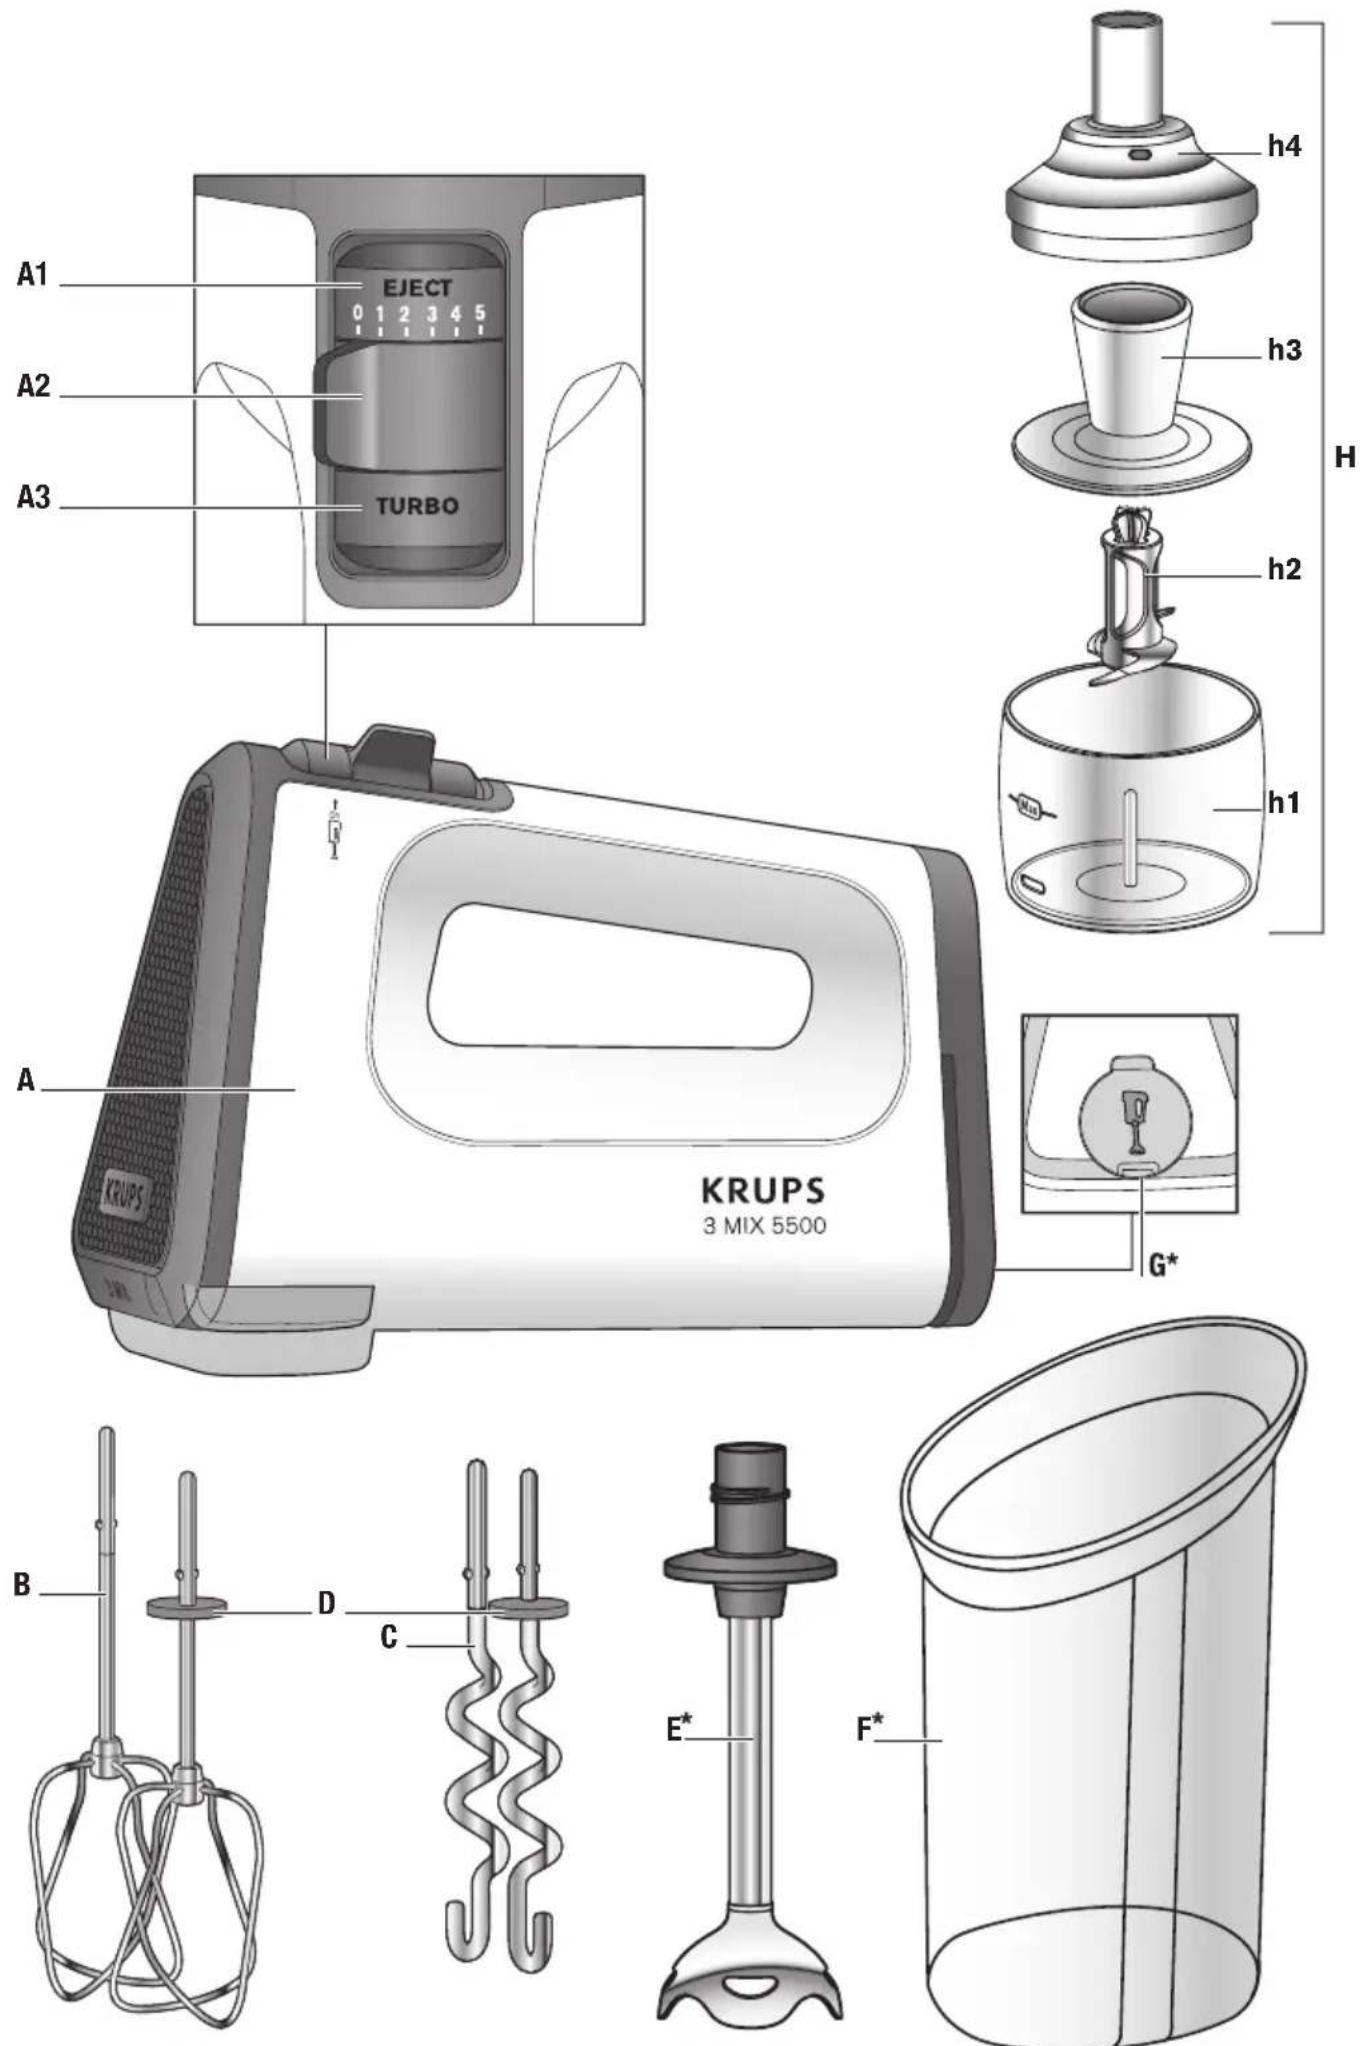
*selon modèle - depending on model - je nach modell - afhankelijk van het model
natural_image
Diagram of a mechanical or electrical component with two vertical rods and circular features, no visible text or symbols

natural_image
Illustration of a hand using a power shaver to clean or store floor, with no visible text or symbols.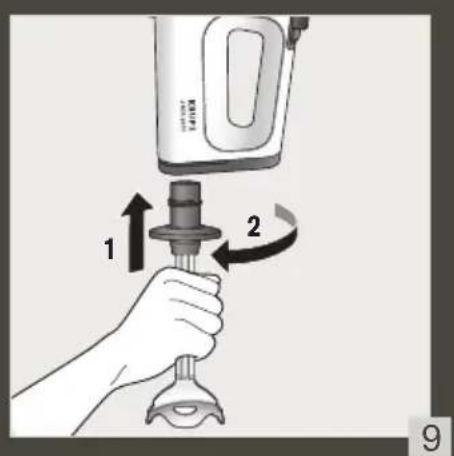
natural_image
Illustration of a hand mixer in a container with a black arrow indicating motion (no text or symbols)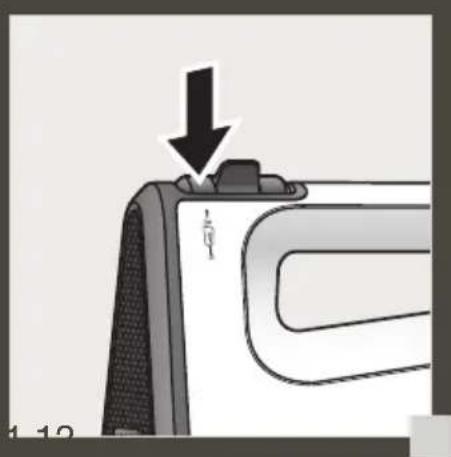
natural_image
Close-up of a car door handle with a black arrow pointing to a keyhole (no text or symbols visible)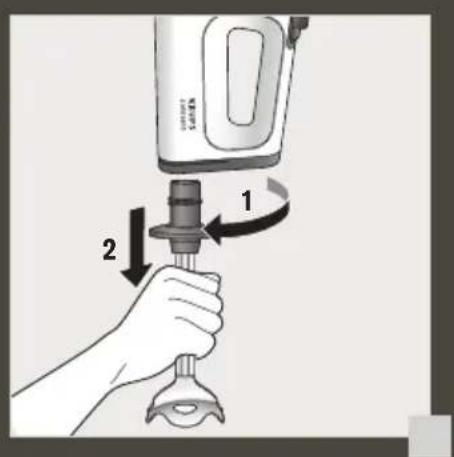

natural_image
Diagram showing a lamp and a grid-patterned container with an arrow pointing to the interior (no text or symbols)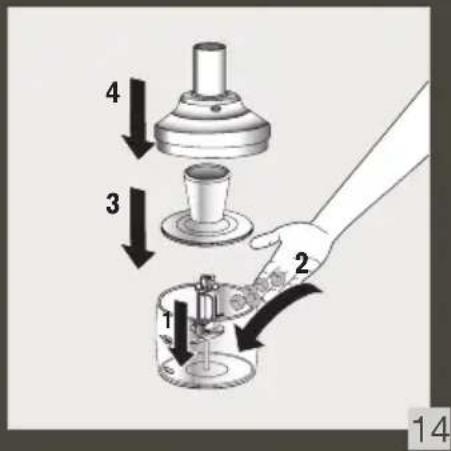
natural_image
Illustration of a kitchen blender with a handle and spool, showing a 1-step assembly (no text or symbols)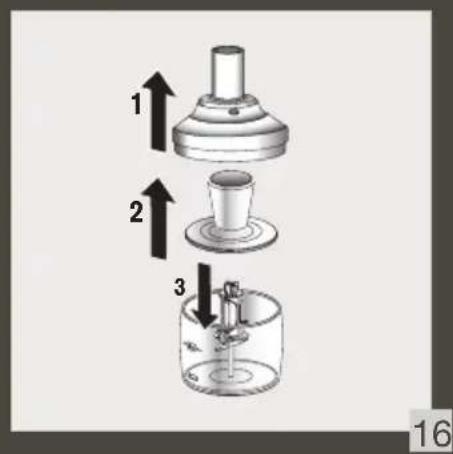
natural_image
Diagram showing a crossed-out electrical circuit with grid and power supply, no text or symbols present
natural_image
Cross-sectional diagram of a bathroom fixture with no visible text or symbols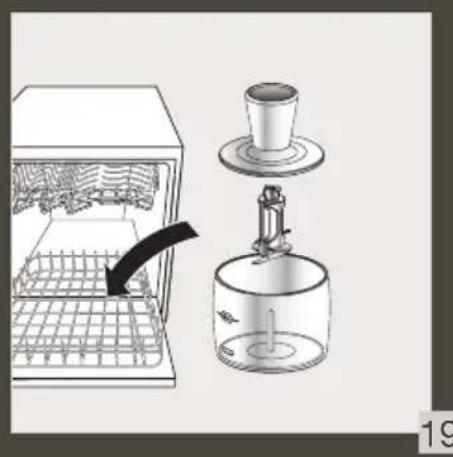
natural_image
Illustration of a kitchen setup with a bed, a cup, and a thermosier (no text or symbols)DESCRIPTION
Thank you for choosing a product from the KRUPS range, exclusively designed for preparing food and for domestic use inside the home.
The safety instructions are part of the unit. Please read them carefully before using your new appliance. Keep them in a place where you can find and keep them for future reference.
A Whisk
A1 Accessory ejection button / Blender shaft and mini-chopper function
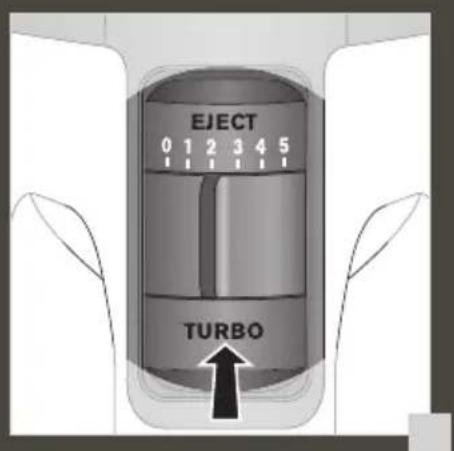
A2 Speed control
A3 Turbo button
B Multi-strand whisks for light preparations
C Mixers for heavy dough
D Alignment pin
E Stainless steel blender shaft (depending
on model)
F Measuring bowl (depending on model)
G Rear panel
H Mini-chopper (depending on model)
H1 Bowl
H2 Blade unit
H3 Lid centre
H4 Lid
SET UP
■ Before first use, remove the accessories from their packaging and clean them in hot water.
Dry thoroughly.
USING YOUR APPLIANCE
Connect the appliance:
- Your appliance has 5 speeds and a turbo button. Always mix or knead in position “1” before switching to a higher speed - fig. 4.
For kneading heavy doughs we recommend that you only use position "5" - fig. 5.
■ You can also increase the speed by pressing the TURBO button (A3).
However we recommend that you use it only for a brief period of time (a maximum of 30 sec. for a heavy dough).
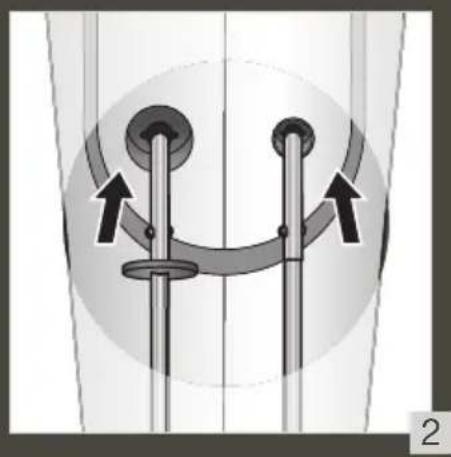
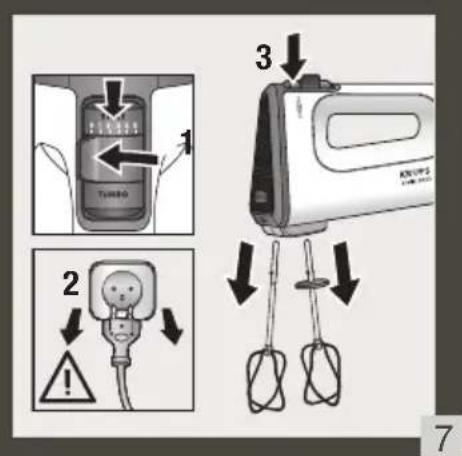
Before removing the accessories, please switch off the appliance (this will avoid splashing). Set the speed selector (A2) to position "0" - fig. 7.
Mixer function with beaters B or kneaders C:
■ Depending on the amount to be prepared, place the ingredients in a suitable container (preferably a shallow bowl or cup).
- Set the speed selector (A2) to position "0" - fig. 1.
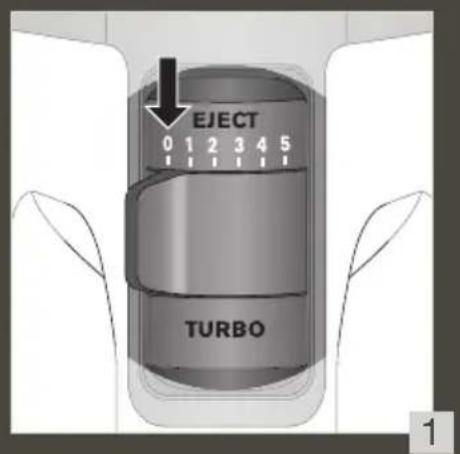
■ Insert the stems of the whisks (B) or mixers (C) in the holes provided and lock them.
- Immerse the accessories into the mixture, before switching on the unit - this will avoid splashing.
TIPS & TRICKS
Whisks and mixers have a specific design. The mixer or whisk with the alignment (D) must be placed in the biggest hole – fig. 2 and fig. 3.
Blender function E (depending on model)
- Check that the appliance is unplugged, that the speed control (A2) is set to "0" and that the beaters or kneaders have been removed from the appliance.
■ Lift the panel at the back of the appliance and screw the blender shaft (E) anti-clockwise without forcing it until you hear a click (fig.8). If you feel resistance when screwing in, this means that the shaft is not correctly aligned. You should remove it completely and screw it in again correctly.
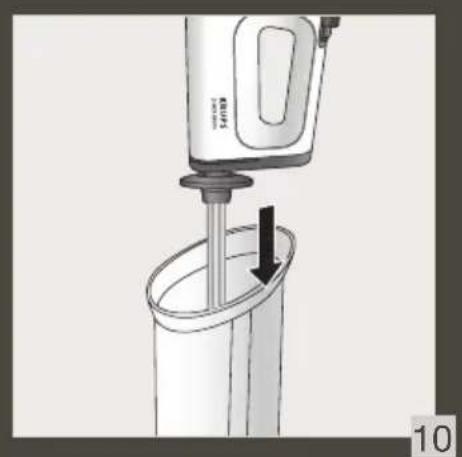
■ Connect the appliance: Dip the blender shaft into the preparation before starting the appliance to avoid splashing (Fig.11). Start using the Eject button (A1) (Fig.11). Stop the appliance before removing the blender shaft from the preparation (to avoid splashing).
■ Removing the blender shaft: Stop the appliance by selecting "0", disconnect it and unscrew the blender shaft (E) by turning clockwise (Fig.12).
- Do not use the blender shaft: In a container on a heat source. Do not use it empty or with ice cubes, to chop raw meat, dried fruit (almonds, hazelnuts, etc.).
Mini-chopper function 150ml H (depending on model)
Check that the appliance is unplugged, that the speed control (A2) is set to "0" and that the beaters or kneaders have been removed from the appliance.
■ Assembly : place the blade unit (H2) on the bowl (H1) (fig. 14).
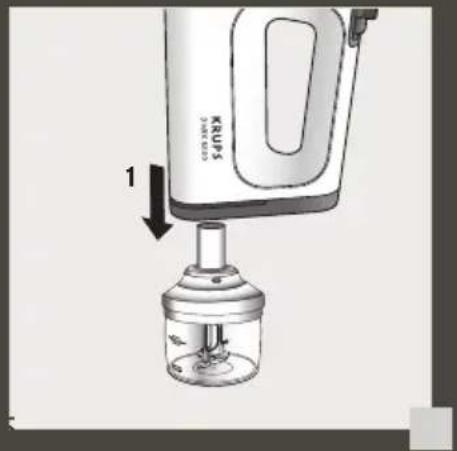
■ Use : Place the food in the bowl (H1) then fit the lid centre (H3), then the lid (H4). Connect the motor unit to the mini chopper (H) (fig. 15) and press the Start or Turbo button (A1) (fig. 11). After use, remove the food.
Dismantling : Be careful not to touch the sharp blades when dismantling the appliance. Remove the motor unit, then the lid (H4) and then the lid centre (H3). Remove the blade unit (H2) taking it by its plastic part as it is extremely sharp. Do not use this appliance for over 10 seconds if it is empty.
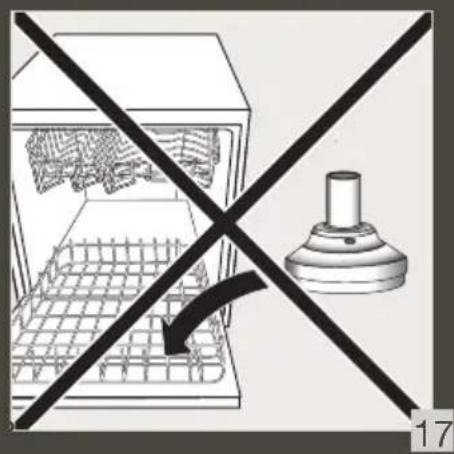
- Cleaning: the blades are very sharp. Always unplug the appliance before cleaning it. Never put the mini chopper lid in the dishwasher. (H4) (fig. 17). Never immerse these parts in water or place them under running water. Clean them with a damp sponge. (fig. 18). The other parts of the mini chopper (H1, H2 and H3) are dishwasher friendly (fig. 19). You may wash the body, the blades and the blade holder with a moist sponge and some washing-up liquid.
Unplug the unit
■ Then press the accessory eject button (A1) to release the whisks or mixers.
RECIPES
| RECIPES ACCESSORIES INGREDIENTS SPEED TIME | ||||
| Whipped cream | Whisks | 250 g of full fat UHT cream (minimum 30% fat content) | 1 min. 30 sec. at minimum speed then 1 min. 30 sec at maximum speed | 3 min. |
| Egg whites Whisks | 4 egg whites + 1 pinch of salt | Maximum speed 3 min. | ||
| Bread dough | Mixers | 500 g strong white bread flour, 300 ml lukewarm water, 10 g salt, 10 g fast action dried yeast | Gradually increase the speed for 2 min., then at maximum speed for 2 min. 50 sec. | 4 min. 50 sec. |
| Vegetable soup | Blender shaft | 160g of cooked vegetables (potatoes, carrots and leeks), 240g of stock, freshly ground black Pepper | Eject | 55 sec with at least 1 min break. Do not operate more than 5 times. |
| Carrot and cumin soup | Blender shaft | 160 g carrots (cut into 15 x 15 mm cubes), 240 ml water, 1 teaspoon ground cumin, salt and freshly ground black pepper | Eject | 55 sec with at least 1 min break. Do not operate more than 5 times. |
| Apricots purée | Mini-chopper | 200g dried apricots 150g creamed honey | Eject 3 s. | |
CLEANING
■ Unplug the unit.
- You must remove the whisks or mixers or rear panel prior to cleaning - fig. 7.
- Clean the whisks and mixers immediately after use to prevent egg mixture or oil residues drying on them.
- You can clean the whisks and mixers with a sponge and washing up liquid. They can be put in the dishwasher.
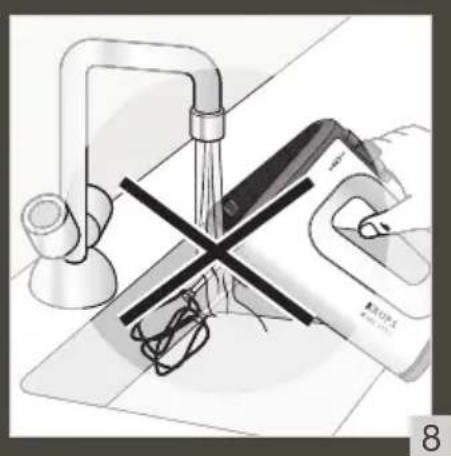
■ Only clean the body of the appliance with a damp sponge and dry thoroughly.
■ Never wash the appliance in the dishwasher.
- Do not use abrasive sponges or objects containing metal parts.
■ Never immerse the body of the appliance in water - fig. 8, 13, 17, 18, 19.
IF THERE IS A PROBLEM
| Problem Cause Solution | ||
| My appliance does not switch on. | Your appliance is not connected. | Check the connection and voltage of your appliance. |
| The turbo function does not work. | You have already reached the maximum speed with the speed controller (A2). | The turbo allows for maximum speed directly without the speed controller (A2) . |
| I cannot attach my whisk (B) and mixer (C) accessories. | Poor positioning. | ■ Respect the assembly direction- fig. 2.■ Invert the position of the accessories. |
| The whipped cream does not bind together and become stiff. | ■ The cream is not cold enough.■ The whisks are not sufficiently immersed in the mixture.■ The container is not adapted to the quantity of ingredients. | ■ Always use chilled cream: place the cream in the refrigerator for at least 2 hours before use.■ Tip: place the container in the freezer for 1 hour.■ Make sure the preparation covers at least half of the whisks. Tip: use whole cream with at least 30% fat. |
| The unit overheats. | The quantities of ingredients are too large and do not respect the amounts set out in the manual. | Adjust the amounts of ingredients according to recipes listed in the recipe table. |
| The blender shaft (E) doesn’t work. | Your appliance is not connected or incorrect button pressed. | Check the connection or press the Blender shaft function (A1). |
Does your appliance still not work? Please contact an authorised service centre (see list in the service booklet).