
MultiSync LCD1525XBK - Monitor NEC - Free user manual and instructions
Find the device manual for free MultiSync LCD1525XBK NEC in PDF.
| Product Type | Color LCD Monitor |
| Brand | NEC |
| Model | MultiSync LCD1525XBK |
| Screen Size (Diagonal) | 15 inches (38.1 cm) |
| Optimal Resolution | 1024 x 768 |
| Video Inputs | DVI-D (digital), DVI-A (analog via adapter), D-Sub 15-pin |
| Connectors | 1 DVI port, 1 D-Sub port, 1 upstream USB port, 2 downstream USB ports |
| Power Supply | 100 - 240 V AC, 50/60 Hz |
| Power Consumption (Typical) | 23 W |
| Weight (with stand) | 4.0 kg |
| Dimensions (W x H x D, with stand) | 381 x 383 x 178 mm |
| Main Features | OSM (On-Screen Menu), auto adjustment, color control, OSM lock, video detection, USB hub |
| Package Contents | Monitor, power cord, DVI-A to VGA cable, DVI-D to DVI-D cable, USB cable, CD-ROM (PDF manual, .inf drivers, color profile), user manual |
| Care and Cleaning | Use a lint-free, non-abrasive cloth. Do not use cleaning solution or glass cleaner. |
| Safety Precautions | Do not open the case (high voltage). Do not expose to water. Unplug during thunderstorms or prolonged non-use. Do not block ventilation openings. |
| General Information | ENERGY STAR certified. Complies with directives 73/23/EEC and 89/336/EEC (EN 60950, EN 55022, EN 61000, EN 55024). |
Frequently Asked Questions - MultiSync LCD1525XBK NEC
User questions about MultiSync LCD1525XBK NEC
0 question about this device. Answer the ones you know or ask your own.
Ask a new question about this device
Download the instructions for your Monitor in PDF format for free! Find your manual MultiSync LCD1525XBK - NEC and take your electronic device back in hand. On this page are published all the documents necessary for the use of your device. MultiSync LCD1525XBK by NEC.
USER MANUAL MultiSync LCD1525XBK NEC
natural_image
Two computer server racks connected by cable, showing ventilation and port labels (no readable text or symbols)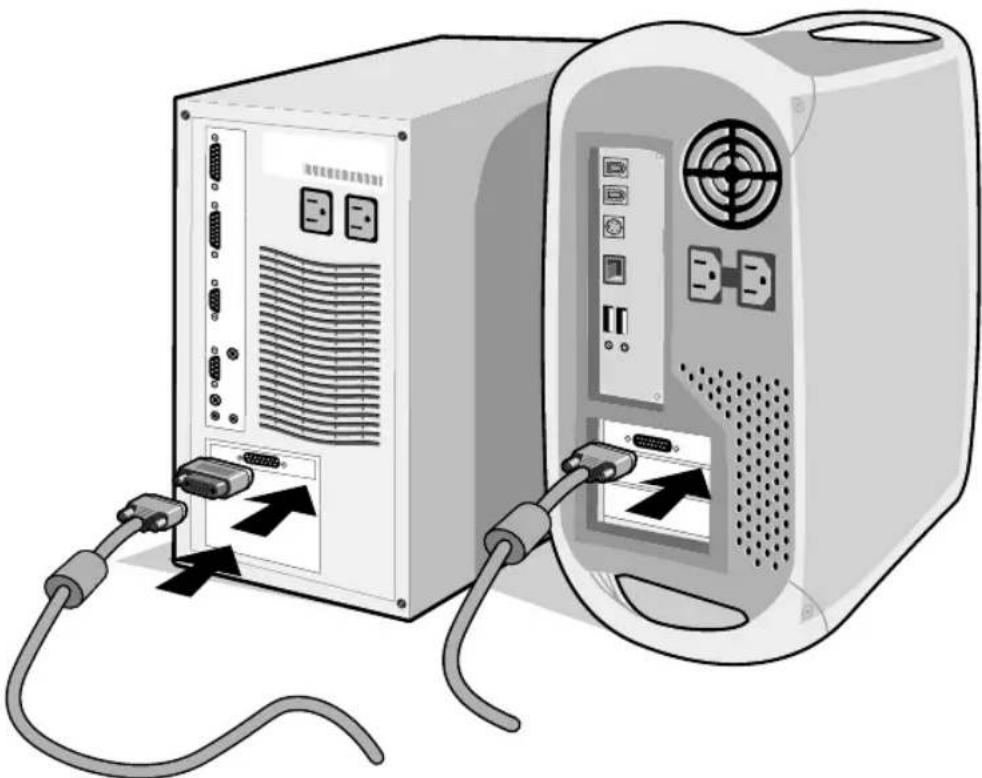
natural_image
Illustration of two computer hardware units connected by cable, showing front and rear ports with connectors (no text or symbols)B.1 B.2


natural_image
Illustration of a hand inserting a card into a computer monitor (no text or symbols visible)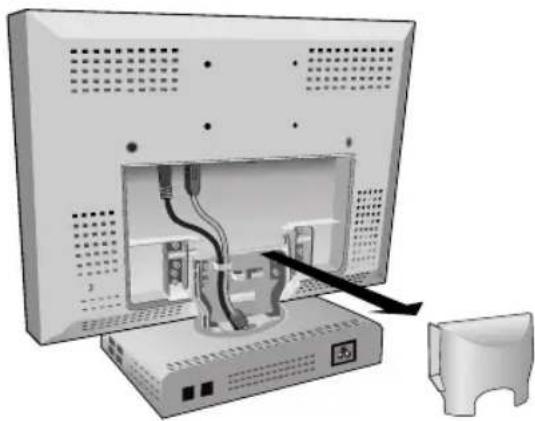
natural_image
Diagram of a computer monitor with cable and connectors inserted, showing internal wiring and a separate device (no text or symbols present)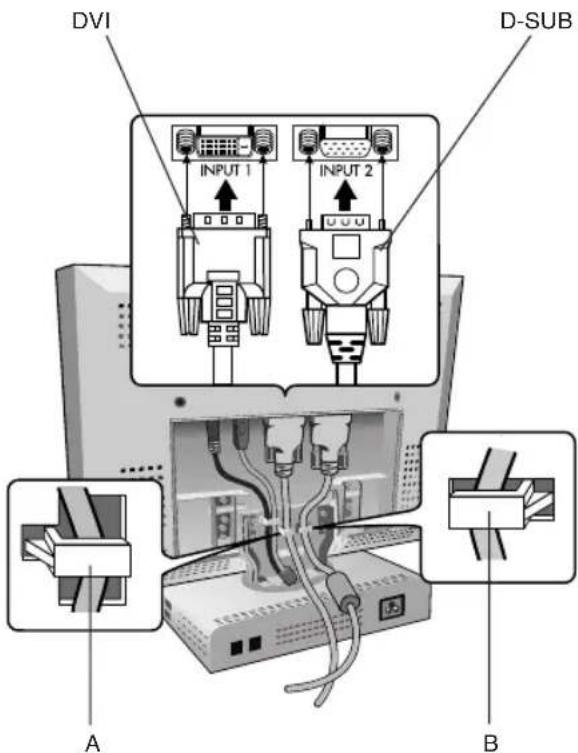
natural_image
Illustration of a computer monitor with cables and a cable attachment, showing no text or symbolsC.1

G.1
bar
| Language | Value | |---|---| | English | 100 | | Česky | 95 | | Deutsch | 90 | | Ελληνικά | 85 | | Español | 80 | | Français | 75 | | Italiano | 70 | | Nederlands | 65 | | Polski | 60 | | Русский | 55 | | Türkçe | 50 |


Declaration of the Manufacturer
We hereby certify that the colour monitor
MultiSync LCD1525X (LA-1526HMW)
are in compliance with
Council Directive 73/23/EEC:
- EN 60950
Council Directive 89/336/EEC:
- EN 55022
- EN 61000-3-2
- EN 61000-3-3
- EN 55024
and marked with

NEC-Mitsubishi Electric Visual Systems, Corp.
686-1, NISHIOI OI-MACHI
ASHIGARAKAMI-GUN
KANAGAWA 258-8533, JAPAN

English-1
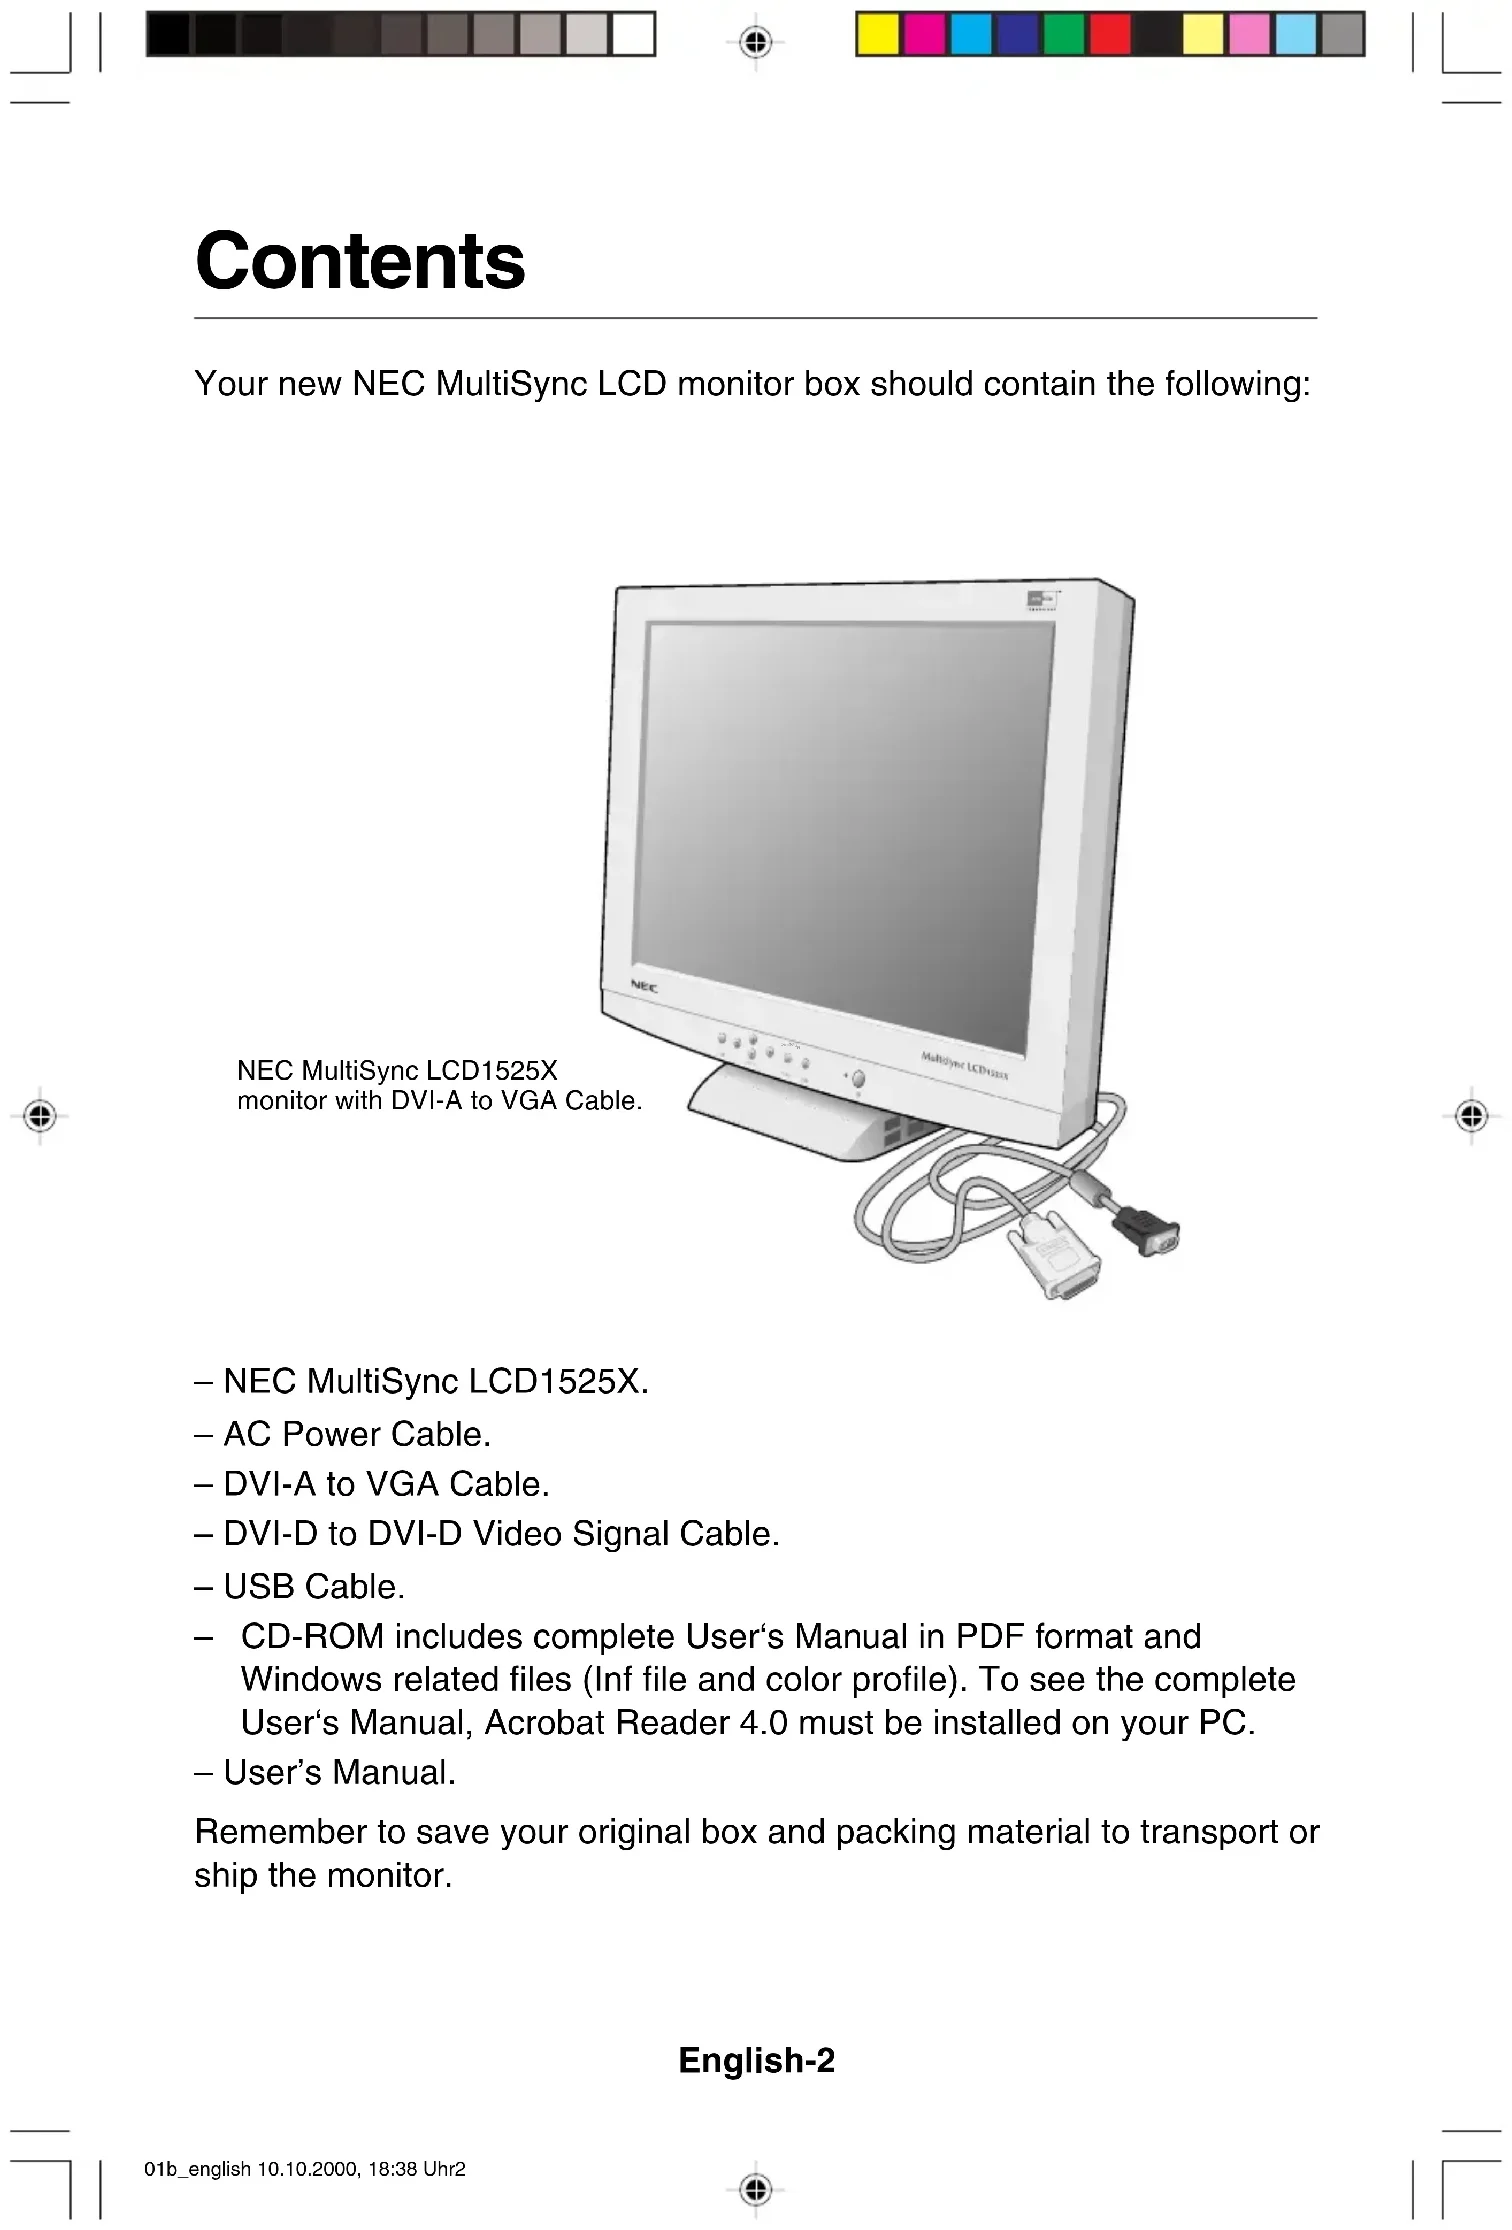
Contents
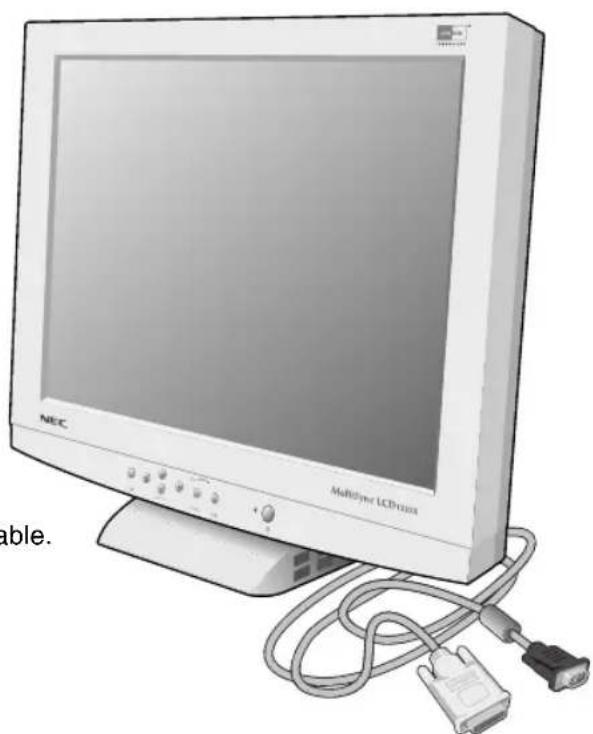
Your new NEC MultiSync LCD monitor box should contain the following:
natural_image
Illustration of a NEIC computer monitor with attached cables and a DVI port (no text or symbols on the device itself)NEC MultiSync LCD1525X monitor with DVI-A to VGA Cable.
- NEC MultiSync LCD1525X.
- AC Power Cable.
- DVI-A to VGA Cable.
– DVI-D to DVI-D Video Signal Cable.
- USB Cable.
- CD-ROM includes complete User's Manual in PDF format and Windows related files (Inf file and color profile). To see the complete User's Manual, Acrobat Reader 4.0 must be installed on your PC.
- User's Manual.
Remember to save your original box and packing material to transport or ship the monitor.
English-2
Installation
To attach the MultiSync LCD1525X monitor to your system, follow these instructions:
-
Turn off the power of your computer.
-
For the PC with DVI digital output: Connect the DVI-D to DVI-D signal cable to the connector of the display card in your system (Figure A.1). Tighten all screws.
For the PC with analog output: Connect the DVI-A to VGA cable to the connector of the display card in your system (Figure A.2).
To connect a secondary PC with analog output, connect the MultiSync LCD1525X D-SUB to D-SUB (not included) cable to the connector of the display card in your system.
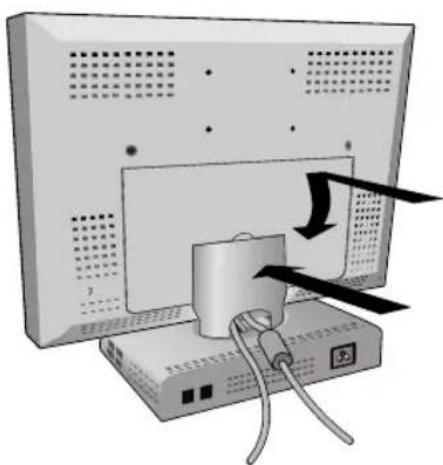
For the Mac: Connect the MultiSync Macintosh cable adapter to the computer (Figure B.1). Attach the 15-pin mini D-SUB signal cable to the MultiSync Macintosh cable adapter (Figure B.1).
NOTE: Macintosh G3 and G4 do not need a Macintosh cable adapter.
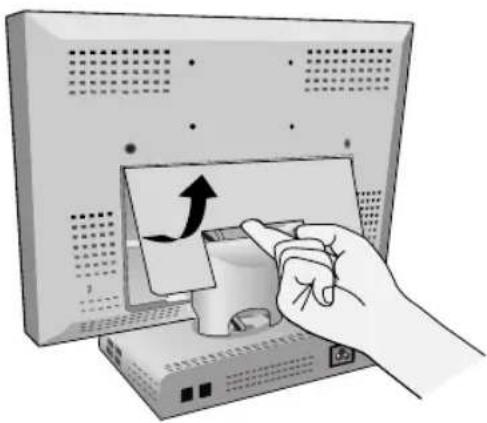
- Remove connector cover and cable cover. Connect the DVI signal cable to the connector on the back of the monitor. Place the DVI video signal cable under Clip A.
Replace connector cover and cable cover.
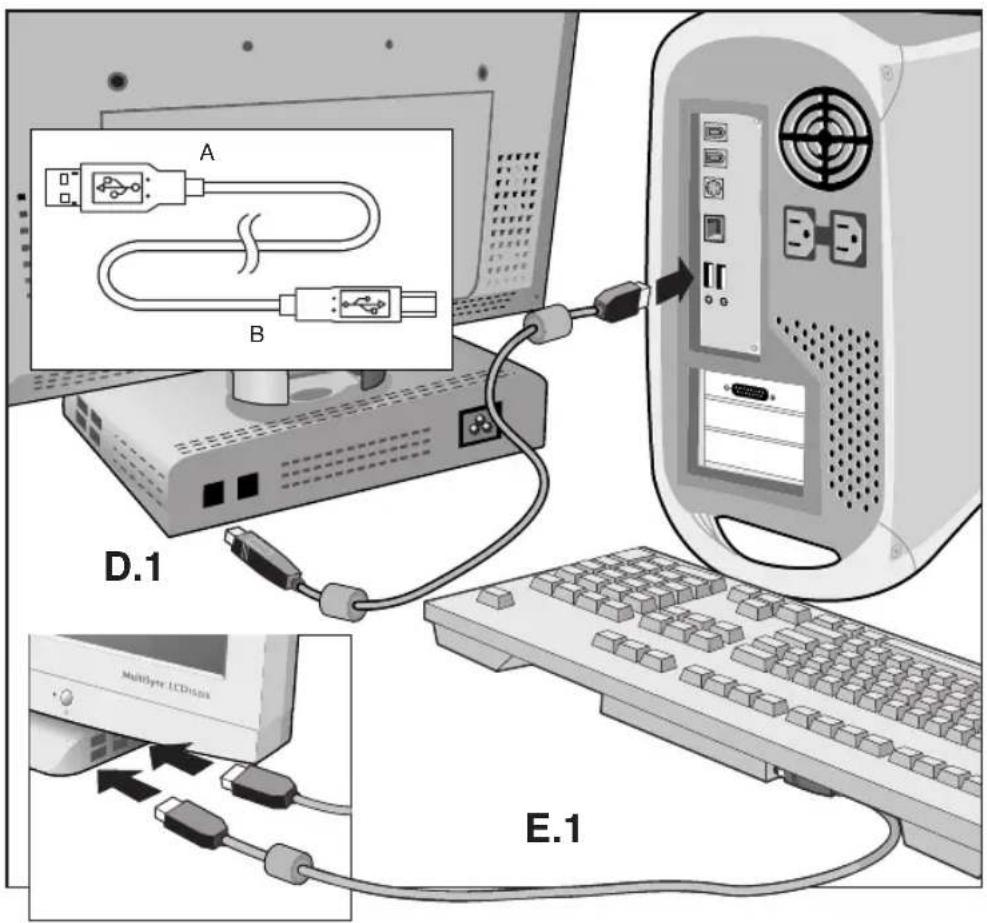
- Using the USB cable, connect the B type connector to the USB upstream port on the back of the monitor and A type connector to the downstream part on the computer (Figure D.1). If you are using the cord from the USB device, use one of the downstream ports on the side of the monitor (Figure E.1).
NOTE: Incorrect cable connections may result in irregular operation, damage display quality/components of LCD module and/or shorten the module's life.
-
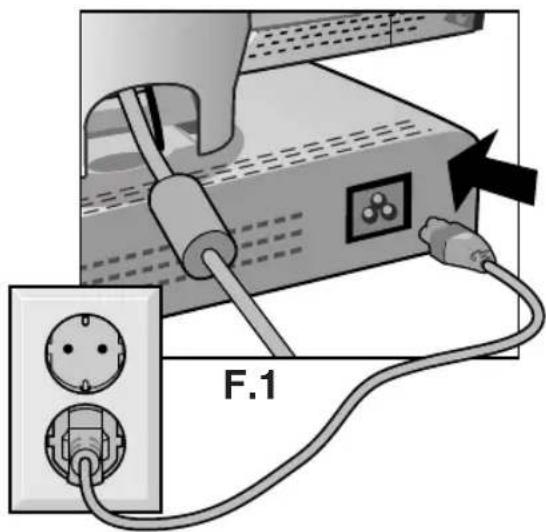
Connect one end of the power cord to the MultiSync LCD Series monitor and the other end to the power outlet (Figure F.1).
-
Turn on the monitor (Figure G.1) and the computer.
English-3
- To complete the setup of your MultiSync LCD monitor, use the following OSM controls:
• Auto Adjust Contrast
- Auto Adjust
Refer to the Controls section of this User's Manual for a full description of these OSM controls.
NOTE: If you have any problems, please refer to the Troubleshooting section of this User's Manual.
Controls
INPUT SELECT
If no OSM menu is displayed, video input and USB upstream can be changed by pressing the PROCEED button.
▲: changing only video
▼: changing video and USB
OSM Controls
The OSM controls on the front of the monitor provide the following functions:
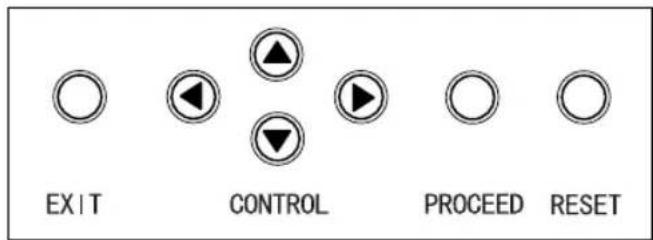
To access OSM press any of the control buttons (◀, ▶, ▲, ▼) or the PROCEED button
English-4
| Main Menu | Sub-Menu | |
| EXIT | Exits the OSM controls. | Exits to the OSM controls main menu. |
| CONTROL ▲▼ | Moves the highlighted area up/down to select one of the controls. | Moves the highlighted area up/down to select one of the controls. |
| CONTROL ▲▶ | Proceeds to the selected menu choice (indicated by the highlighted area). | Moves the bar in the + or - direction to increase or decrease the adjustment. |
| PROCEED | Has no function. | Activates Auto Adjust feature. In Tool and Information Mode, opens additional window. |
| RESET | Resets the highlighted control menu to the factory setting. | Resets the highlighted control to the factory setting. |
English
NOTE: When RESET is pressed, a warning window will appear allowing you to cancel the RESET function.
Brightness and Contrast
This function is control of brightness and video contrast.
BRIGHTNESS
Adjusts the overall image and background screen brightness.
CONTRAST
Adjusts the image brightness in relation to the background.
AUTO ADJUST (Analog Input Only)
Corrects the image displayed for non-standard video inputs.
AUTO Auto Adjust (Analog Input Only)
Adjusts the Position, H. size and Fine controls.
☐☐ Position (Analog Input Only)
This function controls image position within the display area of the LCD.
English-5

LEFT/RIGHT
Position control for horizontal image position.

DOWN/UP
Position control for vertical image position.

AUTO ADJUST
Automatically sets the horizontal and vertical image position within the display area of the LCD.
Image Adjust (Analog Input Only)

H. SIZE
Adjusts the horizontal size by increasing or decreasing this setting.

FINE
This function is used for adjustment of the delay of internal clock to arrange image focus. Factory setting is "Zero" as minimum value.
AUTO ADJUST
Automatically adjusts the H. Size or Fine settings.

Colour Control System
Preset 1, 2, 3, 4, 5
Colour presets 1 trough 5 selects the desired colour setting.
Each colour setting is adjusted the factory to that stated degree Kelvin. If a setting is adjusted, the name of setting will change from degree Kelvin to Custom.
Colour Gain RED, GREEN, BLUE
This function is controls the video contrast of R/G/B independently. The change in colour will appear on screen and the direction (increase or decrease) will shown Colour gain control range is from about 0% to 100%.
Factory setting is preset number 2, and R,G,B setting value is 100%.
English-6

Tools
LANGUAGE
OSM control menus are available in seven languages.
OSM POSITION
You can choose where you would like the OSM control image to appear on your screen. Selecting OSM Location allows you to manually adjust the position of the OSM control menu left, right, up or down.
OSM TURN OFF
The OSM control menu will stay on as long as it is in use. In the OSM Turn Off sub-menu, you can select how long the monitor waits after the last touch of a button to shut off the OSM control menu. The preset choices are 10, 20, 30, 60 and 120 seconds.
OSM LOCK OUT
This control completely locks out access to all OSM control functions. When attempting to activate OSM controls while in the Lock Out mode, a screen will appear indicating the OSM controls are locked out. To activate the OSM Lock Out function, simultaneously press and hold down the PROCEED and ▲buttons. To deactivate the OSM Lock Out mode, again simultaneously press and hold down the PROCEED and ▲buttons.
VIDEO DETECT
Selects the method of video detection when two computers are connected.
NONE
The Monitor will never switch ports automatically, only by user control.
English-7
FIRST DETECT
The video input has to be switched to “FIRST DETECT” mode. When current video input signal is not present, then the monitor searches for a video signal from the other video input port. If the video signal is present in the other port, then the monitor switches the video source input port to the new found video source automatically. The monitor will not look for other video signals while the current video source is present.
LAST DETECT
The video input has to be switched to the “LAST DETECT” mode. When the monitor is displaying a signal from the current source and a new secondary source is supplied to the monitor, then the monitor will automatically switch to the new video source. When current video input signal is not present, then the monitor searches for a video signal from the other video input port. If the video signal is present in the other port, then the monitor switches the video source input port to the new found video source automatically.
DVI SELECTION
This function is selected the DVI input mode. When the DVI selection has been changed, you must restart your computer.
DIGITAL
DVI digital input is available.
ANALOG
DVI analog input is available.
FACTORY PRESET
Selecting Factory Preset allows you to reset all OSM control settings back to the factory settings. The RESET button will need to be held down for several seconds to take effect. Individual settings can be reset by highlighting the control to be reset and pressing the RESET button.
English-8
RESOLUTION NOTIFIER
This optimal resolution is 1024 x 768. If ON is selected, a message will appear on the screen after 30 seconds, notifying you that the resolution is not at 1024 x 768.
Information
DISPLAY MODE
Provides information about the current resolution display and technical data including the preset timing being used and the horizontal and vertical frequencies.
MONITOR INFO
Indicates the model and serial numbers of your monitor.
OSM Warning
No Signal: This function gives a warning when there is no signal present. After power is turned on or when there is a change of input signal or video is inactive, the No Signal window will appear. The PROCEED button opens the DVI SELECTION CONTROL, as indicated in the section for DVI selection.
Resolution Notifier: This function gives a warning of use with optimized resolution. After power is turned on or when there is a change of input signal or the video signal doesn't have proper resolution, the Resolution Notifier window will open. This function can be disable in the TOOL menu.
Out of Range: This function gives a recommendation of the optimized resolution and refresh rate. After the power is turned on or there is a change of input signal or the video signal doesn't have proper timing, the Out Of Range menu will appear. The PROCEED button opens the DVI SELECTION CONTROL, as indicated in the section for DVI selection.
Check Cable: This function will advise you to check all Video Inputs on the monitor and computer to make sure they are properly connected.
English-9
Recommended Use
Safety Precautions and Maintenance
For optimum performance, please note the following when setting up and using the MultiSync LCD colour monitor:
- DO NOT OPEN THE MONITOR. There are no user serviceable parts inside and opening or removing covers may expose you to dangerous shock hazards or other risks. Refer all servicing to qualified service personnel.
- Allow adequate ventilation around the monitor so that heat can properly dissipate. Do not block ventilated openings or place the monitor near a radiator or other heat sources. Do not put anything on top of monitor.
- Do not spill any liquids into the cabinet or use your monitor near water.
- Do not insert objects of any kind into the cabinet slots, as they may touch dangerous voltage points, which can be harmful or fatal or may cause electric shock, fire or equipment failure.
- Do not place any heavy objects on the power cord. Damage to the cord may cause shock or fire.
- Do not place this product on a sloping or unstable cart, stand or table, as the monitor may fall, causing serious damage to the monitor.
- The power cable connector is the primary means of detaching the system from the power supply. The monitor should be installed close to a power outlet that is easily accessible.
- When operating the MultiSync LCD monitor with its AC100-240V power supply, use a power supply cord that matches the power supply voltage of the AC power outlet being used. The power supply cord you use must have been approved by and comply with the safety standards of your country.
- Handle with care when transporting. Save packaging for transporting.
- The inside of the fluorescent tube located within the LCD monitor contains mercury. Please follow the bylaws or rules of your local municipality to dispose of this tube properly.
- Do not bend power cord.
- Do not use monitor in high temperatured, humid, dusty, or oily areas.
- Do not cover vent on monitor.
English-10
- If monitor is broken, do not come in contact with the liquid crystal.
- If glass is broken. Handle with care.
Immediately unplug your monitor from the wall outlet and refer servicing to qualified service personnel under the following conditions:
- When the power supply cord or plug is damaged.
- If liquid has been spilled or objects have fallen into the monitor.
- If the monitor has been exposed to rain or water.
- If the monitor has been dropped or the cabinet is damaged.
CORRECT PLACEMENT AND ADJUSTMENT OF THE MONITOR CAN REDUCE EYE, SHOULDER AND NECK FATIGUE. CHECK THE FOLLOWING WHEN YOU POSITION THE MONITOR:
- For optimum performance, allow 20 minutes for warm-up.
- Adjust the monitor height so that the top of the screen is at or slightly below eye level. Your eyes should look slightly downward when viewing the middle of the screen.
- Position your monitor no closer than 40 cm and no further away than 70 cm from your eyes. The optimal distance is 53 cm for the MultiSync LCD1525X monitor.
- Rest your eyes periodically by focusing on an object at least 6 m away. Blink often.
- Position the monitor at a 90° angle to windows and other light sources to minimize glare and reflections. Adjust the monitor tilt so that ceiling lights do not reflect on your screen.
- If reflected light makes it hard for you to see your screen, use an anti-glare filter.
- Clean the LCD monitor surface with a lint-free, non-abrasive cloth. Avoid using any cleaning solution or glass cleaner!
- Adjust the monitor's brightness and contrast controls to enhance readability.
- Use a document holder placed close to the screen.
- Position whatever you are looking at most of the time (the screen or reference material) directly in front of you to minimize turning your head while you are typing.
- Avoid displaying fixed patterns on the monitor for long periods of time to avoid image persistence (after-image effects).
- Get regular eye checkups.
English-11
Safety Instruction

WARNING

TO PREVENT FIRE OR SHOCK HAZARDS, DO NOT EXPOSE THIS UNIT TO RAIN OR MOISTURE. ALSO, DO NOT USE THIS UNIT'S POLARIZED PLUG WITH AN EXTENSION CORD RECEPTACLE OR OTHER OUTLETS UNLESS THE PRONGS CAN BE FULLY INSERTED.
REFRAIN FROM OPENING THE CABINET AS THERE ARE HIGH VOLTAGE COMPONENTS INSIDE. REFER SERVICING TO QUALIFIED SERVICE PERSONNEL.
CAUTION
RISK OF ELECTRIC SHOCK • DO NOT OPEN


TO REDUCE THE RISK OF ELECTRIC SHOCK, MAKE SURE POWER CORD IS UNPLUGGED FROM WALL SOCKET. TO FULLY DISENGAGE THE POWER TO THE UNIT, PLEASE DISCONNECT THE POWER CORD FROM THE AC OUTLET. DO NOT REMOVE COVER (OR BACK). NO USER SERVICEABLE PARTS INSIDE. REFER SERVICING TO QUALIFIED SERVICE PERSONNEL.

This symbol warns user that uninsulated voltage within the unit may have sufficient magnitude to cause electric shock. Therefore, it is dangerous to make any kind of contact with any part inside this unit.

This symbol alerts the user that important literature concerning the operation and maintenance of this unit has been included. Therefore, it should be read carefully in order to avoid any problems.
ENERGYSTAR is a U.S. trademark.
As an ENERGYSTAR ^® Partner, NEC-Mitsubishi Electronics Display of America, Inc. has determined that this product meets the ENERGYSTAR guidelines for energy efficiency. The ENERGYSTAR emblem does not represent EPA endorsement of any product or service.
IBM PC/XT/AT, PS/2, MCGA, VGA, 8514/A and XGA are registered trademarks of International Business Machines Corporation. Apple and Macintosh are registered trademarks of Apple Computer Inc.
Microsoft and Windows are registered trademarks of the Microsoft Corporation.
NEC is a registered trademark of NEC Corporation.
All other trademarks or registered trademarks are property of their respective owners.
English-12
Prohlášení výrobce
Česky-1
Obsah dodávky
natural_image
Illustration of a NEIC computer monitor with attached cables and a DVI cable (no text or symbols visible)Monitor NEC MultiSync LCD1525X s kabelem DVI-A-VGA.
- NEC MultiSync LCD1525X.
- napájecí šňůru,
Deutsch-1
Inhalt
natural_image
Illustration of a NEIC computer monitor with attached cables and a DVI cable (no text or symbols visible)Ελληνικά-1
Περιεχόμενα
natural_image
Illustration of a NEIC computer monitor with attached cables and a DVI cable (no text or symbols visible)Español-1
Contenido
natural_image
Illustration of a NEIC computer monitor with attached cables and a DVI cable (no text or symbols visible)Monitor NEC MultiSync LCD1525X con cable DVI-A a VGA.
- NEC MultiSync LCD1525X.
- Un cable de CA.
- Un cable DVI-A a VGA.
Français-1
Contenu
natural_image
Illustration of a NEIC computer monitor with attached cables and a DVI cable (no text or symbols visible)Italiano-1
Contenuto
natural_image
Illustration of a NEIC computer monitor with attached cables and a DVI cable (no text or symbols visible)Monitor NEC MultiSync LCD1525X con cavo DVI-A - VGA.
in overeenstemming is met
Nederlands-1
Inhoud
natural_image
Illustration of a NEIC computer monitor with attached cables and a DVI cable (no text or symbols visible)Brightness and Contrast
Colour Control System
Preset 1, 2, 3, 4, 5
natural_image
Illustration of a beige NEC computer monitor with attached cables and a DVI connector (no text or symbols visible on the device itself)Kabel do monitora NEC MultiSync LCD1525X DVI-A - VGA.
- Monitor NEC MultiSync LCD1525X.
- Kabel zasilający.
– Kabel od DVI-A do VGA.
Содержимое
natural_image
Illustration of a NEC computer monitor with attached cables and a DVI port (no text or symbols visible)Монитор NEC MultiSync LCD1525X с кабелем "DVI-A to VGA"
- NEC MultiSync LCD1525X.
Türkçe-1
İçindekiler
natural_image
Illustration of a NEIC computer monitor with attached cables and a DVI cable (no text or symbols visible)DVI-A – VGA Kablosu ile NEC MultiSync LCD1525X monitor.
- NEC MultiSync LCD1525X.
- AC Güç Kablosu
- DVI-A VGA Kablosu
– DVI-D DVI-D Video Sinyal Kablosu
- USB Kablosu
H. SIZE (YATAY BOYUT)


- Declaration of the Manufacturer
- Contents
- English-2
- Installation
- English-3
- Controls
- INPUT SELECT
- OSM Controls
- English-4
- Brightness and Contrast
- BRIGHTNESS
- CONTRAST
- AUTO ADJUST (Analog Input Only)
- AUTO Auto Adjust (Analog Input Only)
- ☐☐ Position (Analog Input Only)
- English-5
- LEFT/RIGHT
- DOWN/UP
- AUTO ADJUST
- Image Adjust (Analog Input Only)
- SIZE
- FINE
- Colour Control System
- Preset 1, 2, 3, 4, 5
- Colour Gain RED, GREEN, BLUE
- English-6
- Tools
- LANGUAGE
- OSM POSITION
- OSM TURN OFF
- OSM LOCK OUT
- VIDEO DETECT
- NONE
- English-7
- FIRST DETECT
- LAST DETECT
- DVI SELECTION
- DIGITAL
- ANALOG
- FACTORY PRESET
- English-8
- RESOLUTION NOTIFIER
- Information
- DISPLAY MODE
- MONITOR INFO
- OSM Warning
- English-9
- Recommended Use
- Safety Precautions and Maintenance
- English-10
- English-11
- Safety Instruction
- WARNING
- CAUTION
- English-12
- Prohlášení výrobce
- Obsah dodávky
- Inhalt
- Περιεχόμενα
- Contenido
- Contenu
- Contenuto
- Inhoud
- Содержимое
- İçindekiler
- SIZE (YATAY BOYUT)
Brand : NEC
Model : MultiSync LCD1525XBK
Category : Monitor