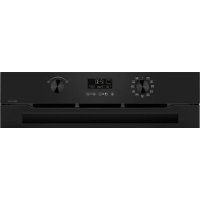
FV400XS1 - Electric oven BRANDT - Free user manual and instructions
Find the device manual for free FV400XS1 BRANDT in PDF.

| Product type | Electric oven |
| Brand | BRANDT |
| Model | FV400XS1 |
| Usable dimensions (W x H x D) | 38.5 cm x 18.2 cm x 33.5 cm |
| Usable volume | 23.5 liters |
| Power supply voltage | 220-240 V ~ 50-60 Hz |
| Total power | 1.77 kW |
| Energy consumption (rise and hold at 100°C, 1 h) | 0.71 kWh |
| Recommended thermal protection | 10 A |
| Main function | Steam cooking at 100 °C |
| Adjustable timer | 5 to 60 minutes |
| Display lock | Yes (Hold Stop button) |
| Supplied accessories | Perforated dish, pierced dish, stainless steel support grid, removable tank (1 L max) |
| Steam generator | Integrated at the bottom of the cavity |
| Water tank | Removable, capacity ~1 liter, low-limescale water recommended |
| Cavity cleaning | Wipe after each use, leave door ajar for drying |
| Steam generator cleaning | Monthly: white vinegar, rinse, no abrasive |
| Water inlet hose cleaning | Monthly: remove and descale with a thin object |
| Descaling prohibited | Do not use coffee machine descaler |
| Child safety | Key lock, hot steam when opening door |
| Indicators | Temperature, water shortage, lock |
| Installation | Built-in, fixing with 2 screws, accessible plug after installation |
| Electrical connection | Plug with ground, do not use if cord damaged |
| Country of origin | France (Brandt brand) |
Frequently Asked Questions - FV400XS1 BRANDT
User questions about FV400XS1 BRANDT
0 question about this device. Answer the ones you know or ask your own.
Ask a new question about this device
Download the instructions for your Electric oven in PDF format for free! Find your manual FV400XS1 - BRANDT and take your electronic device back in hand. On this page are published all the documents necessary for the use of your device. FV400XS1 by BRANDT.
USER MANUAL FV400XS1 BRANDT
What does your oven look like? p. 19
Accessories p. 20
How do you install your oven?
Electrical connection p. 21
Build-in p. 22
How do you program for immediate cooking? p. 23-24
Locking display p. 25
Water management p. 25
Cooking chart p. 26-27
How do you care for your oven? p. 28
What to do in case of malfunctions? p. 29
Introduction
Dear Customer,
You have just acquired a BRANDT oven and we would like to thank you.
Our research teams have designed for you a new generation of appliances so that you can cook with enjoyment each day.
With pure lines and modern aesthetics, your new Brandt oven blends harmoniously into your kitchen and perfectly combines ease of use with cooking performance.
In the line of Brandt products, you will also find a wide range of hobs, ventilation hoods, dishwashers and refrigerators, all of which can be built in and all of which can be coordinated with your new Brandt oven.
At the cutting edge of innovation, Brandt helps to improve the quality of everyday life by bringing you products that are ever more effective, easy to use, environmentally friendly, attractive and reliable.
The BRANDT brand.
Steam cooking
Overview
Steam cooking presents nothing but advantages if you follow the instructions for use. Healthy and natural, steam cooking preserves the full flavour of foods. A delicate sauce or aromatic herb seasonings add that something extra that makes the difference.
This kind of cooking releases no odours. There is no need to season the cooking water with herbs or spices; however, you can flavour a fish by placing it on a bed of seaweed or make a savoury poultry dish by adding a bunch of rosemary or tarragon.
You can simultaneously cook meat, fish and vegetables.
Steam cooking gently reheats pasta, rice and mashed potatoes with no risk of food sticking or drying out.
It makes it easier to cook puddings, flans, rice pudding, etc. covered with aluminium foil, the condensation water does not add moisture to the preparations.
There is no need to season before cooking--not even the steam water.
To make meat look more appetising, quickly brown it on all sides with hot butter in a pan.
Compared to boiling, steam offers nothing but advantages:
It is quick: cooking starts immediately, whereas for food in a water-filled dish, the cook time only begins counting down once the water returns to a full boil.
It is healthy: vitamins (those that are water soluble) and minerals are well preserved because they scarcely dissolve in the condensation water that touches the food.
Moreover, no fats are used for this type of cooking.
The steam maintains the taste of food. It does not add odours, nor the taste of the grill or the pan. Furthermore, it takes nothing away because the food is not diluted in the water.
Words of advice: there is no point in using this cooking method to prepare fish that is not fresh or vegetables left in the refrigerator for a week--the results are catastrophic!
The steam does not transfer flavours or aromas; therefore do not hesitate to save both time and money by cooking items side by side, but without touching. For example, you can cook a fish next to a dessert.
Steam is also appropriate for blanching, reheating or even holding warm, especially sauces.
First use a very small amount of fat to heat meats like poultry, veal and pork so that they take on an appetizing browned appearance. Then finish cooking them using the steam method.
Cut into pieces, food cooks faster and more evenly than if left whole.
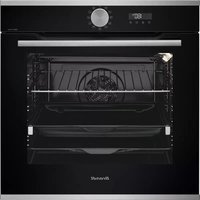
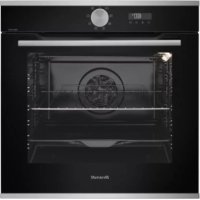
What does your oven look like?

GB
Close-up of control panel
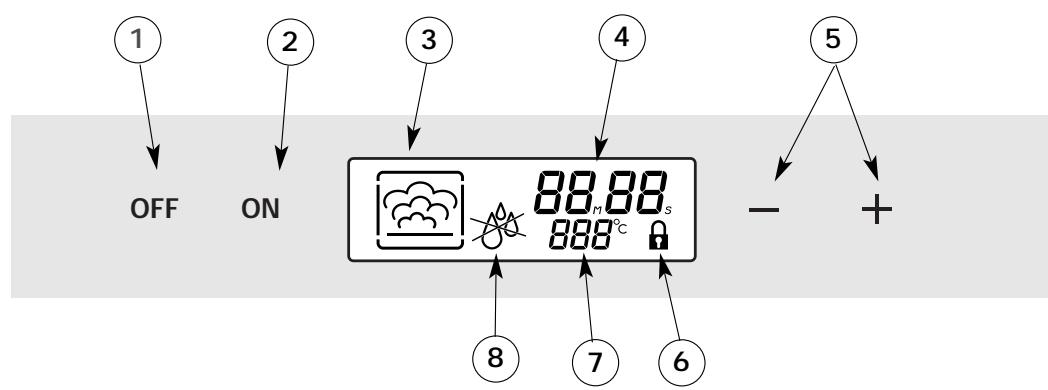
- Off button
- Start button
- Steam cook symbol
- Cook time display
-
- and - touch controls for time adjustment
- Touch pad-locking mechanism
- Temperature indicator
- Water circuit problem indicator
Accessories
Cookware

Pierced cooking dish to prevent contact between food and the condensation water.
Dish that makes it possible to recover the condensation water.
Stainless steel removable support grid: it must be placed in the oven.

The cookware may be cleaned in the dishwasher.
Removable tank
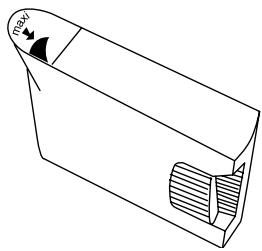
Tank that allows for independent water supply to the oven.
Its capacity is approximately one litre (maximum level).

Using water with a low level of lime will make it easier to care for your oven.

Using demineralised water is forbidden (not for human consumption).
How do you install your oven?
Electrical connection
For permanent installation, be mindful to add a standardised, compliant cut-off device in the electrical conduit. Otherwise the appliance must be positioned so that the electrical outlet is accessible after the unit has been built-in.
You must use an electrical receptacle that contains a ground wire and is connected in compliance with applicable safety standards.
Your electrical installation must be equipped with 10-ampere thermal-sensitive protection.
Do not operate the oven if the power cable or its plug are damaged. In this case, they must be replaced by the manufacturer, its After Sales Service department of a person of similar qualifications so as to avoid any danger.
Operating voltage 220-240 V ~ 50-60 Hz
Total oven power 1.77 kW
Energy consumption
- heating up to and holding at 100^ for one hour 0.71 kWh
Useful dimensions of your oven
Width 38.5 cm
Height 18.2 cm
Depth 33.5 cm
Net capacity 23.5 litres
Build-in
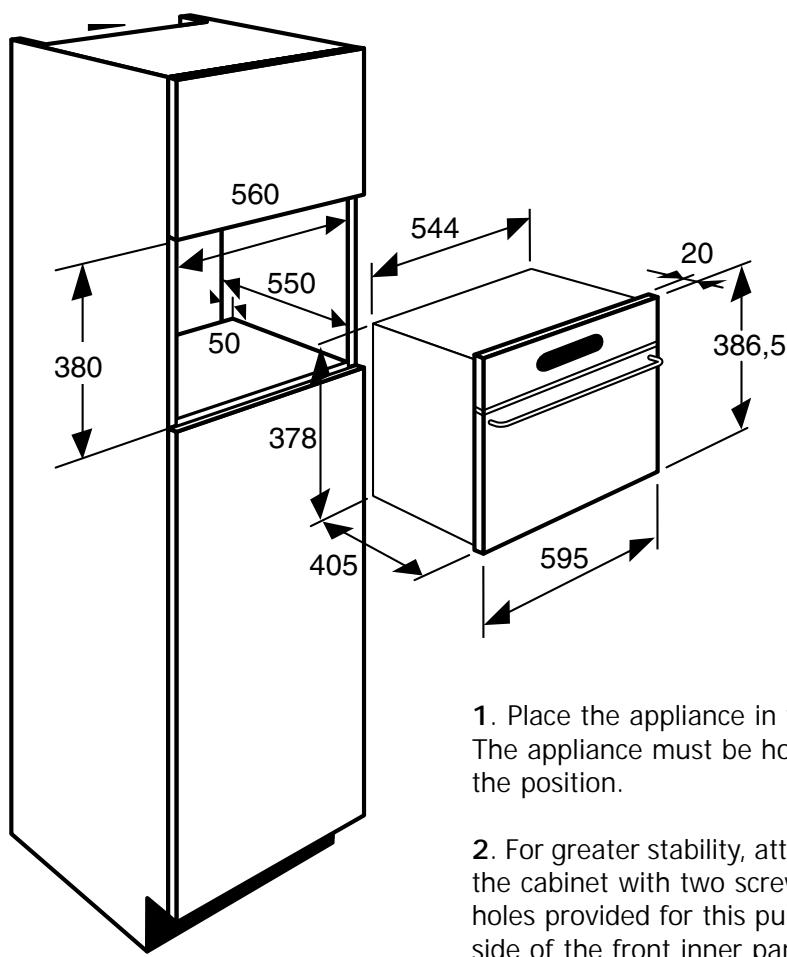
- Place the appliance in the nook.
The appliance must be horizontal. Check the position.
-
For greater stability, attach the oven in the cabinet with two screws through the holes provided for this purpose on either side of the front inner panels.
-
Make the electrical connection.

Ensure that the plug will be accessible after installation.
How do you program for immediate cooking?
Operating principle
The water contained in the tank arrives in the cavity via a pipe. This water is transformed into steam when it comes into contact with a hot surface located in the lower part of the cavity: this is the steam generator.
There is no need to add water to the cooking dish. To guarantee REAL STEAM COOKING, your oven is furnished with specially designed cookware that will allow for perfect cooking.
GB
You ABSOLUTELY MUST fill the water tank to the Max. level before cooking. Return the tank to its housing by firmly pushing ALL THE WAY until you feel the tank LOCK INTO POSITION.
When in use, the appliance becomes hot. Hot steam will escape when you open the door of the appliance. Keep children away.
Steam cooking
Steam cooking at 100^

OFF

一

1 Press the "Start" touch control. A cooking time of 25 minutes is suggested.
2 Set the desired length of time (minimum is five minutes and maximum is 60 minutes) by pressing the + and - touch controls.
3 Enter by pressing the "Start" touch control.
OFF
ON


一
4 The symbol is activated. When the temperature has been reached, the 100^ display stops flashing and a beep is emitted.

To avoid compromising the cooking results, do not open the appliance door during cooking.
Changing the cooking time
During cooking, you can adjust the cooking time by pressing the + or - touch controls.
Cancelling cooking in progress
You can stop the cooking at any time by pressing the Off touch control (press and hold for approximately one second).
If steam generation has not yet begun (approximately one minute), the oven stops immediately and the time disappears.
If steam generation has already begun, the time converts to three minutes; a countdown begins and the steam escapes before the door is opened.
At the end of a cooking programme
0m00s is displayed. The display animation ceases. Discontinuous beeps are emitted for three minutes.
To silence the beeps, press the Off touch control or open the door.

You ABSOLUTELY MUST empty the tank.

In order guarantee good oven reliability, the fan continues to function for a short period after cooking is complete.
Locking display
It is possible to lock the display. This feature cannot be used during timed cooking programmes or delayed cooking programmes.


1 Press the "Off" touch control for a few seconds.
2 A beep is sounded and a "padlock" appears on the screen. From this moment on, no touch control is active.
3 To unlock the display, press the "Off" touch control for a few seconds: a beep is sounded and the padlock disappears.
Water management
In the event of a water circuit-related problem during cooking, the "no water" indicator appears and a beep is emitted.

This error is specifically associated with:
- An empty tank.
- A poorly seated tank.
After checking these two items, cooking automatically restarts as soon as the door is closed.
Cooking chart
| VEGETABLES | TIMES Regardless of quantity | PREPARATIONS | NOTES |
| Artichokes (small) | 40 to 45 min. | placed upside down in the dish for tips decrease cooking time in small bunches | ·These times are a function of the type, size and freshness of the vegetables. Follow the indications that appear in the "Preparations" column. |
| Asparagus | 35 to 40 min. | ||
| Broccoli | 18 min. | ||
| Carrots | 20 to 22 min. | in thin, round slices | |
| Celery root | 25 to 30 min. | in thin slices | |
| Pumpkin | 15 to 20 min. | in cubes | |
| Mushrooms | 15 min. | in thin strips | |
| Puff pastry | 30 to 35 min. | Brussels sprouts | |
| 22 min. | Cauliflower in small bunches | ·The cooking time remains the same regardless of the quantity to be cooked. | |
| 30 to 35 min. | Chopped green cabbage | ||
| Courgettes | 10 to 15 min. | in round slices | |
| Chinese artichokes | 20 min. | Example: 1 or 4 artichokes require the same cooking time. | |
| Spinach | 20 min. | (fresh) stir while cooking | |
| 35 min | (frozen) | ||
| Endives | 30 min. | core removed, cut in half lengthwise | ·To check doneness, stick the tip of a knife into the thickest part of the vegetable; there will be no resistance if the food is cooked. |
| Fennel | 22 min. | cut in half | |
| Green beans | 30 to 35 min. | ||
| Turnips | 15 to 20 min. | in cubes | |
| Fresh peas | 20 to 25 min. | / | |
| Leeks | 25 min. | cut in half | |
| Potatoes | 25 min. | cut in round slices | |
| 40 to 45 min. | whole | ||
| SHELLFISH | TIMES | PREPARATIONS | NOTES |
| CRUSTACEANS | |||
| Sea scallops | 10 to 12 min. | with seasoning | ·Place the scallops on the grid of the glass dish, add aromatic herbs. |
| Mussels/periwinkles | 20 to 25 min. | with seasoning | |
| Crabs | 25 min. | / | ·Place the crustaceans on a bed of seaweed. |
| Lobsters | 30 to 35 min. | depending on weight | |
| Langoustines | 12 to 15 min. | / | |
| FRUITS- PIDDINGS | TIMES | PREPARATIONS | NOTES |
| Apples/pears/peaches | 10 to 15 min. | whole, peeled | ·Times depend on ripeness. |
| Compote | 25 min. | fruit in strips | |
| Puddings | 10 min. | in ramekins | |
| FISH | TIMES | PREPARATIONS | NOTES |
| Northern pikeCod | 25 to 30 min. | whole (1 kg) | • *Steaks: Round slices of fish of 2 to 3 cm in thickness (180/200g) per person. |
| 13 to 15 min. | steaks (180 g)* | ||
| Sea breamHaddock | 20 to 25 min. | whole (1kg) | • Insist on very fresh products. |
| 15 min. | filets | • Place whole fish in the dish as is or on bay leaves, fennel or other aromatic herbs. | |
| HerringPollack/black codMonkfish | 20 min. | whole (200 g) | • As soon as cooking is complete, remove the skin, which will detach easily. |
| 15 to 20 min. | steaks (180 g) | ||
| MackerelAtlantic cod | 15 min. | depending on thickness | |
| 20 min. | whole (250 g) | ||
| 15 min. | filets | ||
| SkateRed mulletRed mulletSpotted dogfishSalmonSolesTunaTrout, whole (1 kg) | 25 to 30 min. | whole (200 g) | |
| 15 min. | filets | ||
| 10 min. | thick steaks (6 to 10 cm in length) | ||
| 20 min. | steaks (180/200 g) | ||
| 15 to 20 min. | filets | ||
| 10 to 12 min. | steaks (180/200 g) | ||
| 20 to 25 min. | whole (200 g) 13 to 15 min. | ||
| MEATSEGGS | TIMES | PREPARATIONS | NOTES |
| BeefPork (filet mignon)Poultry (breasts, files)(stuffed)SausagesBoudins | 15 to 30 min. | Roast 800 g: 55 to 60 min. | • Then brown under the grill in another dish. |
| 25 min. | Chicken thighs: 35 to 40 min. | ||
| 20 to 25 min. | Roast turkey: 50 to 60 min. | ||
| 25 min. | 400 g piece | ||
| 20 min. | |||
| 10 to 15 min. | |||
| Eggsstart with very fresh eggs kept at room temperature | 7 min. | Soft-boiled: placed directly on the grid. | |
| 5 to 6 min. | Fried: broken in an individual dish placed on the grid and covered with cooking wrap. | ||
| 8 min. | Medium-boiled: placed directly on the grid. | ||
| 10 to 12 min. | Hard-boiled / poached: see detailed recipes. | ||
| RICE, PASTAFARINA | TIMES | PREPARATIONS | NOTES |
| Place directly in a dish then cover with water or milk. The steam is not enough to saturate these inflating foods. Place a sheet of aluminium foil on the dish to prevent water droplets from falling in. | |||
| Rice puddingFarina | 30 min. | 100 g rinsed rice - 20 cl milk - 2 T. sugar | • Fluff with a fork when cooking is complete. |
| 20 min. | 200 g (1/4 litre water) | ||
How do you care for your oven?
Maintenance
Cavity (after each use)
Wipe the cavity with a dry cloth after the steam generator has cooled or let the cavity air-dry by leaving the door open.
Water intake tube (once a month)
Remove the water intake tube by pulling it toward you. Remove any hard-water deposits that may be inside (using a thin, pointed object such as a think skewer or a knitting needle).
Steam generator (once a month)
Pour 1/2 cup of white alcohol vinegar on the generator. Let sit for a few minutes, then clean and rinse with water. Do not use sponges or abrasive powders, nor coffee maker cleaning agents.
Cleaning the Gutter

Remove this gutter by pulling it upward. Wipe it off and return it to its position using the three notches provided.

The oven should not be cleaned with a steam cleaner.
What to do in case of malfunctions?


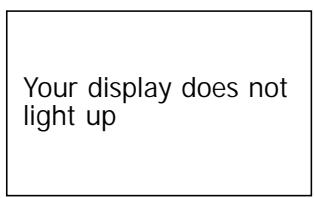
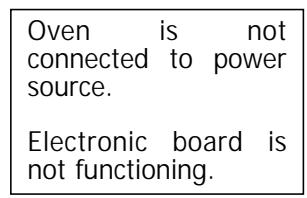
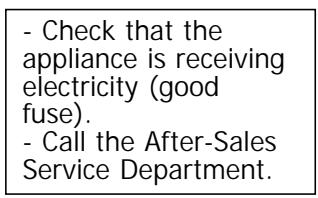
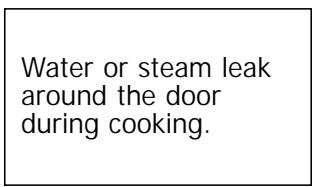


In all circumstances, if your efforts are not sufficient, contact the After-Sales Service Department without delay.
Sommaire
Edito p. 31
La cuisson vapeur
Généralités p. 32
Chere Client, Cher Client,
LES CAUSES POSSIBLES
QUE FAUT-IL FAIRE?
FR
Iapouoiaon Tou foupvou oac; 61
DusLREiJtJiJiJiJiJiJiJiJiJiJiJiJiJiJiJiJiJiJiJiJiJiJiJiJiJiJiJiJiJiJiJiJiJiJiJiJiJiJiJiJiJiJiJiJiJiJiJiJiJiJiJ1

1 贝主通安"“

2 2
SsKiennepa.

3 3 3