PO100 - Heart rate monitor LANAFORM - Free user manual and instructions
Find the device manual for free PO100 LANAFORM in PDF.

| Product type | Pulse oximeter (heart rate monitor) |
| Brand | Lanaform |
| Model | PO100 |
| Dimensions | 62 × 37 × 32 mm |
| Weight | 42.5 g (batteries included) |
| Power supply | 2 AAA 1.5V batteries (included) |
| Display | OLED, multidirectional display |
| SpO2 measurement range | 35% to 100% |
| SpO2 accuracy | ±2% (70% – 100%) |
| Pulse measurement range | 25 to 250 bpm |
| Pulse accuracy | ±2 bpm |
| Perfusion index | 0.3% to 20% |
| Alarms | Adjustable SpO2 and pulse thresholds, alert sound and beep |
| Battery life | Approx. 30 hours (depending on usage) |
| Auto shut-off | 10 seconds after finger removal |
| Protection | IP22 (resistant to water splashes) |
| Electrical classification | Internally powered equipment, BF type applied part |
| Operating temperature | 5°C to 40°C |
| Operating humidity | 15% to 80% non-condensing |
| Included accessories | 2 AAA batteries, lanyard, storage pouch, manual |
| Maintenance | Clean with 75% medical alcohol and soft cloth |
| Warranty | 2 years |
Frequently Asked Questions - PO100 LANAFORM
User questions about PO100 LANAFORM
0 question about this device. Answer the ones you know or ask your own.
Ask a new question about this device
Download the instructions for your Heart rate monitor in PDF format for free! Find your manual PO100 - LANAFORM and take your electronic device back in hand. On this page are published all the documents necessary for the use of your device. PO100 by LANAFORM.
USER MANUAL PO100 LANAFORM
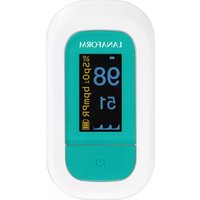
Thank you for choosing the pulse oximeter by LANAFORM.
The Pulse Oximeter is a non-invasive method used to measure blood oxygen saturation ( SpO_2 ) by checking the percentage of oxygen-saturated haemoglobin as well as the Perfusion Index (PI) and heart rate measurement. This process has been in regular use now for twenty years and is proving to be an essential control in medical practice for maintaining oxygen levels and preventing respiratory problems. The value of the oxygen saturation may be regarded as dangerous if it is below 90% for arterial blood. Normal value is 100% under normal atmospheric conditions.
▲ Please read all the instructions before using your product, particularly these basic safety instructions.
The photographs and other images of the product in this manual and on the packaging are as accurate as possible, but do not claim to be a perfect reproduction of the product.
Contents
01 Unpacking
02 Contents of the package
03 Symbols
04 Safety precautions
05 Product description
06 Product structure
07 Description of the screen
08 Settings
09 Instructions for use
10 Reading the measurements
11 About the display
12 Replacing the batteries
13 Fixing the strap
14 Cleaning and disinfecting routine
15 Maintenance
16 Technical specifications
17 Safety category
18 Storage et transport
19 Manufacturer's guidelines and declaration - Electromagnetic emissions
20 Limited warranty
21 Waste disposal
22 After-sales service
01 Unpacking
Please open the packaging carefully before use. Check whether all the accessories are present and whether any components have been damaged during transport and follow the installation and operating instructions in this manual. In the event of any damage or malfunction, please contact the reseller or Lanaform directly. In the event of any complaint, you will need the model of the device, serial number, date of purchase, your details and your address.
02 Contents of the package
- 1 pulse oximeter
• 2 AAA batteries (supplied)
• 1 set of instructions for use - 1 storage bag
- 1 carrying cord
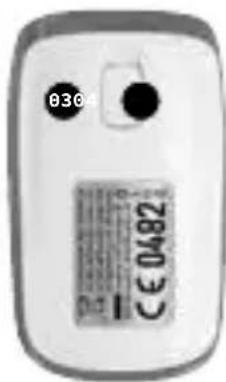
03Symbols
The following marks and symbols may appear in the instructions for use, on the PO-100 and its accessories.
SYMBOL DESCRIPTION
| 大 | Type BF applied part. |
| ▲ | Due attention required. |
| ⊗ | Action that is prohibited. |
| Information about the manufacturer. | |
| Date of manufacture. | |
| Consult the instructions for use. | |
| €0482 | This product also complies with the requirements of directive MDD93/42/EEC. |
SYMBOL DESCRIPTION
| Electrical waste must be sent to a specialist collection point for recycling. | |
| IP22 | Level of protection against water penetration. |
| Warning | Misuse of the device can damage the oximeter or cause physical injury. |
| Please note | Misuse of the device can damage the oximeter or cause inaccurate readings. |
| %SpO _2 | Symbol of oxygen saturation |
| bpmPR | Symbol of pulse rate |
| No SpO _2 alarms. |
04 Safety precautions
Read the following precautions carefully before using the pulse oximeter.
▲ Please note
- Do not try to maintain the oximeter unless you are a qualified professional. Only qualified maintenance
professionals are authorised to carry out internal maintenance if necessary.
- The oximeter might not run if you have poor blood circulation. Rub your finger to increase circulation or put the device on another finger.
- Do not use the device for more than 30 minutes without changing fingers.
- This product is not suitable for examining new-borns.
- Seek prompt medical treatment if the value measured is beyond the normal range and you are sure that the instrument is not malfunctioning.
- Do not expose your eyes directly to the electroluminescent components of the oximeter because this might cause damage.
- For further details on clinical limits and contraindications, please read the relevant medical documentation carefully.
- The following factors may disrupt or affect the accuracy of the examination:
- This product is used in an environment involving high-frequency devices.
- The oximeter probe is place on the same part of the body or same limb as with the arterial duct of the blood pressure cuff.
- The user suffers from hypotension, severe vascular atrophy, severe anaemia or lack of oxygen.
The user is in sudden cardiac arrest or in shock. - Nail polish or false nails may cause incorrect oxygen saturation or pulse readings.
• Take care of the measuring probe lens, which is fragile.
- Remove used batteries with care. In order to protect the environment, used batteries should be sent to a collection point provided for this purpose.
- Remove the batteries when the oximeter is not in use for more than two months.
- Do not immerse the oximeter in water or expose it directly to sunlight.
- Do not expose the oximeter to vibrations or shocks.
- Clean the oximeter probe after each time it is used.
- Do not use the oximeter for purposes not specified in this manual. Follow the instructions in the chapter "Instructions for use" and use the oximeter with care.
- The oximeter is not watertight so do no immerse it in water or any other liquid. Clean and disinfect the oximeter as described in the “Cleaning and disinfecting routine” chapter.
- Do not touch the tip of the measuring probe.
- Keep the measuring probe clean to maintain the accuracy of the readings.
- The ambient temperature must not be too high or too low. For accurate readings, keep the oximeter at an ambient temperature for more than 30 minutes before using it.
-
Do not use the oximeter at an ambient temperature above 40^ C ( 104^ F) or below 5^ C ( 41^ F). These temperatures are beyond the oximeter's operating range.
-
Risk of pollution! The recommendation is that the used oximeter should be deposited in a recycling centre.
- 2×1.5V AAA batteries (supplied) are the only replaceable accessories of the oximeter. Do not use batteries of other voltages or specifications.
▲ Warning
- Do not use the oximeter in an environment containing flammable gases, flammable anaesthetic or other flammable substances.
- Do not use the oximeter in an MRI or CT environment.
- Do not use the oximeter when it is humid with overflow or water vapour condensation. Do not move the oximeter from an excessively cold environment to a high-temperature humid environment.
- Keep the oximeter out of the reach of children.
- Use of a used oximeter could cause inaccurate readings.
- The oximeter is not designed to diagnose or treat a health problem or illness.
The results of measurements are provided for information only.
- Self-diagnostics or self-medication based on the results obtained are dangerous. Please consult a doctor.
- Do not try to charge dry-cell alkaline batteries and do not throw them onto a fire. They could explode.
- Do not dismantle the oximeter and do not try to repair it. It could be permanently damaged.
- During the measuring process, do not use a mobile phone or any other device likely to cause electromagnetic interference.
05 Product description
Based on entirely digital technology, the finger pulse oximeter measures in a non-invasive manner the actual content (oxygen saturation) of oxyhaemoglobin (HbO2) in arterial blood by using the optical transmission method.
The finger pulse oximeter measures the blood's oxygen saturation and the pulse of a human body via the finger's artery. It applies to a wide range of areas, such as families and clinics. Use this instrument for measuring before or after sport. Use of this instrument is not recommended during sports activities. Do not use it for the continuous treatment of patients.
06 Product structure
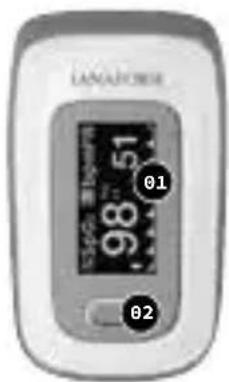
01 OLED screen
02 Power button
03 Battery cover
04 Battery cover lock
07 Description of the screen 2
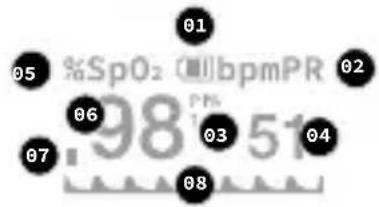
other
| Label | Value | |---|---| | 01 | 98 | | 02 | 51 | | 03 | 51 | | 04 | 51 | | 05 | 51 | | 06 | 51 | | 07 | 51 | | 08 | 51 |01 Battery level indicator
02 Pulse symbol
03 Perfusion Index
04 Pulse rate value
05 Oxygen saturation symbol
06 Oxygen saturation value
07 Bar graph
08 Plethysmograph
08Settings

After turning on the oximeter, hold the power button down for about a second. The oximeter displays a configuration in-ter face. Press the button or hold it down to carry out the corresponding operations: hold it down to define a part or press it once to change option or display mode.
Adjusting its alarm
| V2.12 | |
| Sound setup | - |
| SpO2 Alm Hi | 100 |
| SpO2 Alm Lo | 94 |
| PR Alm Hi | 130 |
| PR Alm Lo | 50 |
| +/- | * |
| Exit | |
| V2.12 | |
| Alm setup | - |
| Alm | on |
| Beep | off |
| Demo | off |
| Restore | ok |
| Brightness | 4 |
| Exit | |
Hold the power button down for 1 second while the oximeter is on. The configuration interface 1 is displayed, as the illustration shows.
Move “*” to the corresponding option by continually pressing the power button. Hold the power button down for 1 second to activate/deactivate the alarm: when ALM is activated and the measured values of the oxygen saturation of the blood and pulse exceed the top or bottom limit, the oximeter emits a sound alert. Hold the power button down for 1 second to activate/deactivate the beep: when the beep is activated, a tick-tack will be heard with the pulse beats when the pulse rate is being measured. While the “*” remains on the Restore option, hold down the power button for 1 second to restore the factory settings.
Brightness settings
Press the power button on the settings 1 interface to select the Brightness option, then hold the button down to adjust the brightness on a value between 1 and 5. The higher the value, the higher the screen's brightness.
Adjusting the alarm range
On settings interface 2 (hold the power button down for 1 second when you are in the settings 1 interface and the “*” symbol is displayed on Alarm Setup), press the power button to switch between options. You can define the upper and lower limits of the “SpO _2 ” oxygenation rate alarm on this interface as well as the upper and lower limits of the “PR” pulse rate alarm. While the “*” symbol remains on option +/-, hold the power button down for 1 second to adjust the option to + or -. In + mode, select the corresponding option and hold the power button down to increase the upper or lower limit. In - mode, hold down the power button to reduce the upper or lower limit. Move “*” to the Leave option and hold the power button down to return to the monitoring interface.
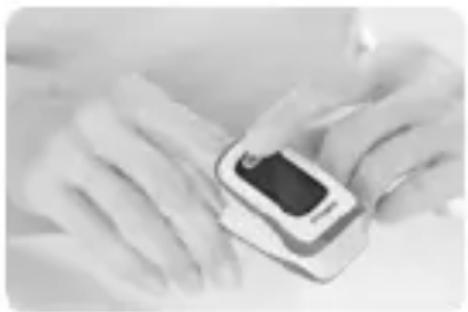
09 Instructions for use ■ 4
natural_image
Close-up of hands using a blood glucose meter to apply insulin (no visible text or symbols)Insert a finger fully into the oximeter's measuring sections. Keep the surface of the nail pointing upwards and release the clip. Press the power button to switch on the oximeter.
▲ Warning
If you do not insert your finger fully into the cavity, the measuring result may be inaccurate.
▲ Warning
Do not allow your finger to vibrate during the measuring process. Preferably, make sure your body does not move. Once the readings have become stable, read the measured values of oxygen saturation and pulse on the screen.
Comment: the oximeter will switch off automatically 10 seconds after removing your finger.
10 Reading the measurements
Evaluate the pulsed oxygen saturation index
▲ Warning
The table below for evaluating your results does NOT apply to people with certain pre-existing conditions (for example, asthma, heart failure, respiratory tract diseases) and in the event time is spent at altitudes higher than 1,500 metres. If you already have an illness, always consult your doctor for an evaluation of your results.
| SPO2 RESULT(PULSED OXYGEN SATURATION) IN% | CLASSIFICATION/MEASUREMENTTO BE TAKEN |
| 99-94 | Normal range |
| 94-90 | Reduced range:Visit to the doctor recommended |
| <90 | Critical range:Consult a doctor in an emergency |
Evaluate the Perfusion Index
The Perfusion Index (PI) must be between 0.3% and 20%. It fluctuates depending on the patient, the measuring point and physical state. A very low PMI value may interfere with the measurements.
11 About the display ■ 5

Press the power button continuously during the monitoring process. The data monitored and display method will be displayed cyclically on the OLED screen in two different ways (large fonts and plethysmograph) and in four directions, as shown in the illustration.
12 Replacing the batteries
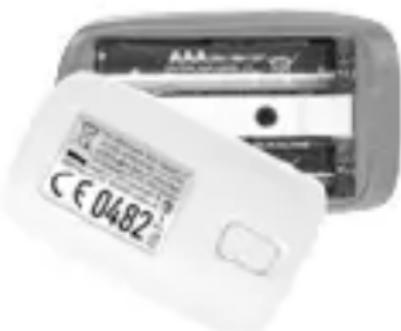
Replace the batteries when low and when the symbol flashes on the screen. Install two AAA dry-cell batteries in the battery compartment according to the polarity indicated and replace the battery cover.
13 Fixing the strap
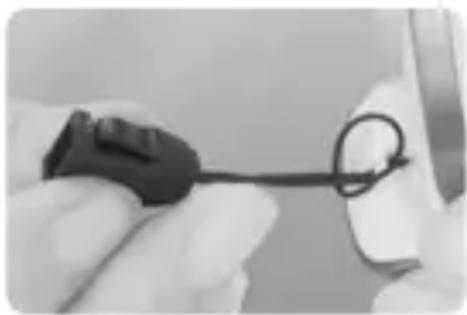
natural_image
Close-up of a gloved hand holding a black cable with a loop, partially visible against a plain background (no text or symbols)You can fix a strap to the device to make it easier to carry the pulse oximeter. Slide the thin end of the strap through the holder as illustrated. Firmly pull the other end of the strap through the holder of the narrow end.
14 Cleaning and disinfecting routine
Cleaning
Turn off the instrument and remove the batteries before cleaning. Make sure the instrument looks clean, is free of dust and dirt. Clean the instrument's outer surface (including the OLED screen) with 75% medical spirit and a piece of soft, dry cloth.
▲ Make sure the liquid does not run into the instrument when cleaning.
▲ Do not immerse any part of the instrument in any liquid.
Disinfection
Before measuring with the instrument, clean the rubber pad with a piece of soft, dry cloth soaked in 75% medical spirit. Clean the finger to be measured with medical spirit for the purposes of disinfection before and after use.
▲ Warning
Do not disinfect the instrument by disinfecting at a high temperature/high pressure or with gas.
15Maintenance
- Remove the batteries from their casing and store them properly if you do not intend to use the oximeter for a lengthy period.
- Store the oximeter between 14^ and 122^ (-10^ to +50^) and at levels of humidity of between 10% and 93% .
- Check the oximeter regularly for damage.
- Do not use the oximeter in an environment containing flammable gases or use it in an environment where the temperature or humidity is excessively high or low.
- Check the accuracy of the oxygen saturation and pulse rate measurements using an appropriate calibration device.
16 Technical specifications
01 Dimensions: 62.0 mm (Width) × 37.0 mm (Depth) × 32.0 mm (Length) Weight: 42.5 g (including two AAA dry-cell batteries)
02 Peak wavelength range of light emitted by the probe: red light 660 nm ±3; 905 nm ±5 infrared light.
03 Maximum optical output power of the probe: 1.2 mw for infrared light (905 nm).
04 Date of manufacture: see label
05 Normal working condition
| Operating temperature | 5°C to 40°C(41°F to 104°F) |
| Relative humidity | 15% to 80%,no condensation |
| Atmospheric pressure | 70 kPa to 106 kPa |
| Voltage rating DC 3.0 V | |
06 Default values and warning conditions
SETTING VALUE
| Oxygen saturation | Upper limit: 100Lower limit: 94 |
| Heart rate | Upper limit: 130Lower limit: 50 |
| Warning condition | When the warning switch is activated and the actual measured value exceeds the predefined range of warning settings, the oximeter emits a warning sound. |
07 Technical settings
SETTING VALUE
| DISPLAY RANGE | Oxygen saturation | 35% to 100% |
| Heart rate | 25 bpm to 250 bpm | |
| RESOLUTION | Oxygen saturation | 1% |
| Heart rate | 1 bpm |
SETTING VALUE
| ACCURACY OF MEASUREMENT | Oxygen saturation | ±2% (70% to 100%)No requirement (≤ 69%) |
| Heart rate | ±2 bpm | |
| WARNING RANGE | Oxygen saturation | Upper limit:50% to 100%Lower limit:50% to 100% |
| Heart rate | Upper limit:25 bpm to 250 bpmLower limit:25 bpm to 250 bpm | |
| WARNING RANGE | Oxygen saturation | ±1% of the pre-defined value |
| Heart rate | The highest of ±10% of the predefined value and of ±5 bpm | |
| PI Low PI Min. 0.3% | ||
17 Safety category
- Type of protection against electric shocks: internally powered equipment.
-
Level of protection against electric shocks: type BF applied part.
-
Level of protection against water penetration. IP22
- Safety level for use in flammable anaesthetic mixtures with air, oxygen or nitrous oxide: non-AP/APG
- No part of the oximeter's application impedes the defibrillation load effect.
- No part of the oximeter's application impedes the output signal.
- The oximeter is not a permanently installed device.
18 Storage and transport
The pulse oximeter can be transported using general transport tools. Avoid vibrations, shocks or rain during transport.
The pulse oximeter must be packed and stored on well-ventilated premises with no corrosive gas. The ambient temperature must be between -10^ et +50^ , the relative humidity must be between 10% and 93% (with no condensation) and the atmospheric pressure must be between 50 and 106kPa .
19 Manufacturer's guidelines and statement · Electromagnetic emissions
Manufacturer's guidelines and declaration · Electromagnetic emissions · For all equipment and systems
Manufacturer's guidelines and declaration · Electromagnetic emissions
| The PO-100 pulse oximeter is designed to be used in the electromagnetic environment specified below. The customer or user of the PO-100 pulse oximeter must make sure that he or she uses it in this type of environment. | ||
| Emission test | Compliance | Electromagnetic environment · Guidelines |
| RF emissions · CISPR 11 | Group 1 | The PO-100 pulse oximeter only uses RF energy for its internal operation. The RF emissions are therefore very weak and should not cause any interference with the electronic devices nearby. |
Manufacturer's guidelines and declaration · Electromagnetic emissions
| RF emissions · CISPR 11 | Category B | The PO-100 pulse oximeter can be used in any establishment, including domestic settings and those directly connected to the low-voltage public distribution network supplying electricity to buildings used for domestic purposes. |
20 Limited warranty
LANAFORM guarantees this product against any material or manufacturing defect for a period of two years from the date of purchase, except in the circumstances described below.
The LANAFORM guarantee does not cover damage caused as a result of normal wear to this product. In addition, the guarantee covering this LANAFORM product does not cover damage caused by abusive or inappropriate or incorrect use, accidents, the use of unauthorized accessories, changes made to the product
or any other circumstance, of whatever sort, that is outside LANAFORM's control.
LANAFORM may not be held liable for any type of circumstantial, indirect or specific damage.
All implicit guarantees relating to the suitability of the product are limited to a period of two years from the initial date of purchase as long as a copy of the proof of purchase can be supplied.
On receipt, LANAFORM will repair or replace your appliance at its discretion and will return it to you. The guarantee is only valid through LANAFORM's Service Centre. Any attempt to maintain this product by a person other than LANAFORM's Service Centre will render this guarantee void.
21 Advice regarding the disposal of waste
All the packaging is composed of materials that pose no hazard for the environment and which can be disposed of at your local sorting centre to be used as secondary raw materials. The cardboard may be disposed of in a paper recycling bin. The packaging film must be taken to your local sorting and recycling centre.
When you have finished using the device, please dispose of it in an environmentally friendly way and in accordance with the law.
Prior to disposal, please remove the battery and dispose of it at a collection point so that it can be recycled.
Under no circumstances should spent batteries be disposed of with household waste.

22 After-sales service

Shenzhen Jumper Medical
Equipment Co., Ltd.
D Building, No. 71, Xintian
Road, Fuyong Street,
Baoan, Shenzhen,
Guangdong, China
Tel: +86-755-26696279

MedPath GmbH, Mies-vander-Rohe-Strasse 8, 80807
Munich, Deutschland
Tel: +49(0)89-189174474
Lanaform SA
natural_image
Close-up of hands using a mobile device to scan or test blood (no visible text or symbols)Shenzhen Jumper Medical Equipment Co., Ltd.
D Building, No. 71, Xintian
Road, Fuyong Street,
Baoan, Shenzhen,
Guangdong, China
Tel: +86-755-26696279

MedPath GmbH, Mies-vander-Rohe-Strasse 8, 80807
Munich, Deutschland
Tel: +49(0)89-189174474
Lanaform SA
natural_image
Close-up of hands using a blood glucose meter to apply a black liquid (no visible text or symbols)natural_image
Close-up of a gloved hand holding a black connector with a loop, partially visible on a white surface (no text or symbols)| V2.12 | |
| Sounds setup | - |
| SpO2 Ajm Hi | 100 |
| SpO2 Ajm Lo | 94 |
| PR Ajm Hi | 130 |
| PR Ajm Lo | 60 |
| +/- | - |
| Exit | |
| V2.12 | |
| Alm setup | - |
| Alm | on |
| Beep | off |
| Dema | off |
| Restore | ok |
| Brightness | 4 |
| Exit | |
natural_image
Close-up of hands using a blood pressure meter to test blood (no visible text or symbols)natural_image
Close-up of a hand holding a black plug with a wire, next to a white plastic clip (no text or symbols visible)natural_image
Close-up of hands using a blood glucose meter to test blood (no visible text or symbols)natural_image
Close-up of a hand holding a black cable with a coiled wire, next to a white object (no visible text or symbols)natural_image
Close-up of hands using a blood glucose meter to test blood (no visible text or symbols)Vložte jeden prst úplne do meracích častí oximetra. Držte povrch nechtu hore a uvoľnite klip. Stlačením tlačidla tlačidlo napájania sa oxymeter rozsvieti.
▲ Varovanie
natural_image
Close-up of a gloved hand holding a black cable with a coiled wire, next to an open device (no visible text or symbols)Shenzhen Jumper Medical
Equipment Co., Ltd.
D Building, No. 71, Xintian
Road, Fuyong Street,
Baoan, Shenzhen,
Guangdong, China
Tel: +86-755-26696279

MedPath GmbH, Mies-van-
der-Rohe-Strasse 8, 80807
Munich, Deutschland
Tel: +49(0)89-189174474
Lanaform SA