
Elite - Stroller Chipolino - Free user manual and instructions
Find the device manual for free Elite Chipolino in PDF.
| Product type | Child car seat (group 0+/1) |
| Brand | Chipolino |
| Model | Elite |
| Certification | R129/03 (i-Size) |
| Usage | Rear-facing only |
| Child height | 40 to 87 cm |
| Maximum child weight | 13 kg |
| Seat weight | Approximately 5 kg |
| Dimensions (W x H x D) | Approximately 45 x 60 x 35 cm |
| Vehicle installation | Vehicle 3-point seat belt |
| ISOFIX base compatible | Yes, model STKBS0251DE (sold separately) |
| Harness | 5-point height-adjustable |
| Headrest adjustment | 6 positions |
| Handle | 4 positions: forward, up, back, down |
| Canopy | Removable |
| Reduced insert | Included for children from 40 to 75 cm |
| Cover material | Washable fabric |
| Cover care | Hand wash at 30°C, mild detergent |
| Belt care | Clean with soapy water only |
| Safety | Do not install on seat with active airbag |
| Use after accident | Replace seat after a violent impact |
| Replacement parts | Only original Chipolino parts |
Frequently Asked Questions - Elite Chipolino
User questions about Elite Chipolino
0 question about this device. Answer the ones you know or ask your own.
Ask a new question about this device
Download the instructions for your Stroller in PDF format for free! Find your manual Elite - Chipolino and take your electronic device back in hand. On this page are published all the documents necessary for the use of your device. Elite by Chipolino.
USER MANUAL Elite Chipolino
IMPORTANT - READ CAREFULLY AND
KEEP FOR FUTURE!
TO ASSURE SAFE USAGE OF THIS PRODUCT
FOLLOW ALL WARNING, INSTRUCTIONS AND
RECOMMENDATIONS GIVEN IN THIS USER MANUAL!
WARNING!
NOTE
for "Universal Enhanced Child Restraint System with Belts" (40-87 cm)
This is the "Universal Enhanced Child Restraint System with Belts". It is approved under Regulation No. 129 for use for "Universal Seating" in the vehicle as specified by the vehicle manufacturers in the vehicle user manual.
If in doubt, consult the manufacturer or dealer of the enhanced child restraint system.

NO SYSTEM CAN GUARANTEE ABSOLUTE PROTECTION FROM INJURY
IN IMPACT OR DISASTER! DRIVE WITH AN INCREASED ATTENTION,
ESPECIALLY WHEN THERE IS A CHILD IN THE VEHICLE!
TO ENSURE THE SAFE USE OF THIS PRODUCT, FOLLOW THE WARNINGS
INSTRUCTIONS AND RECOMMENDATIONS OF THIS MANUAL!
IMPROPER USE OF THE SEAT WILL CONTRIBUTE TO
REDUCING ITS PROTECTIVE AND SAFETY FUNCTIONS!
FAILURE TO FOLLOW THE INSTRUCTIONS IN THIS
MANUAL INCREASES RISK OF SERIOUS INJURY OR DEATH!
WARNING!
- NEVER FIT OR USE THE SEAT ON A PASSENGER SEAT EQUIPPED WITH AN ACTIVE AIR BAG! THIS COULD RESULT IN DEATH OR SERIOUS INJURY!
Consult the vehicle's instructions for information on airbags and child transport conditions.
- DO NOT USE OTHER CONTACT POINTS THAN THOSE DESCRIBED IN THE INSTRUCTIONS AND MARKED ON THE CAR SEAT!

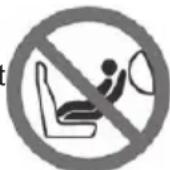
The seat is only suitable for installation in vehicles equipped with a 3-point safety belt approved according to UNECE Regulation No. 16.
A-diagonal belt
B-lap belt

Correct installation

Incorrect installation
SEATS IN THE VEHICLE
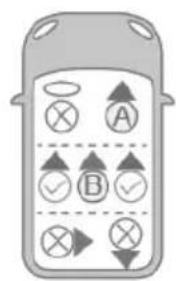


It is not allowed to mount the seat

Installation of the seat is allowed

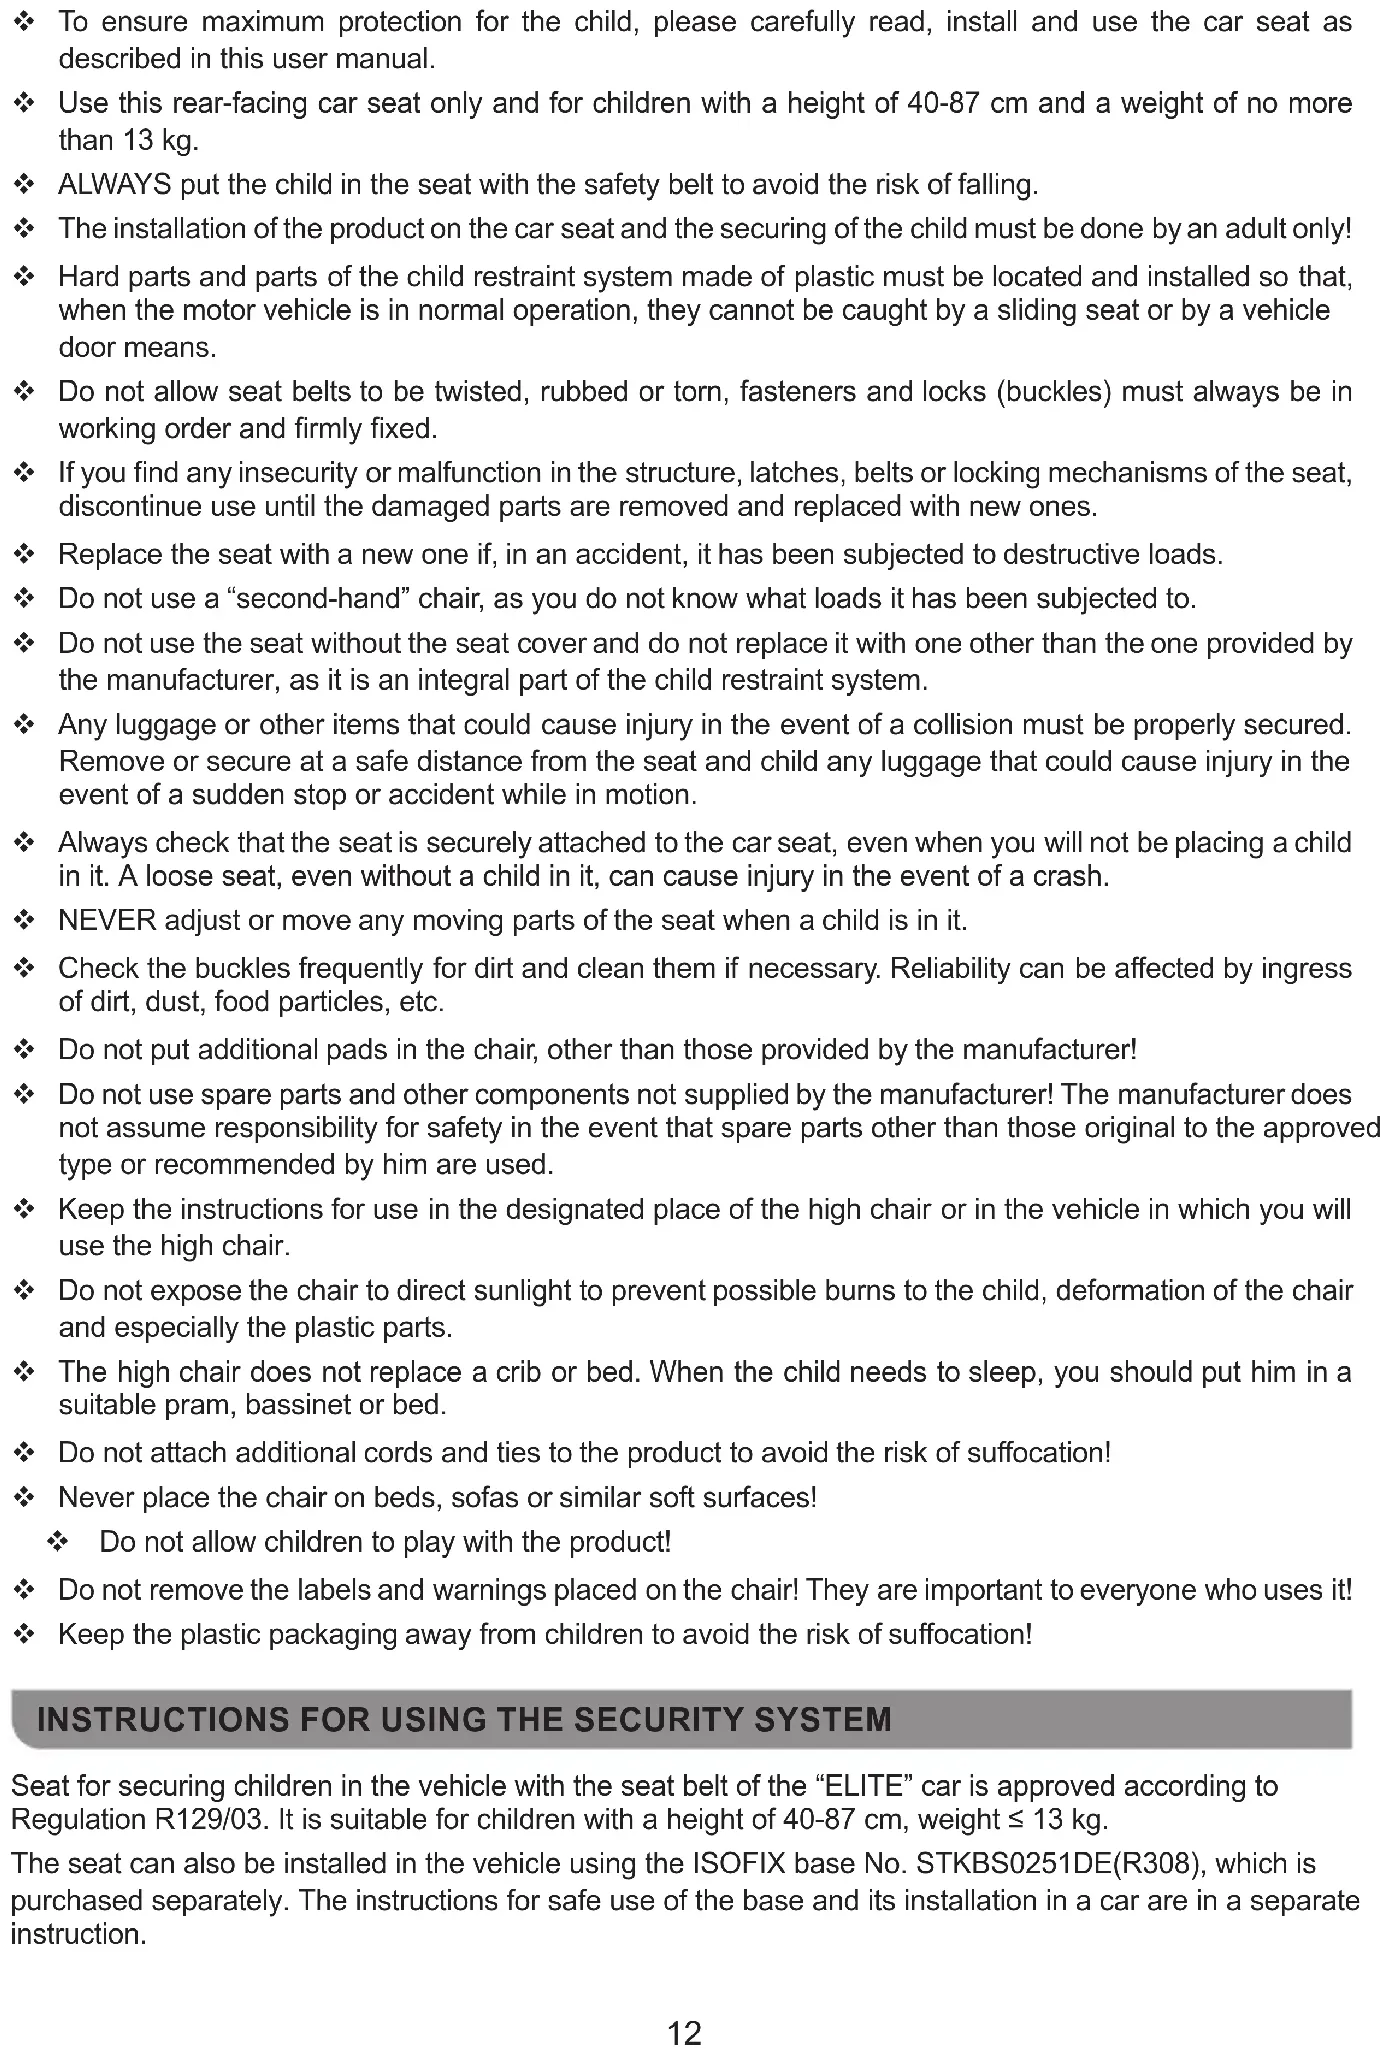
Do not install the seat if the car seat is equipped with an active airbag.

Install in this seat only if equipped with a 3-point seat belt.
ATTENTION!WARNINGS!
WARNING! NEVER LEAVE THE CHILD UNATTENDED!
WARNING! DO NOT USE OTHER CONTACT POINTS THAN THOSE DESCRIBED IN THE INSTRUCTIONS AND MARKED ON THE CAR SEAT!
WARNING! NEVER PLACE THE CAR SEAT ON A PASSENGER SEAT EQUIPPED WITH AN ACTIVE AIR BAG! THIS COULD RESULT IN DEATH OR SERIOUS INJURY!
WARNING! THE VEHICLE SEAT BELTS THAT HOLD THE CHAIR TO THE CAR SEAT MUST BE TIGHTENED AND FASTENING!
WARNING! THE SEAT BELTS THAT RETAIN THE CHILD MUST BE TIGHTENING AND FASTENING WELL, ADJUSTED ACCORDING TO THE BODY AND DIMENSIONS OF THE CHILD SO THAT THEY COVER THEM WELL.
WARNING! THE LIP BELT SHOULD BE LOCATED LOW AND EACH PROTECTION BARRIER MUST BE INSTALLED CORRECTLY SO THAT THE CHILD'S PELVIS IS PROPERLY SUPPORTED WITHOUT PRESSURE.
WARNING! DO NOT MAKE CHANGES, ADDITIONS OR MODIFICATIONS TO THE CAR SEAT WITHOUT THE APPROVAL OF THE NOTIFIED AUTHORITY! IT IS DANGEROUS NOT TO EXACTLY FOLLOW THE INSTRUCTIONS FOR USE PROVIDED BY THE MANUFACTURER!
WARNING! KEEP OUT OF FIRE!
To ensure maximum protection for the child, please carefully read, install and use the car seat as described in this user manual.
Use this rear-facing car seat only and for children with a height of 40-87 cm and a weight of no more than 13 kg.
ALWAYS put the child in the seat with the safety belt to avoid the risk of falling.
The installation of the product on the car seat and the securing of the child must be done by an adult only!
Hard parts and parts of the child restraint system made of plastic must be located and installed so that, when the motor vehicle is in normal operation, they cannot be caught by a sliding seat or by a vehicle door means.
Do not allow seat belts to be twisted, rubbed or torn, fasteners and locks (buckles) must always be in working order and firmly fixed.
If you find any insecurity or malfunction in the structure, latches, belts or locking mechanisms of the seat, discontinue use until the damaged parts are removed and replaced with new ones.
Replace the seat with a new one if, in an accident, it has been subjected to destructive loads.
Do not use a "second-hand" chair, as you do not know what loads it has been subjected to.
Do not use the seat without the seat cover and do not replace it with one other than the one provided by the manufacturer, as it is an integral part of the child restraint system.
Any luggage or other items that could cause injury in the event of a collision must be properly secured. Remove or secure at a safe distance from the seat and child any luggage that could cause injury in the event of a sudden stop or accident while in motion.
Always check that the seat is securely attached to the car seat, even when you will not be placing a child in it. A loose seat, even without a child in it, can cause injury in the event of a crash.
NEVER adjust or move any moving parts of the seat when a child is in it.
Check the buckles frequently for dirt and clean them if necessary. Reliability can be affected by ingress of dirt, dust, food particles, etc.
Do not put additional pads in the chair, other than those provided by the manufacturer!
Do not use spare parts and other components not supplied by the manufacturer! The manufacturer does not assume responsibility for safety in the event that spare parts other than those original to the approved type or recommended by him are used.
- Keep the instructions for use in the designated place of the high chair or in the vehicle in which you will use the high chair.
Do not expose the chair to direct sunlight to prevent possible burns to the child, deformation of the chair and especially the plastic parts.
The high chair does not replace a crib or bed. When the child needs to sleep, you should put him in a suitable pram, bassinet or bed.
Do not attach additional cords and ties to the product to avoid the risk of suffocation!
Never place the chair on beds, sofas or similar soft surfaces!
Do not allow children to play with the product!
Do not remove the labels and warnings placed on the chair! They are important to everyone who uses it!
Keep the plastic packaging away from children to avoid the risk of suffocation!
INSTRUCTIONS FOR USING THE SECURITY SYSTEM
Seat for securing children in the vehicle with the seat belt of the "ELITE" car is approved according to Regulation R129/03. It is suitable for children with a height of 40-87 cm, weight ≤ 13kg
The seat can also be installed in the vehicle using the ISOFIX base No. STKBS0251DE(R308), which is purchased separately. The instructions for safe use of the base and its installation in a car are in a separate instruction.
WARNING! ELITE CHAIR MOUNTING BASE (R308) IS NOT PART OF THIS KIT AND MUST BE PURCHASED SEPARATELY!
IMPORTANT! Follow exactly the instructions and sequence for installing and using the product from the text and illustrations attached to the manual. Check the security of the fixation after performing each operation! ALWAYS CHECK THE SECURITY OF THE BELT FASTENING! After each installation, make sure that the car seat belts are not twisted and are in the correct position.
MAIN PARTS
1- Handle;
2-Headrest;
3 - Vehicle lap belt guide;
4 - Soft pads on the shoulder belts;
5 - Shoulder belts;
6 - Soft pad between the legs;
7-Belt adjustment tape;
8 - Canopy frame;
9 - Uniting current;
10 - Crotch belt;
11 - Button for adjusting the inclination of the handle;
12 - Body;
13 - Lever for adjusting the height of the headrest;
14 - Hole for belts;
15 - Guide of the diagonal belt;
16 - Additional pad;
17-Belt adjustment button (below the Press label).
1. ADJUSTING THE HEIGHT OF THE HEADREST AND SHOULDER STRAPS
You can adjust the shoulder straps and headrest in 6 positions, according to the height of the child. Press the belt adjustment button (Press) and pull the shoulder belts outwards to release them (a).
Press the headrest height adjustment lever (b) and move up or down to the desired height. Release the lever to fix the selected height. You will hear a "click" sound when locking.
WARNING! CHECK THAT THE HEADREST IS PROPERLY FIXED BY SLIDING IT SLIGHTLY DOWNWARD.
IMPORTANT! Always check that the shoulder belts are at the correct height for your child.
Belts should pass through the holes in the gusset and body closest to the child's shoulders (See Figure: Yes-Correct).
Step 1: Press the belt adjustment button located below the "PRESS" sign on the front of the seat and at the same time grasp the shoulder belts as shown in the figure.
Step 2: While holding the button down, pull the shoulder straps forward to loosen them.
3. TIGHTENING THE SHOULDER BELTS
Pull the adjustment strap to tighten the belts.
IMPORTANT! Belts must fit the child's body well without squeezing or creating discomfort.
Note: Always check and fasten seat belts when placing the child in the seat.
4. ADDITIONAL MAT
Used for a child with a height of 40 to 75~cm
Place the pad in the car seat. Pass the shoulder straps through the top of the pad as shown in the figure. Pass the connecting buckle with the belt and the crotch pad through the holes at the bottom.
To remove the extra pad, perform the steps described in reverse order.
5. SECURING THE CHILD IN THE CAR SEAT
Before placing the child in the seat, you must relax the shoulder belts (See item 2), adjust the height of the shoulder belts and the headrest (See item 1) and insert the inner pad (See item 4).
Press the red button on the unifying buckle (a) to release the belts from the buckle and place them to the sides (b). Place the child in the seat and the shoulder belts on the child's shoulders (c).
Bring the two metal lugs together and insert them into the power connector (d). You will hear a "click" sound when fixed.
IMPORTANT! Make sure the lugs are firmly fixed to the buckle by trying to pull the shoulder belts up (e).
To remove the child from the seat, perform the described actions in reverse order.
6. HANDLE ADJUSTMENT
To rotate the handle, press the buttons on both sides of the chair at the same time. Place the handle in one of four (4) positions:
1-FORWARD position (when installing the car seat in the "REAR" facing position).
2 - UP position (when carrying the chair by hand).
3 - BACK position (when using the rocking function of the seat).
4 - DOWN position (for baby feeding and play).
WARNING! BEFORE USING THE CAR SEAT, YOU MUST MAKE SURE THAT THE HANDLE IS SECURELY FIXED IN THE SELECTED POSITION, THE BELT IS CORRECTLY PLACED AROUND THE CHILD AND IS FASTENED IN THE UNIFYING BUCKLE!
7. MOUNTING THE CANOPY
Rotate the handle and lock it in the BACK position as shown in fig. ②.
① Insert the canopy frame into the hole in the damask.
③ Insert the two ends of the canopy on either side of the seat.
④ Attach the bottom edge of the canopy to the seat body as shown in the figure.
5 Unfold the canopy by pulling the canopy forward to the desired position.
⑥ Move the handle to the desired position as described in item 6 "Adjusting the handle". To remove the canopy, reverse the steps described.
8. SECURING THE CHILD IN THE CHAIR WITH THE 3-POINT SEAT BELT
CAUTION! DO NOT INSTALL THE SEAT IF THE CAR SEAT IS EQUIPPED WITH A FRONT ACTIVE AIRBAG!
CAUTION! THIS CAR SEAT CAN ONLY BE INSTALLED WITH A 3-POINT SAFETY BELT ON THE CAR SEAT (DIAGONAL AND LAP). WARNING! ALWAYS INSTALL THE CAR SEAT FACING "REAR" (OPPOSITE TO THE DIRECTION OF TRAVEL OF THE VEHICLE).
8-1 - Place the child in the car seat. Fasten and adjust the seat's 3-point harness around the child. Place the chair handle in the UP position. Also place the seat to the car seat in the "BACKWARD" direction, making sure that it is firmly pressed against the backrest.
8-2 - Pass the lap belt of the vehicle through the lap belt guides of the seat. Fasten the belt in the buckle of the car seat (click/click). Pull the diagonal belt in the direction shown in the figure to tighten the lap belt.
Note: Make sure the vehicle's seat belt is securely fastened by attempting to pull it out of the buckle.
8-3 - Pass the vehicle's diagonal belt through the diagonal belt guide on the back of the seat.
8-4 - Fasten the vehicle seat belt by pulling it in the direction shown in the figure.
8-5 - Turn the handle to the FORWARD position.
Note: Make sure the handle is firmly pressed against the back of the car seat. The correct position of the buckle when the vehicle seat belt is fastened is shown in fig. 5 - A.
8-6-
WARNING! THE CAR SEAT BELT (LAP AND DIAGONAL) MUST BE WELL STRETCHED AND TIGHTENED AFTER INSTALLING THE SEAT!
IMPORTANT! Make sure that the belt is correctly installed in the buckle of the car seat (fig. 5A) and is not twisted.
IMPORTANT! Make sure that the damask does not interfere in any way with the movement and tightening of the belt.
To remove the booster seat from the car seat, perform the steps described in reverse order.
PREVENTION AND MAINTENANCE INSTRUCTIONS
Clean contaminated plastic or metal parts with a soft cotton cloth or sponge moistened with water or a mild detergent.
Wash damask and soft pads by hand at 300C with a mild detergent!
Do not bleach! Do not spin! Do not tumble dry! Do not iron!
Do not clean with aggressive detergents containing abrasive particles, ammonia, bleach or alcohol.
After cleaning, allow the chair to dry completely and then use it or put it away for storage.
Clean the belts only externally with mild soap and a damp cloth!
Do not wet or remove the labels! They contain important information!
Store the product in a clean and dry place. Do not expose to the direct impact of the environment - sun, rain, moisture, or sudden temperature changes!
In case of problems related to normal operation, contact authorized service centers for consultation or repair.
2. LOSLASSEN DER SCHULTERGURTE
CONDUIRE AVEC UNE AUGMENTATION ATTENTION, SURTOUT
QUAND IL Y A UN ENFANT DANS LE VEHICULE!
POUR GARANTIR UNE UTILISATION SECURISEE DE CE
PRODUIT, SUIVEZ LES AVERTISSEMENTS, INSTRUCTIONS
ET RECOMMANDATIONS DE CE MANUEL!
UNE MAUVAISE UTILISATION DU SIEGE CONTRIBUTUERA A
REDUIRE SES FONCTIONS DE PROTECTION ET DE SECURITE!
LE NON-RESPECT DES INSTRUCTIONS DE CE MANUEL
AUGMENTE RISQUE DE BLESSURES GRAVES OU DE MORT!
AVERTISSEMENTS!
- JAMAIS INSTALLER OU UTILISER LE SIÈGE SUR UN SIÈGE PASSAGER
EQUIPE D'UN AIRBAG ACTIF ! CELA POURRAIT ENTRAIER LA MORT OU
IIA NA (\Delta I A \Sigma \Phi A \Lambda^{\prime} \Sigma E T E) THN (A\Sigma \Phi A\Lambda^{\prime} H X P^{\prime} H S H A Y T O^{\prime} Y T O Y I N P O I ONTO
AKOAOYHOSE OAE TIZ IPOEIAONIOHSEIE, TIZ OAHIGKAI
INSTRUCTIONS DE PREVENIRE $I INTREINERE
Curata piesele din plastic sau metal contaminate cu o carpa moale de bumbac sau un burete umezit cu apa sau cu un detergent slab.
Spalati manual damascul si tampoanele moi la 300C cu un detergent uor!
A nu se folosi inalbitor! Nu te invarti! Nu uscati la rufe! Nu calcati!
WAARSCHUWING! LAAT HET KIND NOOIT ONBEHERD ACHTER!
WAARSCHUWING! GEBRUIK GEEN ANDERE CONTACTPUNTEN DAN DIE IN DE INSTRUCTIES ZIJN BESCHREVEN EN OP DE AUTOSTOEL ZIJN GEMARKEERD!
WAARSCHUWING! PLAATS DE AUTOSTOEL NOOIT OP EEN PASSAGIERSSTOEL DIE IS UITGERUST MET EEN ACTIEVE AIRBAG! DIT KAN LEIDEN TOT DE DOOD OF ERNSTIG LETSEL!
WAARSCHUWING! DE VEILIGHEIDSGORDELS DIE DE STOEL AAN DE AUTOSTOEL VASTHOUDEN, MOETEN STRAK EN VAST WORDEN GEMAAKT!
WAARSCHUWING! DE VEILIGHEIDSGORDELS DIE HET KIND VASTHOUDEN, MOETEN GOED STRAK EN VAST WORDEN GEMAAKT, AFGESTELD OP HET LICHAAM EN DE AFMETINGEN VAN HET KIND, ZODAT ZE HET GOED BEKLEMMEN.
WAARSCHUWING! DE LIPGORDEL MOET LAAG ZIJN EN ELKE BESCHERMINGSBARRIER MOET CORRECT WORDEN GEINSTALLEERD, ZODAT HET BEKKEN VAN HET KIND GOED WORDT ONDERSTEUND ZONDER DRUK.
WAARSCHUWING! BRENG GEEN VERANDERINGEN, TOEVOEGINGER OF MODIFICATIES AAN DE AUTOSTOEL AAN ZONDER DE GOEDKEURING VAN DE AANGEMELDE AUTORITEIT! HET IS GEVAARLIJK OM DE GEBRUIKSAANWIJZING VAN DE FABRIKANT NIET PRECIES OP TE VOLGEN!
WAARSCHUWING! HOUD UIT BRAND!
aonbmo! 3000000000000000000000000000000000000000000000000000000000000000000
aonbmo! n hnu jdsma ng 60s a6bns3bogu oos mnnmymn osbsnns n yms nmu uymnng ayg6dymn nu, md os3d3nl d6x no sssbom ng nmyls absmgymn ngmmn a6m.
aogonbnmgo! by aagobg 33mnngdo, gaofojgon 6
dmogon3oogon o56b6nlu 5smdgm an yymoan6o jno s3mmnoognl
osbbamnu agm! lsbngssms ng so onn33u dsmamgmo
anm amgogdmyaodmy6b6nlu nblmgjns!
aogmnbngds!ammgogon b5bdsml!
033n 033n 063n 063n 063n 063n 063n 063n 063n 063n 063n 063n 063n 063n 063n 063n 063n 063n 063n 063n 063n 063n 0
aamny6g jubbmmn y36s d6d6nl bgsmdgm gds3gdonl03nl, mdoomns lndsmgo 40-87
bd qo fms snoyogj 13 38.
ym30mmn3nl gssy6m 332n lssdgm n yogmmbmdn 33gnn, mns nng56 ngmmn
3mmgndn 0sy6ds 45656n 1s3mdm89c 0s 3d3n u 5da7a3ds y6cs amboglu dbmmng
3mabgdslnla6 088sogymn 033nb 03323jnl nubgndn ysmn 6hngmon 6hngmon 66o a6bnoaagcb 000am68yglu, mda 3gmdmonnmbmddmngdmon 000gnsan dmbagl amgymgonb lgsmdmn 56 d6jsnb jmsnlsaygmgon.
sm gyns ygmoa mgon n 330n 86b33, 86b35 86ygmn, ygmoaon 86ygmn (dsmon) ymgoan3n y6gs nyml dyds agammdmsd gn dymsg ydaamdygm.
m y smdshgbo hondy33mmosu 6 aydsmonmsu 53smdmnlu mydymn, 53ydo, 53do 5b30n doj56n8do, d9y3oogaoaay66ns6dyom bsnmdoa mnnosdco
d30n 30n, n 30n n 30n n 30n n 30n n
am yomnygmon,gmno"b30n,moa5b m noon,moa3nmon3gon 3ab.
sm aamnybmon bsmdmnn bsmdmnlu bsmdnlu asmdg csm d3ssmmnon nan aamdmoa nan amfmgdoomn bsmdmnnon, mga5nl ds33nl gdoon bnogdno asyymgmaa no 6sngmns.
60n 66 66 66 66 66 66 66 66 66 66 66 66 66 66 66 66 66 66 66 66 66 66 66 66 66 66 66 66 66 66 66 66 66 66
ym3m0n3nl 2smdg, mda u3smdg mn bndgme smn dndsaedgm n 65nb 83sndg,
dsno5o 30, mbs dsbn sm dmson3bdoan 3d3gl. 3b3nmn bsmdgmo, my6o3 dsbn ds3o3n 8mno,
andmgos 8aemn3nmu gns66ds 3smonn duomgb33o.
smlmglgssnmn m 5aossogannm n3smdnnn mdm3n 6hnn, mgoosd 8sbn dn 333n ndymg3ds.
banaa aamn anan anan anan anan anan anan anan anan anan anan anan anan anan anan anan anan anan anan anan anan anan anan anan anan anan anan anan anan anan anan anan anan anan anan anan anan anan anan anan anan anan anan anan anan anan anan anan anan anan anan anannnnaa
am aomnyo mbsosomam bshnngon 5b3s m3m66gon, mmdgongsm sn mnu amfmojynnn
aamomnns anm! aamomgnm n n ngdu 3sugbnadagmmosu yusmnoabmgos 2n daanb333an,
aamoyoynnn ngds bsosomam bshnngon, agnos mnangmnynn oogohjoynn gnnl 6
an nn mmdg6yog.
a66666666666666666666666666666666666666666666666666666666666666666666666666666
50g23001300300300300300300300300300300300300300300300300300300300300300300300300300300300300300300300300300300
品 100000000000000000000000000000000000000000000000000000000000
mou3n!
shabmogbu gcomn bdoa hsmng, 0366666666666666666666666666666666
sh yddo3do3d3ob 3mccgdo6 osdso
am 2b60 amos3gogm 0n3gogon 0a0mnbngogon! nbn 6n36mmssy3m03n, 368 86y6
aagnbg 3mababn daqon3o d3d3gonb6 amh, mns onsngmon oobhmnb nbo!
360606060606060606060606060606060606060606060606060606060606060606060606060606060606060606060606060606
"ELITE" 36566n 100000000000000000000000000000000000000000000000000000000000000000000000000000000000000000000000000
B3d mns y6bds dgdmogmnns 3gmdmgonan ISOFIX no. STKBS0251DE(R308) aymgdonn,
mmgn 3g3d g6mnns. 6bn glsngmmb admy6gonus 6d6d6dn dn n cys6gonu nbu mydnoa
Gn n6bmydnoa.
a3nbnmdo! DUO SMART 3s86g qssaaamdoomds (R308) sm smnu 63nndb 6fynmno y6go aondmb (3m3o!
6n36mm36ns! yuagcnnn 3mmyjgnu nblssmngnns 0a ydmyg2ndnu nbbmydngnu 0s 6anqammslu bsmad36mml m6gmonnnn 0dugos5 0nylgmo3oogos6. dsmfo 0n lusgnl yusgmonbymds ym3cmn m3mgonl dumgmonl dgaog! ym3cmn3nl dsmfo 0dansn lusgmonbymds! ym3cmn yogdonl dgaog, gmdygon, md a6d6dn yusgmonbmgon 3cgon dm smnu agasabgmnncs hmm dgaamdgmsdsns.
do0005660080
1-bsbomn;
2-mogluogsohno;
3-50m5b3mmm bdygmjnl m3nJ6mgjnl a8s33m3n;
4- monn nn gn gn gn gn gn gn gn gn gn gn gn gn gn gn gn gn gn gn gn gn gn gn gn gn gn gn gn gn gn gn gn gn gn gn gn gn gn gn gn gn gn gn gn gn gn gn gn gn gn gn gn gn gn gn gn gn gn gn gn gn gn gn gn gn gn gn gn gn gn gn gn gn gn gn gn gn gn gn gn gn gn gn gn gn gn gn gn gn gn gn gn gn gn gn gn gn gn gn gn gn
5-abmnljdoaegon;
6- monn buagcbn 3bgbob mnnb;
7- jao nu ngywnnngnngnog;
8-Canopyh#m;
9-aaagmonssgogm g6n;
10-633mnb jdoa;
11-babmynnu gsbnnmndn ngaymnndn bnnns;
12-666666666666666666666666666666666666666666666666666666
13-0gmyo n mglusmnl bdoymnls
moynonbn3nl;
14-b3mgondoaogonb0n;
15-gosambsmynnn jsdmnb a33m33n;
16-gosgdoonno bogjgon;
17- jdnnu jmmgndnngnun nnmnn (3mgnu)
1.0s30uS qS abmnu UsasamJoo Uusomnu ammaos
a36 aandmn 88y6m 63m8n8, 033n 1nssmn
anb3nn. gsn m nynn
mn (g) 8n y36m 6bn m3cgon
gm, md aonssn8gmmn nbo (a).
gssfnnn nssusmnu lnssmmnu mnymnndn
a3b (b) aosssgnn nnms 6 d33nn
luynmnu lnssmng. aossnlnyogmnn oyn.
snhymnu lnssmnu gssngdunng
h2g3n5u dmudg"osf3s62ndu" bds.
aogmnbmgds! gsdmdg,
mmd m3usgsn uhmnsu smnu
oosamgoymn, m653 d330nn
agoslmsgmnon.
品 品 品 品 品 品 品 品 品 品 品 品 品 品 品 品 品 品 品 品 品 3 mddabnub3gdo n3jbn3gnbnnb3n bmm
bnssmggs.
JdMnO y60 osmMb 3a3a3u bMgdoosb
y3cmmu sbmmu agosmg b3mcgonus
ubaymnlu b3mgondu (nb. uymsn: oosb-ym).
2. a55030u93m0n ab6mo 1
6doxo 1: gosn mnn 320nl naymngnol
mnss, mnagmogd oosommo bssmdmol f65
abnsb agosbnb6n, gosn" -nu d3amn
o sasgmmyg osfmon abnlo dsamgon,
mmamg jb bsh360n ngmng.;
6doxo2: mnnnsu gosfmou, ayn360n dbmol osdgon fno, mda mabbson nunbo.
3. abmnu damaonu amna3s
aongndgmon mayymnngonu mssd jodmgonu
agus3ms30;
6n36mm36ns!JdHonJnJnAsy6oamnamu
33nlbBnbl 33nnl00n1m00nbl
66nl8n;
26n36s: ym30mmn3nl 45amfdgom 50 dn3mn m30gon d3gnblssmdgman dmssbndls.
4. 053680000b5c0b5
40-56 75 b-8g jnssmnns3nns3ns;
amsssbuon ssgbsn bsmdgm.
anmnnnnsu onsuon dsmnndnu gogbshnman,
mmamng bsh3j0ds nqaymndn. hssymgon
dagsmangomn dsmnnsdpmn ng dyssymmon
33c6563mggdon..;
osdsgjonnn dsmnndn a mssamngmog,
dsunmygon smghonnn bdoxjbn ssanmnsmm
msdnoqgmnon.
5. 0330u 03a7am0s a6d60u U3Jmdm8
dsd3nLus3mdg amns3b068g y6
dmoy6mon abmnu 3g2o (nb. 3y6j0n 2),
ssngaymnmon dbnnu 3gogndnu ndsugm
ms3lu3sn (nb. 3y6j0n 1) ghsogon angsuogsn.
(nbnmnn 3y6j0n 4);
gssgnn nnm mnns aodghannns60
dmmn (a), nnnn aonnnygmmn 33000
dsmnss o anssgjun nnnn 33000
(b). dmsos3ugon ds3a3n bsmdgmon gdsbmnu 3gpon ds3a3nl dbngg (a);
aon mnnnmbn bsaa n hsb3nn
gnb m6gdmnd (q). gubmgonlsu dmudgbo
"053y6gonb" bbs;
86n36mm35ns! 6mhy6gon, mm dsmndgon
dymso snb osaamdoyn oomosg 6bnu
jdmngnb osms shznl agcmmon (e). 63d3nu
usanssd amsbubgme gdsunmyon sghmnnn
dmjagdon usnmbnm n5bndg3mnnon.
6. Lb630mGnU m8ymmn
Lsbomnol cooognnmgo, mngnnmgo
gogonm n yadn mn3g abngn mns3job.
amssgum Lsbommnmbngs5 (4) 3mgngs6:
1-6n53mngns(8s6j5nbus3mdmnlqsy6gjonlsu "3s6" 0ndommydgaamdsymosdn);
2-630nn 3m6nns (yda nls bgaon nn)
3- ymanu 3mngns (buaaundmaunmba3nu aybdannu aamgbsnss);
4-330mm 3m9n3ns (ds3d3nl 330nss osdanssngn3nl).
aogmnbomos! a6j56nl u3smdmo
asmy6ofo ycoos osnfoqon,
mmu b6yymn bsndgom
smu gdsamoynn dhygm
dawamssmoadn, jdsnnbhmns
snlu amos3uoymn os3d3nu asmdjam
os osdaamoymn osdjmnonsbjdom
osmonn!
7.356m3nU qJam68j08
Gssohy6m Lsbmynn Gs Hs8g0n nn 365
dgamdsymosdn, hmammb 6h36jons 6sb. 2
① hou3nn Gommmjndn HmHm cssdu3n b3mgmdn.
3 haoan gannmndn mno dmnn lssmdmn mnn30 abnglu.
4 anssaaan gnmmnnd 330g nag bsmdnnb bgyy, mamm g 6h36jons ymsng.
5 aodsmn gnmm luym3gm 3mngnsdog nmmndb fn6 aogshj3nm.
6 aosnabnn bsbmynn bysm3cm 3mnngs, mmamg gl swhgmnnn 6 3y6gdqn "wzymynu dmoos" Gmmgonu ambsb6qo, 33000000000000000
8. 8330u 838m0ds u33md2mao 3-396d0560 930900
8-5-000000000000000FORWARD 3m0n3n6n;
26n36s: 66y66n, nda 15b6myn
4ysmsq smnb 66fynmaa 066bsnl bs3mdmnls
3366 ab6mbl. 66mon 66mn 3m9ngns 066bsnl
gl63mmbjndu 03cognu 068mgndus
66g6gons 66b.5-5.
8-6-
aogmbmgs! 65666n
yusommbmjns u300 (msyn 0s
conssam6mn) us36ndmnu osy6dnb
d208 30mas y6ws nymb
osgndymn oasmgndymn!
603603603603 5000000000000000000000000000000000000000000000000000
6n36mm36ns! 6nhy6gon, mda 6dsb36d bmo sm agyosmmb jodnnl mdmsosbs osj3ms.
a565nL 53mndmo5 aodmdmngdmo
53mndmo5 admssdo, dabmygmon mghm
52xgon 53nml3nm on60nog3mnon.
3603060005 95 am3mou 06u@yD800
a#n6000 0s#n6dyhodynn 3msu#d#nsu 56 mnnm6ns 6shngmon monnn o#do n #um3oannn 56 yhgon, mmgmon 8s3yoymnny hymnn 56 monnn Ls#gbn Lysygmnon.
aomgboon gdsbs moongn oomndgon bgmnn 300C gddmsymsg monnn lomgbn ssymgon!
am assonomn! sm gnnmgon! sm aangls! sm qyogmmn!
s m aoluyg03n53mon s6m01ygm n lsmj8bn
luyyamngoJOn, nmdoomng 2n03b
soaoynn 67nmo30b, 8n03nl,
dsonmogmbl 6szmamml.
a666666666666666666666666666.
djmgon anfjbnbgon dbmnnnge asmjg5
monmnus36non g6b6gn56n jum3ngnnn!
s m gssu3gmmn gssm dmsgnmmnnn nn nnnn nnnnnnnnnnnnnnnnnnnnnnnnnnnnnnnnnnnnnnnnnnnnnnnnnnnnnnnnnnnnnnnnnnnnnnnnnnnnnnnnnnnnnnnnnnnnnnnnnnnnnnnnnnnnnnnnnnnnnnnnnnnnnnnnnnnnnnnnnnn
a 3mmgyn lyg0s aamn
anm. sm ydgsoaogdm 3nmo3nno
6dmdgds - 86, f3nds, g6ns5mos 5
33mnnnn
6mmdsmy 3mmdoynb 30mnnn 30mnnn 366mnnn 366mnnn


- IMPORTANT - READ CAREFULLY AND
- KEEP FOR FUTURE!
- WARNING!
- NOTE
- SEATS IN THE VEHICLE
- ATTENTION!WARNINGS!
- INSTRUCTIONS FOR USING THE SECURITY SYSTEM
- WARNING! ELITE CHAIR MOUNTING BASE (R308) IS NOT PART OF THIS KIT AND MUST BE PURCHASED SEPARATELY!
- MAIN PARTS
- ADJUSTING THE HEIGHT OF THE HEADREST AND SHOULDER STRAPS
- WARNING! CHECK THAT THE HEADREST IS PROPERLY FIXED BY SLIDING IT SLIGHTLY DOWNWARD.
- TIGHTENING THE SHOULDER BELTS
- ADDITIONAL MAT
- SECURING THE CHILD IN THE CAR SEAT
- HANDLE ADJUSTMENT
- MOUNTING THE CANOPY
- SECURING THE CHILD IN THE CHAIR WITH THE 3-POINT SEAT BELT
- PREVENTION AND MAINTENANCE INSTRUCTIONS
- LOSLASSEN DER SCHULTERGURTE
- AVERTISSEMENTS!
- INSTRUCTIONS DE PREVENIRE $I INTREINERE
- 360606060606060606060606060606060606060606060606060606060606060606060606060606060606060606060606060606
- do0005660080
- 1.0s30uS qS abmnu UsasamJoo Uusomnu ammaos
- a55030u93m0n ab6mo 1
- abmnu damaonu amna3s
- 053680000b5c0b5
- 0330u 03a7am0s a6d60u U3Jmdm8
- Lb630mGnU m8ymmn
- 7.356m3nU qJam68j08
- 8330u 838m0ds u33md2mao 3-396d0560 930900
- 95 am3mou 06u@yD800
Brand : Chipolino
Model : Elite
Category : Stroller