JV53 - Vacuum Cleaner JIMMY - Free user manual and instructions
Find the device manual for free JV53 JIMMY in PDF.
Download the instructions for your Vacuum Cleaner in PDF format for free! Find your manual JV53 - JIMMY and take your electronic device back in hand. On this page are published all the documents necessary for the use of your device. JV53 by JIMMY.
USER MANUAL JV53 JIMMY
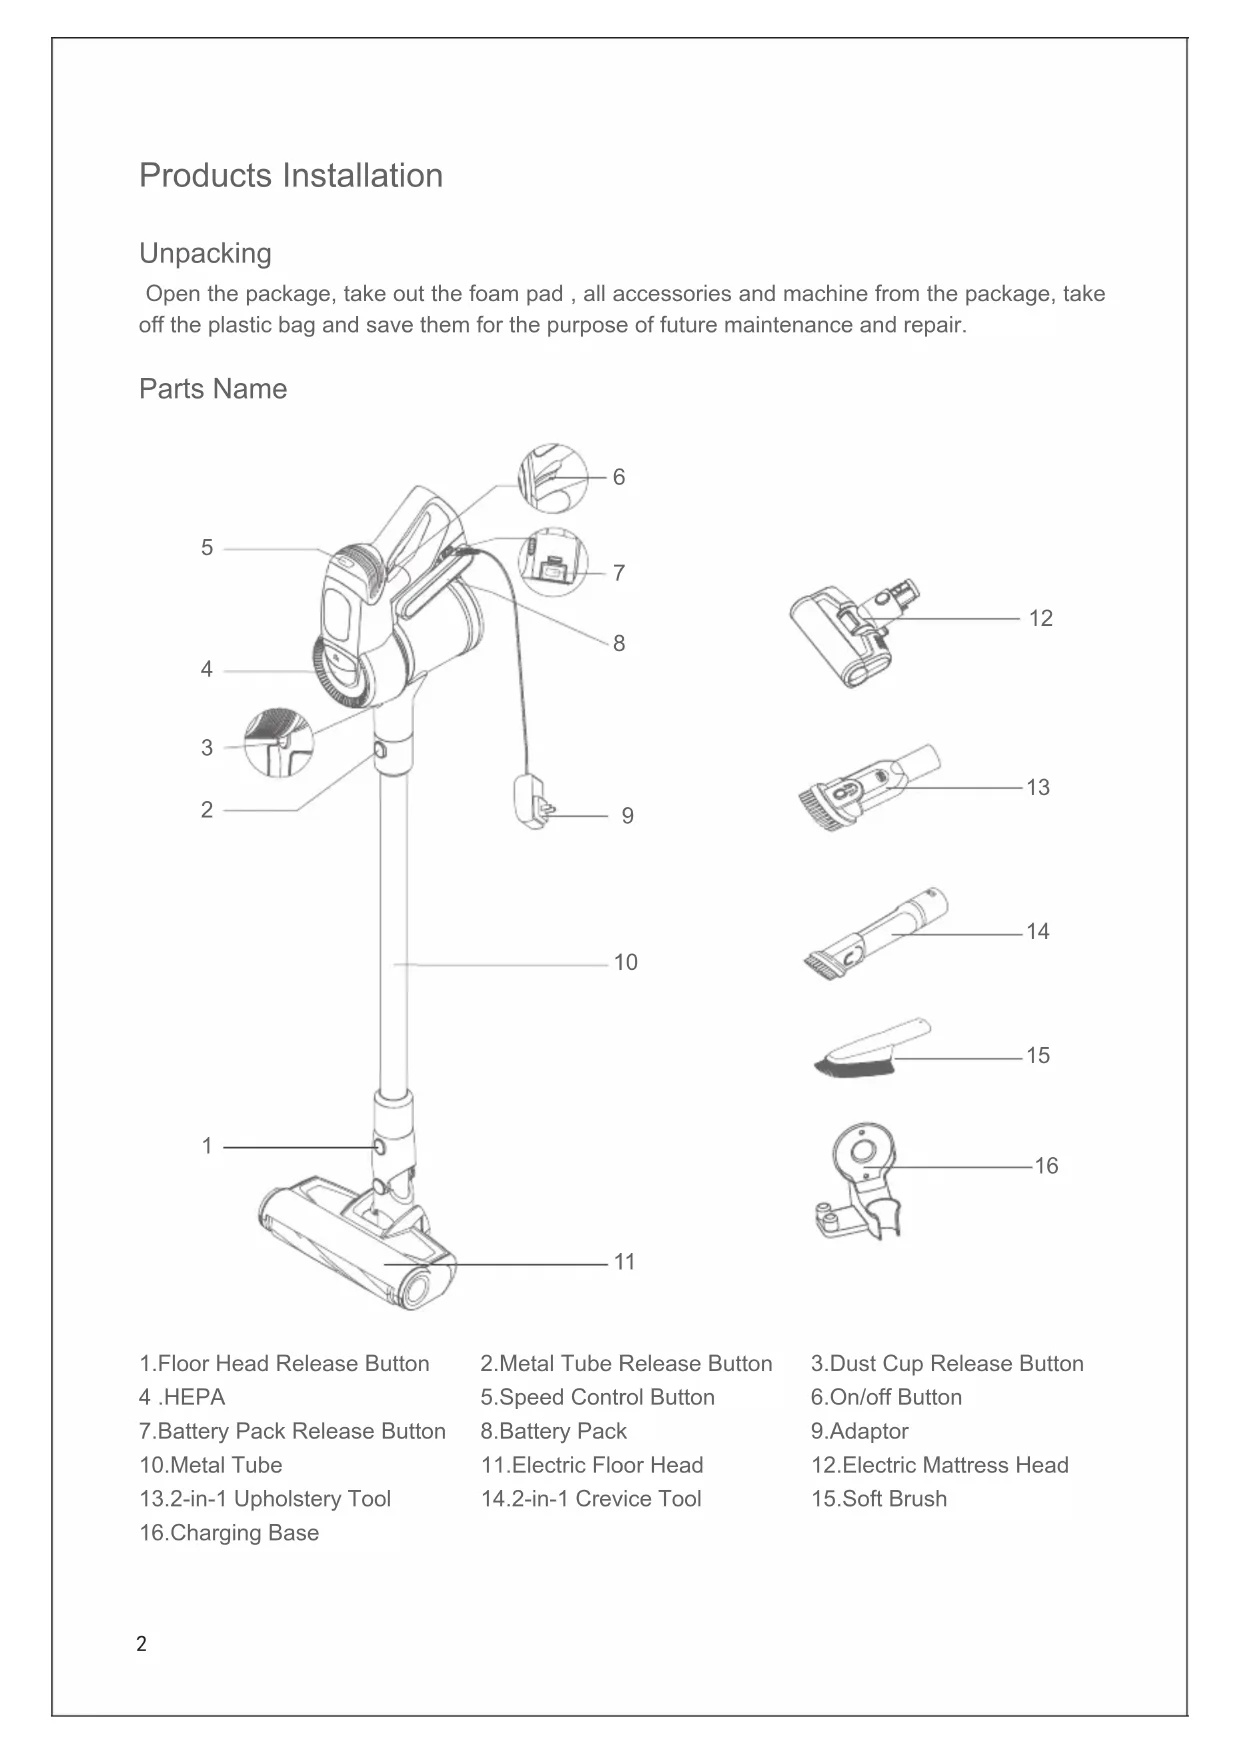
русский язык 57 Français 46 Italiano 35 Español 24 Deutsch 132 Products Installation Unpacking Open the package, take out the foam pad , all accessories and machine from the package, take off the plastic bag and save them for the purpose of future maintenance and repair. Parts Name 1.Floor Head Release Button 4 .HEPA 7.Battery Pack Release Button 10.Metal Tube 13.2-in-1 Upholstery Tool 16.Charging Base 2.Metal Tube Release Button 5.Speed Control Button 8.Battery Pack 11.Electric Floor Head 14.2-in-1 Crevice Tool 3.Dust Cup Release Button 6.On/off Button 9.Adaptor 12.Electric Mattress Head 15.Soft Brush
Packing List Main-body Assembly Connect the electric oor head with metal tube Hold the oor head with left hand, use right hand to insert the metal tube vertically into oor head, align with the conductive needle, press the handle until a “click” sound is heard.(Picture 1) Attention:Keep the handle and oor head in the same direction, conductive needle shall align with the socket. Charging base assembly Fix the charging base on wall through screw holes, so that the handheld vacuum cleaner can be placed.(Picture 2) Assemble battery pack and handheld vacuum Cleaner Battery pack assembly: use one hand to hold handheld vacuum cleaner, one hand to hold battery pack, align with the guide-track groove, then install the battery pack until the “click” sound is heard. Pull hard the battery pack downwards, if the batter pack remain tight, which means battery pack assembly complete. (Picture3) Attention:Please disassemble the battery pack from the machine when the vacuum cleaner is not used for a long time.Pack the machine and store in dry place, avoiding direct sunlight or humid environment.
Metal Tube Screw Holes Groove Battery Pack Guide Track Groove Charging Base Electric Floor Head Conductive
Part Name Handheld Vacuum Cleaner Battery Pack Electric Floor Head Electric Mattress Head 2-in-1 Upholstery Tool Quantity 1 1 1 1 1 2-in-1 crevice tool Soft Brush Charging Base Metal Tube Adaptor Instruction Manual
Main Body Metal Tube Electric Floor Head 2-in-1 Upholstery Tool 2-in-1 Upholstery Tool 2-in-1 Crevice Tool Charging Base Handheld Vacuum Conductive Needle Assemble the electric head oor, metal tube and handheld vacuum cleaner First, assemble the oor head and conductive metal tube based on the assembling method of electric oor head and conductive metal tube. Secondly, align the conductive needle of the conductive metal tube with the suction mouth conductive pipe, push upwards until a “click” sound is heard.(Picture4) Accessories Assembly For ease of use, this product is specially equipped with accessories for the hand-held vacuum cleaner. The handheld can connect to different tools for different cleaning purpose. Connect handheld vacuum cleaner with 2-in-1 upholstery tool Insert 2-in-1 upholstery tool connector into the handheld air inlet until it is tightly tted. (Picture5) Attention:The handheld vacuum cleaner can also connect the accessories such as: 2-in-1 crevice tool, soft brush and electric mattress head, the connecting method is the same as 2-in-1 upholstery tool. Connecting accessories with charging base Please x the charging base on a clean wall, do not x on the wet wall like in the kitchen. After the task has been competed, place them on the charging base.(Picture6&7)
Use of Vacuum Cleaner Charging Attention:When using the machine for the first time, the battery capacity is not full, need to put the machine on the charging base or take out the battery to charge. The machine is able to be used after the battery is charged fully.(Picture8-1&2) Charge the vacuum cleaner in time when battery power is insufcient; When the voltage is too low, to protect the battery, the vacuum will automatically turn off. At this time, the vacuum must be charged. During charging, the battery pack can be taken off, charge it through adaptor(Picture8-1), or place the machine onto the charging base(Picture8-1), and the charging indicator turns red. The vacuum cleaner is charging. Attention:When using the vacuum cleaner for the first time, fully charge the battery and fully discharge the battery before second charge to increase the battery life. JV53 Charging time is about 4-5 hours.When the charging indicator on the hand-held vacuum turns from red to green, it means the vacuum cleaner is fully charged. We recommend continue charging for half an hour to one hour, so that the charging effect is better. After charging, unplug the charger to stop charging.(Picture9) Use of Handheld Vacuum Cleaner Take the handheld vacuum from the charging base, press the on/off button to turn on and turn off the vacuum. Green indicator lights up, it is normal mode, press the speed control button to strong mode, the speed control button can switch between strong mode and normal mode easily. (Picture10)
“Red ” means charging “Green”means fully charged
8-1 8-2 Indicate Light Charging Base Charging Socket Indicate Light Speed Control Button On/off Button Adaptor Adaptor6 Use of Electric Floor Head Electric oorhead can clean short hair carpet, hardoor or tile oor.(Picture11) Attention:When the electric floorhead is running, if brushroll stops running due to big foreign object blockage or excessive fiber entangle, or the child accidentally putting hand into brushroll, the floorhead will stop working to protect personal safety and avoid damage to floorhead motor. Use of Accessories 2-in-1 upholstery tool: Suitable to clean dust mites on bed, sofa and other kinds of fabric furniture. (Picture12) 2-in-1 crevice tool: Suitable to clean crevices, corners and other narrow areas.(Picture13) Soft brush:Suitable to clean easily scratched furniture, such as book shelf, artworks. (Picture14) Electric mattress head: Specially designed for sofa and mattress, it can beat up and remove the dust mites and bacteria which hide in the sofa and mattress by apping of the brushroll. (Picture15) Cleaning and Replacing Parts Attention: 1.HEPA filter is available for sale from local vacuum cleaner distributors. 2.It is recommended to clean the dust cup after each use; When the dust cup is full or the HEPA filter is clogged, it needs to be cleaned and replaced if necessary. Floorhead brushroll might be entangled with hair after long time use, it needs to be cleaned in time to keep the vacuum working more efficiently. 11-211-1
Dust Cup on/ off7 Cleaning Dust Cup and Filtration System Clean dust cup Pull out downwards the dust cup On/ off button to dump dust in dust cup.(Picture 16) Press hard the dust cup release button, hold steady the main body with right hand, rotate the dust cup in the direction shown on the picture, remove the dust cup from main body to further clean the dust cup.(Picture17) Clean lter system Hold the main body, take the HEPA upwards as shown in the picture, take out the HEPA, then take out the dual-cyclonic system components, clean them. (Picture18) Fix inlet HEPA, rotate the HEPA cover in the same direction as shown in the picture, separate the HEPA cover from inlet HEPA, which will be easily cleaned. After cleaning and drying, assemble again.(Picture19&20) Attention:The inlet HEPA must be fully dried before installation. Cleaning Electric Brushroll 1.Use your nger to release the brushroll button, take out the side cover of the brushroll. 2.Take out one side of the brushroll in the same direction as shown on the picture, then brushrollcan be taken out to clean. 3.After cleaning and replacing, reassemble it.(Picture21)
Dust Cup Release HEPA Filter HEPA Cover Inlet HEPA Brushroll Release Button Brushroll Cover Dual-cyclonic System Components8 Storage of Vacuum Cleaner Disassemble electric oor head and metal tube When store or clean the vacuum cleaner, if you need to disassemble the electric oor head, press the electric oor head release button, pull upwards the metal tube. (Picture22) Unpack the Battery Pack Press the battery release button, take out the battery pack.Put the battery pack into a plastic bag, then place in a dry place.(Picture23) Disassemble the Handheld Vacuum Cleaner and Metal Tube Fix the handheld rst, press the release button of metal tube, pull out it.(Picture24) Machine Storage Take out the battery pack if the machine is not used for a long time. Store the machine in cool and dry place, avoiding direct sunlight or humid environment.
Metal Tube Electric Floor Head Release Button Battery Pack Release Button Handheld Vacuum Metal Tube Release Button Metal Tube9 Safety Notes This vacuum cleaner is designed for home use. Do not use it for commercial or other purposes. Please read this instruction manual carefully before use, properly save and store it for future use. Do not put the vacuum close to re or other high temperature facility. Do not use or store the machine under extreme bad conditions, for example, extreme temperature. It is recommended to use it indoors between the temperature of 5 °C to 40 °C. Store the machine in dry place and avoid direct sunlight. Fully charge the battery before rst use or after long storage. Before using the vacuum, make sure brushroll is assembled, otherwise, it may lead to motor fan blockage, causing motor burn out. Please do not use the vacuum to pick up detergent, oil, glass slag, needle, cigarette ash, wet dust, water, matches, etc. Please do not use the vacuum to pick up tiny particles such as cement,gypsum powder, wall powder, or large objects such as paper balls, otherwise it will cause malfunctions such as blockage and motor burnout. Avoid blockage to air inlet or brushroll, it may cause motor failure. Do not pour or splash water or other liquids into the machine to avoid short circuit to burn out the machine. If the brushroll is not working, please check whether the brushroll is entangled with hair or other long ber, clean it in time. When storing the machine for a long time, ensure that the battery is fully charged before storage and charge the machine at least every three months. Unplug the charger to clean or repair the machine. Hold the charger when plugging or unplugging it, and do not pull the charging cord. Use a dry cloth to clean the machine. Liquids like gasoline, alcohol, lacquer thinner will cause crack or colour fading and cannot be used. If the machine is not working after fully charged, it must be checked and repaired in our designated ofce, please do not dismantle the machine on your own.10 Symptoms Possible Causes Solutions Motor is not working Battery has no power Charge the vacuum cleaner Motor is not working Metal tube, electric oor had, battery pack is not assembled correctly to the mainbody Check the accessories are assembled correctly to the mainbody Low suction Dust cup is full Empty dust cup Low suction HEPA is blocked by dust Clean or replace HEPA Trouble Shooting Please check the following issues before sending to designated repair ofces. Attention:If any other failures occurred, which need professional tools, in order to avoid danger, the machine must be repaired or replaced by manufacturer, other maintenance offices or professionals from similar offices. When discard the machine, please press the button to release the battery pack, take out the battery pack, make sure the machine is disconnected with power and handled properly. Do not throw into re,water or soil. If the battery liquid leakage touches your skin or clothes, wash it with water, if there is any discomfort, please go to hospital immediately. Do not use non-original battery pack, avoiding machine damage and safety problems. Avoid to use the vacuum cleaner to pick up easily blockable things such as: plastic bags, candy paper, big scrap of paper, which might affect the function, even cause failure of working. Please clean the foreign matter on the oor head in time, then it will work normally. The discarded battery pack shall be recycled safely, do not throw away casually. Low suction Floor head hose or brushroll blocked Clean the oorhead Charging indicator did not turn red during charging Battery pack is not well assembled Reassemble battery pack Short run time after charging Battery not fully charged Follow instruction manual to fully charge the battery Short run time after charging Battery old aging Replace new battery11 Product Specication Technical Parameter Model No. JV53 Rated Voltage 21.6V Rated Power 425W Adaptor Input Voltage 100-240V
50/60Hz 0.5A Adaptor Output Voltage 25V 600mA Model No of Electric Floor Head T-EB110 Rated Power of Electric Floor Head 30W Model No of Electric Mattress Head T-CS6.0 Rated Power of Electric Mattress Head
Battery pack capacity 2500mAh Charging time 4h-5h Circuit Diagram Adaptor Battery Pack Lithium BatteryProtection PCBTransfer PCB 1 Transfer PCB 2Speed Control BoardOn/off Button Floor Head Motor Vacuum Cleaner Motor