
WQ9 M2L - Fridge WHIRLPOOL - Free user manual and instructions
Find the device manual for free WQ9 M2L WHIRLPOOL in PDF.
| Product type | French door refrigerator with convertible freezer compartment |
| Brand | Whirlpool |
| Model | WQ9 M2L |
| Power supply | 220-240 V, 10 A, 50-60 Hz |
| Climate class | SN (10°C to 32°C), N (16°C to 32°C), ST (16°C to 38°C), T (16°C to 43°C) |
| Refrigerant | R600a (isobutane) |
| Dimensions (H x W x D) | 179 x 91 x 73 cm (estimated) |
| Weight | Approximately 110 kg (estimated) |
| Main functions | 6th Sense, Fast cooling, Fast freezing, Pure Control, Convertible zone (wine, vegetables, meat/fish, freezing), LED lighting, Open door alarm, Vacation mode, Key lock |
| Storage compartments | Refrigerator (2 doors), Freezer (drawer), Convertible zone, Adjustable door bins, Adjustable shelves |
| Recommended cleaning | Soft cloth, warm soapy water with mild detergent. Avoid abrasive products, alcohol, acids |
| Safety | Grounding mandatory, do not use extension cord or adapter, risk of child entrapment - remove doors before disposal |
| Spare parts and repairability | Contact after-sales service or retailer for parts specified by the factory. Pure Control generator replaceable every 3 years |
| General information | Manual available in multiple languages, free download on notice-facile.com |
Frequently Asked Questions - WQ9 M2L WHIRLPOOL
User questions about WQ9 M2L WHIRLPOOL
0 question about this device. Answer the ones you know or ask your own.
Ask a new question about this device
Download the instructions for your Fridge in PDF format for free! Find your manual WQ9 M2L - WHIRLPOOL and take your electronic device back in hand. On this page are published all the documents necessary for the use of your device. WQ9 M2L by WHIRLPOOL.
USER MANUAL WQ9 M2L WHIRLPOOL
natural_image
Pure architectural line drawing of a two-story refrigerator with no text or symbolsEnglish REFRIGERATOR USER INSTRUCTIONS 3
Italiano ISTRUZIONI PER L'USO DEL FRIGORIFERO....29
Français INSTRUCTIONS D'UTILISATION DU RÉFRIGÉRATEUR 55
Proper Disposal of Your Old Refrigerator....8
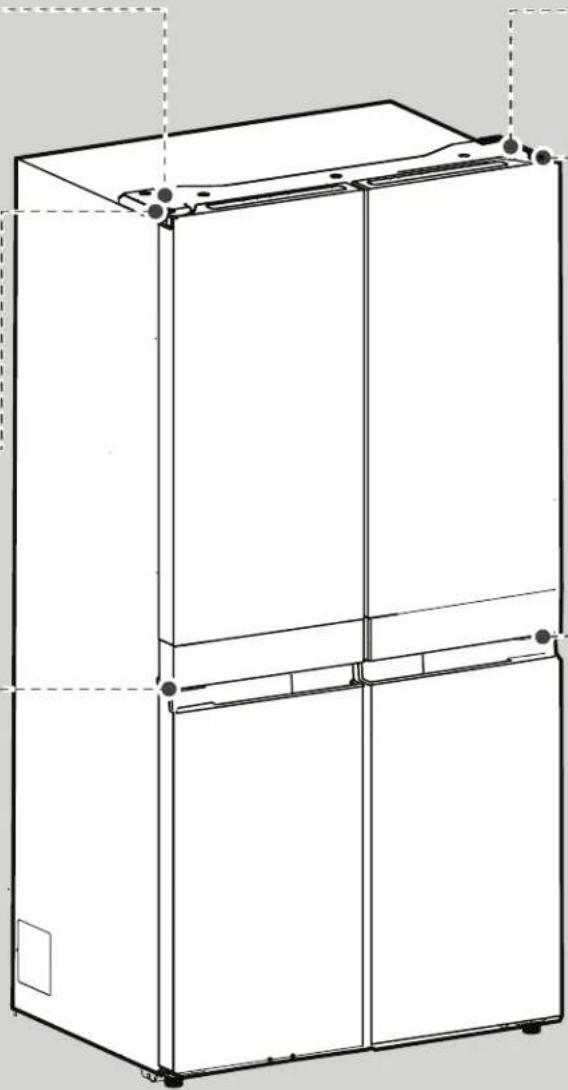
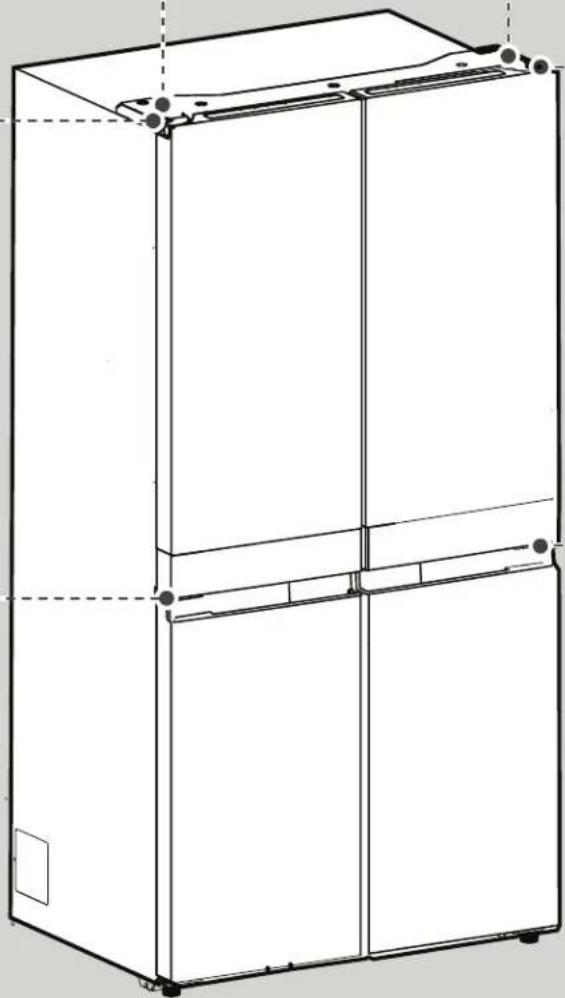
PARTS AND FEATURES 9
INSTALLATION INSTRUCTIONS....10
Getting Started....10
Unpack the Refrigerator 10
Location Requirements....11
Electrical Requirements....11
Remove and Replace Refrigerator Doors ....13
Remove and Replace Freezer/Flexi Freeze Door....15
Refrigerator Levelling....16
Water Supply Requirements....16
Connect the Water Supply....16
Using the Controls ....18
Lighting the Refrigerator....19
REFRIGERATOR USE ....20
Opening and Closing Doors 20
SHELVES, BINS AND DRAWERS....21
Freezer Storage Compartments....22
Audio Reference 22
Accessories....22
Cleaning 23
Lights....24
Holiday and Moving Care 24
TROUBLESHOOTING 25
REFRIGERATOR SAFETY
Your safety and the safety of others are very important.
We have provided many important safety messages in this manual and on your appliance. Always read and obey all safety messages.
This is the safety alert symbol.
This symbol alerts you to potential hazards that can kill or hurt you and others.
All safety messages will follow the safety alert symbol and either the word "DANGER" or "WARNING."
These words mean:
DANGER
You can be killed or seriously injured if you don't immediately follow instructions.
WARNING
You can be killed or seriously injured if you don't follow instructions.
All safety messages will tell you what the potential hazard is, tell you how to reduce the chance of injury, and tell you what can happen if the instructions are not followed.
SAFETY INSTRUCTIONS
IMPORTANT TO BE READ AND OBSERVED
Before using the appliance, read these safety instructions. Keep them nearby for future reference. These instructions and the appliance itself provide important safety warnings, to be observed at all times. The manufacturer declines any liability for failure to observe these safety instructions, for inappropriate use of the appliance or incorrect setting of controls.
⚠️ Very young children (0-3 years) should be kept away from the appliance. Young children (3-8 years) should be kept away from the appliance unless continuously supervised. Children from 8 years old and above and persons with reduced physical, sensory or mental capabilities or lack of experience and knowledge can use this appliance only if they are supervised or have been given instructions on safe use and understand the hazards involved. Children must not play with the appliance. Cleaning and user maintenance must not be carried out by children without supervision. Children aged from 3 to 8 years are allowed to load and unload refrigerating appliances.
PERMITTED USE
⚠️ CAUTION: The appliance is not intended to be operated by means of an external switching device, such as a timer, or separate remote controlled system.
This appliance is intended to be used in household and similar applications such as: staff kitchen areas in shops, offices and other working environments; farm houses; by clients in hotels, motels, bed & breakfast and other residential environments.
This appliance is not for professional use. Do not use the appliance outdoors.
The bulb used inside the appliance is specifically designed for domestic appliances and is not suitable for general room lighting within the home (EC Regulation 244/2009).
The appliance is designed for operation in places where the ambient temperature comes within the following ranges, according to the climatic class given on the rating plate. The appliance may not work properly if it is left for a long time at a temperature outside the specified range.
Climatic Class Amb. T. (°C)
SN: From 10 to 32 °C; N: From 16 to 32 °C
ST: From 16 to 38 °C; T: From 16 to 43 °C
This appliance does not contain CFCs. The refrigerant circuit contains R600a (HC). Appliances with Isobutane (R600a): isobutane is a natural gas without environmental impact, but is flammable. Therefore, make sure the refrigerant circuit pipes are not damaged, especially when emptying the refrigerant circuit.
⚠ WARNING: Do not damage the appliance refrigerant circuit pipes.
⚠ WARNING: Keep ventilation openings, in the appliance enclosure or in the built-in structure, clear of obstruction.
⚠ WARNING: Do not use mechanical, electric or chemical means other than those recommended by the Manufacturer to speed up the defrost process.
⚠ WARNING: Do not use or place electrical devices inside the appliance compartments if they are not of the type expressly authorised by the Manufacturer.
⚠ WARNING: Ice makers and/or water dispensers not directly connected to the water supply must be filled with potable water only.
⚠ WARNING: Automatic ice-makers and/or water dispensers must be connected to a water supply that delivers potable water only, with mains water pressure between 20 psi and 145 psi (1.4 bar and 10 bar).
⚠ Do not store explosive substances such as aerosol cans with a flammable propellant in this appliance.
⚠ Do not swallow the contents (non-toxic) of the ice packs (provided with some models). Do not eat ice cubes or ice lollies immediately after taking them out of the freezer since they may cause cold burns.
⚠ For products designed to use an air filter inside an accessible fan cover, the filter must always be in position when the refrigerator is in function.
⚠ Do not store glass containers with liquids in the freezer compartment since they may break. Do not obstruct the fan (if included) with food items. After placing the food check that the door of the compartments closes properly, especially the freezer door.
⚠️ Damaged gaskets must be replaced as soon as possible.
⚠ Use the refrigerator compartment only for storing fresh food and the freezer compartment only for storing frozen food, freezing fresh food and making ice cubes.
Avoid storing unwrapped food in direct contact with internal surfaces of the fresh food or freezer compartments. Appliances could have special compartments (Fresh Food Compartment, Zero Degree Box, etc.). Unless specified in the specific booklet of product, they can be removed, maintaining equivalent performances.
Warning: Risk of fire/flammable materials The most appropriate compartments of the appliance where specific types of food are to be stored, taking into account different temperature distribution in different compartments in the appliance, are as follows:
- Refrigerator compartment: Store tropical fruit,
cans, drinks, eggs, sauces, pickles, butter, jam, cheese, milk, dairy food, yoghurt. You may also store cold cuts, desserts, meat and fish, cheesecake, fresh pasta, sour cream, pudding and cream cheese.
Fruit & vegetable drawer at the bottom of the refrigerator compartment: Store vegetables and fruits (excluding tropical fruits).
Chiller compartment: Only store meat and fish in the coldest drawer
- Freezer compartment:
is suitable for freezing foodstuffs from ambient temperature and for storing frozen food as the temperature is evenly distributed throughout the entire compartment. Purchased frozen food has the storage expiration date stated on the packaging. This date takes into account the type of food being stored and therefore this date should be respected. Fresh food should be stored for the following time periods: 1-3 months for cheese, shellfish, ice cream, ham/sausage, milk, fresh liquids; 4 months for steak or chops (beef, lamb, pork); 6 months for butter or margarine, poultry (chicken, turkey); 8-12 months for fruits (except citrus), roast meat (beef, pork, lamb), vegetables. Expiration dates on the packaging of foods must be respected. To avoid food contamination, please observe the following:
- Opening the door for long periods can cause a significant increase of the temperature in the compartments of the appliance.
- Regularly clean surfaces that may come into contact with food and accessible drainage systems.
– Clean water tanks if they have not been used for 48 h; flush the water system connected to a water supply if water has not been drawn for 5 days.
- Store raw meat and fish in suitable containers in the refrigerator, so that it does not come into contact with or drip onto other food.
In the Flexi Freeze storage should be as followed:
+10°C: store wine
+4°C: store vegetables and fruits (excluding tropical fruits)
0°C: only store meat and fish
All set points below zero: store frozen foodstuff as for freezer cavity
– Two-star frozen food compartments are suitable for storing pre-frozen food, storing or making ice cream and ice cubes.
- Do not freeze fresh food in one, two or three-star compartments.
- If the refrigerating appliance is left empty for long periods, switch off, defrost, clean, dry, and leave the door open to prevent mould developing inside the appliance.
INSTALLATION
The appliance must be handled and installed by two or more persons - risk of injury. Use protective gloves to unpack and install - risk of cuts.
⚠️ Installation, including water supply (if any) and electrical connections, and repairs must be carried out by a qualified technician. Do not repair or replace any part of the appliance unless specifically stated in the user manual. Keep children away from the installation site.
After unpacking the appliance, make sure that it has not been damaged during transport. In the event of problems, contact the dealer or your nearest After-sales Service. Once installed, packaging waste (plastic, styrofoam parts etc.) must be stored out of reach of children - risk of suffocation. The appliance must be disconnected from the power supply before any installation operation - risk of electric shock. During installation, make sure the appliance does not damage the power cable - risk of fire or electric shock. Only activate the appliance when the installation has been completed.
⚠️ Be careful not to damage the floors (e.g. parquet) when moving the appliance. Install the appliance on a floor or support strong enough to take its weight and in a place suitable for its size and use. Make sure the appliance is not near a heat source and that the four feet are stable and resting on the floor, adjusting them as required, and check that the appliance is perfectly level using a spirit level. Wait at least two hours before switching the appliance on, to ensure that the refrigerant circuit is fully efficient.
⚠ WARNING: When positioning the appliance, ensure the supply cord is not trapped or damaged.
⚠ WARNING: To avoid a hazard due to instability, positioning or fixing of the appliance must be done in accordance with the manufacturer instructions. It is forbidden to place the refrigerator in such way that the metal hose of gas stove, metal gas or water pipes, or electrical wires are in contact with the refrigerator back wall (condenser coil).
⚠ To guarantee adequate ventilation, leave a space on both sides and above the appliance. The distance between the rear of the appliance and the wall behind the appliance should be 50mm, to avoid access to hot surfaces. A reduction of this space will increase the Energy consumption of product.
⚠️ If it is necessary to replace the doors, please contact the Technical Assistance Center.
⚠ An 'Approved' single check valve or some other no less effective backflow prevention device providing backflow prevention protection to at least fluid category two shall be fitted at the point of connection(s) between the water supply and the fitting or appliance."
ELECTRICAL WARNINGS
⚠ It must be possible to disconnect the appliance from the power supply by unplugging it if plug is accessible, or by a multi-pole switch installed upstream of the socket in accordance with the wiring rules and the appliance must be earthed in conformity with national electrical safety standards.
⚠ Do not use extension leads, multiple sockets or adapters. The electrical components must not be accessible to the user after installation. Do not use the appliance when you are wet or barefoot. Do not operate this appliance if it has a damaged power cable or plug, if it is not working properly, or if it has been damaged or dropped.
If the supply cord is damaged, it must be replaced with an identical one by the manufacturer, its service agent or similarly qualified persons in order to avoid a hazard - risk of electric shock.
⚠ WARNING: Do not locate multiple portable socket-outlets or portable power supplies at the rear of the appliance.
CLEANING AND MAINTENANCE
⚠ WARNING: Ensure that the appliance is switched off and disconnected from the power supply before performing any maintenance operation; never use steam cleaning equipment - risk of electric shock.
⚠ Do not use abrasive or harsh cleaners such as window sprays, scouring cleansers, flammable fluids, cleaning waxes, concentrated detergents, bleaches or cleansers containing petroleum products on plastic parts, interior and door liners or gaskets. Do not use paper towels, scouring pads, or other harsh cleaning tools.
DISPOSAL OF PACKAGING MATERIALS
The packaging material is 100% recyclable and is marked with the recycle symbol 🌐
The various parts of the packaging must therefore be disposed of responsibly and in full compliance with local authority regulations governing waste disposal.
ENERGY SAVING TIPS
Install the appliance in a dry, well ventilated room far away from any heat source (eg. radiator, cooker, etc.) and in a place not exposed directly to the sun. If required, use an insulating plate.
To guarantee adequate ventilation follow installation instructions. Insufficient ventilation at the back of the product increases energy consumption and decreases cooling efficiency.
Frequent door opening might cause an increase in Energy Consumption. The internal temperature of the appliance and the Energy Consumption may be affected also by the ambient temperature, as well as location of the appliance. Temperature setting should take into consideration these factors.
Reduce door opening to a minimum.
When thawing frozen food, place in the refrigerator. The low temperature of the frozen products cools the food in the refrigerator. Allow warm food and drinks to cool down before placing in the appliance.
Positioning of the shelves in the refrigerator has no impact on the efficient usage of energy. Food should be placed on the shelves in such way to ensure proper air circulation (food should not touch each other and distance between food and rear wall should be kept).
You can increase storage capacity of frozen food by removing baskets and, if present, Stop Frost shelf.
Do not worry about noises coming from the compressor which are described as normal noises in this product's Quick Guide.
Proper Disposal of Your Old Refrigerator
DANGER : Risk of child entrapment. Before You Throw Away Your Old Refrigerator or Freezer:
■Take off the doors.
■ Leave the shelves in place so that children cannot easily climb inside.
WARNING
Suffocation Hazard
Remove doors from your old refrigerator.
Failure to do so can result in death or brain damage.
IMPORTANT: Child entrapment and suffocation are not problems of the past. Scrapped or abandoned refrigerators are still dangerous—even if they will sit for “just a few days.” If you are getting rid of your old refrigerator, please follow these instructions to help avoid accidents.
Important information to know about disposal of refrigerants:
Dispose of refrigerator in accordance with Federal and Local regulations. Refrigerants must be evacuated by a licensed, EPA certified refrigerant technician in accordance with established procedures.
natural_image
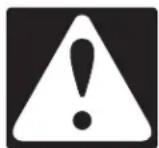
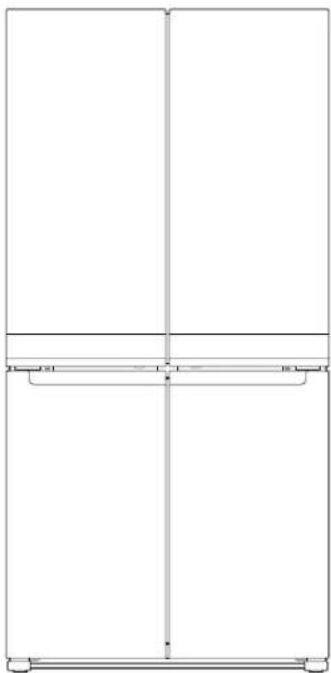
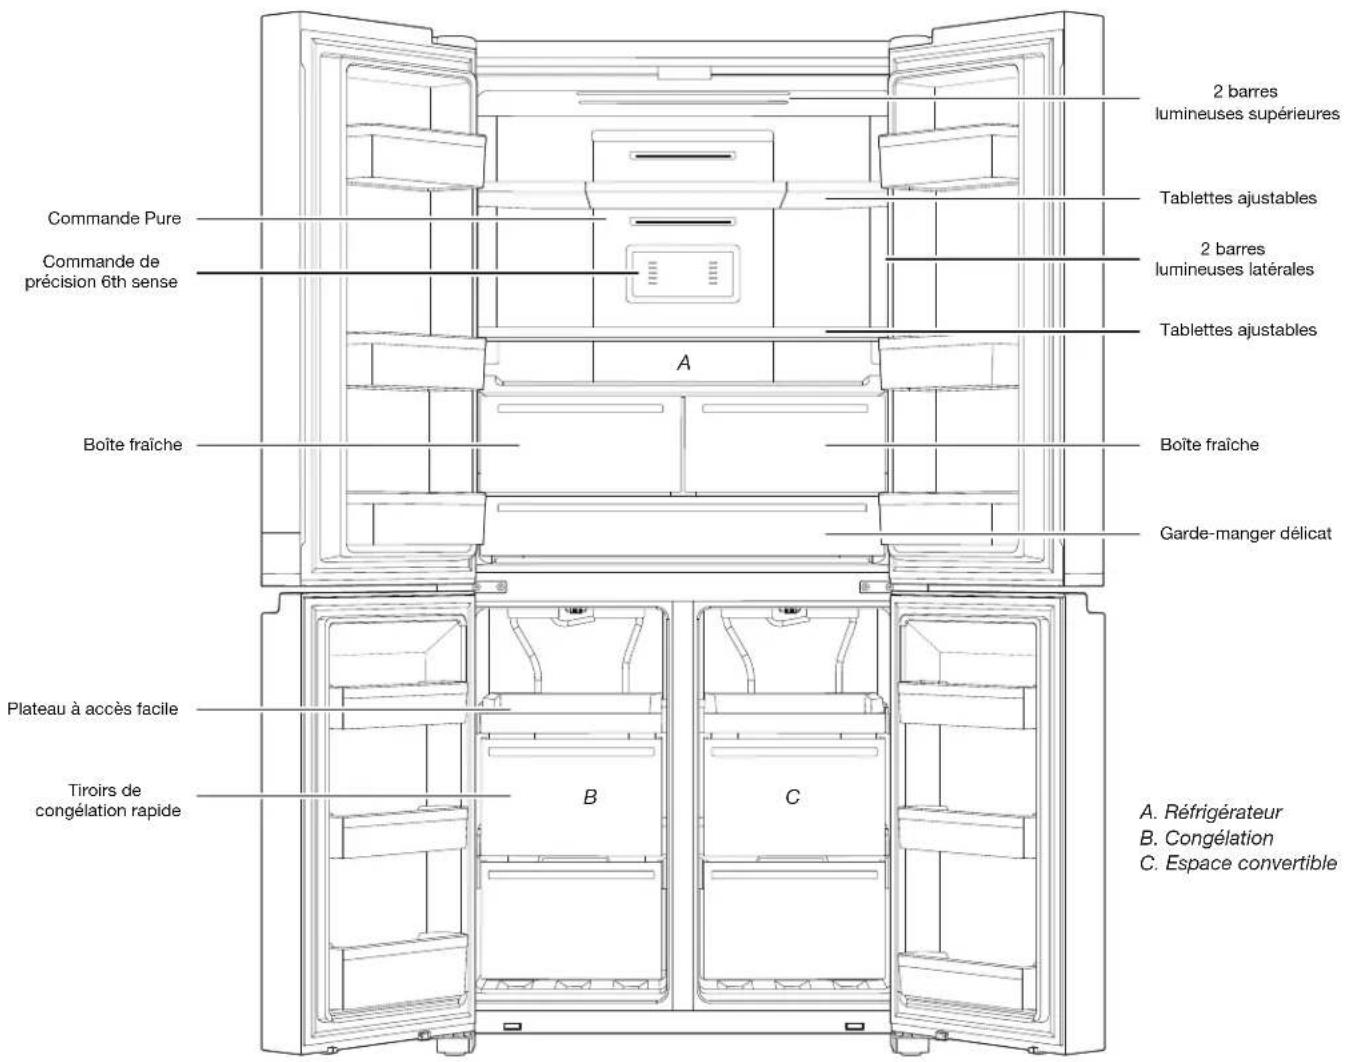
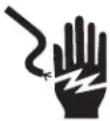
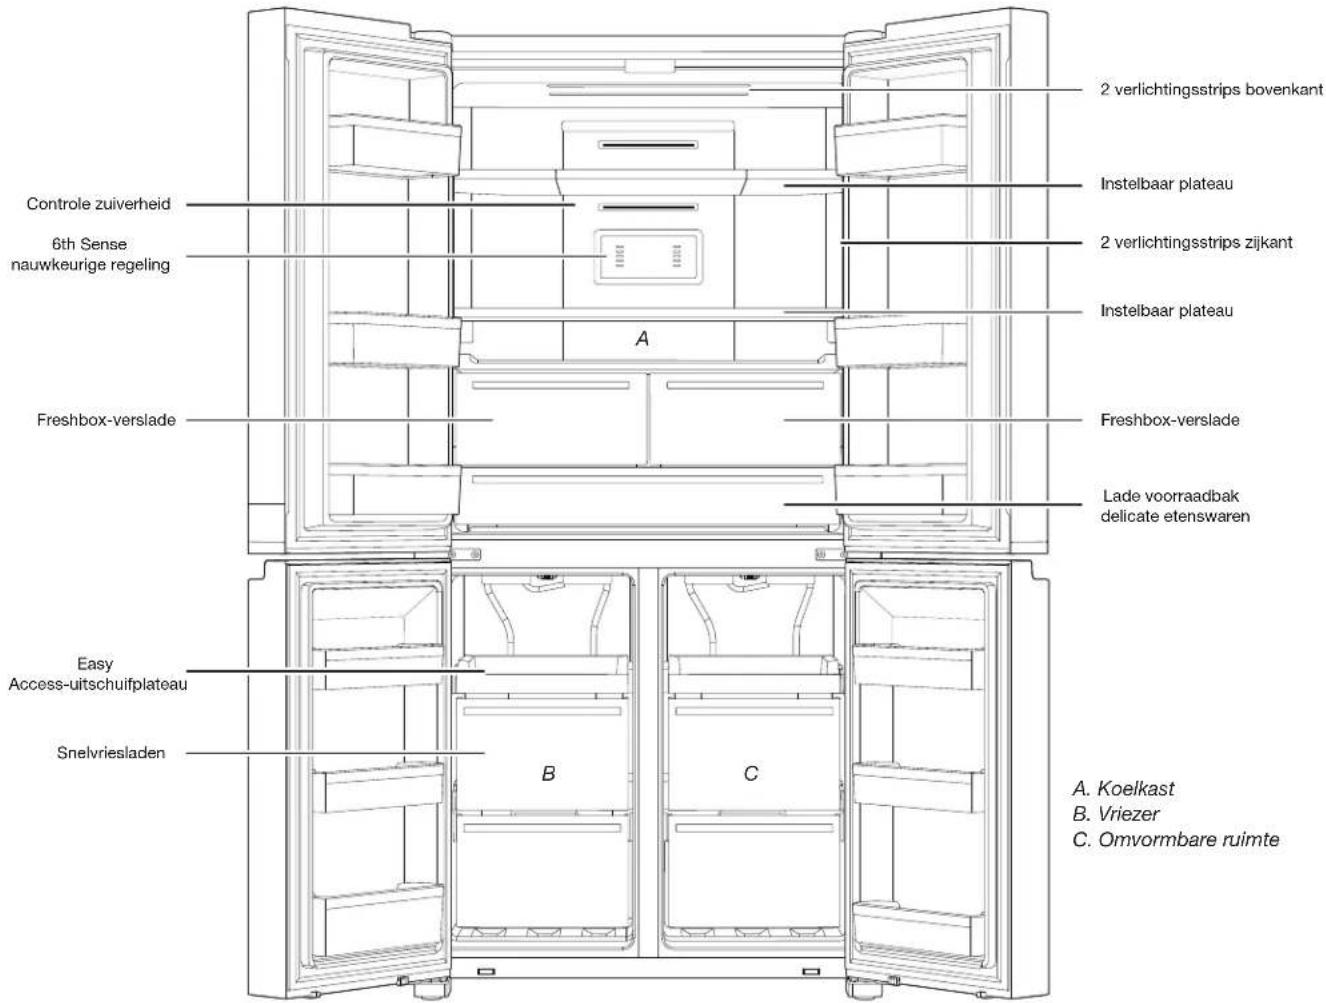
Line drawing of a refrigerator with multiple doors placed beside it (no text or symbols)PARTS AND FEATURES
natural_image
Pure technical line drawing of a rectangular frame with vertical and horizontal cutouts (no text or symbols)Storage Capacity:
Please check the rating label in the back of the product.
This feature minimizes moisture migration in the frozen food and reduces the freezer burn occurrence.
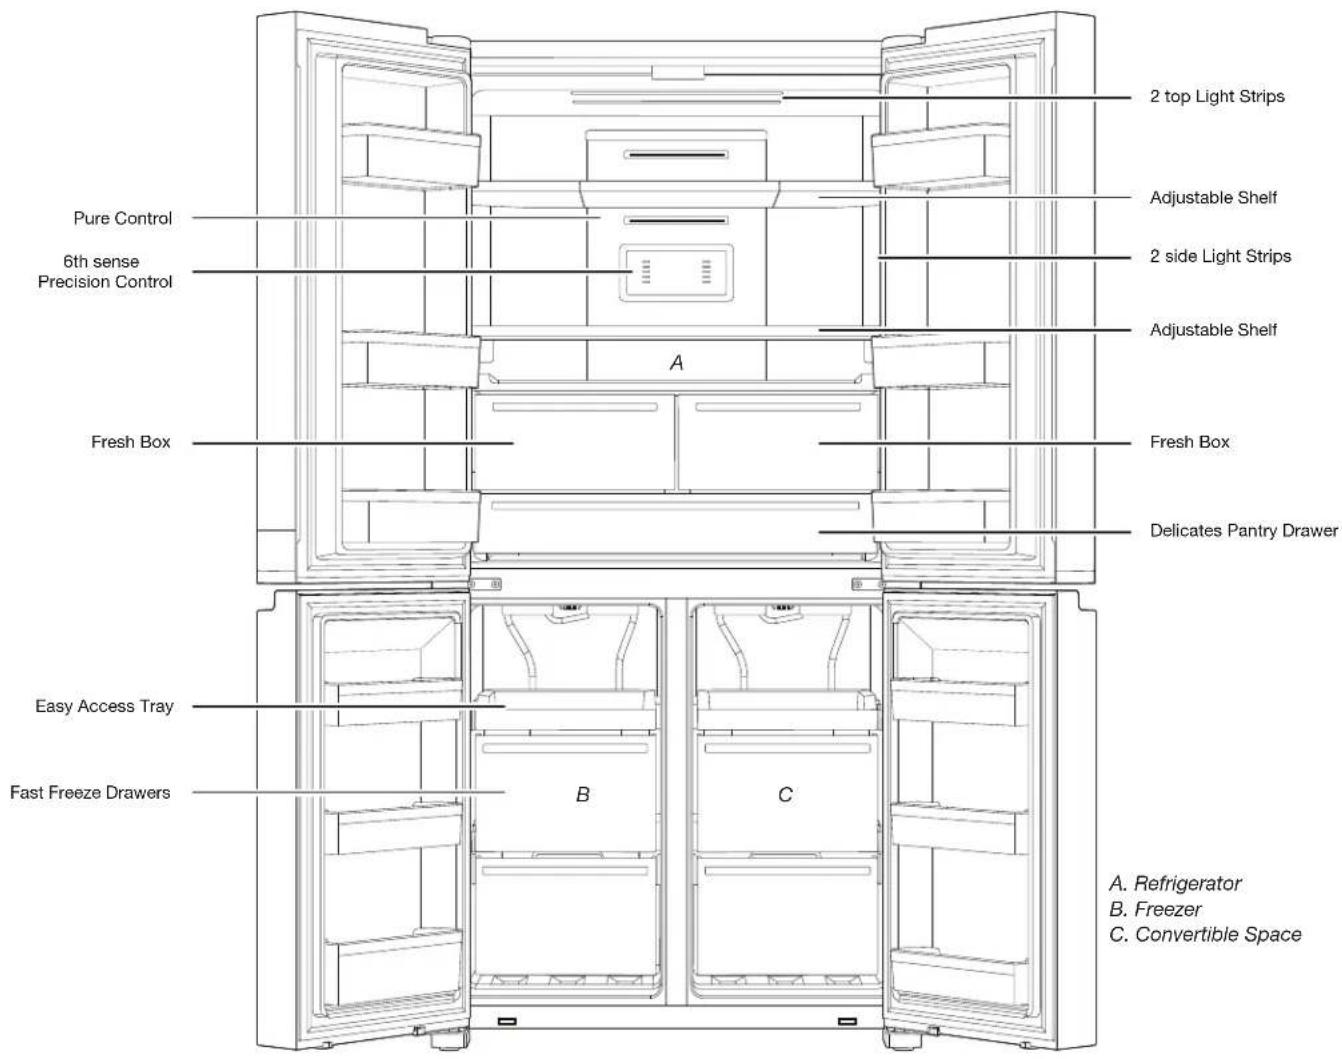
Delicates Pantry Drawers
To store things like meat, deli items, and drinks to keep in their ideal cooling environment.
Panoramic LED lighting
Multiple strips of LED lights inside the refrigerator compartment, freezer compartment, and interior drawers minimize shadows and evenly distribute light throughout the refrigerator.
Convertible Space
Switch from freezer to fridge in one touch by selecting among the 6+ preset temperatures and create the space you want according to your evolving needs.
Pure control
Hygiene, with innovative device releasing ozone to reduce odours and prevent the proliferation of bacteria inside the cabinet, improving the air quality for a better environment.
INSTALLATION INSTRUCTIONS
Getting Started
INSTALLATION CHECKLIST
√ Electrical Power
WARNING

Electrical Shock Hazard
Plug into a grounded 3 prong outlet.
Do not remove ground prong.
Do not use an adapter.
Do not use an extension cord.
Failure to follow these instructions can result in death, fire, or electrical shock.
■ Plug refrigerator into a earthed socket.
√ Doors
If doors need to be removed during installation, see the "Remove and Replace Refrigerator Doors" and "Remove and Replace Freezer Door Fronts" sections.
■ Doors seal completely.
■ Refrigerator is level. Adjust leveling feet so they are snug against the floor.
■ Doors are even across the top. (Use door alignment feature if necessary).
√ Final Checks
■ Remove all shipping material.
■ Set temperature controls to the recommended setting.
■ Save instructions and other literature.
In order to receive a more complete assistance, please register your product on www.whirlpool.com.
Unpack the Refrigerator
WARNING
Excessive Weight Hazard
Use two or more people to move and install refrigerator.
Failure to do so can result in back or other injury.
Refrigerator Delivery
A minimum door opening of 838 mm (33") is required. If door opening is 914 mm (36") or less, then removal of doors, drawer and hinges is required.
Cart the refrigerator from the side for all door openings.
When Moving Your Refrigerator:
Your refrigerator is heavy. When moving the refrigerator for cleaning or service, be sure to cover the floor with cardboard or hardboard to avoid floor damage. Always pull the refrigerator straight out when moving it. Do not wiggle or "walk" the refrigerator when trying to move it, as floor damage could occur.
Remove the Packaging
■ Remove tape and glue residues from surfaces before turning on the refrigerator. Rub a small amount of liquid dish detergent over the adhesive with your fingers. Wipe with warm water and dry.
■ Do not use sharp instruments, rubbing alcohol, flammable fluids, or abrasive cleaners to remove tape or glue. These products can damage the surface of your refrigerator.
■ Dispose of/recycle all packaging materials.
Clean Before Using
After you remove all of the packaging materials, clean inside of your refrigerator before using it. See cleaning instructions in the "Refrigerator Care" section.
Important information to know about glass shelves and covers:
Do not clean glass shelves or covers with warm water when they are cold. Shelves and covers may break if exposed to sudden temperature changes or impact, such as bumping. Tempered glass is designed to shatter into many small, pebble-size pieces. This is normal. Glass shelves and covers are heavy. Use both hands when removing them to avoid dropping.
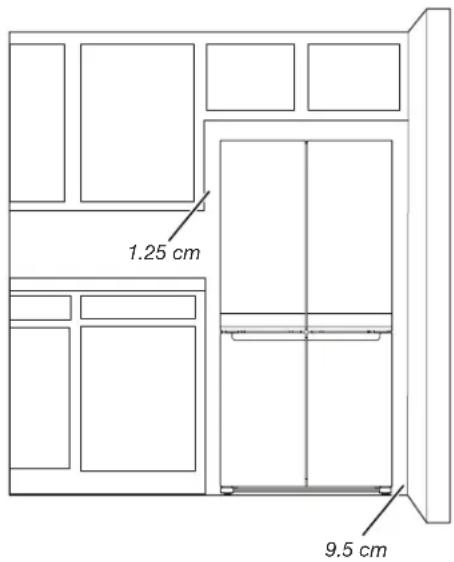
Location Requirements
WARNING
Explosion Hazard
Keep flammable materials and vapors, such as gasoline, away from refrigerator.
Failure to do so can result in death, explosion, or fire.
To ensure proper ventilation for your refrigerator, allow for a 1.25 cm space on each side and at the top. Allow for a 5 cm space behind the refrigerator. If your refrigerator has an ice maker, allow extra space at the back for the water line connections. When installing your refrigerator next to a fixed wall, leave a 9.5 cm minimum space between the refrigerator and wall to allow the door to swing open.
NOTE: This refrigerator is intended for use in a location where the temperature ranges from a minimum of 10^ C to a maximum of 43^ C. The preferred room temperature range for optimum performance, which reduces electricity usage and provides superior cooling, is between 15^ C and 32^ C. It is recommended that you do not install the refrigerator near a heat source, such as an oven or radiator.
Electrical Requirements
WARNING

Electrical Shock Hazard
Plug into a grounded 3 prong outlet.
Do not remove ground prong.
Do not use an adapter.
Do not use an extension cord.
Failure to follow these instructions can result in death, fire, or electrical shock.
IMPORTANT: Installation and electrical connection must be carried out by a qualified technician according to the manufacturer's instructions and in compliance with the local safety regulations.
■ The refrigerator is designed to operate on a separate 220-240 V, 10 A, 50-60 Hz circuit.
■ Make sure the voltage specified on the rating plate corresponds to that of your home.
It must be possible to disconnect the appliance from the power supply by unplugging it or by means of a main two pole switch installed upstream of the socket.
If the supply cord is damaged, it must be replaced by the manufacturer, its service agent or similarly qualified persons in order to avoid a hazard.
Before you move your refrigerator into its final location, it is important to make sure you have the proper electrical connection:
Recommended Earthing Method
220-240 V 50 Hz, 220 V 60 Hz, or 230/240 V 50 Hz AC only 10 A fused and earthed electrical supply is required.
[Non-Text]
Type B
[NO TEXT]
Type E and F

Type N
0
Type I

Type M
Type G
For Australia and New Zealand:
Your new appliance has been especially manufactured to meet all Australian Standards and Conditions.
Some notations in the installation instructions may refer to electrical requirements in other countries, so we draw your particular attention to these specific notes.
Your appliance needs to be plugged into a 230/240 V 50 Hz AC only 10 A earthed socket.
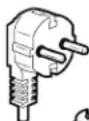
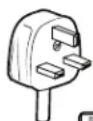
Electrical Requirements (Great Britain and Ireland only)
IMPORTANT: This refrigerator must be earthed.
Fuse Replacement
If the main lead of this refrigerator is fitted with a BS1363A, 13 A fused plug, to replace a fuse in this type plug use an A.S.T.A. approved fuse to BS 1362 type and proceed as follows:
- Remove the fuse cover (A) and fuse (B).
- Fit replacement 13 A fuse into the fuse cover.
- Reinsert both the fuse and its cover into the plug.
IMPORTANT: The fuse cover must be refitted when changing a fuse. If fuse cover is lost, the plug must not be used until a correct replacement cover is fitted. A correct replacement is identified by the colour insert or colour "word" embossed on the base of the plug. Replacement fuse covers are available at your local electrical shop.
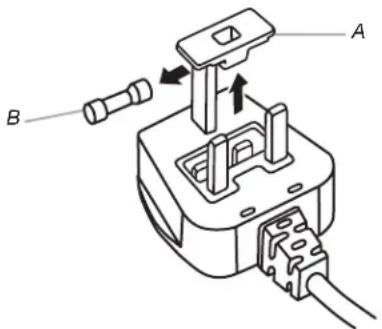
A. Fuse cover
B. Fuse
For the Republic of Ireland (only):
The information given in respect of Great Britain will frequently apply, but a third type of plug and socket is also used, the 2-pin, side earth type.
Socket/Plug (valid for both countries):
If the fitted plug is not suitable for your socket, please contact After-sales Service for further instruction. Please do not attempt to change the plug yourself. This procedure needs to be carried out by a qualified technician in compliance with the manufacturer's instructions and current standard safety regulations.
Temperature
This refrigerator is designed for operation in places where the temperature comes within the following ranges, according to climatic class shown on the rating plate. The refrigerator may not work properly if it is left for a long time at a temperature outside the specified range.
NOTE: It is recommended that you do not install the refrigerator near a heat source, such as an oven or radiator.
| Climatic Class Amb. T. (°C) Amb. T. (°F) | |
| SN From 10 to 32 From 50 to 90 | |
| N From 16 to 32 From 61 to 90 | |
| ST From 16 to 38 From 61 to 100 | |
| T From 16 to 43 From 61 to 110 |
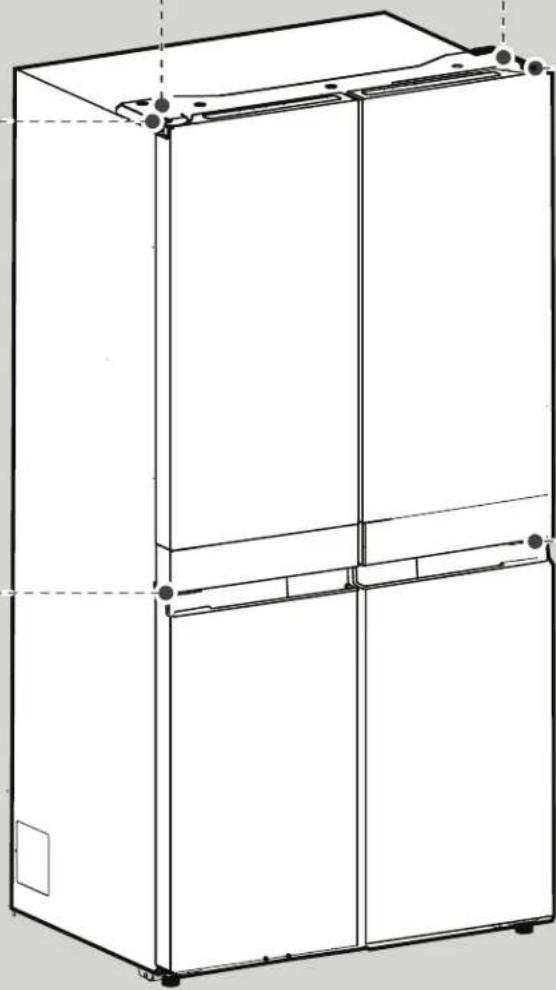
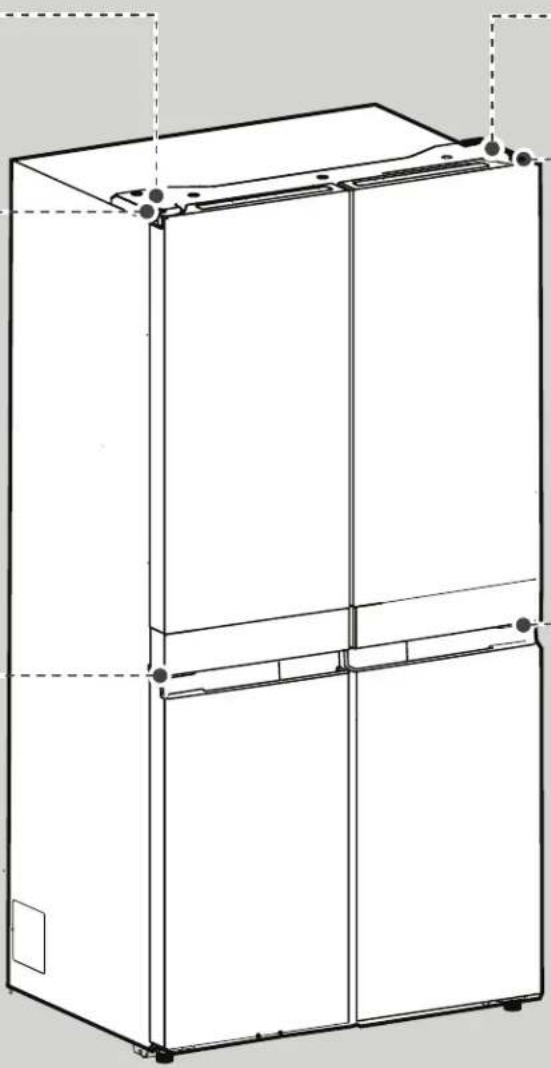
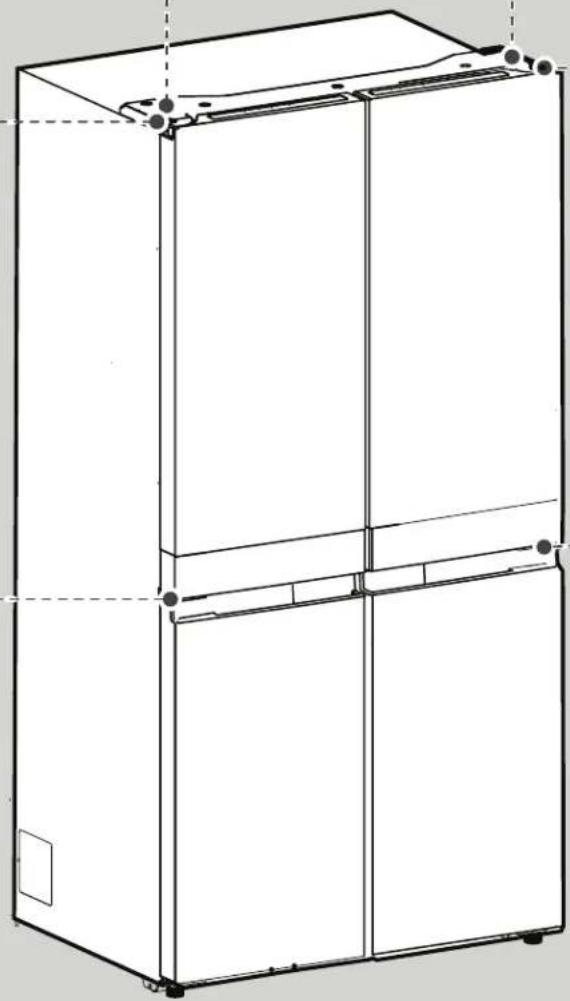
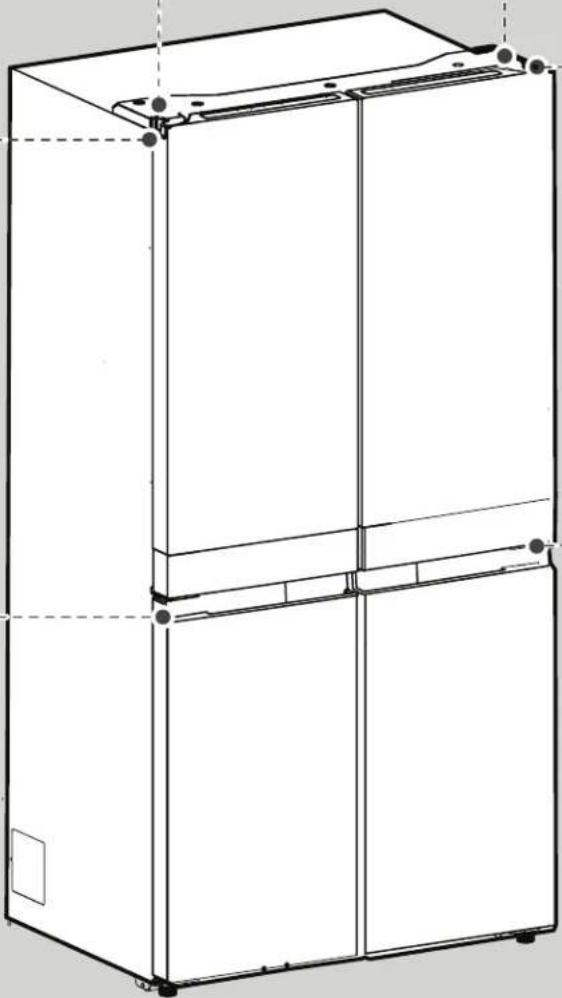
Remove and Replace Refrigerator Doors
NOTE: Measure the width of your door opening to see whether or not you need to remove refrigerator doors to move refrigerator into your home. If door removal is necessary, see the following instructions.
IMPORTANT: If refrigerator was previously installed and you are moving it out of the home, turn refrigerator control off before you begin removing the doors. Unplug refrigerator or disconnect power. Remove food and adjustable door or utility bins from doors.
Gather required tools and read all instructions before removing doors.
TOOLS NEEDED: 6 mm socket wrench, 5 mm socket wrench and #2 Phillips screwdriver.
WARNING
Electrical Shock Hazard
Disconnect power before removing doors.
Failure to do so can result in death or electrical shock.
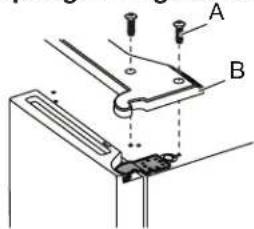
Top Left Hinge Cover
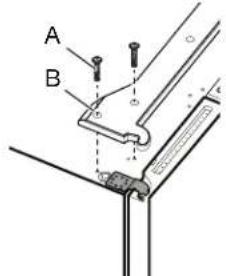
A. Top Hinge Cover screws
B. Top Hinge Cover
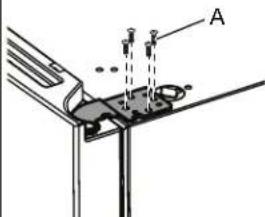
Top Left Hinge
A. 5 mm socket screws
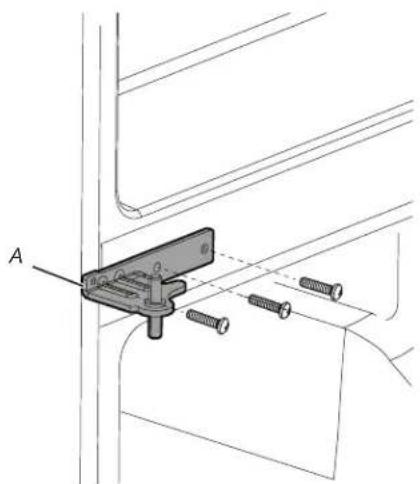
Middle Left Hinge
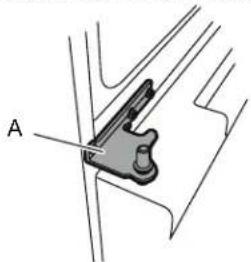
natural_image
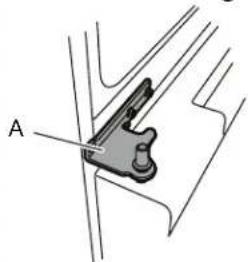
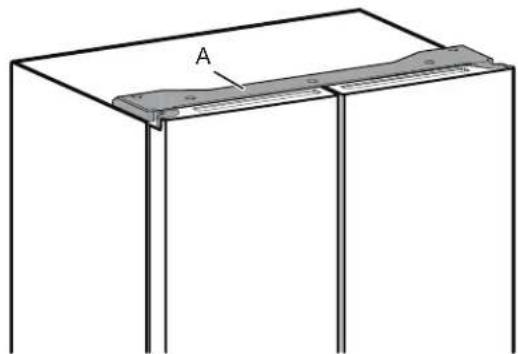
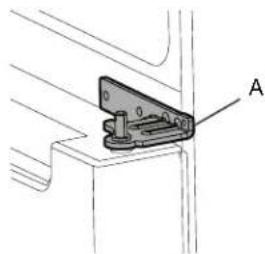
Mechanical assembly diagram showing a clamp or bracket with labeled point A (no text or symbols beyond label)A. Hinge
natural_image
Line drawing of a multi-tiered refrigerator cabinet (no text or labels)Top Right Hinge Cover
A. Top Hinge Cover screws B. Top Hinge Cover
Top Right Hinge
natural_image
Technical diagram of a mechanical assembly with labeled component A (no text or symbols present)A. 5 mm socket screws
Middle Right Hinge

natural_image
Technical line drawing of a mechanical clamp or bracket component (no text or symbols)A. Hinge
WARNING
Excessive Weight Hazard
Use two or more people to lift the refrigerator door.
Failure to do so can result in back or other injury.
Remove Refrigerator Doors
WARNING
Electrical Shock Hazard
Disconnect power before removing doors.
Failure to do so can result in death or electrical shock.
Remove Right-Hand Door
- Unplug refrigerator or disconnect power.
- Keep refrigerator doors closed until you are ready to lift them free from the cabinet.
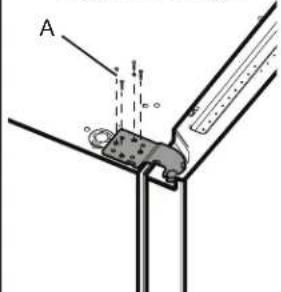
NOTE: Provide additional support for refrigerator door while the hinges are being removed. Do not depend on the door gasket magnets to hold the door in place while you are working. - Using a Phillips screwdriver, remove cover from top hinge.
- Using 5 mm socket wrench, remove four screws from top hinge and set aside.
A. Top hinge cover screw
B. Top hinge cover
C. 5 mm socket screws
D. Top hinge
- Lift refrigerator door from the middle hinge pin. The top hinge will come away with the door.
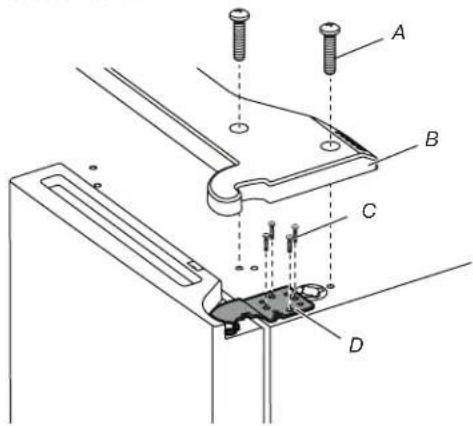
Remove Left-Hand Door
IMPORTANT: The wiring for UI run through left-hand door hinge, so they must be disconnected before removing the door.
- Using a Phillips screwdriver, remove cover from top hinge.
A. Top hinge cover screw
B. Top hinge cover
- Disconnect two wiring plugs located on top of the door hinge.
■ Grasp each side of wiring plugs. With your left thumb, press down to release the catch and pull the sections of the plugs apart.
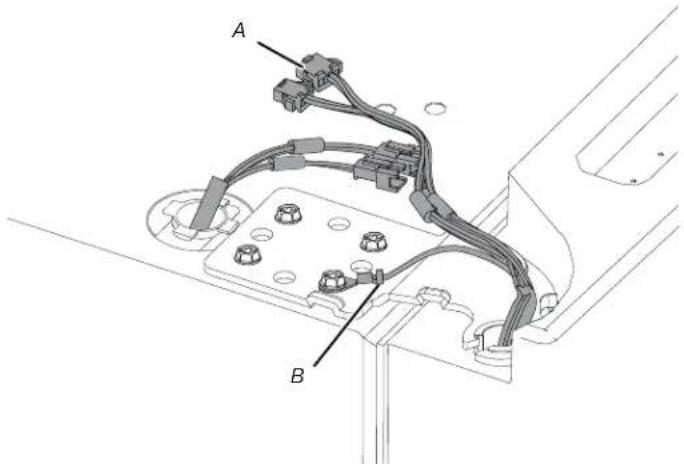
A. Wiring Plug
B. Ground (earth) connector
- Using 5 mm socket wrench, remove four internal screws from top hinge and set aside.
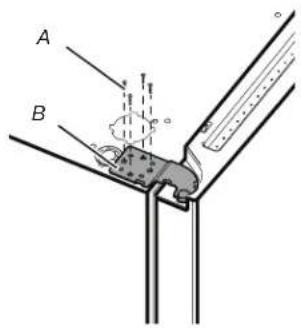
A. 5 mm socket screws
B. Top Hinge
NOTE: Provide additional support for refrigerator door while hinges are being removed. Do not depend on the door gasket magnets to hold the door in place while you are working.
- Lift refrigerator door from bottom hinge pin. The top hinge will come away with door.
NOTE: It may not be necessary to remove bottom hinges and brake feet assemblies to move the refrigerator through a doorway.
■ Only if necessary, use 6 mm socket wrench and #2 Phillips screwdriver to remove middle hinge.
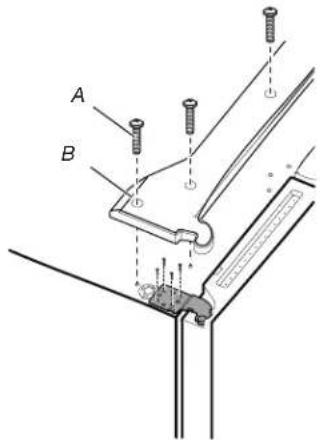
Replace Right-Hand Refrigerator Door
- Set right-hand door onto middle hinge pin.
- Insert top hinge pin into open hole in top of refrigerator door.
- Using four 5 mm socket screws, fasten hinge to cabinet. Do not tighten screws completely.
Replace Left-Hand Refrigerator Door
- Set left-hand door onto middle hinge pin.
- Using four 5 mm socket screws, fasten hinge to cabinet. Do not tighten screws completely.
- Reconnect electrical wiring.
■ Push together two sections of wiring plug.
■ Reconnect earth wire to hinge screw.
Final Steps
- Completely tighten eight 5 mm socket screws.
- Replace top hinge covers.
Remove and Replace Freezer/Flexi Freeze Door
- Keep freezer doors closed until you are ready to lift them free from cabinet.
NOTE: Provide additional support for freezer door while hinges are being removed. Do not depend on door gasket magnets to hold door in place while you are working.
■ Using a #2 Phillips screwdriver and 6 mm socket wrench to remove middle hinge from cabinet.
natural_image
Technical line drawing of a mechanical clamp or bracket assembly with screws and a labeled component (no text or symbols present)A. Middle hinge
■ Lift freezer door from the bottom hinge pin.

natural_image
Line drawing of a refrigerator interior showing door, front panel, and side door with labeled component A (no text or symbols beyond label)A. Bottom hinge
Final Steps
WARNING
Electrical Shock Hazard
Plug into a grounded 3 prong outlet.
Do not remove ground prong.
Do not use an adapter.
Do not use an extension cord.
Failure to follow these instructions can result in death, fire, or electrical shock.
- Plug into an grounded (earthed) socket.
- Return all removable parts and food to the drawers.
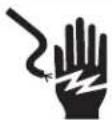
Refrigerator Levelling
- Move refrigerator to its final location.
- Using hand, rotate the brake feet. Turn them counterclockwise until the rollers are off the floor and both brake feet are snug against the floor. This keeps refrigerator from rolling forward when opening the doors.
natural_image
Technical line drawing of a mechanical assembly with a central component and labeled point A (no text or symbols beyond label)A. Brake feet
IMPORTANT: If you need to make further adjustments involving brake feet, you must turn both brake feet same amount to keep the refrigerator level.
- Use a level to make sure refrigerator is level from side to side and front to back.
Replace and Install the Pure Control
It is recommended to replace the Pure Control every 3 years as the ozone generate degrades over time, reducing its impact on food preservation. At the beginning of life, it generates an average of 0.06 ppm.
To order and replace the Pure Control, please contact us. See the "Accessories" section for information on ordering.
Accessories
To order accessories, contact the dealer from whom you purchased your refrigerator.
Assistance or Service
Before calling for assistance or service, please check the "Troubleshooting" section. It may save you the cost of a service call. If you still need help, follow the instructions below.
If you need replacement parts
To locate factory-specified replacement parts in your area, contact the dealer from whom you purchased your refrigerator.
Warranty
Contact the dealer from whom you purchased refrigerator for warranty information.
Keep this book and your sales slip together for future reference. You must provide proof of purchase or installation date for in-warranty service.
Write down the following information about your appliance to help you obtain assistance or service if you ever need it. You will need to know your complete model number and serial number. You can find this information on the model and serial number label, located on the inside wall of the fresh food compartment.
Dealer name
Serial number
Address
Phone number
Model number
Purchase date
Refer to whirlpool.eu to contact.
Using the Controls
The touch-activated controls are located on the left hand refrigerator door. The control panel includes information about various buttons and indicators. Refrigerator and freezer temperature indicator shows last temperature set point.

- Sound and Vacation mode Button
- Freezer Compartment BUTTON & INDICATOR
- Freezer Mid Freeze Fast Chill INDICATORS
- Convertible Space BUTTON & INDICATOR
- Wine, Fridge, Meat & Fish INDICATORS
- Refrigerator Compartment BUTTON & INDICATOR
- Lock INDICATOR
- Lock and Celsius/Fahrenheit BUTTON
- Fast Cool BUTTON and INDICATOR
- Door Open INDICATOR
The Control Panel will automatically turn off after one minute of inactivity. To turn on the control panel, press any key.

Viewing and Adjusting Temperature Set Points
Adjusting Fresh Food and Freezer Compartment Temperature:
For your convenience, your refrigerator and freezer controls are preset at the factory.
When you first install your refrigerator, make sure that the controls are still set to the recommended set points. The factory recommended set points are 3°C for the refrigerator and -18°C for the freezer.
Pressing Refrigerator or Freezer Temperature button will toggle through temperature set points in Celsius (°C).
IMPORTANT:
■ Wait 24 hours before you put food into refrigerator. If you add food before refrigerator has cooled completely, your food may spoil.
NOTE: Adjusting the set points to a colder-than recommended setting will not cool compartments any faster.
If the temperature is too warm or too cold in the refrigerator or freezer, first check the air vents to be sure they are not blocked before adjusting the controls.
■ The recommended settings should be correct for normal household use. The controls are set correctly when milk or juice is as cold as you like and when ice cream is firm.
NOTE: Areas such as a garage, basement or porch may have higher humidity or extreme temperatures. You may need to adjust the temperature away from the recommended settings to accommodate for these conditions.
■ Wait at least 24 hours between adjustments. Recheck the temperatures before other adjustments are made.
- 6th Sense INDICATOR
- Fahrenheit INDICATOR
- Celsius INDICATOR
- Fast Freeze INDICATOR
- Pure control replacement INDICATOR
- Pure control BUTTON & INDICATOR
- Sound Off INDICATOR
- Vacation Mode INDICATOR
- Demo Mode INDICATOR
NOTE: To toggle the temperature between degrees Celsius and Fahrenheit, touch and hold "Max Ice" and "Max cool" buttons for 3 seconds and the temperature display will change.

6 ^th Sense Precision Control
The 6 ^th SENSE Fresh Lock sensor ensures precise and consistent temperature control to preserve fresh food for longer, in the most natural way. Once a temperature variation is detected, the sensor activates a compressor that quickly restores the original temperature.
The 6 ^th SENSE Precision Control sensor minimizes temperature fluctuations in freezer thanks to an innovative temperature management system. Freezer burns are reduced to preserving quality and color of food.

\* - 日 Flexi Freeze Setting
Convertibility function allows you to toggle preset temperature for Convertible Compartment. While toggling, the selected temperature displays in the user interface. Press and hold the convertible zone temperature button for 3 seconds to change between refrigerator and freezer presets.
| Symbol Function Temperature | ||
| Traditional Freezer: Food already frozen and fresh food for maximum 1 month | -16°C to -22°C | |
| Mild Freezer: Food already frozen for maximum 1 month | -12°C | |
| Soft Freezer: Food already frozen for maximum 1 month | -7°C | |
| Wine 10°C | ||
| Veggies 4°C | ||
| Meat and Fish 0°C | ||
When adjusting temperature set points, use the following chart as a guide:
| CONDITION TEMPERATURE ADJUSTMENT | |
| Refrigerator too cold Refrigerator setting 1° higher | |
| Refrigerator too warm Refrigerator setting 1° lower | |
| Freezer too cold Freezer setting 1° higher | |
| Freezer too warm/ too little ice | Freezer setting 1° lower |

Fast Cool
The Fast Cool feature assists with periods of high refrigerator use, full grocery loads, or temporarily warm room temperatures.
■ To turn on the Fast Cool feature, press and hold the Refrigerator Temperature button for 3 seconds. When feature is activated, the Fast Cool icon will be illuminated. The Fast Cool feature will remain on for 2 hours unless manually turned off.
■ To manually turn off the Fast Cool feature, press and hold the Refrigerator Temperature button for 3 seconds. The Fast Cool icon will turn off when feature is not activated.
■ Adjusting refrigerator temperature will automatically turn off the Fast Cool feature.

Fast Freeze
The amount of fresh food (in kg) that can be frozen in 24 hours is indicated on the appliance rating plate.
■ Press Freezer Temperature button for 3 seconds (until the Fast Freeze Indicator lights up), 30 hours before placing fresh food in the freezer. After placing fresh food in the freezer, 30 hours on Fast Freeze function is generally sufficient; After 50 hrs the fast freeze function automatically deactivates.
■ To manually turn off the Fast Freeze feature, press and hold the Freezer Temperature button ☐ for 3 seconds. The Fast Freeze icon will turn off.
■ Adjusting the freezer temperature will automatically turn off the Fast Freeze feature.

Vacation Mode
This mode is designed to avoid your appliance from wasting energy during times when it's not in regular use (when you are on vacation for example).
By selecting this function the temperature of fresh food compartment will automatically be set to 12^ C.
■ To use the Vacation mode, press mode button until Holiday mode indicator is lit on the display.
■ To exit the Vacation mode, press the mode button until no mode icon is lit on the display.
■ Adjusting the refrigerator temperature will automatically turn off the Vacation Mode feature.
IMPORTANT: If this mode is selected then all food and drinks must be removed from fresh food compartment.

Sound ON-OFF
Press and hold "Filter Reset" and "Pure Control" buttons for 3 seconds to toggle the sound ON-OFF. If you turn on the sound, the "Sound" icon will light up on the display.

Key Lock
■ Press and hold the Lock button for 3 seconds to activate lock feature.
■ To deactivate lock, press and hold the Lock button for 3 seconds.
The lock feature will ignore all interaction with control panel until the user unlocks the control panel. This feature is meant to avoid unintentional changing of settings.
Demo Mode
This mode is used when refrigerator is on display in a retail shop or if you want to turn the cooling off and deactivate all other functions (except interior lighting).
Demo mode can be used when going on extended holiday. See the “Holiday and Moving Care” section for proper steps on leaving your refrigerator in this mode for long periods of time.
■ If you turn on Demo mode, the "Demo" icon will light up on the display.
■ Enter or exit Demo mode by pressing and holding the "Measured Fill" and "Water Filter Reset" button simultaneously for 3 seconds.
Pure Control
The refrigerator has a Ozone generator located in the center of the air tower. The Pure Control can be enabled or disabled.
■Once the Pure Control Button light is on, press the button to turn the Pure Control off. Toggle the button to enable/disable the Pure Control.
The Pure Control expires in 3 years of usage. Once the 3 years life is reached, the Pure Control icon will turn on. After changing the Pure Control, the alarm can be reset.
■ Pressing the Pure Control reset button for 3 seconds will reset the counter and turn off the Pure Control Replace Indicator
Additional Features
Door Ajar Alarm
The Door Ajar Alarm feature sounds an alarm when the refrigerator door(s) or freezer drawer is open for 5 minutes and cooling is turned on. The alarm will repeat every 2 minutes. Close all doors and drawer to turn it off.
NOTE: To mute the audible alarm while keeping the doors open, such as while cleaning the inside of the refrigerator, touch any button on the control panel. The alarm sound will be temporarily turned off, but the Door Ajar icon will still be displayed on the dispenser control panel.
Water Filter Reset and Indicator
Displays the status of the water filter. To reset the filter, press Water filter reset button for 3 seconds. After countdown, the icon will blink 3 times and the filter reset operation is completed.
The Water Filter status lights on the internal controls will let you know when to change your water filter.
■ORDER FILTER (Yellow): Order a replacement water filter.
■REPLACE FILTER (RED): Replace the water filter. While you are dispensing water, "Replace Filter" icon will flash constantly from beginning to the end of dispensing. After 14 days without replacing the water filter, the "Replace Filter" icon will blink 7 times and an alert tone will sound 3 times at the end of dispensing. See the "Water Filtration System" section.
NOTE: REPLACE FILTER will remain illuminated if a filter reset is not done.
Lighting the Refrigerator
The refrigerator has an interior light that comes on any time door is opened.
NOTE: The light is LED which does not need to be replaced. If the LED does not illuminate when the door is opened, call service.
REFRIGERATOR USE
Opening and Closing Doors
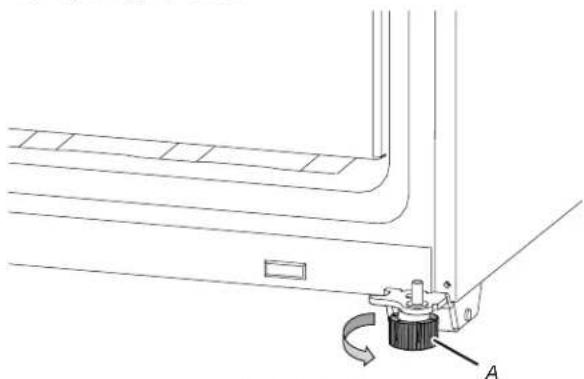
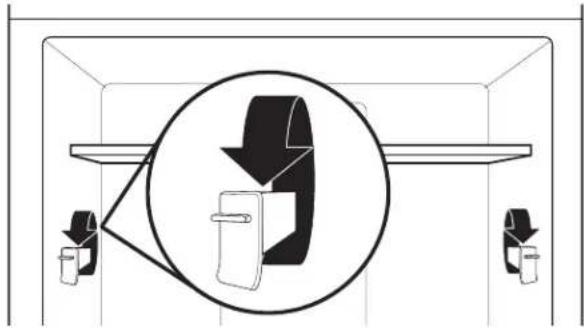
There are two fresh food compartment doors. The doors can be opened and closed either separately or together. There is a vertically hinged seal on left refrigerator door.
■ When left-side door is opened, hinged seal automatically folds inward so that it is out of the way.
■ When both doors are closed, the hinged seal automatically forms a seal between two doors.
NOTE: When closing the door, the hinged seal should be in correct position (be bent inside). Otherwise it will hit the right door or the fixing shaft.
natural_image
Technical line drawing of a cabinet or enclosure with a vertical panel and labeled component 'A' (no text or symbols beyond label)A. Hinged seal
Shelf Height Adjustment
Shelf height can be adjusted by changing its location from bottom support to upper support and vice versa.
The fresh food compartment door switch is located in top left and right hinge cover.
■ For Freezer and Multi Temperature Zone, door switch is located in the bottom mullion.
■ The door switch uses magnet to sense door opening/closing.
■ Ensure there are no magnet or electronic devices (Speaker, Coolvox® etc.) within 7.62 cm of the hinge cap.
NOTE: The light will not turn on if door opening is not detected.
natural_image
Simple line drawing of a rectangular frame with a labeled component 'A' on top, no text or symbols present.A. Hinge cover
SHELVES, BINS, AND DRAWERS
Shelves and Shelf Frames
The shelves in your refrigerator are adjustable to meet your individual storage needs.
Storing similar food items together in your refrigerator and adjusting the shelves to it different heights of items will make finding the exact item you want easier. It will also reduce the amount of time the refrigerator door is open and save energy.
Shelf Height Adjustment
Shelf height can be adjusted by changing the adjustable shelf mounts between their vertical and horizontal positions.
- Carefully lift the shelf off the shelf mounts and turn the lipper to the desired orientation.
- Repeat for remaining shelf mounts.
- Apply pressure to the top of the shelf to ensure the shelf is properly seated on the shelf mounts.
natural_image
Diagram of a double door mechanism inside a vehicle cabin, showing a circular component with a handle and lock (no text or symbols)NOTES:
■You will need to remove middle shelf first before removing top shelf.
- Remove the bottom shelf by lifting it up and out of the shelf supports. Then pull the shelf forward and tilt up to a vertical position. Turn the shelf at an angle and pull out of the refrigerator.
- Replace the bottom shelf by putting the shelf in the refrigerator at an angle with the shelf up. Lift the front of the shelf down and in until rear shelf drops into the shelf supports. Lower the front of the shelf and make sure that the shelf is in position.
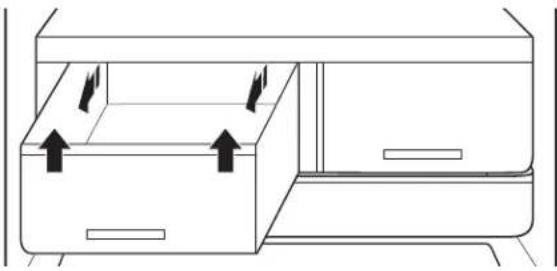
Crisper Drawers
To remove and replace the drawers:
- Grasp the handle at the bottom of the drawer and slide the drawer straight out to the stop. Lift the drawer off the bottom guide.
- Replace the drawer by placing it on the bottom drawer guide and pushing it past the drawer stop into position.
natural_image
Line drawing of a cabinet with arrows indicating movement or force, no text or symbols presentRefrigerator Door Bins
The bins on your refrigerator door are adjustable to meet your individual storage needs. The bins make it easy to customize door storage to hold gallon containers.
Door Bin Divider (on some models)
This divider lts in the door bin to divide the bin and elevate smaller items at the back of the bin.
natural_image
Architectural line drawing of a refrigerator interior showing door, shelves, and storage compartments (no text or symbols)Freezer Storage Compartments
Easy Access Tray
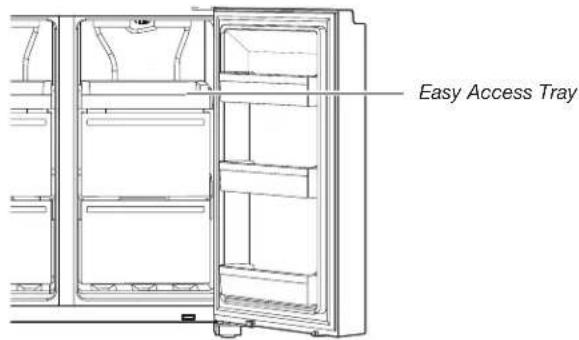
Easy Access tray is useful to easily access frequently used products, freeze or simply store leftovers or small items.
Freezer Drawers
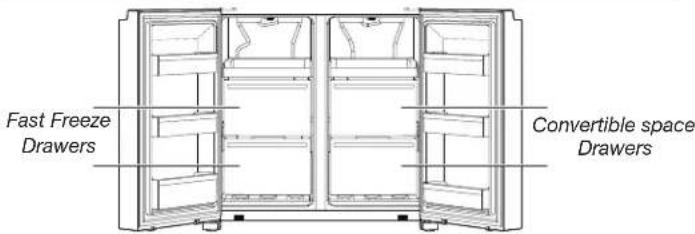
Fast Freeze compartment
■ Use this drawers to freeze a bigger amount of fresh or cooked food (in the best or in the fastest way).
■ Fast Freeze option allows you to store all your frozen food safely and transparently.
NOTE: Freezer temperature might be cooled down to be same as Flexible Freezer Compartment temperature, when Freezer set to warmer than Flexible Freezer compartment.
Convertible Space
■Use this drawers to freeze a bigger amount of fresh or cooked food (in the best or in the fastest way)
■Use Convertible Space to store all kinds of food in the ideal preservation environment. Adjusting the settings it can be used to store wine (10°C), fruits and veggies (4°C), Meat and fish (0°C), weekly meals (-7°C), ice cream and desserts (-12°C) and hard freeze food (-16°C or less).
Refrigerator Door Bins
The bins on your refrigerator door are removable to meet your individual storage needs.
natural_image
Architectural cross-section diagram of a refrigerator with doors open and internal compartments, showing no text or symbolsFor maximum freezer capacity, you may remove the freezer drawer to expose the freezer shelf.
To remove the upper drawer:
- Grasp handle of the drawer and slide drawer straight out to the stop. Lift drawer off the bottom guide.
- Replace/putting back drawer stop into position.
REFRIGERATOR CARE
Cleaning
WARNING
Explosion Hazard
Use nonflammable cleaner.
Failure to do so can result in death, explosion, or fire.
All of the Refrigerator, Freezer and Convertible Space sections defrost automatically. However, clean all the sections about once a month to avoid build-up of odours. Wipe up spills immediately.
Exterior Cleaning
Fingerprint-Resistant Stainless
IMPORTANT:
■ Avoid exposing stainless steel appliances to caustic or corrosive elements such as high-salt, high-moisture, or high-humidity environments. Damage due to exposure to these elements is not covered under the warranty.
| DO USE DO NOT USE | |
| √ Soft, clean cloth | ✕ Abrasive cloths✕ Paper towels or newsprint✕ Steel-wool pads |
| √ Warm, soapy water with a mild detergent | ✕ Abrasive powders or liquids✕ Window sprays✕ Ammonia✕ Acidic or vinegar-based cleaners✕ Oven cleaners✕ Flammable fluids |
NOTES:
If unintentional contact does occur, clean plastic part with a sponge and mild detergent in warm water. Dry thoroughly with a soft cloth.
■ Just because a cleaner is a liquid does not mean it is non-abrasive. Many liquid cleansers formulated to be gentle on tile and smooth surfaces still damage stainless steel.
■ Citric acid permanently discolours stainless steel.
■ To avoid damaging the finish of your stainless steel refrigerator:
Do not allow these substances to remain on the finish:
✗ Mustard Citrus-based sauces
✗ Tomato juice Citrus-based products
✗ Marinara sauce
Interior Cleaning
IMPORTANT: Refrigerator shelves with under-shelf, LED lighting are not dishwasher safe.
- Unplug refrigerator or disconnect power.
- Hand wash, rinse, and dry removable parts and interior surfaces thoroughly. Use a clean sponge or soft cloth and a mild detergent in warm water.
NOTE: Do not use abrasive or harsh cleaners such as window sprays, scouring cleansers, flammable fluids, cleaning waxes, concentrated detergents, bleaches, or cleansers containing petroleum products on plastic parts, interior and door liners, or gaskets.
- Plug in refrigerator or reconnect power.
Condenser
This refrigerator has skin condenser on both sides of refrigerator. It is normal to feel warm on the sides.
Lights
The lights in both the fresh food and freezer compartments are LEDs which do not need to be replaced. If the lights do not illuminate when the door is opened, contact the dealer from whom you purchased your refrigerator.
Holiday and Moving Care
Holidays
If You Choose to Leave the Refrigerator On While You're Away:
- Use up any perishables and freeze other items.
- If your refrigerator has an automatic ice maker and is connected to the household water supply, turn off the water supply to the refrigerator. Property damage can occur if the water supply is not turned off.
- If you have an automatic ice maker, turn off the ice maker.
■ Press the switch to Off (O) for the door ice maker.
- Empty the ice bin.
If You Choose to Turn Off the Refrigerator Before You Leave:
NOTE: Put refrigerator in Demo Mode while on Holiday. See the "Using the Controls" section.
- Remove all food from the refrigerator.
- If your refrigerator has an automatic ice maker:
■ Turn off water supply to the ice maker at least 1 day ahead of time.
■ When last load of ice drops, press the switch to Off (O) for display to be unlit on the top inside of the refrigerator, depending on your model.
-
Empty ice bin.
-
Turn off temperature controls. See the "Using the Controls" section.
- Clean refrigerator, wipe it and dry well.
- Tape rubber or wood blocks to the tops of both doors to prop them open far enough for air to get in. This stops odours and mould from building up.
Moving
When you are moving your refrigerator to a new home, follow these steps to prepare it for the move.
- If your refrigerator has an automatic ice maker:
■ Turn off water supply to the ice maker at least 1 day ahead of time.
■ Disconnect water line from the back of the refrigerator.
■ When last load of ice drops, press the switch to Off (O) either on the ice maker or the control, depending on your model.
-
Remove all food from refrigerator and pack all frozen food in dry ice.
-
Empty ice bin.
-
Unplug refrigerator.
-
Clean, wipe and dry thoroughly.
- Take out all removable parts, wrap them well and tape them together so they don't shift and rattle during the move.
- Depending on the model, raise the front of the refrigerator so it rolls more easily or raise the levelling screws so they do not scrape the floor. See the "Adjust the Doors" or "Refrigerator Levelling and Door Closing" sections.
- Tape doors closed and tape the power cable to the back of the refrigerator.
When you get to your new home, put everything back and refer to the "Installation Instructions" section for preparation instructions.
Also, if your refrigerator has an automatic ice maker, remember to reconnect the water supply to the refrigerator.
TROUBLESHOOTING
First try the solutions suggested here to possibly avoid a service call.
WARNING

Electrical Shock Hazard
Plug into a grounded 3 prong outlet.
Do not remove ground prong.
Do not use an adapter.
Do not use an extension cord.
Failure to follow these instructions can result in death, fire, or electrical shock.
| If you experience Possible | Causes Solution | |
| Refrigerator Operation | ||
| The refrigerator will not operate. | Check electrical supply. Plug the power | cable into an earthed socket. |
| Do not use an extension cable. | ||
| Make sure there is power to the socket. Plug in a lamp to see if the socket is working. | ||
| Reset a tripped circuit breaker. Replace any blown fuses.NOTE: If problems continue, contact an electrician. | ||
| Check controls. Make sure the controls | are turned on. See the “Using the Controls” section. | |
| New installation. Allow 24 hours following | ing installation for refrigerator to cool completely.NOTE: Adjusting the temperature controls to the coldest setting will not cool either compartment more quickly. | |
| Refrigerator control is in Demo mode (on some models). | If refrigerator is in Demo mode, cooling is turned off and “Demo” will be illuminated on the control panel. See the “Using the Controls” section for more information. | |
| The motor seems to run too much. | High-efficiency compressor and fans. Larger, more efficient refrigerators run longer at lower, more energy efficient speeds. | |
| The room or outdoor temperature is hot. | It is normal for refrigerator to work longer under these conditions. For optimum performance, place refrigerator in an indoor, temperature-controlled environment. See the “Location Requirements” section. | |
| A large amount of warm food has been recently added. | Warm food will cause refrigerator to run longer until the air cools to the desired temperature. | |
| The door(s) are opened too frequently or for too long. | Warm air entering refrigerator causes it to run more. Open the door less often. | |
| The refrigerator door or freezer drawer is open. | Make sure refrigerator is level. See the “Refrigerator Levelling and Door Closing” section. Keep food and containers from blocking the door. | |
| The refrigerator control is set too cold. Adjust refrigerator control to a less-cold setting until the refrigerator temperature is as desired. | ||
| The door or drawer gasket is dirty, worn, or cracked. | Clean or change the gasket. Leaks in the door seal will cause refrigerator to run longer in order to maintain desired temperatures. | |
TROUBLESHOOTING
First try the solutions suggested here to possibly avoid a service call.
| If you experience Possible Causes Solution | ||
| The lights do not work. Your refrigerator is equipped with LED lighting which does not need to be replaced. | If there is power to the refrigerator and the lights do not illuminate when a door or drawer is opened, call for service or assistance. | |
| The Temperature Control UI does not turn on. | Ensure there are no magnets or electronic devices within 7.6 cm (3") of the hinge cover. | |
| The Temperature Control UI went to sleep. | Press any button on the UI to wake up the The Temperature Control UI. | |
| Unable to adjust setting on The Temperature Control UI. | Close the door. | |
| Unusual Noise | ||
| To listen to normal refrigerator sounds, go to the Product Help/FAQ section of the brand website and search for “normal sounds.” Below are listed some normal sounds with explanations. | ||
| The refrigerator seems noisy. The compressor in your new refrigerator regulates temperature more efficiently while using less energy and operates quietly. | Due to this reduction in operating noise, you may notice unfamiliar noises that are normal. | |
| Sound of the compressor running longer than expected. | Larger, more-efficient refrigerators run longer at lower, more energy efficient speeds. | |
| Pulsating/Whirring Fans/compressor adjusting to optimize performance during normal compressor operation. | This is normal. | |
| Popping Contraction/expansion of inside walls, especially during initial cool down. | This is normal. | |
| Hissing/Dripping Flow of refrigerant or flow of oil in the compressor. | This is normal. | |
| Vibration The refrigerator may not be steady. Adjust the levelling screws and lower the levelling foot firmly against the floor. See the “Refrigerator Levelling and Door Closing” section. | ||
| Sizzling Water dripping on the heater during Defrost cycle. | This is normal. | |
| Water running/Gurgling May be heard when ice melts during the Defrost cycle and water runs into the drain pan. | This is normal. | |
TROUBLESHOOTING
First try the solutions suggested here to possibly avoid a service call.
| If you experience Possible Causes Solution | ||
| Temperature and Moisture | ||
| Temperature is too warm. The refrigerator has just been installed. | Refrigerator has just been installed. | Allow 24 hours following installation for refrigerator to cool completely. |
| The controls are not set correctly for the surrounding conditions. | Adjust the controls a setting colder. Check the temperature in 24 hours. See the "Using the Controls" section. | |
| The door(s) are opened often or not closed completely. Allows warm air to enter refrigerator. | Minimize door openings and keep doors fully closed. | |
| A large load of food was recently added. | Allow several hours for refrigerator to return to normal temperature. | |
| Demo mode is on. Turn off the | Demo mode. See the "Using the Control" section. | |
| Holiday mode is on. Turn off the | the Holiday mode. See the "Using the Control" section. | |
| Temperature is too cold in the refrigerator/crisper. | The refrigerator air vent(s) are blocked. | If the air vent located in the middle rear of the fresh food compartment is blocked by items placed directly in front of it, the refrigerator will get too cold. Move items away from the air vent. |
| The controls are not set correctly for the surrounding conditions. | Adjust the controls a setting warmer. Check the temperature in 24 hours. See the "Using the Controls" section. | |
| Temperature is too cold in the temperature controlled drawer. | The control is not set correctly for the items stored in drawer. | Adjust the temperature setting. See the "Using the Controls" in the "Refrigerator Use" section. |
| There is interior moisture build-up.NOTE: Some moisture build-up is normal. | The room is humid. A humid environment contributes to moisture build-up. | |
| The door(s) are opened often or not closed completely. Allows humid air to enter the refrigerator. | Minimize door openings and close doors completely. | |
| The door(s) are blocked open. | Move food packages away from door. | |
| A bin or shelf is in the way. Push bin or shelf back into the correct position. | ||
| Storing liquid in open containers. | This adds humidity to refrigerator interior. Keep all containers tightly covered. | |
| There is frost/ice build-up in the freezer compartment. | The door is opened often or left open. | Minimize door openings and close drawer completely after use. |
| The door has poor door seal. | Ensure door seals are making full contact with the refrigerator cabinet to allow for an adequate seal. | |
| Temperature controls are not set correctly. | See the "Using the Controls" section for recommended temperature settings. | |
TROUBLESHOOTING
First try the solutions suggested here to possibly avoid a service call.
WARNING
Explosion Hazard
Use nonflammable cleaner.
Failure to do so can result in death, explosion, or fire.
To view an animation showing how to adjust and align the doors, refer to the Product Help/FAQ section of the brand website and search for “Door Closing and Door Alignment.”
| If you experience Possible | Causes Solution | |
| Doors | ||
| The doors will not close completely. | The door is blocked open. Move food | packages away from door. |
| A bin or shelf is in the way. Push bin | or shelf back into the correct position. | |
| Recently installed Remove all packaging materials. | ||
| The doors are difficult to open. | The door gaskets are dirty or sticky. | Clean gaskets and contact surfaces with mild soap and warm water. Rinse and dry with soft cloth. |
| The doors appear to be uneven. | The doors need to be aligned or the refrigerator needs to be levelled. | If you need to align door please call for service. |
| The refrigerator is unsteady or it rolls forward when opening and closing doors. | The refrigerator brake feet are not snug against the floor. | Turn both brake feet (one on each side) counterclockwise, the same amount, until they are snug against the floor. See the “Refrigerator Levelling and Door Closing” section. |
Whirlpool
FRIGORIFERO ALL'AMERICANA
CON CONGELATORE IN BASSO
GUIDA ALL'USO E ALLA MANUTENZIONE
Sommario
SICUREZZA DEL FRIGORIFERO....30
natural_image
Line drawing of a refrigerator with multiple doors stacked on the side (no text or symbols)natural_image
Pure technical line drawing of a rectangular frame with vertical and horizontal cutouts (no text or symbols)natural_image
Mechanical component diagram showing a bracket with labeled point A (no text or symbols beyond label)A. Cerniera
natural_image
Technical line drawing of a multi-tiered refrigerator unit (no text or symbols)natural_image
Pure mechanical diagram showing a bracket with mounting holes and a labeled point A (no text or symbols beyond label)A. Viti a brugola 5 mm
Cerniera mediana destra
natural_image
Technical line drawing of a mechanical bracket or clamp assembly with labeled component A (no text or symbols beyond label)A. Cerniera
AVVERTENZA
natural_image
Technical line drawing of a mechanical clamp or bracket assembly with screws and a labeled component 'A' (no text or symbols beyond label)A. Cerniera mediana
natural_image
Line drawing of a refrigerator interior showing door, shelf, and drawer with labeled component A (no text or symbols beyond label)natural_image
Technical line drawing of a mechanical assembly with a central component and labeled point A (no text or symbols beyond label)A. Piedini frenati
natural_image
Technical line drawing of a refrigerator with labeled component A (no text or symbols beyond label)natural_image
Technical diagram of a metal bracket with labeled component A, no text or symbols presentA. Copricerniera
natural_image
Diagram of a mechanical device with a circular component and two hanging weights (no text or symbols)NOTE:
natural_image
Simple line drawing of a cabinet with arrows indicating direction (no text or symbols)natural_image
Architectural line drawing of a refrigerator interior showing door, shelves, and storage compartments (no text or symbols)natural_image
Architectural line drawing of a refrigerator interior showing door, shelves, and storage compartments (no text or symbols)INSTRUCTIONS D'INSTALLATION....63
Pour commencer....63
natural_image
Line drawing of a refrigerator with multiple doors placed beside it (no text or symbols)PIÈCES ET CARACTÉRISTIQUES
natural_image
Pure technical line drawing of a rectangular frame with vertical and horizontal cutouts (no text or symbols)natural_image
Line drawing of a three-tier refrigerator cabinet (no text or symbols)natural_image
Technical diagram of a mechanical assembly with labeled component A (no text or symbols present)natural_image
Technical line drawing of a mechanical clamp or bracket assembly (no text or symbols)A. Charnière
AVERTISSEMENT
natural_image
Technical line drawing of a mechanical clamp or bracket assembly with screws and a labeled component (no text or symbols present)natural_image
Line drawing of a refrigerator interior showing door, front panel, and side door with labeled component A (no text or symbols beyond label)natural_image
Technical line drawing of a mechanical assembly with a curved component and labeled point A (no text or symbols beyond label)natural_image
Technical line drawing of a refrigerator with labeled component A (no text or symbols beyond label)natural_image
Simple line drawing of a rectangular frame with a labeled component 'A' on top, no text or symbols present.A. Couvre-charnière
natural_image
Diagram of a mechanical device with a circular component and two hanging weights (no text or symbols)REMARQUES :
natural_image
Simple line drawing of a two-cabinet storage unit with arrows indicating flow or movement (no text or symbols)natural_image
Architectural cross-section diagram of a double door with internal compartments and a black arrow indicating direction (no text or symbols)natural_image
Architectural cross-section diagram of a refrigerator with doors open and internal compartments, showing no text or symbolsnatural_image
Line drawing of a refrigerator with open doors and shelves (no text or symbols)natural_image
Pure technical line drawing of a door frame structure without any text, numbers, or symbolsnatural_image
Mechanical component diagram showing a bracket with labeled point A (no text or symbols beyond label)A. Петля
natural_image
Line drawing of a multi-tiered refrigerator cabinet with mounting holes and front panel (no text or labels)natural_image
Pure mechanical assembly diagram showing a bracket with mounting holes and a labeled component A (no text or symbols beyond label)natural_image
Technical line drawing of a mechanical clamp or bracket component (no text or symbols)A. Петля
ПРЕДОСТЕРЕЖЕНИЕ
natural_image
Technical line drawing of a mechanical clamp or bracket assembly with screws and a labeled component (no text or symbols present)A. Средняя петля
natural_image
Line drawing of a refrigerator interior showing door, front panel, and battery compartment with labeled component A (no text or symbols beyond label)A. Нижняя петля
ПРЕДОСТЕРЕЖЕНИЕ
natural_image
Technical line drawing of a mechanical assembly with a knob and curved arrow (no text or symbols)A. Опорные ножки
natural_image
Simple line drawing of a rectangular frame with a labeled section 'A' (no text or symbols beyond label)A. Крышка петли
natural_image
Diagram of a double door mechanism inside a cabinet, showing no text or symbolsПРИМЕЧАНИЯ:
natural_image
Simple line drawing of a cabinet with arrows indicating direction (no text or symbols)natural_image
Architectural cross-section diagram of a refrigerator with doors open and internal compartments, showing no text or symbolsnatural_image
Architectural line drawing of a refrigerator interior showing door, shelves, and storage compartments (no text or symbols)natural_image
Line drawing of a refrigerator with multiple doors stacked on the side (no text or symbols)ELEMENTY I FUNKCJE
natural_image
Pure technical line drawing of a rectangular frame with vertical and horizontal cutouts (no text or symbols)natural_image
Mechanical component diagram showing a bracket with labeled point A (no text or symbols beyond label)A. Zawias
natural_image
Technical line drawing of a multi-tiered refrigerator unit (no text or symbols)natural_image
Technical diagram of a mechanical assembly with labeled component A (no text or symbols present)natural_image
Technical line drawing of a mechanical clamp or bracket assembly (no text or symbols)A. Zawias
OSTRZEŻENIE
natural_image
Technical line drawing of a mechanical clamp or bracket assembly with screws and a labeled component 'A' (no text or symbols beyond label)D. Środkowy zawias
natural_image
Line drawing of a refrigerator interior showing door, front panel, and side panel with labeled component A (no text or symbols beyond label)D. Dolny zawias
OSTRZEŻENIE

natural_image
Technical line drawing of a mechanical assembly with a rotating component and labeled point A (no text or symbols beyond label)D. Nóżki blokujące
natural_image
Technical line drawing of a refrigerator with a labeled component 'A' (no text or symbols beyond label)natural_image
Simple line drawing of a rectangular frame with a labeled component 'A' and a small curved object on top (no text or symbols beyond label)A. Pokrywa zawiasu
natural_image
Diagram of a mechanical device with a circular component and two hanging weights (no text or symbols)UWAGI:
natural_image
Line drawing of a cabinet with arrows indicating movement or force (no text or symbols)natural_image
Line drawing of a refrigerator interior showing door, shelves, and ventilation unit (no text or symbols)Komory zamrażarki
natural_image
Line drawing of a refrigerator interior showing door, shelves, and storage compartments (no text or symbols)natural_image
Line drawing of a refrigerator with multiple doors stacked on the side (no text or symbols)natural_image
Pure architectural or structural line drawing with no text, numbers, or symbolsPure Control (Control puritate)
natural_image
Mechanical component diagram showing a bracket with labeled point A (no text or symbols beyond label)A. Balama
natural_image
Line drawing of a three-tier refrigerator cabinet (no text or labels)natural_image
Technical line drawing of a mechanical clamp or bracket assembly (no text or symbols)A. Balama
AVERTISMENT
natural_image
Technical line drawing of a mechanical clamp or bracket assembly with screws and a labeled component (no text or symbols present)A. Balama mijlocie
natural_image
Line drawing of a refrigerator interior showing door, front panel, and side door with labeled component A (no text or symbols beyond label)natural_image
Technical line drawing of a mechanical assembly with a knob and curved arrow indicating rotation (no text or symbols)Pure Control (Control puritate)
natural_image
Technical line drawing of a refrigerator with labeled component A (no text or symbols beyond label)natural_image
Simple line drawing of a metal shelf or support structure with labeled point A (no text or symbols beyond label)A. Capac balama
natural_image
Diagram of a mechanical device with a circular component and two hanging weights (no text or symbols)NOTE:
natural_image
Simple line drawing of a cabinet with arrows indicating direction (no text or symbols)natural_image
Architectural line drawing of a refrigerator interior showing door, shelves, and ventilation slots (no text or symbols)natural_image
Architectural line drawing of a refrigerator interior showing door, shelves, and storage compartments (no text or symbols)PROBLEEMOPLOSSING....183
VEILIGHEID VAN DE KOELKAST
WAARSCHUWINGEN M.B.T. ELEKTRICITEIT
natural_image
Line drawing of a refrigerator with multiple doors stacked on the side (no text or symbols)ONDERDELEN EN KENMERKEN
natural_image
Pure technical line drawing of a rectangular frame with vertical and horizontal cutouts (no text or symbols)WAT GAAT ER SCHUIL ACHTER DE DEUREN?
Freeze Shield (Vriesbescherming)
A. Afdekkap
B. Zekering
Scharnier links midden
natural_image
Technical line drawing of a mechanical clamp or bracket assembly (no text or symbols)A. Scharnier
natural_image
Line drawing of a multi-tiered refrigerator cabinet with mounting holes and dashed-line guide rails (no text or symbols)Afdekking scharnier
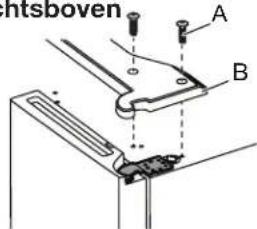
rechtsboven
natural_image
Pure mechanical diagram showing a bracket with mounting holes and a labeled point A (no text or symbols beyond label)natural_image
Technical line drawing of a mechanical clamp or bracket assembly (no text or symbols)A. Scharnier
⚠ WAARSCHUWING
Gevaarlijk gewicht
A. Schroef afdekkap bovenscharnier
natural_image
Line drawing of a refrigerator interior showing door, shelf, and drawer with labeled component A (no text or symbols beyond label)A. Onderscharnier
Laatste handelingen
⚠ WAARSCHUWING

natural_image
Technical line drawing of a mechanical assembly with a rotating component and labeled point A (no text or symbols beyond label)A. Remvoet
natural_image
Technical line drawing of a cabinet or refrigerator with a vertical panel and labeled component 'A' (no text or symbols beyond label)A. Scharnierafdichting
natural_image
Simple line drawing of a rectangular frame with a labeled component 'A' on top (no text or symbols beyond label)A. Afdekkap scharnier
natural_image
Diagram of a mechanical device with a circular component and two hanging weights (no text or symbols)OPMERKINGEN:
natural_image
Simple line drawing of a cabinet with arrows indicating direction (no text or symbols)Deurvakken in de koelkast
natural_image
Line drawing of a refrigerator interior showing door, shelves, and storage compartments with an arrow indicating direction (no text or symbols)natural_image
Architectural cross-section diagram of a refrigerator with labeled doors and an arrow indicating direction (no text or symbols present)natural_image
Line drawing of a refrigerator with multiple doors stacked on the side (no text or symbols)natural_image
Pure technical line drawing of a rectangular frame with vertical and horizontal cutouts (no text or symbols)natural_image
Black and white illustration of a hand with a lightning bolt symbol (no text or numbers)WARNING
natural_image
Line drawing of a three-tier refrigerator cabinet with mounting holes and front panel (no text or symbols)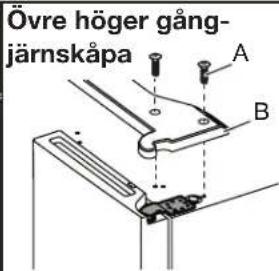
A. 5 mm sockelskruvar
natural_image
Technical line drawing of a mechanical clamp or bracket assembly (no text or symbols)A. Gångjärn
WARNING
Fara för tung vikt
natural_image
Technical line drawing of a mechanical clamp or bracket assembly with screws and a labeled component (no text or symbols present)A. Mittre gångjärn
natural_image
Line drawing of a refrigerator interior showing door, front panel, and side door with labeled component A (no text or symbols beyond labels)A. Nedre gångjärn
Slutliga steg
WARNING

natural_image
Technical line drawing of a mechanical assembly with a curved component and labeled point A (no text or symbols beyond label)A. Bromsfötter
Sound On/Off (Ljud På/Av)
=○ Key Lock (Knapplås)
natural_image
Technical line drawing of a refrigerator with labeled component A (no text or symbols beyond label)A. Ledad tätning
natural_image
Simple line drawing of a rectangular frame with a labeled component 'A' on the top (no other text or symbols)A. Gångjärnskåpa
Justera hyllhöjder
natural_image
Diagram of a mechanical device with a circular component and two hanging weights (no text or symbols)ANMÄRKNINGAR:
natural_image
Simple line drawing of a cabinet with arrows indicating direction (no text or symbols)Dörrfack
natural_image
Line drawing of a refrigerator interior showing door, shelves, and storage compartments (no text or symbols)Frysavdelningar
Enkel åtkomstbricka
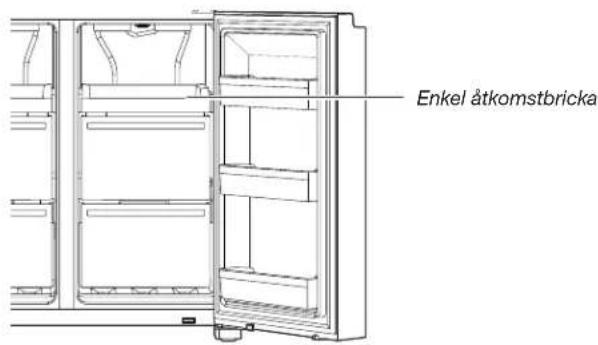
natural_image
Architectural line drawing of a refrigerator interior showing door, shelves, and storage compartments (no text or symbols)HYLDER, D∅RHYLDER OG SKUFFER ....231
Fryseafdelingens opbevaringsrum 232
Rengøring....233
Lamper....233
natural_image
Line drawing of a refrigerator with open doors and stacked boxes (no text or symbols)OVERSIGT
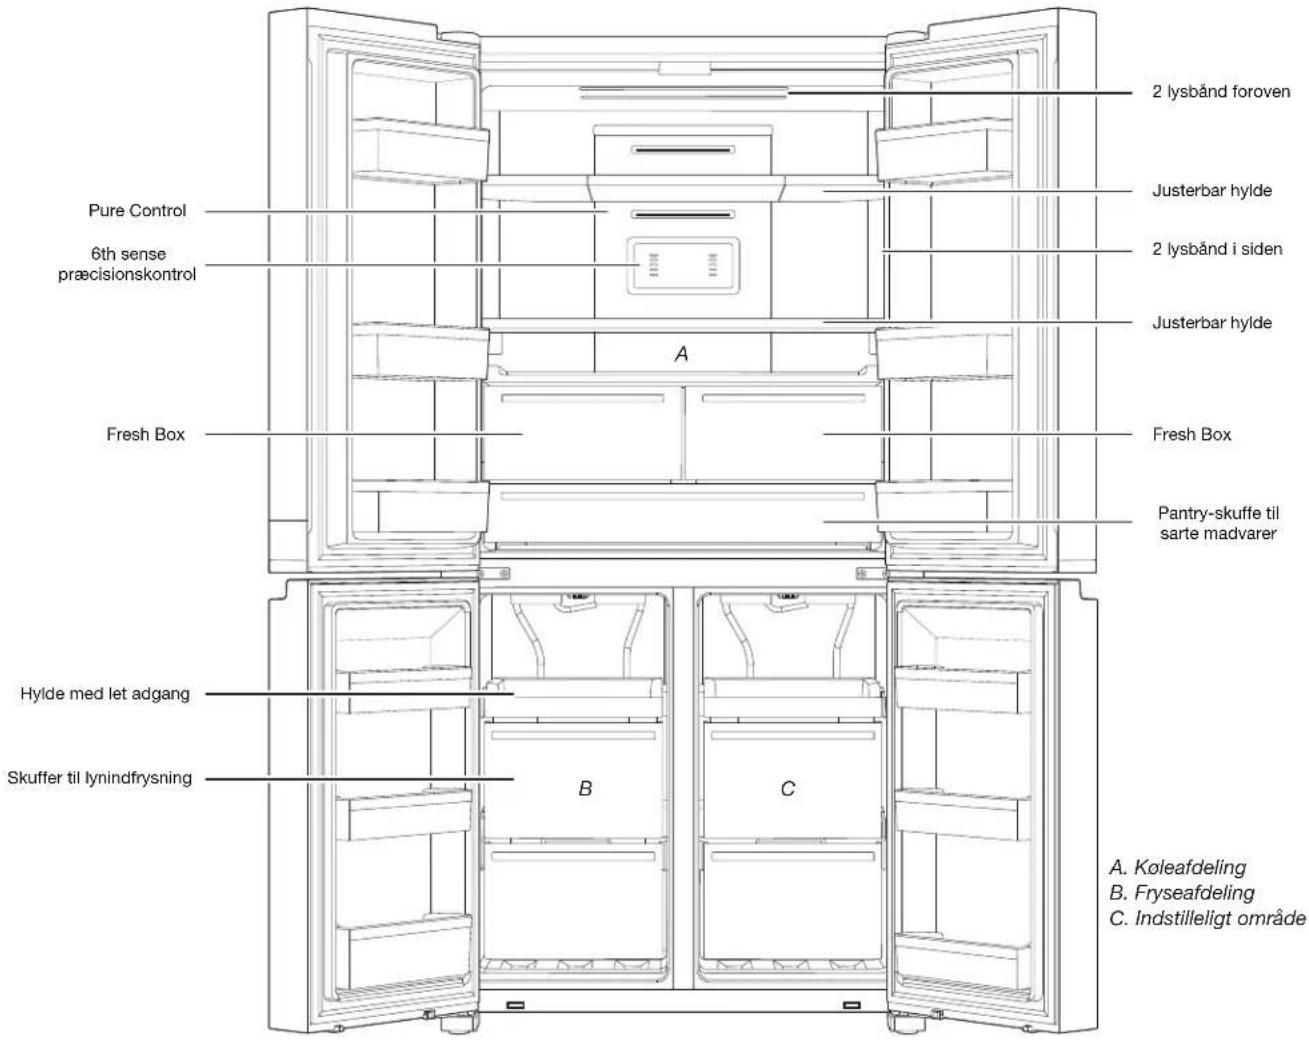
natural_image
Pure technical line drawing of a rectangular frame with vertical and horizontal cutouts (no text or symbols)Opbevaringskapacitet:
A. Sikringsdæksel
B. Sikring
natural_image
Technical line drawing of a multi-tiered refrigerator cabinet (no text or labels)natural_image
Technical line drawing of a mechanical clamp or bracket assembly (no text or symbols)A. Hængsel
ADVARSEL
Meget tung - fare
natural_image
Technical line drawing of a mechanical clamp or bracket assembly with screws and a labeled component (no text or symbols present)natural_image
Line drawing of a refrigerator interior showing door, shelves, and battery compartment (no text or symbols)A. Nederste hængsel
Afsluttende trin
ADVARSEL

natural_image
Technical line drawing of a mechanical assembly with a knob and curved arrow, no text or symbols presentA. Bremsefod
natural_image
Technical line drawing of a refrigerator with labeled component A (no text or symbols beyond label)natural_image
Simple line drawing of a rectangular frame with a labeled component 'A' on top (no text or symbols beyond label)A. Hængselsdæksel
natural_image
Diagram of a mechanical device with a circular component and two hanging weights (no text or symbols)BEMÆRK:
natural_image
Simple line drawing of a cabinet with arrows indicating direction (no text or symbols)natural_image
Line drawing of a refrigerator interior showing door, shelves, and storage compartments (no text or symbols)Fryseafdelingens opbevaringsrum
Bakke med let adgang
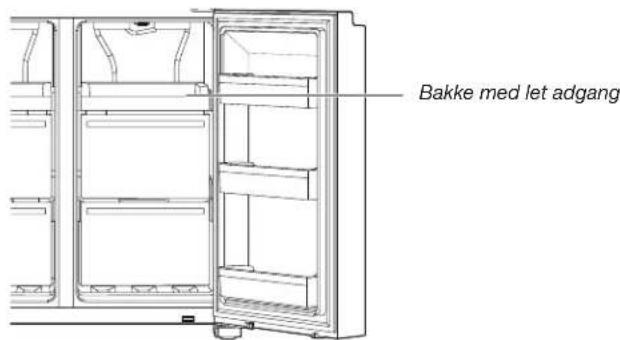
natural_image
Architectural line drawing of a refrigerator interior showing door, shelves, and ventilation unit (no text or symbols)HYLLER, BOKSER OG SKUFFER....257
KJ∅LESKAPETS SIKKERHET
natural_image
Line drawing of a refrigerator with multiple doors placed beside it (no text or symbols)DELER OG FUNKSJONER
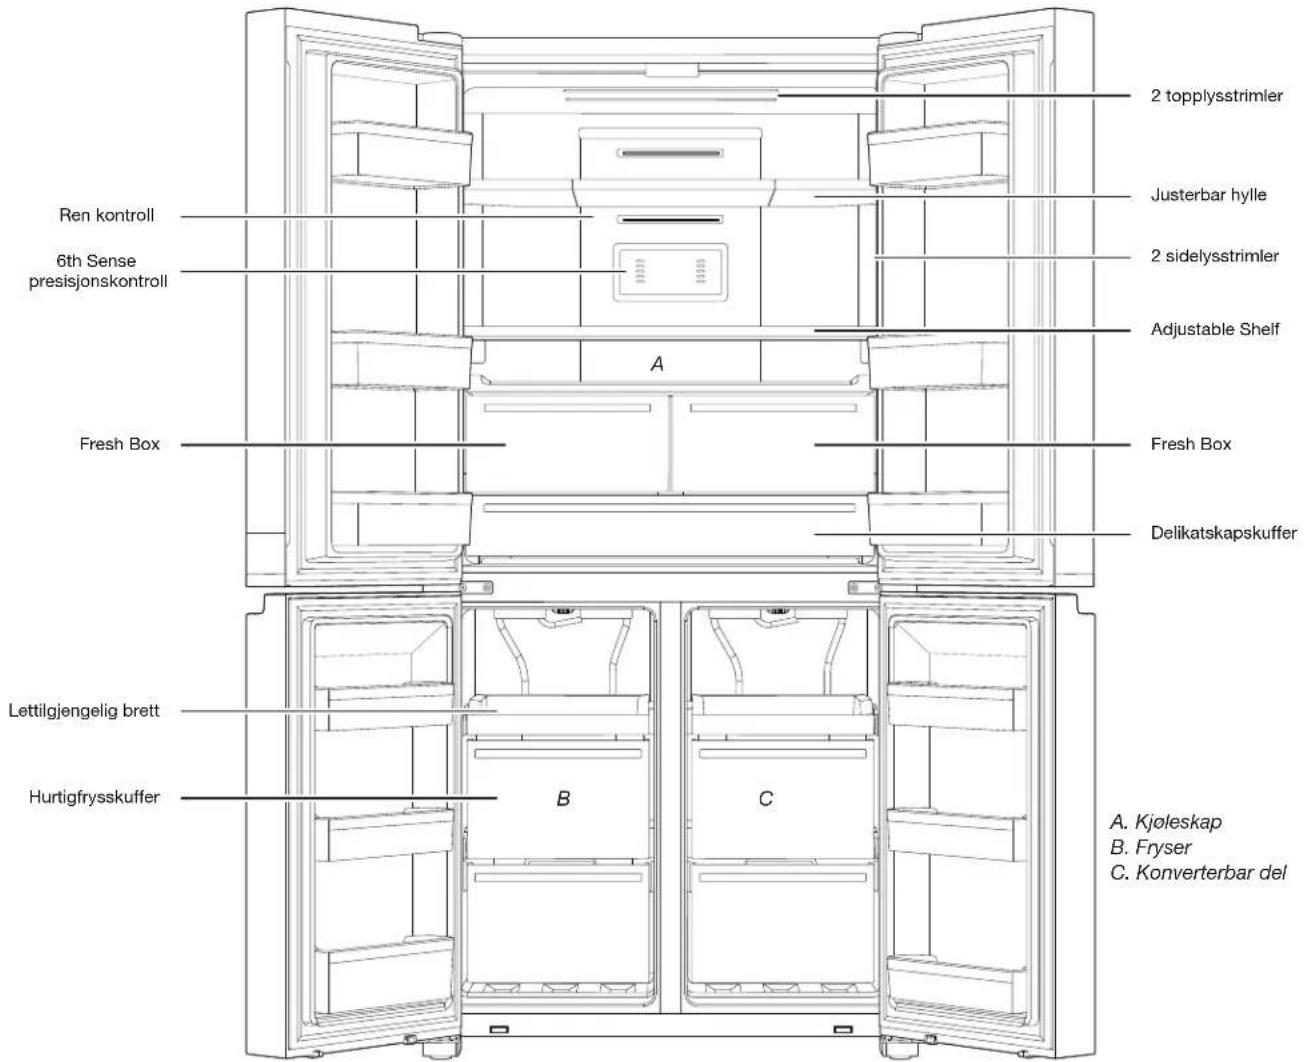
natural_image
Pure technical line drawing of a rectangular frame with vertical and horizontal cutouts (no text or symbols)Oppbevaringskapasitet:
Kontroller typeetiketten bak på produktet.
HVA ER NYTT BAK DØRENE?
Freeze Shield
A. Sikringsdeksel
B. Sikring
For Irland (kun):
natural_image
Mechanical component diagram showing a bracket with labeled point A (no text or symbols beyond label)A. Hengsel
natural_image
Line drawing of a three-tier refrigerator cabinet with mounting holes and ventilation slots (no text or labels)A. ∅verste hengseldek selskruer
B. ∅verste hengseldeksel
A. 5 mm sokkelskruer
natural_image
Technical line drawing of a mechanical clamp or bracket component (no text or symbols)A. Hengsel

ADVARSEL
Fare for høy vekt
A. Skrue på øverste hengseldeksel
B. ∅verste hengseldeksel
C. 5 mm unbrakoskruer
D. ∅verste hengsel
- Løft kjøleskapdøren fra den midterste hengslebolten. Det øverste hengslet vil komme av med døren.
Ta av venstre dør
natural_image
Technical line drawing of a mechanical clamp or bracket assembly with screws and a labeled component (no text or symbols present)A. Midtre hengsel
natural_image
Line drawing of a refrigerator interior showing door, shelves, and battery compartment (no text or symbols)B. Nedre hengsel
Sluttrinn
ADVARSEL
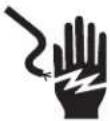
natural_image
Technical line drawing of a mechanical assembly with a labeled component 'A' (no text or symbols beyond label)A. Bremseføtter
natural_image
Technical line drawing of a cabinet or refrigerator with a vertical panel inserted, labeled 'A' (no text or symbols on the diagram itself)A. Hengslet tetning
natural_image
Simple line drawing of a rectangular frame with a labeled section 'A' on top, no text or symbols present.A. Hengseldeksel
HYLLER, BOKSER OG SKUFFER
natural_image
Diagram of a double door mechanism inside a cabinet, showing a circular component with a handle and lock (no text or symbols)MERKNADER:
natural_image
Simple line drawing of a cabinet with arrows indicating direction (no text or symbols)natural_image
Architectural line drawing of a refrigerator interior showing door, shelves, and ventilation unit (no text or symbols)natural_image
Architectural line drawing of a refrigerator interior showing door, shelves, and storage compartments (no text or symbols)natural_image
Line drawing of a refrigerator with multiple doors placed beside it (no text or symbols)natural_image
Pure technical line drawing of a rectangular frame with vertical and horizontal cutouts (no text or symbols)natural_image
Black and white illustration of a hand with a lightning bolt symbol (no text or numbers)! AVISO
natural_image
Technical line drawing of a mechanical clamp or bracket assembly with screws and a labeled component 'A' (no text or symbols beyond label)A. Dobradiça central
natural_image
Line drawing of a refrigerator interior showing door, shelf, and door lock (no text or symbols)A. Dobradiça inferior
Passos finais
! AVISO

natural_image
Technical line drawing of a mechanical assembly with a curved component and labeled point A (no text or symbols beyond label)A. Pés de travagem
natural_image
Technical line drawing of a refrigerator with labeled component A (no text or symbols beyond label)natural_image
Simple line drawing of a rectangular frame with a labeled section 'A' and a small rectangular component on top (no text or symbols beyond label)natural_image
Diagram of a mechanical device with a circular component and two hanging weights (no text or symbols)NOTAS:
Para retirar e voltar a colocar as gavetas:
natural_image
Line drawing of a cabinet with arrows indicating movement or force (no text or symbols)natural_image
Architectural line drawing of a refrigerator interior showing door, shelves, and storage compartments (no text or symbols)natural_image
Architectural line drawing of a double door with shelves and doors, showing internal compartments and a black arrow indicating direction (no text or symbols)Remove doors from your old refrigerator.
Failure to do so can result in death or brain damage.
natural_image
Line drawing of a refrigerator with multiple doors placed beside it (no text or symbols)natural_image
Pure technical line drawing of a rectangular frame with vertical and horizontal lines, no text or symbols presentnatural_image
Mechanical component diagram showing a bracket with labeled point A (no text or symbols beyond label)A. Шарнир
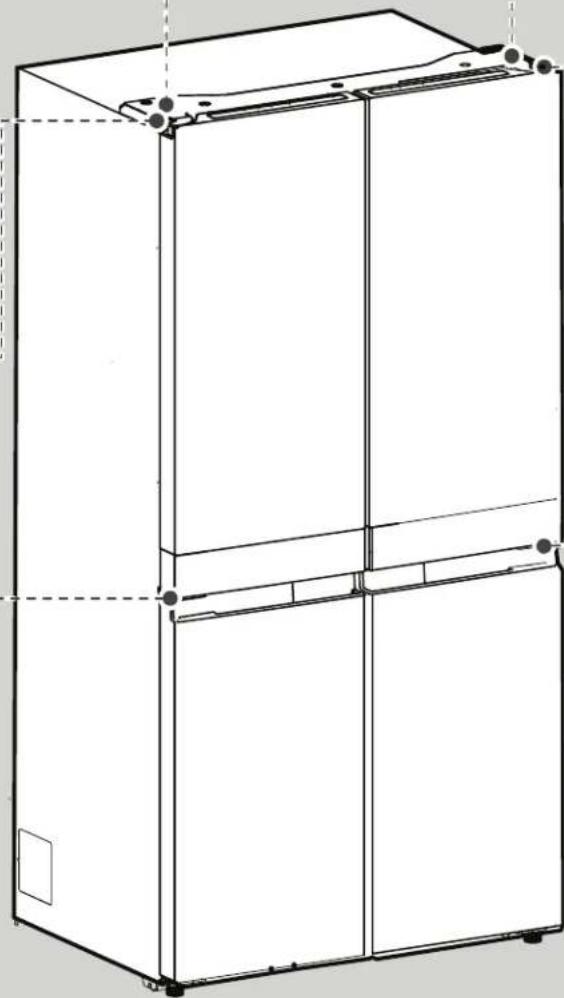
natural_image
Line drawing of a three-tier refrigerator cabinet (no text or symbols)natural_image
Technical diagram showing a mechanical assembly with labeled component A (no text or symbols present)natural_image
Technical line drawing of a mechanical clamp or bracket component (no text or symbols)A. Шарнир
ПРЕДУПРЕЖДЕНИЕ
natural_image
Technical line drawing of a mechanical clamp or bracket assembly with screws and a labeled component (no text or symbols present)A. Средна панта
natural_image
Line drawing of a refrigerator interior showing door, front panel, and side-mounted appliances (no text or symbols)A. Долна панта
ПРЕДУПРЕЖДЕНИЕ

natural_image
Technical line drawing of a mechanical assembly with a knob and curved arrow, no text or symbols presentA. Спирачни крака
natural_image
Technical line drawing of a refrigerator with labeled component A (no text or symbols beyond label)natural_image
Simple line drawing of a rectangular frame with a labeled section 'A' and a small shaded component inside (no text or symbols beyond the label)A. Капачка на панта
natural_image
Diagram of a ceiling-mounted door with a circular inset showing a down arrow and handle (no text or symbols)БЕЛЕЖКИ:
natural_image
Line drawing of a cabinet with arrows indicating movement or force (no text or symbols)natural_image
Architectural line drawing of a refrigerator interior showing storage compartments and door frame (no text or symbols)natural_image
Architectural line drawing of a multi-level refrigerator or cabinet with an arrow indicating a portion (no text or symbols present)POLICE, POSUDE I LADICE....336
natural_image
Line drawing of a refrigerator with open doors and stacked compartments (no text or symbols)natural_image
Pure technical line drawing of a rectangular frame with vertical and horizontal lines, no text or symbols presentA. Poklopac osigurača B. Osigurač
Za Republiku Irsku (samo za to tržište):
Često će se primjenjivati informacije koje su dane za Veliku Britaniju, ali se koristi i treća vrsta utikača i utičnice, 2-pinska, od tipa s bočnim uzemljenjem.
Utičnica/utikač (vrijedi za obje države):
Ako priloženi utikač nije prikladan za vašu utičnicu, javite se u postprodajnu službu kako biste dobili dodatne upute. Ne pokušavajte sami zamijeniti utikač. Taj postupak treba provesti kvalificirani tehničar u skladu s uputama proizvođača i trenutnim standardnim sigurnosnim odredbama.
Temperatura
natural_image
Mechanical component diagram showing a bracket with labeled point A (no text or symbols beyond label)A. Šarka
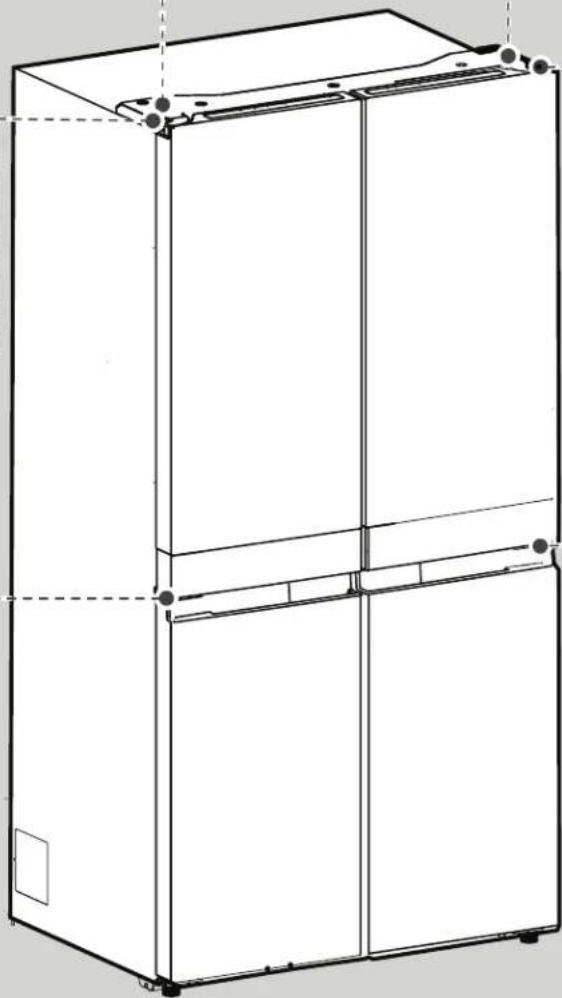
natural_image
Line drawing of a multi-tiered refrigerator cabinet with mounting holes and ventilation slots (no text or labels)A. Vijci poklopca gornje šarke B. Poklopac gornje šarke
Gornja desna šarka
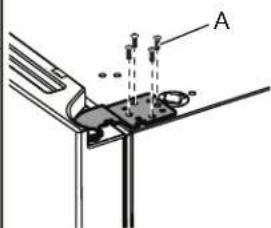
natural_image
Technical diagram of a mechanical assembly with labeled component A (no text or symbols present)A. Utični vijci od 5 mm
Srednja desna šarka
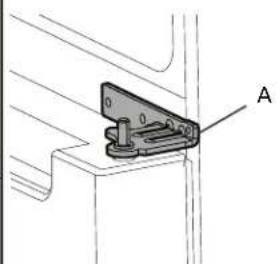
natural_image
Technical line drawing of a mechanical clamp or bracket assembly (no text or symbols)A. Šarka

UPOZORENJE
A. Vijak poklopca gornje šarke
C. Utični vijci od 5 mm
B. Poklopac gornje šarke
D. Gornja šarka
- Vrata hladnjaka podignite sa zatika srednje šarke. Gornja šarka skinut će se s vratima.
natural_image
Technical line drawing of a mechanical clamp or bracket assembly with screws and a labeled component 'A' (no text or symbols beyond label)A. Srednja šarka
natural_image
Line drawing of a refrigerator interior showing door, front panel, and side panel with labeled component A (no text or symbols beyond label)A. Donja šarka
Završni koraci
UPOZORENJE

natural_image
Technical line drawing of a mechanical assembly with a labeled component 'A' (no text or symbols beyond label)A. Kočne nožice
- Gumb načina rada Sound and Vacation (Zvuk i praznični način rada)
- GUMB I INDIKATOR Freezer Compartment (Pretinac zamrzivača)
- INDIKATORI Freezer Mild Freeze Fast Chill (Zamrzavanje, umjereni zamrzivač i brzo hlađenje zamrzivača)
- GUMB I INDIKATOR Convertible Space (Konvertibilni prostor)
- INDIKATORI Wine, Veggies, Meat & Fish (Vino, povrće, meso i riba)
- GUMB I INDIKATOR Refrigerator Compartment (Pretinac hladnjaka)
- INDIKATOR Lock (Zaključavanje)
-
GUMB Lock and Celsius/Fahrenheit (Zaključavanje i stupnjevi Celzija/Fahrenheit)
-
GUMB i INDIKATOR Fast Cool (Brzo hladenje)
- INDIKATOR Door Open (Otvorena vrata)
- INDIKATOR 6th Sense (Funkcija 6th Sense)
- INDIKATOR stupnjeva Fahrenheit
- INDIKATOR stupnjeva Celzija
- INDIKATOR Fast Freeze (Brzo zamrzavanje)
- INDIKATOR zamjene značajke Pure control (Čista kontrola)
- GUMB I INDIKATOR Pure Control (Indikator sustava Pure Control)
- INDIKATOR Sound Off (Isključivanje zvuka)
- INDIKATOR Vacation Mode (Praznični način rada)
- INDIKATOR Demo Mode (Demo način rada)
natural_image
Technical line drawing of a refrigerator with a vertical panel and labeled component A (no text or symbols beyond label)A.Brtva na šarki
Sklopka odjeljka za svježu hranu nalazi se u gornjem lijevom i desnom poklopcu šarke.
■ Na zamrzivaču i u zoni s više temperatura, sklopka na vratima smještena je u donjoj pregradnoj prečki.
■ Sklopka na vratima koristi magnet za otkrivanje otvaranja/zatvaranja vrata.
■ Uvjerite se da na udaljenosti do 7,62 cm od kapice na šarki nema magneta ili elektroničkih uređaja (zvučnik, Coolvox® itd.).
natural_image
Simple line drawing of a rectangular frame with a labeled section 'A' and a small shaded component at the base (no text or symbols beyond label)A. Poklopac šarke
Prilagodba visine police
POLICE, POSUDE I LADICE
Police i okviri polica
Police u vašem hladnjaku mogu se prilagoditi tako da udovoljavaju vašim individualnim potrebama čuvanja namirnica.
Čuvanje sličnih prehrambenih artikala u vašem hladnjaku i prilagodba polica tako da odgovaraju raznim visinama prehrambenih artikala olakšat će vam nalaženje baš onog artikla kojeg tražite. Time će se i skratiti vrijeme otvaranja vrata hladnjaka i uštedjeti energija.
Prilagodba visine police
natural_image
Diagram of a mechanical device with a circular component and two hanging weights (no text or symbols)NAPOMENE:
■Trebat ćete prvo skinuti srednju policu prije nego što skinete gornju policu.
- Donju policu uklonite podignuvši je prema gore izvan potpora za police. Zatim policu povucite prema gore i nagnite je prema dolje u okomit položaj. Zaokrenite policu pod nekim kutom i izvucite je iz hladnjaka.
- Vratite na mjesto donju policu stavljajući policu u hladnjak pod kutom s policom okrenutom prema gore. Podignite prednji dio police prema dolje i prema unutra sve dok se stražnja polica ne spusti u nosače police. Spustite prednji dio police i provjerite je li polica na mjestu.
natural_image
Simple line drawing of a cabinet with arrows indicating direction (no text or symbols)natural_image
Line drawing of a refrigerator interior showing door, shelves, and storage compartments with an arrow indicating direction (no text or symbols)Odjeljci za pohranu u zamrzivaču
Pladanj za lako pristupanje
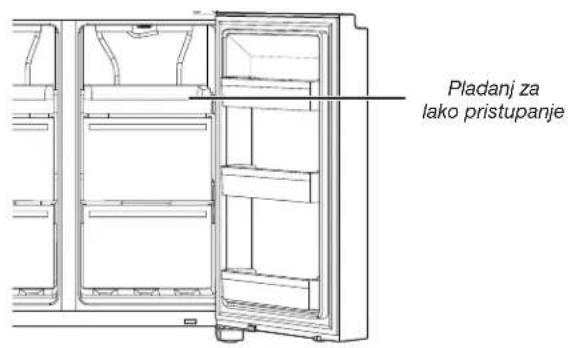
Pladanj za lako pristupanje koristan je za lako pristupanje često korištenim proizvodima, za zamrzavanje ili jednostavno čuvanje ostataka malih artikala.
Ladice zamrzivača
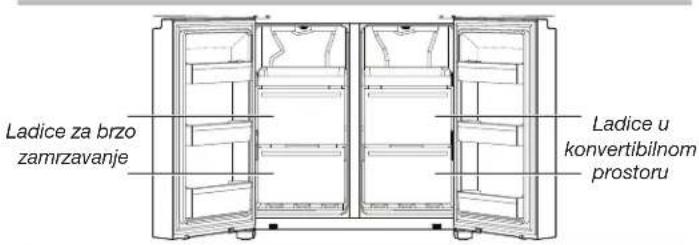
natural_image
Architectural cross-section diagram of a refrigerator with door frame and storage compartments (no text or labels)Za maksimalno iskorištenje kapaciteta zamrzivača možete izvaditi ladicu zamrzivača kako biste izložili policu zamrzivača.
Uklanjanje gornje ladice:
- Čvrsto uhvatite ručku ladice i povucite je tako da ladica klizne ravno iz zaustavljača. Podignite ladicu s donje vodilice.
- Zamjena/vraćanje zaustavljača ladice natrag na njegovo mjesto.
ODRŽAVANJE HLADNJAKA
Čišćenje
UPOZORENJE
POKYNY NA INSTALÁCIU 352
Začíname 352
Vybalenie chladničky 352
natural_image
Line drawing of a refrigerator with open doors and shelves (no text or symbols)DIELY A VLASTNOSTI
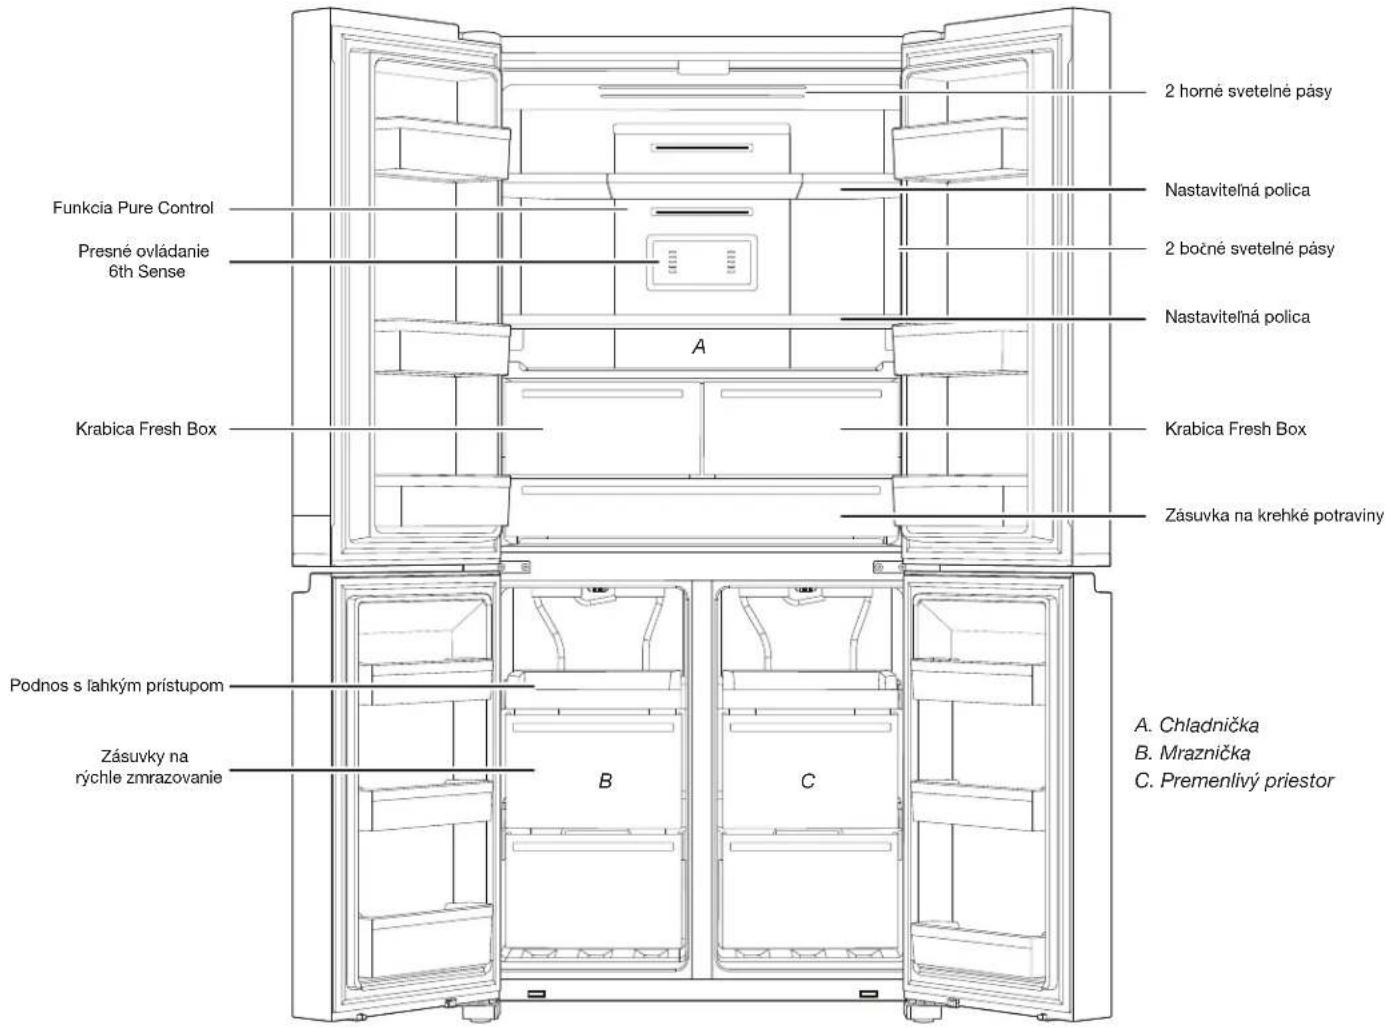
natural_image
Pure technical line drawing of a rectangular frame with vertical and horizontal cutouts (no text or symbols)Úložná kapacita:
POKYNY NA INŠTALÁCIU
Začíname
KONTROLNÝ ZOZNAM PRE INŠTALÁCIU
natural_image
Technical line drawing of a mechanical clamp or bracket with labeled point A (no text or symbols beyond label)A. Záves
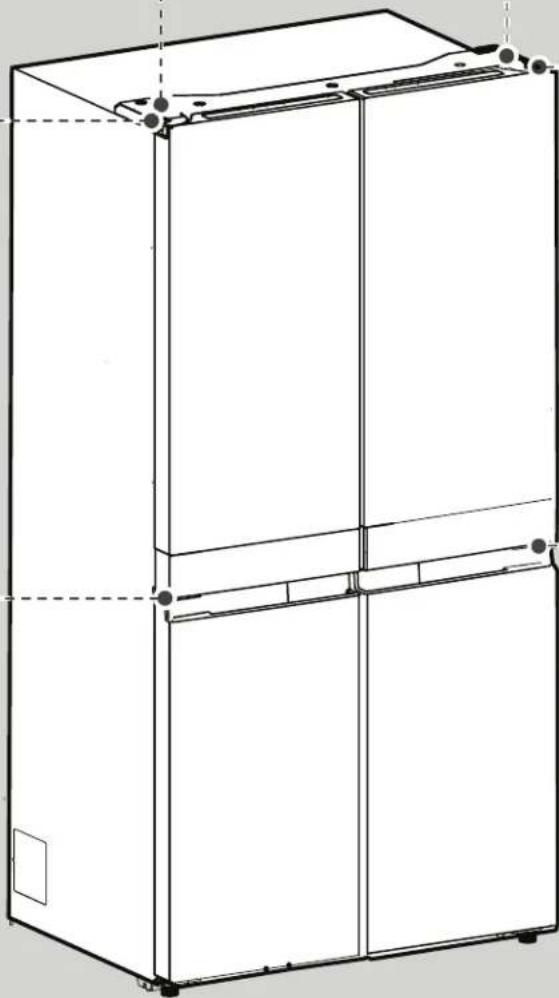
natural_image
Line drawing of a multi-tiered refrigerator cabinet with mounting holes and front panel (no text or symbols)natural_image
Technical line drawing of a mechanical clamp or bracket assembly (no text or symbols)A. Záves
!VAROVANIE
Ohrozenie nadmernou hmotnostou spotrebiča
natural_image
Technical line drawing of a mechanical clamp or bracket assembly with screws and a labeled component 'A' (no text or symbols beyond label)A. Stredný záves
natural_image
Line drawing of a refrigerator interior showing door, front panel, and side panel with labeled component A (no text or symbols beyond label)A. Spodný záves
Záverečné kroky
!VAROVANIE
natural_image
Technical line drawing of a mechanical assembly with a knob and curved component (no text or symbols)natural_image
Technical line drawing of a refrigerator with a labeled component 'A' (no text or symbols beyond label)A. Tesnenie so závesom
natural_image
Simple line drawing of a rectangular frame with a labeled section 'A' and a small curved component at the base (no text or symbols beyond label)A. Kryt závesu
Úprava výšky police
natural_image
Diagram of a mechanical device with a circular component and two hanging weights (no text or symbols)POZNÁMKY:
natural_image
Line drawing of a cabinet with arrows indicating movement or force, no text or symbols presentnatural_image
Architectural line drawing of a refrigerator interior showing storage compartments and doorways (no text or symbols)Skladovacie priestory v mrazničke
natural_image
Architectural cross-section diagram of a double door with shelves and doors, showing internal compartments and a directional arrow (no text or symbols)First try the solutions suggested here to possibly avoid a service call.
⚠️VAROVANIE
natural_image
Line drawing of a refrigerator with open doors and shelves, no text or symbols presentOSAD JA FUNKTSIOONID
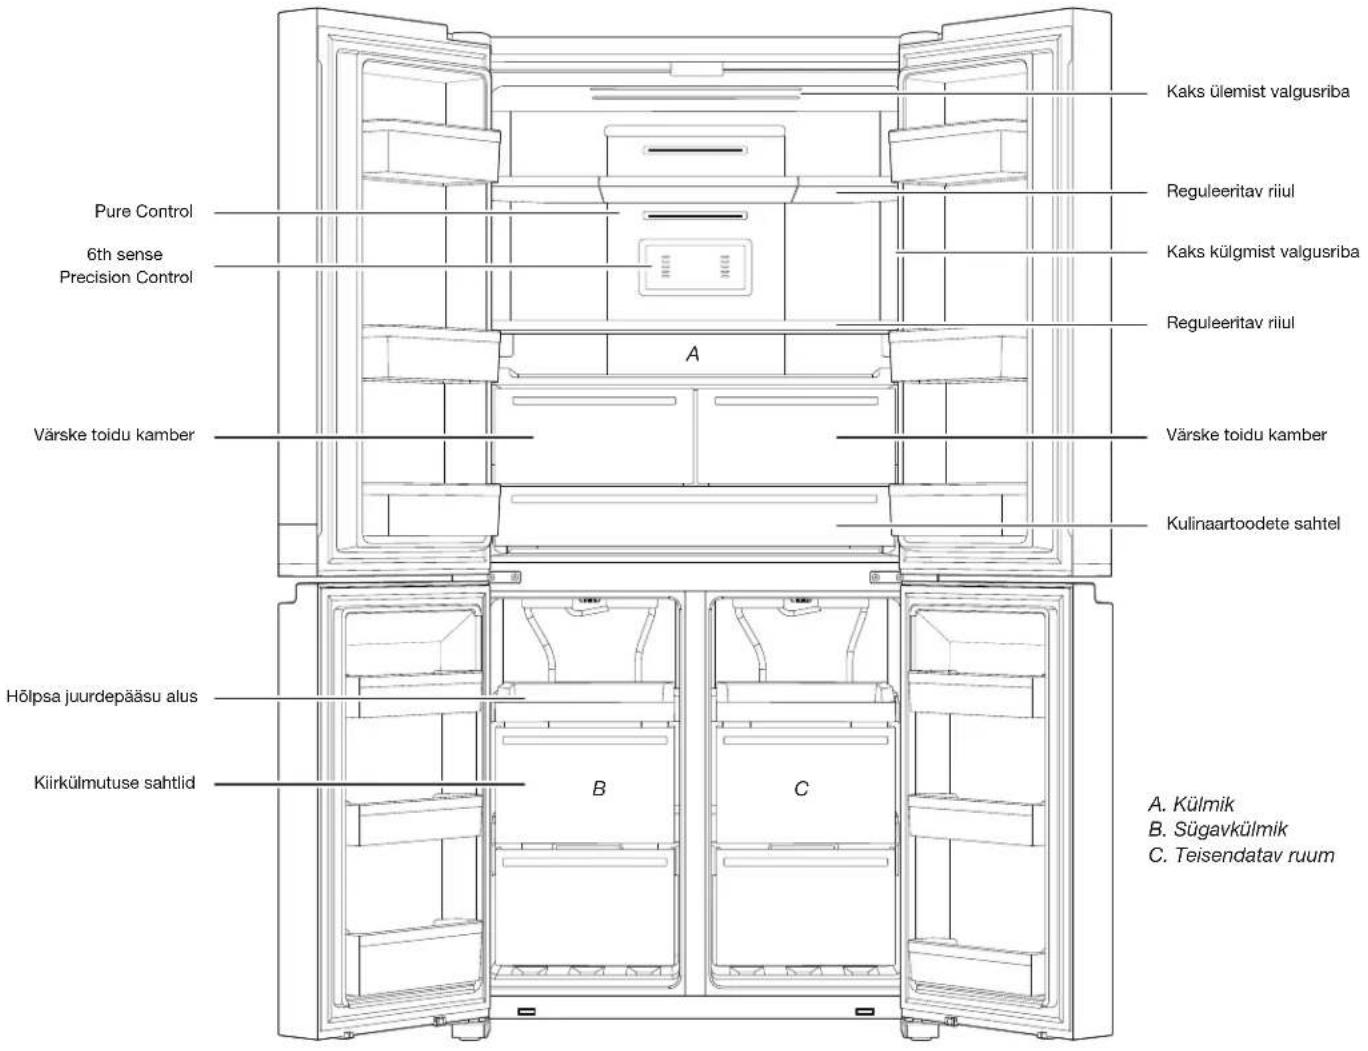
natural_image
Pure technical line drawing of a rectangular frame with vertical and horizontal cutouts (no text or symbols)A. Kaitsme kate
B. Kaitse
Ainult lirimaal
natural_image
Mechanical component diagram showing a bracket with labeled point A (no text or symbols beyond label)A. Hing
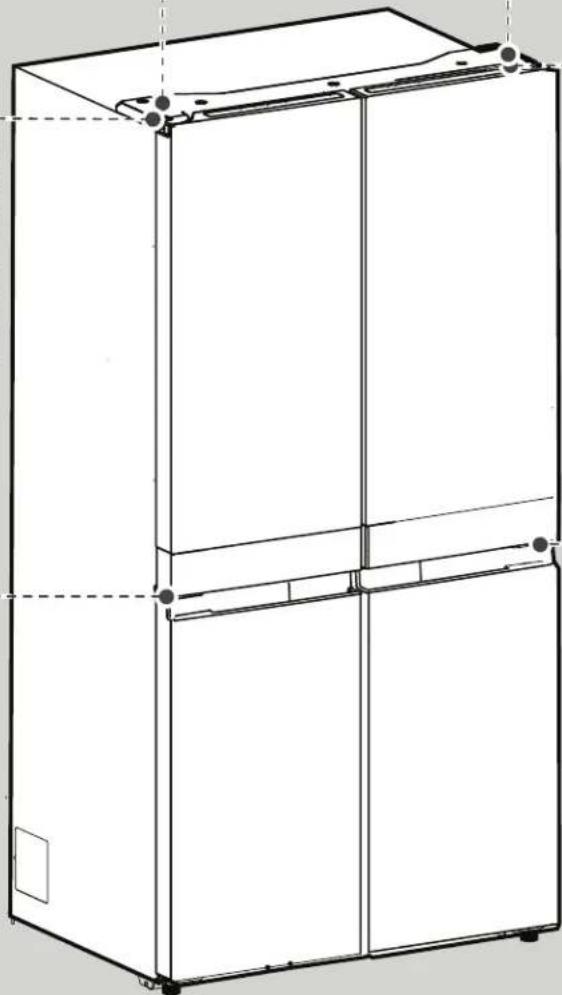
natural_image
Technical line drawing of a multi-tiered refrigerator unit (no text or symbols)Ülemise parema hinge
kate A
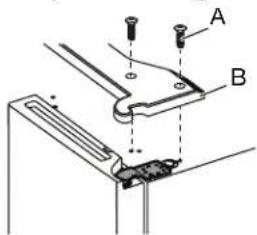
natural_image
Technical line drawing of a mechanical clamp or bracket assembly (no text or symbols)A. Hing

HOIATUS!
natural_image
Technical line drawing of a mechanical clamp or bracket assembly with screws and a labeled component 'A' (no text or symbols beyond label)A. Keskmine hing
natural_image
Line drawing of a refrigerator interior showing door, front panel, and side panel with labeled component A (no text or symbols beyond label)A. Alumine hing
Viimased sammud
HOIATUS!
Elektrilöögioht
natural_image
Technical line drawing of a mechanical assembly with a labeled component 'A' (no text or symbols beyond label)A. Pidurijalg
- Heli- ja puhkuserežiimi NUPP
- NUPP JA NÄIDIK „Freezer Compartment“ (Sügavkülmik)
- NÄIDIKUD „Freezer“, „Freeze“, „Fast Chill“ (Sügavkülmik, külmutamine, kiire jahutus)
- Teisendatava ruumi NUPP JA NÄIDIK
- NÄIDIKUD „Wine“, „Meat & Fish“ (Vein, liha ja kala)
- NUPP JA NÄIDIK „Refrigerator Compartment“ (Külmutuskamber)
- NÄIDIK „Lock“ (Lukk)
- NUPP „Lock and Celsius/Fahrenheit“ (Lukk ja Celsius/Fahrenheit)
-
NUPP JA NÄIDIK „Fast Cool“ (Kiirjahutus)
-
NÄIDIK „Door Open“ (Uks avatud)
- NÄIDIK „6th Sense“
- Fahrenheit NÄIDIK
- Celsiuse NÄIDIK
- Fast Freeze (Kiirkülmutuse) NÄIDIK
- Pure Controli asendamise NÄIDIK
- Pure Controli NUPP JA NÄIDIK
- NÄIDIK „Sound Off“ (Heli väljas)
- NÄIDIK „Vacation Mode“ (Puhkuserežiim)
- NÄIDIK „Demo Mode“ (Demorežiim)
natural_image
Technical line drawing of a refrigerator with a labeled component 'A' (no text or symbols beyond label)natural_image
Simple line drawing of a rectangular frame with a labeled section 'A' and a small rectangular component on top (no text or symbols beyond label)A. Hinge kate
natural_image
Diagram of a double door mechanism inside a vehicle cabin, showing handle and seat connections (no text or labels)MÄRKUSED.
natural_image
Simple line drawing of a cabinet with arrows indicating direction (no text or symbols)Külmiku uksekastid
natural_image
Architectural cross-section diagram of a refrigerator with doors and shelves, showing internal compartments and a directional arrow (no text or labels)natural_image
Architectural cross-section diagram of a refrigerator with doors open and a black arrow indicating a directional component (no text or symbols)natural_image
Line drawing of a refrigerator with open doors and shelves, no text or symbols presentnatural_image
Pure technical line drawing of a rectangular frame with vertical and horizontal lines, no text or symbols presentnatural_image
Line drawing of a multi-tiered refrigerator cabinet with mounting holes and doors (no text or symbols)natural_image
Pure mechanical assembly diagram showing a bracket with mounting holes and a labeled component A (no text or symbols beyond label)natural_image
Technical line drawing of a mechanical bracket or clamp assembly with labeled component A (no text or symbols beyond label)A. Μεντεσές
⚠️ ПРОЕІДОПОІНЄН
natural_image
Technical line drawing of a mechanical clamp or bracket assembly with screws and a labeled component 'A' (no text or symbols beyond label)A. Μεσαίος μεντεσές
natural_image
Line drawing of a refrigerator interior showing door, front panel, and side panel with labeled component A (no text or symbols beyond label)A. Κάτω μεντεσές
Τελικά βήματα
⚠️ ΠΡΟΕΙΔΟΠΟΙΗΣΗ

natural_image
Technical line drawing of a mechanical assembly with a labeled component 'A' (no text or symbols beyond label)natural_image
Technical line drawing of a cabinet or storage unit with a labeled section A (no text or symbols beyond label)A. Αρθρωτό λάστιχο
natural_image
Simple line drawing of a rectangular frame with a labeled section 'A' on top, no text or symbols present.A. Κάλυμμα μεντεσέ
natural_image
Diagram of a double door with a circular arrow indicating direction, no text or symbols presentΣΗΜΕΙΩΣΕΙΣ:
natural_image
Line drawing of a cabinet with arrows indicating movement or force, no text or symbols presentnatural_image
Architectural line drawing of a refrigerator interior showing door, shelves, and storage compartments (no text or symbols)natural_image
Architectural line drawing of a refrigerator interior showing storage compartments and doorways (no text or symbols)natural_image
Line drawing of a refrigerator with open doors and stacked boxes (no text or symbols)natural_image
Pure technical line drawing of a rectangular frame with vertical and horizontal lines, no text or symbols presentnatural_image
Mechanical component diagram showing a bracket with labeled point A (no text or symbols beyond label)A. Zsanér
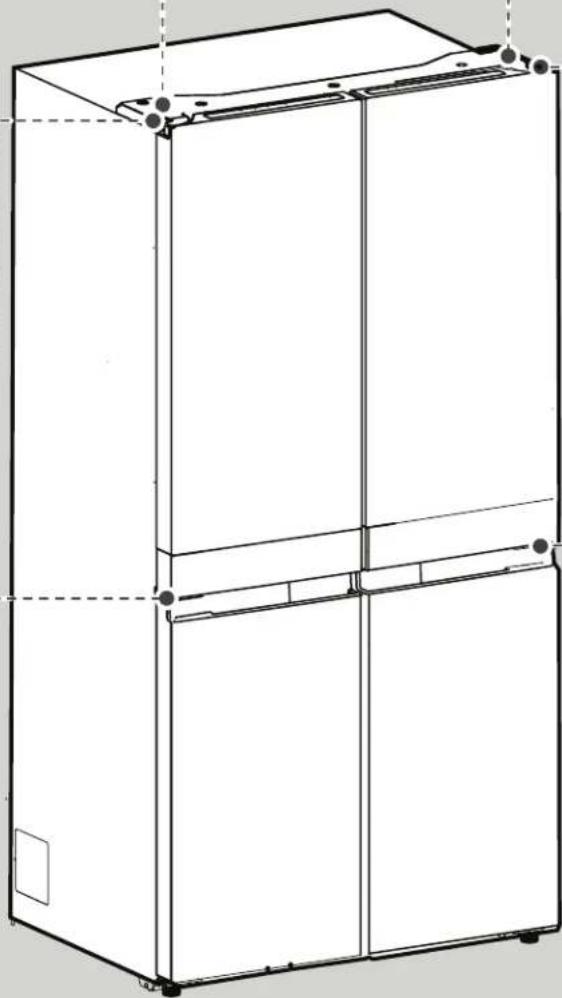
natural_image
Line drawing of a multi-tiered refrigerator cabinet with mounting holes and ventilation slots (no text or labels)natural_image
Technical diagram of a mechanical assembly with labeled component A (no text or symbols present)natural_image
Technical line drawing of a mechanical clamp or bracket assembly (no text or symbols)A. Zsanér

VIGYÁZAT
natural_image
Technical line drawing of a mechanical clamp or bracket assembly with screws and a labeled component (no text or symbols present)A. Középső zsanér
natural_image
Line drawing of a refrigerator interior showing door, shelves, and door panel with labeled component A (no text or symbols beyond label)A. Alsó zsanér
Befejező lépések
VIGYÁZAT
Áramütés veszélye
natural_image
Technical line drawing of a mechanical assembly with a rotating component and labeled point A (no text or symbols beyond label)A. Fékezőláb
natural_image
Technical line drawing of a refrigerator with labeled component A (no text or symbols beyond label)A. Csuklós tömítés
natural_image
Simple line drawing of a rectangular frame with a labeled section 'A' and a small inset showing a sloped edge (no text or symbols beyond the label)A. Zsanérfedél
natural_image
Diagram of a mechanical device with a circular component and directional arrows, no text or symbols presentMEGJEGYZÉSEK:
natural_image
Simple line drawing of a cabinet with arrows indicating direction (no text or symbols)natural_image
Line drawing of a refrigerator interior showing door, shelves, and ventilation slots (no text or symbols)natural_image
Architectural line drawing of a refrigerator interior showing storage compartments and door frame (no text or symbols)natural_image
Line drawing of a refrigerator with multiple doors stacked on the side (no text or symbols)natural_image
Pure technical line drawing of a rectangular frame with vertical and horizontal cutouts (no text or symbols)natural_image
Mechanical component diagram showing a bracket with labeled point A (no text or symbols beyond label)A. Enge
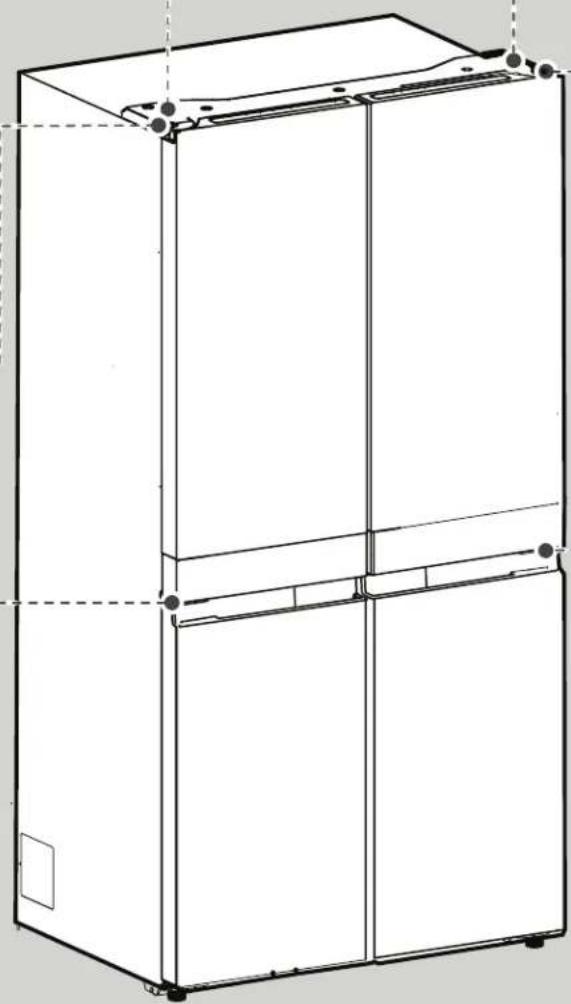
natural_image
Technical line drawing of a three-tier refrigerator unit (no text or symbols)natural_image
Technical diagram of a mechanical assembly with labeled component A (no text or symbols present)natural_image
Technical line drawing of a mechanical clamp or bracket assembly (no text or symbols)A. Enge
BRĪDINĀJUMS
A. Augšejas enğes parsega skruve
natural_image
Technical line drawing of a mechanical clamp or bracket assembly with screws and a labeled component (no text or symbols present)A. Vidējā enge
natural_image
Line drawing of a refrigerator interior showing door, storage compartments, and a small appliance labeled A (no text or symbols beyond labels)A. Apakšējā enğe
Pēdējās darbības
BRĪDINĀJUMS
natural_image
Technical line drawing of a mechanical assembly with a labeled component 'A' (no text or symbols beyond label)natural_image
Technical line drawing of a refrigerator with labeled component A (no text or symbols beyond label)A. Enges blivējums
natural_image
Simple line drawing of a rectangular frame with a labeled section 'A' and a small inset showing a sloped edge (no text or symbols beyond the label)A. Enges pârsegs
natural_image
Diagram of a mechanical device with a circular component and two hanging weights (no text or symbols)PIEZIMES:
natural_image
Simple line drawing of a cabinet with arrows indicating direction (no text or symbols)Ledusskapja durvju nodalijumi
natural_image
Line drawing of a refrigerator interior showing door, shelves, and ventilation slots (no text or symbols)natural_image
Architectural line drawing of a double door with internal compartments and a black arrow indicating direction (no text or symbols)natural_image
Line drawing of a refrigerator with multiple doors placed beside it (no text or symbols)DALYS IR SAVYBÈS
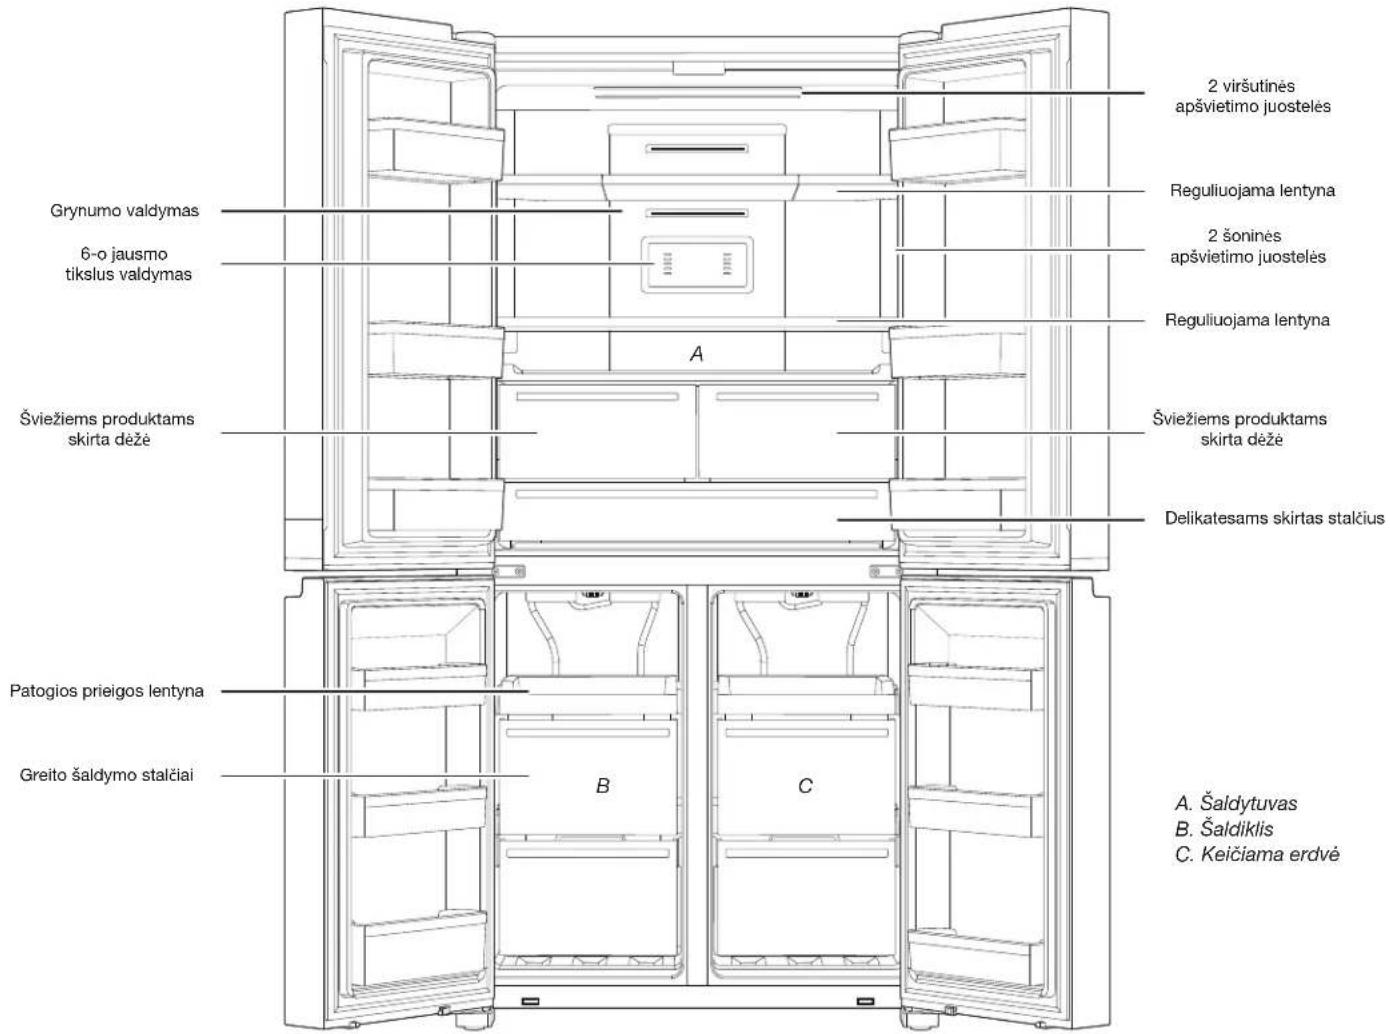
natural_image
Pure technical line drawing of a rectangular frame with vertical and horizontal cutouts (no text or symbols)A. Saugiklio dangtelis
B. Saugiklis
natural_image
Mechanical assembly diagram showing a bracket with labeled point A (no text or symbols present)A. Vyris
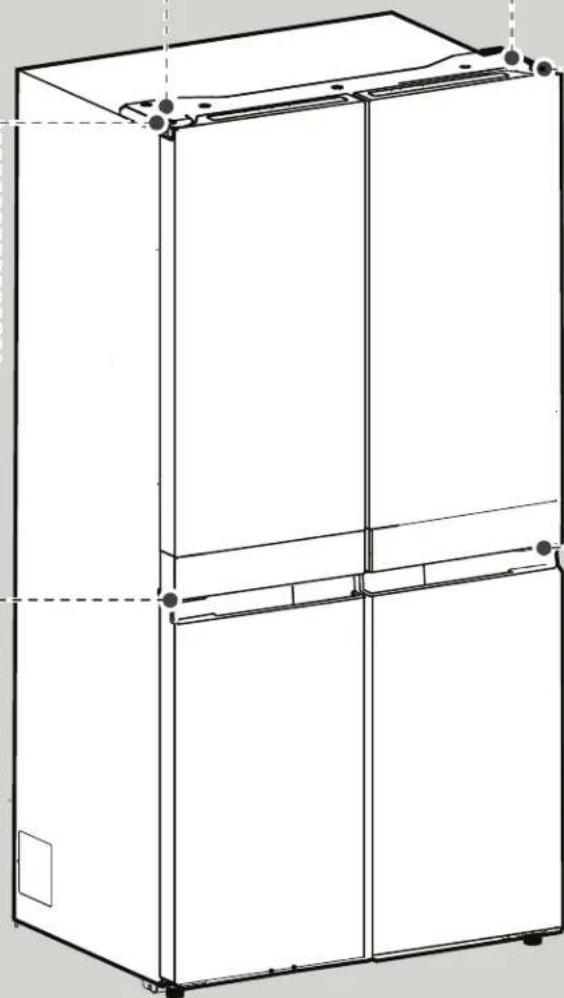
natural_image
Line drawing of a three-tier refrigerator cabinet (no text or labels)natural_image
Technical diagram of a mechanical assembly with labeled component A (no text or symbols present)A. 5 mm varžtai
natural_image
Technical line drawing of a mechanical clamp or bracket assembly (no text or symbols)A. Vyris

ISPÈJIMAS
Pavojus, kylantis del per didelio svorio
natural_image
Technical line drawing of a mechanical clamp or bracket assembly with screws and a labeled component 'A' (no text or symbols beyond label)A. Vidurinis vyris
natural_image
Line drawing of a refrigerator interior showing door, front panel, and side door with labeled component A (no text or symbols beyond label)A. Apatinis vyris
natural_image
Technical line drawing of a mechanical assembly with a knob and curved arrow, no text or symbols presentA. Stabdymo kojelé
natural_image
Technical line drawing of a cabinet or refrigerator with a vertical panel and labeled component 'A' (no text or symbols beyond label)A. Lankstinis sandariklis
natural_image
Simple line drawing of a rectangular frame with a labeled section 'A' and a small protrusion on the side (no text or symbols beyond label)A. Vyrio dangtelis
natural_image
Diagram of a mechanical device with a circular component and two hanging weights (no text or symbols)PASTABOS.
natural_image
Simple line drawing of a cabinet with arrows indicating direction (no text or symbols)natural_image
Architectural line drawing of a refrigerator interior showing door, shelves, and storage compartments (no text or symbols)Šaldiklio skyriai
natural_image
Architectural line drawing of a refrigerator interior showing door, shelves, and ventilation unit (no text or symbols)natural_image
Line drawing of a refrigerator with multiple doors stacked on the side (no text or symbols)natural_image
Pure architectural or mechanical diagram showing vertical and horizontal lines without any text, numbers, or symbolsnatural_image
Mechanical component diagram showing a bracket with labeled point A (no text or symbols beyond label)A. Pant
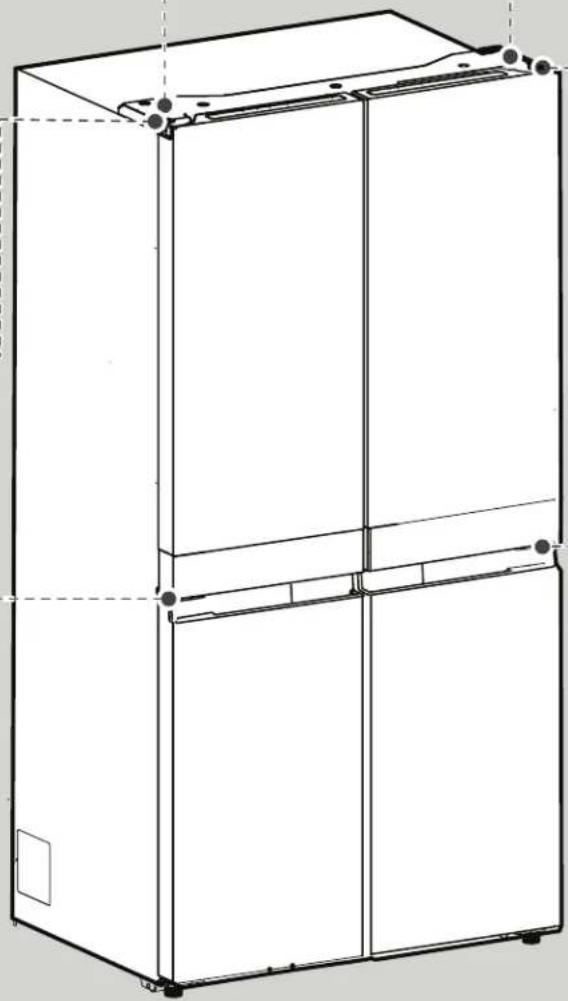
natural_image
Line drawing of a multi-tiered refrigerator cabinet with mounting holes and front panel (no text or symbols)natural_image
Technical diagram of a mechanical assembly with labeled component A (no text or symbols present)A. 5 mm šrouby
Pravý střední pant

natural_image
Technical diagram of a mechanical clamp or bracket assembly with labeled component A (no text or symbols beyond label)A. Pant
VAROVÁNÍ
natural_image
Technical line drawing of a mechanical clamp or bracket assembly with screws and a labeled component 'A' (no text or symbols beyond label)A. Středový pant
natural_image
Line drawing of a refrigerator interior showing door, shelves, and battery compartment (no text or symbols)A. Spodní pant
Závěrečné kroky
VAROVÁNÍ
natural_image
Technical line drawing of a mechanical assembly with a labeled component 'A' (no text or symbols beyond label)A. Brzdné nožky
natural_image
Technical line drawing of a refrigerator with a vertical panel and labeled component A (no text or symbols beyond label)A. Závěsné těsnění
natural_image
Simple line drawing of a rectangular frame with a labeled component 'A' on top, no text or symbols present.A. Kryt pantu
natural_image
Diagram of a mechanical device with a circular component and two hanging weights (no text or symbols)POZNÁMKY:
natural_image
Simple line drawing of a cabinet with arrows indicating direction (no text or symbols)natural_image
Line drawing of a refrigerator interior showing door, shelves, and storage compartments with an arrow indicating direction (no text or symbols)natural_image
Architectural line drawing of a refrigerator interior showing storage compartments and doorways (no text or symbols)natural_image
Line drawing of a refrigerator with multiple doors stacked on the side (no text or symbols)PIEZAS Y CARACTERÍSTICAS
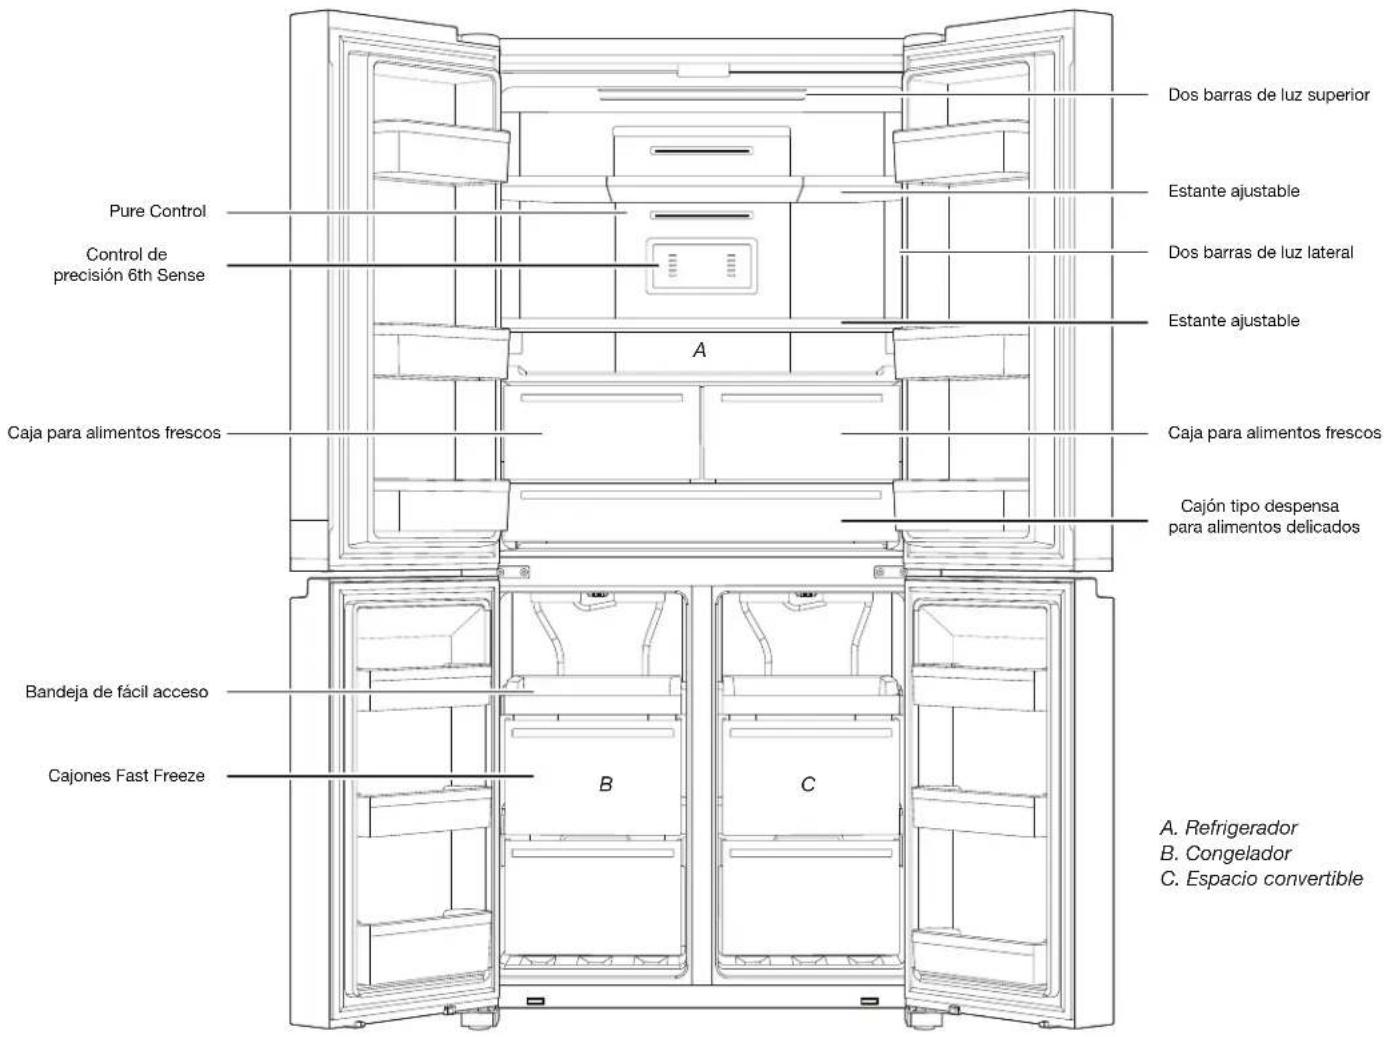
natural_image
Pure technical line drawing of a rectangular frame with vertical and horizontal cutouts (no text or symbols)A. Cubierta de fusible B. Fusible
natural_image
Line drawing of a multi-tier refrigerator cabinet (no text or labels)natural_image
Technical diagram of a mechanical assembly with labeled component A (no text or symbols present)A. Tornillos Allen de 5 mm
natural_image
Technical line drawing of a mechanical clamp or bracket assembly (no text or symbols)A. Bisagra
ADVERTENCIA
natural_image
Technical line drawing of a mechanical clamp or bracket assembly with screws and a labeled component (no text or symbols present)natural_image
Line drawing of a refrigerator interior showing door, front panel, and side door with labeled component A (no text or symbols beyond label)A. Bisagra inferior
ADVERTENCIA

natural_image
Technical line drawing of a mechanical assembly with a rotating component and labeled point A (no text or symbols beyond label)A. Patas con freno
natural_image
Technical line drawing of a refrigerator with labeled component A (no text or symbols beyond label)natural_image
Simple line drawing of a rectangular frame with a labeled component 'A' on top (no text or symbols beyond label)natural_image
Diagram of a mechanical device with a circular component and two hanging weights (no text or symbols)NOTAS:
natural_image
Simple line drawing of a two-cabinet storage unit with arrows indicating flow direction (no text or symbols)natural_image
Architectural line drawing of a refrigerator interior showing door, shelves, and ventilation slots (no text or symbols)natural_image
Architectural line drawing of a double door with internal compartments and a black arrow indicating direction (no text or symbols)natural_image
Line drawing of a refrigerator with open doors and shelves, no text or symbols presentnatural_image
Pure technical line drawing of a rectangular frame with vertical and horizontal cutouts (no text or symbols)Lagerkapazität:
natural_image
Technical line drawing of a mechanical clamp or bracket assembly with screws and a labeled component (no text or symbols present)A. Mittleres Scharnier
natural_image
Line drawing of a refrigerator interior showing door, front panel, and side door with labeled component A (no text or symbols beyond label)natural_image
Technical line drawing of a mechanical assembly with a knob and curved component (no text or symbols)A. Bremsfuß
natural_image
Technical line drawing of a refrigerator with labeled component A (no text or symbols beyond label)natural_image
Simple line drawing of a rectangular frame with a labeled component 'A' on top (no text or symbols beyond label)natural_image
Diagram of a double door mechanism inside a cabinet, showing a circular component with a downward arrow and handle (no text or symbols)HINWEISE:
natural_image
Diagram of a cabinet with two drawers and an open door, showing directional arrows indicating movement (no text or symbols)natural_image
Architectural line drawing of a refrigerator interior showing door, shelves, and storage compartments (no text or symbols)Gefrierfächer
natural_image
Architectural cross-section diagram of a refrigerator with doors open and internal shelves, showing no text or symbolsnatural_image
Line drawing of a refrigerator with multiple doors stacked on the side (no text or symbols)natural_image
Pure architectural or structural line drawing with no text, numbers, or symbolsA. 保險絲蓋
B. 保險絲
愛爾蘭 (僅):
A. 頂部轉軸蓋螺絲
B. 頂部轉軸蓋
A. 頂部轉軸蓋螺絲
B. 頂部轉軸蓋
- 中斷門轉軸上方的電線插頭之電源。
natural_image
Technical line drawing of a mechanical clamp or bracket assembly with screws and a labeled component (no text or symbols present)A. 中間轉動
■ 從下方的轉軸插腳處抬起冷藏箱門。
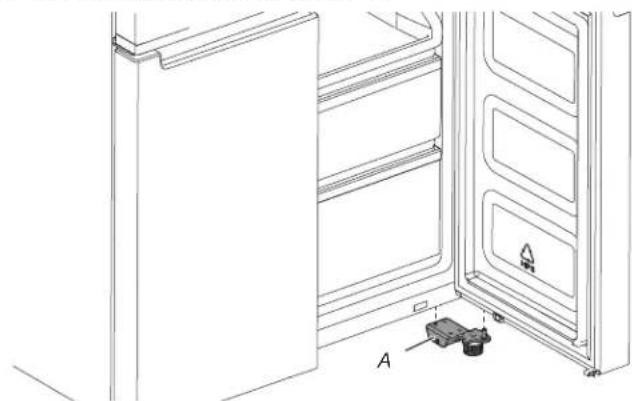
natural_image
Line drawing of a refrigerator interior showing door, front panel, and side panel with labeled component A (no text or symbols beyond label)A. 下方轉軸
最後步驟
警告
觸電危險
插入至接地插座。
請勿拔下接地插腳。
請勿使用變壓器。
請勿使用延長線。
natural_image
Technical line drawing of a mechanical assembly with a curved component and labeled point A (no text or symbols beyond label)A. 刹車腳
- 聲音和 Vacation mode (假期模式) 按鈕
- Freezer Compartment (冷凍室) 按鈕 & 指示燈
- Freezer (瞬冷凍) Mild Freeze (微冷凍) Fast Chill (軟冷凍) 指示燈
- Convertible Space (可轉換空間) 按鈕 & 指示燈
- Wine, Veggies, Meat & Fish (酒類、蔬菜類、肉類和魚類) 指示燈
- Refrigerator Compartment (冷藏室) 按鈕 & 指示燈
- Lock (鎖定) 指示燈
- Lock and Celsius/Fahrenheit (鎖和攝氏/華氏) 按鈕
- Fast Cool (快速冷卻) 按鈕和指示燈
- Door Open (箱門開啟) 指示燈
natural_image
Technical line drawing of a refrigerator with labeled component A (no text or symbols beyond label)A. 轉軸密封
調整架子高度
natural_image
Simple line drawing of a rectangular frame with a labeled section 'A' and a small shaded band, no text or symbols present.A. 轉触盖
架子、儲物箱和抽屜
架子和框架
可調整冰箱架,以符合您的單獨儲物需要。
natural_image
Diagram of a mechanical device with a circular component and directional arrows, no text or symbols present備註:
natural_image
Simple line drawing of a cabinet with arrows indicating direction (no text or symbols)冰箱門儲物盒
natural_image
Architectural line drawing of a refrigerator interior showing door, shelves, and storage compartments (no text or symbols)冷凍儲存室
快速取用盒
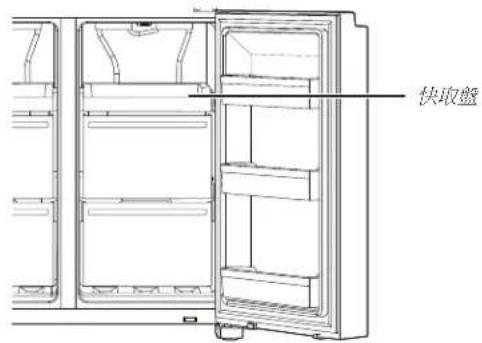
natural_image
Line drawing of a refrigerator interior showing door, shelves, and ventilation unit (no text or symbols)natural_image
Line drawing of a refrigerator with multiple doors stacked on the side (no text or symbols)natural_image
Pure technical line drawing of a rectangular frame with vertical and horizontal lines, no text or symbols presentМісткість:
natural_image
Technical line drawing of a multi-tiered refrigerator unit (no text or symbols)
natural_image
Technical line drawing of a mechanical clamp or bracket assembly with screws and a labeled component (no text or symbols present)A. Середня петля
natural_image
Line drawing of a refrigerator interior showing door, front panel, and side door with labeled component A (no text or symbols beyond label)A. Нижня петля
Заключні дії
ПОПЕРЕДЖЕННЯ
natural_image
Technical line drawing of a mechanical assembly with a knob and curved arrow indicating rotation (no text or symbols)natural_image
Technical line drawing of a refrigerator with labeled component A (no text or symbols beyond label)natural_image
Simple line drawing of a rectangular frame with a labeled component 'A' on top (no text or symbols beyond label)A. Кришка петлі
natural_image
Diagram of a mechanical device with a circular component and two hanging weights (no text or symbols)ПРИМІТКИ.
natural_image
Simple line drawing of a cabinet with arrows indicating direction (no text or symbols)natural_image
Architectural line drawing of a double door with shelves and doors, showing internal structure and an arrow indicating direction (no text or symbols)natural_image
Architectural line drawing of a refrigerator interior showing door, shelves, and storage compartments (no text or symbols).8. Supc by shrip laapc Albwaib bege gliche warabl the kabil by shrip laapc oni yher thlaja
natural_image
Line drawing of a refrigerator interior showing door, shelves, and storage compartments (no text or symbols)natural_image
Line drawing of a cabinet with arrows indicating direction (no text or symbols)سلال بابesthesia
natural_image
Architectural line drawing of a refrigerator interior showing door, shelves, and ventilation unit (no text or symbols)natural_image
Diagram of a mechanical device with a circular component and directional arrows, no text or symbols presentملاحظات:
natural_image
Technical line drawing of a cabinet or enclosure with a vertical panel inserted, labeled 'A' (no text or symbols beyond label)A. عزل معلق
natural_image
Simple line drawing of a rectangular frame with a labeled component 'A' on top, no text or symbols present..A. غطاء مفصلة
(Pure Control Indicator) .16.
(Freezer Compartment) .2
(Freezer Mid Freeze Fast Chill)
.A. .B.
natural_image
Pure technical line drawing of a rectangular frame with vertical and horizontal cutouts (no text or symbols)سعة التخزين:
natural_image
Line drawing of a refrigerator with multiple doors placed beside it (no text or symbols)natural_image
Line drawing of a double door refrigerator with no text or symbols- REFRIGERATOR SAFETY
- Your safety and the safety of others are very important.
- DANGER
- WARNING
- SAFETY INSTRUCTIONS
- IMPORTANT TO BE READ AND OBSERVED
- PERMITTED USE
- INSTALLATION
- ELECTRICAL WARNINGS
- CLEANING AND MAINTENANCE
- DISPOSAL OF PACKAGING MATERIALS
- ENERGY SAVING TIPS
- Proper Disposal of Your Old Refrigerator
- Important information to know about disposal of refrigerants:
- Delicates Pantry Drawers
- Panoramic LED lighting
- Convertible Space
- Pure control
- INSTALLATION INSTRUCTIONS
- Getting Started
- INSTALLATION CHECKLIST
- Electrical Shock Hazard
- √ Doors
- √ Final Checks
- Unpack the Refrigerator
- Excessive Weight Hazard
- Refrigerator Delivery
- When Moving Your Refrigerator:
- Remove the Packaging
- Clean Before Using
- Important information to know about glass shelves and covers:
- Location Requirements
- Electrical Requirements
- Recommended Earthing Method
- For Australia and New Zealand:
- Electrical Requirements (Great Britain and Ireland only)
- Fuse Replacement
- For the Republic of Ireland (only):
- Socket/Plug (valid for both countries):
- Temperature
- Remove and Replace Refrigerator Doors
- Remove Right-Hand Door
- Remove Left-Hand Door
- Replace Right-Hand Refrigerator Door
- Replace Left-Hand Refrigerator Door
- Final Steps
- Remove and Replace Freezer/Flexi Freeze Door
- Refrigerator Levelling
- Replace and Install the Pure Control
- Accessories
- Assistance or Service
- If you need replacement parts
- Warranty
- Keep this book and your sales slip together for future reference. You must provide proof of purchase or installation date for in-warranty service.
- Using the Controls
- Viewing and Adjusting Temperature Set Points
- Adjusting Fresh Food and Freezer Compartment Temperature:
- IMPORTANT:
- th Sense Precision Control
- \* - 日 Flexi Freeze Setting
- Fast Cool
- Fast Freeze
- Vacation Mode
- Sound ON-OFF
- Key Lock
- Demo Mode
- Additional Features
- Door Ajar Alarm
- Water Filter Reset and Indicator
- Lighting the Refrigerator
- REFRIGERATOR USE
- Opening and Closing Doors
- Shelf Height Adjustment
- SHELVES, BINS, AND DRAWERS
- Shelves and Shelf Frames
- NOTES:
- Crisper Drawers
- To remove and replace the drawers:
- Refrigerator Door Bins
- Door Bin Divider (on some models)
- Freezer Storage Compartments
- Fast Freeze compartment
- To remove the upper drawer:
- REFRIGERATOR CARE
- Cleaning
- Explosion Hazard
- Exterior Cleaning
- Fingerprint-Resistant Stainless
- Interior Cleaning
- Condenser
- Lights
- Holiday and Moving Care
- Holidays
- If You Choose to Leave the Refrigerator On While You're Away:
- If You Choose to Turn Off the Refrigerator Before You Leave:
- Moving
- TROUBLESHOOTING
- Whirlpool
- FRIGORIFERO ALL'AMERICANA
- CON CONGELATORE IN BASSO
- GUIDA ALL'USO E ALLA MANUTENZIONE
- Sommario
- AVVERTENZA
- NOTE:
- AVERTISSEMENT
- REMARQUES :
- ПРЕДОСТЕРЕЖЕНИЕ
- ПРИМЕЧАНИЯ:
- OSTRZEŻENIE
- UWAGI:
- Komory zamrażarki
- Pure Control (Control puritate)
- AVERTISMENT
- VEILIGHEID VAN DE KOELKAST
- WAARSCHUWINGEN M.B.T. ELEKTRICITEIT
- WAT GAAT ER SCHUIL ACHTER DE DEUREN?
- Freeze Shield (Vriesbescherming)
- ⚠ WAARSCHUWING
- Laatste handelingen
- OPMERKINGEN:
- Deurvakken in de koelkast
- Slutliga steg
- Sound On/Off (Ljud På/Av)
- =○ Key Lock (Knapplås)
- Justera hyllhöjder
- ANMÄRKNINGAR:
- Dörrfack
- Frysavdelningar
- Opbevaringskapacitet:
- ADVARSEL
- Afsluttende trin
- BEMÆRK:
- Fryseafdelingens opbevaringsrum
- KJ∅LESKAPETS SIKKERHET
- HVA ER NYTT BAK DØRENE?
- Freeze Shield
- For Irland (kun):
- Ta av venstre dør
- Sluttrinn
- HYLLER, BOKSER OG SKUFFER
- MERKNADER:
- ! AVISO
- Passos finais
- NOTAS:
- Para retirar e voltar a colocar as gavetas:
- ПРЕДУПРЕЖДЕНИЕ
- БЕЛЕЖКИ:
- Za Republiku Irsku (samo za to tržište):
- Utičnica/utikač (vrijedi za obje države):
- Temperatura
- UPOZORENJE
- Završni koraci
- Prilagodba visine police
- POLICE, POSUDE I LADICE
- Police i okviri polica
- NAPOMENE:
- Odjeljci za pohranu u zamrzivaču
- Uklanjanje gornje ladice:
- ODRŽAVANJE HLADNJAKA
- Čišćenje
- Úložná kapacita:
- POKYNY NA INŠTALÁCIU
- Začíname
- KONTROLNÝ ZOZNAM PRE INŠTALÁCIU
- !VAROVANIE
- Záverečné kroky
- Úprava výšky police
- POZNÁMKY:
- Skladovacie priestory v mrazničke
- ⚠️VAROVANIE
- Ainult lirimaal
- HOIATUS!
- MÄRKUSED.
- Külmiku uksekastid
- ⚠️ ПРОЕІДОПОІНЄН
- ⚠️ ΠΡΟΕΙΔΟΠΟΙΗΣΗ
- ΣΗΜΕΙΩΣΕΙΣ:
- VIGYÁZAT
- Befejező lépések
- MEGJEGYZÉSEK:
- BRĪDINĀJUMS
- Pēdējās darbības
- PIEZIMES:
- Ledusskapja durvju nodalijumi
- ISPÈJIMAS
- PASTABOS.
- Šaldiklio skyriai
- VAROVÁNÍ
- Závěrečné kroky
- ADVERTENCIA
- Lagerkapazität:
- HINWEISE:
- Gefrierfächer
- 愛爾蘭 (僅):
- 最後步驟
- 觸電危險
- 調整架子高度
- 架子、儲物箱和抽屜
- 架子和框架
- 備註:
- 冰箱門儲物盒
- 冷凍儲存室
- Місткість:
- ПОПЕРЕДЖЕННЯ
- ПРИМІТКИ.
Brand : WHIRLPOOL
Model : WQ9 M2L
Category : Fridge