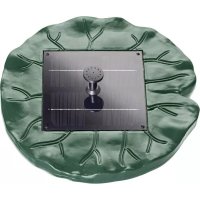
PondoSolar Lily Island - Pump Pontec - Free user manual and instructions
Find the device manual for free PondoSolar Lily Island Pontec in PDF.


| Product type | Solar pump for pond fountain |
| Brand | Pontec |
| Model | PondoSolar Lily Island |
| Category | Pump |
| Power supply | Solar panel integrated into the float |
| Use | Outdoors, in a body of water (pond, lake) |
| Main functions | Creation of a decorative fountain, autonomous operation with solar energy |
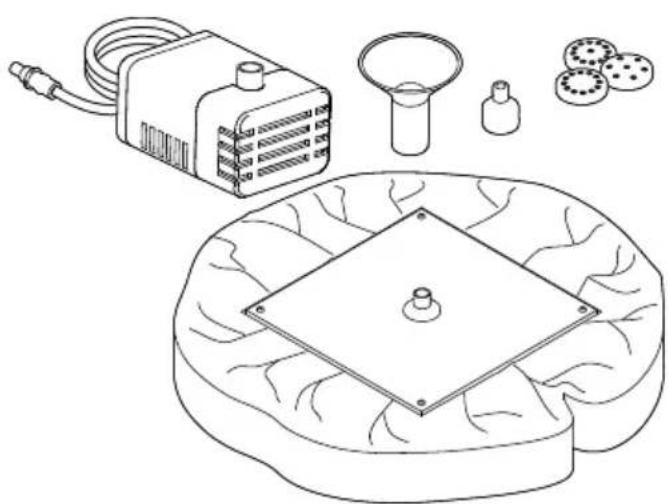
| Delivery contents | Pump body, pump with outlet and cable, nozzle holder, 4 nozzle attachments, float with integrated solar panel |
| Commissioning | Assemble the nozzle unit, connect the pump to the float, plug in the cable, place the float on the water |
| Conditions of use | Only with clean water, do not run dry, submerge the pump |
| Safety | Use under adult supervision for children under 8 and mentally disabled persons |
| Maintenance and cleaning | Clean at least 2 times per year, use a soft brush and clean water, clean the solar panel with a damp cloth |
| Wear parts | Filter sponge, operating unit |
| Repairability | Replaceable operating unit, original spare parts recommended |
| Winter storage | Keep the pump submerged and frost-free, observe the operating temperature range |
| Recycling | Do not dispose with household waste, dispose via the return system |
| Warranty | 2 years from the date of purchase, wear parts excluded |
Frequently Asked Questions - PondoSolar Lily Island Pontec
User questions about PondoSolar Lily Island Pontec
0 question about this device. Answer the ones you know or ask your own.
Ask a new question about this device
Download the instructions for your Pump in PDF format for free! Find your manual PondoSolar Lily Island - Pontec and take your electronic device back in hand. On this page are published all the documents necessary for the use of your device. PondoSolar Lily Island by Pontec.
USER MANUAL PondoSolar Lily Island Pontec
EN Operating instructions
FR Notice d'emploi
PondoSolar Lily Island
- 5 -
A
PSO0013
B
PSO0014
C
PSO0003
Translation of the original Operating Instructions

WARNING
- This unit can be used by children aged 8 and above and by persons with reduced physical, sensory or mental capabilities or lack of experience and knowledge if they are supervised or have been instructed on how to use the unit in a safe way and they understand the hazards involved.
- Do not allow children to play with the unit.
- Only allow children to carry out cleaning and user maintenance under supervision.
- A damaged connection cable cannot be replaced. Dispose of the unit.
Safety information
- Never carry or pull the unit by the electrical cable.
- Only use original spare parts and accessories for the unit.
- Operate the pump exclusively with the solar module included in the delivery.
- Protect the unit from knocks or vibration.
- Never carry out technical changes to the unit.
Information about these operating instructions
You made a good choice with the purchase of this product PondoSolar Lily Island.
Prior to commissioning the unit, please read the instructions of use carefully and fully familiarise yourself with the unit. Ensure that all work on and with this unit is only carried out in accordance with these instructions.
Adhere to the safety information for the correct and safe use of the unit.
Keep these instructions in a safe place! Please also hand over the instructions when passing the unit on to a new owner.
Warnings used in these instructions

NOTE
Information for the purpose of clarification or for preventing possible damage to assets or to the environment.
Cross-references used in these instructions
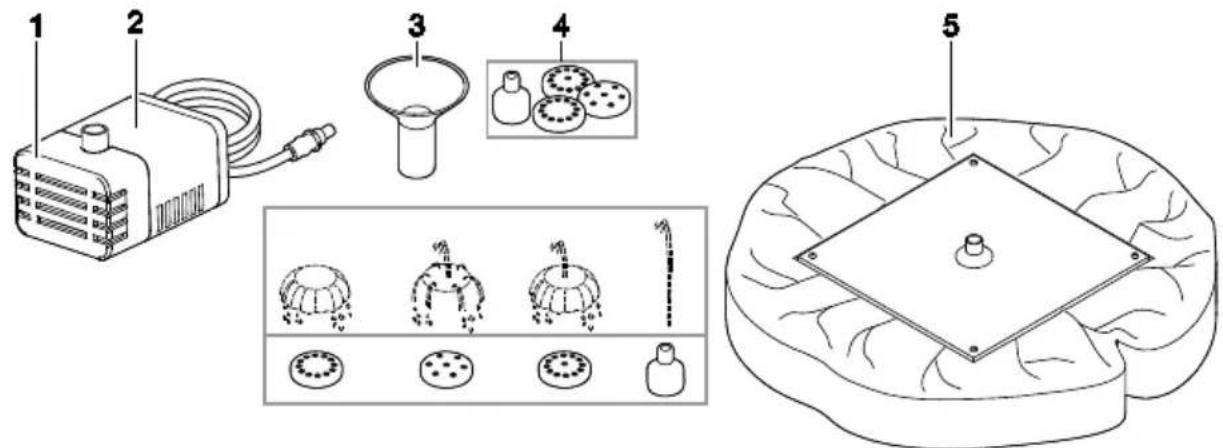
5 A reference to a figure, e.g. figure A.
→ Reference to another section.
Scope of delivery
| 5 A | Quantity | Description |
| 1 | 1 | Pump housing |
| 2 | 1 | Pump with outlet and connection line |
| 3 | 1 | Nozzle holding fixture |
| 4 | 4 | Nozzle attachment |
| 5 | 1 | Floater with integrated solar module |
Intended use
PondoSolar Lily Island, referred to as "unit", may only be used as specified in the following:
• For creating a water fountain in a pond.
- For operation with clean water.
- Operate in accordance with instructions.
The following restrictions apply to the unit:
- Never use the unit with fluids other than water.
- Never run the unit without water.
- Do not use for commercial or industrial purposes.
- Do not use in conjunction with chemicals, foodstuff, easily flammable or explosive substances.
- Do not connect to the domestic water supply.
Installation and connection

NOTE
Prevent the pump from running dry. Otherwise the pump will be destroyed.
- Only operate the pump when it is immersed.
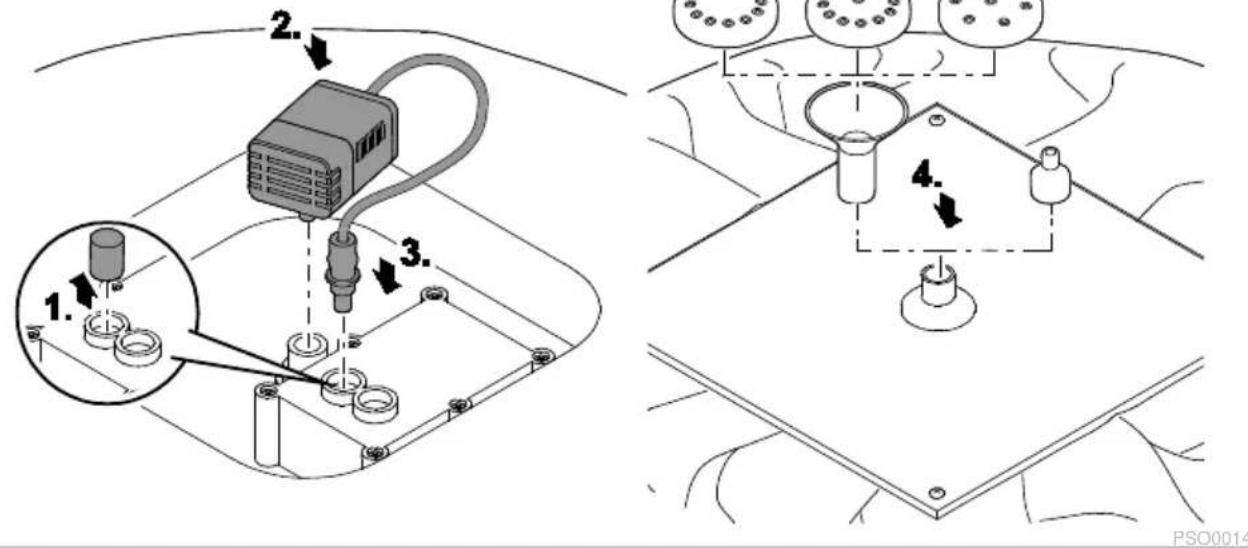
How to proceed:
5 B
-
Pull the stop plug from the connection.
-
The stop plug protects the electronic system from the water.
-
When the electrical plug is pulled, insert the stop plug.
-
Connect the pump with the floater.
-
Insert the connection line in the socket.
-
Push the plug completely into the socket (up to the stop) to ensure that the connection is water-tight.
- Switching on: Connect the pump with the solar module.
-
Switching off: Disconnect the solar module from the pump.
-
Assemble the nozzle unit and install on floater.
-
Position the floater on the surface of the water.
Remedy of faults
| Malfunction | Cause | Remedy |
| Pump does not start. | No connection to the solar module. | Connect the pump to the solar module.Correctly insert the connection cable. |
| The solar module is soiled. | Clean | |
| The impeller unit is blocked | Clean | |
| Insufficient or no pump delivery. | The filter is clogged. | Open the pump, remove and clean the filter. |
| The nozzle unit is clogged. | Remove and clean the nozzle unit. | |
| The impeller unit is worn. | Replace | |
| Insufficient sunlight | Direct sunlight |
Maintenance and cleaning
The unit has to be taken out of the water for cleaning or maintenance.
Cleaning the device
Recommendation regarding cleaning:
- Clean the unit as required but at least twice a year.
-
When cleaning the pump, pay particular attention to the cleaning of the impeller unit and pump housing.
-
Do not use aggressive cleaning agents or chemical solutions as they could attack the housing or impair the function of the unit.
- Recommended cleaning agent for removing stubborn limescale deposits:
- Pump cleaning agent PumpClean from OASE.
Vinegar- and chlorine-free household cleaning agent.
- Clean the outside of the pump.
- Use a soft brush as an aid.
• After cleaning, thoroughly rinse all parts in clean water.
How to proceed:
- Disassemble the unit.
- Clean the filter housing and impeller unit. (→ Replacing the impeller unit)
- Pull the nozzle unit apart.
- Clean all parts.
- Use a soft brush as an aid.
- Rinse parts in clean water.
- Clean the solar module with a damp cloth and wipe dry.
- Reassemble the unit in the reverse order.
Replacing the impeller unit
How to proceed:
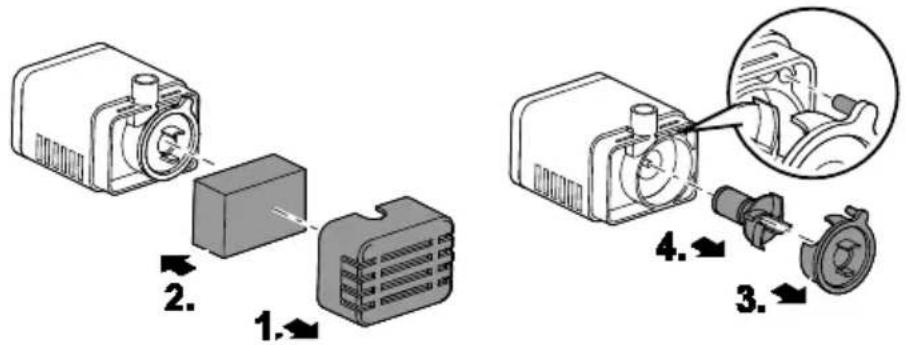
5 C
- Pull the filter housing from the pump.
- Remove the foam filter from the filter housing and rinse it out.
- Pull the cover off the impeller unit (push-fit fastening, lever out carefully).
- Pull out the impeller unit and clean or replace.
- Reassemble the unit in the reverse order.
Wear parts
- Foam filter
- Impeller unit
Storage/overwintering
Observe the permissible operating temperature range. (→ Technical data)
- If the limit values are exceeded or gone below, it is necessary to remove the unit. Clean the unit thoroughly and check it for damage.
- Store the pump submerged and in a frost-free environment.
Disposal

NOTE
This unit contains electronic components - do not dispose of this unit with domestic waste.
- Render the unit unusable by cutting off the cables.
- Dispose of the unit by using the return system provided for this purpose.
Guarantee conditions
PfG grants a 2 year guarantee from the date of sale on proven material and manufacturing faults. Wear parts such as bulbs etc. are exempted from the guarantee. Prerequisite for our guarantee is the presentation of the purchase receipt. Our guarantee will become null and void if the unit is misused, electrically or mechanically damaged by inappropriate use and improper repair by non-authorised workshops. Repairs are reserved for workshops authorised by PfG or by PfG itself. In the case of warranty claims, please return the defective unit or part freight paid to PfG together with a description of the fault and the purchase receipt. PfG reserves the right to invoice repair costs. PfG is not liable for transport damage. Any damage must be claimed against the carrier. Further claims of whatever type, especially consequential damage, are excluded. This guarantee does not affect the final customer's claims against the dealer.
PSO0015

PIG GmbH Tecklenburger Straße 161 D - 48477 Hörstel Germany www.pontec.com
CE
- PONDOSOLAR LILY ISLAND
- WARNING
- SAFETY INFORMATION
- INFORMATION ABOUT THESE OPERATING INSTRUCTIONS
- NOTE
- CROSS-REFERENCES USED IN THESE INSTRUCTIONS
- INTENDED USE
- INSTALLATION AND CONNECTION
- MAINTENANCE AND CLEANING
- CLEANING THE DEVICE
- REPLACING THE IMPELLER UNIT
- WEAR PARTS
- STORAGE/OVERWINTERING
- DISPOSAL
- GUARANTEE CONDITIONS
Brand : Pontec
Model : PondoSolar Lily Island
Category : Pump