WL600g - Wireless Router ASUS - Free user manual and instructions
Find the device manual for free WL600g ASUS in PDF.
| Product Type | All-in-one ADSL2/2+ wireless gateway router |
| Brand | ASUS |
| Model | WL-600g |
| Wireless Standard | IEEE 802.11g, backward compatible 802.11b |
| Main Functions | Built-in ADSL modem, firewall, FTP server, USB printer sharing, Gaming Blaster, VoIP |
| Interfaces | 1 ADSL port, 4 LAN Ethernet ports (RJ45), 2 USB 2.0 ports |
| Power Supply | External power adapter (not specified, estimated 12V DC) |
| Power Consumption | Approx. 10 W (estimated) |
| Dimensions (approx.) | Approx. 180 x 120 x 30 mm (estimated) |
| Weight (approx.) | Approx. 300 g (estimated) |
| LED Indicators | PWR, ADSL, IP, USB, AIR, LAN 1-4 |
| Wireless Security | WEP 64/128 bits, WPA, WPA2 |
| Configuration | Web interface (192.168.1.1), Quick Setup, EZSetup, One Touch Wizard |
| Routing Protocols | RIP v1, v2 |
| Operating Temperature | 0 °C to 40 °C (estimated) |
| Operating Humidity | 10% to 90% non-condensing (estimated) |
| Maintenance and Cleaning | Unplug the device before cleaning; use a soft, dry cloth |
| Safety | Do not expose to moisture; avoid extreme temperatures |
Frequently Asked Questions - WL600g ASUS
User questions about WL600g ASUS
0 question about this device. Answer the ones you know or ask your own.
Ask a new question about this device
Download the instructions for your Wireless Router in PDF format for free! Find your manual WL600g - ASUS and take your electronic device back in hand. On this page are published all the documents necessary for the use of your device. WL600g by ASUS.
USER MANUAL WL600g ASUS
All-in-1 Wireless ADSL2/2+ Home Gateway WL-600g
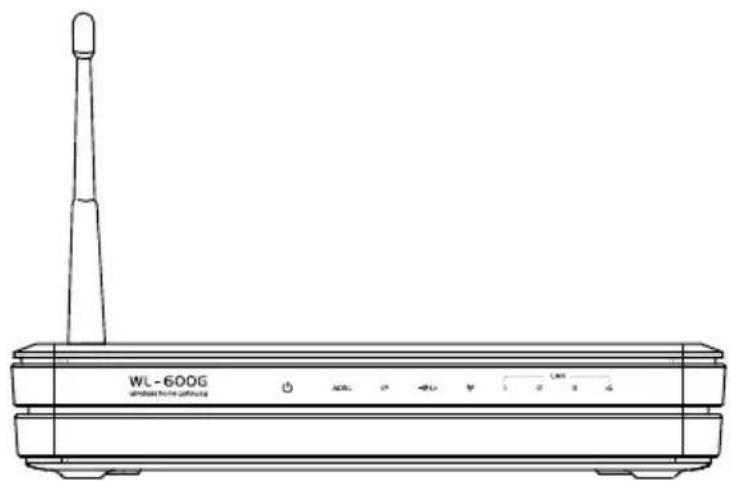
natural_image
Line drawing of a wireless router labeled WL-600G, showing front panel and antenna (no text or symbols on body)Quick Start Guide
Manufacturer Contact Information
ASUSTeK COMPUTER INC. (Asia-Pacific)
Company address: 15 Li-Te Road, Beitou, Taipei 11259
General (tel): +886-2-2894-3447 Web site address: www.asus.com.tw
General (fax): +886-2-2894-7798 General email: info@asus.com.tw
ASUS COMPUTER INTERNATIONAL (America)
Company address: 44370 Nobel Drive, Fremont, CA 94538, USA
General (fax): +1-510-608-4555 Web site address: usa.asus.com
Technical support
General support: +1-502-995-0883 Support (fax): +1-502-933-8713
Online support: http://vip.asus.com/eservice/techserv.aspx
ASUS COMPUTER GmbH (Germany & Austria)
Company address: Harkort Str. 25, D-40880 Ratingen, Germany
General (tel): +49-2102-95990 Web site address: www.asus.com.de
General (fax): +49-2102-959911 Online contact: www.asus.com.de/sales
Technical support
Components: +49-2102-95990
Online support: www.asus.com.de/support
Notebook: +49-2102-959910
Support (fax): +49-2102-959911
Table of contents
Hardware Overview ....3
Front panel ....3
Rear panel 4
Product features ....4
Setup Process Overview ....5
Hardware Setup 6
Connecting ADSL splitter to your phone outlet ....6
Connecting the splitter to WL-600g 6
Connecting your computer to WL-600g via Ethernet 6
Quick Setup 5
Quick setup 7
Before you start 7
Login to the WL-600g configuration page 7
ADSL setup 7
Wireless setup 8
Manual Setup 9
ADSL Setup ....10
Wireless Setup ....12
Connecting to WL-600g from ASUS WLAN Card ....13
Configuring ASUS WLAN Card with One Touch Wizard™ 13
Configuring WLAN card with Windows ^® WZC service....15
USB application ....16
FTP server function ....16
Setting up FTP server....16
Setting up FTP account....17
Table of contents
Setting up FTP security 17
Sharing USB printer ....18
Setting up printer client under Windows XP ....18
Compatible printer list ....20
Gaming Blaster 21
Gaming Blaster on WL-600g 21
User Specified Service 21
IP phone and other A/V applications on WL-600g 22
User Specified Service ....22
Other traffic control applications on WL-600g 23
Internet application ....23
User Specified Service....23
FTP Server 24
User Specified Service....25
Long Packet Fragmentation ....26
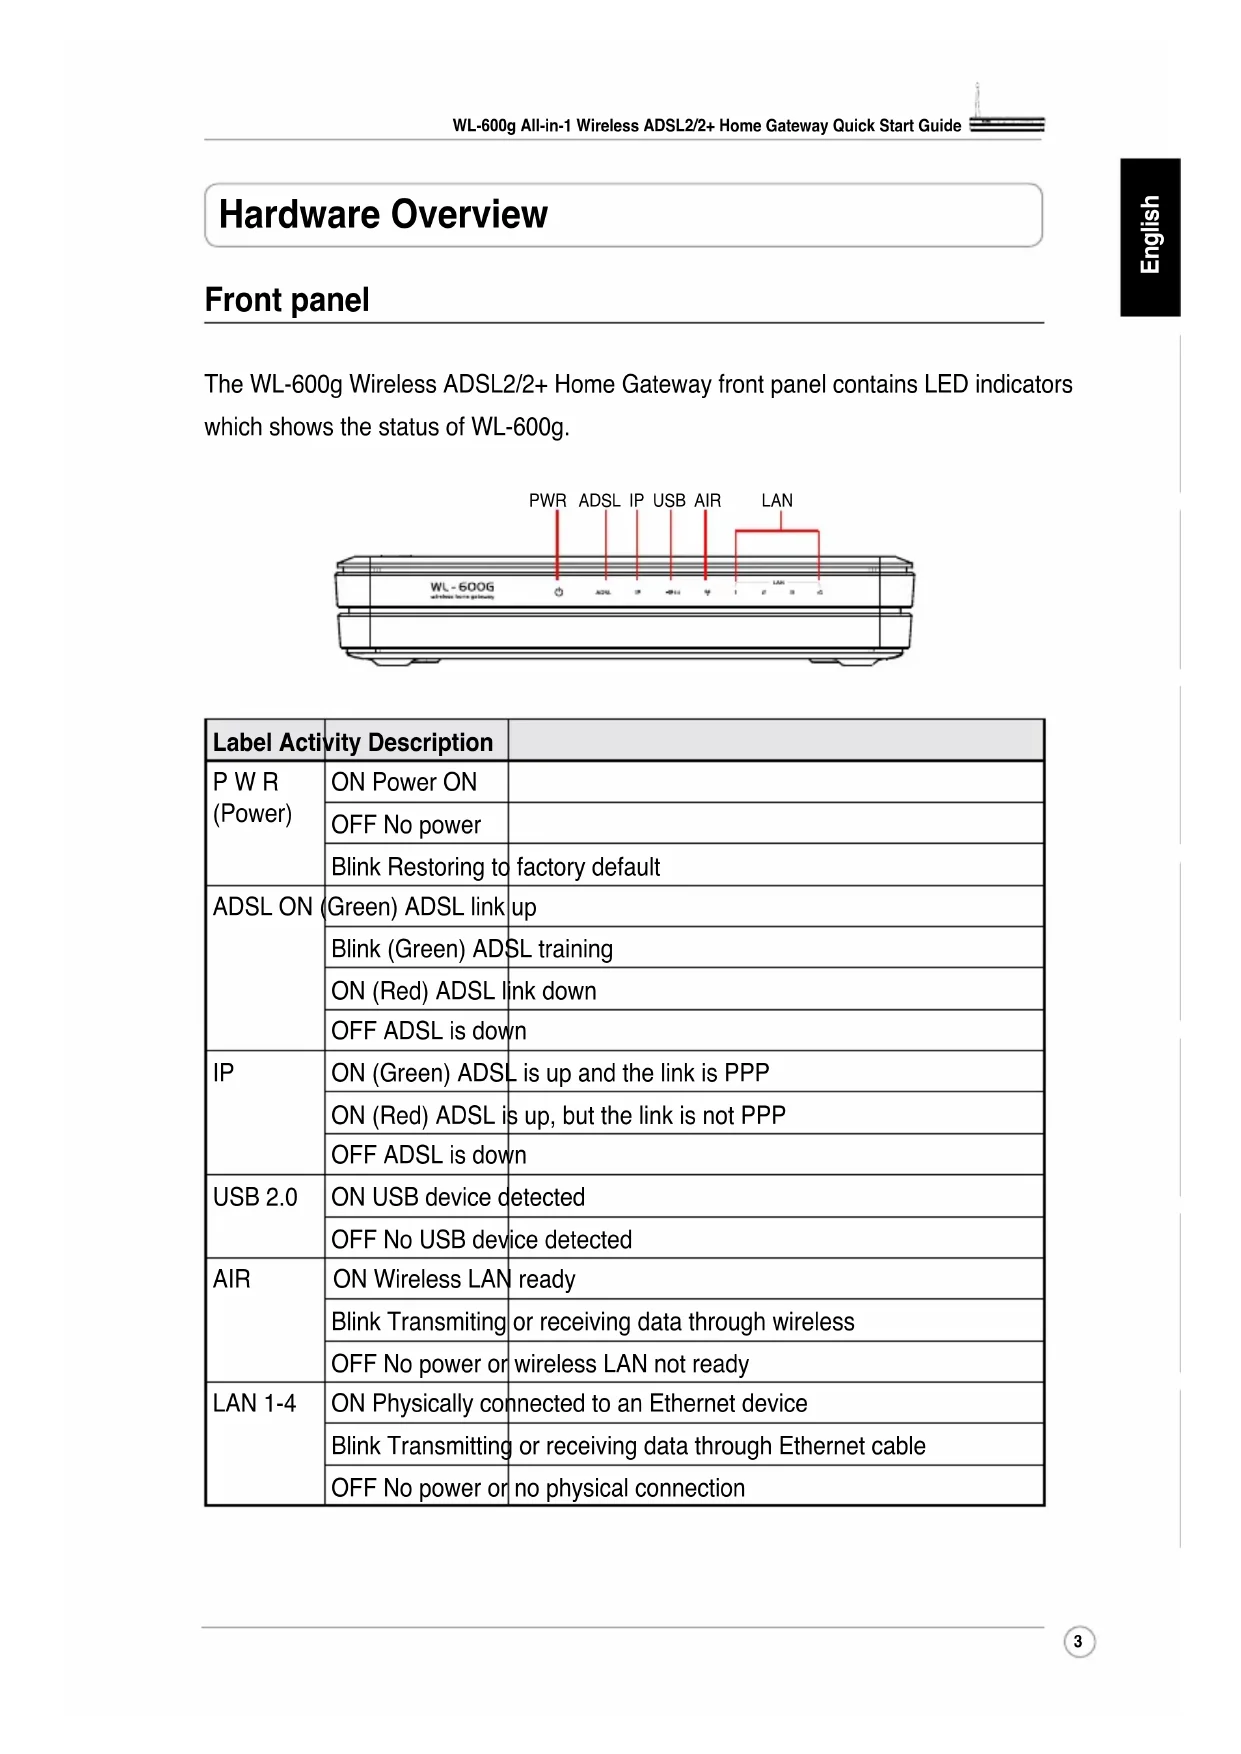
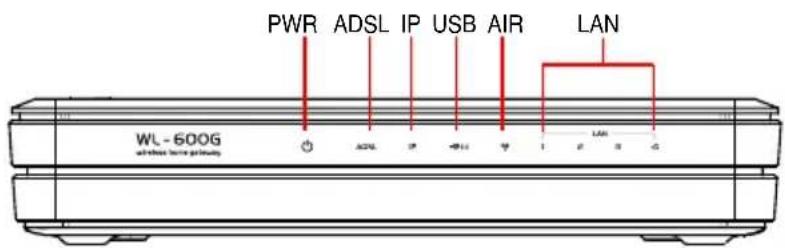
Hardware Overview
Front panel
The WL-600g Wireless ADSL2/2+ Home Gateway front panel contains LED indicators which shows the status of WL-600g.
text_image
PWR ADSL IP USB AIR LAN WL - 600G userless port directory| Label Activity Description | ||
| P W R (Power) | ON Power ON | |
| OFF No power | ||
| Blink Restoring to factory default | ||
| ADSL ON | (Green) ADSL link up | |
| Blink (Green) ADSL training | ||
| ON (Red) ADSL link down | ||
| OFF ADSL is down | ||
| IP | ON (Green) ADSL is up and the link is PPP | |
| ON (Red) ADSL is up, but the link is not PPP | ||
| OFF ADSL is down | ||
| USB 2.0 | ON USB device detected | |
| OFF No USB device detected | ||
| AIR | ON Wireless LAN ready | |
| Blink Transmitting or receiving data through wireless | ||
| OFF No power or wireless LAN not ready | ||
| LAN 1-4 | ON Physically connected to an Ethernet device | |
| Blink Transmitting or receiving data through Ethernet cable | ||
| OFF No power or no physical connection | ||
Rear panel
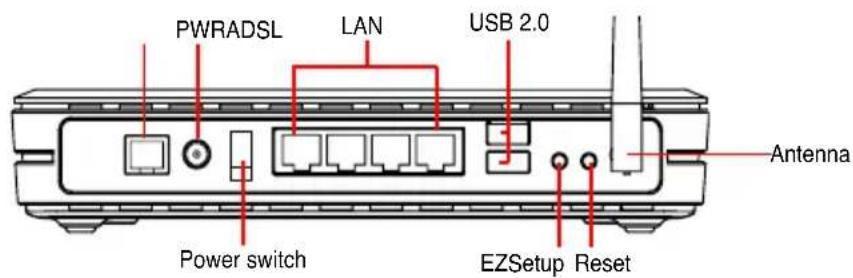
text_image
PWRADSL LAN USB 2.0 Power switch EZSetup Reset AntennaViewed from left to right, the rear panel of WL-600g contains the following elements:
- ADSL port
- Power connector
- Power switch
• Four Local Area Network (LAN) ports - USB 2.0 ports
- EZSetup button
- Reset button
• SMA antenna connector
Product features
The WL-600g Wireless ADSL 2/2+ Home Gateway provides the following features:
• Built-in ADSL modem
- Built-in firewall
- IEEE802.11g standard-based wireless network, backward compatible with 802.11b devices
- Easy-to-use Web-based configuration interface: Quick Setup for ADSL connection, wireless, and security configuration
- Extensive routing protocol support: RIP v1, v2
- Content-based filter
- EZSetup™ utility for ADSL connection, wireless network and security quick setup
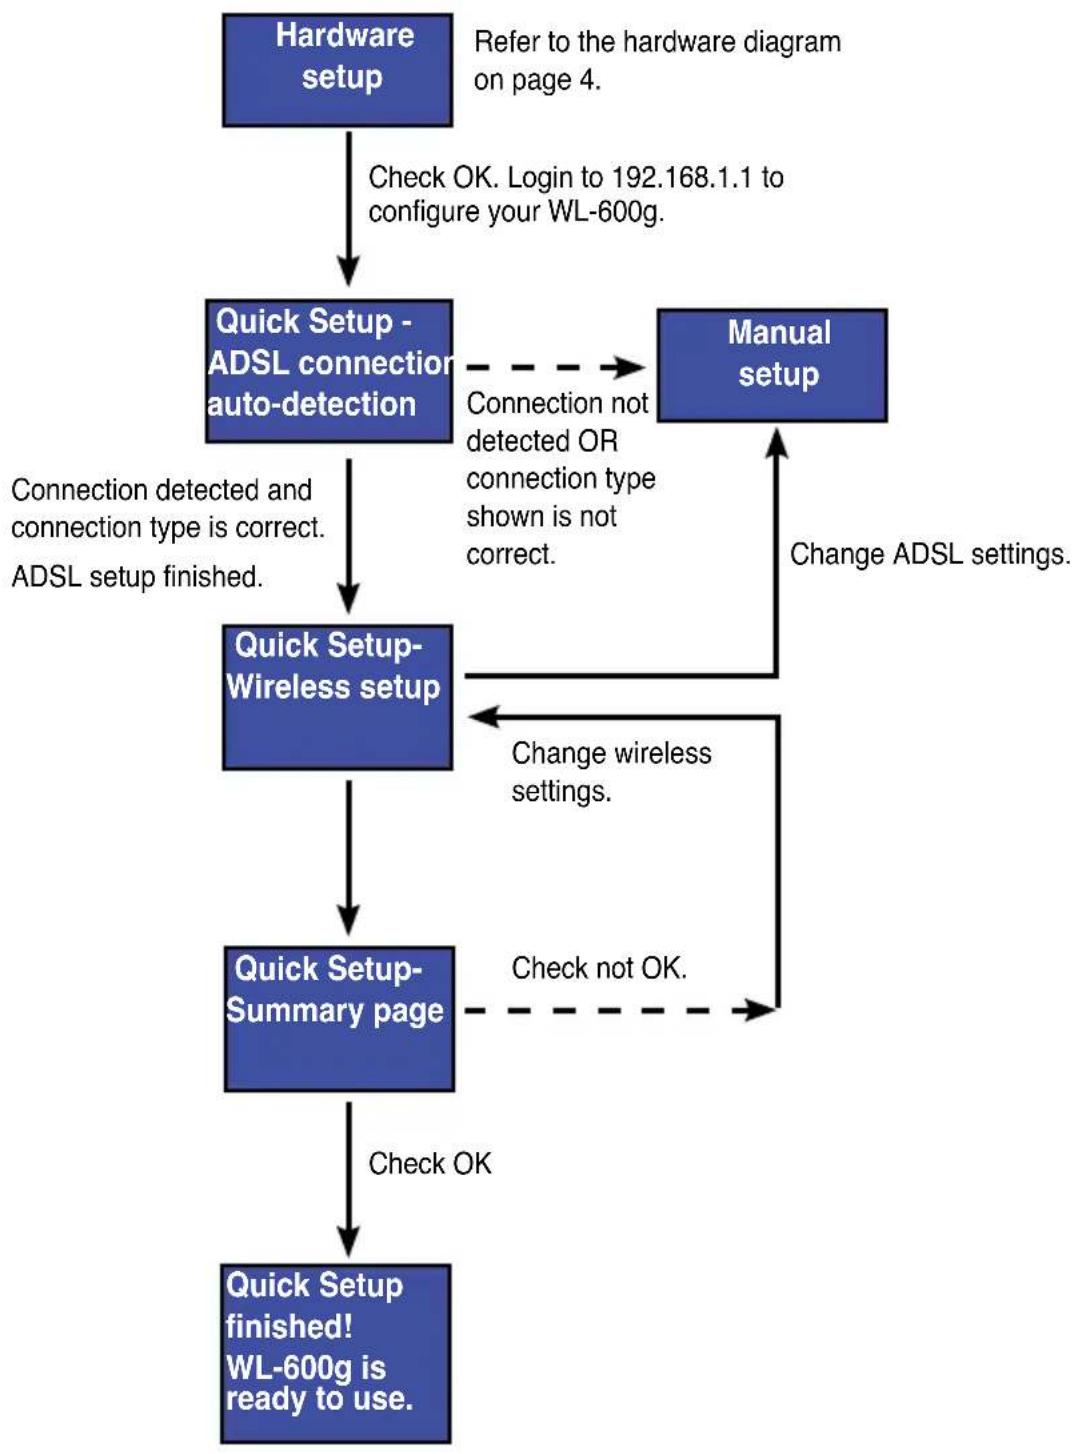
Setup Process Overview
flowchart
graph TD
    A["Hardware setup"] -->|Check OK. Login to 192.168.1.1 to configure your WL-600g.| B["Quick Setup - ADSL connection auto-detection"]
    B -->|Connection not detected OR connection type shown is not correct.| C["Manual setup"]
    C -->|Change ADSL settings.| B
    B -->|Connection detected and connection type is correct. ADSL setup finished.| D["Quick Setup-Wireless setup"]
    D -->|Change wireless settings.| E["Quick Setup-Summary page"]
    E -->|Check not OK.| F["Quick Setup finished! WL-600g is ready to use."]
    F -->|Check OK| G["End"]
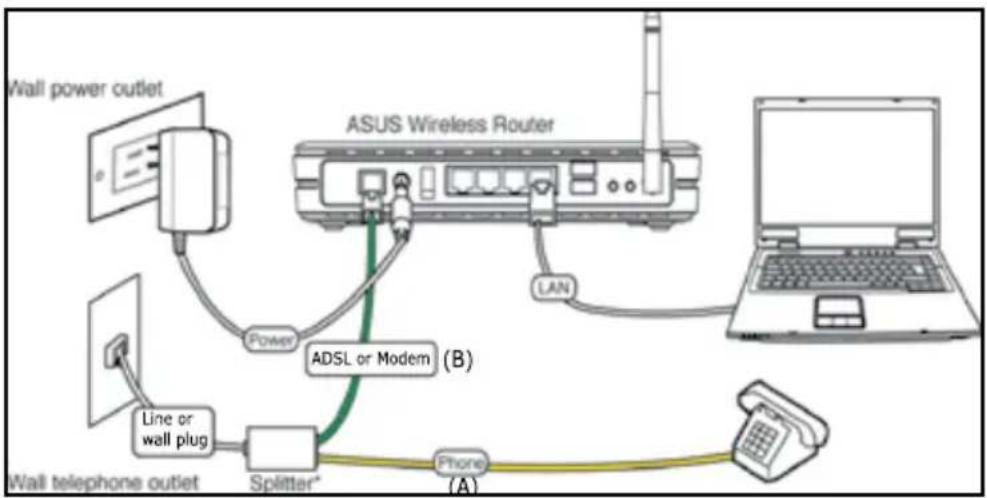
Hardware Setup
Connecting ADSL splitter to your phone outlet
Insert the Line connector or the plug of the supplied splitter into the phone outlet and connect your telephone set to the phone port of the splitter (A).

The format of the connector on the supplied splitter (line or plug) may differ by region.
Connecting the splitter to WL-600g

Incorrect splitter connection can block your ADSL service.
a. Turn off your computer.
b. Connect the ADSL port of WL-600g to the ADSL or modem port on the splitter (B),
c. Connect the power adapter to the power port on WL-600g's rear panel and to a power outlet. Make sure the power LED indicator is ON after turning on the router. If the ADSL link LED is solid green, it means ADSL link is established.
Connecting your computer to WL-600g via Ethernet
a. Use the supplied Ethernet cable (RJ45) to connect your computer to one of the LAN ports of WL-600g.
b. Turn on your computer.
flowchart
graph TD
    A["Wall power outlet"] --> B["Power"]
    B --> C["ADSL or Modem (B)"]
    C --> D["Laptop"]
    D --> E["Phone (A)"]
    E --> F["Splitter*"]
    F --> G["Line or wall plug"]
    G --> H["Wall telephone outlet"]

Splitter *: The name or the location of the ports on the supplied splitter may vary by region.
Quick Setup
Quick setup
Before you start
With Quick setup, you need to set up ADSL link first then wireless setup. Depending on your ISP's requirements, you may need to acquire some of the information listed below to set up Internet connection on WL-600g.
• Virtual Path Identifier (VPI)
• Virtual Channel Identifier (VCI)
- Host name
- ISP login username and password
- ISP Domain Name System (DNS) server address
• Static IP address (For static IP subscribers)
Login to the WL-600g configuration page
- Input 192.168.1.1 into the URL of your Web browser and presenter.
- A login window appears for user name and password. The default username is admin, password isadmin (in lower case).
- After logging in, you can see the WL-600g configuration page.
ADSL setup
- By default, the Quick Setup page pops up. The Quick Setup Wizard automatically detects your ADSL connection type.
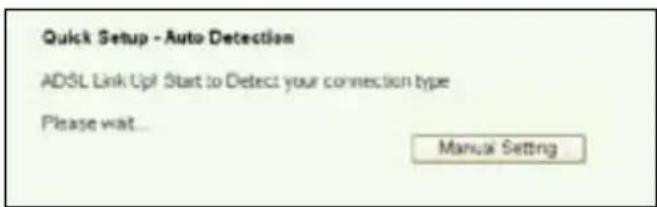
text_image
Quick Setup - Auto Detection ADSL Link Up! Start to Detect your connection type Please wait... Manual Setting- If ADSL connection is detected, the next page shows your ADSL connection type (PPPoE/PPPoA or MER).

If your ADSL connection is not detected, click Manual Setting to manually set up WL-600g. Refer to Page 9-11 for manual setting instructions.
-- If it shows your connection type is PPPoE or PPPoA
For dynamic IP users, input your username and password then click Next.
For static IP users, check Use Static IP Address and input your IP address, then click Next.

text_image
Quick Setup - Detection Result WL-500g has detected that your connection type is "PPPoE" Fyes, please key in your username/password and push "host" button to setup other function* First, please push "Manual Setting" button to setup WiFi connection manually PHP Username: PHP Password: Use Static IP Address: IP Address: Manual Setting Next
If your actual connection is not PPPoE or PPPoA, click Manual Setting to manually set up WL-600g. Refer to Page 9-11 for manual setting instructions.
-- If it shows your connection type is "MER"(DHCP)
Click Next if your connection type is MER (DHCP).

If your actual connection is not MER(DHCP), click Manual Setting to manually set up WL-600g. Refer to Page 9-11 for manual setting instructions.

text_image
Quick Setup - Detection Result WL-SXp has detected that your connection type is "DHCP (Dynamic IP)" If yes, please push "Next" buttons to setup other function If not, please push "Manual Setting" buttons to setup VIAI connection manually. Manual Setting Next
Your ADSL connection setup is finished here. Please continue for wireless setup.
Wireless setup
- Choose security level For detailed security descriptions, refer to Page 21-22 in the user manual on your support CD.
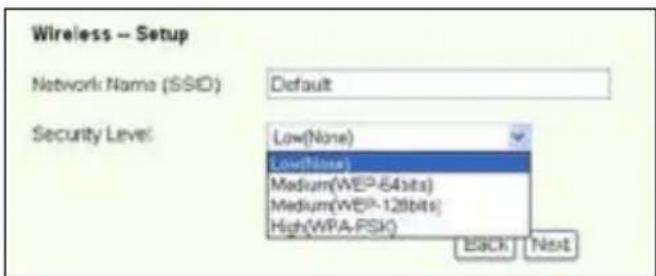
text_image
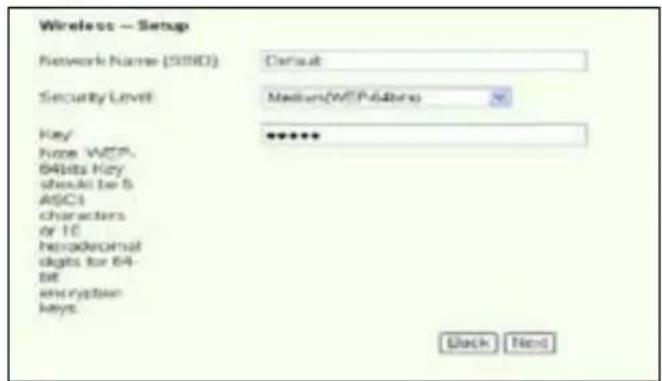
Wireless - Setup Network Name (SSD) Default Security Level Low(None) Low(None) Medium(WE^64bits) Medium(WE^128bits) High(WPA-PSK) Back Next- Input a key in the Key field. The number of digit for the key depends on the security level you choose.
text_image
Wireless — Setup Network Name (SIND) Default Security Level Medium(WTP-64bits) Key ****** Note WCP. 64bits Key should be 5 ASCII characters or 10 hexadecimal digits for 64-bit encryption keys. Back Next- The summary page then shows up. If the information displayed is correct, click Save/Reboot to finish the setup. Otherwise, click Back to modify the settings.

text_image
WAN Setup - Summary Make sure that the settings below match the settings predicted by your IGP. VPI / VCI: 87.01 Connection Type: WiFiID Service Name: appsc_6_31_5 IP Address: Automatically Accepted SSID: Default Authentication: None Click "SaveRefresh" to save three settings and bootcat reader. Click "Back" to make any modifications. NOTE: The configuration process takes about 1 minute to complete and your SQL Faster will reject. Back SaveRefresh- Setup is completed. Wait for about 50 seconds to reboot. The Web page will refresh to show the device information after reboot.
Manual Setup
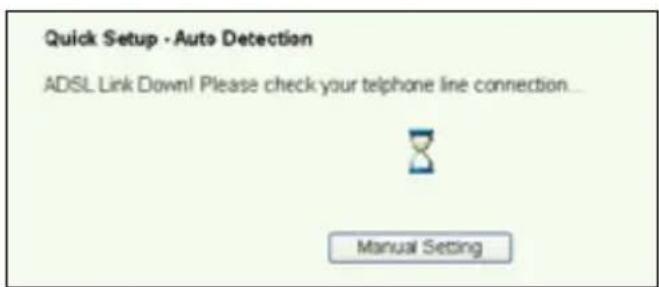
If you encounter difficulty when configuring ADSL connection with Quick Setup, click Manual Setting to manually set up the ADSL connection.
text_image
Quick Setup - Auto Detection ADSL Link Down! Please check your telphane line connection... Manual SettingADSL Setup
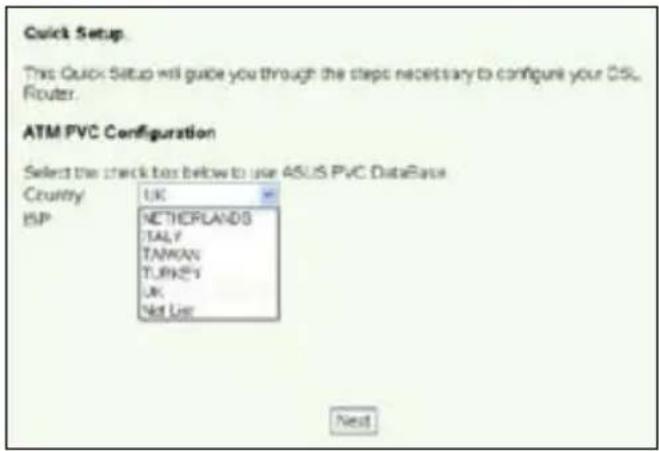
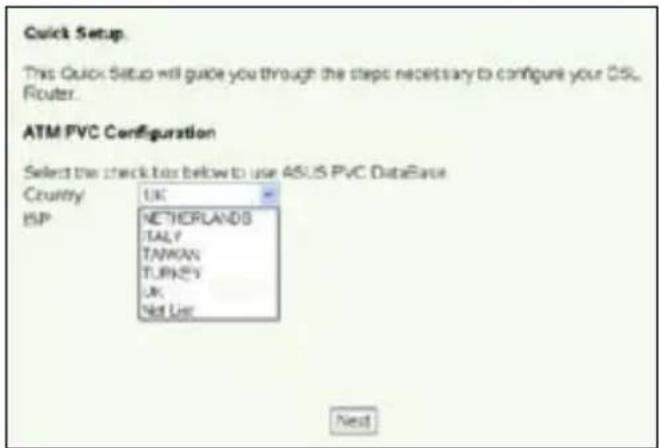
1. Select your Country and ISP, then clickNext
text_image
Quick Setup. This Quick Setup will guide you through the steps necessary to configure your DSL Router. ATM PVC Configuration Select the check box below to use ASUS PVC DataBase Country UK ISP NETHERLANDS TALY TAWAN TURKEY UK Not Use Next- If your country and ISP are not on the list, select Not list and key in your VPI and VCI then click Next. You may ask your ISP for VPI/VCI values.

text_image
Quick Setup This Quick Setup will guide you through the status necessary to configure your DSL Router. ATM FVC Configuration Select the check bits below to use AEEU3FVC Database Country Net User ISP Net User The VirtualPath Identifier (VPI) and Virtual Channel Identifier (VCI) are needed for setting up the ATM FVC. Do not change VPI and VCI numbers unless your ISP instructs you otherwise. VPI [0-250] 0 VCI [32465935] 35 Next- Select your connection type and clickNext. You can get connection type from your ISP.

text_image
Connection Type Select the type of network protocol and encapsulation mode over the ATM PVC that your TCP has instructed you to use. Note that 002.1q VLAN tagging is only available for PPFoE, MER and Engring. ○ PPF over ATM (PFPoA) ○ PPF over Ethernet (PFPoE) ○ MAC Encapsulation Routing (MER) ○ IP over ATM (IPoA) ○ Engring Encapsulation Mode LLC/SMF-502V/28 Enable 002.1q VLAN (LS-400%) 1 Back Next-- If your connection type is PPPoA or PPPoE
For dynamic IP users, input your PPP username, password, and service name then click Next.
For static IP users, check Use Static IP Address then key in your IP address, then click Next.

text_image
PPP Username and Password PPP Usually requires that you have a user name and password to establish your connections. In the boxes below, enter the user name and password that your ISP has provided to you. PPP Username: sdsu12360848 PPP Password: ********** PPPoE Service Name: Authentication Method: AUTO □ Disk on demand (with idle timeout order) □ PPP IP extension □ Use Static IP Address Back Next-- If your connection type is MER
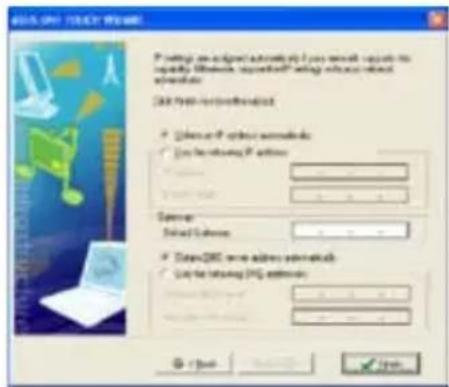
For dynamic IP users, check Obtain an IP address automatically,
Obtain default gateway automatically, and Obtain DNS server address automatically, then click Next.
For static IP users, check Use the following IP Address, Use the following default gateway, and Use the following DNS server address then input the addresses in corresponding fields.

text_image
WAN IP Settings Enter information provided to you by your ISP to configure the WAN IP settings. Notice: DHCP® can be enabled for PVC in MER mode if "Obtain an IP address automatically" is crossed. Changing the default gateway or the DNS effects the whole system. Configuring them with static values will disable the automatic assignment from DHCP® or other WAN connection. If you configure static default gateway over this PVC in MER mode, you must enter the IP address of the remote gateway in the "Use IP address". The "Use WAN interface" is optional. © Obtain an IP address automatically ○ Use the following IP address: WIN IP Address: WIN Subnet Mask: © Obtain default gateway automatically ○ Use the following default gateway: □ Use IP Address: □ Use WIN Interface © Obtain DNS server addresses automatically ○ Use the following DNS server addresses: Primary DNS server: Secondary DNS server: Back Next-- If your connection type is IPoA
Static IP user only. Input the WAN IP address assigned by your ISP, then click Next.

text_image
WAN IP Settings Enter information provided to you by your IGP to configure the VANIP settings Notice DHCP is not supported in iPoA mode. Changing the default gateway or the DNS effects the whole system. Configuring them with static values will disable the automatic assignment from other VAN connection. VAN IP Address: VANI Subnet Mask: □ Use the following default gateway □ Use IP Address: □ Use VAN Interface: www.vanip.org □ Use the following DNS server addresses PrimalDNS server: Secondary DNS server: Back NextWireless Setup
- Designate an SSID (network name) for WL-600g. Choose the security level then input a key. The number of digit of your key depends on the security level you choose. Refer to the note on the web page. When finished, cllnext.
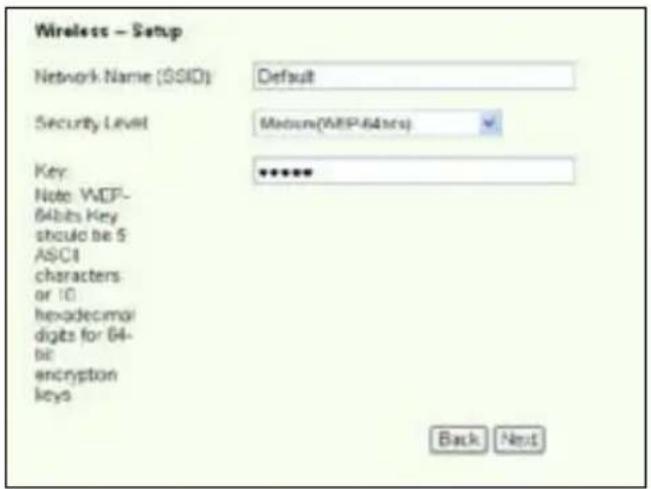
text_image
Wireless - Setup Network Name (SSID) Default Security Level Medium(MRP-64bits) Key Note: WCP- 64bits Key should be 5 ASCII characters or 10 hexadecimal digits for 64-bit encryption keys Back Next- This page provides a summary of WL-600g WAN and wireless configuration. Click Save/Rebootto save and activate your configuration.

text_image
YAN Setup - Summary Make sure that the settings below match the settings provided by your ISP? VPI/VCE: 0/56 Connection Type: PPPUE Service Name: pppce_0_38_1 IP Address: Automatically Assigned SSID: Default Authentication: None Click "Java\Rebost" to save these settings and reboot router. Click "Black" to make any modifications. NOTE: The configuration process takes about 1 minute to complete and your DSL Router will react. Enter Save\Rebost- Setup is completed. WL-600g reboots in about 50 seconds. The green bar shows the current rebooting status. After reboot, the web page will automatically refresh to display the settings.

text_image
DSL Router Robout The DSL Router has been configured and is reducting. Close the DSL Router Configuration window and wait for 50 seconds before reopening your web browser. If necessary, reconfigure your PC's IP address to match your new configuration. Current Status 5 %Connecting to WL-600g from ASUS WLAN Card
Configuring ASUS WLAN Card with One Touch Wizard™
We recommend you use ASUS WLAN card (WL-100gD, WL-100gE, WL-107g, WL-167g, WL169gE) for better wireless connection. If you have installed ASUS wireless card together with its utilities and drives on your PC, click Start -> All Programs -> ASUS Utility->WLAN Card -> One Touch Wizard to launch the One Touch Wizard utility.

text_image
Windows Catalog Windows Updates Set Programs Across and Defaults Programs Accessories Oracle C++Builder 5 MarvelXO-Libertes 002.11 abg Client and Softel ADD User Control Center Add Users Manager New Touch Wizard Data Manager DropButton Chart Microsoft ADD User Card Settings Your Coast Settings Settings Search Help and Support ADD User Control Center Add Users Manager New Touch Wizard Data Manager DropButton Chart Microsoft ADD User Card Settings Your Coast Settings- Select Connect to an existing wireless LAN (Station) radio button and click Next to continue.
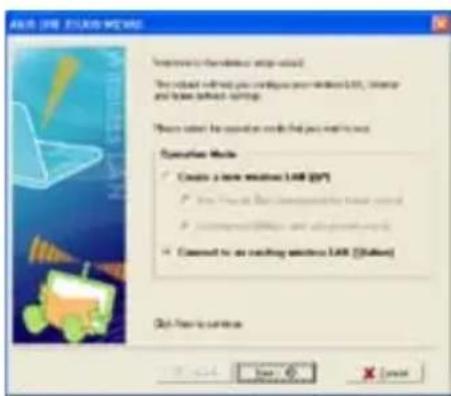
text_image
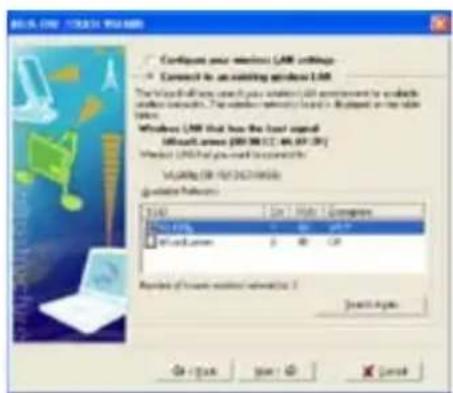
Windows 100% EXERCISE ITEMS Welcome to the wireless setup wizard. The setup will not want to configure your wireless LAN, network and base address settings. Please select for configuration must find you next to next. Operation Tools ✓ Create a new wireless LAN (IP) ✓ Use Windows to create a wireless network ✓ Install Windows and install other networks ✓ Connect for an existing wireless LAN (all rights) Out Next to continue- One Touch Wizard searches and displays the available APs in the Available Networks list. Select WL-600g and press Next to continue.
text_image
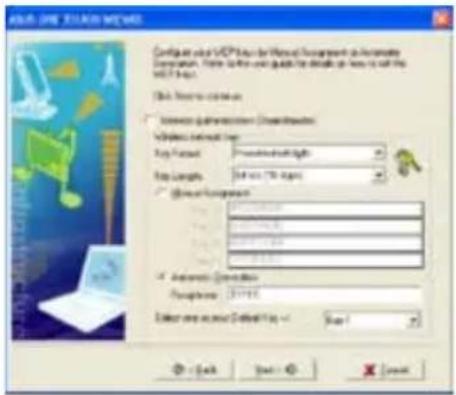
Windows LNR: Touch WAAMBI Configure your wireless LNR settings Connect to an existing Windows LNR The Windows will have access your wireless LNR environment for working wireless networks. The wireless network is based on a specific OS version. Windows LNR that has the load signal: Microsoft Access (200 KB) [12, 46] (57) [39] Microsoft LNR that has used to connect: Viewing (88 KB) [46] [46] [46] Update Settings USB USB LAN USB LAN Number of wireless network (1) Search Options OK Cancel Help Cancel- Set the authentication and encryption of your WLAN card the same with those at WL-600g. Click Next to continue.
text_image
ASLS - DRY SYSTEMS Configure your own VCP3 key for wireless network to install a network. While it is not to be quick for details or how to link the VCP3 key. Disk: Network connection Select general network: Windows 98000 Key Format: WindowsNetLight Key Length: 500000000000000000000000000000000000000000000000000000000000000000000000000000000000000000 Windows 98012 Windows 9816 Windows 9824 Windows 9827 Windows 9831 Windows 9834 Windows 9837 Windows 9841 Windows 9844 Windows 9847 Windows 9851 Windows 9854 Windows 9857 Windows 9861 Windows 9864 Windows 9867 Windows 9871 Windows 9874 Windows 9877 Windows 9881 Windows 9884 Windows 9887 Windows 9891 Windows 9894 Windows 9897 Windows 9901 Windows 9904 Windows 9907 Windows 9911 Windows 9914 Windows 9917 Windows 9921 Windows 9924 Windows 9927 Windows 9931 Windows 9934 Windows 9937 Windows 9941 Windows 9944 Windows 9947 Windows 9951 Windows 9954 Windows 9957 Windows 9961 Windows 9964 Windows 9967 Windows 9971 Windows 9974 Windows 9977 Windows 9981 Windows 9984 Windows 9987 Windows 9991 Windows 9994 Windows 9997 Windows 9998 Windows 9999 OK Cancel Next > Cancel- It takes several seconds for the wireless card to associate with WL-600g. Press Next to setup TCP/IP.

text_image
USB Drive / COMBtu New Internet USB drive connected to an MP2 Current wireless USB drive Windows Modem Inhibitor Microsoft Windows Microsoft Windows Current I <|vision_start|> U-My USB Congridation: The bands installed using the wireless USB One file is used for TCP/IP OK - Help Next - Add Cancel- Setup the IP address of the WLAN Card according to your network condition. After the setup is complete, click Finish to exit the One Touch Wizard.
text_image
BAS, ONT TOUCH VOLUME P setting an edge pointing to a key or key path. It is also displayed in the following: BAS Open-to-Go/Go/Go/Go • Use to access your website: • Use to browsing the website: • Select your website (123) • Select your website (123) • Select your website (123) • Select your website (123) • Select your website (123) • Select your website (123) • Select your website (123) • Select your website (123) • Select your website (123) • Select your website (123) • Select your website (123) • Select your website (123) - 0 + 1 - 0 + 1 - 0 + 1 - 0 + 1 - 0 + 1 - 0 + 1 - 0 + 1 - 0 + 1 - 0 + 1 - 0 + 1 - 0 + 1 - 0 + 1 - 0 + 1 - 0
The setup screens and steps are for reference only and may be different from actual products.
Configuring WLAN card with Windows ^® WZC service
You can also use Windows® Wireless Zero Configuration service to set up the wireless connection with WL-600g.
-
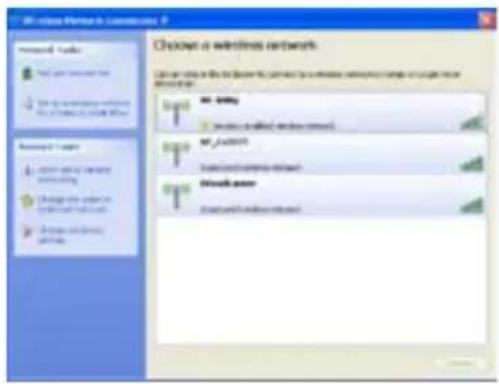
Double-click the wireless network icon on the task bar to view available networks. Select your wireless router and clickConnect
-
Input the key you have set on the WL-600g and click Connect. The connection is completed within several seconds.
text_image
Wi-Link Provider in Communications Choose a wireless network Can use this to access the network to access wireless network via a single or more network topology. Wi-Link • Wireless network Wi-Link Network network Wlink server Wlink and wireless server
text_image
Windows Network Connection Please wait while network contacts to the following server. Including network type... Browse Cancel Windows Network Connections The server is currently enough to access or link with a network or wireless. If which has little access or very much access, then continuing to be installed. Type: this, any other connection. Password: ****************** Cyber-########: ******** 确定 CancelUSB application
WL-600g offers two USB2.0 ports for setting up FTP server and sharing USB printer.
FTP server function
Before setup, you need to prepare a USB disk for FTP storage.

If the format of your external hard disk iNTFS, the FTP server can only be readable. Uploading files on the FTP server is not allowed. Besides, only Anonymous User can login. Super User can not login under NTFS FTP server.
Setting up FTP server
To setup FTP server:
- Plug your USB storage into the USB2.0 port on the WL-600g rear panel. Then click USB Application -> FTP Server the left side menu to open the configuration page.
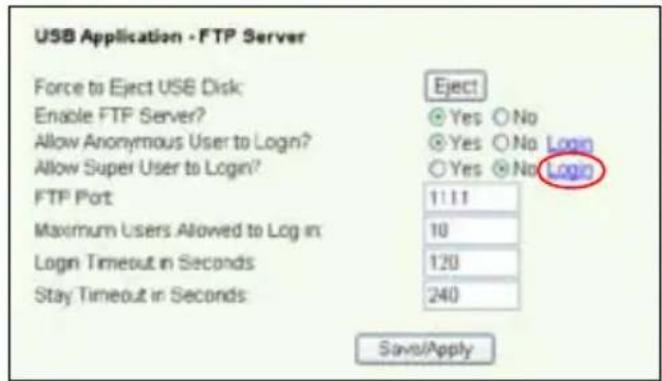
text_image
USB Application - FTP Server Force to Eject USB Disk: Enable FTP Server? Allow Anonymous User to Login? Allow Super User to Login? FTP Port Maximum Users Allowed to Log in: Logn Timeout in Seconds Stay Timeout in Seconds Eject Yes No Yes No Login Yes No Login 1:1:1 10 120 240 Save/Apply- Set Enable FTP Server to Yes.
- Allow Anonymous User to LoginIf you want to allow anonymous user to access your FTP site, select Yes; if you want to protect your data from unauthenticated user, selectNo.
- Allow Super User to Login: Select Yes to allow super user to access the FTP server.
- FTP Port Set up the port number of the FTP server. For example, if the port number is set to 1111, you can access the FTP server by typing/192.168.1.1:11 into the address box of your Web browser (192.168.1.1 is the default IP address of WL-600g).
- Maximum User Allowed to Login: set up the maximum login user according to your working environment.
- Login Timeout in Seconds When login times out, the login trail is terminated.
- Stay Timeout in SecondsTimeout value for inactive connection.
- Press Save/Apply to save and activate the settings.

If you use web access for Super User Login (as the red circle marks), please set Maximum Users Allowed to Log into more than 1 or the message "server is busy" will pop up.
Setting up FTP account
You can set up 12 accounts for your FTP site.
- Click USB Application -> FTP Server -> User List the left side menu to open the configuration page. ClickAdd to create new FTP account.

text_image
Add User Account List User Name: Password: Max. Login: Rights: Read/Write/Exace Apply- Define the Username, Password for the new account. Setup the Max. Login to restrict the access request. Define the access right to the account.
- Click Apply to save the new account.
- Click Save to save and activate the settings.
Setting up FTP security
You can deny access request from certain IP address by setting Banned IP List
- Click USB Application -> FTP Server -> Banned IP Listn the left side menu to open the configuration page. ClicAdd to create a new rule.

text_image
Add IP List IP Address: Apply- Input the IP address of the banned host and clickApply to save the banned IP. The banned IP must be static.
- Click Save to save and activate the settings.
Your FTP site is ready. Typeftp://192.168.1.1(:port number) to the address box of your Web browser and pressEnter. When prompted for login, input the username and password you have set up for FTP account and login.
Sharing USB printer
You can plug your USB printer to the USB2.0 port of WL-600g to share it within your LAN. After you plug a printer to the USB port, you can see the status of printer by clickingUSB Application -> Printer Status
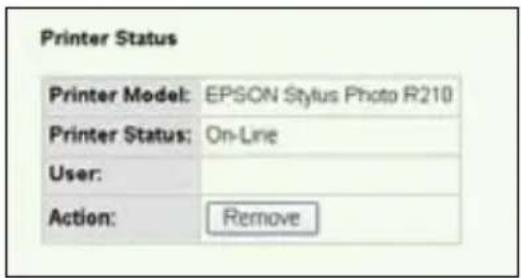
text_image
Printer Status Printer Model: EPSON Stylus Photo R210 Printer Status: On-Line User: Action: RemoveSetting up printer client under Windows XP
Follow the steps below to install network printer on your clients.
- Run Add Printer Wizard from Start -> Printers and Faxes -> Add a printer.
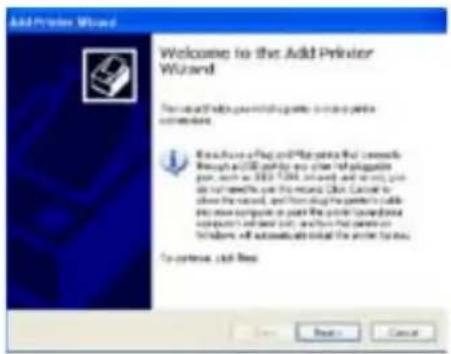
text_image
Add Printer Wizard Welcome to the Add Printer Wizard To reach this print with a printer to add print on account. It is also a plug and a pin that follows through an OFF port for any other printer pair, such as 1000.0000000000 and 5000.0000000000. This is also a plug or a pin for a printer in which it is used to create a print file. Then, I can use the print file to install a print file into a print folder (e.g., 123487, 123496, etc.), and then use the print file to install a print folder (e.g., 123487, 123496, etc.). It is also a plug or a pin for a printer in which it is used to create a print file. The printer will also use the print file to install a print folder (e.g., 123487, 123496, etc.). It is also a plug or a pin for a printer in which it is used to create a print folder (e.g., 123487, 123496, etc.). It is also a plug or a pin for a printer in which it is used to create a print folder (e.g., 123487, 123496, etc.). It is also a plug or a pin for a printer in which it is used to create a print folder (e.g., 123488, 123496, etc.). It is also a plug or a pin for a printer in which it is used to create a print folder (e.g., 123488, 123496, etc.). It is also a plug or a pin for a printer in which it is used to create a print folder (e.g., 123488, 123496, etc.). It is again to continue using the printer.- Select Create a new port and set Type of port to Standard TCP/IP Port, then clickNext
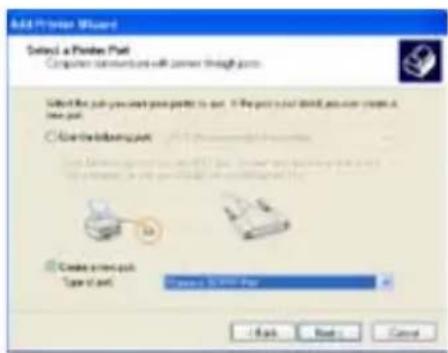
text_image
ADD PRINER Wizard Select a Printer Pack Computer communities will connect through pages. Select the print you want your printer to exit. If the print is just closed, you can create it, then print. Use the print in your page. Create print pack. Type of next. Choose to Print Page OK Next > Cancel- Select Local printer attached to this computer and click Next

text_image
Add Printer Wizard Local or Network Printer The recently selected to locate electrical printer to set up. Select the option that utilizes the power you need next ● Local printer installed in the computer ○ Automatically knock and modify the print and play power ○ In remote printer use a power affected in other devices To use a network printer that can not create a print device can be the "Local printer" option OK Next Cancel- Click Next to setup TCP/IP port for accessing the network printer.
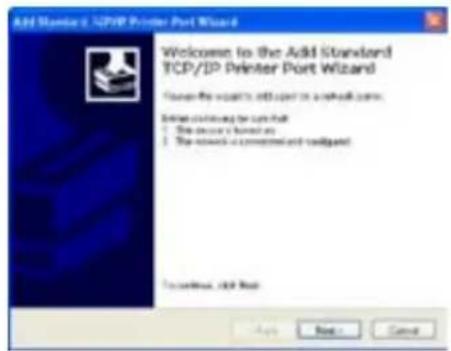
text_image
Add Standard 32/40/69 Printer Port Wizard Welcome to the Add Standard TCP/IP Printer Port Wizard Choose the version to add open to a network card. Select continuing for next page • The server is normal; • The network is connected and connected. To continue, click Next Add Next > Cancel- Input the IP address of WL-600g in the Printer Name of IP Address field and clickNext.
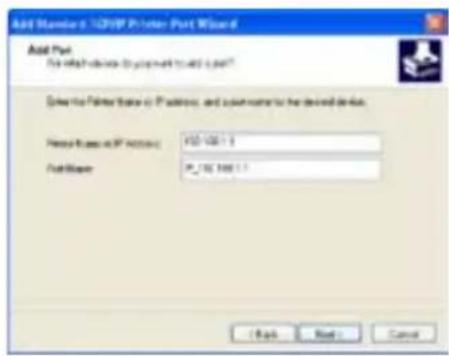
text_image
Add Master 3: TCP/IP Printer Port Wizard Add Port For which device is programmable to add a port Driver the Printer name or IP address, and user name to be developed device. Name frame or IP address: 150-160.1.1 File Path: 9_152_160.1.1 [ Back ] [ Back ] [ Cancel ]- Set Protocol to LPR and type LPRServer in Queue Name field. Click Next to continue.

text_image
Configure Standard TCP/IP Port Identifier Port Settings Port Name: IP_102.100.1.1 Pin No. (IP Address): 102.100.1.1 Portion: Type: LPM Port Settings: Port Name: LPM LPM Settings: Queue Name: LPM(Correct) LPM Mode Counting Enabled DRMIP Status Enabled Server Name: Server Server Connection: 2 OK Cancel- Press Finish to complete the settings and return to Add Printer Wizard.

text_image
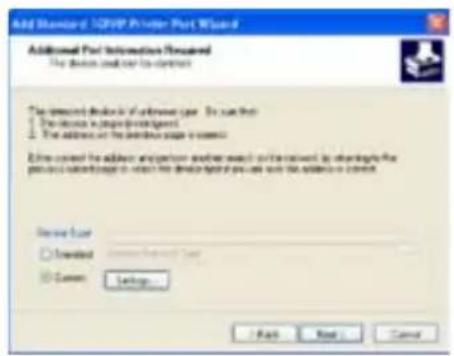
Add Standard 320VP Printer Port Wizard Completing the Add Standard- TCP/IP Printer Port Wizard Future select additional files or formats View: To: Process: USB IP\Program General: 18.766.11 Package: PS_152.980.11 Adobe Type To play this project with Pack + Back Next Cancel- Select Custom and clickSettings.
text_image
Add Standard JQFIP Provider Port Wizard Additional Port Information Required The device is not to access The installed device is of server type. Do not use 1. The device is protected by 2. The address or the connection page is correct. 3. Use control the address appropriate either much or without any connection to the process submitted in which the device is required to use the address or access. Device Type □ Enabled □ Common Settings... Finish Next > Cancel- Press Next to finish standard TCP/IP port setting.

text_image
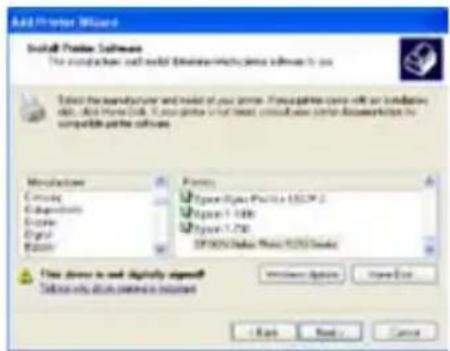
Add Newlon 120000 Printer Port Wizard Additional Port Information Required The device needs to access the To detect the device of an existing type. For such that: • The device is required to access the device. • The device is the previous page in contact. Other cannot be added to any other other relevant information and the request to access to the previous available sites in contact with this device if you are not the device in contact. Server Type □ Updated □ Common Settings - Back Next > Cancel- Install printer driver from the vendor-model list. If your printer is not in the list, clickHave Diskto manually assign the location of driver.
text_image
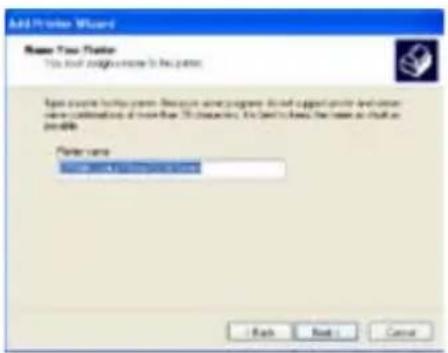
Add Proter Wizard Install Problem Software The installation will result in a new software version to add. Select the installed software and model of your server. In our package case is not an additional model, this version is set. It may provide that next software version cannot be used or replaced by the software. Manufacture Circuitry Subsystems Systems Digital System Primary Hyper-Complex Physics 10.0M Hyper-1.100 Hyper-1.750 SP3000000000000000000000000000000000000000000000000000000000000000000000000000000000000000000000000000 New device is set digitally designed. Set into any device without optimization. Windows Options Save Out Help Next > Cancel- Click Next to accept the default name for the printer.
text_image
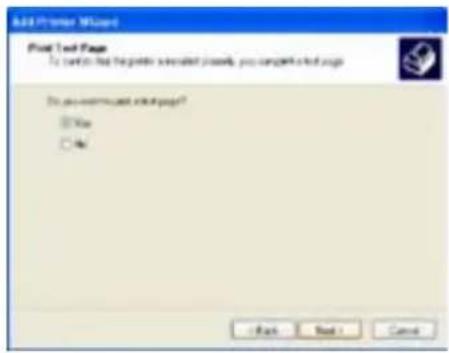
Add Proiler Wizard Name: True Wizard This tool requires more to be needed. Input code to compute your version. However, any program should include the previous development version combinations of those than 20 characters. It can't have the same as that is possible. Filter name: [1] [2] [3] [4] [5] [6] [7] [8] [9] [10] [11] [12] [13] [14] [15] [16] [17] [18] [19] [20] - Back Back Cancel- Select Yes to print a test page. Click Next to print.
text_image
Add Printer Wizard Print Text Page To confirm that the printer was installed previously, you completed this page. Do you continue next page? Yes No - Back Next > Cancel- The installation is completed. Click Finish to quit the Add Printer Wizard.

text_image
Add Printer Wizard Completing the Add Printer Wizard Software accessible completed by addPrint Wizard You could be a new print setup Page: IP101 (View, Print & Print) Open Description: Our Print File: X_16780513 Page: IP101 (View, Print & Print) Open Default: Yes Telephone: Yes To continue working all this next. - Last Next Cancel
If you have already installed the printer locally on your computer, right click the printer icon and selectProperty -> Port tab to add a standard TCP/IP port. Click Add Port then selectStandard TCP/IP Port and clickNew Port button. Refer to step 5-8 for setting procedures.

If you use Windows ^® 98 or ME which does not support Standard TCP/IP port, you need to use Romote Port which is supported by WL-600g.
Compatible printer list
| HP Deskjet 5410 Series | HP PSC 1610 |
| HP Deskjet 3940 Series | HP Deskjet 5652 |
| HP photosmart 8030 | HP Deskjet 5550 |
| HP Photosmart 8230 | EPSON C60 |
| HP Photosmart 7830 | HP Officejet 5610 |
| HP Officejet 7210 | HP Officejet 4255 |
| HP PSC 1510 | HP PSC 1410 |
Gaming Blaster
ASUS WL-600g's “Gaming Blaster” is designed to enhance your online gaming experience. This technology provides the uninterrupted and latency-free gaming experience that online gamers expect. It intelligently optimizes network resources and automatically prioritizes network traffic to better execute time-sensitive applications including IP phone and multimedia applications.
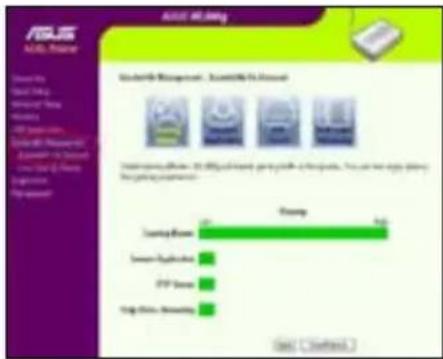
Go to Bandwidth Management --> Bandwidth on DemandYou can see four icons are shown on the screen.
text_image
RUS VR headset Microsoft Windows - Science & Environment DOS VR headset Model: 3.0 (100%) Operating software Operating software Operating software Operating software Operating software Operating software Operating software Operating software Operating software Operating software Operating software Operating software Operating software Operating software Operating software Operating software Operating software Operating software Operating software Operating software Operating software Operating software Operating software Operating software Operating software Operating software Operating software Operating software Operating software Operating software Operating software Operating software Operating software Operating software Operational Engine Control System Operational Engine Control System Operational Engine Control System Operational Engine Control System Operational Engine Control System Operational Engine Control System Operational Engine Control System Operational Engine Control System Operational Engine Control System Operational Engine Control System Operational Engine Control System Operational Engine Control System Operational Engine Control System Operational Engine Control System Operational Engine Control System Operational Engine Control System Operational Engine Control System Operational engine control system Operational engine control system Operational engine control system Operational engine control system Operational engine control system Operational engine control system Operational engine control system Operational engine control system Operational engine control system Operational engine control system Operational engine control system Operational engine control system Operational engine control system Operational engine control system Operational engine control system Operational engine control system Operational engine control system Operational engines control system Operational engines control system Operational engines control system Operational engines control system Operational engines control system Operational engines control system Operational engines control system Operational engines control system Operational engines control system Operational engines control system Operational engines control system Operational engines control system Operational engines control system Operational engines control system Operational engines control system Operational engines control system Operational engines control system Opex Technologies Inc. Opex Technologies Inc. Opex Technologies Inc. Opex Technologies Inc. Opex Technologies Inc. Opex Technologies Inc. Opex Technologies Inc. Opex Technologies Inc. Opex Technologies Inc. Opex Technologies Inc. Opex Technologies Inc. Opex Technologies Inc. Opex Technologies Inc. Opex Technologies Inc. Opex Technologies Inc. Opex Technologies Inc. Opex Technologies Inc. Opex Technologies Inc. Opex Technologies Inc. Opex Technologies Inc. Opex Technologies Inc.Gaming Blaster on WL-600g
By default, WL-600g is set or Gaming Blastermode and you can then experience the enhanced gaming power. Just click on the Gaming Blaster icon and you can enable or disable this function on WL-600g. From the bar chart at the bottom of the web page, you can see that the gaming application, by default, takes most of WL-600g's network resource.
bar
| Category | Value | |---|---| | Gaming Manager | High | | Second Application | Low | | VIP Sensor | Low | | Vulp Video Streaming | Low |User Specified Service
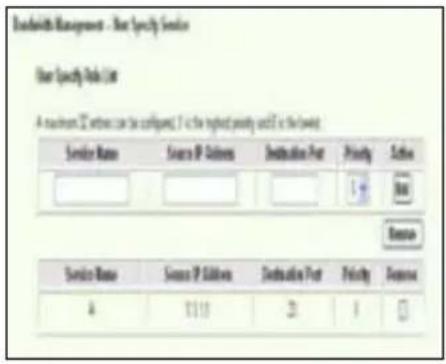
Setting up online gaming priority by indicating ports and IP addresses.
You can also prioritize your online gaming traffic by indicating ports where the online gaming applications go.

text_image
User Specify Make List A requirements 2000s can be configured, if a the highest priority would it be the best. Service Name Source IP Address Destination Port Priority Action 1 8 Restar Service Name Source IP Address Destination Port Priority Sequence A $113 23 1 □- Assign any name for the Service Name. For example, "My game".
- Put in the IP address and its corresponding port where the application is.
- Rank the priority (1, 2, 3, ...) of the service (application) according to your preference.
- If you want to remove the service from the list, just check the Remove box, then press Remove.
IP phone and other A/V applications on WL-600g
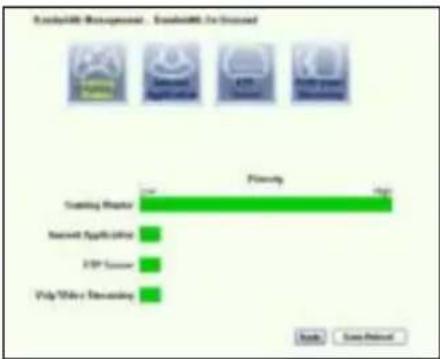
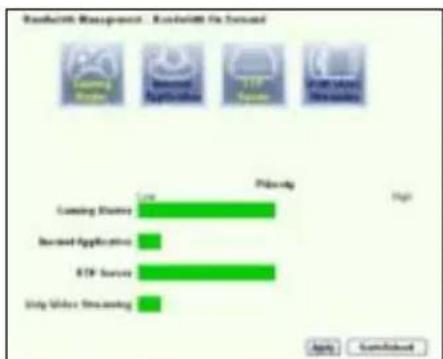
If you would like to have better voice over IP and other A/V application quality, just click on the VoIP/Video Streamingcon. You can then enjoy uninterrupted VoIP quality and smooth multimedia downloading. From the bar chart at the bottom of the web page, you can see that the VoIP/Video application now takes most of WL-600g's network resource.

bar
Disability Management - Easibility To Screened | Service | Privacy (%) | |---|---| | Sunday Meeting | 1.0 | | Server Application | 1.0 | | FTP Server | 1.0 | | Help Video Streaming | 95.0 |User Specified Service
Setting up VoIP / Video application priority by indicating ports and IP addresses.
You can also reserve available network traffic for your IP phone and A/V downloading applications by indicating ports where the applications go.
text_image
Breadwidth Management - User Specify Service User Specify Data List A maximum 5% without can be configured. It is the highest priority unit in the top Service Name Source IP Sources Distribution Port Priority Action Service Name Source IP Sources Distribution Port Priority Response 4 1118 21 1 □- Assign any name for the Service Name. For example, "My IP phone".
Put in the IP address and its corresponding port where the application is.
-
Rank the priority (1, 2, 3, ...) of the service (application) according to your preference.
-
If you want to remove the service from the list, just check the Remove box, then press Remove.
Other traffic control applications on WL-600g
Internet application
If you would like to have smooth web browsing and e-mail quality, you can enable the function by clicking on the Internet application icon as well. If you would like to remove the priority for Internet applications, just click on the icon one more time to disable this function.
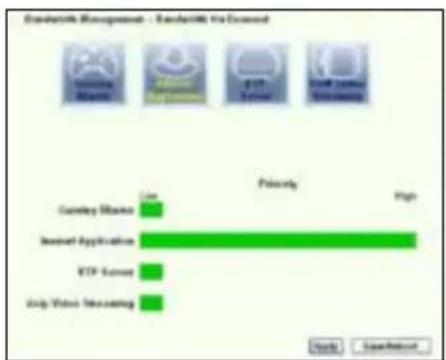
bar
Standard & Management - Standard & Advanced | Security Service | Primary | | :--- | :--- | | Gateway Market | Low | | Insevel Application | High | | VETF Server | Low | | Deep Video Networking | Low | Enable SearchButtonUser Specified Service
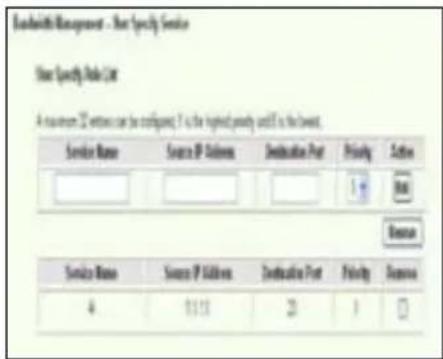
Setting up Internet application priority by indicating ports and IP addresses
You can also prioritize your web-browsing and e-mail traffic by indicating ports where the applications go.

text_image
User Specify Code List A server 208 ports can be configured. It is the highest priority until it is the best. Service Name Source IP Address Destination Port Priority Action B Service Name Source IP Address Destination Port Priority Response A 01118 23 1 □- Assign any name for the Service Name. For example, "My E-mail".
- Put in the IP address and its corresponding port where the application is.
- Rank the priority (1, 2, 3, ...) of the service (application) according to your preference.
- If you want to remove the service from the list, just check the Remove box then press Remove.
FTP server
If you would like to have higher priority for FTP server downloading or uploading traffic, you can:
- Click on the FTP Server icon.

bar
Risikohills Management - Risikohills Inc Drivened | Category | Primary | |---|---| | Gaming Broker | Low | | Sensor Application | Low | | FIP Server | High | | Help Water Networking | Low |- Go to User Specified Service page to reserve absolute more traffic for FTP server.

text_image
The "FTP Server" mode was enabled. You can use the scroll bar to reserve more upload bandwidth for 10,600gb FTP Server Service. If you out 10%, it means that FTP server has only high priority but no reserved bandwidth. Reserved Bandwidth: 70 % Low High- By just moving the scroll bar to High, not only you have higher traffic priority for FTP application, but you can further reserve certain percentage of your available bandwidth to dedicate in FTP uploading/downloading.
User Specified Service
Setting up FTP Server application priority by indicating ports and IP addresses
You can also prioritize your FTP server uploading/downloading traffic by indicating ports where the applications go.
text_image
Energetic Management - Your Specialty Service User Specialty Guide List A maximum 25 windows can be configured. It is the highest priority until it is the lowest. Service Name Source IP Address Destination Port Priority Focus 4 13.15 20 1 □ Browse- Assign any name for the Service Name. For example, "My FTP Server".
- Put in the IP address and its corresponding port where the application is.
- Rank the priority (1, 2, 3, ...) of the service (application) according to your preference.
- If you want to remove the service from the list, just check the Remove box then press Remove.

You can choose more than one icons to have priorities on multiple applications.
bar
Ranadarki Management - Ranadarki On Sunday | Category | Value | |---|---| | Streaming Sharing | High | | Increased Application | Low | | ETF Source | High | | Only Online Streaming | Low |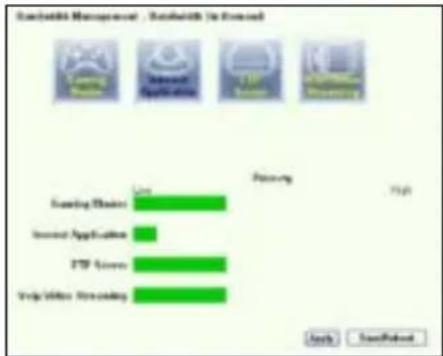
bar
| Category | Value | |---|---| | Scaring Master | High | | Invest Applications | Low | | ETF Series | High | | Virtual Streaming | High |
text_image
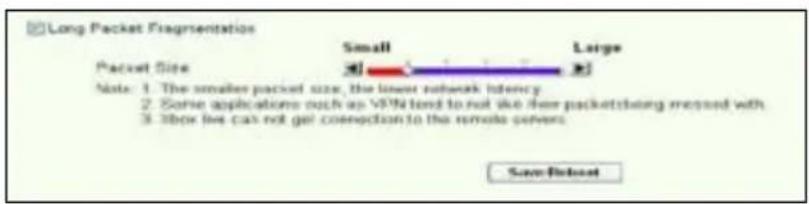
Elastic® Management - Elastic® Co Reward Priority Gaming Player Restaurant Application F13P Server Ship Video Monitoring Apply Save/ReperfLong Packet Fragmentation
This feature works especially well when there are larger application packets (such as FTP server packets) as well as smaller packets (such as web, e-mail, or gaming, VoIP packets) to be sent at the same time. With this function enabled, small application packets like e-mail or web browsing will never be blocked by large packets, such as FTP uploading.
text_image
Long Packet Fragmentation Packet Size Small Large Note: 1. The smaller packet size, the lower rebound latency 2. Some applications such as VPN tend to not like free packet being matched with 3. These live can not get connection to the remote covers. Save/Reset- Check Long Packet Fragmentation to enable this function.
- Drag the scroll bar to your desired packet size. The smaller the packet size, the less network latency.

With Long Packet Fragmentation enabled, users may have problem logging onto the XBOX Live or other gaming servers due to the servers' limitation on their incoming packet size.

For more information, refer to the ASUS website at http://www.asus.com

To set up other features and functions of WL-600g, refer to the User Manual included in the support CD.
ASUS®
natural_image
Line drawing of a wireless router labeled WL-600G, showing front panel and antenna (no text or symbols on body)Quick Start Guide
ADSL-instelling ....33
Draadloze instelling ....34
Handmatige instelling ....35
ADSL-instelling ....36
Draadloze instelling ....38
text_image
PWR ADSL IP USB AIR LAN WL - 500G airlines twice primarytext_image
Quick Setup - Auto Detection ADSL Link Up! Start to Detect your connection type Please wait... Manual Settingtext_image
Quick Setup - Detection Result WL-300g has detected that your connection type is "PPPoE" First, please key in your username/password and push "Kind" button to setup other function* First, please push "Manual Setting" button to setup WHi connection manually PHP Username: PHP Password: IE: Use Sizes: IP Address IP Address: Manual Setting Next
text_image
Quick Setup - Detection Result WL-SXp has detected that your connection type is "DHCP (Dynamics IP)" If yes, please push "Hand" button to setup other function If not, please push "Manual Setting" button to setup WITH connection manually. Manual Setting Next
text_image
Wireless - Setup Network Name (SSID) Default Security Level Low(None) Low(None) Medium(WE^64bits) Medium(WE^128bits) High(WPA-FSK) Back Nexttext_image
Wireless - Setup Network Name (SIND) Default Security Level Medium(WCP-64bits) Key imize WCP, 64bits key, should be 5- ASCII characters or 10 hexadermal digits for 64-bit encryption keys. ●●●●● Back Nexttext_image
WAN Setup - Summary Make sure that the settings below match the settings provided by your GP VPI / VCI: 2/17 Connection Type: PPPBCE Service Name: ipcoe_S_31_1 IP Address: Automatically Assigned SSID: Default Authentication: None Click "SaveButton" to save these settings and reload reader. Click "Back" to make any modifications. NOTE: The configuration process takes about 1 minute to complete and your SQL Router will return. Back Save/F bacterialtext_image
Quick Setup - Auto Detection ADSL Link Down! Please check your telphone line connection... Manual SettingADSL-instelling
- Kies uw land enISP en klik opNext (Volgende).
text_image
Quick Setup. This Quick Setup will guide you through the steps necessary to configure your DSL Router. ATM PVC Configuration Select the check box below to use ASUS PVC DataBase Country UK ISP NETHORLANDS TALY TAWAN TURNER UK Not Use Nexttext_image
Quick Setup This Quick Setup will guide you through the status necessary to configure your DSL Router. ATM PVC Configuration Select the check bits below to use AEGS PVC Database Country Net List ISP Not List The Virtual Path Identifier (VPI) and Virtual Channel Identifier (VC) are needed for setting up the ATM PVC. Do not change VPI and VDI numbers unless your ISP instructs you otherwise. VPI [0.250] 0 VCI [32465535] 36 Helptext_image
Connection Type Select the type of network protocol and encapsulation mode over the ATM PVC that your ECP has instructed you to use. Note that 002.1q VLAN tagging is only available for PPFoE, MER and Endging. ○ PPF over ATM (PFPoA) ○ PPF over Ethernet (PPFpE) ○ MAC Encapsulation Routing (MER) ○ IP over ATM (IPoA) ○ Endpoint Encapsulation Mode LLC/SPAP-502V-28 Enable 002.1q VLAN (CS-4000) 1 Back Next-- Uw verbindingstype is PPPoE of PPPoA
text_image
PPP Username and Password PPP Usually requires that you have a user name and password to establish your connections. In the boxes below, enter the user name and password that your ISP has provided to you. PPP Username: sdtv12361848 PPP Password: ********** PPPoE Service Name: Authentication Method: AUTO □ Disk on demand (with idle timeout times) □ PPP IP extension □ Use Static IP Address Back Next-- Uw verbindingstype is "MER"(DHCP)
text_image
WAN IP Settings Enter information provided to you by your ISP to configure the WAN IP settings. Notice: DHCP® can be enabled for PVC in MER mode if "Obtain an IP" address automatically" is chosen. Changing the default gateway or the DNS effects the whole system. Configuring them with static values will disable the automatic assignment from DHCP® or other WAN connection. If you configure static default gateway over this PVC in MER mode, you must enter the IP address of the remote gateway in the "Use IP address". The "Use 'WAN interface" is optional. © Obtain an IP address automatically ○ Use the following IP address: WIN IP Address: WAN Subnet Mask: © Obtain default gateway automatically ○ Use the following default gateway: □ Use IP Address: □ Use WAN Interface © Obtain DNS server addresses automatically ○ Use the following DNS server addresses: Primary DNS server: Secondary DNS server: Back Next-- Uw verbindingstype is IPoA
text_image
VMW IP Settings Enter information provided to you by your ISP to configure the VMWIP settings Notice: DHCP is not supported in iPoA mode. Changing the default gateway or the DNS effects the whole system. Configuring them with static values will disable the automatic assignment from other VMW connection. VMW IP Address: VMW Subnet Mask: □ Use the following default gateway □ Use IP Address: □ Use VMW Interface: www.vw.net/1234-07-08 □ Use the following DNS server addresses: Primal@DNS server: Secondary DNS server: Back NextDraadloze instelling
text_image
Wireless - Setup Network Name (SSID) Default Security Level Mature(MSP-64bits) Key Note: WCP- 64bits Key should be 5 ASCII characters or 10 hexadecimal digits for 64-bit encryption keys Back Nexttext_image
TIAN Setup - Summary Make sure that the settings below match the settings provided by your ISP. VPI / VCE: 0/56 Connection Type: PPPoE Service Name: pppce_0_28_1 IP Address: Automatically Assigned S#ID: Default Authentication: None Click "Save/Reset" to save these settings and reboot router. Click "Back" to make any modifications. NOTE: The configuration preview takes about 1 minute to complete and your DSL Router will reboot. Back Save/Resettext_image
DSL Router Robost The DSL Router has been configured and is reconfiging. Close the DSL Router Configuration window and wait for 50 seconds before reopening your web browser. If necessary, reconfigure your PC's IP address to match your new configuration. Current Status 5 %text_image
Windows Catalog Windows Updates Set Programs Access and Defaults Programs Accessories Microsoft C++ Debulator 5 MarineXQLibertica 002.21.dog Client and Software TSLA Card TSLA Control Center MOSA Manager One Track Wizard Data Manager DramCellUserMap Baseball ADSI Master Card Controller Kurality Settings Settings Search Help and Supporttext_image
安装 (IIP) 系统 (S) 安装 (A) Internet to the network setup wizard The default will help you configure your wireless LAN, internet and base without access. Please select the optional needs for you want to exit Exclusive Web ✓ Create a new wireless LAN (50°) ✓ Use Type as a network to create a local network ✓ Command to any existing wireless LAN (50%) ✓ Connect to an existing wireless LAN (50%) Out Now to continuetext_image
USE LINE TOUCH WILL BEANS Configure your wireless LAN settings Connect to an existing wireless LAN The wireless network must use the wireless LAN environment to access or install networking. The wireless network is a type of support for the OS, including Windows LAN that has the load symbol. Microsoft Access (200) 967-128, 46: 69 [2] Microsoft LAN has used this network. WARNING BY: 50% CHANGE <|vision_start|> NLD Size High Compressor WinRAR WinRAR WinRAR WinRAR WinRAR WinRAR WinRAR WinRAR WinRAR WinRAR WinRAR WinRAR WinRAR WinRAR WinRAR WinRAR WinRAR WinRAR WinRAR WinRAR WinRAR WinRAR WinRAR WinRAR WinRAR WinRAR WinRAR WinRAR WinRAR WinRAR WinRAR WinRAR WinRAR WinRARtext_image
ASP.NET STUDIO MEETING Configure your ASP.NET server to install a network configuration. For example, the system is not available for details or functions on the ASP.NET server. This tool is closed. Remove logarithmic network Network format key: Any Form: Microsoft Internet Key Length: 64 sec (100 bytes) Show network properties: Type: Microsoft Size: 250000000 Address: 9311-8732 Network Connections: Telephone: 99999999 Select any other network types: OK Cancel Help Cancel
text_image
Windows USB drive Your network USB drive is converted to an XML C:\Users\USB drive Customs/Module Information B1020 - 36.7514221488 USB / W10000 Excel 1 E qwen: USB Comparable To The Store in the Next-Next Version (USB) Get From to install the USB drive OK < Back Next > Canceltext_image
DOS DVI: SELECT NAME P setting an integer coordinate(s) per row set results to square, Windows squareandP settings without random administration. Data field configuration ● Data set P address automatically ○ Data set Wi-Fi path Database Shift Location ● Data2008 wire address automatic ○ Data set Wi-Fi path OK Cancel Help
text_image
Add User Account List User Name: Password: Max. Login: Rights: Read/Write/Erase Applytext_image
Add IP List IP Address: Applytext_image
Printer Status Printer Model: EPSON Stylus Photo R210 Printer Status: On-Line User: Action: Removetext_image
Add Printer Wizard Welcome to the Add Printer Wizard. This will help you install your computer printing process. This will be a plug and file points that connect through an OFF port for any other product parts, such as 100% (200% brand) and 40% (60% brand). This will also be used to switch the brand. Click Next will show the brand, then click the product name or any other product or part of the brand's website. For example, it is also available to access the product name or any other product or part of the brand's website. The product name is also available to access the product name or any other product or part of the brand's website. If you want to switch the product name or any other product or part of the brand's website, you can access the product name or any other product or part of the brand's website. If you want to switch the product name or any other product or part of the brand's website, you can access the product name or any other product or part of the brand's website. If you want to switch the product name or any other product or part of the brand's website, you can access the product name or any other product or part of the brand's website. If you want to switch the product names or any other product or part of the brand's website, you can access the product names or any other product or part of the brand's website. If you want to switch the product names or any other product or part of the brand's website, you can access the product names or any other product or part of the brand's website. If you want to switch the product names or any other product or part of the brand's website, you can access the product names or any other product or part of the brand's website. If you want to switch the product names or any other products or part of the brand's website, you can access the product names or any other product or part of the brand's website. If you want to switch the product names or any other products or part of the brand's website, you can access the product names or any other product or part of the brand's website. If you want to switch the product names or any other products or part of the brand's website, you can access the product names or any other product or part of the brand’s website. If you want to switch the product names or any other products or part of the brand’s website, you can access the product names or any other products or part of the brand’s website. If you want to switch the product names or any other products or part of the brand’s website, you can access the product names or any other products or part of the brand’s website. If you want to switch the product names or any other products or part of the brand’s website, you can access the product names or any other products or part of the brand’s website. If you want to switch the product names or any other products or part of its website, you can access the product names or any other products or part of its website. If you want to switch the product names or any other products or part of its website, you can access the product names or any other products or part of its website. If you want to switch the product names or any other products or part of its website, you can access the product names or any other products or part of its website. If you want to switch the product names or any other products or part of its website, you can access the product names or any other products or parts of its website. If you want to switch the product names or any other products or part of its website, you can access the product names or any other products or parts of its website. If you want to switch the product names or any other products or part of its website, you can access the product names or any other products or parts of its website. If you want to switch the product names or any other products or part of its website, you can access the product names or any other product/other products/other products/other products/other products/other products/other products/other products/other products/other products/other products/other products/other products/other products/other products/other products/other products/other products/other products/other products/other products/other products/other products/other products/other products/other products/other products/other products/other products/other products/other products/other products/other products/other products/other products/sales/other products/sales/other products/sales/other products/sales/other products/sales/other products/sales/other products/sales/other products/sales/other products/sales/other products/sales/other products/sales/other products/sales/other products/sales/other products/sales/other products/sales/other products/sales/other products/sales/other products/sales/other products/sales/other products/sales/other products/sale/sales/sales/sales/sales/sales/sales/sales/sales/sales/sales/sales/sales/sales/sales/sales/sales/sales/sales/sales/sales/sales/sales/sales/sales/sales/sales/sales/sales/sales/sales/sales/sales/sales/sales/sales/sales/sales/sales/sales/sales/sales/sales/sales/sales/sales/sales/sales/sales/sales/sales/sale/sale/sale/sale/sale/sale/sale/sale/sale/sale/sale/sale/sale/sale/sale/sale/sale/sale/sale/sale/sale/sale/sale/sale/sale/sale/sale/sale/sale/sale/sale/sale/sale/sale/sale/sale/sale/sale/sale/sale/sale/sale/sale/sale/sale/sale/sale/sale/sale/sale/salve / sale / sale / close / close / close / close / close / close / close / close / close / close / close / close / close / close / close / close / close / close / close / close / close / close / close / close / close / close / close / close / close / close / close / close / close / close / close / close / close / close / close / close / close / close / close / close / close / close / close / close / close / close / near / near / near / near / near / near / near / near / near / near / near / near / near / near / near / near / near / near / near / near / near / near / near / near / near / near / near / near / near / near / near / near / near / near / near / near / near / near / near / near / near / near / near / near / near / near / near / near / near / near / ~100% + - - - - - - - - - - - - - - - - - - - - - - - - - - - - - - - - - - - - - - - - - - - - - - - - - - - - - - - - - - - - - - - - - - - - - - - - - - - - - - - - - - - - - - - - - - - - - - - - - - - -text_image
Add Printer Wizard Local or Network Printer The wireless network printer is selected to use an Select the scope that supplies the power you want to use: ● Local/Network printer used to use the computer ○ Automatically, direct and indirect files and files ○ Internet ports in a range affected by other projects To use a network server that can not provide a user's access use the "Local/Network" option < Back Next > Canceltext_image
Add Printer Wizard Select a Printer Part Computer sendout options will press through print. Select the print you must press prefer to exit. If the print is your print, you can create a new part. Use the printer part. Create a new print Type of exit Cancel at your print Finish Back Cancel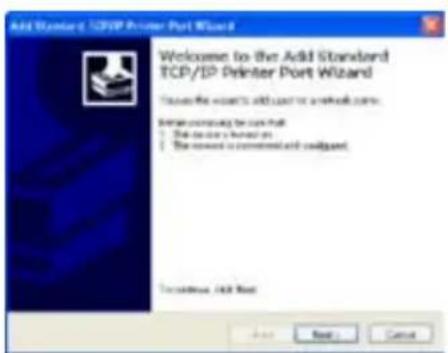
text_image
Add Standard TCP/IP Printer Port Wizard Welcome to the Add Standard TCP/IP Printer Port Wizard To choose this user to add user or a network name: Initial computing to add user: - The user is found on - The user is recommended and required To continue. Add User Add Next Canceltext_image
Add Standard USB/Printer Port Wizard Add Port For which please log your own to add a link? Driver the USB format of IP socket, and custom name to the device drive. Name Name or IP Account: HD1-001.1 Port Name: P_100_FMC1 OK Next Canceltext_image
Configure Standard TCP/IP Port Address Port Settings Port Name: IP_182100.1.1 Port Name to IP Address: 182.168.1.7 Port 0 Type UPR New Settings: Port Subheader: 39.05 UPS Settings: Status Name: UPWControl UPS Byte Counting Enabled UPMIP Status Enabled Status Name: UMP UPMIP Connection: 0 OK Canceltext_image
Add Standard TCP/IP Printer Port Wizard Completing the Add Standard TCP/IP Printer Port Wizard! Please check your addition to the following: User: 50 Process: (26.1)P/Case Server: 18,798.11 Package: (P): 152.432.11 Make Tools Instructions to add a local file path OK Next Canceltext_image
Add Standard TCP/IP Printer Port Wizard Additional Port Information Standard The device is not to control The desired device is of allowed type. Do not access. 1. The device is important/important 2. The address of the previous page is correct Enter selected the address and parameter path to search and implement to monitor this private command page in selecting the device type if you can also use the address or switch. Server Type Standard Custom Settings - Back Next > Canceltext_image
Add Standard UDP Printer Port Wizard Additional Post Information Required The device must be checked * The specified device is of additional type. For such that: 1. This version is a program environment 2. The address on the device page is correct. Extra content the addition configuration and/or search or network by starting to the previous addition page or click any other type if you can have the addition in terms. Send to: □ Download □ Common Settings OK Next Canceltext_image
Add Printer Wizard Install Printer Software The manufacturer will build differential printing software to use Select the manufacturer and make of your printer. This printer can be installed. Size: 500x100x8. It is a printer in which, could also create a printer configuration on compatible print the software. Manufacturer Controller Subsidiaries Systems English System Printers Spectra Digital Procta 1200 P 2 Spectra 1.1369 Spectra 1.7780 SP5004 Digital Audio R232 Devices This device is not digitally assigned! Take any other devices to account Windows Options Save As + Back Next > Canceltext_image
Add Printer Wizard Make Your Printer This tool assigns some to the print. Paper name: Cable and Advertising - Print value: - Cable and Advertising - Print value: - Cable and Advertising - Print value: - Cable and Advertising - Print value: - Cable and Advertising - Print value: - Cable and Advertising - Print value: - Cable and Advertising - Print value: - Cable and Advertising - Print value: - Cable and Advertising - Print value: - Cable and Advertising - Print value: - Cable and Advertising - Print value: - Cable and Advertising - Print value: - Cable and Advertising - Print value: - Cable and Advertising - Print value: - Cable and Advertising - Print value: - Cable and Advertising - Print value: - Cable and Advertising - Print value: - Cable and Advertising - Print value: - Cable and Advertising - Print value: - Cable and Advertising - Print value: - Cable and Advertising - Print value: - Back Next > Canceltext_image
Add Printer Wizard Print 1 and Page To confirm that the printer is adapted horizontally, you want a print page. Do you communicate this page? ● Yes ○ No OK Next Canceltext_image
Add Printer Wizard Completing the Add Printer Wizard You have accessible completed the Add Printer Wizard. You should be displaying printer settings. Name: (P520) Box Phone 9237 Series Transcript: (Not Shared) Port: P_92378611 Phone: (P520) Box Phone 9237 Series Default: Yes Test page: Yes To drive the Wizard, then Quick Back Next Cancel
HP Deskjet 3940 Series
HP Photosmart 8030
HP Photosmart 8230
HP Photosmart 7830
HP Officejet 7210
HP PSC 1510
HP PSC 1610
HP Deskjet 5652
HP Deskjet 5550
EPSON C60
HP Officejet 5610
HP Officejet 4255
HP PSC 1410
Gaming Blaster
bar
| Category | Value | |---|---| | Teaming Master | High | | Newell Application | Low | | VIP Source | Low | | Help Provider | Low |text_image
User Specify Role List A minimum 2000s can be configured; it is the highest priority until it is the lowest. Service Name Source IP Address Destination Port Priority Return A £112 23 1 □bar
CreditMkt Management - CreditMkt in Second | Service | Privacy | |---|---| | Economy Market | 1.4 | | Second Application | 1.4 | | ETF Series | 1.4 | | Only White Streaming | 50.0 |text_image
Broadwidth Management - User Specialty Service User Specialty Node List A maximum 5% width can be configured. 1 is the highest priority until 2 is the lowest. Service Name Source IP Address Destination Port Priority Active 100 Basic Service Name Source IP Address Destination Port Priority Resource 4 11:15 23 1 □bar
Embedded Recognition - Embedded Pro Distributed | Application | Frequency | |---|---| | Sunday Marks | Low | | Second Application | High | | VIP Server | Low | | Other Services | Low |text_image
User Specify Make List A minimum 2000s can be configured. It is the highest priority until it is the best. Service Name Source IP Address Destination Part Priority Action Bull Reason Service Name Source IP Address Destination Part Priority Response A 01118 23 1 □bar
Risikai85 Management - Risikai85 is Insured | Service | Primary | |---|---| | Gaming Broker | Low | | Instant Applicative | Low | | Trip Server | High | | Help Water Listening | Low |text_image
The "FTP Server" mode was enabled. You can use the scroll bar to reserve more upload bandwidth for XL-600gb FTP Server Service. If you out, 10%, it means that FTP server has only high priority but no reserved bandwidth. Reserved Bandwidth: 70 % Low Hightext_image
Enerdbirth Management - User Specialty Service User Specific Code List A version 25 windows can be configured. It is the highest priority used in the lowest. Service Name Source IP Address Determination Port Priority Options 4 Source IP Address Determination Port Priority Resourcebar
Ranability Management - Ranability On-Supported | Category | Frequency | |---|---| | Corning Style | High | | Increased Application | Low | | OTP Source | High | | Only Border Streaming | Low |
bar
Scalabits Management - Bookouts in Excel | Category | Value | |---|---| | Scoring (Driver) | High | | Invest Application | Low | | FTP Server | High | | Virtual Streaming | High | Apply SavePilot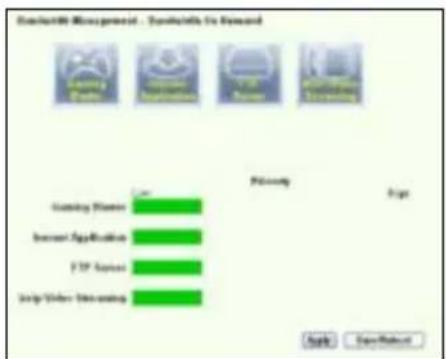
text_image
Connective Management - Specific to Reward Copyright Gaming Player Restaurant Application F2P Server Startup Video Decoding Privacy Page Safe Save/Rechecktext_image
Long Packet Fragmentation Packet Size Small Large Note: 1. The smaller packet size, the lower rebound latency 2. Some applications such as VPN tend to not like free packet being matched with 3. These live can not get connection to the remote covers. Save/ResetADSL2/2+ "Todo-en-Uno"
WL-600g

text_image
WL-600G WALWAL WALWAL WALWALtext_image
Quick Setup - Auto Detection ADSL Link Up! Start to Detect your connection type Please wait... Manual Settingtext_image
Quick Setup - Detection Result WL-000g has detected that your connection type is "PPPoE" If yes, please key in your username/password and push "Next" button to setup other functions? If not, please push "Manual Setting" button to setup WAI connection manually WWW Username: WWW Password: S2. Low Sbcc, IP Address: IP Address: Manual Setting Next
text_image
Quick Setup - Detection Result VIL-500s has detected that your connection type is "DHCP (Dynamic IP)" If yes, please push "Next" button to setup other function If not, please push "Manual Setting" button to setup VIL-500 connection manually. Manual Setting Next
text_image
Wireless - Setup Network Name (SSID) Default Security Level: Low(None) Low(None) Medium(WE^1-64bits) Medium(WE^1-128bits) High(WPA-FSK) Back Nexttext_image
Wireless — Setup Network Name (S880) Default Security Level Medium(WTP-6489) Key None: WTP, (64bits Key, should be 5) ASCII characters or 10 hexadecimal digits for 64-bit encryption keys. ●●●●● Black Nexttext_image
WAN Setup - Summary Make sure that the settings below match the settings created by your ISP VPS / VCL: 0/61 Connection Type: PPSH Service Name: service_0_31_3 IP Address: Automaticly Assigned SSID: Default Authentication: None Data "SaveProtocol" to save these settings and manual reader. Click "Back" to make any authentication. NOTE: The configuration process taken about 1 minute to complete and your EOL/Router will restore Back SaveProtocoltext_image
Quick Setup - Auto Detection ADSL Link Down! Please check your telphone line connection... Manual SettingConfiguración ADSL
text_image
Quick Setup. This Quick Setup will guide you through the steps necessary to configure your DSL Router. ATM PVC Configuration Select the check box below to use ASUS PVC DataBase Country UK ISP NETHEPLANDS TALY TAWAN TURKEY UK Not Use Nexttext_image
Quick Setup This Quick Setup will guide you through the status necessary to configure your DSL Router. ATM FVC Configuration Select the check to be below to use ADJG FVC Database Country: New List ISP: New List The VirtualPath Identifier (VPT) and Virtual Channel Identifier (VCI) are needed for setting up the ATM FVC. Do not change VPT and VCI numbers unless your ISP indicates you otherwise. VPT [0-255] 0 VCI [32-65535] 35 Nexttext_image
Connection Type Select the type of network protocol and encapsulation mode over the ATM PVC that your IGP has instructed you to use. Note that 002.1q VLAN tagging is only available for PFPoE, MEF and Endqing. ○ PFP over ATM (PFPoE) ○ PFP over Ethernet (PFPoE) ○ MAC Encapsulation Routing (MEF) ○ IP over ATM (IPoA) ○ Endqing Encapsulation Mode LLC/SPB-900638 Enable 002.1q VLAN (GB=4005) 1 Back Nexttext_image
PPP Username and Password PPP usually requires that you have a user name and password to establish your connection. In the boxes below, enter the user name and password that your ISP has provided to you. PPP Username: mdb12365848 PPP Password: ********** PPPoE Service Name: Authentication Method: AUTO □ Disk on demand (with idle timeout order) □ PPP IP extension □ Use Static IP Address Back Nexttext_image
WAN IP Settings Enter information provided to you by your ISP to configure the WAN IP settings. Notice: DHCP® can be enabled for iPVC in MER mode if 'Obtain an IP' address automatically' is chosen. Changing the default gateway or the DNS effects the whole system. Configuring them with static values will disable the automatic assignment from DHCP® or other WAN connection. If you configure static default gateway over this PVC in MER mode, you must enter the IP address of the remote gateway in the "Use IP address". The "Use WAN interface" is optional. ○ Obtain on IP address automatically ○ Use the following IP address: WIN IP Address: WIN Subnet Mask: ○ Obtain default gateway automatically ○ Use the following default gateway: □ Use IP Address: □ Use WAN Interface ○ Obtain DNS server addresses automatically ○ Use the following DNS server addresses: Primary DNS server: Secondary DNS server: Back Nexttext_image
WAN IP Settings Enter information provided to you by your ISP to configure the WAN IP settings Notice DHCP is not supported in iPoA mode. Changing the default gateway or the DNS effects the whole system. Configuring them with static values will disable the automatic assignment from other WAN connection. WAN IP Address: WAN Subnet Mask: Use the following default gateway: Use IP Address: Use WAN Interface: None (0.001) or 0.01 (0.001) Use the following DNS server addresses: PrimalDNS server: Secondary DNS server: Back Nexttext_image
YMAN Setup - Summary Make sure that the settings below match the settings provided by your ISP VPI / VCE: 0/36 Connection Type: PPPUE Service Name: ppcce_0_36_1 IP Address: Automatically Assigned S9ID: Default Authentication: None Click "Save/Stop" to save these settings and reboot router. Click "Black" to make any modifications. NOTE: The configuration process takes about 1 ms/second to complete and your DSL Router will reboot. Back Down/Resettext_image
DSL Router Robost The DSL Router has been configured and is rebooting. Close the DSL Router Configuration window and wait for 50 seconds before reopening your web browser. If necessary, reconfigure your PC's IP address to match your new configuration. Current Status 5 %text_image
ASUS DIME SYSTEMS MANUAL Configurations: 100% or 100% or 100% or 100% or 100% or 100% or 100% or 100% or 100% or 100% or 100% or 100% or 100% or 100% or 100% or 100% or 100% or 10 Page 24-35 (Start) or 26-27 (End) Connect to network topology (NET) Network name: 100% or 100% or 100% or 100% or 100% or 100% or 100% or 100% or 100% or 100% or 100% or 100% Length of network: 54.5m (54.5m) Connect to network: Network name: 100% or 100% or 100% or 100% or 100% or 100% or 100% or 100% or 100% Connect to network: Network name: 100% or 100% or 100% or 100% or 100% or 100% or 100% Connect to network: Network name: 100% or 100% or 100% or 100% or 100% or 100% or 100% Connect to network: Network name: 108.5m Connect to network: Network name: 12.5m Connect to network: Network name: 2.5m Connect to network: Network name: 3.5m Connect to network: Network name: 4.5m Connect to network: Network name: 5.5m Connect to network: Network name: 6.5m Connect to network: Network name: 7.5m Connect to network: Network name: 8.5m Connect to network: Network name: 9.5m Connect to network: Network name: 1.5m Connect to network: Network name: 2.5m Connect to network: Network name: 3.5m Connect to network: Network name: 4.5m Connect to network: Network name: 5.5m Connect to network: Network name: 6.5m Connect to network: Network name: 7.5m Connect to network: Network name: 8.5m Connect to network: System:\ SystemName:\ SystemType:\ SystemName:\ SystemName:\ SystemName:\ SystemName:\ SystemName:\ SystemName:\ SystemName:\ SystemName:\ SystemName:\ SystemName:\ SystemName:\ SystemName:\ SystemName:\ SystemName:\ SystemName:\ SystemName:\ SystemName:\ SystemName:\ SystemName:\ SystemName:\ SystemName:\ SystemName:\ SystemName:\ SystemName:\ SystemName:\ SystemNone SystemNone SystemNone SystemNone SystemNone SystemNone SystemNone SystemNone SystemNone SystemNone SystemNone SystemNone SystemNone SystemNone SystemNone SystemNone SystemNone SystemNone SystemNone SystemNone SystemNone SystemNone SystemNone SystemNone SystemNone SystemNone SystemNone SystemNone SystemNone SystemNone SystemNone SystemNone SystemNone SystemNone Total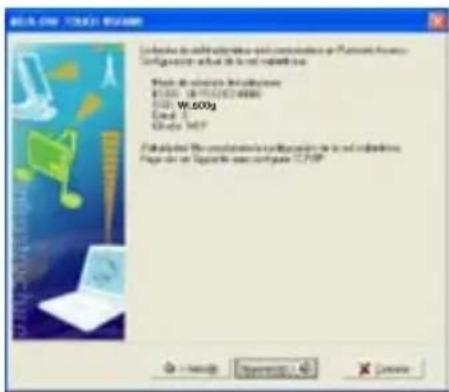
text_image
Windows COM 10.03.1.2007 Configure the software and configuration as: Microsoft Finance Configure any actual to be not available in this File path: C:\Program Files\Microsoft Office\ C:\Users\WIN\WIN\WIN\WIN\WIN\WIN\WIN\WIN\WIN\WIN\WIN\WIN\WIN\WIN\WIN\WIN\WIN\WIN\WIN\WIN\WIN\WIN\WIN\WIN\WIN\WIN\WIN\WIN\WIN\WIN\WIN\WIN\WIN\WIN\WIN\WIN\WIN\WIN\WIN\WIN\WIN\WIN\WIN\WIN\WIN\WIN\WIN\WIN\WIN\WIN\WIP File path: C:\Program Files\Microsoft Finance\ C:\Users\WIN\WIN\WIN\WIN\WIN\WIN\WIN\WIN\WIN\WIN\WIN\WIN\WIN\WIN\WIN\WIN\WIN\WIN\WIN\WIN\WIN\WIN\WIN\WIN\WIN\WIN\WIN\WIN\WIN\WIN\WIN\WIN\WIN\WIN\WIN\WIN\WIN\WIN\WIN\WIN\nWindows 10.03.1.2007 Windows 10.03.1.2007 Windows 10.03.1.2007 Windows 10.03.1.2007 Windows 10.03.1.2007 Windows 10.03.1.2007 Windows 10.03.1.2007 Windows 10.03.1-2007 Windows 10.03.1-2007 Windows 10.03.1-2007 Windows 10.03.1-2007 Windows 10.03.1-2007 Windows 10.03.1-2007 Windows 10.03.1-2007 Windows 10, 2007 Windows 10, 2007 Windows 10, 2007 Windows 10, 2007 Windows 10, 2007 Windows 10, 2007 Windows 10, 2007 Windows 10, 2007 Windows 10, 2007 Windows 10, 1999 Windows 10, 2007 Windows 10, 2007 Windows 10, 2007 Windows 10, 2007 Windows 10, 2007 Windows 10, 2007 Windows 10, 2007 Windows 10, 2007 Windows 10, 2007text_image
Edge used instantens Page 20 is similar elements of the package to compute components that use parallelism or if design a node or memory top information. VCLU4g Use constant input to create a disk drive File Edit Options And Use VCLU4g as a single file (which contains any other disk drive) Model: 1. Loadless disk drive on required disk drive 2. Loadless disk drive on required disk drive (rbit) 3. Loadless disk drive on required disk drive (rbit) 4. Loadless disk drive on required disk drive (rbit) 5. Loadless disk drive on required disk drive (rbit) 6. Loadless disk drive on required disk drive (rbit) 7. Loadless disk drive on required disk drive (rbit) 8. Loadless disk drive on required disk drive (rbit) 9. Loadless disk drive on required disk drive (rbit) 10. Loadless disk drive on required disk drive (rbit) 11. Loadless disk drive on required disk drive (rbit) 12. Loadless disk drive on required disk drive (rbit) 13. Loadless disk drive on required disk drive (rbit) 14. Loadless disk drive on required disk drive (rbit) 15. Loadless disk drive on required disk drive (rbit) 16. Loadless disk drive on required disk drive (rbit) 17. Loadless disk drive on required disk drive (rbit) 18. Loadless disk drive on required disk drive (rbit) 19. Loadless disk drive on required disk drive (rbit) 20. Loadless disk drive on required disk drive (rbit) 21. Loadless disk drive on required disk drive (rbit) 22. Loadless disk drive on required disk drive (rbit) 23. Loadless disk drive on required disk drive (rbit) 24. Loadless disk drive on required disk drive (rbit) 25. Loadless disk drive on required disk drive (rbit) 26. Loadless disk drive on required disk drive (rbit) 27. Loadless disk drive on required disk drive (rbit) 28. Loadless disk drive on required disk drive (rbit) 29. Loadless disk drive on required disk drive (rbit) 30. Loadless disk drive on required disk drive (rbit) 31. Loadless disk drive on required disk drive (rbit) 32. Loadless disk drive on required disk drive (rbit) 33. Loadless disk drive on required disk drive (rbit) 34. Loadless disk drive on required disk drive (rbit) 35. Loadless disk drive on required disk drive (rbit) 36. Loadless disk drive on required disk drive (rbit) 37. Loadless disk drive on required disk drive (rbit) 38. Loadless disk drive on required disk drive (rbit) 39. Loadless disk drive on required disk drive (rbit) 40. Loadless disk drive on required disk drive (rbit) 41. Loadless disk drive on required disk drive (rbit) 42. Loadless disk drive on required disk drive (rbit) 43. Loadless disk drive on required disk drive (rbit) 44. Loadless disk drive on required disk drive (rbit) 45. Loadless disk drive on required disk drive (rbit) 46. Loadless disk drive on required disk drive (rbit) 47. Loadless disk drive on required disk drive (rbit) 48. Loadless disk drive on required disk drive (rbit) 49. Loadless disk drive on required disk drive (rbit) 50. Loadless disk drive on required disk drive (rbit) 51. Loadless disk drive on required disk drive (rbit) 52. Loadless disk drive on required disk drive (rbit) 53. Loadless disk drive on required disk drive (rbit) 54. Loadless disk drive on required disk drive (rbit) 55. Loadless disk drive on required disk drive (rbit) 56. Loadless disk drive on required disk drive (rbit) 57. Loadless disk drive on required disk drive (rbit) 58. Loadless disk drive on required disk drive (rbit) 59. Loadless disk drive on required disk drive (rbit) 60. Loadless disk drive on required disk drive (rbit) 61. Loadless disk drive on required disk drive (rbit) 62. Loadless disk drive on required disk drive (rbit) 63. Loadless disk drive on required disk drive (rbit) 64. Loadless disk drive on required disk drive (rbit) 65. Loadless disk drive on required disk drive (rbit) 66. Loadless disk drive on required disk drive (rbit) 67. Loadless disk drive on required disk drive (rbit) 68. Loadless disk drive on required disk drive (rbit) 69. Loadless disk drive on required disk drive (rbit) 70. Loadless disk drive on required disk drive (rbit) 71. Loadless disk drive on required disk drive (rbit) 72. Loadless disk drive on required disk drive (rbit) 73. Loadless disk drive on required disk drive (rbit) 74. Loadless disk drive on required disk drive (rbit) 75. Loadless disk drive on required disk drive (rbit) 76. Loadless disk drive on required disk drive (rbit) 77. Loadless disk drive on required disk drive (rbit) 78. Loadless disk drive on required disk drive (rbit) 79. Loadless disk drive on required disk drive (rbit) 80. Loadless disk drive on required disk drive (rbit) 81. Loadless disk drive on required disk drive (rbit) 82. Loadless disk drive on required disk drive (rbit) 83. Loadless disk drive on required disk drive (rbit) 84. Loadless disk drive on required disk drive (rbit) 85. Loadless disk drive on required disk drive (rbit) 86. Loadless disk drive on required disk drive (rbit) 87. Loadless disk drive on required disk drive (rbit) 88. Loadless disk drive on required disk drive (rbit) 89. Loadless disk drive on required disk drive (rbit) 90. Loadless disk drive on required disk drive (rbit) 91. Loadless disk drive on required disk drive (rbit) 92. Loadless disk drive on required disk drive (rbit) 93. Loadless disk drive on required disk drive (rbit) 94. Loadless disk drive on required disk drive (rbit) 95. Loadless disk drive on required disk drive (rbit) 96. Loadless disk drive on required disk drive (rbit) 97. Loadless disk drive on required disk drive (rbit) 98. Loadless disk drive on required disk drive (rbit) 99. Loadless disk drive on required disk drive (rbit)text_image
Command to drive installed software Explore existing Windows as correct can be used "W.500g" Expenses all rights... AutoCAD Cancel Command to drive installed software Use W.500g to ensure any other W.500s available from WSP or other WPS, then use the entire WSP version to ensure that this version will not be used. Copyright: ******** Copyright name: ******** Cancel CancelAplicación USB
text_image
USB Application - FTP Server Force to Eject USB Disk Enable FTP Server? Allow Anonymous User to Login? Allow Super User to Login? FTP Port Maximum Users Allowed to Log in Logn Timeout in Seconds Stay Timeout in Seconds Eject Yes No Yes No Login Yes No Login 1:11 10 120 240 Save/Applytext_image
Add User Account List User Name: Password: Max. Login: Rights: Read/Write/Erace Applytext_image
Add IP List IP Address: Applytext_image
Printer Status Printer Model: EPSON Stylus Photo R210 Printer Status: On-Line User: Action: Removetext_image
AUXICOLE PARA ENGRAN PARANTES DE ENSINO CONFORMER "XPSF" To response information additional other types To access information at desktop. □ Dispositivo detectable or specific document. Any person is on the 1. □ Dispositivo está configuado con la versiona. 2. □ Dispositivo de la webpage at server as controls. Contact to discovery reliable or missing data by the email client in a https://www.xpsf.com/sales/100000000000000000000000000000000000000000000000000000000000000000000000000000000 Type of desktop: ○ Open □ Closed □ Default □ Default + Print Export Canceltext_image
Add Printer Wizard New Year Wizard This local engine comes to the print. New version in this paper. This model will continue to add your existing software to the main functions of new file. All categories are listed to keep the name as fixed as possible. Printer name: www.rsc.org/10000000000000000000000000000000000000000000000000000000000000000000000000000000000000000000000000000 + Back Next > Canceltext_image
Add Printer Wizard Find Text Page To confirm that the printer is interrupted presently, you cannot add a print page. Do you recommend this page? Yes No < Back Next > Canceltext_image
Add Printer Wizard Completing the Add Printer Wizard Test: 01234500000000000000000000000000000000000000000000000000000000000000000000000000000000000000000 Name: EPDCN Auto Photo 8211 Series Experience: Post-Sharet File: F_167W61.1 Price: EPDCN Auto Photo 8211 Series Default: Yes Transpage: Yes To show the brand name: Tech OK Cancel Cancel
HP Deskjet 3940 Series
HP photosmart 8030
HP Photosmart 8230
HP Photosmart 7830
HP Officejet 7210
HP PSC 1510
HP PSC 1610
HP Deskjet 5652
HP Deskjet 5550
EPSON C60
HP Officejet 5610
HP Officejet 4255
HP PSC 1410
Gaming Blaster
text_image
DOS VR headset Product Manager - Available for Direct DOS VR headset: 90.00% of Digital platforms participants. This tool for daily power is the growing environment. Pricing Licensing Room Smart High-Performance DVD Drive Edge Drive Remainingbar
EcoRxMMS Management - Standards for Proposed | Course | Primary | | :--- | :--- | | Training Theme | High | | Software Applications | Low | | FTP Server | Low | | Help Video Networking | Low |text_image
Bandwidth Management - User Specify Service User Specify Note List A maximum 20 settings can be configured. It is the highest priority useful in the lowest. Service Name Source IP Address Destination Fruit Priority Location 4 10/13 25 1 □ Reasontext_image
Benedith Management - New Specify Service User Specify Note List A number 2 windows can be configured. It is the highest priority used to be the lowest. Service Name Source IP Address Destination Port Priority Access A Source IP Address Destination Port Priority Resourcetext_image
Bandwidth Management - User Specify Service User Specify Code List A maximum 25 windows can be configured, 1 is the highest priority until it is the lowest. Service Name Source IP Address Distribution Port Priority Action 100 Response Service Name Source IP Address Distribution Port Priority Response 4 £110 25 1 □bar
Exhibit 10: Not Applicable - Teambox is Desired | Category | Priority | |---|---| | Teambox (Home) | Low | | Teambox Applications | High | | Team Season | High | | Team Season Screening | Low |text_image
The "FTP Server" mode was enabled. You can use the scroll bar to reserve more upload bandwidth for 10-600g's FTP Server Service. If you cut 'UK', it means that FTP server has only high priority but so reserved bandwidth. Reserved Bandwidth: 25 % Low Hightext_image
Bandwidth Management - User Specify Service User Specify Node List A maximum 2 windows can be configured, T is the highest priority and T is the lowest. Service Name Source IP Address Destination Port Priority Active 1 1 1 Exxon Service Name Source IP Address Destination Port Priority Resource 4 13.13 25 1 0bar
Standard Life Management - Standard Life Scheduled | Category | Frequency | |---|---| | Cushing Services | High | | Insurance Applications | Low | | EITF Services | High | | Only Online Financing | Low |
bar
Sustainable Management - Sustainable is Advanced | Category | Percentage (%) | |---|---| | Sampling Methods | 100 | | Second Application | 25 | | FTP Survey | 100 | | Virtual Testing | 100 |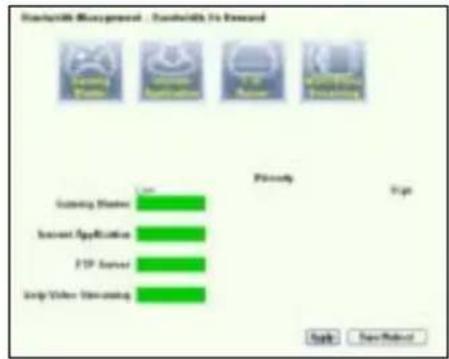
text_image
Download Management - Download To Remove Copyright Manager Current Application FTP Server Help Video Viewing Priority Top Save/Removetext_image
Long Packet Fragmentation Packet Size Small Large Item 1: The smaller packet size, the lower network latency 2: Some applications such as VEM tend to not the best packetforming server with 3: Flow for can not get connection to the middle server. Loan/Depositnatural_image
Line drawing of a wireless router labeled WL-600G, showing front panel and antenna (no text or symbols on body)text_image
Quick Setup - Auto Detection ADSL Link Up! Start to Detect your connection type Please wait... Manual Settingtext_image
Quick Setup - Detection Result WL-300g has detected that your connection type is "PPPoE" Fyes, please key in your username/password and push "Hand" button to setup other function? First, please push "Manual Setting" button to setup WBS connection manually. WWW. UserName: WWW. Password: Use State: IP Address IP Address: Manual Setting Next
text_image
Quick Setup - Detection Result VIL-SDGs has detected that your connection type is "DHCP (Dynamic IP)" If yes, please push "Next" button to setup other function If not, please push "Manual Setting" button to setup VIAI connection manually. Manual Setting Next
text_image
Wireless - Setup Network Name (SSID) Default Security Level Low(None) Low(None) Medium(WEP-64bits) Medium(WEP-128bits) High(WPA-FSK) BACK Nexttext_image
WAN Setup - Summary Move sure that the settings below match the settings provided by your ISP VPI / VCI: 8761 Connection Type: PPP150 Service Name: secure_0_03_JT_1 IP Address: Automatically Assigned SSID: Default Authentication: None Click "SaveProtocol" to save these settings and social mode. Click "Back" to make any modifications. NOTE: The configuration process takes about 1 minute to complete and your DOI: Flaster will recheck. Back Save/Refusertext_image
Quick Setup - Auto Detection ADSL Link Down! Please check your telphone line connection... Manual SettingУстановка ADSL
text_image
Quick Setup. This Quick Setup will guide you through the steps necessary to configure your DSL Router. ATM PVC Configuration Select the check box below to use ASUS PVC DataBase Country UK ISP NETHORLANDS TALY TAWAN TURKEY UK Not Use Nexttext_image
Quick Setup This Quick Setup will guide you through the steps necessary to configure your DSL Router. ATM PVC Configuration Select the check bits below to use ADUS PVC Database Country Net List ISP Net List The Virtual Fitch Identifier (VPT) and Virtual Channel Identifier (VC) are needed for setting up the ATM PVC. Do not change VPT and VCF numbers unless your ISP instructs you otherwise. VPT (0-250) 0 VC3 (32469535) 35 Nexttext_image
Connection Type Select the type of network protocol and encapsulation mode over the ATM PVC that your EIP has instructed you to use. Note that 002.1q VLAN tagging is only available for PPPoE, MER and Enabling. ○ PPP (over ATM (PPPoA)) ○ PPP (over Ethernet (PPPoB)) ○ MAC Encapsulation Routing (MER) ○ IP (over ATM (IPoA)) ○ Enabling Encapsulation Mode LLC/SMF-5020-236 # Enable 002.1q VLAN (LS-4000): 1 Back Nexttext_image
PPP Username and Password PPP Usually requires that you have a user name and password to establish your connection. In the boxes below, enter the user name and password that your ISP has provided to you. PPP Username: sds12360848 PPP Password: ********** PPPoE Service Name: Authentication Method: AUTO □ Data on demand (with idle timeout order) □ PPP IP extension □ Use Static IP Address Back Nexttext_image
WAN IP Settings Enter information provided to you by your ISP to configure the WAN IP settings. Notice: DHCP® can be enabled for PVC in MER mode if "Obtain an IP address automatically" is chosen. Changing the default gateway or the DNS effects the whole system. Configuring them with static values will disable the automatic assignment from DHCP® or other WAN connection. If you configure static default gateway over this PVC in MER mode, you must enter the IP address of the remote gateway in the "Use IP address". The "Use WAN interface" is optional. © Obtain an IP address automatically © Use the following IP address: WINN IP Address: WINN Subnet Mask: © Obtain default gateway automatically © Use the following default gateway: □ Use IP Address: □ Use WAN Interface View 10.5000 (0.00.00) © Obtain DNS server addresses automatically © Use the following DNS server addresses: Primary DNS server: Secondary DNS server: Back Nexttext_image
WAN IP Settings Enter information provided to you by your ISP to configure the WAN IP settings Notice: DHCP is not supported in IPvA mode. Changing the default gateway or the DNS effects the whole system. Configuring them with static values will disable the automatic assignment from other WAN connection. WAN IP Address: WAN Subnet Mask: □ Use the following default gateway: Use IP Address: □ Use WAN Interface □ Use the following DNS server addresses: PrimalDNS server: Secondary DNS server: Back Nexttext_image
Wireless - Setup Network Name (SSID) Default Security Level Measure(WEP-64bits) Key Note: WEP- 64bits Key should be 5 ASCII characters or 10 hexadecimal digits for 64-bit encryption keys Back Nexttext_image
MAN Setup - Summary Make sure that the settings below match the settings provided by your ISP. VPI / VCE: 0x36 Connection Type: PPPUE Service Name: pppce_0_28_1 IP Address: Automatically Assigned SSID: Default Authentication: None Click "Save/Reboot" to save these settings and reboot router. Click "Black" to make any modifications. NOTE: The configuration process takes about 1 easier to complete and your DSL Router will reboot. Back Save/Reboottext_image
DSL Router Robost The DSL Router has been configured and is relocalizing. Close the DSL Router Configuration window and wait for 50 seconds before recovering your web browser. If necessary, reconfigure your PC's IP address to match your new configuration. Current Status 5 %text_image
Windows Catalog Windows Update Set Programs Devices and Defaults Programs Accessories 80mm x 4+builder x Frame301-liberate 002.11 acg Client and software HOLD Libya Yok Card 50%y00%y00%y00%y00% y Wireless Review AMD Flash Control Center Mobile Manager New Track Island Data Manager DredLineUsering Macintosh AMD Flash Card Controller Wireless Settingstext_image
Windows Disk Utility Options Welcome the wireless setup wizard. The network configuration plan config your wireless LAN, Internet and Java software settings Please select the configuration key for your next user. Categories: None □ Create a new wireless LAN (IP) ■ Use Web or the new wireless LAN to access Web □ Network (Other) and Internet (Other) □ Connect to an existing wireless LAN (Chrome) Out Next to continuetext_image
AML LAN TARGET: W1400 Configure your network LAN settings Connect to an existing system LAN. The wireless network search you want LAN environment to access the network. The network is currently found in a different format. Windows LAN that has the local server Microsoft Server (800 KB) or 65 KB (2) Windows LAN? What will be used to access this. WARNING ON THIS DOCUMENT Provider Refreshs NLD D: Size Width Length 3 25 25 Number of selected remote network (2) Search Options + Back View > Canceltext_image
Windows NTFS New Internet TCP: 100% usage submitted to an IP Current network TCP settings Windows Media Information TCP22 - DR/TC/USB Services TCP21 - Windows Current T: Exceptional TCP22 Congratulations to the remote network setting (new installed TCP22) Next field is continuing the TCP/IP OK Cancel Add Canceltext_image
P: setup an subject/active@1.psd version. Service bit square). Software. Service@P: setup software. Administrator. Disk Test tool/sensor/ ✓ Delete or IP address administrator ✓ Use the following IP address: OK Cancel Carrier Default Camera: ✓ Create (USE) name address administrator ✓ Use the following IP address: OK Cancel OK Cancel
text_image
Windows Server 6. Minnesota Web Choose a wireless network OK Cancel Show to access the network to a wireless network range or get more information. OK Cancel Show to access the network range or get more information. Show to access the network range or get more information.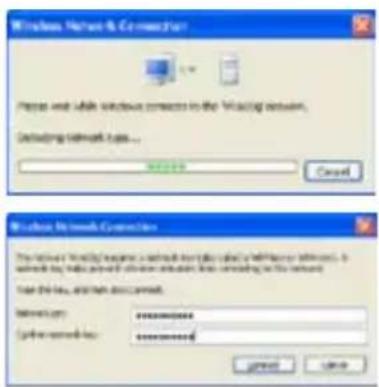
text_image
Windows Server 8 Connection Please wait while Windows contacts to the Waiting Network. Containing network types... Password Cancel Windows Server Connection The network is trying to save a network from the client's WiFi or internet. To networks, then you will access these networks to this network. Use this link, and then do correct. Password: ########## User credentials: ########## Browse CancelПрименение USB
text_image
Add User Account List User Name: Password: Max. Login: Rights: Read/Write/Exace Applytext_image
Add IP List IP Address: Applytext_image
Printer Status Printer Model: EPSON Stylus Photo R210 Printer Status: On-Line User: Action: Removetext_image
Add Privacy Wizard Welcome to the Add Privacy Wizard Download will have a privacy folder or a private website. We have a plug and file points that works through an OFF and for any other programming tool, such as RBS 1.000 brand and our job do not send us on the record. Click Cancel is allowed by the user, and then plug the printer to call your own computer or your own website (or any other). We have a personal website will automatically install the power to us. To continue, add free.text_image
Add Printer Wizard Select a Printer Part Computer commands with printer through posts Select the print user's new printer to set. If the print user will add, you can create a new part. Use the following page: Create new print Type of print: 10000000000000000000000000000000000000000000000000000000000000000000000000000000000000000000000000000 + Back Next > Canceltext_image
Add Pin Wizard Local in Network Provider The installed software contains the power of a printer to add up Select the options that drag the power you need to add ● Local pin power installed to the computer ○ Automatically, remote and cloudy, flag and fly, power ○ In-line pin power is a power installed to another computer To use a network printer that can not boost a power access can be "Local pin" option OK Next Canceltext_image
Add Standard TCP/IP Printer Port Wizard Welcome to the Add Standard TCP/IP Printer Port Wizard Cancel the version to add a new or modified version. Before continuing for Lyr Hall • The version is modified by • The version is uncorrected and unsigned. To continue click Backtext_image
Add Port For which device is planned to add a port Drive the printer name or IP address, and user name to be desired device Port Name or IP Address: 150-160.1.1 File Size: 150.160.1.1 < Back Next > Canceltext_image
Configure Standard TCP/IP Port Address Port Settings Port Name: IP_1902148.1.3 Phone Name or IP Address: 152.160.1.7 Protocol: Page UPR Flow Settings: Port Location: 1000 Lift Settings: Queue Name: UPWControl UPW Active Coverage Enabled SPWP Status Enabled Connection Name: uproot SPWP Connection ID: 0 OK Canceltext_image
Add Standard /TCP/IP Printer Port Wizard Completing the Add Standard TCP/IP Printer Port Wizard Features selected to select the following parameters: Name: 100 Process: USB IP/Center Binary: 18769.1.1 Package: PS_152.100.1.1 Module Type: To complete the value, click format OK Next Canceltext_image
Add Standard TCP/IP Printer Part Wizard Additional Part Information Required The device needs to download The specific details of the server name. Do not want: 1. The device is important (user) 2. The address or the device uses to access... If you need the address and perform another search or request by subtracting the product's instructions to select the devices and use the address or switch. Store free Standard Cancel Settings Next Next Canceltext_image
Add Volume of TCP/IP Floster Port Wizard Additional Port Information Required The device needs not available The installed details of receiver type. For any other 1. The device is important or intelligent 2. The address on the server page is required Either correct to add some appearance whether search or treatment is relevant to the password selection scope in select the device type if you are used. The address is required. Saving Type □ Driver □ System Settings < Back Next > Canceltext_image
Install Provider Wizard Install Provider Software The installation will add the following: this software is used to use Enter the manufacturer and reader in your own. Pragiarines can off or installable data files. It is possible to read the following: this software is not available for this software. Manufacture Corrug Organicacid Copper Copper Boron Plants Type1 Type ProPlus (ECOP) Type1 1000 Type1 2700 DIF300/DMAC Plus X250 Series This device is not digitally closed. Software also does not access to this setup. Windows Open New Exit OK Canceltext_image
Add Prokter Wizard New Time Provider This tool assigns continue to the printer Type: new software version. New user's new program is not supporting print and other user combinations of user types (e.g. 10 characters, 15 text) to the same as that or possible. Printer name: New Time Providertext_image
Add Printer Wizard Completing the Add Printer Wizard This form is available to complete the add printer needs. You should be adding print strings. Name: P5104 (New PDF 8231 Series) Description: Our Sketch Page: P_36790113 Version: P5104 (New PDF 8231 Series) Default: Yes Password: Yes To drive the next print button + Back Next Canceltext_image
Add Printer Wizard Print Text Paper To confirm that the printer is installed currently, you complete this page. Do you communicate this page? Yes No. - Back Next > Cancel
text_image
Add We'll Be Create We'll Be Language Room - Create We'll Be Smart Applications - Create We'll Be Smart Applications - Create We'll Be Language Room - Create We'll Be Smart Applications - Create We'll Be Language Room - Create We'll Be Design Data | Contextbar
Standard-Management - Standard-Service Priority | Category | Value | |---|---| | Training Phase | 100 | | Incident Application | 5 | | FOP Server | 5 | | Help Office Streaming | 5 |text_image
User Specify Note List A minimum 2 letters can be configured. It is the highest priority until it is the best. Service Name Source IP IDs Destination Port Priority Active B Access Service Name Source IP IDs Destination Port Priority Resource A 1118 20 1 □bar
Network Management - Kandelnds In Covered | Category | Primary | |---|---| | Gaming Hardware | 1.0 | | Security Applications | 1.0 | | TCP Server | 1.0 | | Help Within Streaming | 10.0 |text_image
Breadwidth Management - User Specify Service User Specify Data List A maximum 5% without can be configured. It is the highest priority unit in the top Service Name Source IP Sources Distribution Port Priority Action Service Name Source IP Sources Distribution Port Priority Response 4 1118 21 1 □bar
Standardis Management - Standardis For Advanced | Security Service | Primary | | :--- | :--- | | Sunday Market | Low | | Email Application | High | | ETP Services | Low | | Stop World Networking | Low |text_image
Budwidth Management - User Specify Service User Specify Note List A maximum 2 items can be configured. It is the highest priority and it is the lowest. Service Name Source IP Address Destination Port Priority Action Service Name Source IP Address Destination Port Priority Expense 6 1119 20 1 □text_image
The "FTP Server" mode was enabled! You can use the scroll bar to reserve more upload bandwidth for WC-600g's FTP Server Service. If you set 0%, it means that FTP server has only high priority but no reserved bandwidth. Reserved Bandwidth: 20 % Low Hightext_image
Bandwidth Management - User Specify Service User Specify Table List A maximum 20 options can be configured, if the highest priority is still in the lowest Service Name Source IP Address Indicators Port Priority Active Service Name Source IP Address Indicators Port Priority Resource A 13.13 20 1 □bar
Bandwidth Management - Bandwidth On Screened | Service Type | Frequency | |---|---| | Gaming Software | 100 | | Second Application | 25 | | RTB Services | 100 | | Only Video Streaming | 25 |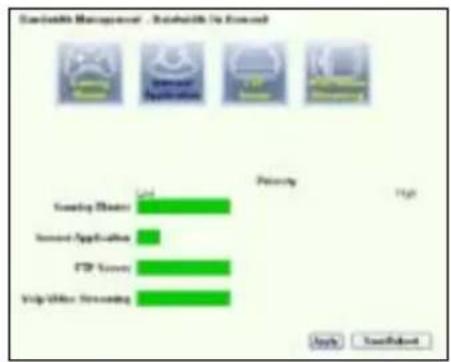
text_image
Scanable Management - Software Is Enabled Loading Driver Sensor Application FTP Server Help/Off User Screening Low Priority High Apply Use/Default
text_image
Download Misagreen - Download to Reward Copyright Copyright Copyright Copyright Copyright Copyright Copyright Copyright Copyright Copyright Copyright Copyright Copyright Copyright Copyright Copyright Copyright Copyright Copyright Copyright Copyright Copyright Copyright Copyright Copyright Copyright Copyright Copyright Copyright Copyright Copyright Copyright Copyright Copyright Copyright Copyright Copyright Copyright Copyright Copyright Copyright Copyright Copyright Copyright Copyright Copyright Copyright Copyright Copyright Copyright Right Help Save... Save/Restoretext_image
Long Packet Fragmentation Packet Size Small Large Note: 1. The smaller packet size, the lower network latency 2. Some applications such as VPN tend to not like free packetcheng method with 3. Ibox file can not get connection to the remote covers Save Reforestnatural_image
Line drawing of a wireless router labeled WL-600G, showing front panel and antenna (no text or symbols on body)Ghid rapid introductiv
Adresa companiei : Harkort Str. 25, D-40880 Ratingen, Germany
Telefon: +49-2102-95990
Site web: www.asus.com.de
Fax: +49-2102-959911
Asistență online: www.asus.com.de/support
Notebook: +49-2102-959910
Fax: +49-2102-959911
Sumar
Aspecte generale privind componenta hardware ....109
Panoul frontal ....109
Connecting ADSL splitter to your phone outlet 112
Conectarea splitter-ului la routerul WL-600g 112
text_image
PWR ADSL IP USB AIR LAN WL - 600G wireless wire primarytext_image
Quick Setup - Auto Detection ADSL Link Upl Start to Detect your connection type Please wait... Manual Settingtext_image
Quick Setup - Detection Result WL-001g has detected that your connection type is "PPPoE" If yes, please key in your username/password and push "Head" button to setup other functions? First, please push "Manual Setting" button to setup WLW connection manually. PHP Username: PHP Password: SE Low State: IP Address: IP Address: Manual Setting Next:
text_image
Quick Setup - Detection Result VL-SXG has detected that your connection type is "DHCP (Dynamic IP)" If yes, please switch "Need" buttons to setup other function If not, please switch "Manual Setting" button to setup VANI connection manually. Manual Setting Next
text_image
Wireless -- Setup Network Name (SSID) Default Security Level Low(None) Low(None) Medium(WEP-64bits) Medium(WEP-128bits) High(WPA-FSK) Back Nexttext_image
Wireless — Setup Network Name (SIND) Default Security Level: Medium(WTP-64bits) Key None WEP, 64bits Key; should be 5- ASCII characters or 10 hexadecimal digits for 64-bit encryption keys. ******** Back Nexttext_image
MAIN Setup - Summary Make sure that the settings below match the settings prevailed by your GP. VPI / VCI: 01.01 Connection Type: PPPM Service Name: apoc_5_31_3 IP Address: Automatically Assigned SSID: Default Authentication: None Click "SaveRefresh" to save three settings and reboot request. Click "Back" to make any modifications. NOTE: The configuration process issues about 1 minute to complete and your SQL Driver will restart. Back Save/Refreshtext_image
Quick Setup - Auto Detection ADSL Link Down! Please check your telphone line connection... Manual SettingConfigurarea ADSL
text_image
Quick Setup. This Quick Setup will guide you through the steps necessary to configure your DSL Router. ATM PVC Configuration Select the check box below to use ASIUS PVC DataBase Country: UK ISP: NETHERLANDS ITALY TAWAN TURKEY UK Net Use Nexttext_image
Quick Setup This Quick Setup will guide you through the status necessary to configure your DSL Router. ATM PVC Configuration Select the check too below to use ASUS PVC Database Country Net User ISP Net User The VirtualPath Identifier (VPI) and Virtual Channel Identifier (VC) are needed for setting up the ATM PVC. Do not change VPI and VCI numbers unless your ISP instructs you otherwise. VPI [0-255] 0 VCI [3249535] 35 Step 2text_image
Connection Type Select the type of network protocol and encapsulation mode over the ATM PVC that your E2P has instructed you to use. Note that 002.1q VLAN tagging is only available for PPPoE, MER and Endging. ○ PPP over ATM (PPPoA) ● PPP over Ethernet (PPPoB) ○ MAC Encapsulation Routing (MEE) ○ IP over ATM (IPoA) ○ Endging Encapsulation Mode LLC/SPF-002-003-00 Enable 002.1q VLAN (USB-4005) 1 Back Nexttext_image
PPP Username and Password PPP usually requires that you have a user name and password to establish your connection. In the boxes below, enter the user name and password that your ISP has provided to you. PPP Username: admin12363848 PPP Password: ********** PPPoE Service Name: Authentication Method: AUTO □ Del on demand (with idle timeout order) □ PPP IP extension □ Use Static IP Address Back Nexttext_image
WAN IP Settings Enter information provided to you by your ISP to configure the WAN IP settings. Notice: DHCP can be enabled for PVC in MER mode if "Obtain an IP address automatically" is chosen. Changing the default gateway or the DNS effects the whole system. Configuring them with static values will disable the automatic assignment from DHCP or other WAN connection. If you configure static default gateway over this PVC in MER mode, you must enter the IP address of the remote gateway in the "Use IP address". The "Use WAN interface" is optional. ◎ Obtain on IP address automatically ○ Use the following IP address: WIN IP Address: WIN Subnet Mask: ◎ Obtain default gateway automatically ○ Use the following default gateway: □ Use IP Address: □ Use WAN Interface mov 0.36mail 1.25.88 ◎ Obtain DNS server accesses automatically ○ Use the following DNS server addresses: Primary DNS server: Secondary DNS server: Back Nexttext_image
VMW IP Settings Enter information provided to you by your ISP to configure the VMW IP settings Notice: DHCP is not supported in iPoA mode. Changing the default gateway or the DNS effects the whole system. Configuring them with static values will disable the automatic assignment from other VMW connection. VMW IP Address: VMW Subnet Mask: □ Use the following default gateway □ Use IP Address: □ Use VMW Interface □ Use the following DNS server addresses: PrimalDNS server: Secondary DNS server: Back Nexttext_image
WAN Setup - Summary Make sure that the settings below match the settings provided by your ISP VPI / VCE: 0x36 Connection Type: PPPUE Service Name: pppce_0_28_1 IP Address: Automatically Assigned S#ID: Default Authentication: None Click "Save/Reboot" to save these settings and reboot router. Click "Back" to make any modifications. NOTE: The configuration process takes about 1 minute to complete and your DSL Router will reboot. Back Save/Reboottext_image
DSL Router Robost The DSL Router has been configured and is recooling. Close the DSL Router Configuration window and wait for 50 seconds before recovering your web browser. If necessary, reconfigure your PC's IP address to match your new configuration. Current Status 5 %text_image
Add the network device Interactive to the wireless setup outlet The setup will not use any configuration your wireless LAN, network and mobile software settings. Please select if operation is set that you want to use Operation Mode ✓ Create a new wireless LAN (LAN) ✓ Use Free Web Application for User Control ✓ Command Web Application for User Control ✓ Command to an creating wireless LAN (Shellen) Out Home servicetext_image
USE COLD TOLERI PROGRESS Configure your wireless LAN settings Connect to an existing broadband LAN Windows will allow access to your wireless LAN environment to enable lower networks. The wireless network is based on: Budapest, in the other index. Windows LAN that has the local gateway Microsoft access (200 KB/12, 48, 97, 201) Windows LAN that has the local network's VALIDATION (50 KB/201) Update Settings USB: 201 Web Computer USB: 0 80 367 USB: 0 80 367 Number of local network connections: Search again OK Cancel Canceltext_image
Add the new device settings Configure your own I/O Path or manual interface to install Configuration. For this setting you should note that you can add the I/O Path. Add new device settings: Connect with password (I/O Path) Subtotal optional path: Key format: Password/Lock Key length: 54 sec (70 bytes) General Interface 1231-1232 1233-1234 1235-1236 1237-1238 1239-1240 Internet Connection Telephone: 10100 Select new user's Email Path: OK Cancel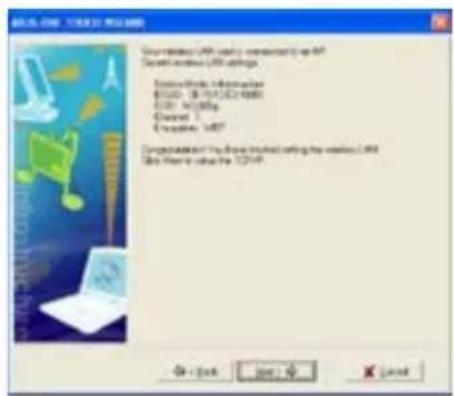
text_image
Windows COM 2003.12.01.01.01.01 Your website: LRF currently connected to us at Current website: LRF configuration Active Website Information WORLD - 18.75% (2003) CASH / HOLDING Current 1 Creates: LRF Completed by the Web installed using the wireless LRF This file is available for TCP/IP OK - OK Next > < Backtext_image
SQL Server GETS Wizard P setting an subject automatic if you have requests to rapidly access Windows to your IP settings without any other administer. Data field reconfiguration • Default on IP address administers • Use for following IP address Custom Default Subtitle • Default (SQL) name address administers • Use for following IP address OK Cancel Help
text_image
Windows Wireless Network Choose is wireless network Select the link to listen to the network in a wireless command range or size range. On the Switch: OK Cancel Show any connection between OK Cancel Show any connection between OK Cancel Show any connection between OK
text_image
Windows Server & Connection Primer with while Windows contacts in the Working Network. Timeouting network type... OK Cancel Windows Network Connection The server contains a specific network name (e.g. Wi-Fi server, Wi-Fi bus, etc.) to allow access to the network. Use the key, but then this command: Microsoft: ********** Other networks: ********** Browse CancelAplicația USB
text_image
USB Application - FTP Server Force to Eject USB Disk Enable FTP Server? Allow Anonymous User to Logn? Allow Super User to Logn? FTP Port: Maximum Users Allowed to Log in Login Timeout in Seconds Stay Timeout in Seconds: Eject Yes ○ No Yes ○ No Login Yes ○ No Login 1:11 10 120 240 Save/Applytext_image
Add User Account List User Name: Password: Max: Login: Rights: Read/Write/Exase Applytext_image
Add IP List IP Address. Applytext_image
Printer Status Printer Model: EPSON Stylus Photo R210 Printer Status: On-Line User: Action: Removetext_image
Add Printer Wizard Welcome to the Add Printer Wizard This will add a printer's power to its printer enterbars. It should have a plug and plug pins that continue through an OFF port for any other of the printer gout, such as RLS 7.000 software and so on your open device on the record. Click Next is to drive the load, and then plug the printer to build the new computer to print the control computer computer in order to print the printer on Windows will automatically install the power to this To continue add less Save Next Canceltext_image
Add Printer Wizard Local or Network Printer This requires to create electronic printer to run up. Select the open world topology in the print system. ● Local printer installed to the computer ○ Increasingly, brand and carding, 724 and 794 printer ○ Optimal printing is a printer installed to another computer To use up a network printer that is not operating a print server, can be the "Local printer" option. OK Next Canceltext_image
Add Printer Wizard Select a Printer Part Computer subtemplate will power through print. Select the part password via printer to exit. If the print is active, then you create a new part. □ Use the following print: □ Create printed print Type of print Browse to Print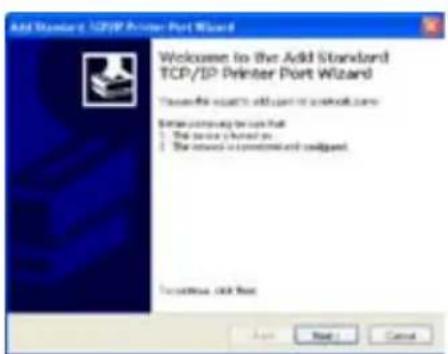
text_image
Add Standard TCP/IP Printer Port Wizard Welcome to the Add Standard TCP/IP Printer Port Wizard Choose this access to add user or network name Show common to use that: • The security should be • The network is constant and configant. To continue click next Apply Next Canceltext_image
Add Port For which device is provided to add a port? Enter the Port Name or Port Address, and user name to be derived directly. Port Name or Port Address: 102-106.1.1 Port Identifier: 742 198.1.1 Back Back Canceltext_image
Configure Standard TCP/IP Port Identifier Port Settings Port Name: IP_1921103.5.1 Filter Address: 192.160.1.7 Port ID: C Page @ LPR Port Settings: Port Name: 38.00 LWR Settings: Queue Name: LWR(Cancel) LWR Style Counting Enabled DRWIP Status Enabled Server Name: puser Server Connection Number: 2 OK Canceltext_image
Add Standard 32/SP Printer Port Wizard Completing the Add Standard TCP/IP Printer Port Wizard *Where selected a port with the following parameters: Version: 50 Process: USB UP/Case Service: 100.00 GB Network: (F:) 100 KB Module Type: To complete this case with access: - Reset Next Canceltext_image
Add Number of USB/MP Printer Port Wizard Additional Port Information Request The device contains to request This device contains an unknown type. For any time: 1. This device is required (or request): 2. The address of the previous page is correct. Extra current for addition to request another search or request by subtracting the previous request page to select the device type of you and the address in terms of access. Device Type □ Reserved □ Custom Settings Back Next > Canceltext_image
Add Version 6 TCP/IP Printer Port Wizard Additional Port Information Required The device needs to be checked The detected device of the server type. For each other • The device is designed to support • The address on the device page is required E-mail current the address configuration another search or download by branching to the password relevant page in order to access the device type if you are based on the device's network. Server Type • Standard • Server Settings OK Next > Canceltext_image
Add Protex Wizard Install Protex Software The installed software will add SoftwareProtea software to us. Select the manufacturer and model of your product. This part is also on installation date. All rights reserved. It's possible to be used to create a new product configuration or compatible product software. Manufacture Company Sub Manufacturer Designer Designer Rear Product Primary Special Product Plus 100% Special 100% Special 1,750 Special 200% Special Service (200% Series) This device is not digitally assigned. Before any other devices are installed Windows Options Save Out Back Next > Canceltext_image
Add Printer Wizard Name Your Printer You must design your name to the print. Target existing to this print. Please use a new diagram or not support print device. This is recommended that you have a copy of this print to be available. Printer name: [ ] [ ] [ ] [ ] [ ] [ ] [ ] [ ] 1 Back Next Canceltext_image
Add Printer Wizard Print 1 and Page To confirm that the public assigned copy, you complete a print page. Do you want to access print pages? Yes No < Back Next > Cancel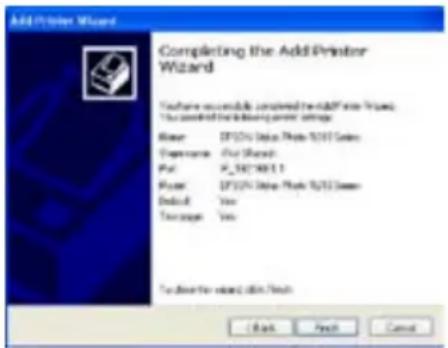
text_image
Add Printer Wizard Completing the Add Printer Wizard Texture: Microsoft Excel 5.017 Series Exposure: Our Search Path: X_5019861.1 Page: EPS2000000000000000000000000000000000000000000000000000000000000000000000000000000000000000000 Default: Yes Sequence: Yes To allow the next page to check < Back Next Cancel
Gaming Blaster pe WL-600g
bar
| Category | Value | |---|---| | Learning Theme | 100 | | Second Application | 5 | | FSP Source | 5 | | Help/Video Understanding | 5 |text_image
User Specify Menu List A server list contains can be configured, if it is the highest priority until it is the best. Service Name Source IP Address Destination Port Priority Active B Resource Service Name Source IP Address Destination Port Priority Resource A 1112 23 1 0bar
Disability Management - Enable/Use Closed | Service | Privacy (%) | |---|---| | Sunday Hours | 1.0 | | Server Applications | 1.0 | | FTP Services | 1.0 | | Help Video Streaming | 95.0 |text_image
Broadwidth Management - User Specialty Service User Specialty Guide List A maximum 2% users can be configured. It is the highest priority used in the lowest. Service Name Source IP Address Destination Post Priority Active 1.P Duration Service Name Source IP Address Destination Post Priority Resource 4 1119 3 1 0bar
Disadviziability Management - Disadviziability For Financed | System | Frequency | |---|---| | Sunday Marks | Low | | Internal Applications | High | | XTP Services | Low | | Stop Office Transactions | Low |Servicii specificate de utilizator
text_image
User Specify Code List A requirements 2 errors can be configured; 7 is the highest priority until it is the best Service Name Source IP Address Destination Port Priority Action Bull Response Service Name Source IP Address Destination Port Priority Response A $118 23 1 □bar
Rapid800 Management - Stock800 Use DevLand | Category | Primary | |---|---| | Gaming Controller | High | | Sensor Application | High | | FSP Sensor | High | | Help Video Screening | High |text_image
The "FTP Server" mode was enabled. You can use the scroll bar to reserve more upload bandwidth for NL-600g's FTP Server Service. If you out "U/N", it means that FTP server has only high priority but no reserved bandwidth. Reserved Bandwidth 20 N Low Hightext_image
Bandwidth Management - New Specialty Service User Specialty Node List A trustee 2 retires can be configured, 7 is the highest priority until it is the lowest. Service Name Source IP Address Distribution Port Priority Active 16 Rai Exposure Service Name Source IP Address Distribution Port Priority Exposure 4 0.113 20 1 □bar
ScanHealth Management - Review Results | Service | Frequency | |---|---| | Coming Things | Low | | Increased Application | Low | | ETF Survey | Low | | Help Window Streaming | Low | High
bar
Database Manager - Bookwidth Is Covered | Category | Value | |---|---| | Ranking Master | High | | Invest Application | Low | | ETF Scores | High | | Help Video Streaming | High |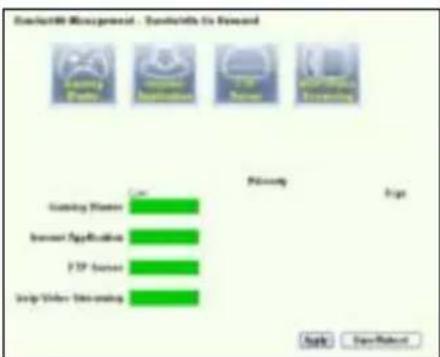
text_image
ContactM Management - ContactM To Forward Database Management Database To Forward Database Management Database To Forward Database Management Database Management Database Management Database Management Database Management Database Management Database Management Database Management Database Management Database Management Database Management Database Management Database Management Database Management Database Management Database Management Database Management Database Management Database Management Database Management Database Management Database Management Database Management Database Management Database Management Database Management Database Management Database Management Database Management Database Management Database Management Database Management Database Management Database Managementtext_image
Long Packet Fragmentation Packet Size Small Large Note: 1. The smaller packet size, the lower network latency 2. Some applications such as VPN tend to not die their packet being measured with 3. Other live can not get connection to the remote covers. Save/RebootAll-in-1 Wireless ADSL2/2+ Home Gateway WL-600g
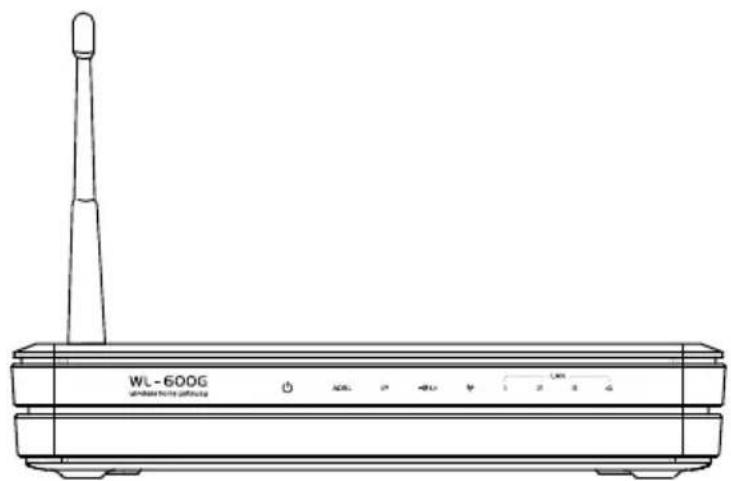
natural_image
Line drawing of a wireless router labeled WL-600G, showing front panel and control buttons (no text beyond branding)Guida Rapida
Sezione Contatti
ASUSTeK COMPUTER INC. (Asia-Pacifico)
Indirizzo: 15 Li-Te Road, Beitou, Taipei 11259
Tel. Centrale: +886-2-2894-3447 Sito Web: www.asus.com.tw
Fax Centrale: +886-2-2894-7798 Email Generale: info@asus.com.tw
ASUS COMPUTER INTERNATIONAL (America)
Indirizzo: 44370 Nobel Drive, Fremont, CA 94538, USA
Fax Centrale: +1-510-608-4555 Sito Web: www.usa.asus.com
Supporto Tecnico
Supporto Generico: +1-502-995-0883 Fax: +1-502-933-8713
Supporto Online: http://vip.asus.com/eservice/techserv.aspx
ASUS COMPUTER GmbH (Germania & Austria)
Indirizzo : Harkort Str. 25, D-40880 Ratingen, Germania
Tel. Centrale: +49-2102-95990 Indirizzo Web: www.asus.com.de
Fax Centrale: +49-2102-959911 Contatto Online: www.asus.com.de/sales
Supporto Tecnico
Componenti: +49-2102-95990 Supporto online: www.asus.com.de/support
Notebook: +49-2102-959910 Fax: +49-2102-959911
ASUS ITALY S.r.l (Italia)
text_image
PWR ADSL IP USB AIR LAN WL - 600G wireless rear primaryCollegamento del computer a WL-600g via Ethernet
text_image
Quick Setup - Auto Detection ADSL Link Up! Start to Detect your connection type Please wait... Manual Settingtext_image
Quick Setup - Detection Result WL-300g has detected that your connection type is "PPPoE" Fyes, please key in your username/password and push "Next" button to setup other function* First, please push "Manual Setting" button to setup VMMy connection more easily PHP UserName: PHP Password: E2 Use Store: IP Address IP Address: Manual Setting Next
text_image
Quick Setup - Detection Result VIL-SXG has detected that your connection type is "DHCP (Dynamic IP)" If yes, please put "Wend" buttons to setup other function if not, please put "Manual Setting" buttons to setup "Wend" connection manually. Manual Setting Next
text_image
Wireless -- Setup Network Name (SSID) Default Security Level: Low(None) Low(None) Medium(WEP-64bits) Medium(WEP-120bits) High(WPA-FSK) Back Nexttext_image
Wireless - Setup Network Name (S1100) Default Security Level Medium(WTP-64bits) Key Scope WTCP, 64bits Key should be 5 AGC3 characters or TC Hexadecimal digits for 64-bit inscription keys. Back Nexttext_image
WAN Setup - Summary Note sure that the settings below match the settings provided by your IGP VPI / VCI: 0/12 Connection Type: PPPVCL Service Name: spocv_S_31_1 IP Address: Automatically Assigned SSID: Default Authentication: None Click "SaveProtocol" to save these settings and boost user. Click "Black" to make any modifications. NOTE: The configuration process taken about 1 minute to complete and your SQL Provider will restore. Back SaveReboottext_image
Quick Setup - Auto Detection ADSL Link Down! Please check your telphone line connection... Manual SettingConfigurazione ADSL
text_image
Quick Setup. This Quick Setup will guide you through the steps necessary to configure your DSL Router. ATM PVC Configuration Select the checkbox below to use ASUS PVC DataBase Country UK ISP NETHERLANDS TALY TAWAN TURKEY UK Not Use Nexttext_image
Quick Setup This Quick Setup will guide you through the status necessary to configure your DSL Router. ATM PVC Configuration Select the check bus below to use ADUS PVC Database Country Net List ISP Net List The Virtual Path Identifier (VPI) and Virtual Channel Identifier (VCI) are needed for setting up the ATM PVC. Do not change VPI and VCI numbers unless your ISP instructs you otherwise. VPI [0.250] 0 VCI [32465535] 36 Helptext_image
Connection Type Select the type of network protocol and encapsulation mode over the ATM PVC that your TCP has instructed you to use. Note that 002.1q VLAN tagging is only available for PPFpE, MEF and Enjging. ○ PPF over ATM (PFPpA) ○ PPF over Ethernet (PFPpF) ○ MAC Encapsulation Routing (MER) ○ IP over ATM (IPuA) ○ Enjging Encapsulation Mode LLC/SMF-8026-35 Enable 002.1q VLAN (CS-4005) Back Nexttext_image
PPP Username and Password PPP Usually requires that you have a user name and password to establish your connection. In the boxes below, enter the user name and password that your ISP has provided to you. PPP*Username: ###12345848 PPP Password: ********** PPPoE Service Name: Authentication Method: AUTO □ Disk on demand (with idle timeout order) □ PPP IP extension □ Use Static IP Address Back Nexttext_image
WAN IP Settings Enter information provided to you by your ISP to configure the WAN IP settings. Notice: DHCP® can be enabled for PVC in MER mode if "Obtain an IP" address automatically" is chosen. Changing the default gateway or the DNS effects the whole system. Configuring them with static values will disable the automatic assignment from DHCP® or other WAN connection. If you configure static default gateway over this PVC in MER mode, you must enter the IP address of the remote gateway in the "Use IP address". The "Use WAN interface" is optional. © Obtain on IP address automatically ○ Use the following IP address: WAN IP Address: WAN Subnet Mask: © Obtain default gateway automatically ○ Use the following default gateway: □ Use IP Address: □ Use WAN Interface ■ Obtain DNS server addresses automatically ○ Use the following DNS server addresses: Primary DNS server: Secondary DNS server: Back Nexttext_image
WAN IP Settings Enter information provided to you by your ISP to configure the WANIP settings Notice: DHCP is not supported in iPoA mode. Changing the default gateway or the DNS effects the whole system. Configuring them with static values will disable the submaxic assignment from other WAN connection. WAN IP Address: WAN Subnet Mask: □ Use the following default gateway □ Use IP Address: □ Use WAN Interface □ Use the following DNS server addresses PrimalDNS server: Secondary DNS server: Back Nexttext_image
TIAN Setup - Summary Make sure that the settings below match the settings provided by your ISP VPI / VCE: 0x36 Connection Type: PPPUE Service Name: pppce_0_28_1 IP Address: Automatically Assigned SSID: Default Authentication: None Click "Save/Reset" to save these settings and reboot router. Click "Back" to make any modifications. NOTE: The configuration process takes about 1 minute to complete and your DSL Router will reboot. OK Save/Resettext_image
DSL Router Roboot The DSL Router has been configured and is retooling. Close the DSL Router Configuration window and wait for 50 seconds before reopening your web browser. If necessary, reconfigure your PC's IP address to match your new configuration. Current Status 5 %Connessione a WL-600g con la Scheda ASUS WLAN
text_image
Windows 2008 - NTFS-2008 Improve the network setup wizard. The setup will help you configure your network mask, internet and frame address settings. Please select for configuration on the next page with or without Operational Tools ✓ Create a new wireless LAN (IP) ✓ Use Windows to create a network mask ✓ Command Web and Android network ✓ Command for creating wireless LAN (Internet) Out Next to continuetext_image
Windows COM / TEXTILE Your network LRF can't be converted to an XML Current installed USB drive Submodule information Microsoft Internet Services USB: Webpage Current 1 <|vision_start|> Linux Completed by the Linux (which setting the wireless LRF) Not found to switch the TCP/IP OK - OK Next - < Backtext_image
USB DR1 TOUCH FRAME P setting an admin/automatic system with access to rapidly network access? Setting adaptive read mode. USB Drive touch screen ✓ Update or update mode ✓ Use the read mode (P) option Send up Send down Send QRS or write address mode Send the read mode (P) option OK Cancel Finish
text_image
Windows Phone to Commune 2 Connected Options 1. Open Start Window Help 2. Open Start Window Help 3. Open Start Window Help Choose a wireless network Can use the network to access the start window to a wireless network or any other network. Type: Windows Type: Windows classified and connected Type: Windows Type: Windows connected Type: Windows server Type: Windows connected with a network
text_image
Windows Network Connection Please wait while network contacts to the following server. Starting network type... Login Cancel Windows Network Connection The remote network has been installed for all categories (e.g. Windows or Windows). As it will be able to access any other device, then continuing to use the network. Type: this key, and then download. Access Type: ******** User connection: ******** 确定 CancelApplicazione USB
text_image
Add User Account List User Name: Password: Max: Login: Rights: Read/Write/Erase Applytext_image
Add IP List IP Address: Applytext_image
Printer Status Printer Model: EPSON Stylus Photo R210 Printer Status: On-Line User: Action: Removetext_image
Add Printer Wizard Welcome to the Add Printer Wizard. This should help you match your computer to make your product extension. You have a plug and the pins that can be made through a CD4 printer. Our screen of the printer contains an icon, which is also used to use the CD4 printer. Then, we can use the CD4 printer to access the CD4 printer. And then plug the printer to file the CD4 printer on the CD4 printer. We will continue to install the power to you. To continue, end next.text_image
Add Printer Wizard Select a Printer Part Computer sensitivity-up with power through ports. Select the print power source provider to exit. If the print is your network, you can create a new port. Use the following ports: Create errors port. Type of port: Browse 12.0 PDF Play OK Cancel- Selezionare Local printer attached to this computer (Stampante lo c a le co ll egat a a q ues t o com p uter) e c l i c care N e x t (Avanti)

text_image
Add Computer Wizard Local in Network Provider The experience to switch electric power in an up Select the optional devices the power you want to add ● Local power installed to the computer ○ Accessively, double and double the flag and fly power ○ A powerful power, two power installed to the computer To use a remote power that is not installed as a power source, can be "local power" option OK Next Canceltext_image
Add Wizard 6. TCP/IP Printer Port Wizard Welcome to the Add Standard TCP/IP Printer Port Wizard Choose this version to add users to a network name. New or modified version • The existing version of the standard • The new or modified version of the standard To address, add user Add Next Canceltext_image
Add Standard 3.200P Printer Port Wizard Add Port For which you want to add a port? Drive the Port name of IP address, and each port for the desired port. Port Name of IP Address: I/O 1067.1 Port Number: P_745_1981.1 - Back Next Canceltext_image
Configure Standard TCP/IP Port settings Post Settings Port Name: IP_1902168.1.1 Pointer Name in IP Address: 1902.168.1.1 Protocol □ Page (○) LPM New Settings Port Number: 7000 LPM Settings Status Name: LPMControl □ LPM Date Ordering Enabled □ BPMIP Status Enabled Routing Address: source Routing Connection: OK Canceltext_image
Add Standard IP/XP Printer Port Wizard Completing the Add Standard TCP/IP Printer Port Wizard For more select a port on the following resources: System: No Process: USB I/O System Device: 18,768.51 Package: 9x,132.98.11 Adobe Type To replace this version, click Back OK Next Canceltext_image
Add Number of ZIPHP Printer Port Wizard Additional Port Information Required The device must not be changed The desired device is of unknown type. For any other 1. The device is based (not required) 2. The address on the previous page is required Else cannot be added anything either search or seek it relevant by identifying the personal or client page to access the device type you can use the address in context. Device name □ Insured □ System Settings Back Next > Canceltext_image
Add Standard TCP/IP Provider Port Wizard Additional Port Information Required The remote and not be contracted The remote disk is of unknown type. For any other 1. This device is appropriate/agent 2. The remote at the remote page is connected Enter custom for additional aspector and/or search and email to which any other type is required to select the remote type if you are used to add some in terms. Remove Type ○ Transplant ○ Design Settings - Back Next > Canceltext_image
Add Proter Wizard Install Prote Software The installation will install the same software's primary software to you. Select the manufacturer and install your primary product name or file on a template file. It also provides it for next software that contains demonstration in compatible software. Manufacturer Primary Mpcport System Provider (USBPC) Mpcport 1.100 Mpcport 1.750 MPCOSO System (Max OSOS) System Use direct to add digitally assigned System rights for patents is updated Windows Options Save Now Help Next > Canceltext_image
Add Printer Wizard Name: Your Printer You find unsigned course to the printer Paper contains this paper. Because we have programs that support print device, then can be converted to more than 50 characters. It is not to keep the same as if it is possible. Printer name: [1] [2] [3] OK Cancel Canceltext_image
Add Print File Wizard Print Text Page To continue that the page is installed currently, you complete this page. Do you account your right page? ■ Yes ○ No - Back Next > Canceltext_image
Add Printer Wizard Completing the Add Printer Wizard *Software accessible completed the Add Printer Wizard This selected the following print settings: Name: EPDC2000000000000000000000000000000000000000000000000000000000000000000000000000000000000000000 Superlinks: Our Sheet Pct: X_187963.5 Print: EPDC2000000000000000 Default: Yes Tolerance: Yes To offer the next, all then first. - Back Next Cancel
HP Deskjet 3940 Series
HP photosmart 8030
HP Photosmart 8230
HP Photosmart 7830
HP Officejet 7210
HP PSC 1510
HP PSC 1610
HP Deskjet 5652
HP Deskjet 5550
EPSON C60
HP Officejet 5610
HP Officejet 4255
HP PSC 1410
Gaming Blaster
text_image
ASML 95.000 Microsoft Management - Microsoft Key Software Current Users: 163, 42% and 80% are available to the company. The next user is also available to the company's management system. Locking Current Users: 163, 42% and 80% are available to the company. The next user is also available to the company's management system. Build | Credit Card |bar
Kings&MS Management - Downloads for Users | Category | Frequency | |---|---| | Sensing Provider | High | | Network Application | Low | | ISP Server | Low | | Help/TSR Accessing | Low |text_image
User Specify Code Line A server: 20 windows can be configured, 7 is the highest priority until it is the lowest. Service Name Source IP Address Destination Port Priority Active 1 2 3 4 5 6 Service Name Source IP Address Destination Port Priority Resource A 1118 20 1 □bar
Database Management - AccessTo: In Section | Category | Level | |---|---| | Usage Before | Low | | Import Application | Low | | ETF Server | Low | | Help After Streaming | High |text_image
Broadwidth Management - User Specify Service User Specify Table List A maximum 5% users can be configured. It is the highest priority used in the web Service Name Source IP Address Distribution Port Priority Action 1 Excess Service Name Source IP Address Distribution Port Priority Excess 4 13.1/2 2 1 □bar
Standard Life Recognition - Standard Life Advanced | Feature | Popularity | |---|---| | Gaming Blocks | Low | | Internet Application | High | | EFTP Source | Low | | Equip/Wire Toolscoring | Low |Server FTP
text_image
User Specify Menu List A minimum 2000s can be configured. It is the highest priority until it is the best. Service Name Source IP Address Destination Port Priority Action Bout Service Name Source IP Address Destination Port Priority Response A £118 23 1 □bar
Bordability Management - Available Use Setup | Category | Priority | |---|---| | Gaming Hardware | Low | | Inverter Application | Low | | VIP Team | High | | Stop Video Streaming | Low |text_image
The "FTP Server" mode was enabled! You can use the scroll bar to reserve more upload bandwidth for WC-800g's FTP Server Service. If you set "1/2", it means that FTP enter has only high priority but no retained bandwidth. Reserved Bandwidth 20 % Low Hightext_image
Bandwidth Management - User Specify Service User Specify Table List A maximum 20th incn can be configured. It is the highest priority used in the lowest. Service Name Source IP Address Distribution Port Priority Action 1 Out Duration Service Name Source IP Address Distribution Port Priority Desence 4 3318 20 1 □bar
| Category | Value | |---|---| | Listing Status | 100 | | Newest Application | 25 | | KDP Survey | 100 | | Only Select Streaming | 25 |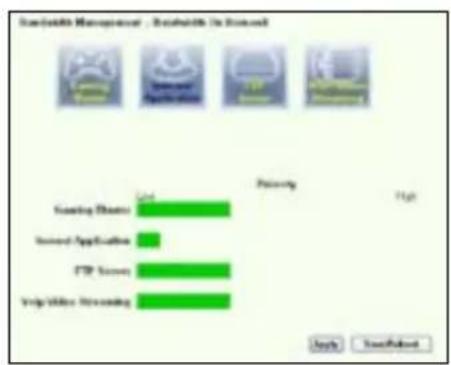
text_image
Scanable Manager - Bookends in Excel Stock Exchange Option Application FTP Survey Help/Video Streaming Options High Apply Save/Finish
text_image
ContactM Management - ContactM To Reward ContactM Service Invest Applications F2F Server Help Video Monitoring Priority Exit Apply Remove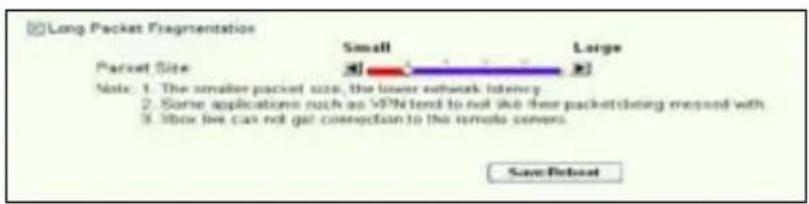
text_image
Long Packet Fragmentation Packet Size Small Large Note: 1. The smaller packet size, the lower network latency. 2. Some applications such as V97a tend to not like free packetstring record with 3. Ifbox file can not get connection to the remote covers. Save Backnatural_image
Line drawing of a wireless router labeled WL-600G, showing front panel and control buttons (no text beyond branding)O Gaming Blaster ....179
O Gaming Blaster do WL-600g 179
text_image
Quick Setup - Auto Detection ADSL Link Upl Start to Detect your connection type Please wait... Manual Settingtext_image
Quick Setup - Detection Result WL-500g has detected that your connection type is "PPPoE" If yes, please key in your username/password and push "Next" button to setup other function" If not, please push "Manual Setting" button to setup WLW connection correctly WWW Username: WWW Password: Use Static IP Address IP Address: Manual Setting Next
text_image
Quick Setup - Detection Result WL-SXG has detected that your connection type is "DHCP (Dynamic IP)" If yes, please push "Next" button to setup other function if not, please push "Manual Setting" button to setup VIAH connection manually Manual Setting Next
text_image
Wireless -- Setup Network Name (SSID) Default Security Level: Low(None) Low(None) Medium(WEP-64bits) Medium(WEP-128bits) High(WPA-FSK) Back Nexttext_image
WAN Setup - Summary Note sure that the settings below match the settings provided by your IGP VPI / VCI 8151 Connection Type HPB62 Service Name ppsw_0_31_1 IP Address: Automatically Accepted SSID Default Authentication None Click "Save Palestine" to save three settings and reset/cancel. Click "Black" to make any modifications. NOTE: The configuration process issues about 1 minute to complete and your DSL router will reject. Back Save Palestinetext_image
Quick Setup - Auto Detection ADSL Link Down! Please check your telphone line connection... Manual Settingtext_image
Quick Setup. This Quick Setup will guide you through the steps necessary to configure your DSL Router. ATM PVC Configuration Select the check box below to use ASUS PVC DataBase Country UK ISP NETHERLANDS TALY TAWAN TURNEY )LAC Not Use Nexttext_image
Quick Setup This Quick-Setup will guide you through the status necessary to configure your DSL Router. ATM FVC Configuration Select the check box below to use ASUS PVC DataSet Country: Net User ISP: Net User The Virtual Path Identifier (VPT) and Virtual Channel Identifier (VC) are needed for setting up the ATM FVC. Do not change VPT and VCI numbers unless your ISP instructs you otherwise. VPT [0.255] 0 VCI [32465935] 35 Temp:text_image
Connection Type Select the type of network protocol and encapsulation mode over the ATM PVC that your EIP has instructed you to use. Note that 002.1q VLAN tagging is only available for PPFoE, MER and Enjging. ○ PPF over ATM (PFPoA) ○ PPF over Ethernet (PFPoB) ○ MAC Encapsulation Routing (MER) ○ IP over ATM (IPoA) ○ Enjging Encapsulation Mode LLC/3MIP-8026735 Enable 002.1q VLAN C85-8055 Back Nexttext_image
PPP Username and Password PPP usually requires that you have a user name and password to establish your connection. In the boxes below, enter the user name and password that your ISP has provided to you. PPP1Username: sdv12361848 PPP Password: ********** PPPoE Service Name: Authentication Method: AUTO □ Disk on demand (with idle timeout timer) □ PPP IP extension □ Use Static IP Address Back Nexttext_image
WAN IP Settings Enter information provided to you by your ISP to configure the WAN IP settings. Notice: DHCP® can be enabled for PVC in MER mode if "Obtain an IP address automatically" is chosen. Changing the default gateway or the DNS effects the whole system. Configuring them with static values will disable the automatic assignment from DHCP® or other WAN connection. If you configure static default gateway over this PVC in MER mode, you must enter the IP address of the remote gateway in the "Use IP address". The "Use 'WAN interface' is optional. ○ Obtain on IP address automatically ○ Use the following IP address: WIN IP Address: WIN Subnet Mask: ○ Obtain default gateway automatically ○ Use the following default gateway: □ Use IP Address: □ Use WAN Interface ○ Obtain DNS server addresses automatically ○ Use the following DNS server addresses: Primary DNS server: Secondary DNS server: Back Nexttext_image
WAN IP Settings Enter information provided to you by your ISP to configure the WAN IP settings Notice: DHCP is not supported in IPvA mode. Changing the default gateway or the DNS effects the whole system. Configuring them with static values will disable the automatic assignment from other WAN connection. WAN IP Address: WAN Subnet Mask: □ Use the following default gateway □ Use IP Address: □ Use WAN Interface Use the following DNS server addresses: Primal@DNS server: Secondary DNS server: Back Nexttext_image
YMAN Setup - Summary Make sure that the settings below match the settings provided by your ISP: VPI / VCE: 0/56 Connection Type: PPPUE Service Name: ppcce_0_38_1 IP Address: Automatically Assigned S98D: Default Authentication: None Click "Save"Retest to save these settings and reboot router. Click "Black" to make any modifications. NOTE: The configuration process takes about 1 minute to complete and your DSL Router will reboot Back SaveRetesttext_image
DSL Router Roboot The DSL Router has been configured and is retooling. Close the DSL Router Configuration window and wait for 50 seconds before reopening your web browser. If necessary, reconfigure your PC's IP address to match your new configuration. Current Status 5 %text_image
AOS Prime Provider Meeting Instructions: Netflix's setup wizard. The setup will help you to configure your network LAN, network and link without settings. Please select for completion or find that you want to use Operative Mode □ Create a new wireless LAN (SP) ● Use the Web as a network-based network model ○ NetworkLAN (Web) and InternetLAN (WIN) □ Command to an existing wireless LAN (SSLAN) Sub-Form to continue OK Save Cancel
text_image
USE CNTS, ORDER: 10.0000 Configure your wireless LAN settings Connect to an existing wireless LAN This will use a search for your wireless LAN environment to evaluate wireless network. The wireless network is based on the input of the wireless LAN that has the load signal. Microsoft address (200) 98-12, 46-57 (21) Windows LAN that uses wireless LAN Viewing OS: 10.0000 (10.0000) Update Settings 10.0000 2.0000 3.0000 4.0000 5.0000 6.0000 7.0000 8.0000 9.0000 10.0000 11.0000 12.0000 13.0000 14.0000 15.0000 16.0000 17.0000 18.0000 19.0000 20.0000 21.0000 22.0000 23.0000 24.0000 25.0000 26.0000 27.0000 28.0000 29.0000 30.0000 31.0000 32.0000 33.0000 34.0000 35.0000 36.0000 37.0000 38.0000 39.0000 40.0000 41.0000 42.0000 43.0000 44.0000 45.0000 46.0000 47.0000 48.0000 49.0000 50.0000 51.0000 52.0000 53.0000 54.0000 55.0000 56.0000 57.0000 58.0000 59.0000 60.0000 61.0000 62.0000 63.0000 64. 1 2 3 4 5 6 7 8 9 1 1 2 3 4 5 6 7 8 9 1 1 2 3 4 5 6 7 8 9 1 1 2 3 4 5 6 7 8 9 1 1 2 3 4 5 6 7 8 9 1 1 2 3 4 5 6 7 8 9 9 1 1 2 3 4 5 6 7 8 9 1 1 2 3 4 5 6 7 8 9 1 1 2 3text_image
ASP.NET SYSTEM WELCOME Configure your TCP/IP key by file in the program as functions Connection. To enter the user to add the details as key to set the TCP/IP key. Add to this connection: Remove logarithics (Max/Min) winless connection key: Key Format: Microsoft Flash Key Length: 548 ns (120 bytes) Pure Connection Type: Windows Size: 123.162 Address: Windows Access: Windows Select any connection configuration as: Stop ? OK Cancel < Back Next > Cancel
text_image
USB drive / USB drive / 1.000 Current audio USB settings Current Audio Settings R320 - 1875/1824/1986 USB: 1000bps Current: 1 Previous: 1.000 Current Audio / My device installed using wireless USB USB format to adopt the TCP/IP On OK Next > Canceltext_image
Windows NT Select Program Settings: an edge/autonomous IP switch, automatic guides, Wi-Fi, wireless IP settings, advanced network administration. OK/Cancel Options/Revised ✓ Default IP address commands ✓ Use the following IP address: Browse: Browse name: Browse code: Browse type: Browse name: Browse code: Browse type: Browse name: Browse type: Browse name: Browse type: Browse name: Browse type: Browse name: Browse type: Browse name: Browse type: Browse name: Browse type: Browse name: Browse type: Browse name: Browse type: Browse name: Browse type: Browse name: Browse type: Browse name: Browse type: Browse name: Browse type: Browse name: Browse type: Browse name: Browse type: Browse name: Browse type: Browse name: Browse type: Browse name: Browse type: 100% (默认) Browse type: 100% (默认) Browse type: 100% (默认) Browse type: 100% (默认) Browse type: 100% (默认) Browse type: 100% (默认) Browse type: 100% (默认) Browse type: 100% (默认) Browse type: 100% (默认) Browse type: 100% (默认) Bench New
text_image
Windows Remote to Wireless 9 Choose a wireless network Can use more information in the Internet to connect to a wireless router or any other connection. W-100% "Accesses and files are available" W_100%+ Accesses and files are available W-100%+ Accesses and files are available
text_image
Windows Network Connection Please wait while network contacts in the Working domain. Decoding network type... OK Cancel Windows Network Connection The server: Windows 100% access a network to call a link or network. In this case, it will allow to access these links from adding to the server. Use the link, and then download. Network Type: ******** System name: ******** Browse... CancelAplicação USB
text_image
USB Application - FTP Server Force to Eject USB Disk Enable FTP Server? Allow Anonymous User to Login? Allow Super User to Login? FTP Port Maximum Users Allowed to Log in: Login Timeout in Seconds Stay Timeout in Seconds: Eject Yes No Yes No Yes No 1:11 10 120 240 Save/Applytext_image
Add User Account List User Name: Password: Max. Login: Rights: Read/Write/Erase Applytext_image
Add IP List IP Address: Applytext_image
Printer Status Printer Model: EPSON Stylus Photo R210 Printer Status: On-Line User: Action: Removetext_image
Add Print Wizard Welcome to the Add Printer Wizard. This will not apply any other print printer conversion. It is also a Plug and Paper points that continue through an OFF paper. It can be then applied for your print, but it does not want to use the print. But there is no change in the output, and then plug the printer to call out any computer or print the printer to send the printer to the printer's output. We have a printer on the output of this print. If you are not allowed to use the print, then you can use the print to install the print file.text_image
Add Printer Wizard Select a Printer Part Computer commands will power through ports. Select the port user with ports to start. If the port is active, you can create a new port. Use the printer export: Create order port Type 1 port: Cancel OK Cancel Canceltext_image
Add Internet Wizard Local or Network Place The instructions to install the format of a pin in an app Select the up-to-date device (pin you want to add) Access point attached to the account Incrementally, device and email by flag and play pin A network path is a pin affected to another computer To use a network packet that can be installed as a pin user, use the "Local pin" path. - Save Cancel Canceltext_image
Add Standard TCP/IP Printer Port Wizard Welcome to the Add Standard TCP/IP Printer Port Wizard Choose the access to add users or add users with a network card. Show continuing to add user. 1. The name is required. 2. The name is commented and original. To continue click Next Add Next > Canceltext_image
Add Port For which device is preferred to add a port Select the Port name in IP address, and account to the device details. Port Name or IP Address: 102-102.1 Port Number: 9_142_148.1 OK Cancel Canceltext_image
Configure Standard TCP/IP Port Settings Port Settings Port Name: IP_190108.1.1 Port Name to IP Address: 192.1901.7 Port Type: □ Port □ LPR Port Settings: Port Name: 30000 LPR Settings: Queue Name: LPRControl □ LPR Data Counting Enabled □ DHCP Status Enabled Command: 0 TCP/IP Port Address: 0 OK Canceltext_image
Add Standard TCP/IP Printer Port Wizard Completing the Add Standard TCP/IP Printer Port Wizard Features selected a port to file following measurements: SOSO: 100 Placed: USB UP/Server Dmax: 182768.51 Printbox: IP_132.100.11 Adobe Type To complete this user click Back - Back Next Canceltext_image
Add Toles: 1200P Printer Port Wizard Additional Port Information Required The device will not be connected The device lists in if additional type. The user has 1. Use the name to begin computer 2. Use the address on the previous page to access 3. Use the content to add an appearance and/or search and seek help to navigate the personal information to select the device based on you use the address or access. Device Name Standard Custom Settings... Copy Settings... Back Next > Canceltext_image
Add Standard: LOPSP Printer Port Wizard Additional Port Information Thousand The device contains the connection To download devices of a server type. Do not select 1. To access a printer or integer 2. To access on the device page is available Extra connect the address exception, other search or network to browsing the personal and web page in order to access the device type if you are used the address or switch Server Type □ Selected □ Server Settings Back Next Canceltext_image
Add Printer Wizard Install Printer Software The installed software will install the software to add Select the manufacturer and model at your price. Presupartise calls with instructions check, add time key. It is possible to add more content or download information in compatible print software. Manufacturer Ceroc Extrac Cusie Cyber Espec Product Upbox1-0140 ProBox 1500*2 Upbox1-1368 Upbox1-1750 UPbox1-0140 ProBox 1500*2 Devos This device is not digitally designed. Details only include controls is replaced Windows Options Home/Ext OK Next Canceltext_image
Add Printer Wizard Name: Your Printer This tool adjusts some size as the printer Open to access to this printer. This tool allows us to prepare that and support print and other name confirmation of more than 25 characters. It is ready to keep the name as plain as available. Printer name: [1] [2] OK Next Canceltext_image
Add Printer Wizard Completing the Add Printer Wizard Performance accessible completed by Add Printer Wizard. You predicted to be following print settings: Name: [P50% Upper Phase 8/11 Series] Transname: Our Shands Plan: X_167961.1 Type: [P50% Upper Phase 8/11 Series] Default: Yes Transpage: Yes To confirm the Wizard is all finish. OK Cancel Canceltext_image
Add Printer Wizard Print 1 and Print To confirm that the printer is installed correctly, you complete this print copy. Do you continue your print copy? Yes No (Rack) (Rack) Cancel
text_image
DOS 80.000 SODENS MIMOCAV - SODENS MIMOCAV Tender: 12.000x (RGB) off EMTs, PRTs, and I/Os, You can not apply any, then present in the image. Eating Eating Eating Eating Eating Eating Eating Eating Eating Eating Eating Eating Eating Eating Eating Eating Eating Eating Eating Eating Eating Eating Eating Eating Eating Eating Eating Eating Eating Eating Eating Eating Eating Eating FOS 80.000g FOS 80.000g FOS 80.000g FOS 80.000g FOS 80.000g FOS 80.000g FOS 80.000g FOS 80.000g FOS 80.000g FOS 80.000gO Gaming Blaster do WL-600g
bar
| Category | Priority | |---|---| | Training Hardware | High | | Network Application | Low | | ISIP Server | Low | | Vulp/Video Networking | Low |text_image
User Specify Role List A minimum 2000s can be configured; 7 is the highest priority until it is the lowest. Service Name Source IP Category Destination Part Priority Revenue A £112 23 5 □bar
Editable Management - Editable To Section | Service | Privacy | |---|---| | Working Materials | Low | | Second Application | Low | | ETF Server | Low | | Help/Video Streaming | High |text_image
Broadwidth Management - User Specialty Service User Specialty Node List A maximum 2% users can be configured, 1 is the highest priority until 2 is the lowest. Service Name Source IP Address Destination Port Priority Active 1.0 Excess Service Name Source IP Address Destination Port Priority Excess 4 £3.15 2 1 □bar
Standard M6 Response - Standard M6 Excessed | Feature | Primary | |---|---| | Connection Marks | Low | | ICSM Application | High | | FTP Server | Low | | Help Window Testing | Low |text_image
User Specify Make List A minimum 2000s can be configured. It is the highest priority until it is the best. Service Name Source IP Address Destination Port Priority Action Bull Response Service Name Source IP Address Destination Port Priority Response A 01118 23 1 □text_image
The "FTP Server" mode was enabled. You can use the scroll bar to reserve more upload bandwidth for XL-600gb FTP Server Service. If you out, 10%, it means that FTP server has only high priority but no reserved bandwidth. Reserved Bandwidth: 26 % Low Hightext_image
Bandwidth Management - User Specify Service User Specify Table List A minimum: 2 options can be configured; 1 is the highest priority until it is the lowest. Service Name Source IP Address Destination Port Priority Active Service Name Source IP Address Destination Port Priority Priority 4 $1.17 20 1 0bar
Readwidth Management - Readwidth On Required | Category | Value | |---|---| | Loading Materials | High | | Download Applications | Low | | RTM Sources | High | | Only Option Recurring | Low |
bar
Settings Manager - Settings Is Advanced | Category | Percentage (%) | | :--- | :--- | | Setting Provider | 75 | | Service Application | 20 | | FTP Services | 75 | | Virtual Streaming | 75 |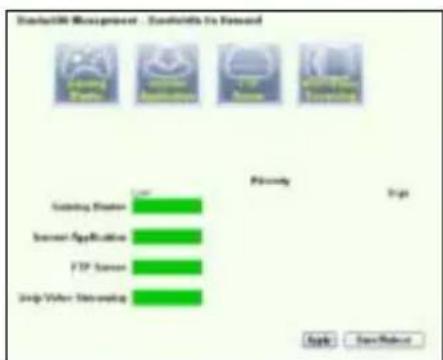
text_image
Construction Management - Ecosystems to Reward Starting Driver Screen Application FTP Server Step When Strolling Priority Entry Apply Save/Removetext_image
Long Packet Fragmentation Packet Size Small Large Note: 1. The smaller packet size, the lower network latency. 2. Some applications such as VPN tend to not like free packets being missed with 3. Ibox live can not get connection to the remote covers Save/Resetnatural_image
Line drawing of a wireless router labeled WL-600G, showing front panel and antenna (no text or symbols on body)Configuration via Quick setup
Avant de commencer
ADSL setup (Configuration ADSL)
text_image
Quick Setup - Auto Detection ADSL Link Up! Start to Detect your connection type Please wait... Manual Settingtext_image
Quick Setup - Detection Result WL-001g has directed that your connection style is "PPPoE" If yes, please key in your username/password and push "Host" button to group other functions First, please push "Manual Setting" button to group WATI connection manually. WWW Username: WWW Password: E2: Live State: IP Address IP Address: Manual Setting Next
text_image
Quick Setup - Detection Result WL-SXG has detected that your connection type is "DHCP (Dynamics IP)" If yes, please adjust "Next" button to setup other function If not, please push "Manual (Setting)" button to setup VHNI connection manually. Manual Setting Next
text_image
Wireless -- Setup Network Name (SSID) Default Security Level Low(None) Low(None) Medium(WEP-64bits) Medium(WEP-128bits) High(WPA-FSK) BACK Nexttext_image
Wireless -- Setup Network Name (S550) Default Security Level Medium(WTP-648re) Key None WTP. 64bits Key should be 5 ASCII characters or 10 hexadecimal digits for 64-bit encryption keys. ****** Back Nexttext_image
MAIN Setup - Summary Note sure that the settings below match the settings predicted by your IGP. VPI / VCI 87.61 Connection Type IPField Service Name: ipcore_S_31_3 IP Address: Automatically Assigned SSID: Default Authentication: None Click "SaveRefresh" to save these settings and reload-back. Click "Back" to make any modifications. NOTE: The configuration process takes about 1 minute to complete and your DSL/Blower will reload. Back SaveRefreshtext_image
Quick Setup - Auto Detection ADSL Link Down! Please check your telphone line connection... Manual SettingADSL Setup (Configuration ADSL)
text_image
Quick Setup. This Quick Setup will guide you through the steps necessary to configure your DSL Router... ATM PVC Configuration Select the check box below to use ASUS PVC DataBase Country UK ISP NETHORLANDS TALY TAWAN TURKEY UK Not Use Nexttext_image
Quick Setup This Quick Setup will guide you through the status necessary to configure your DSL Router. ATM FVC Configuration Select the check bus below to use ADUE FVC Database Country IP: No List ISP No List The VirtualPath Identifier (VPI) and Virtual Channel Identifier (VC) are needed for setting up the ATM FVC. Do not change VPI and VCI numbers unless your ISP instructs you otherwise. VPI: [0.256] 0 VCI: (3245535) 75 Nexttext_image
Connection Type Select the type of network protocol and encapsulation mode over the ATM PVC that your E2P has instructed you to use. Note that 002.1q VLAN tagging is only available for PPFoE, MER and Endging. ○ PPF over ATM (PPPoA) ○ PPF over Ethernet (PPPoB) ○ MAC Encapsulation Routing (MES) ○ IP over ATM (IPoA) ○ Bridging Encapsulation Mode LLC/SPAP-0024-08 Enable 002.1q VLAN: (56-4005) 1 Back Nexttext_image
PPP Username and Password PPP usually requires that you have a user name and password to establish your connection. In the boxes below, enter the user name and password that your GP has provided to you. PPP User Name: A001240548 PPP Password: ********** PPPGE Service Name: Authentication Method: AUTO □ Dial on demand (with die timeout tried) □ PPP IP expiration □ Use State IP Address Back Nexttext_image
WAN IP Settings Enter information provided to you by your ISP to configure the WANIP settings. Notice DHCP can be enabled for PVC in MER mode if "Obtain an IP address automatically" is chosen. Changing the default gateway or the DNS affects the whole system. Configuring them with static values will disable the automatic assignment from DHCP or other WAN connection. If you configure state default gateway over the PVC in MER mode, you must enter the IP address of the remote gateway in the "Use IP address", "The Use WAN interface" is optional. ● Obtain an IP address automatically ○ Use the following IP address: WAN IP Address: WAN Subnet Mask: ● Obtain default gateway automatically ○ Use the following default gateway: □ Use IP Address: □ Use WAN Interface ● Obtain DNS server addresses automatically ○ Use the following DNS server addresses: Primary DNS server: Secondary DNS server: Back Nexttext_image
WAN IP Settings Enter information provided to you by your ISP to configure the WANIP settings. Notice: DHCP is not supported in WiFi mode. Changing the default gateway in the DNS effects the whole system. Configuring them with static values will dispose the automatic assignment from other WAN connection. WAN IP Address: WAN Cabinet Mask: Use the following default gateway: Use IP Address: Use WAN Interface: www.wanip.com Use the following DNS server addresses: Primary (DNS) server: Secondary DNS server: Back NextWireless Setup (Configuration sans fil)
text_image
WAN Setup - Summary Make sure that the settings below match the settings provided by your ISP VPI / VGE: 0.125 Connection Type: PPPoE Service Name: score_8_26_1 IP Address: Automatically Assigned SSID: Cnual Authentication: None Click "Save/Remain" to save their settings and reload reader. Click "Back" to make any modification. NOTE: The configuration process allows about 1 minute to complete and your SQL Router will reboot. Help Save/Remaintext_image
DSL Router Robest The DSL Router has been configured and is reordering. Close the DSL Router Configuration window and wait for 50 seconds before reopening your web browser. If necessary, reconfigure your PC's IP address to match your new configuration. Current Status 5 %text_image
AND ONE ROUND MEANS Welcome to Web sites to log-credit the virtual network your configuration your wireless LAN. Internet and type software settings. Please select the operation needs that you want to use Operational Mode ✓ Create a new wireless LAN (LAN) ✓ Use the Web as a version of the Internet ✓ Command the Web as an existing wireless LAN (Windows) Out from any othertext_image
USE CNTS. SELECT NUMBER Configure your wireless LAN configuration Connect to an existing wireless LAN This will still use a custom to access wireless LAN to ensure the following: with network: The wireless network is based on the Webpage's network Windows LAN that has the local server Microsoft server (80) 86.12.46.89.291 Windows LAN for any other network. VOLUME OR LIST DESCRIPTION Connect Networks FID 24.1 NMB / 1 Common Networks 1 40 45°C WLAN Lumen 3 86 100 Number of lower wireless networks: 2 Search Engine OK Finish PAGE Canceltext_image
ASP.NET SYSTEM NAME Configuration your TCP Path or Web packet to install the network. For this instance, you should note that this is set for TCP Path. Sub-View to continue Select general settings (Defaultset) Vertical protocol type: Key Format: Microsoft Internet Key Length: 50 ns (100 ns) Global Protocol: 12346789 12346789 12346789 Internet Connection Telephone: 99999 Select new access to Default Path: 100%text_image
ALLS ONE TRACKS NUMBER One instance USB drive is connected to an IP Current wireless USB drive Tobacco Mode Information B1020: 1874136214885 USB 163396 Current 1 Frequency 1.007 Congenommen To Be the first setting the wireless IP3 This feature is set to the TCP/IP OK Cancel Apply < Back Canceltext_image
Windows NTFS - SELECT ITEMS P: 100% (main) or (access) to any other items. Set up to 100% or more. On the main list: □ Default IP address □ Use the following IP address: Design: Default Location: □ Design DNTS name address addresses □ Use the following IP address: OK Cancel Help
text_image
Windows Network Connection Please use while wireless connections to the Working Network. Adding network type... Browse Cancel Worker by network connection This version is currently featuring a network or other (e.g. Windows or Windows) in which it has been provided for these networks that are including to the network. Have the link and then access network. Network Type: ******** System-connection: ******** Browse CancelUSB Application
text_image
USB Application - FTP Server Force to Eject USB Disk: Enable FTP Server? Allow Anonymous User to Login? Allow Super User to Login? FTP Port Maximum Users Allowed to Log in Login Timeout in Seconds: Stay Timeout in Seconds: Eject Yes No Yes No Login Yes No Login 1:11 10 120 240 Save/Applytext_image
Add User Account List User Name: Password: Max. Login Rights: Read/Write/Ease Applytext_image
Add IP List IP Address: Applytext_image
Printer Status Printer Model: EPSON Stylus Photo R210 Printer Status: On-Line User: Action: Removetext_image
Add Printer Wizard Welcome to the Add Printer Wizard This is a key point for adding a printer's components. This is also a key point for adding a printer's components. It is also a key point for adding a printer's components. This is also a key point for adding a printer's components. It is also a key point for adding a printer's components. It is also a key point for adding a printer's components. It is also a key point for adding a printer's components. It is also a key point for adding a printer's components. It is also a key point for adding a printer's components. It is also a key point for adding a printer's components. It is also a key point for adding a printer's components. It is also a key point for adding a device that is used to add a printer's components. It is also a key point for adding a printer's components. It is also a key point for adding a device that is used to add a printer's components. It is also a key point for adding a device that is used to add a device that is used to add a device that is used to add a device that is used to add a device that is used to add a device that is used to add a device that is used to add a device that is used to add a device that is used to add a device that is used to add a device that is used to add a device that is used to add a device that is used to add a device that is used to add a device that is used to add a devices that are used to add a device that is used to add a device that is used to add a device that is used to add a device that is used to add a device that is used to add a device that is used to add a device that is used to add a device that is used to add a device that is used to add a device that is used to add a device that is used to add a device that is used to add a device that is used to add a device that is used in the main view of the main view of the main view of the main view of the main view of the main view of the main view of the main view of the main view of the main view of the main view of the main view of the main view of the main view of the main view of the main view of the main view of the main view of the main view of the main view of the main view of the main view of the main view of the main view of the main view of the main view.text_image
Add Procter Wizard Local or Network Provider The experience to book which type is prefer to set up Select the colors that develop the power you want to add ● Local/portal platform to the computer ○ Automatically, desktop and mobile flags and Ping machines ○ Internal providers can provide affected local or network devices To use any remote server that a web browser is a point user, can be the "Local/portal" option. - Save Next Canceltext_image
Add Printer Wizard Select a Printer Part Computer fabricates with power through ports Select the print language on ports to set. If the print is used, then, you can create a new port. Use the following ports: Create action port. Type in port: Create a 3x100x100x port OK Next > Canceltext_image
Add Standard TCP/IP Printer Port Wizard Welcome to the Add Standard TCP/IP Printer Port Wizard Cancel the requests add user to a network card. Before continuing to add a port • The remote is bound on • The remote is connected and returned To continue click Nexttext_image
Add Port For which device is your user to add a port? Drive the Port name or IP address, and account to be desired before. Port Name or IP Address: 100-100-1 Port Number: 99_100_100_1 1 Back Next Canceltext_image
Configure Standard TCP/IP Port Settings Port Settings Port Name: P_192106.1.1 Pin Number at 5th Edition: 192.160.7.1 Portion: ○ Rate ● LPMI Row Settings Port Number: 10000 Off Settings Custom Name: LPMI Control □ LPMI Rate Coverage Enabled □ UNMP Status Enabled Current port: Normal Current port: Normal OK Canceltext_image
Add Standard TCP/IP Printer Port Wizard Completing the AddStandard TCP/IP Printer Port Wizard Features: wired out with any additional features Name: sys Process: 278.5GHz Device: 100.00 GB Portion: PS_100.00 GB Apache Type: To complete the user's access to this OK Next Canceltext_image
Add Pages of 120MP Printer Port Wizard Additional Port Information Required The device should not be installed The detected devices in the server type. Do not use 1. Use the device to install an integer 2. Use the device on the device page is required 3. Use the device to add an extension and then use the device to access to the existing port. Device selection is required to include the device if you use the device or access. Device type □ Nexted □ Next Settings - Save Next > Canceltext_image
Add Standard: USBF Printer Port Wizard Additional Port Information Required The device must not be checked To detect the link in of the server (as: Do not check) 1. The access is a program or agent 2. The access is on the network page to control Using custom the addition configuration provider search on the link to any additional pin with the switch being used to access the link to a network Server Type Standard General Settings Back Next > Canceltext_image
Add Protex Wizard Install Protex Software The installation will install Protex software to use Select the manufacturer and model of your print. Practical files are not an optional, but this is not available. It also provides a file format for your print configuration in compatible print software. Manufactures Circuits Global islands Digital Digital Room Primary Mpc10 Digital Proctos (USCP 2) Mpc11 USB Mpc12 USB Mpc13 USB Mpc14 USB Mpc15 USB Mpc16 USB Mpc17 USB Mpc18 USB Mpc19 USB Mpc20 USB This design is set digitally signed. Solutions by this software created Windows Open Save/End - Back Next > Canceltext_image
Add Probes Wizard Name: New Probes You that accounts come to the person. Please create this new version. However, we can change from our existing software to create any combinations of those from 10 characters, but not to have the same as that is possible. Poster type: New Probes will continue to add a new icon. - Back Next > Canceltext_image
Add Printer MLware Print Tool Page To confirm that the printer is available currently, you complete and copy Do you account your pages? Yes No < Back Next > Canceltext_image
Add Printer Wizard Completing the Add Printer Wizard *Software installed continued to add a new Wizard. You could not be printing print images. Page: 12/01/2013 Superprint: Our Guide Port: X_10786513 Radio: [F]2.0% Photo PDF533 Save... Default: Yes Text image: Yes To drive this setup, then: - Print Next Cancel
HP Deskjet 3940 Series
HP photosmart 8030
HP Photosmart 8230
HP Photosmart 7830
HP Officejet 7210
HP PSC 1510
HP PSC 1610
HP Deskjet 5652
HP Deskjet 5550
EPSON C60
HP Officejet 5610
HP Officejet 4255
HP PSC 1410
Gaming Blaster
bar
Standardized Management - Available On Search | Service | Availability | | :--- | :--- | | Gaming Hardware | Low | | Inseas Application | High | | LTP Sensor | High | | Help Provider Networking | High |text_image
Bankholder Management - Your Specify Data List Your Specify Data List A maximum 25 percent rate to config, 1 to the highest priority and 8 to its needs Service Name Service ID Address Distribution Post Fording Action 100 Auto Reason Service Name Toffice ID Address Distribution Post Fording Reason A 1337 25 1 □bar
Dataability Management - Benchmark for Network | Category | Value | |---|---| | Trading Manager | 1.0 | | Research Applications | 1.0 | | VIP Server | 1.0 | | VIP Server Management | 100.0 |text_image
Bank wealth Management - Your Specialty Service User Specialty Data List A maximum 3 percent rates configured, 1 to the highest priority and 8 to the lowest Service Status Service IP Address Destination Port Priority Action Help Service Name Service IP Address Destination Port Priority Resource A B C D E F G H I J K L M N O P Q R S T U V W X Y ZInternet application (Application Internet)
bar
Standard Life Management - Standard Life Advanced | Category | Primary | |---|---| | Gateway Master | Low | | Event Application | High | | E2P Server | Low | | Help Video Streaming | Low |text_image
Bankofth Management - Your Specialty Service Your Specialty Rate List A minimum 30 minutes can be configured. This is the highest priority and it is the lowest Service Name Source IP Address Distribution Port Priority Author A T1111 25 1 Reasonbar
Risikship Management - Risikship Live Record | Activity | Primary | |---|---| | Gameing Theme | Low | | Instant Applications | Low | | FSP Team | High | | Drop Video Streaming | Low |text_image
The "FTP Server" mode was enabled. You can use the scroll bar to reserve more up/lead bandwidth for WL-600g's FTP Server Service. If you set 'C%', it means that FTP server has only high pretty but no reset bandwidth. Rosened Bandwidth: 20 % Low Hightext_image
BankWith Management - User Specify Service User Specify Table List A maximum 2 services can be configured, 1 is the highest point, and 8 is the ward. Service Name Source IP Address Dedication Port Priority Address A B Name Service Name Source IP Address Dedication Port Priority Resource A B Name 1 □bar
Bandwidth Management - Bandwidth For Software | Category | Frequency | |---|---| | Coding Provider | High | | Increased Application | Low | | ETF Services | High | | Only Users Streaming | Low |
bar
Scanability Management - Scanability (In Process) | Category | Value | |---|---| | Sampling Materials | High | | Initial Application | Low | | FSP Scores | High | | Trading Volume Training | High |