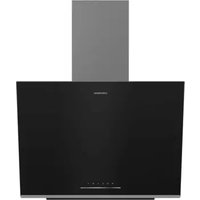
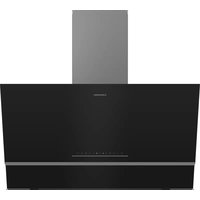
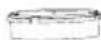
GDSP 5470 DXSCH - Basket GRUNDIG - Free user manual and instructions
Find the device manual for free GDSP 5470 DXSCH GRUNDIG in PDF.
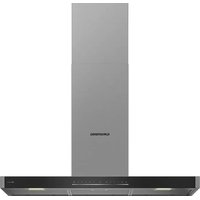
| Product type | Cooker hood |
| Brand | Grundig |
| Model | GDSP 5470 DXSCH |
| Category | Hood |
| Power supply voltage | 220-240 V ~ 50 Hz |
| Motor power | 275 W |
| Lighting | 2 LED lamps 3 W each, socket GZ10, 3000 K, 260 lm |
| Airflow (levels) | 3 speeds + Boost: 575 m³/h (level 1), 763 m³/h (max boost) |
| Grease filter | Washable aluminium filter (monthly cleaning) |
| Charcoal filter | Optional, replace every 3 months (not included) |
| Insulation class | Class I |
| Minimum distance from hob | 65 cm (from the hob surface) |
| Duct diameter | 120 or 150 mm |
| Main functions | Auto mode, HobToHood, Air Cleaning, Wi-Fi/HomeWhiz, timer, automatic shut-off, boost |
| Connectivity | Wi-Fi 2.4 GHz, HomeWhiz app, Bluetooth for pairing |
| Auto mode sensitivity setting | 3 levels (low, medium, high) |
| Grease filter cleaning reminder | Every 60 hours of operation |
| Charcoal filter replacement reminder | Every 180 hours of operation |
| Maintenance and cleaning | Clean grease filters in dishwasher, replace charcoal filters, use a damp cloth for exterior |
| Safety | Automatic shut-off after 15 min on normal speed, flame detection (shuts off if flame), overheat protection |
| Spare parts and repairability | Replaceable LED lamps (GZ10), filters available from customer service, accessible motor |
| General information | Domestic use, complies with WEEE and RoHS, recyclable packaging |
Frequently Asked Questions - GDSP 5470 DXSCH GRUNDIG
User questions about GDSP 5470 DXSCH GRUNDIG
0 question about this device. Answer the ones you know or ask your own.
Ask a new question about this device
Download the instructions for your Basket in PDF format for free! Find your manual GDSP 5470 DXSCH - GRUNDIG and take your electronic device back in hand. On this page are published all the documents necessary for the use of your device. GDSP 5470 DXSCH by GRUNDIG.
USER MANUAL GDSP 5470 DXSCH GRUNDIG
Please read this user manual first!
Dear Valued Customer,
Thank you for preferring this Grundig appliance. We hope that you get the best results from your appliance which has been manufactured with high quality and state-of-the-art technology. For this reason, please read this entire user manual and all other accompanying documents carefully before using the appliance and keep it as a reference for future use. If you handover the appliance to someone else, give the user manual as well. Follow the instructions by paying attention to all the information and warnings in the user manual.
Remember that this user manual may also apply to other models. Differences between models are explicitly described in the manual.
Meanings of the Symbols
Following symbols are used in various sections of this user manual:

Important information and useful hints about usage.

WARNING: Warnings against dangerous situations concerning the security of life and property.

WARNING: Warning for danger of fire.
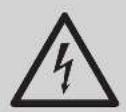
WARNING: Warning for electric shock.
1 Important safety and environmental instructions
1.1 General Safety
Important Safety Instructions Read Carefully And Keep For Future Reference This section contains safety instructions that will help protect from risk of fire, electric shock, exposure to leak microwave energy, personal injury or property damage. Failure to follow these instructions shall void any warranty.
- Grundig products comply with the applicable safety standards; therefore, in case of any damage on the appliance or power cable, it should be repaired or replaced by the dealer, service center or a specialist and authorized service alike to avoid any danger. Faulty or unqualified repair work may be dangerous and cause risk to the user.
- This appliance is intended to be used in household and similar applications such as:
- Staff kitchen areas in shops, offices and other working environments;
-
Farm houses
-
By clients in hotels, and other residential type environments;
- Bed and Breakfast type environments.
- Operate the appliance for its intended purpose only as described in this manual.
- The manufacturer cannot be held liable for damages resulting from improper installation or misuse of the product.
- This appliance can be used by children aged from 8 years and above and persons with reduced physical, sensory or mental capabilities or lack of experience and knowledge if they have been given supervision or instruction concerning use of the appliance in a safe way and understand the hazards involved.
- Children shall not be allowed play with the appliance. Cleaning and user maintenance shall not be made by children without supervision.
1 Important safety and environmental instructions
- The minimum distance between the supporting surface for the cooking vessels on the hob and the lowest part of your product must be at least 65~cm .
- If the instructions for installation for the gas hob specify a greater distance, this has to be taken into account.
Make sure that your mains power supply complies with the information supplied on the rating plate of the appliance. - Never use the appliance if the power cable or the appliance itself is damaged.
- Prevent damage to the power cable by not squeezing, bending, or rubbing it on sharp edges. Keep the power cable away from hot surfaces and naked flame.
- Use the appliance with a grounded outlet only.
WARNING: Do not connect the appliance to the mains until the installation is fully complete.
-
Place the appliance in a way so that the plug is always accessible.
-
Do not touch the lamps if they have operated for a long time. They can burn your hands since they will be hot.
- Follow the regulations set out by competent authorities on discharge of the exhaust air (this warning is not applicable for use without flue).
- Operate your appliance after putting a pot, pan etc. on the hob. Otherwise, high heat may cause deformation in some parts of your product.
- Turn off the hob before taking the pot, pan etc. from it.
- Do not leave hot oil on the hob. Pans with hot oil may cause self combustion.
- Pay attention to your curtains and covers since oil may catch fire while cooking food such as fries.
- Grease filter must be cleaned at least monthly. Carbon filter must be replaced at least every 3 months.
1 Important safety and environmental instructions
- Product shall be cleaned accordance with user manual. If cleaning was not carried out in accordance with user manual, there may be fire risk.
- Do not use non-fire-resistant filtering materials instead of the current filter.
- Only use the original parts or parts recommended by the manufacturer.
- Do not operate the product without the filter and do not remove the filters while the product is running.
- In the event of be started any flame, de-energize your product and cooking appliances.
- In the event of be started any flame, cover the flame and never use water to extinguish.
- Unplug the appliance before each cleaning and when the appliance is not in use.
-
The negative pressure in the environment should not exceed 4 Pa (4x10 bar) while the hood for electric hob and appliances running on another type of energy but electricity operate simultaneously.
-
In the environment where the appliance is being used, the exhaust of devices running on fuel oil or gas, such as room heater must be absolutely isolated or device must be hermetical type.
- When connecting the flue, use pipes with a diameter of 120 or 150~mm . Pipe connection must be as short as possible and have as few elbows as possible.
- Danger of choking! Keep all the packaging materials away from children.
CAUTION: Accessible parts may become hot when used with cooking appliances.
- The product outlet must not be connected to air channels that include other smoke.
- The ventilation in the room may be insufficient when the hood for electric hob is used simultaneously with the devices operating on gas or other fuels (this may not apply to appliances that only discharge the air back into the room).
1 Important safety and environmental instructions
- Objects placed on the product may fall. Do not place any objects on the product.
- Do not flambe under the your product.
WARNING: Before installing the Hood, remove the protective films.
- Never leave high naked flames under the hood when it is in operation
- Deep fat fryers must be continuously monitored during use: overheated oil can burst into flames.
1.2 Compliance with the WEEE Directive and Disposing of the Waste Product:
This product complies with EU WEEE Directive (2012/19/EU). This product bears a classification symbol for waste electrical and electronic equipment (WEEE).
This symbol indicates that this product shall not be disposed with other household wastes at the end of its service life. Used device must be returned to official collection point for recycling of
electrical and electronic devices. To find these collection systems please contact to your local authorities or retailer where the product was purchased. Each household performs important role in recovering and recycling of old appliance. Appropriate disposal of used appliance helps prevent potential negative consequences for the environment and human health.
1.3 Compliance with RoHS Directive
The product you have purchased complies with EU RoHS Directive (2011/65/EU). It does not contain harmful and prohibited materials specified in the Directive.
1.4 Package Information

Packaging materials of the product aremanufactured from recyclable materialsin accordance with our National
Environment Regulations. Do not dispose of packaging materials together with the other wastes. Take them to the packaging collection points designated by the priorities.
1.5 CE Declaration of Conformity
| Frequency band 2400 MHz | |
| Max. Transmission power 2.75 W | |
| As Arçelik A.S., we declare that this product and/or these products comply with the directive 2014/53/EU. The full text of the EU declaration of conformity is available at the following website: - Products: support.grundig.com | |
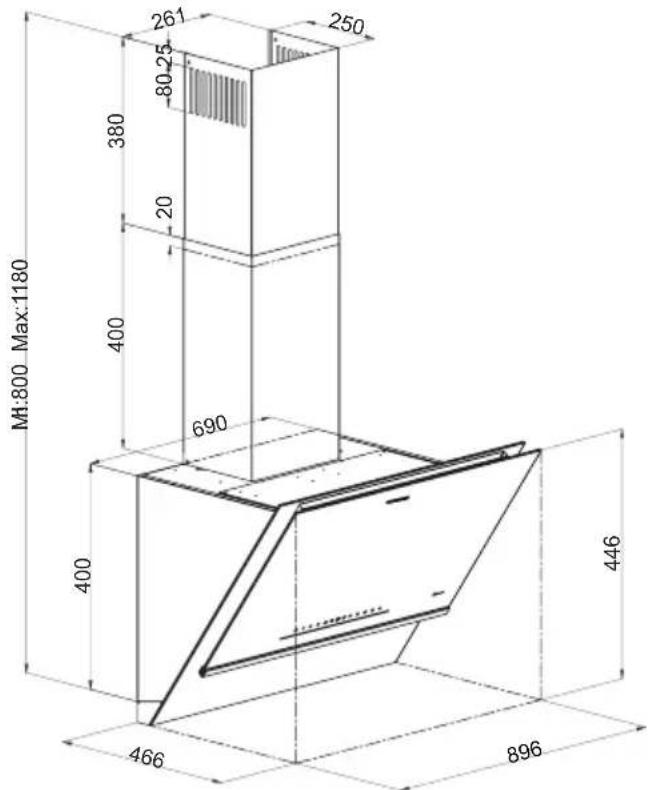
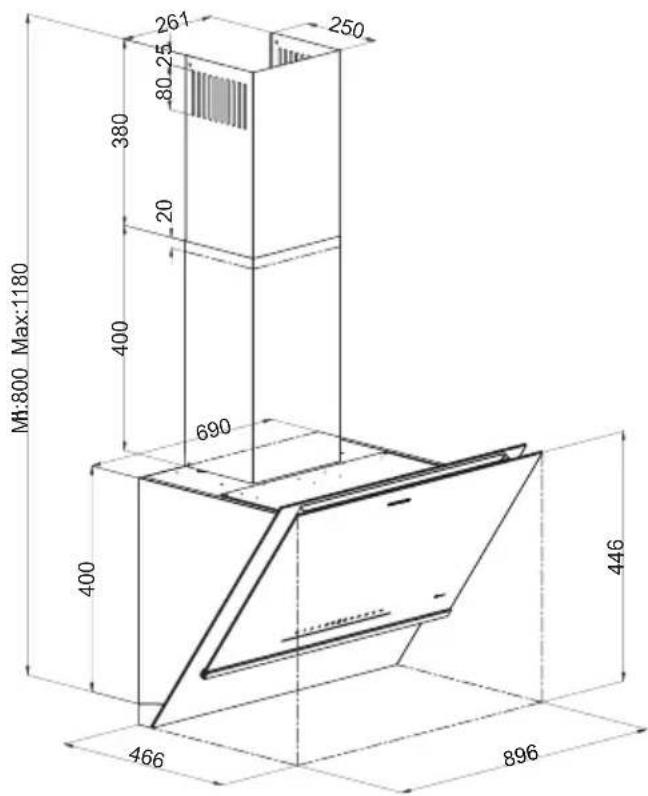
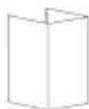
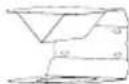
2 General appearance
2.1 Overview
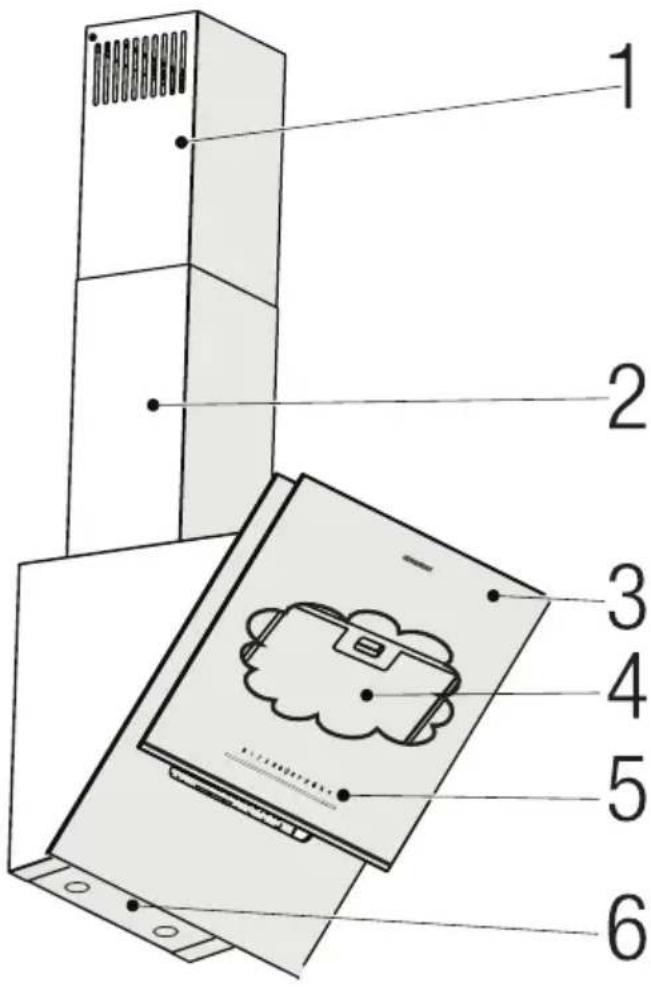
- Inner flue
- Outer flue
- Lateral absorption glass
- Aluminium oil filters (Behind glass cover)
- Control assembly
- Lamp
2 General appearance
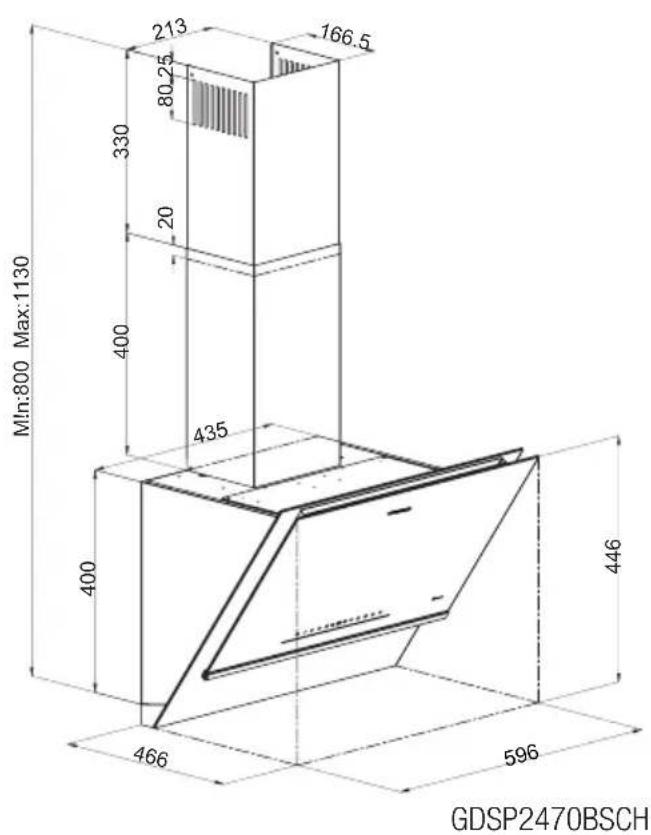
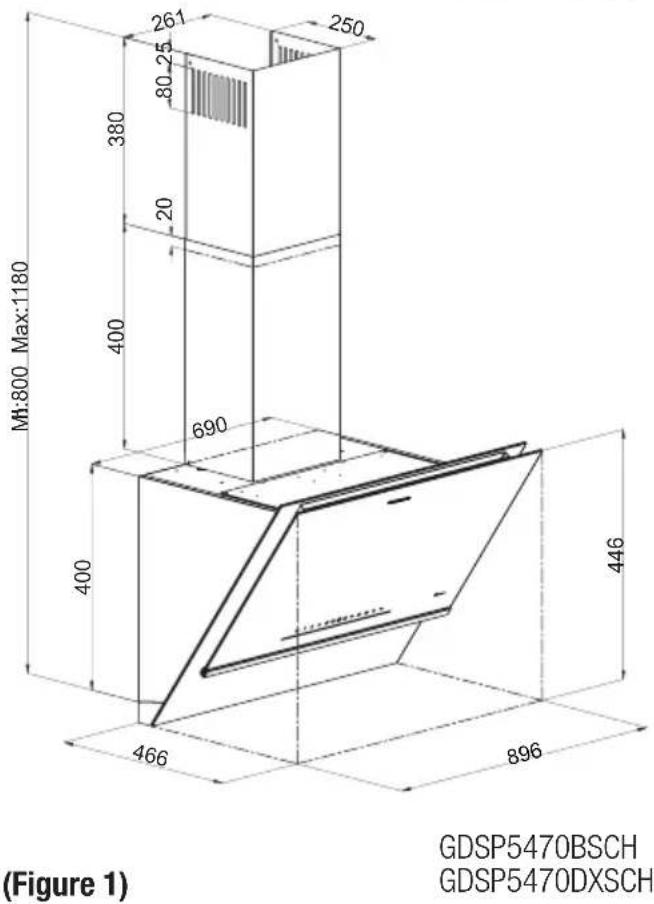
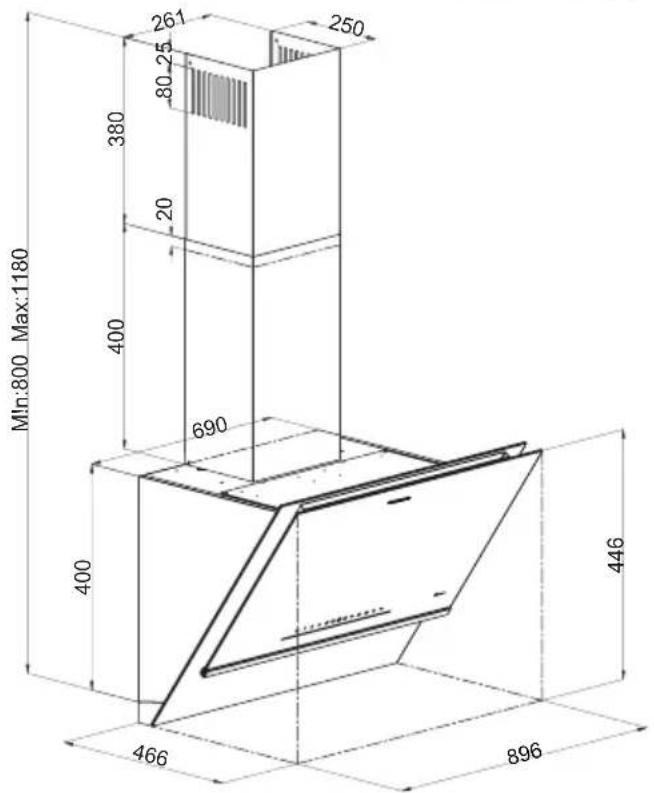
2.2 Technical data
| Model GDSP2470BSCH GDSP5470 | BSCH | GDSP5470DXSCH |
| Supply voltage & Frequency 220-240V ~ 50 Hz | ||
| Lamp power 2x3 W | ||
| Motor power 275 W | ||
| Flow rate – 3. Level 580 m3/h 575 m3/h | ||
| Flow rate – Intensive level 752 m3/h 763 m3/h | ||
| Insulation class of motor Class F | ||
| Insulation class Class I | ||
3 Operation of the appliance
3.1 Controlling the Appliance
| 1: Auto mode button HobToHood and Auto Mode functions cannot be used at the same time. | It is used to make the choice between automatic and manual operation. When you switch to automatic mode by pressing this button, the auto key lights on 1-2-3 revolution LEDs respectively by 100% and finally moves to the 1st revolution, where it operates as 1 time light off and 1 time light on for 30 seconds. This duration is sufficient for the sensor to activate. The sensor is used to measure air quality. In automatic mode, if an increase in the value in the sensor is detected and the engine is closed, the engine is run at the 2nd speed and the speed is automatically changed. Auto key and speed key are indicated by lightening 100% while the engine is running. When the auto key is pressed or the speed is changed while auto mode is active, the changed speed indicator lights up 100% and the engine switches to that speed and the auto key indicator lights up 50% and the auto is cancelled. If nothing happens to allow the engine to start again within 15 minutes while the engine is off, the automatic position is exited. If the hood is switched off with the On/Off key in the automatic position, the auto is cancelled. Auto Mod Sensitivity Setting: There are 3 precision settings as Lowest (1) to highest (3). The factory default is (2), medium level. If you want to change the sensitivity, press Auto/Mode key for 3 seconds and you enter into sensitivity setting. The current stage is flashed on the speed LEDs. The sensitivity level can be changed by pressing the Auto/Mode button. The last level shown is continuously valid. The levels increase relatively easy when high precision is selected; when low precision is selected it is increased relatively hard. |
| 2:1. Stage button | Operates the appliance on 1st speed. It is used to change the engine speeds. When the hood is ON, the brightness of these keys is 50%. The illumination of the selected speed will be 100%. |
| 3:2. Stage button | Operates the appliance on 2nd speed. It is used to change the engine speeds. When the hood is ON, the brightness of these keys is 50%. The illumination of the selected speed will be 100%. |
| 4:3. Stage button | Operates the appliance on 3rd speed. It is used to change the engine speeds. When the hood is ON, the brightness of these keys is 50%. The illumination of the selected speed will be 100%. |
| 5: Boost function | In almost 10 minutes after the activation of this function, it goes to the lower engine speed. When the Boost function is active, the boost key lights up by flashing 100%. Timer function cannot be activated when the engine is at the top speed. When timer is taken to the top level while it is active, the timer is cancelled. It is used to change the engine speeds. When the hood is ON, the brightness of these keys is 50%. The illumination of the selected speed will be 100%. |
| 6: Carbon filter warning | The electronic unit records the operating time of the engine. When the operation of the engine reaches to the specified time, you will be warned that the filter must be replaced by lightening up the relevant LED. If you press to 1st speed button about 5 seconds when this filter warning LED is on, the filter time resets and the 180-hour process restarts. |
3 Operation of the appliance
| 7: On/Off | It's used to turn the hood on and off. When pressing this key approximately 1 second, the open motor speed is turned off if any and the key illuminations turn off and switch to OFF position. In this position, the cycle cannot be changed and the hood cannot be turned on. At OFF position, pressing this key turns on the other key illuminations with 50% brightness. |
| 8: Fatty filter warning | The electronic unit records the operating time of the engine. When the operation time of the engine reaches to 60 hours, you will be warned that the filter must be cleaned by lightening up the relevant LED. If you press to 1st speed button about 5 seconds when this filter warning LED is on, the filter time resets and the 60-hour process restarts. |
| 9: Wi-Fi mode * See 3.2 for HomeWhiz Setup | When the Wi-Fi key is pressed for 3 seconds, it turns on AP mode and moves to the installation stage, all icons go off until setup is completed and only the Wi-Fi icon flashes. After setup, the Wi-Fi remains on (the Wi-Fi icon is 100% on when we turn on the device). The Wi-Fi icon does not go off when the device is turned off. If the Wi-Fi icon is 100% on when we turn on the device, it means that Wi-Fi is on and when you press the key Wi-Fi lights up 50% and turns off. If you press the Wi-Fi key without installing it, it flashes 2 times. |
| 10: HobToHood mode | When the HobToHood key is pressed for 3 seconds, it starts flashing, when Hob-ToHood key on the cooker is pressed for 3 seconds while it is not cooking it starts flashing and both lights up 100% when the matching is completed. Unless HobToHood is turned off, the HobToHood icon lights up 100% and remains connected to the cooker when the hood is opened from on/off button. When Hob-ToHood icon is pressed it lights up 50% and disconnects the hood from the cooker. HobToHood and auto mode functions cannot be used at the same time. If the function is cancelled by pressing this button while HobToHood is actively cooking, the hood continues to operate at the last speed. |
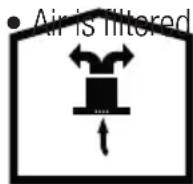
| 11: Air cleaning function | Pressing the air cleaning button activates the air cleaning mode. This means that the engine runs for 10 minutes on 1st speed and stops for 50 hour, and repeats this. As long as the air purification is active, the air purification indicator lights up 100%. After completing total period of 1hr for 24 times, the air cleaning indicator lights up 50% and the air cleaning mode is exited. If the hob is turned on with the speed keys while the air cleaning mode is active or in automatic mode, it will be disabled and will operate at the desired speed. When air cleaning mode is disabled, air cleaning LED lights up 50%. NOTE: In air cleaning functions, the engine operating time is approximately 5 minutes, 10 minutes, 15 minutes or 20 minutes with 4 adjustment modes. When the Air cleaning button is pressed for about 3 seconds to enter into this mode, the current stage is indicated by flashing the current rpm LEDs. Pressing the air purification button changes the stage that indicates the engine operating time in air cleaning mode. |
| 12: Automatic stop | If the hood is on and any speed except the top speed is on, the buzzer is squealed when the auto-stop button beeps and it enters into the 15-minute shutdown timer. When the Shutdown timer is active, timer button lights up by flashing 100%. When time is up, the engine stops, and if the lamp is on, it goes off. |
| 13: Light On/Off | Light will turn on when this button is pressed once while the cooker hood is “on”. Light will turn off when this button is pressed once again. |

If the keys are not pressed for 10 minutes while no function is working on the hood, the hood moves to OFF position.
3 Operation of the appliance
3.2 Homewhiz setup and user account settings
Follow the steps below to check and track your hood from your mobile phone or tablet. You need to connect your mobile phone to your home network and download the HomeWhiz app from your smartphone's app store to your tablet/mobile phone.
- Open the HomeWhiz mobile app that you downloaded to your mobile phone/tablet.
- In the HomeWhiz app, tap the "Add Product" section, select the hood from "Kitchen Appliances".
- Advance the setup by following the on-screen instructions.
- Press the wireless button for 3 seconds, the wireless icon should start flashing slowly.
- Make sure that the location and bluetooth are turned on, the necessary permissions are granted, so that your mobile phone will automatically connect to the hood at the step of connecting to the device.
- In the next step, connect the product to your home's local network. Open the local network list from your phone and select the local network you want to connect to and enter its password. When connecting to the local area network is complete, the wireless network icon must be light up continuously.
- After moving to the last step and naming your hood, you can go back to the homepage. You can select the product from the Devices page and start using it.

You can see the products paired with your account by touching the "Appliances" page in the application. You can delete the product from your account by pressing and holding the product on this page.

-
When you press and hold the Wireless icon for 3 seconds, the wireless network icon starts flashing. If HomeWhiz setup is not completed in 5 minutes, the wireless network is turned off and the wireless network icon light goes off.
-
During the HomeWhiz setup stage, your mobile phone/tablet must be connected to the wireless network to which you want to connect the hood before the setup and it should stay connected until the setup is complete.
3.3 HomeWhiz operation
If the hood is installed in your HomeWhiz account, just pressing the wireless network icon 1 time is enough to start the HomeWhiz control. It starts flashing when you press the wireless network icon 1 time and it tries to connect to your local network automatically. Since the hood was already connected to your local network in advance, it connects to local network of your home quickly, and the wireless network icon goes into a continuous flashing state and remains stable.

- To control your hood with HomeW-hiz, the local network you previously connected the hood must be active and the Internet speed should be good. Your mobile phone/tablet must be connected to the Internet.
- You can also control the product with both HomeWhiz and the screen of the hood while your HomeWhiz connection is active.
- In the event of a power outage or an Internet outage on the local network to which the hood is connected, the device becomes disabled in your HomeWhiz app.
3 Operation of the appliance
3.4 Efficient use in terms of energy saving
- When using your appliance, adjust the speed settings according to vapour and odour intensity, in order to save energy.
-
Use low speeds (1-2) under normal conditions, and high speed (3) and boost mode for intense odour and vapour.
-
The hood is equipped with lamps in order to illuminate the cooking area.
- Using them for environmental lighting shall cause unnecessary energy expenditure and insufficient lighting.
3.5 Operation of the hood
- Your appliance contains a motor that has various speeds.
- For better performance, we recommend using low speeds under normal conditions and high speeds in cases of strong odours and intense vapour.
- You can start your appliance by pressing on the desired speed setting button. (2,3,4)
- You can illuminate the cooking area by pressing the lamp (13).
3.6 Replacement of Lamp
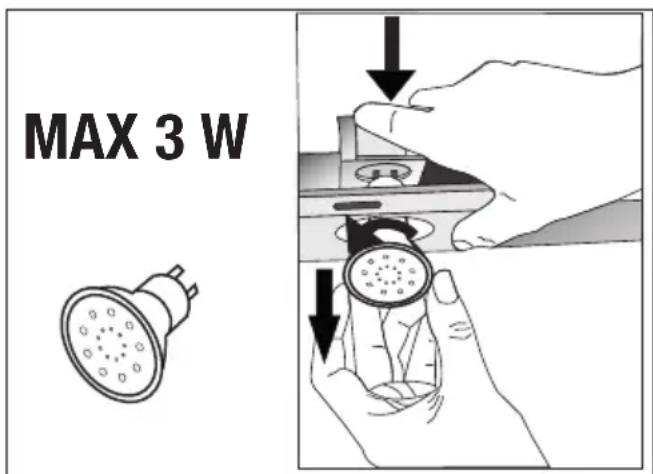
Make the electrical connections of the appliance. Your appliance uses 3W spot LED lamp. For rep
lacing the lamps, push downwards on the holder from its behind, turn it counter-clockwise, and take it out downwards. Apply the above operation in reverse to install new lamps.
| Bulb | |
| Bulb power 3 W | |
| Holder/Socket GZ 10 | |
| Bulb voltage 220 - 240 V | |
| Size 53x50 mm | |
| ILCOS Code DR/F3-220 | -240-GZ10-50-53 |
| Luminous flux 260 lm | |
| Correlated colour temperature | 3000 K |
This product contains a light source of energy efficiency class "F".
3.7 Operation with flue connection
acted through the flue duct, which is fastened to the connection head on the hood.
- The diameter of the flue duct must be the same as the connection ring. In horizontal settings, the pipe has to have a slight upward slope (around 10^ ) so that the air can exit the room easily.
3 Operation of the appliance
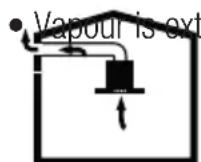
3.8 Operation without flue connection
through the carbon
filter and recirculated in the room. Carbon filter is used when it is impossible to use a flue in the house.
- In flueless use, remove the flaps inside the flue adapter.
- Remove the oil filter. To install the carbon filter, fit the filter to the tabs by centring it on the plastic piece on both sides of the fan body. Tighten it by turning right or left.
- Replace aluminium oil filter.

CAUTION: To activate the carbon filter, the mode is activated by holding down the automatic stop button and air cleaning button for 3 seconds. If the product switches to use with flue, it should be deactivated in the same way.
4 Cleaning and maintenance

Before cleaning and maintenance, unplug the product or turn off the switch.
4.1 Cleaning of the aluminium oil filter
This filter retains the oil particles in the air. Aluminium oil filters may change colour as they are washed; this is normal and does not require replacing your aluminium oil filters.
-
Push the aluminium oil filter lock forward.
-
Then pull it slightly down and pull it out. Otherwise, you can bend the filter. Wash and rinse aluminium oil filters with liquid detergent and replace aluminium oil filters to their sockets by by carrying out the steps specified above in reverse order. This filter retains the oil particles in the air.

You may wash your aluminium oil filters in the dishwasher.

CAUTION: In case of normal use, clean your filter once in a month.
4.2 Replacement of carbon filters
Odour removing filters contain charcoal. Grease filters must be installed in the product, regardless of whether or not charcoal filters are used.
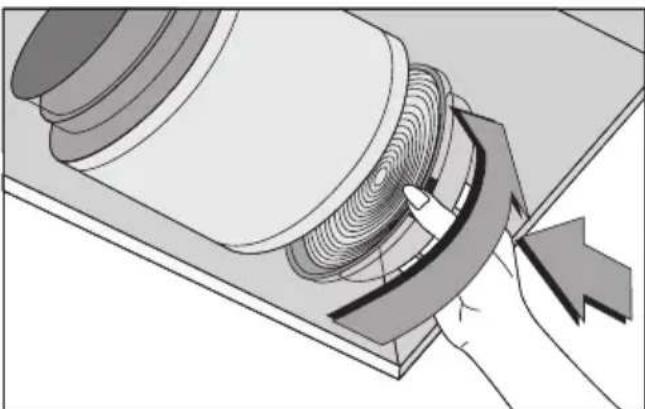
- Remove the aluminium oil filter.
- To remove the carbon filter, remove the carbon filter from its housing by rotating it counterclockwise from the tab.
Install the new carbon filter.
Install the aluminium oil filter.

CAUTION:
- Carbon filter shall never be washed.
- Replace carbon filters once every 3 months.
- You can obtain the carbon filter from the authorized services.
5 Installation of appliance

WARNING: Before starting the installation, read the safety information on User Manual.
WARNING: Failure to install with screws and stabilizers in accordance with these instructions may result in electric shock.
For the installation of the hood, please contact the nearest Authorized Service.
It is the customer's responsibility to prepare the location and electrical installation of the hood.
5.1 Position of the appliance
- Distance between the cooker and the cooker hood must be considered prior to assembly. This distance should be 65~cm .
- Distance must be measured from the surface of grate for gas cookers,
- from surface of glass for electric cookers.
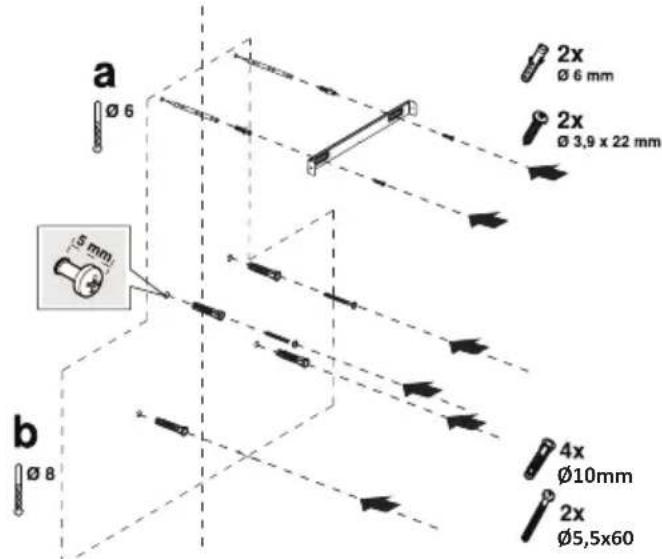
5.2 Installation accessories

1
2

3
4

5
6
7

8

9
10
1
1
1

13

14
15
- Product
- Outer flue
- Inner flue
- Flue connection plate
- 0150/120mm plastic flue adapter
- User manual
- Assembly pattern
- 010mm plastic dowel
- 0 6 mm plastic dowel
- 5.5x60 wall mount screw
- 3.9x22 flue connection plate screw
- 3.5x9.5 Flue connection screw
- 0120mm flue adapter
- 0120mm flue flap
- Air baffle
The information required to make the location suitable for the installation of the hood is given below.
5.3 Wall mounting
-
Wall must be flat, straight and have the sufficient bearing capacity.
-
Depth of drilling holes must comply with the length of bolts.
5 Installation of appliance
- The bolts and dowels provided are suitable for brick walls. For other construction material (e.g. drywall, plate, porous concrete), suitable fixing dowels and nuts shall be used.
(Figure 2)

CAUTION: Before drilling, ensure that there are no power, gas or water pipes in the close proximity of the drilling locations.
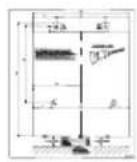
Draw a mid location line from the ceiling perpendicular to the lower edge of the hood.
Paste the installing template provided within the accessories on the surface where the hood is to be mounted. In doing this operation, observe the mounting height of the hood.
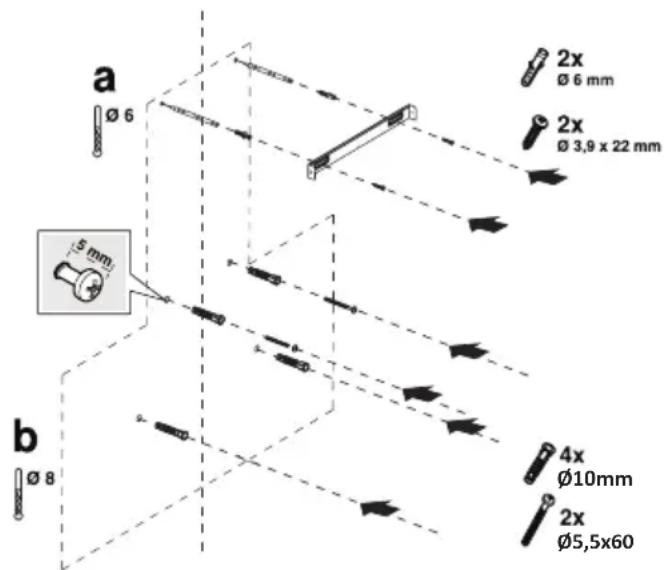
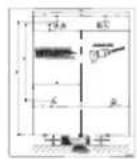
There is a tab in the middle of the flue connection plate. Place the middle point of this tab on the line that is drawn perpendicular to the wall. In doing this operation, adjust the hood according to the maximum height (Figure 1). Mark the holes where the flue connection plate will be mounted with the help of a pen (Figure 2/a).
Drill the marked points with 06mm drill and insert 2 plastic dowels in the drilled holes (Figure 2/a). Fix the flue connection plate to the wall with 3,9x22 screws (Figure 2/a).
To assemble the hood body, you can use the A, B, C, D 010 mm drill on the assembly template, and insert 010 mm plastic dowels at these points. (Figure 2/b).
2 piece 5.5 × 60 suspension screw with a clearance of 5 ~mm between the screw head and the wall (Figure 2/b).
(Figure 3)
- Hanger plate
- Hanging plate connection screw
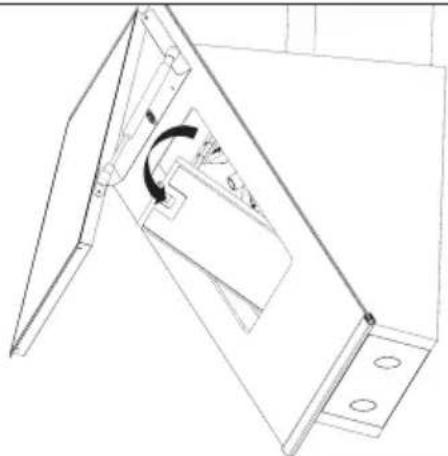
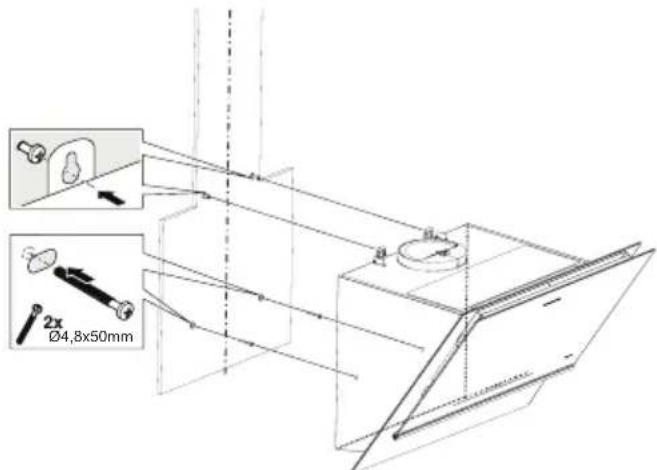
In order to install your hood to the wall, loosen the screws on the hanger plates mounted on the motor cabin and pull them up, and then fasten again (Figure 3/A).
Turn on the suction glass of the hood and remove the aluminum oil filter.
(Figure 4)
Hold the cooker hood by its body and place it on the mounting screws on the wall and tighten the screws (Figure 4). Secure the cooker hood with two 5.5 × 60 screws to the wall through the mounting hole on the interior of the appliance (Figure 4).
5 Installation of appliance
5.4 Connecting to flue
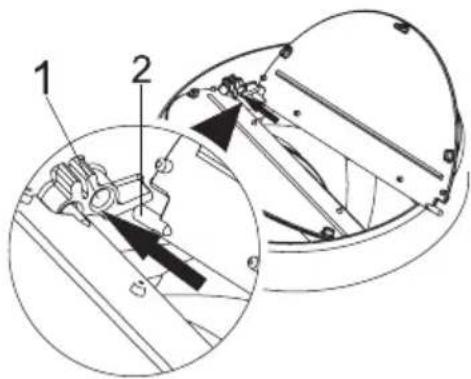
Figure 5
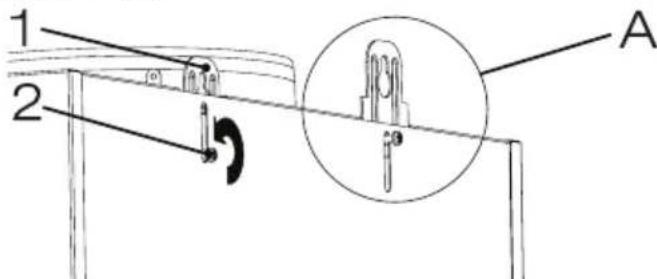
- Flap pin socket
- Flap pin
Insert the plastic pin (Figure 5/area no.2) on the pin socket on the motor exhaust (Figure 5/area no.1). Then bend the flap lightly to insert the other pin on the flap and insert the other pin to its socket (Figure 5).
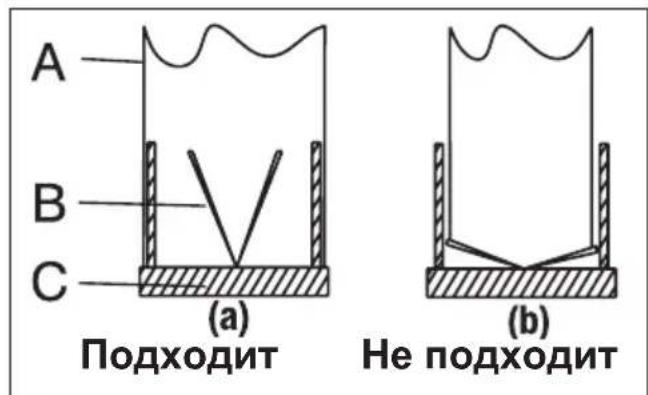
If you are going to use the 0120 / 150mm plastic flue adapter, connect one end of the pipe to this adapter, if you are not going to use it, to the direct output on the product. Connect the other end of the pipe to your flue. Check that these two connections are tight enough so they will not come out when the appliance runs on full power. Ensure that the flaps inside the flue work when tightened with clamp. Connect the flue connection duct outside the adapter (Figure 6/a). If the connection duct is fitted inside the adapter, suction of air shall not occur as the flue flap that prevents the return of air will remain closed (Figure 6/b). The length of the pipe connection as well as the number of elbows must be as minimum as possible.
A:Flue exit pipe
B:Flue clamps
C:Plastic flue
The valves are closed then the appliance is not operating and prevent possible outside odour and dust from entering inside.
Figure 6)
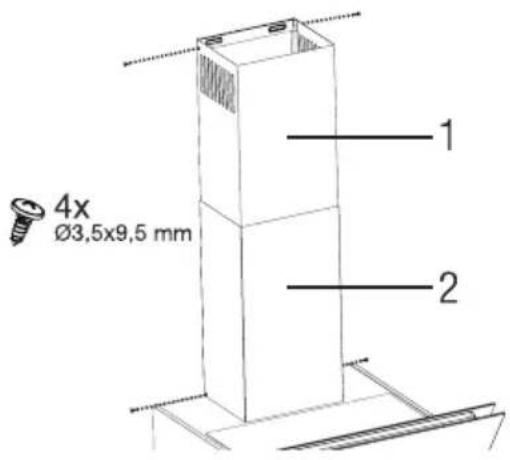
5.5 Installation of the hood to the flue
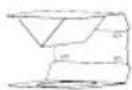
Make the electrical connection of your hood before starting the installation of the flue. Slip the outer flue around the body. Screw the flue from two lower corners to the flue fastening plates available on the motor cabin. (Figure 7).
Install the inner flue to the flue fastening plate that is secured to the wall from its upper outer edges (Figure 7).
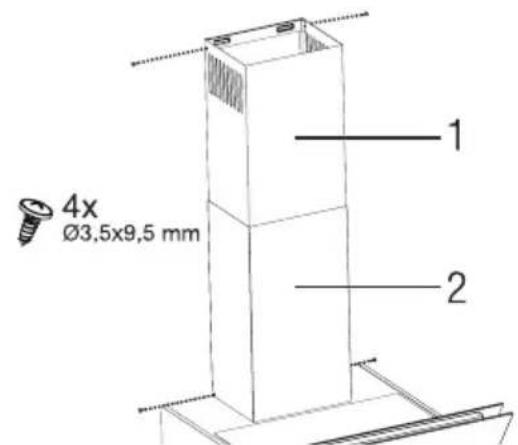
Figure 7
5 Installation of appliance
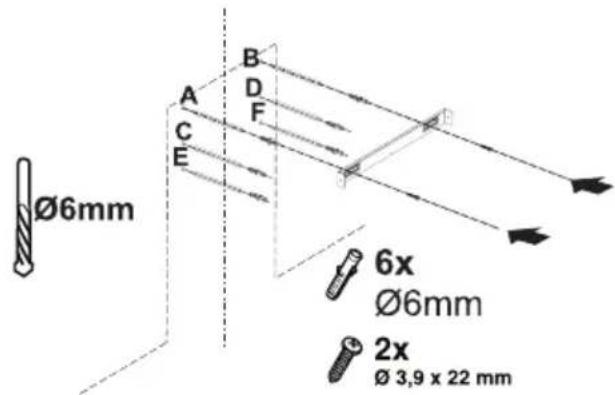
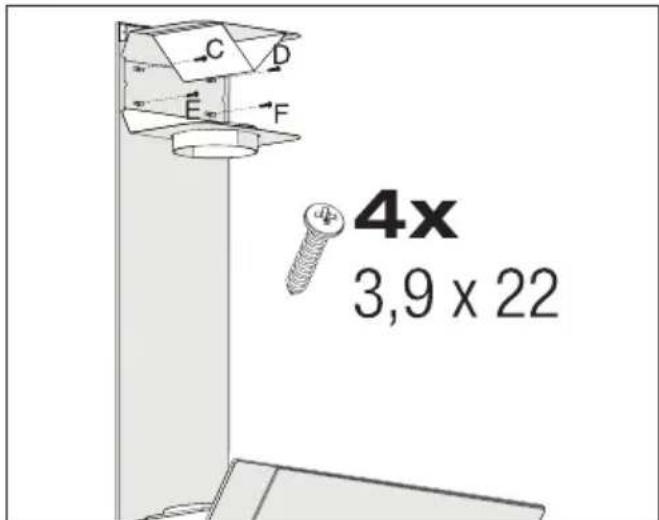
5.6 Installation of air baffle
While using with the carbon filter, air baffle is provided with your appliance with the aim of re-releasing the air which is cleaned with carbon filter from the perforated located on the flue. Assemble the air baffle as below.
(Figure 8)
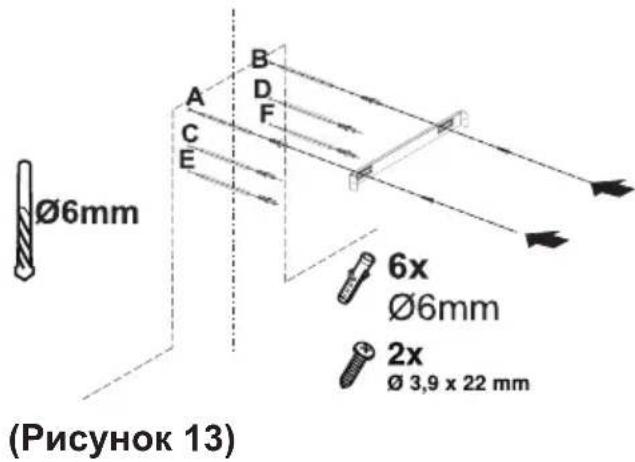
There is a tab in the middle of the flue connection plate. Place the middle point of this tab on the line that is drawn perpendicular to the wall. Align horizontally and mark the holes where the connection plate will be mounted via a pen (Figure 8/A, B).
Drill the marked points with 06mm drill and insert two 06mm plastic dowels in the drilled holes (Figure 8/A, B).
Fix the flue connection plate to the wall with 3.9 × 22 screws (Figure 8/A, B).
For air baffle assembly, install point C, D, E, F with 06mm drill and 06mm plastic dowels (Figure 8). Assemble cooker hood's body (Figure 4).
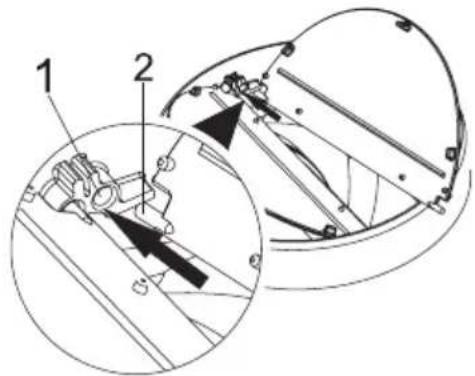
Figure 9
-
Flap pin socket
-
Flap pin
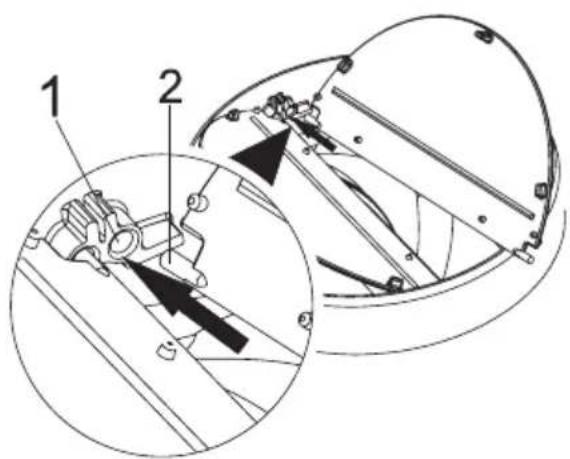
Attach the flue flaps to the plastic flue adapter in the package content as follows.
Insert the plastic pin (Figure 9/area no. 2) on the pin socket on the motor exhaust (Figure 9/area no.1). Then bend the flap lightly to insert the other pin on the flap and insert the other pin to its socket (Figure 9).
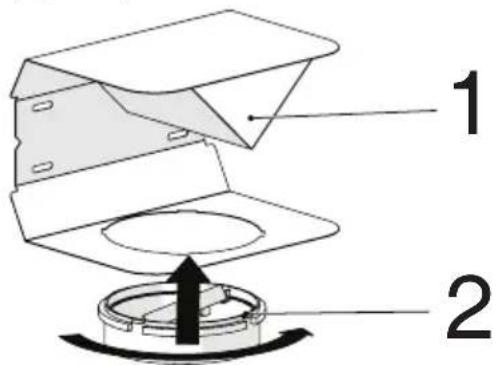
Figure 10
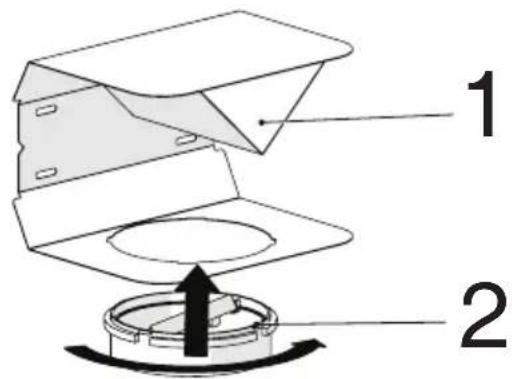
- Air baffle
- Plastic flue
Attach the plastic flue adapter, which is included in the package, in the direction of the air baffle. Lock the flue adapter by turning it in the direction of the arrow.
5 Installation of appliance
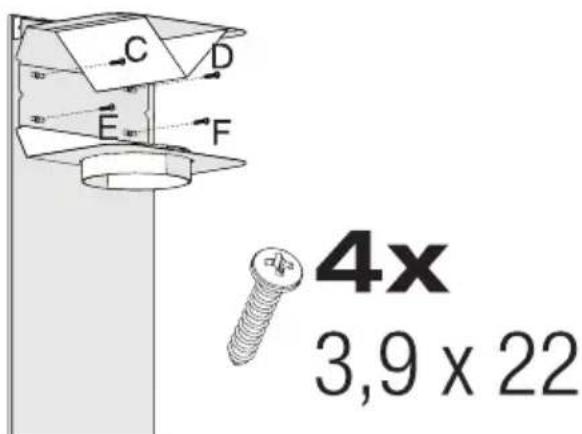
Figure 11)
Assemble the air baffle group with 3.9 × 22 screws from point C, D, E, F that you have already prepared (Figure 11).
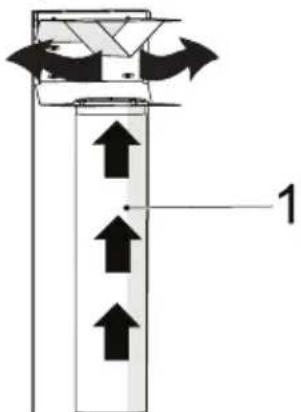
Figure 12
- Aluminium air outlet pipe
Make the air outlet pipe assembly (Figure 12).

Since twists and bends in the aluminium pipe will lead to reduction in the air suction power, avoid using twists and bends as much as possible.
Install the flue plates of the hood (Figure 7).
5.7 Storage
- If you do not intend to use the appliance for a long time, store it carefully.
- Before lifting the appliance unplug it and then let it cool completely.
- Keep the appliance and its accessories in their original packages.
- Store it in a cool, dry place.
- Always keep the appliance out of the reach of children.
5.8 Handling and transportation
-
During handling and transportation, carry the appliance in its original packaging. The packaging of the appliance protects it against physical damages.
-
Do not place heavy loads on the appliance or the packaging. The appliance may be damaged.
- Dropping the appliance will render it non-operational or cause permanent damage.
6 Troubleshooting
| Troubleshooting Root Cause Help | ||
| Appliance is not working. | Check your fuses. Fuse may be blown, inspect and restore it. | |
| Appliance is not working. | Check the electrical connection. | Mains voltage shall be between 220 and 240 V. |
| Appliance is not working. | Check the electrical connection. | Check if other appliance in your kitchen ope-rate. |
| Illumination light does not operate. | Check the electrical connection. Mains voltage shall be between 220 and 240 V. | |
| Illumination light does not operate. | Inspect the lamp switch. Lamp switch shall be at "on" position. | |
| Illumination light does not operate. | Inspect the lamps. The lamps of the appliance shall illuminate. | |
| Air inlet of the appliance is inadequate. | Inspect the aluminium filter. | Under normal operating conditions, alumi-um oil filter shall be cleaned at least once in a month. |
| Air inlet of the appliance is inadequate. | Check the air discharge flue. The air discharge flue shall be at "on" position. | |
| Air inlet of the appliance is inadequate. | Inspect the carbon filter. The filters shall be replaced once in every 3 months under normal conditions. | |
Chere cliente, cher client,
(Figure 1)
GDSP5470BSCH GDSP5470DXSCH
(Figura 1)
GDSP5470BSCH GDSP5470DXSCH
2 Apariencia general
2.2 Datos tíncicos
IPEPABOTAHHAR INIPEPABATbIBAEMARByma
3TOT npn6op n3roTOBJIeH Ha 3KOJOnuYeCKn 6e3BpeiHOM COBpeMeHHOM o6OpyIOBaHN, 6e3 HAnecEHn yUep6a OkpykaIoUe i CpeIe.
MHHMaJIbHoe paCCToI Hne MeKdy ONOPHO NOBepXHOCTbIO EMKOCTeI DnI pNIrTOBJeHnI NnHa BapOChNo NaHeNn I CamoH HxHHeY qAcTbIO N3DeJIy DOJxHO 6bITb He MeHee 65 cm.
- Ecnn B nHctpyKcnn No yctaHOBKe r30BOJ pINTbI yka3aHO 6OJIbWee paCCTOJHNe, 3TO CJeDyET PpHHaTb BO BHImaHne.
HanpЯЖeHne cETn nTahnY DoJXHO COOTBcTCTBOBaTb HOMHaJIbHbIM XapaKTePncTnKaM, yka3aHHBIM Ha NaCNoptTHoT a6JIuYe 3JIeKTpO npnbopa.
1 BaxHbIe nHcTpkyKcNn no TexHnKe 6e3OpacHOCTn n 3aunTe OkpykaUoJe cpebl
Hn B Koem clyuae He nOJIb3yIteCb 3JIeKTpO- np6Opom, ecIn shHyp nITaHnI nII 3JIeKTpO- np6Op NOBpeJdeHbl.
-Bo n36eXaHne NOBpeXdEHNy SHHya NtA-HNry He dOnyCKaIte erOcDaBnVBaHNy, nepeRnBaNn KOHTaKTA C OCTpbIMKnPOMKaMn. He dOnyCKaIte COpNIKOCHOBENyShHypa NtAHNry C rOpraYHMN NOBepxHOCTaMn NJIOTKpbITbIM PIIaMeHem.
BkIouaTe np6Op TOnbKO B p03eTKy C 3a-3emJIOUIM KOHTaKTOM.
BHIMAHNE: He nodkno- yaIte np6op K 3JeKtpocetn Do nolHoro 3aBepweHna pa6ot no yctaHOBke.
- 3JIeKTpOpnp6Op cIeDyET pacnoJaraTb TaKIM o6pa3OM, yTO6bl WTeNceJbHaBnIka 6bla JeRKOoOCTynHa.
He npikacaiTecb K lamnam, ecnn OHN pa6oTaN B TeueHne dIInTeNbHorO BpeMeH. 3TO MoKet Bbl3BaTb OxKOr pyK, NOCKOJIbky lamnbI OyeHb rOpaune.
CneyuTe HNCTpyKcIyM, yCTaHOBJIeHHbIM KOM-NEtHTNbIM OprHaAMN OTHOCITIELBO BblNycka OTPa6OtaHHoro BO3dYxa (daHHoe npedynpejdeHne kacaetcBeHTnJaOnHHbIX Tpy6).
BkHouHTe np6op nocTe TOrO, KaK NoCTaBnTe KaCTpOJIIO, CKOBOPOy I T.Д. Ha BapOChNo paHeIb. B IpOTnBHom clyuae BbICoKaJ Tempepatypa MoKeT npINBeCTN K DeOpMaun HeKOTOpbIX qAcTei N3deJIJa.
- OTKIIOUaIte BapOuHyIO nAHeIb IpeEi TeM, KaK y6paTb C Hee KAcTpIIO, cKOBOPOy N T.D.
1 Baxkhble nHctpyKcnn no texhne 6e3oNaCHocTn n 3aunTe OkpykaUoJe cpebl
He octablante ropaee Macno Ha Bapouho nane. CkoBopoda c ropa- ym Macnom MoKeT cTaTb npuHoi CamoBO3ropaHna.
Cleinte 3a stopamn n 3aHaBeckamn,noCKoJbky npiroTOBJIeHn TaKnx 6IIOd, kak KapToOpelb 0prn MacNo MoXeT 3arOpetbcra.
3amehy xnpoynaBnbaTeTJeDyeT OcyuaceTBJb, KaMnHmym, pa3 B Meca. 3ameHy yroIb-HoroΦnIbTp a OcyuaceTBJb, Ka MnHmym, pa3 B 3 Meca.
- HnKOrda He octaBnyTe OTKpbITbIM BbICOKoe Pnamr noD pa6oTaUoche BbITXKOJ.
BoBpeMa nCNoIb3OBaHnA
ΦpntIOpHnUx Heo6xo-
DnMo DePkaTb NOD NOCTOaHHbIM PnCMOTpOM: CNbHO HarpTeoe Maclo
MOXeT 3aRopeTbcra.
1.2 CoOTBeTCTBHe ДиpeKТиBE NO yTnIIN3aцИN OTXODOB эЛeКТрИчecKOrO n эЛeKТрОнHOrO obOpyIDobAHnA n yTnIIN3aцИ N pOdYkTa:
Данhoe n3дени COOTBETCTByet Tpe6OBaHnMДиpeKtNBbI NO yTnIN3aCnN OTXODOB 3ЛeКТрИчECKOrOи 3ЛeKТрОHnHO obOpydoBaHn (2012/19/EC).Ha n3dJIne HaHeceHo yCNoBHOe 6o3HaueHne ДЯ OTXODOB 3ЛeKТрИчECKOrO 3ЛeKТрОHnOro obOpydoBaHn (WEEE).
3TOT CnMBOJ O3HaayeT, YTO NO nCTeueHnn Cpoka cnyx6bl daHHoro npnbopa, OH He dOnJxhen yTuJIIN3nPoBaTbcra BmecTe C dpYrIMN 6bITOBbIMN OTXoDa-
M. BbIbWee B yNtpe6bnHn ycTpoiCTBO Heo6xOdImo CdaTb B OOpuHaJIbHbI NyHKT c6opa DnA yTNIn3aunn 3JIeKTPnuCeCKOrO n 3JeKTPoHHoro o6OpyDoBaHn. DnA NOUyeHn HOpMaunn O TaKnx NpHKTaX c6opa, NoKaanycta, CBJXITecb C MeCTHbIMN OprAHm BnACTn INn PO3HNuHOr TOpROBn, NO MecTy NOKynn HaCToJzero np6opa. B BoNPocax BOCCTaHOBHeHn rYtnIN3aunn 6bIBux B yNtpe6bnHn np6obopk Kajdbn KOHKPeTHbI BnAdJeNeu nIrpaet BaKHyIO pOB. HadJexkaaJyTNIN3aunr NcNoIb3OBAHHoro 6bIBweo B yNtpe6bnHn np6opa nomoraet npedOTBpATNTb NOTeHuaNbHbIe HeratNBhIE NocJeDCTBnI dnn OkpyKaIOUe n Cpebl N 3DOpOBbY eNoBeka.
1.3 CoOTBeTcTBnE DInpeKtNBe EC no orpaHnueHnIO nCNoJIb3OBaHnY BpeDhbIX BeIecTB
Ipnno6peTeHHoe Bamn n3dJIne COOTBETCTByET Tpe6oBaHnram DInpeKTHBbIEC no orpaHnueHIO nCNoJb3OBAHnBpeHbIX BeIeCTB (2011/65/EC).UcTpoiCTBO He CoOpEKNIT yKa3aHHbIX BInpeKTHBe BpeHbIX BeIeCTB n 3aPpeHHbIX MaTePnaIIOB.
1 BaxkhbIe nHcTpyKcIIN PO TexHnKe 6e3OpacHOCTN IN 3aUInTe OkpyKaIOUeN CpeDbl
5 yctaHObKa n3dJIIny

ПЕДУПЕЖДЕНЕ:
IpeNd hauanom yctaHOBKn npoHTte nHopma- cHIO NO 6e3OnacHOCTN B PykoBODCTBe noJb3OBaTeJI.
PPEyPPEXDEHNE:
Hecobnoe HNCTpykni NO yCTaHOBKe C NOMOuB BnHTOB n CTaBnIIN3aTOPOB MOKET npNBecTn K nopaxeHNIO 3JIeKTpueeCKM TOKOM.
No Bopocam yctaHOBKn BbITJxKN O6paauTecb B 6nkaun ABTOp3oBaHHb CEpBnCHb ueHtp.
3aKa3uNK HeCET OTBETCTBEHHOCTb 3a NOIroTOBky MeCTa N 3JIeKTPnueCKORo MOHTaKa BbITJxKN.
5 yctaHObKa n3dJIIny
13.Пл actIKOBын aДaNTep BbITxHoi Tpy6bl 0120 MM
14. 3acNoHka BbITJxHOn Tpy6bl 0120 MM
15.Bo3dUshbIeΦJIeKTop HOpMaun,Heo6xOImmaIyBb60pa MeCTa,NoXoJSeIgIyCTaHOBKn BbITJxKn,IpeDCTaBJIeHa HIXe.
5.3 HacTeHHoe KpeIeHne
CTeHa DOJxHa 6bITb NIOCKoN, npraMOH N IMETb DOCTaTOUHyHO HecuSyHo CNOco6HOCTb.
-Динha OTBepctn Дя CBepneHna DOJxHa COOTBETCTBOBaTb ДинHe 6oITOB.
BnHTbI n IIO6eHn, NOCTaBnaEmble n3DeJIeHm, NODXODr DnKINuHbIX CTeH. Pn yCTaHOBKe Ha CTeHax n3 dpyHX CTPONTeHbIX MaTePnaNoB (HaNPmep, rNcOKaPToHa, NITbI, NOPcTOrO 6eToHa) cNeDuYET NCNOb-3OBaTB NODXODraUne KpeJeKhbIe IIO6eHn n raIKn.
(PncyHok 7)

BHUMAHNE: Npeed nauJIOM CBepJIeHnYbEInTeCb, UTO B HENOCpeIcTBeHHoN 6JIu3OCTN OT MeCT CBepJIeHn HET 3JIeKTPnuecknX Ka-6BeJe, Ra3OBbIX INI N BOIOnpOBODhIx Tpy6.
Hapncyute cpeHIOJINHIOOT NOToIka nepnEnkUjRPHo HxHemy KpaIO.
BcTaBbTe 7a6Ioh yCTaHOBKn, nocTaBJIaEmbI C npOyKTOM, Ha NOBepXHOCTb, Ha KOTOpo JOnJxH 6bITb yCTaHOBHeH npOyKT. Pn BblONHeHn 3Toi onepaCIN CO6JIoDaIte MOHTaXHyO BbICOTy BBITJIKK (PncyHok 6).
IocepeHHe coeHHTeHbHO nHaCTnHbI DbIMOXOa NMeETcra 3bUOK. IomeCTnte CpeHHIO TOky DaHHoro Ra3bUka Ha JINHIO, KOTOPa HApNCOBaHa nepEnDnKylpHo CTHe. BbINOJIHRA 3Ty ONEpaUHO, OTperyIpuYte BBITJxK Ky NO MaKcImaJIbHOB BVICOTE (PncyHOK 1).OTMeTbTe OTBepCTn, rDe 6yJeT yCTaHOBNeHa CoeHNHTeJIbHa PnaCTnHa DblMOXoA, c NOMOUsbpyKn (PncyHok 7/a).
PpocBepnTe OTMeueHHbIe TOnKn 06 MM CBePOM N BCTaBbTe 2 PnlaCTNkoBbIX WtntoTa B PpocBepnEHbIe OTBepCTnA (PncyHok 7/a). PpikpePte coeDnHInTeNbHy O PnactnHy DblMOxOda K CTHeC NOMOu bIO 3,9x22 BNHTOB (PncyHok 7/a).
KlanaHbI 3akpbItbl, 3NaHT npnbOp He pa6oTaET, n npedotBpaauT nonaHaHne BHyTpB BO3MOxHoro 3anaxa N3BHe I nbIIN.
(Pncyhok 11)
5.5 YctaHOBka BbITJxKn HaDbIMOXoD
IodKnIOHTe BbITJkKy K 3JeKTPoCetn nepey UcTaHOBKOJ DbIMOXOJa. HaJeHbTe BHeuHn DbIMOXoHa KOpnyc. 3aKePnte DbIMOXoU cheE3 Dba HxHnx yTna K KpeNTeNbHbIM PnactnHAM DbIMOXoHa HaxOJaXxCra Ha Ka6nHe DBratela.(PncyHok 12).
YcTaHOBInTe BHeUHn DbIMOXoHa KpeNexKHy O NlaCTINHy DblMOXoDa, KOtOpa KpeNTcKa C TcHe C ee BepxHnx BHeuHnx KpaEB (PncyHok 12).
(PncyHok 12)
5.6 YcTaHOBKa BO3dUshOH 3acNoHKn
Pn nCnoB3OBaHn C yroIbHbIM pIb-TPOM B KOMJIeKTe C npIbOpom NoCTaBJIaETcra BO3dyXo3a6OpHnK, IpeHa3Ha-ueHHbI dIyIOBTOPO BblNyCKa BO3-dyxa, OunIeHHoro C NOMOu bO yroIb-Horo qINbTpa, n3 nepOpnpOBaHHoro OTBepCTna Ha dbIMoxOe. Co6epnte DeqneKTOp, KaK NOKa3aHO HnKe.
5 yctahOBka n3deleny
IocepeHHe coeHNHTbHOJ PnactHbI DbIMOXOda NMeETcra 3bUOK. IomeCTnte cpeHHo TOyKy DaHHoro 3bUka Ha JINHIO, KOTopa HapucOBaHa nepEnkynpHo CTeHe. BbipOBHrTe NO TOpN3OHTaJIH N OTMeTbTe OTBepCTna C NOMOuBo pUKN, B KOTopbIX COeHNtEJBHaa PnactHa 6yDet yCTaHOBJeHa (PncyHok 13/A, B).
PpocBepnTe OTMeueHHbIe TOnKn 06 MM CBePOM N BCTaBbTe DBa PJIaCTNKOBbIX WTHoTa B PpocBepJeHHbIe OTBepCTnA (PncyHok 13/A, B).
PpHKpeHnTe COeHNHTbHyO PnactHy DblMOxOa K CTeHe BnHTaMn 3,9x22 (PncyHok 13/A,B).
Дя сборки BO3dYxOBOda yCTaHOBnTe TOnk C, D, E, F c nOMoUb CBeprna 06 MM nПаCTNKOBbIX dIO6eJen 06 MM (PncyHok 13).
Cobepnte Kopnyc BbITaXkN (PncyHok 9).
BCTaBbTe PnactIKOBbl WtntΦT (PncyHok 14/o6IacThb No 2) B rHe3do Dnla WtntΦTa Ha BbIXlone DBNrAteJIa (PncyHok 14/o6IacThb No 1). 3aTeM CJIeRka CoHHTe 3acNoHky, YTO6bI BCTaBNTb DpyroWtntΦT B 3acNoHky, N BCTaBbTe DpyroWtntΦT B eRo THe3do (PncyHok 14).
(PncyHok 15)
1.Bo3dyHbI JeOpneKTop
2.Пл actkoBа BbITxHа Tpy6a PnKpeNte nactMaccobI nepeXoHN KDbIMOXOda,BXODaIINB KOMPJIeKT NOCTaBKn,NO HApBaJIeHIno K DeOpJIeK-Topy.3aФNKcnpuTe nepexoHNK DblMOxoDA,NOBepHyB erO B HApBaJIeHIn CTpeJKN (PncyHok 14).
(Pnc. 14)
- THe3do C OTKnIHOH KpbIiKoN
2.3acJIOHka
Прикpenite 3acNoHKnDbIMoxOda K Пл actNKOBOMyпepexODnkyDbIMoxO- da, BXoJaIeMy B KOMPJIeKT NOCTaBKN, Следуюшmобразм.
5 UctaHOBka n3dJeJna
(PnCyHOK 15)
Cobepnte rpynny Bo3dyxOBOIOB c noMoou BnHTOB 3,9 x 22 n3 Touek C, D,E,F,KOTOpBie Bbl yke noIroTOBnN (PncyHok 15).

(PucyHok 16)
AJIOMHHeBaBbInyckHaTpy6a
Cobepnte c6opky Bo3duyxOBbIpyCKHO Tpy6bl (PncyHok 16).

Tak kak B pe3yIbTaTe nepeRn6aHnry n nepeKpyuBaHnraAnHomHneBOr Tpy6bl MoXeT IMeTB MeCTO CHIXKeHneMOUHOCTN BCacbIBaHnry, CNeDyET NO BO3MOxHOCTNu36eratb nepeKpyuBaHn r nepeRn6aHn.
YcTaHOBnTe PnactnHbI DblMOXoDa BblTJxKn (PncyHok 12).
5.7 XpaHeHne
- Ecni Bbl He co6npaTeEc bncNoJb30BaTb np6Op B TeueHne dnteHoroBpeMeHH, XpaHnte erO OCTOPOXHO.
- Y6eIntecb, yTO npnbop OTKnHoyeh OT cETN, OCTbl IN NOJIHOCTbIO BbICox.
XpaHnTe np6op B npoxnaHOM n cyxom MeCTe.
XpaHnTe ero B MeCTe, HeIOCTynHom dIa DeTei.
5.8Оврашени nТранспортуковka
Bo Bpemr o6pa60TKn n TpaHcnpTnpoBKn nepeHocnte np6Op B opnHaJIbHOyNAKOBE.
- Ynakobka yctpoiCTBa 3aunuaet ero OT cn3nuecknx NOBpeJdeHn.
He knaIte TjKeIbIe rpy3bl Ha npu6op nn ynakOBky. Bo3moXHo noBpeJdeHne np6opa.
6 BbIaBJIeHne HencpapBHOCTeI
MeTO nHAKNEKKOa H3eINNA
Празивовпель: "Arcelik A.S."
Karağac Caddesi No: 2-6 Sutlüce, 34445, Tурция
CdeIaHO B Kntae
ImmopTepe Tepntopn P: OOO «BEKO»
HOpnduueckn aDpec: 601021 Pocn, BnaMnpcka oBn., Knpkauchn p-H, dep. FeDopOBCKoe, yI. CeIbcka, d. 49
1.3 Overholdelse at RoHS-directivet
(Figur 1)
GDSP5470BSCH GDSP5470DXSCH
2 Generelt utseende
2.2 Tekniske data
WARNING: Varning for brandfara.
WARNING: Varning for elektrisk stöt.

ÄTERVINNINGS-OCH
ÄTERVINNINGSPAPPER
5.2 Installationsutrusting
1
2

3
4

5
6
7

8

9
10
1

1
12

12
13

14
15
- Produkt
- Yttre rokkanal
- Inre rokkanal
- Skorstenens anslutningsplatta
- 0150/120 mm rokkanalens plastadapter
- Anvandarmanual
- Installationsmönster
- 10 mm plastplugg
- 06 mm plastplugg
- 5,5x60 vaggmonteringsskruvar
- 3.9x22 rokkanalens anslutningsplattas skruv
- 3.5x9.5 rokkanalens anslutningsskruv
- 0120 mm rokkanalens adapter
- 0120 mm rokkanalens klaff
- Luftbaffel