USER MANUAL Pixma TR4550 CANON
Read Safety and Important Information (addendum) first.
Instructional Videos
Instructions video
Anleitungsvideos
Instructievideo's
Video informativi
Videos instruetionais
Videos instructivos
Eknaieutiko bivteo
Instrukionsfilmer
Instruksjonsvideoer
Instruktionsvideoer
Ohjevideot


Setting up the printer
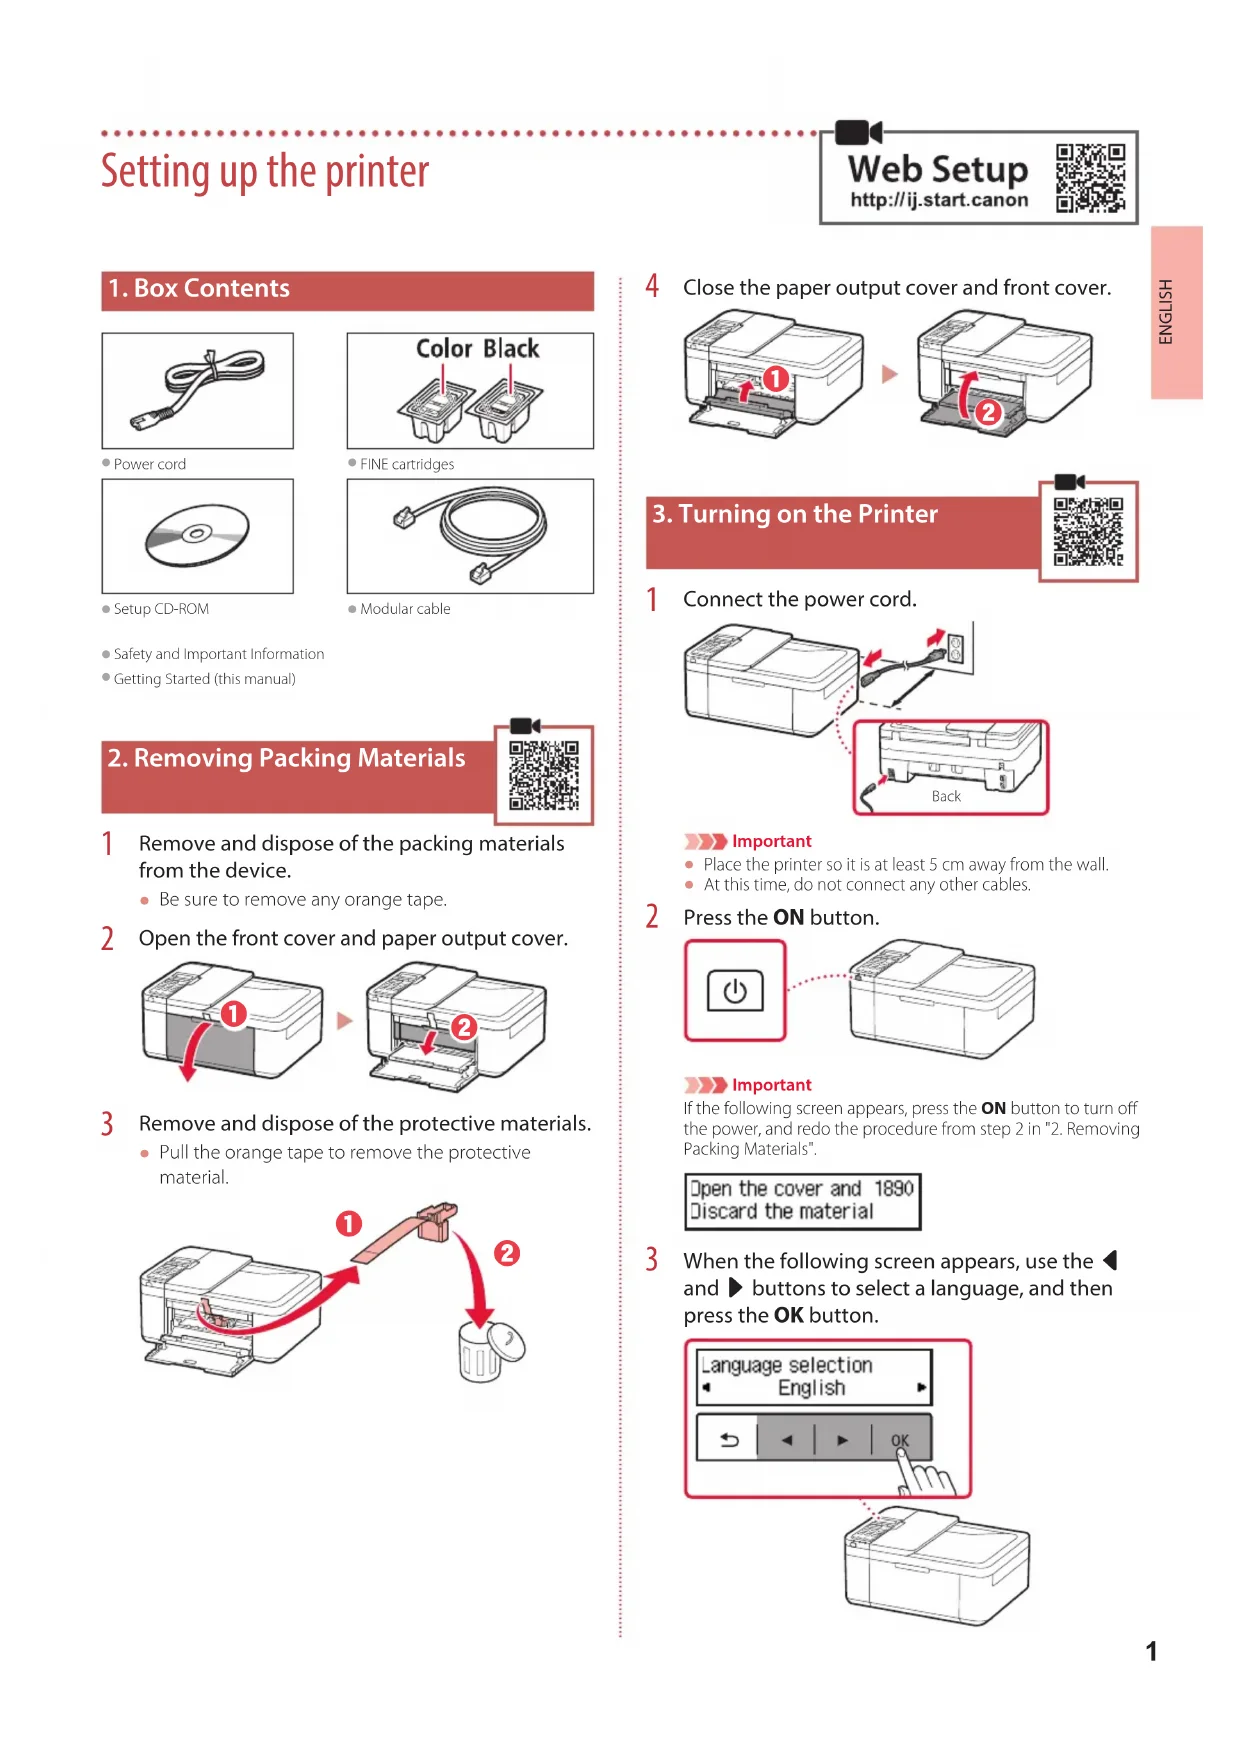
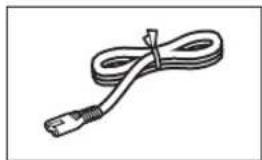
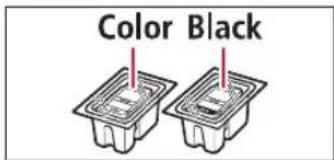
1.Box Contents
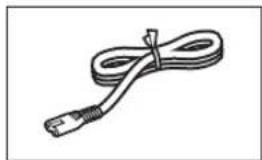
Power cord
FINE cartridges

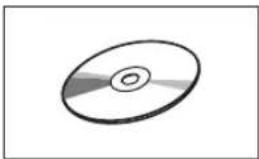
- Setup CD-ROM
Modular cable
Safety and Important information
Getting Started (this manual)
2. Removing Packing Materials

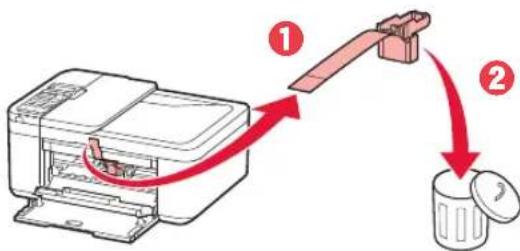
1 Remove and dispose of the packing materials from the device.
- Be sure to remove any orange tape.
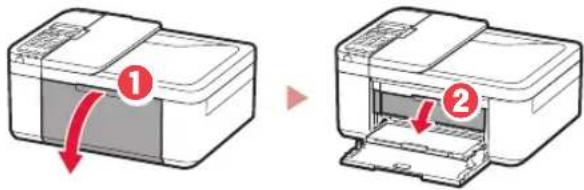
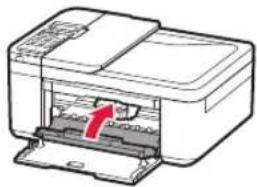
2 Open the front cover and paper output cover.
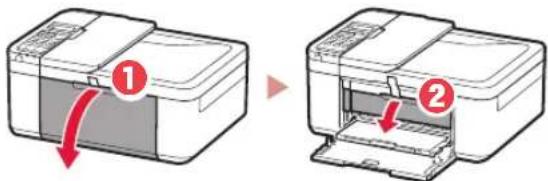
3 Remove and dispose of the protective materials.
Pull the orange tape to remove the protective material.
4 Close the paper output cover and front cover.

3. Turning on the Printer

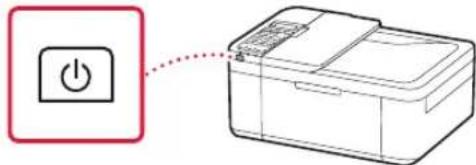
1 Connect the power cord.


Important
- Place the printer so it is at least 5 cm away from the wall.
At this time, do not connect any other cables.
2 Press the ON button.

Important
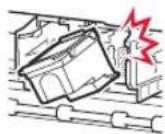
If the following screen appears, press the ON button to turn off the power, and redo the procedure from step 2 in "2. Removing Packing Materials".
Open the cover and 1890 Discard the material
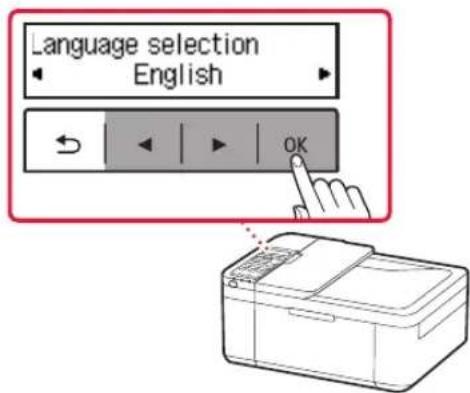
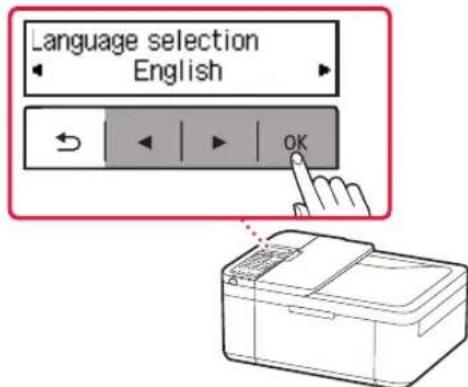
3 When the following screen appears, use the and buttons to select a language, and then press the OK button.
Setting up the printer
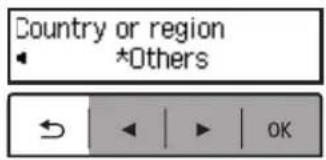
4 If the following screen appears, select your country or region, and then press the OK button.

4. Installing the FINE Cartridges

1 Open the front cover and paper output cover.
2 Remove the color FINE cartridge from the container and remove the protective tape.
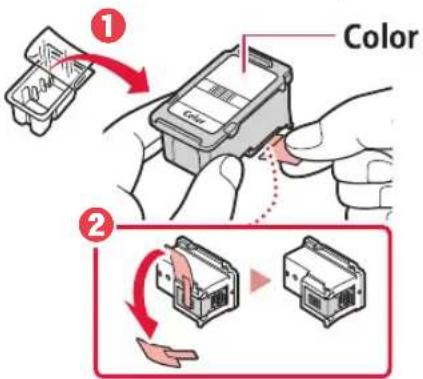
Important
- Do not touch the ink on the protective tape. It could stain your hands or surrounding objects.
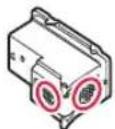
- Do not touch the areas shown in the figure. Otherwise, the printer may not print correctly.
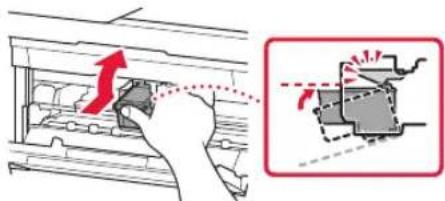
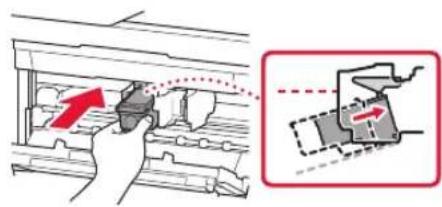
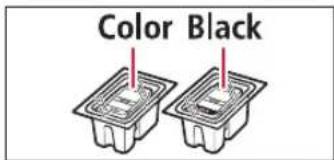
3 Install the color FINE cartridge.
The color FINE cartridge goes on the left.
- Tilt the FINE cartridge upward at an angle and insert it into the FINE cartridge holder.
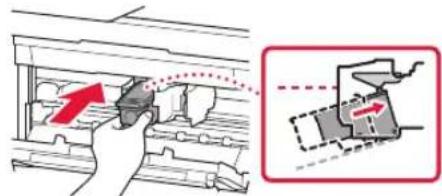
- Insert it all the way and press it upward until it clicks.
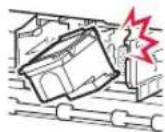
Important
Do not bump the FINe cartridge. Doing so may cause a malfunction.
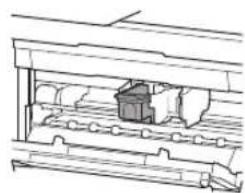
4 Confirm that the FINE cartridge is straight and level.
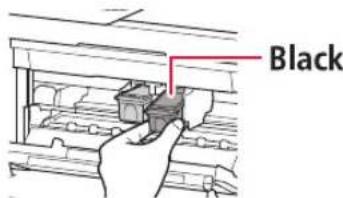
5 Repeat steps 2 to 4 to install the black FINE cartridge.
The black FINE cartridge goes on the right.
6 Close the paper output cover.
Important
If the following screen appears, return to step 3 in "4. Installing the FINE Cartridges" and confirm that the color and black FINE cartridges are positioned correctly.
Install the cartridges pro 168A
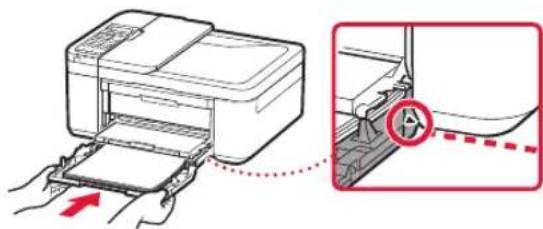
5. Loading Paper

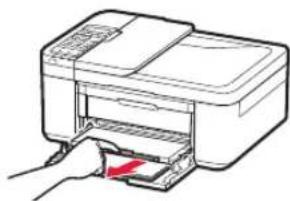
Pull out the cassette until it stops.

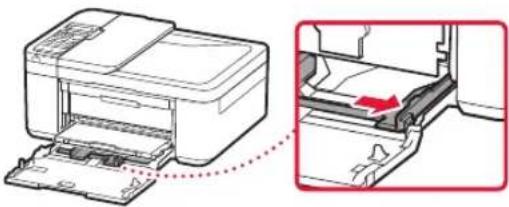
2 Slide apart the paper guides.
- Grip the right paper guide and move it to the right edge.
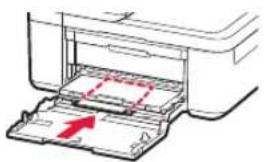
3 Load paper.
- Load plain LTR or A4 size paper with the print side facing down.
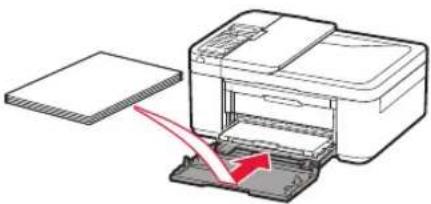
- Push the paper all the way into the cassette, and then slide the right paper guide against the edge of the paper stack.
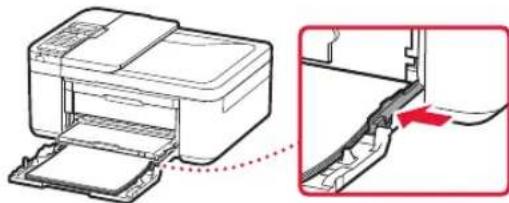
4 Push in the cassette.
The arrow () on the front cover should align with the front edge of the printer.
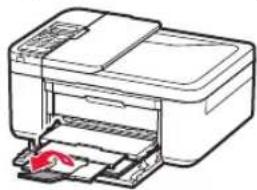
5 Pull out the paper output support of the paper output tray.
6 Open the output tray extension.
Setting up the printer
6-a
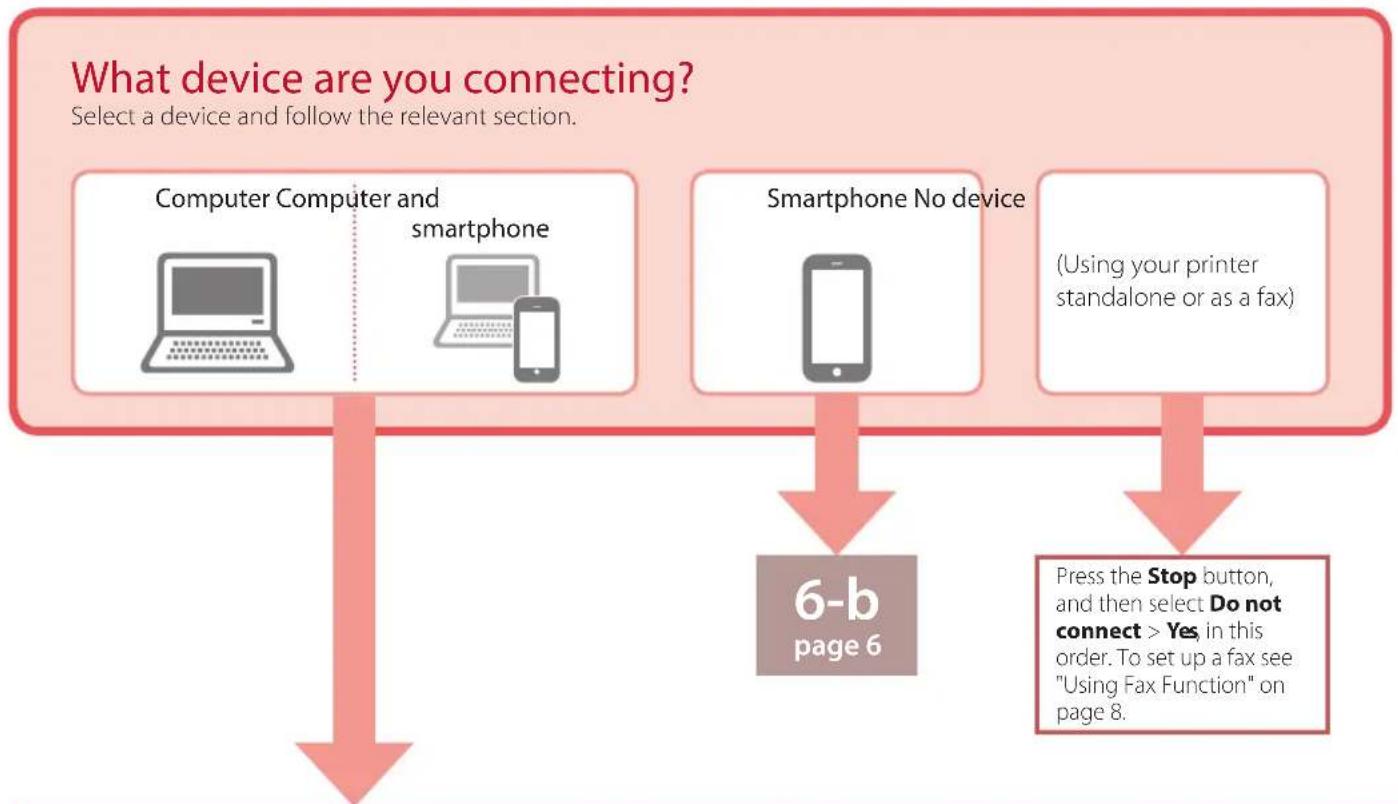
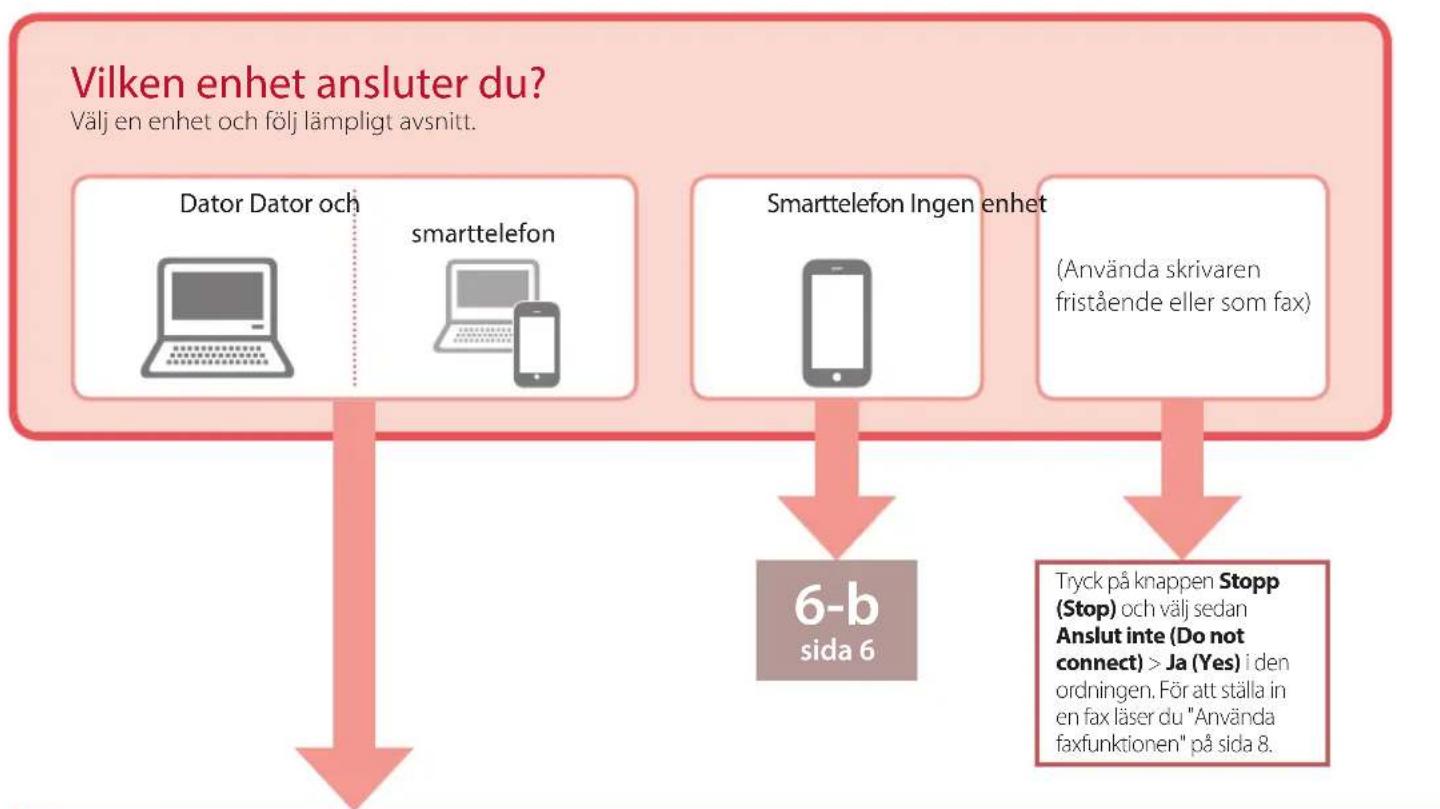
Connecting to a Computer
If you are using multiple computers, perform these steps on each computer. There are two methods, "A Online Setup" and "B ng the Setup CD-ROM (Windows Only) Provided".


Online Setup
1 Access the Canon website from a computer.

2 Select Let Up.
3 Enter your printer's model name and click Go.
4 Click Start.
5 Click If you have already prepared your printer, go to Connect.
Note When you are using a computer with Windows (except for Windows 10 S) or macOS, proceed to the next step. When you are using a computer with another OS, continue the setup by following the on-screen instructions.
6 Click Download.
The setup file is downloaded to your computer.
7 Run the downloaded file.
8 Proceed to step 9 on page 5.

Using the Setup CD-ROM (Windows Only) Provided
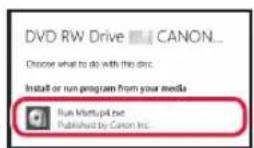
1 Insert the Setup CD-ROM into your computer.

2 Follow the instructions for your version of Windows.
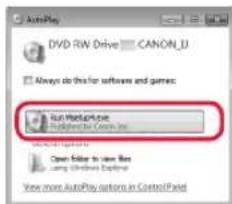
Windows 10/Windows 8.1
1 Click on the following message when it appears on the right-hand side of your computer screen.


Note
If the message does not appear (or is no longer visible), click the File Explorer icon in the taskbar. On the left-hand side of the window, click This PC. Double click the CD icon that is displayed on the right-hand side (when the content of the CD is displayed, and then double click Msetup4.exe). Proceed to 3.

Click Run Msetup4.exe.
3 If the User Account Control dialog box appears, click Yes.

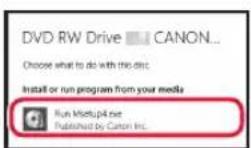
Click Start Setup.
10 Follow the on-screen instructions.
These operations may take some time.
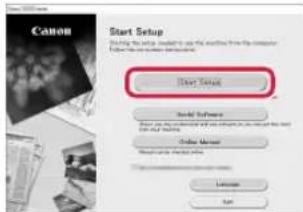
Windows 7
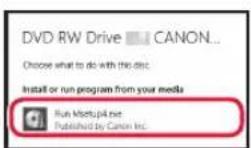
Click Run Msetup4.exe.
- When the AutoPlay screen appears, click Run Msetup4.exe.

If the AutoPlay screen does not appear, in the Start menu, click Computer. On the right-hand side of the window, double click the CD icon (when the content of the CD is displayed, double click Msetup4.exe).
If the User Account Control dialog box appears, click Continue.

Proceed to step 9 below.

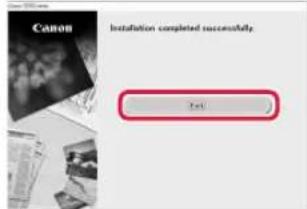
When the following screen appears, click Exit.
- Your printer is now connected to your computer. To connect a smartphone as well, see "6-b. Connecting to a Smartphone" on page 6.
To set up a fax, see "Using Fax Function" on page 8.
6-b
Connecting to a Smartphone
If you are using multiple smartphones, perform these steps on each smartphone.

Prepare the following before starting.
1 Enable the Wi-Fi setting on your smartphone.
2 Connect your smartphone to the wireless router* (if you have a wireless router).
See your smartphone and wireless router manuals regarding these procedures for more details.
1 Install the "Canon PRINT Inkjet/SELPHY" app on your smartphone.
iOS
Search for "Canon PRINT" in the App Store.
Android
Search for "Canon PRINT" in Google Play.


Note
You can also access the Canon website by scanning the QR code shown on the right to download the app.
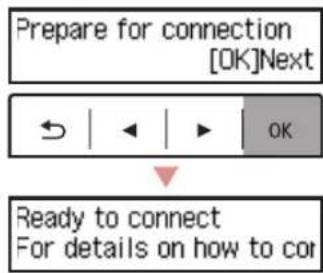
2 Check the printer's screen as you proceed through the steps.
If the following screen appears

Press the Setup button and check the screen that appears.

If appears,

If does not appear,

If the following screen appears

Ready to connect
Ready to connect
For details on how to cor

Note
The printer's screen turns off when the printer is idle for 10 minutes. Press a button (except the ON button) on the operation panel to turn on the screen.
Ifears, the printer cannot communicate by Wi-Fi connection. For details, see "Frequently Asked Questions" at "http://j.start.canon".

3 Open the installed app.
4 Follow the on-screen instructions to add your printer.
5 Check that the following screen appears.

- Your printer is now connected to your smartphone. To print photos, see "Loading Photo Paper" on page 8.
To set up a fax, see "Using Fax Function" on page 8.

Procedures vary for iOS and Android. Follow the instructions for your operating system.
iOS
3 Tap Settings on your smartphone's home screen, and tap Canon_ij_XXXX in the Wi-Fi settings.
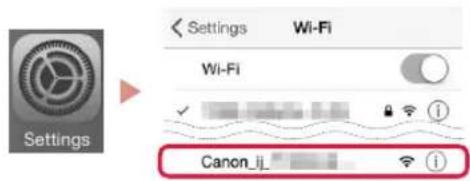
Note
If Canon_ij_XXXX does not appear, follow the procedure in E and then search for Canon_ij_XXXX again.
4 Open the installed app.
The printer is registered with the most appropriate connection method for the environment you are using.
5 Check that the following screen appears.

Android
3 Open the installed app.
The printer is registered with the most appropriate connection method for the environment you are using.
Note
If a message saying "No printer has been added. Perform printer setup?" does not readily appear after starting the application, follow the procedure in E and then return to smartphone operations.
4 Check that the following screen appears.

- Your printer is now connected to your smartphone. To print photos, see "Loading Photo Paper" on page 8.
To set up a fax, see "Using Fax Function" on page 8.

3 Press and hold the Menu/Wireless connect button for about 3 seconds.
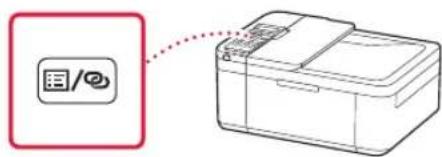
4 When "Follow the instructions on the PC or smartphone, etc." appears on the printer's screen, proceed to D
Loading Photo Paper
1 Pull out the cassette until it stops.
2 Slide apart the paper guides.
- Grip the right paper guide and move it to the right edge.
3 Load photo paper.
- Load photo paper in portrait orientation with the print side facing down, and place it in the center of the cassette.
- Push the paper all the way into the cassette, and then slide the right paper guide against the edge of the paper stack.

4 Push in the cassette.
The arrow () on the front cover should align with the front edge of the printer.
5 Pull out the paper output support of the paper output tray.
6 Open the output tray extension.
7 When the following screen appears, press the OK button.
Register the cassette pa [OK]Next
8 Select the paper size and type, and press the OK button.
Size: L
Type: Glossy
Using Fax Function
The fax function of your printer requires setup. Refer to either of the following manuals.
Online Manual
Access the Canon website.

http://ij.start.canon
Click.
3 Enter your printer's model name and click Go.

FAX Setup Guide
On-screen Manual (installed on your computer)
The following is an example using Windows 10.
1 Click the Start button.
Click All apps > Canon TR4500 series On-screen Manual in this order, and then open the User's Manual.
3ClickFAX Setup Guide.
If Print Results Are Unsatisfactory
Perform Print Head Alignment if straight lines are crooked or colors are inconsistent, or print results are otherwise not what you expected.
For details, click the Maintenance on the Online Manual and refer to If Printing Is Faint or Uneven > Aligning the Print Head.
Refer to the back cover for how to open the Online Manual.
Lines Are Misaligned

Uneven or Streaked Colors
Configuration de l'imprimante
Open the cover and 1890 Discard the material
For details on how to cor

Hinweis
Register the cassette pa [OK]Next
Size: L
Type: Glossy
Open the cover and 1890 Discard the material
Zoek "Canon PRINT" in Google Play.
Opt
Register the cassette pa [OK]Next
Size: L
Type: Glossy
Open the cover and 1890 Discard the material
For details on how to cot

Nota
Register the cassette pa [OK]Next
Size: L
Type: Glossy
Open the cover and 1890 Discard the material
2 Deslize as guias do papel.
Clique em
Executor
Msetup4.exe
(Run Msetup4.exe).
3 Se a caixa de dialogo Controle de Conta de Usuario (User Account Control) for exibida, clique em Sim (Yes).
9
Clique em Executor Msetup4.exe (Run Msetup4.exe).
- Quando aanela Reproducao Automática (AutoPlay) for exibida, clique em Executor Msetup4.exe (Run Msetup4.exe).

Nota
For details on how to cor

Nota
Register the cassette pa [OK]Next
Size: L
Type: Glossy
Usando a Funcao de Fax
Open the cover and 1890 Discard the material
For details on how to cor

Nota
Register the cassette pa [OK]Next
Size: L Type: Glossy
Open the cover and 1890 Discard the material
3 O Tav eepavioTei n akolouo n oovn, xpnoiOnote Ta KOUPIA kai yia va enieEETe yawooa, kai, otn ouvexia, pntote to koupi OK.
Pou EKUTWt
4 Av eupavioTei n akolouo n oovn, eiléTe Tn xwpa n tvn pioxnaoc kai, otn ouvexia, natote to koupi OK.
3 Tooetnoe to eypwmo quoiyyIO FINE.
To eyxpwio quoivyIO FINE tono0eirai ota apioTepa.
Fepetto quoiyyIO FINE oe avodikn kion kai tootheiote to ot kn quaiyyiou FINE.
TooTheTToTealeicmuKaipieTo npoc Ta nawu expi va epapuo.

Σημαντικό
Mnxtunate to quioyIO FINE. Kani teioo uopei va npokaaeoi duoeitoupyia.
Eav to nuvua No printer has been added. Perform printer setup? dev eapaviote aouwc, meta tnv evapen tnc expapoyng, akolovtheta tn diabikacia oTo Kai emotppe otic leitoupyie tou smartphone.
4 BeBaiwOeite oTI eupaviEtaI n akolouo n oovn.

O EKTUNWTNC OAC EIVAI NAEOV OUVDEEVEOC ME TO smartphone OAC. TIA VA EKTUNWOTETe QwTOYPAPIEC, avatpeTE OTNV EVOTNTA ToOnoTetnON QwTOYPAPIKOU XapIOU» OTN eAl8a 8.
Tia va puθμioεTe to paε, avatpeEte Θην εοντητα «Xρησιη tcλειουργίας φαε» Θηθελίδa 8.

3 PataoTepaataeva to koupi Mevou (Menu)/Aopmuatn ouvdeltaon (Wireless connect) yia nepiou 3 dertpoa.
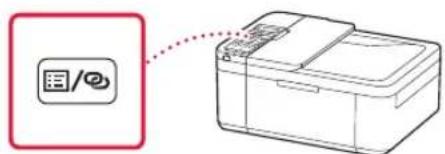
4 Otav epaaviotei Akoouo. tic oyniec stov unoloyiotn to smartphone kAn. oTnv oOvntou EKTUNWT, pOxwpnoTe OTo D
TooTheon toypapikou xaptiou
1 TpaBnEte npoc ta eEw tnV kaoetaaeXpia va otuaatnoeI.
2 Suplete touc odnyouc xaploiowote va touc diaywipoe.
PiataoTov _i o8nyo xaptiou kai metakivnToTov 0to _i akpo.
3 TOnoTeTnOe WToypaqkoXapTi.
Register the cassette pa [OK]Next
Size: L
Type: Glossy
Xpónan Tnç λειToupyiac φαε
Avoioevxpwata nxpwatae pa8woeic
Stalla in skrivaren
1. Boxens innehaill
Stromkabel
FINE-kassetter
Installations-CD

Modularkabel
Open the cover and 1890 Discard the material
Prepare for connection [OK]Next

Ready to connect For details on how to cor
6-a
Ansluta till dator
Sök after "Canon PRINT" iApp Store.
Android
Sökefter"Canon PRINT"iGoogle Play.

For details on how to cor

Obs!
Register the cassette pa [OK]Next
Size: L Type: Glossy
Open the cover and 1890 Discard the material
Klikk pa Kjør Msetup4.exe (Run Msetup4.exe)
Hvis dialogboksen Brukerkontokontroll (User Account Control) vises, klikker du pa Ja (Yes).

For details on how to cor

Merk
Register the cassette pa [OK]Next
Size: L
Type: Glossy
Open the cover and 1890 Discard the material
Sog after "Canon PRINT" i App Store.
Android
Sog after "Canon PRINT" i Google Play.
Bemaerk
Du kan ogsa abne Canon-webstedet ved at scanne QR-koden, der vises til hore, og downloade appen derfra.

or details on how to cor

Bemerk
Register the cassette pa [OK]Next
Size: L
Type: Glossy
Brug af faxfunktionen
Open the cover and 1890 Discard the material
For details on how to cor

Huomautus
Register the cassette pa [OK]Next
Size: L
Type: Glossy