
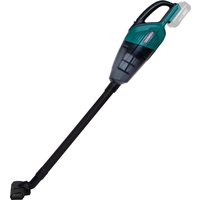
VC506AC - Vacuum Cleaner Vonroc - Free user manual and instructions
Find the device manual for free VC506AC Vonroc in PDF.

| Product type | Wet and dry vacuum with blower function |
| Brand | Vonroc |
| Model | VC506AC |
| Supply voltage | 220-240 V~ |
| Frequency | 50/60 Hz |
| Power consumption | 1400 W |
| Tank capacity | 20 L (dry 15 L, wet 12 L) |
| Filter for dry vacuuming | HEPA filter |
| Filter for wet vacuuming | Foam filter |
| Hose diameter | 32 mm |
| Air inlet diameter | 52 mm |
| Cable length | 6 m |
| Weight (with accessories) | 6 kg |
| Protection class | IPX4 |
| Suction pressure | 19 kPa |
| Airflow | 1.8 m³/min |
| Main functions | Dry vacuuming, wet vacuuming, blowing |
| Intended use | Household, workshop, vehicle, garage |
| Safety | Double insulation (class II), stop float in wet mode |
| Maintenance and cleaning | Clean filters with soapy water, empty tank after each use |
| Recommended spare parts | Dust bag VC805AA / VC809AA, HEPA filter, foam filter |
| Warranty | Legal warranty against manufacturing defects |
Frequently Asked Questions - VC506AC Vonroc
User questions about VC506AC Vonroc
0 question about this device. Answer the ones you know or ask your own.
Ask a new question about this device
Download the instructions for your Vacuum Cleaner in PDF format for free! Find your manual VC506AC - Vonroc and take your electronic device back in hand. On this page are published all the documents necessary for the use of your device. VC506AC by Vonroc.
USER MANUAL VC506AC Vonroc
1. SAFETY INSTRUCTIONS
Read the enclosed safety warnings, the additional safety warnings and the instructions. Failure to follow the safety warnings and the instructions may result in electric shock, fire and/or serious injury. Save the safety warnings and the instructions for future reference.
The following symbols are used in the user manual or on the product:

Read the user manual.

Denotes risk of personal injury, loss of life or damage to the tool in case of nonobservance of the instructions in this manual.

Risk of electric shock.

Immediately remove the mains plug from the mains if the mains cable becomes damaged and during cleaning and maintenance.

Class II machine - Double insulation - You don't need any earthed plug.

If the temperature of the material exceeds 40^ , there is a risk of fire.

Do not dispose of the product in unsuitable containers.

The product is in accordance with the applicable safety standards in the European directives.
SAFETY NOTES
THIS APPLIANCE CAN BE USED BY CHILDREN AGED FROM 8 YEARS AND ABOVE AND PERSONS WITH REDUCED PHYSICAL, SENSORY OR MENTAL CAPABILITIES OR LACK OF EXPERIENCE AND KNOWLEDGE IF THEY HAVE BEEN GIVEN SUPERVISION OR INSTRUCTION CONCERNING USE OF THE APPLIANCE IN A SAFE WAY AND UNDERSTAND THE HAZARDS INVOLVED. CHILDREN SHALL NOT PLAY WITH THE APPLIANCE. CLEANING AND USER MAINTENANCE SHALL NOT BE MADE BY CHILDREN WITHOUT SUPERVISION. IF THE SUPPLY CORD IS DAMAGED, IT MUST BE REPLACED BY THE MANUFACTURER, ITS SERVICE AGENT OR SIMILARLY QUALIFIED PERSON
IN ORDER TO AVOID A HAZARD. THE PLUG MUST BE REMOVED FROM THE SOCKETOUTLET BEFORE CLEANING OR MAINTAINING THE APPLIANCE.
1) Keep your work area clean: Cluttered work areas and workbenches are a source of injury.
2) The vacuum cleaner should be properly assembled before use.
3) Use only extension cords approved for outdoor use (when the vacuum is used outside) and make sure that they are always in good condition.
4) Protect the electric cables and, in particular, make sure that they are not crushed, pulled, or damaged by edges, sharp pieces, or moving parts; or damaged by corrosive liquids.
5) Do not use a damaged extension cord. Do not make any permanent or temporary repairs to the cable itself.
6) Do not use a vacuum cleaner that has a damaged electric cord. Have a new cable installed by an authorised service center.
7) Do not attach anything else to the socket, electric cords, or extension cord.
8) Before plugging your vacuum cleaner into the electrical outlet, make sure that the voltage and the outlet requirements match what is indicated on the label next to the cord.
9) Do not pull the device by the cord.
10) Your machine should always be turned off before unplugging it from the outlet or the extension cord.
11) Before leaving the device unsupervised (even for a brief time) turn it off and unplug it from the electrical outlet. This should also be done if there is a loss of power.
12) Do not underestimate its power. Always maintain a balanced and stable stance.
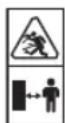
13) Keep children and pets away from the machine. When the machine is operating, everyone should stay at a safe distance.
14) The device should not be used by children or by persons who are not familiar with the device or who have not read this instruction manual.
15) The user of the device is responsible for the safety of others while using it.
16) The vacuum should only be used for its intended purposes.
17) Before performing any maintenance, adjustment or cleaning procedures on the vacuum cleaner, turn it off, unplug it from the electrical outlet, and wait for the motor to stop.
18) Be very careful when checking, cleaning, or performing maintenance on the device and wear thick work gloves to protect your hands.
19) Neither the security devices nor the electric cords should be modified or removed from the machine.
20) When using the machine, it should be kept steady and on a stable surface or supported by the body.
21) Only work in full daylight or with appropriate artificial light.
22) We recommend using some type of hearing protection for your ears.
23) If the machine vibrates abnormally, stop the motor and look for the cause immediately. Vibrations usually mean a problem.
24) The vacuum cleaner should be properly checked before each use. Do not use a machine that is not in perfect condition. If you notice a problem that could constitute a danger to the user, have the machine repaired before using it.
25) For safety reasons, replace worn or damaged parts. Use only manufacturer approved replacement parts. Parts from sources other than the manufacturer may not fit properly or may be dangerous or cause injuries. The power cord can only be replaced by specialized customer service centers.
26) Only use the vacuum cleaner in areas that are dry and protected from bad weather. Do not use it outside when it is raining.
27) Store the vacuum in a dry place, out of the reach of children.
28) Do not leave the power cord lying around once cleanup is done; someone could trip.
29) Take care when emptying extremely heavy tanks.
30) To avoid spontaneous combustion, empty the tank after every use.
31) Do not use this machine to vacuum up flammable or combustible liquids, such as gasoline, photocopier powder, or volatile substances; and do not use the machine in areas where these liquids are present. Do not vacuum up acids.
32) Do not vacuum up any materials that are toxic, cancer causing, combustible, or any other dangerous materials, such as asbestos, asbestos dust, arsenic, barium, beryllium, lead, pesticides, or any other substances hazardous to your health.
33) Extreme caution should be used when vacuuming up wood or charcoal, soot, cement,
plaster, or plasterboard dust. These particles are extremely fine and can pass through the filters affecting the motor's performance or be blown into the air. If necessary, therefore we strongly recommend a HEPA filter in combination with a dust collection bag when cleaning these types of materials.
34) Do not vacuum up anything that is burning or smoldering, such as cigarettes, cigarette butts, matches, or hot ashes.
35) Never vacuum up salt water; it may destroy the motor.
SAFETY WARNINGSPRECIFICFORBLOWING
a) Direct air discharge at work area only. Never at people or animals.
b) Risk of flying objects. Keep bystanders away from the work area.
c) Always wear safety goggles before using the blowing function.
Electrical safety
When using electric machines always observe the safety regulations applicable in your country to reduce the risk of fire, electric shock and personal injury. Read the following safety instructions and also the enclosed safety instructions.

Always check that the voltage of the power supply corresponds to the voltage on the rating plate label.

Class II machine - Double insulation - You don't need any earthed plug.
If operating a power tool in a damp location is unavoidable, use a residual current device (RCD) protected supply. Use of an RCD reduces the risk of electric shock.
2. MACHINE INFORMATION
Intended use
The vacuum cleaner is intended for domestic wet and dry vacuuming in, for example, the house, work room, car or garage. The vacuum cleaner is equipped with a blowing function. It can be used to blow dust and debris. The device is not suitable for commercial or industrial use.
TECHNICAL SPECIFICATIONS
| Model No. VC506AC | |
| Mains voltage 220-240V~ | |
| Mains frequency 50-60 Hz | |
| Power input 1.400W | |
| Cable length 6m | |
| Protection category IPX4 | |
| Suction force 19 kPA, 1.8 m³/min | |
| Container capacity approx. 20 L | |
| Useful volume dry approx. 15 L | |
| Useful volume wet approx. 12L | |
| Filter - dry HEPA filter | |
| Filter - wet Foam filter | |
| Hose system Ø32mm | |
| Diameter intake port (29 Fig. D) Ø52mm | Ø52mm |
| Recommended dust bag VC805AA / VC809AA | |
| Weight (incl. all accessories) approx. | 6kg |
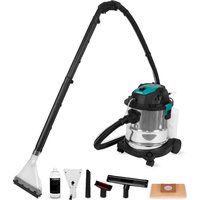
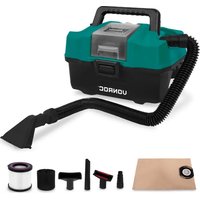
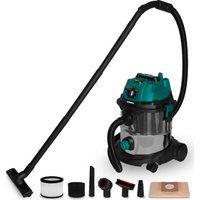
DESCRIPTION
The numbers in the text refer to the diagrams on pages 2-4.
- On/Off switch
- Carrying handle
- Blowing port
- Power cord storage
- Blow function adapter
- Top section
- Locking clamp
- Container
- Base
- Float
- Castor wheels
12.Drainage outlet
13.Drainage outlet cap - Vacuum port
15.Filter cage
16.Nozzles storage
17.Hose
18.Handle adapter
19.Removable handle
20.Suction tubes
21.Wet and dry floor nozzle - Round brush nozzle
23.Crevicenozzle
24.Car vacuum tool
25.Power tool adapter
26.Dust collection bag
27. HEPA filter
28.Foam filter
29.Intake port
3. ASSEMBLY

Before assembly, always switch off the machine and remove the mains plug from the mains.
- Press the container (8) on the base (9) as shown in Fig. B. Make sure the base (9) is securely fastened.
-
Fit the filter (27, 28). Ensure to mount the correct filter, depending on the application:
-
For dry vacuum cleaning, carefully slide the HEPA filter (27) over the filter cage (15) making sure the entire cage (15) is covered as shown in Fig. C-1.
-
For wet vacuum cleaning, carefully slide the foam filter (28) over the filter cage (15) making sure the entire cage (15) is covered as shown in Fig. C-2.
-
Place the top section (6) on the container (8).
-
Connect the suction hose (17).
-
For vacuuming (Fig. E), connect the suction hose (17) to the vacuum port (14).
For blowing (Fig. F, G), connect the suction hose (17) to the blowing port (3). -
Connect the handle (19) to the handle adapter (18). One or more suction tubes (20) can be fit to the handle (19) to extend it (fig. A).
- Connect the desired nozzle to the handle adapter (18), handle(19) or suction tubes (20).
Wet and dry floor nozzle (21)
The floor nozzle is designed for domestic wet and dry vacuuming in, for example, the house, work room, or garage.
Round brush nozzle (22)
The brush is designed to vacuuming solids from small areas.
Crevicenozzle (23)
The crevice nozzle is designed for domestic wet and dry vacuuming, edges and other areas that are difficult to access.
Car vacuum tool (24)
The brush is designed to vacuuming solids from small areas. For example from car seats.
Power tool adapter (25)
Adapter for connecting suction hose with a power tool.
4. OPERATION

If the vacuum cleaner accidentally tips over, the shut-off float (10) mechanism may cover the motor vacuum port and stop the suction. If this happens, simply stand the vacuum upright and turn it off until the float (10) returns to its normal position.
Switching on (Fig. A)

Do not vacuum without a filter!
- Fully unwind the suction hose (17).
- Connect the mains plug.
- Press the power switch (1) into the "ON/1" position to start your vacuum cleaner.
Switching off (Fig. A)
Press the power switch (1) into the "OFF/O" position to switch off your vacuum cleaner.
Dry vacuuming (Fig. A, C-E)

Clean the HEPA filter (27) regularly to maintain the suction power.

To avoid the HEPA filter (27) becoming clogged, we recommend the additional use of a dust collection bag (26).

Fine dust, such as dust from cement, soot and plaster are too fine to be used with only the HEPA filter (27) and risk getting into the motor and damaging it. Therefore we strongly recommend a dust collection bag (26) when cleaning these types of materials.

Clogged dust collection bag (26) can burst - therefore make sure to replace the dust collection bag in a timely manner!
- Press the power switch (1) into the "OFF/O" position and remove the mains plug from the mains.
- Unlock the locking clamp (7) and remove the top section (6).
- Before vacuuming, remove all dirt and debris from the container (8).
- Carefully slide HEPA filter (27) down over the filter cage (15) making sure the whole cage (15) is covered as shown in Fig. C-1.
-
For vacuuming with dust collection bag (26):
-
Hold the cardboard collar tightly and slide the rubber protective element as far as possible onto the intake port (29) as shown in Fig. D.
- When everything is in place, unfold the bag (26) out and position it around the inside walls of the container (8).
- Reattach the top section (6) again and lock the locking clamp (7).
- Insert one end of the hose (17) into the vacuuming port (14). Fully unwind the suction hose (17).
- Connect the mains plug.
- Press the power switch (1) into the "ON/I" position to start your vacuum cleaner.
- The machine now is ready to use for dry vacuum cleaning.
- Press the power switch (1) into the "OFF/O" position to switch off your vacuum cleaner.
Wet vacuuming (Fig. A, C, E, H)

The vacuum cleaner is equipped with a float (10). The suction power decreases when the maximum filling level is reached. Switch the vacuum cleaner off (1) immediately. Remove the plug from the socket and empty the container (8).

Clean the float (10) at regular intervals, and check it for damage. Otherwise, its function can be impaired.

Never reach into the water to be suctioned up. Danger of electric shock.

Immediately switch (1) the machine off if foam forms or liquids escape!

Do not use a dust collection bag (26)!
- Press the power switch (1) into the "OFF/O" position and remove the mains plug from the mains.
- Unlock the locking clamp (7) and remove the top section (6).
- Before wet vacuuming, remove the dust collection bag (26), the HEPA filter (27) and remove all dirt and debris from the container (8).
- Carefully slide foam filter (28) down over the filter cage (15) making sure the whole cage (15) is covered as shown in Fig. C-2.
- Reattach the top section (6) again and lock the locking clamp (7).
- Insert one end of the hose (17) into the vacuuming port (14). Fully unwind the suction hose (17).
- Connect the mains plug.
- Press the power switch (1) into the "ON/I" position to start your vacuum cleaner.
- The machine now is ready for wet vacuum cleaning.
- Press the power switch (1) into the "OFF/O" position to switch off your vacuum cleaner.
- Raise the hose (17) so that the liquids drains into the container (8).
- Empty the container (8) immediately after suction cleaning because it is not designed to store liquids.
Blow function (Fig. A, F, G)

Operation without the use of a filter is recommended.

Remove all dirt and debris from the container (8) before you use the blow function.

Always wear safety goggles before using the blowing function.
Risk of flying objects. Keep bystanders away from the work area.
Your vacuum cleaner is equipped with a blowing function. It can be used to blow dust and debris.
- Press the power switch (1) into the "OFF/O" position and remove the mains plug from the mains.
- Unlock the locking clamp (7) and remove the top section (6).
-
Before blowing, remove the dust collection bag (26), the filter (27, 28) and remove all dirt and debris from the container (8).
-
Reattach the top section (6) again and lock the locking clamp (7).
- Insert one end of the hose (17) into the blowing port (3) on top of machine. Fully unwind the suction hose (17).
- Connect the mains plug.
- Press the power switch (1) into the "ON/l" position to start your vacuum cleaner.
- The machine is now ready for blowing dust and debris.
- Press the power switch (1) into the "OFF/O" position to switch off your vacuum cleaner.
Finish operation (Fig. A)
- Turn off (1) the machine and disconnect the mains plug.
- Opening the drainage outlet (12) to allow the vacuumed liquid to drain out.
- Close the drain outlet (12).
- Remove the top section (6) and empty the container (8).
- Clean the machine with a soft cloth.
- Stow away the mains cable and accessory at the machine. Store the appliance in a dry room.
5. MAINTENANCE

Before cleaning and maintenance, always switch off the machine and remove the mains plug from the mains.
Clean the machine casings regularly with a soft cloth, preferably after each use. Make sure that the ventilation openings are free of dust and dirt. Remove very persistent dirt using a soft cloth moistened with soapsuds. Do not use any solvents such as gasoline, alcohol, ammonia, etc. Chemicals such as these will damage the synthetic components.
Container
Empty the container (8) immediately after suction cleaning because it is not designed to store liquids.
- Opening the drainage outlet (12) to allow the vacuumed liquid to drain out.
- Close the drain outlet (12).
- Remove the top section (6) and empty the container (8).
- Clean the machine with a soft cloth.
Filters (Fig. A)

For optimal performance it is recommended to regularly change the filters (17, 18) depending on level of use.
- Carefully remove HEPA (17) or foam (18) filter.
- Use a mild soap and water solution to clean the filter and afterwards rinse with clean water.
- Allow filter to air dry before installing and using again.
- Re-install the filter.
Float and filter cage (Fig. H)
Clean the float (10) and filter cage (15) regularly with a soft cloth, and check it for damage. Otherwise, its function can be impaired.
ENVIRONMENT

Faulty and/or discarded electrical or electronic apparatus have to be collected at the appropriate recycling locations.
Only for EC countries
Do not dispose of power tools into domestic waste. According to the European Guideline 2012/19/EC for Waste Electrical and Electronic Equipment and its implementation into national right, power tools that are no longer usable must be collected separately and disposed of in an environmentally friendly way.
WARRANTY
VONROC products are developed to the highest quality standards and are guaranteed free of defects in both materials and workmanship for the period lawfully stipulated starting from the date of original purchase. Should the product develop any failure during this period due to defective material and/or workmanship then contact VONROC directly.
The following circumstances are excluded from this guarantee:
- Repairs and or alterations have been made or attempted to the machine by unauthorized service centers;
Normal wear and tear;
The tool has been abused, misused or improperly maintained; - Non-original spare parts have been used.
This constitutes the sole warranty made by company either expressed or implied. There are no other warranties expressed or implied which extend beyond the face thereof, herein, including the implied warranties of merchantability and fitness for a particular purpose. In no event shall VONROC be liable for any incidental or consequential damages. The dealers remedies shall be limited to repair or replacement of nonconforming units or parts.
The product and the user manual are subject to change. Specifications can be changed without further notice.
VEILIGHEIDSWAARSCHUWINGEN
DIT APPARAAT MAG WORDEN GEBRUIKT DOOR KINDEREN VANAF 8 JAAR EN DOOR PERSONEN MET VERMINDERDE LICHAMELIJKE, ZINTUIGLIJKE OF GEESTELIJKE VERMOGENS, OF MET EEN GEBREK AAN ERVARING EN KENNIS, MITS ZIJ ONDER TOEZICHT STAAN OF GEINSTRUEERD ZIJN BETREFFENDE HET VEILIG GEBRUIK VAN HET APPARAAT EN ZICH BEWUST ZIJN VAN DE ERMEE VERBONDEN RISICO'S. KINDEREN MOGEN NIET MET HET APPARAAT SPELEN. REINIGING EN GEBRUIKERSONDERHOUD MOGEN NIET DOOR KINDEREN ZONDER
TOEZICT WORDEN UITGEVOERD. OM GEVAARLIJKESITUATIES TE VOORKOMEN MOET HET NETSNOERDOOR DE FABRIKANT, ZIJN SERVICEMDEWERKERS OF ANDERE GEKWALIFICEERDE PERSONENWORDEN VERVANGEN ALS HET IS BESCHADIGD. DESTEKKER MOET UIT HET STOPCONTACT WORDENGETROKKEN VOORDAT U HET APPARAAT REINIGTOF ONDERHOUD UITVOERT.
2.INFORMATIONSRELATIVES A LA MACHINE
Utilisation prevue
- SAFETY INSTRUCTIONS
- SAFETY NOTES
- SAFETY WARNINGSPRECIFICFORBLOWING
- Electrical safety
- MACHINE INFORMATION
- Intended use
- DESCRIPTION
- ASSEMBLY
- Wet and dry floor nozzle (21)
- Round brush nozzle (22)
- Crevicenozzle (23)
- Car vacuum tool (24)
- Power tool adapter (25)
- OPERATION
- Switching on (Fig. A)
- Switching off (Fig. A)
- Dry vacuuming (Fig. A, C-E)
- Wet vacuuming (Fig. A, C, E, H)
- Blow function (Fig. A, F, G)
- Finish operation (Fig. A)
- MAINTENANCE
- Container
- Filters (Fig. A)
- Float and filter cage (Fig. H)
- ENVIRONMENT
- Only for EC countries
- WARRANTY
- VEILIGHEIDSWAARSCHUWINGEN
- 2.INFORMATIONSRELATIVES A LA MACHINE
- Utilisation prevue
Brand : Vonroc
Model : VC506AC
Category : Vacuum Cleaner