
HR4345 - Air purifier PHILIPS - Free user manual and instructions
Find the device manual for free HR4345 PHILIPS in PDF.
User questions about HR4345 PHILIPS
0 question about this device. Answer the ones you know or ask your own.
Ask a new question about this device
Download the instructions for your Air purifier in PDF format for free! Find your manual HR4345 - PHILIPS and take your electronic device back in hand. On this page are published all the documents necessary for the use of your device. HR4345 by PHILIPS.
USER MANUAL HR4345 PHILIPS
natural_image
Black-and-white photo of a Philips air conditioner unit with digital display and leaf graphics in the background (no text or symbols on main body)English Page 4
- Keep page 3 open when reading these operating instructions.
Français Page 10
Cigarettes, cigars and pipes produce a smoke which contains microscopic particles (approx. 0.18 micron) and around 3000 different gases.
Your Philips Air Cleaner helps you clean the air effectively by catching 90% of gases and 95% of particles produced by smoking.
How does the Philips Air Cleaner work?
The Air Cleaner takes air from the room and directs it through the filter system.
After cleaning, the purified air is blown back into the room towards the ceiling.
For optimum removal of gases and particles from the air, the appliance employs a sophisticated 3-stage Air Cleaner filter:
① Pre-filter
The Pre-filter catches the larger dust particles floating in the air, such as fluff and hairs.
② Hepa filter
This filter takes out all the smaller airborne particles.
The filter is made from glass fibres closely matted such that particles cannot pass through.
Similar filters are used in most hospital operating rooms.
③ Carbon filter
The last filter is the Carbon filter.
Activated Carbon is the only material which can effectively adsorb gases.
This Air Cleaner can be set to automatically select the correct speed of air cleaning.
The appliance is equipped with a 24-hour clock and a timer which make it possible to select a timespan after which the appliance will switch off.
An indicator light will light up when the Carbon filters need replacement.
Positioning
natural_image
Simple line drawing of a room with windows, a sink, and a railing (no text or symbols)
text_image
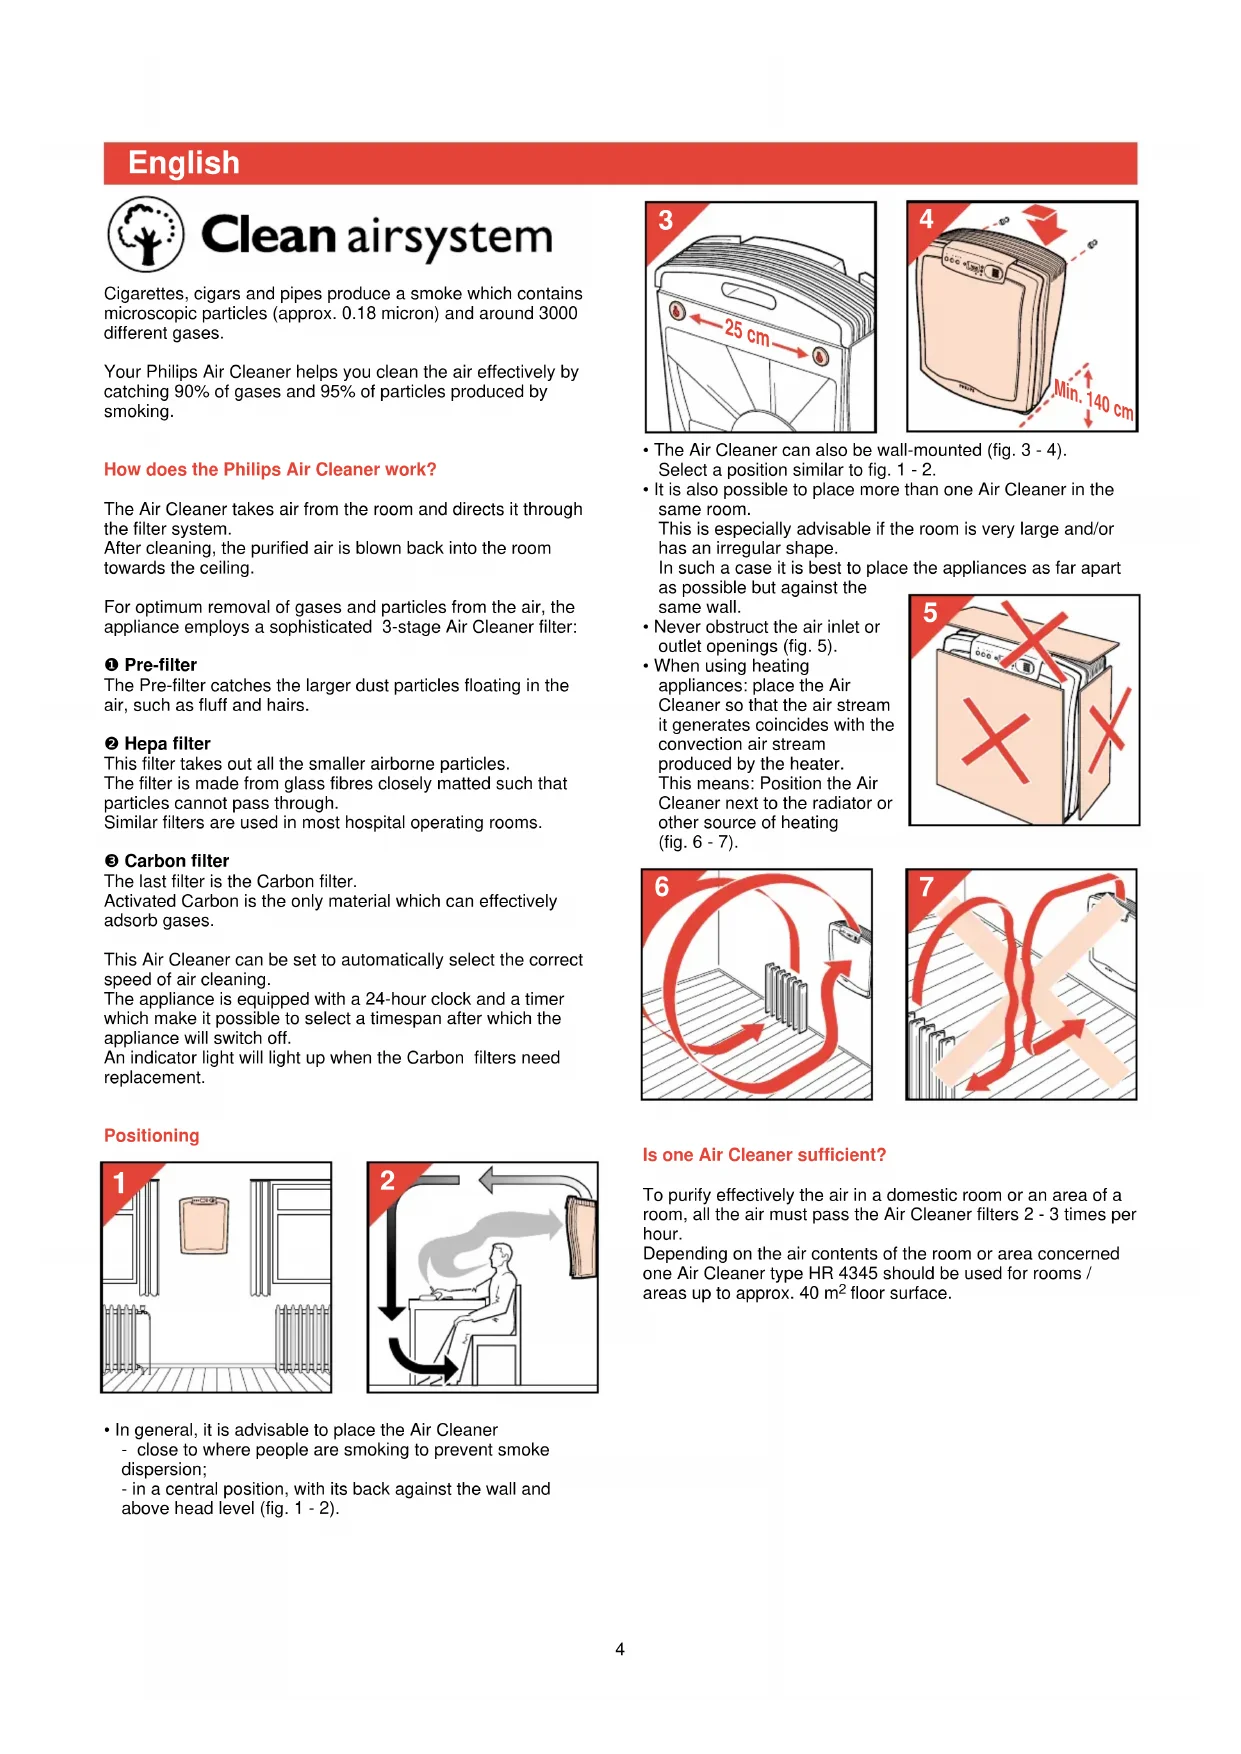
2- In general, it is advisable to place the Air Cleaner - close to where people are smoking to prevent smoke dispersion; - in a central position, with its back against the wall and above head level (fig. 1 - 2).

text_image
3 ← 25 cm →
text_image
4 Min. 140 cm- The Air Cleaner can also be wall-mounted (fig. 3 - 4). Select a position similar to fig. 1 - 2.
- It is also possible to place more than one Air Cleaner in the same room. This is especially advisable if the room is very large and/or has an irregular shape. In such a case it is best to place the appliances as far apart as possible but against the same wall.
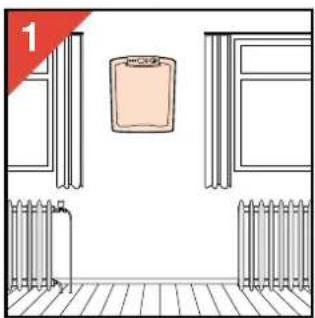
- Never obstruct the air inlet or outlet openings (fig. 5).
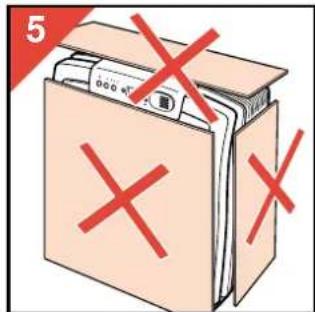
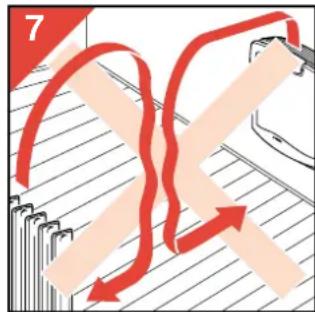
- When using heating appliances: place the Air Cleaner so that the air stream it generates coincides with the convection air stream produced by the heater. This means: Position the Air Cleaner next to the radiator or other source of heating (fig. 6 - 7).
text_image
5 X X
text_image
6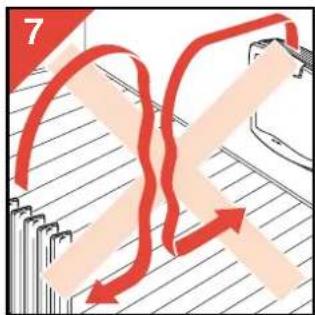
flowchart
graph TD
    A["7"] --> B["Process Step"]
    B --> C["Layer 1"]
    B --> D["Layer 2"]
    B --> E["Layer 3"]
    B --> F["Layer 4"]
    B --> G["Layer 5"]
    B --> H["Layer 6"]
    B --> I["Layer 7"]
Is one Air Cleaner sufficient?
To purify effectively the air in a domestic room or an area of a room, all the air must pass the Air Cleaner filters 2 - 3 times per hour.
Depending on the air contents of the room or area concerned one Air Cleaner type HR 4345 should be used for rooms / areas up to approx. 40 m² floor surface.
Important
- Read these instructions in conjunction with the illustrations before using the appliance. (Also see fold-out page 3.)
- Do not immerse the appliance in water or other liquids.
- Do not use the appliance outdoors or in a humid environment.
- The appliance can be cleaned with a damp cloth. First remove the mains plug from the wall socket.
- When disassembling: do not touch moving parts. Allow the fan to stop in its own time.
- Use only the original Philips filters and carbon material.
- Do not obstruct the air inlet and air outlet grilles. Do not place the appliance on a soft surface such as a bed or couch.
- Keep the mains cord away from heated surfaces.
- If the mains cord of this appliance is damaged, it must only be replaced by Philips or their service representative, as special tools and/or parts are required.
• The appliance has an influence upon the air circulation in the room. In general, it is not advisable to use it near an open hearth fire.
• After a power failure first switch the appliance on. After this the clock and the timer can be reset.
- Do not expose the smoke sensor to a direct heat source or strong smells. For example, do not use the air cleaner as a suction device over the cooker.
- Do not direct an aerosol spray in the direction of the smoke sensor.
- Switch off the "Auto" function if you leave the room where the appliance is placed for a long time.
- Save these instructions for further reference.
General description (fig. 8)
Air inlets (3)
B Pre-filter
© Hepa filter
D Carbon filters (2)
E Control panel
F Air outlet
G Handle
H Cord storage
Fan
Description of the control panel (fig. 9)
On/Off button with indicator light
On/Off button for automatic operation ("Auto") with indicator light
Speed control with indicator lights
1 = low speed
2 = normal speed
turbo= high speed
Button for setting the timer and clock
N Display
Buttons for setting the time (up and downwards)
P Button 'reset' of Carbon filters replacement indicator
Carbon filters replacement indicator (indicator light)
R Smoke sensor
Switch for adjusting the smoke sensor
▲for small rooms (up to ± 20 m²)
▲ for larger rooms (up to ± 40 m²)
Making ready for use
- Fill the carbon filters with the granules provided. Please refer to section "Replacing the carbon filter granules" (fig. 43-51).
- Insert the mains plug into a wall socket. The indicator light above the on/off button, the digits (00:00) and the clock symbol ⚙start flashing. (This will also happen
after a power failure.)
The display is not illuminated.
- Press the on/off switch (fig. 10).
The appliance starts operating at speed 1 and the display lights up orange.
The indicator light above the on/off button remains on to indicate that the appliance is switched to the "on" position.

text_image
10 AUTO SPEED SETTING TIME SETTINGS ClearManual setting
text_image
11 AUTO AUTO SETTING AUTO SETTING Close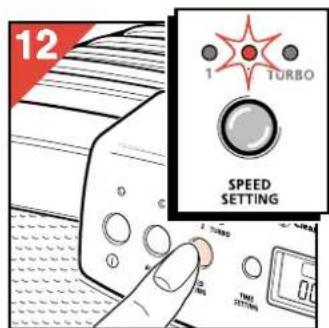
text_image
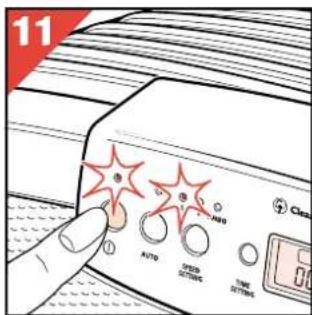
12 1 TURBO SPEED SETTING 2 Turbo 3 GPS TIME SETTING- Switch the appliance on (fig. 11)
The indicator light above the on/off button comes on and the display lights up orange. The appliance starts operating at speed 1.
- Select speed 1, 2 or "Turbo" by pressing the speed selector (fig. 12).
The indicator lights will indicate the selected speed.
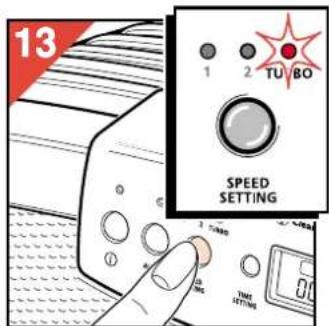
- For quick air cleaning, first set the speed selector to the "Turbo" setting (fig. 13).
After approximately half an hour, set the switch to speed 2.
- To maintain clean, fresh air in your room all the time, you can run your machine continuously on speed 1 or 2, depending on room size and the degree to which the air tends to contaminate.
text_image
13 1 2 TU BO SPEED SETTING 1000000000000000000000000000000000000000000000000000000000000000000000000000000000000000000"Auto function"
The "Auto" function ensures that the Air Cleaner automatically selects the optimum speed to remove smoke from the air effectively.
The built-in smoke sensor (R) detects the concentration of smoke in the room where the Air Cleaner has been placed.
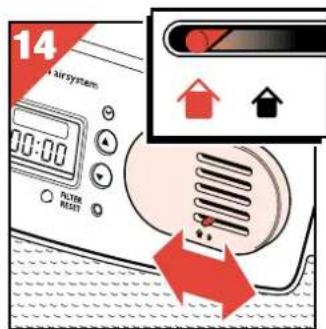
- For proper sensing, set the slide switch (S) to the correct
text_image
14 Air System 0:00 FILTER RESETposition for small (▲) or larger (▲) room (fig. 14). According to the concentration of smoke the Air Cleaner automatically selects a higher or a lower speed.
Setting the "Auto function"
text_image
15 AUTO FISD ATTING TIME ATTING
text_image
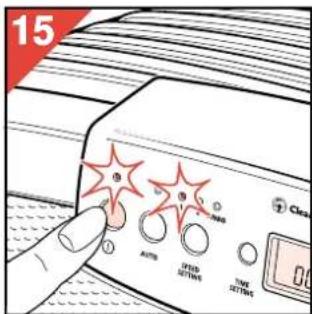
16 AUTO I TUBO SPEED SETTINGS TIME SETTINGS- Switch the appliance on (fig. 15)
The indicator light above the on/off button comes on and the display lights up orange.
The appliance starts operating at speed 1.
- Press the "Auto" button (fig. 16).
If you selected "Auto" within the first three minutes after you switched the appliance on, the "Auto" indicator light will flash orange for a max. of three minutes while it measures the air quality in the room.
text_image
17 AUTO SPEED SETTING 2 TURNO TIME SETTING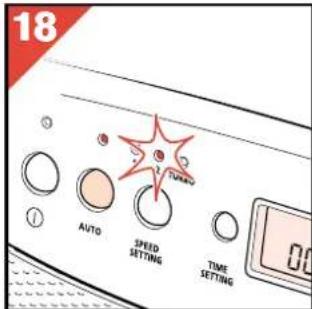
text_image
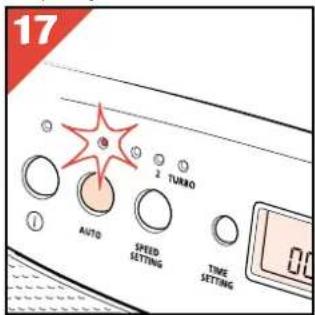
18 AUTO SPEED SETTING TIME SETTING- If the air is clean, the Air Cleaner switches to the stand-by position and the "Auto" indicator light will turn green (fig. 17). The indicator light above the on/off button will remain on.
- If the smoke sensor detects pollution, the "Auto" indicator light will remain orange continuously and the appliance will switch automatically to speed 1, 2 or turbo (fig. 18).
- If you wish to quit the "Auto" function, press the "Auto" button again.
The indicator light above this button will go out.
How to set the clock
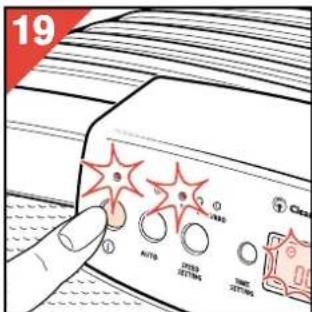
- When connecting the Air Cleaner to the mains (and also after a power failure) the clock must be set (again). The indicator light above the on/off button, the clock symbol and the digits (☐☐:☐☐) will flash to indicate this.
Switch the appliance on (fig. 19) The clock symbol ⊙ and the digits (☐☐:☐☐) remain flashing. The display lights up.
text_image
19 AUTO AUTO SETTING TIME SETTING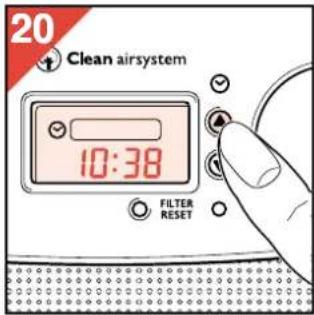
text_image
20 Clean airsystem 10:38 FILTER RESET
text_image
21 Clean airsystem 10:38 FILTER RESET- Press button ▲ or button ▼ to set the time (fig. 20).
The digits will scroll faster if you press and hold the button pressed-in longer.
- The clock time and the clock symbol Ⓧ in the display will no longer flash (fig. 21).
- Press the "time setting" button (M) to initiate the clock (fig. 22).
The clock symbol Ⓧ goes out. The colon flashes to indicate that the clock is operating.

text_image
22 TURBO TIME SETTING Clean airsystem 10:38 FILTER RESETHow to change the set clock time
text_image
23 AUTO SPEED OPTIONS TIME OPTIONS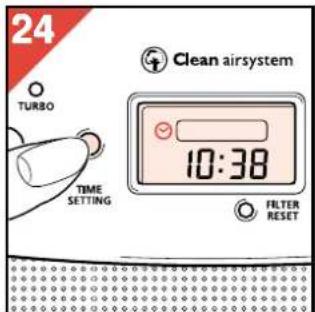
text_image
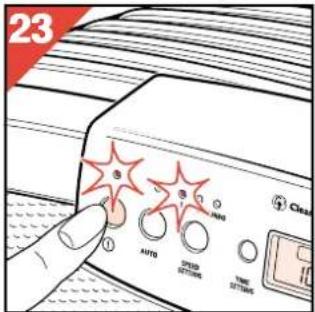
24 TURBO TIME SETTING Clean airsystem 10:38 FILTER RESET- Switch the appliance on (fig. 23)
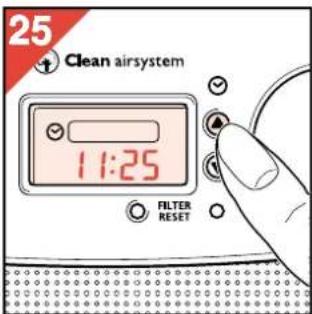
- Press the "time setting" button (M) (fig. 24). The clock symbol ⏻ becomes visible.
text_image
25 Clean airsystem 11:25 FILTER RESET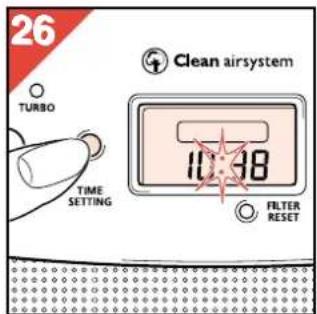
text_image
26 TURBO TIME SETTING Clean airsystem 10:38 FILTER RESET- Press button ▲ or button ▼ to set the new time (fig. 25). (See "Setting the time of day".)
- Finally press the "time setting" button (M) again (fig. 26).
Timer
• Using the timer, you can set how long and at what speed you wish the Air Cleaner to operate.
You can use this function e.g. if you want to use the Air Cleaner for a number of hours during or after smoking. You may also find the timer handy if you often use the appliance for the same period of time.
After switching on, the timer counts down the set operating time and then switches the Air Cleaner off.
- You can program the Air Cleaner in the "Auto" function or in a speed you select.
How to set/change the timer setting
text_image
27 AUTO SPEED TICK TICK CNC
text_image
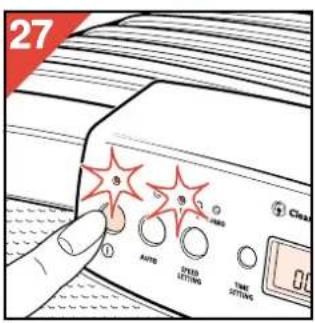
28 OFF TURBO AIRSYSTEM OFF 0:00 TIME SETTING FILTER RESET- Switch the appliance on (fig. 27)
- Select the required speed.
("Auto" or with the manual speed selector.)
- Press the "time setting" button (M) twice (fig. 28).
text_image
29 Clean airsystem 8:00 FILTER RESET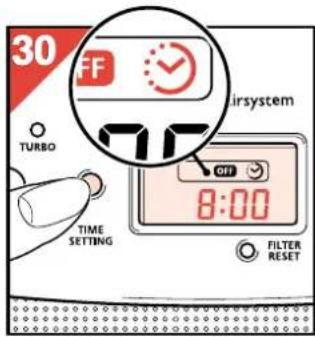
text_image
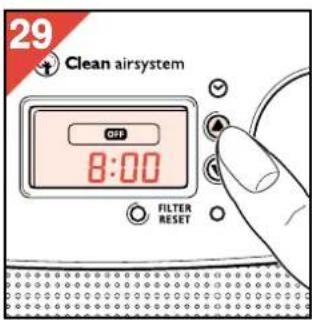
30 OFF TURBO 77 airsystem OFF 8:00 TIME SETTING FILTER RESETThe "OFF" symbol comes on and the display shows 0:00 or the previously set operating time.
- Press button ▲ or button ▼ to set the operating time with one minute precision (fig. 29).
- Press the "time setting" button (M) (fig. 30).
The "OFF" symbol remains visible. The timer symbol ⚙ comes on as well.
After 3 seconds the colon starts flashing to indicate that the timer is counting down from the set time.
- Please note: If the timer symbol 😊 has started flashing and/or has disappeared, this denotes that the setting was not successful.
If this happens, try again to set the timer.
- When the set operating time has elapsed, the Air Cleaner will switch off.
The display lighting, the indicator light above the on/off button, "OFF" symbol and the timer symbol ⏻ will go out.
- After switching off the timer, the program remains stored in the memory.
You can re-activate the program using the "time setting" button (M). (See section "Fast timer setting".)
How to switch off the timer
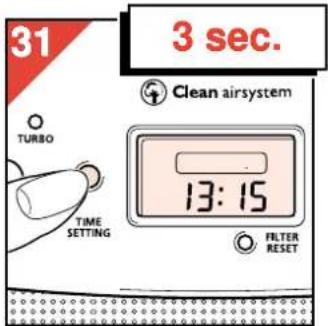
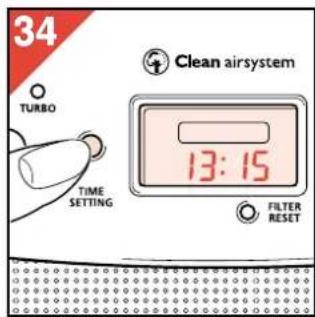
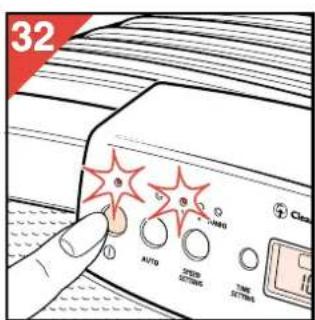
- To switch off the timer (prematurely), press and hold the "time setting" button (M) for at least 3 seconds (fig. 31).
The clock time will appear in the display.
text_image
31 3 sec. TURBO TIME SETTING Clean airsystem 13:15 FILTER RESET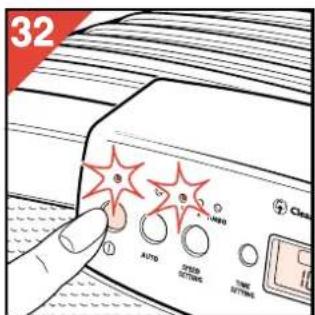
text_image
32 AUTO CLOCK TIME UTIONS Close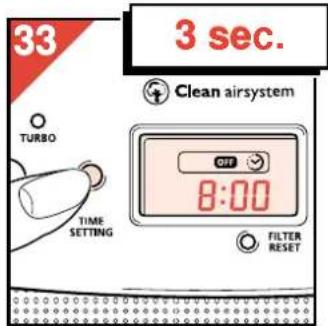
text_image
33 3 sec. Clean airsystem TURBO TIME SETTING 8:00 FILTER RESETFast timer setting
If you had previously programmed an operating time for the appliance, you can use this setting again quickly and simply:
- Switch the appliance on (fig. 32)
- Press and hold the "time setting" button (M) (at least for 3 seconds) until "OFF" and the timer symbol ⚙ come on (fig. 33).
The previously set operating time will become visible. The counting down begins.
Watching the clock while the timer is counting down
You can watch the clock time while the timer is counting down the operating time, by pressing the "time setting" button (M) once (fig. 34). The normal clocktime will be briefly displayed. Then the count down will return in the display.
text_image
34 TURBO TIME SETTING Clean airsystem 13:15 FILTER RESETHow to clean or replace filters
- Remove and clean the pre-filter at least every two months.
- Remove and replace the Carbon filter granules when the filter replacement indicator comes on.
- Remove and replace the Hepa filter every second time when you replace the Carbon filter granules.
- Check the filters right away if the appliance becomes noisier. Clean and/or replace the filters if necessary.
- It may be necessary to clean or replace the filters more frequently. This depends on the condition of the air to be filtered.
text_image
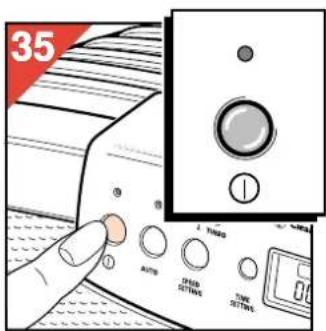
35 AUTO SPEED SETTING TIME SETTING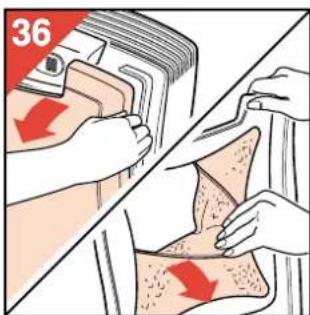
text_image
36Removing the filters
text_image
37- Switch the appliance off (fig. 35).
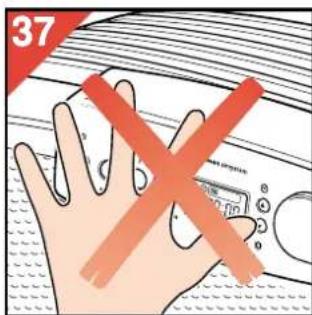
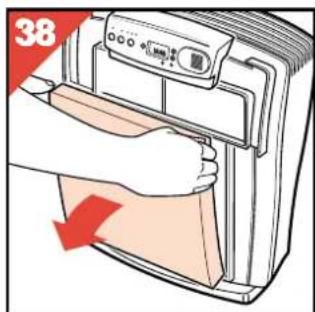
- Remove the front cover with the pre-filter (fig. 36). Please note: Do not push against the control panel when pulling off the front cover (fig. 37).
- Remove the Hepa filter (fig. 38).
- Remove the Carbon filters (fig. 39).
- To place the filters back reverse this process.
text_image
38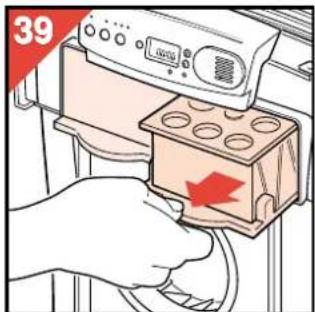
text_image
39Safety lock
The front grill has a safety lock.
This lock switches the motor off if the cover is removed while
text_image
40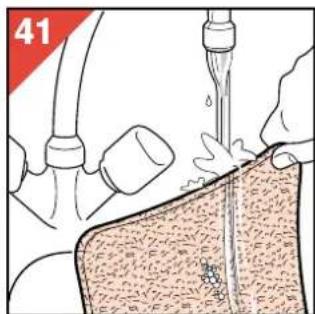
natural_image
Illustration of a hand washing a textured surface with a pipe, no text or symbols presentthe Air Cleaner is still switched on.
Cleaning the Pre-filter
- Wash (fig. 40) or vacuum clean the Pre-filter. You can remove fluff or hairs e.g. using a soft brush.
- If washed with a detergent, rinse the filter with clean warm water (fig. 41).
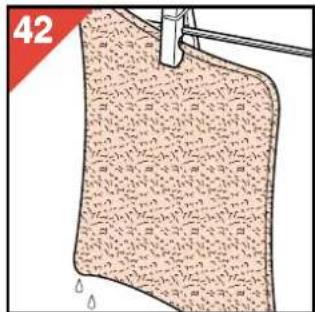
- Allow the filters to air-dry thoroughly (fig. 42) before reassembly.
natural_image
Illustration of a fabric or material sample with a pointed tip and textured fill, no visible text or symbolsReplacing the Hepa filter
Remove and replace the Hepa filter every second time when you replace the Carbon filter granules.
New Hepa filters are available at your dealer under number HR 4940.
Replacing the Carbon filters granules
- Remove and replace the Carbon filters when the Carbon filter replacement indicator (Q) starts flashing (firstly) or is on
text_image
43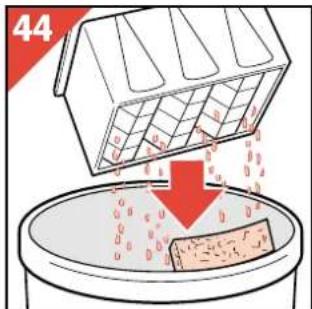
text_image
44continuously (later).
Do not forget to reset the indicator when ready. (See "Resetting the Carbon filter replacement indicator".)
natural_image
3D diagram of a rectangular container with internal cavities and triangular cutouts, placed on a surface (no text or symbols)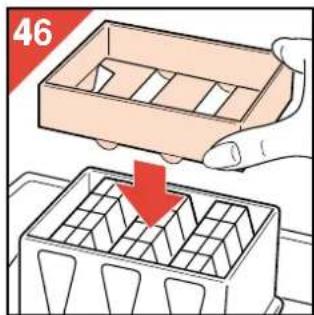
text_image
46- New carbon granules are available at your dealer under number HR 4941.
natural_image
Illustration of a hand using scissors to cut a piece of tissue, no text or symbols present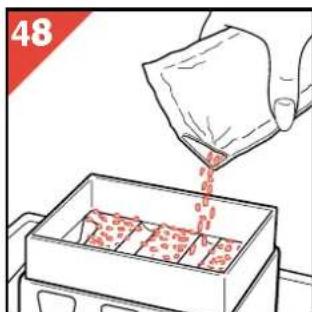
natural_image
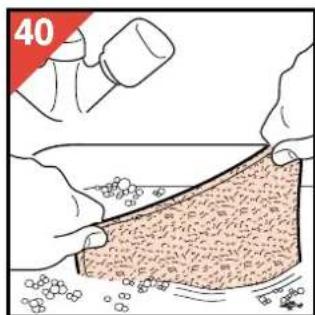
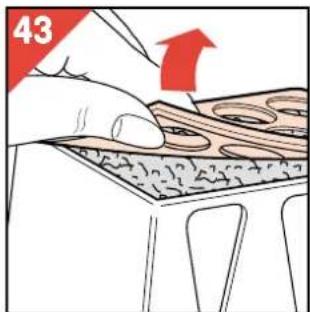
Illustration of a hand pouring red liquid into a container with red contents (no text or symbols)- Carefully remove the lid (fig. 43).
- Tip out the foam screen and the old carbon granules into a disposal bin (fig. 44).
text_image
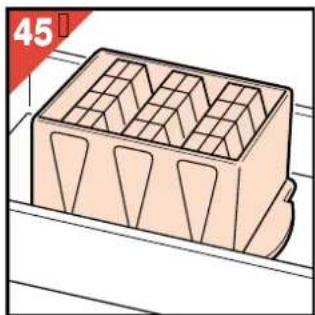
49Place the filter case into the box (fig. 45).
- Fit the card funnel on to the filter case (fig. 46).
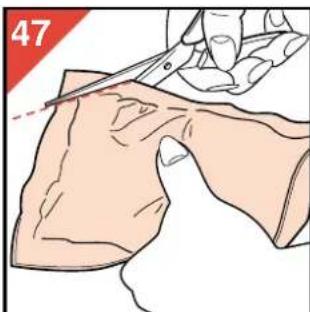
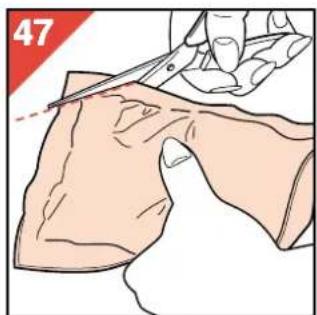
- Cut off the corner of the poly bag which contains the new carbon granules (fig. 47).
- Pour in a complete bagful of new carbon granules (fig. 48).
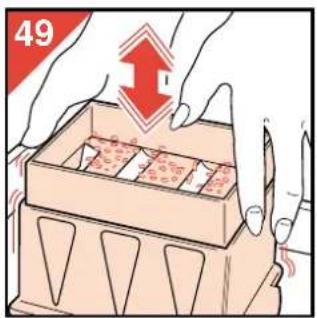
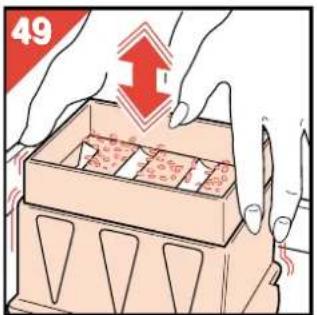
- Tap and shake the filter case to settle the contents (fig. 49).
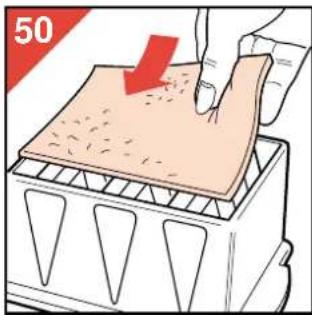
- Place a new foam screen over the carbon granules (fig. 50).
- Refit the lid (fig. 51).
- Repeat this procedure for the other Carbon filter.
natural_image
Illustration of a hand pressing down on a textured surface with a red arrow indicating compression (no text or symbols)
natural_image
Hand placing a chocolate chip into a silicone mold with a red arrow indicating the process (no text or symbols)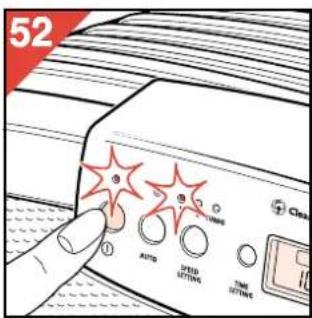
text_image
52 AUTO AUTO AUTO Close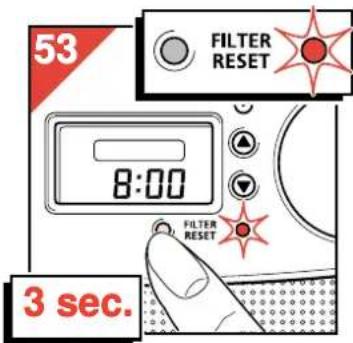
text_image
53 FILTER RESET 8:00 FILTER RESET 3 sec.Resetting the Carbon filters replacement indicator
After replacing the Carbon filters, the Carbon filters replacement indicator needs resetting:
- Switch the appliance on (fig. 52)
- Press and hold the Carbon filters reset button (P) during at least 3 seconds (fig. 53).
The indicator light stays (or comes) on.
After some time it will go out to indicate that the indicator has been reset.
Automatic overheating safety device
To prevent damage and reduce safety risks the overheating safety device switches off the fan motor if it becomes too hot.
text_image
54 TURBO SPEED SETTINGS TIME SETTINGS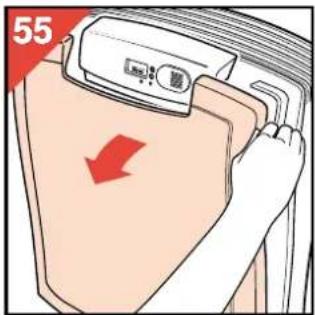
text_image
55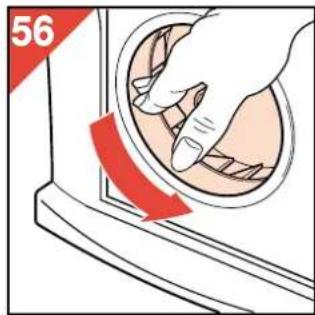
text_image
56To indicate that the appliance is still in switched-on position and connected to the mains, the indicator light will remain on.
If this happens:
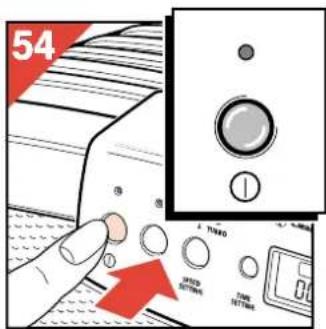
- Switch the appliance off (fig. 54).
(The indicator light goes out.)
- Remove the mains plug from the wall socket.
- Wait for the motor to cool down (approx. 15 minutes).
- Remove the front cover (fig. 55). Check that the filters are not blocked and that nothing is obstructing the airflow.
- Check that the fan can rotate freely if moved by hand (fig. 56).
- Close the appliance. Put the mains plug back into the wall socket and switch on.
If the automatic overheating device is activated repeatedly, it is advisable to take the appliance to your dealer for technical inspection.
For U.K. only:
Fitting a different plug
This appliance is fitted with a BS 1363 13 Amp. plug. Should you need to replace the plug, connect the wires as follows:
Brown wire to the Live (L) terminal of the new plug. Blue wire to the Neutral (N) terminal of the new plug.
Always fit the same value of fuse as that originally supplied with your appliance. Only use BS 1362 approved fuses.
As a guide only: Appliances under 700 W can have a 3 Amp. fuse (red) and all others should have a 13 Amp. fuse (brown).
When disposing of an old plug (particularly the moulded type which has been cut from the mains cord) always remove the
Français

Clean airsystem
natural_image
Simple line drawing of a room with windows, a door, and a wall-mounted fence (no text or symbols)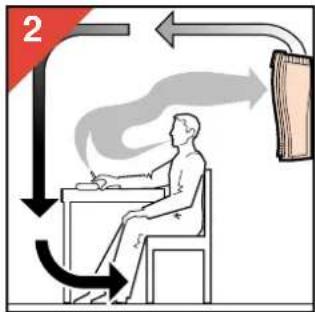
text_image
2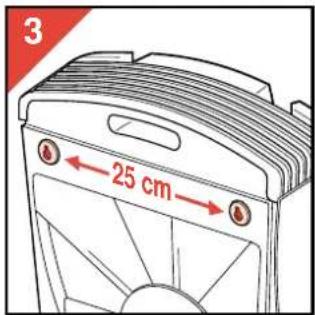
text_image
3 ← 25 cm →
text_image
4 600 - Comp Min. 140 cmnatural_image
Abstract diagram with red curved arrows and striped background, no readable text or symbolstext_image
10 AUTO SPEED OPTIONS SETTINGS TIME OPTIONSRéglage manuel

text_image
11 AUTO SPEED SETTING TIME SETTING Cleartext_image
27 AUTO SPEED OPTIONS TIME OPTIONS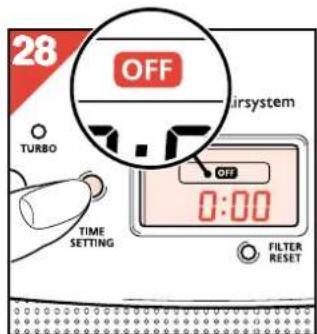
text_image
28 OFF TURBO 0:00 TIME SETTING FILTER RESETnatural_image
Illustration of a fabric or material sample with a pointed tip and textured fill, no visible text or symbolsnatural_image
Illustration of a wooden box with internal geometric cutouts, placed on a surface (no text or symbols)
text_image
46natural_image
Illustration of a hand using scissors to cut a piece of tissue, no text or symbols present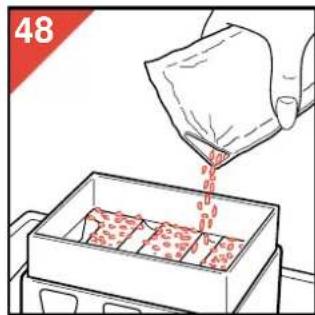
natural_image
Illustration of a hand pouring red liquid into a container with scattered contents (no text or symbols)natural_image
Illustration of a hand pressing down on a textured surface with a red arrow indicating downward motion (no text or symbols)natural_image
Hand using a finger to apply material to a silicone mold with circular cavities (no text or symbols visible)text_image
53 FILTER RESET 8:00 FILTER RESET 3 sec.natural_image
Interior layout diagram showing room furniture including a wall-mounted fan, windows, and a cabinet (no text or symbols)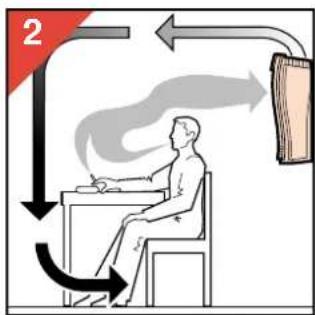
text_image
2
text_image
3 ← 25 cm →
text_image
4 Min. 140 cmtext_image
16 AUTO I VANDO UNITED SETTING TAIN SETTINGnatural_image
Illustration of a fabric or material sample with a droplet and label '42' (no readable text or symbols)natural_image
Illustration of a wooden crate with internal compartments and side cutouts, no text or symbols present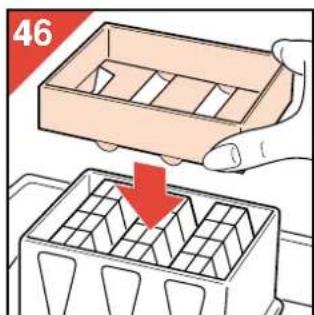
text_image
46natural_image
Illustration of a hand using scissors to cut a tissue sample, no text or symbols present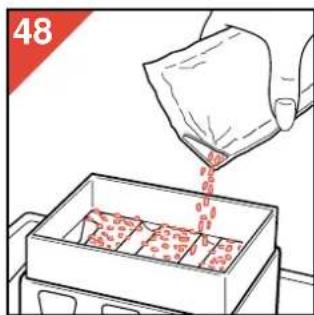
natural_image
Illustration of a hand pouring red liquid into a container with patterned contents (no text or symbols)natural_image
Illustration of a hand pressing down on a textured surface with a red arrow indicating downward motion (no text or symbols)
natural_image
Hand pressing down on a silicone baking mold with circular cavities (no text or symbols visible)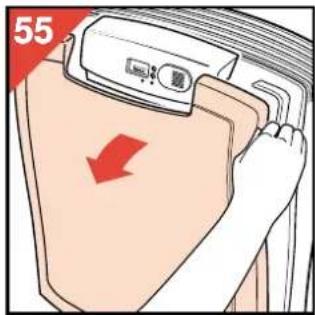
text_image
55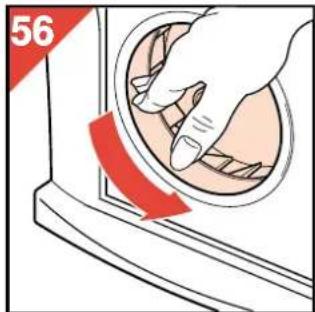
text_image
56text_image
53 FILTER RESET 8:00 FILTER RESET 3 sec.natural_image
Interior layout diagram showing room furniture including a wall-mounted sink and a cabinet, with no visible text or symbols.
text_image
2
text_image
3 ← 25 cm →
text_image
4 600 - Comp Min. 140 cmtext_image
23 AUTO SPEED OPTIONS TIME OPTIONS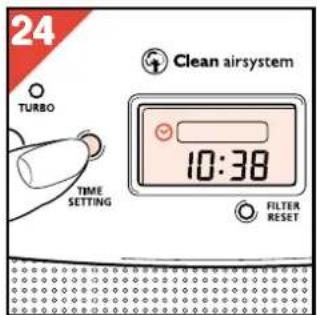
text_image
24 TURBO TIME SETTING Clean airsystem 10:38 FILTER RESETnatural_image
Illustration of a hand pouring liquid into a container with a pipe, no text or symbols presentnatural_image
Illustration of a fabric or material sample with a droplet and label '42' (no readable text or symbols)natural_image
Illustration of a wooden box with internal compartments and triangular cutouts, placed on a surface (no text or symbols)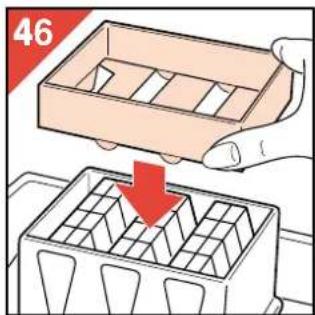
text_image
46natural_image
Illustration of a hand using scissors to cut a piece of tissue, no text or symbols present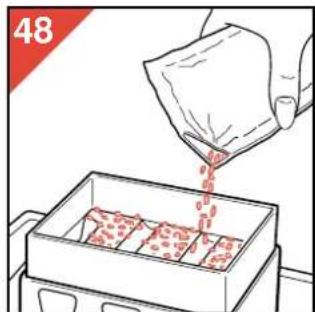
natural_image
Illustration of a hand pouring red liquid into a container with food items (no text or symbols)natural_image
Illustration of a hand pressing down on a textured surface with a red arrow indicating downward motion (no text or symbols)
natural_image
Hand placing a red arrow into a silicone baking mold with circular cavities (no text or symbols)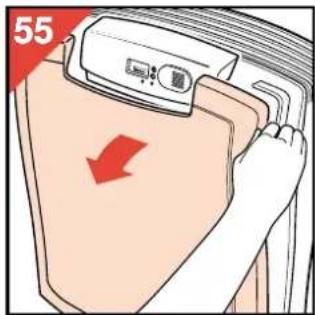
text_image
55
natural_image
Illustration of a hand using a tool to clean or adjust a circular object, with a red arrow indicating rotation (no text or symbols)text_image
53 FILTER RESET 8:00 FILTER RESET 3 sec.natural_image
Interior view of a room with windows, a hanging bag, and a metal fence (no text or symbols)
text_image
2text_image
3 ← 25 cm →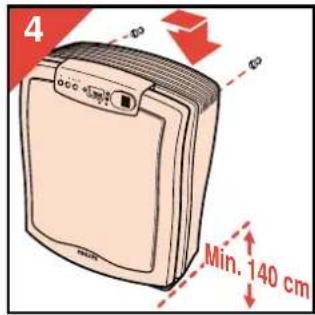
text_image
4 Min. 140 cmnatural_image
Abstract illustration of red curved lines crossing over a striped background (no text or symbols)natural_image
Illustration of a fabric or material sample with no visible text or symbols, showing texture and a small symbol (no readable text or labels)natural_image
Illustration of a wooden crate with internal compartments and side cutouts, placed on a surface (no text or symbols)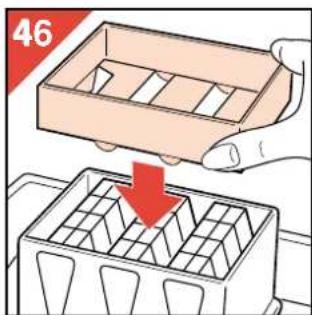
text_image
46natural_image
Illustration of a hand using scissors to cut a piece of tissue, no text or symbols present
natural_image
Illustration of a hand pouring red liquid into a container with scattered contents (no text or symbols)natural_image
Illustration of a hand pressing down on a textured surface with a red arrow indicating compression (no text or symbols)text_image
53 FILTER RESET 8:00 FILTER RESET 3 sec.natural_image
Simple line drawing of a room with a sink, windows, and a railing (no text or symbols)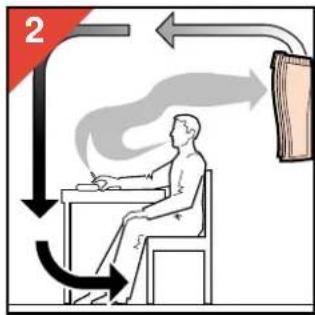
text_image
2text_image
3 ← 25 cm →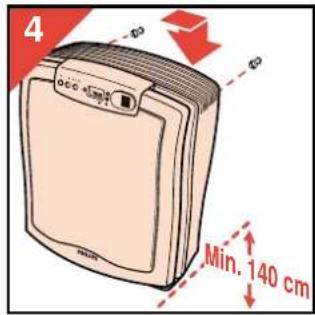
text_image
4 Min. 140 cmnatural_image
Abstract diagram with red curved arrows and striped background, no readable text or symbolstext_image
11 AUTO SPEED OPTIONS TIME OPTIONS Cleantext_image
16 AUTO 2 THOO 3 FED TORT SETTING- Ligue o aparelho (fig. 15).
text_image
27 AUTO JPGS OPTIONS RMS OPTIONS Clear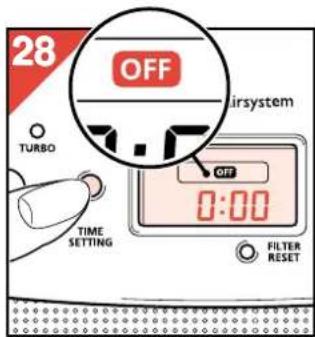
text_image
28 OFF TURBO Airsystem OFF 0:00 TIME SETTING FILTER RESETtext_image
32 AUTO SPEED OPTIONS TIME OPTIONS Clear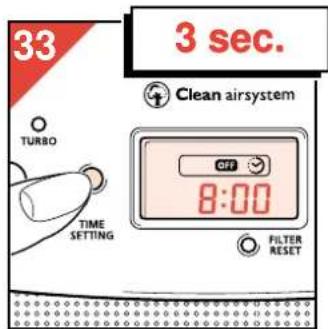
text_image
33 3 sec. TURBO TIME SETTING Clean airsystem OFF 8:00 FILTER RESETnatural_image
Illustration of a hand pouring liquid into a container with a pipe, no text or symbols presentnatural_image
Illustration of a fabric or mesh texture with a hanging hook and droplet, no text or symbols presentnatural_image
Illustration of a 3D-printed box with internal cavities and triangular cutouts, placed on a surface (no text or symbols)
text_image
46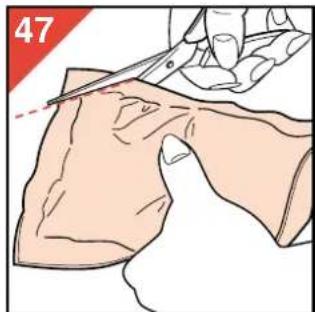
natural_image
Illustration of a hand using scissors to cut a piece of tissue, no text or symbols presentnatural_image
Illustration of a hand pouring red liquid into a container with scattered red particles (no text or symbols)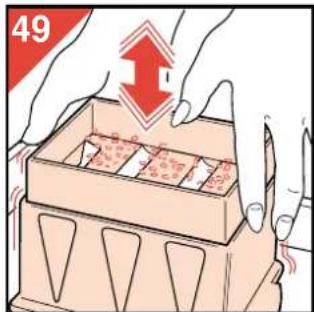
text_image
49natural_image
Hand pressing down on a silicone baking mold with circular cavities (no text or symbols visible)text_image
53 FILTER RESET 8:00 FILTER RESET 3 sec.text_image
54 ① TURBO SPEED OPTIONS TIME OPTIONS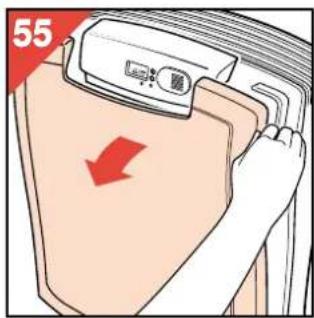
text_image
55text_image
3 ← 25 cm →
text_image
4 60000000 Min. 140 cmnatural_image
Simple line drawing of a room with windows, a hanging clipboard, and a fence (no text or symbols)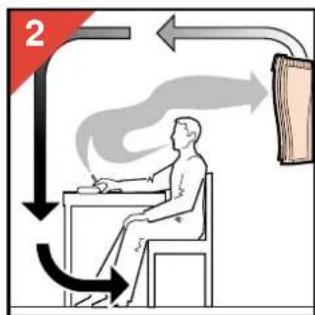
text_image
2text_image
16 AUTO TWO USSO TWO TWO 00- Tænd for apparatet (fig. 15).
Hurtig timer-indstilling.
text_image
32 AUTO AUTO SETTING TIME SETTING + Clean
text_image
33 3 sec. TURBO TIME SETTING Clean airsystem OFF 8:00 FILTER RESETnatural_image
Illustration of a hand pouring liquid into a container with a pipe, no text or symbols presentnatural_image
Illustration of a fabric or material sample with a red label '42' and a droplet symbol, no readable text or symbols present.natural_image
Illustration of a 3D-printed plastic container with internal cavities and triangular cutouts, placed on a surface (no text or symbols)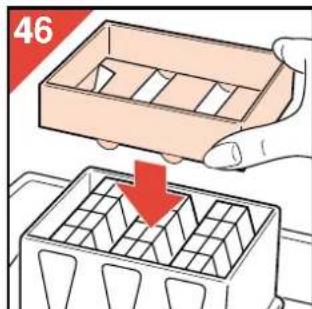
text_image
46natural_image
Illustration of a hand using scissors to cut a tissue sample, no text or symbols present
natural_image
Illustration of a hand pouring red granular substance into a container with patterned contents (no text or symbols)natural_image
Illustration of a hand pressing down on a textured surface with a red arrow indicating direction (no text or symbols)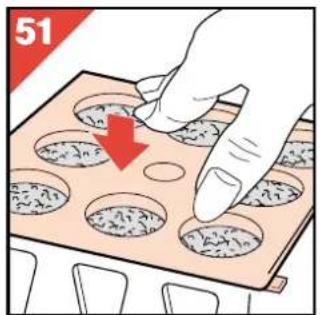
text_image
51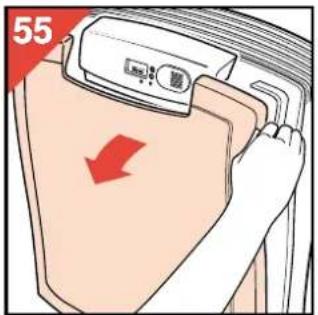
text_image
55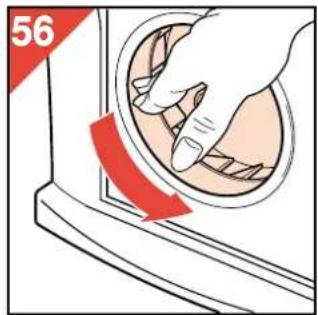
text_image
56text_image
53 FILTER RESET 8:00 FILTER RESET 3 sec.natural_image
Simple line drawing of a room with furniture and a wall-mounted fixture (no text or symbols)
text_image
2text_image
3 ← 25 cm →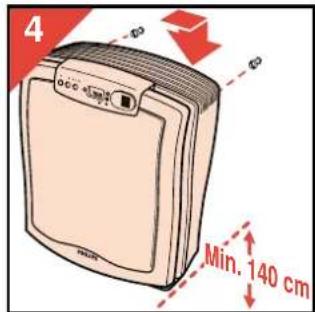
text_image
4 600 - Comp Min. 140 cm- Luftrenseren kan også monteres på veggen (fig. 3-4). Velg en posisjon tilsvarende fig. 1-2.
- Det er også mulig å plassere mer enn en luftrenser i samme rom. Dette anbefales spesielt hvis rommet er veldig stort og/eller har en uregelmessig form.
text_image
5 600 x 123 X Xtext_image
32 AUTO FIRE DISED OPTIONS TIME OPTIONS Close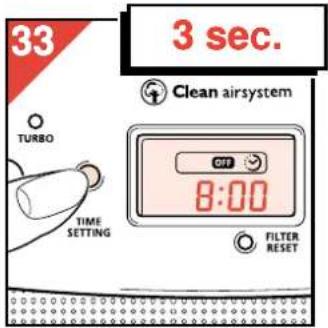
text_image
33 3 sec. Clean airsystem TURBO TIME SETTING OFF 8:00 FILTER RESETnatural_image
Illustration of a person using a drain to clean or wash a brown liquid, with no visible text or symbols.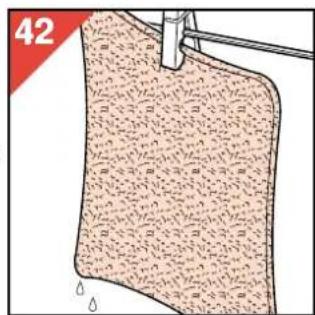
natural_image
Illustration of a fabric or material sample with a red label '42' and a droplet symbol, no readable text or symbols present.natural_image
Illustration of a rectangular plastic container with internal compartments and side cutouts, placed on a surface (no text or symbols)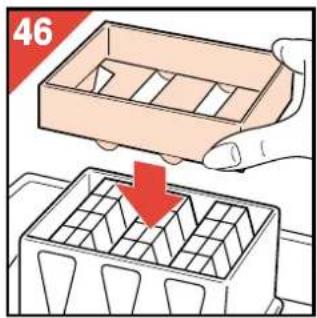
text_image
46- Sett filterbeholderen i boksen (fig. 45). - Plasser trakten i filterbeholderen (fig. 46).
natural_image
Illustration of a hand using scissors to cut a piece of tissue, no text or symbols present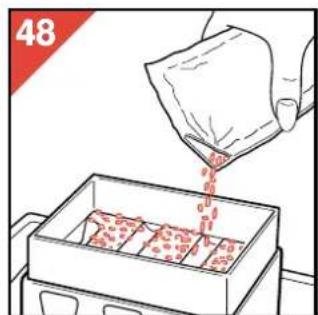
text_image
48- Klipp av hjørnet i plastposen som inneholder det nye kullfilter materiale (fig. 47). - Hell hele posen i filterbeholderen (fig. 48).
text_image
49
natural_image
Illustration of a hand pressing down on a textured surface with a red arrow indicating direction (no text or symbols)natural_image
Hand placing a red arrow into a silicone mold with circular cavities (no text or symbols)text_image
53 FILTER RESET 8:00 FILTER RESET 3 sec.natural_image
Illustration of a hand holding a circular object with a red arrow indicating rotation (no text or symbols)natural_image
Simple line drawing of a room with furniture and a wall-mounted cabinet (no text or symbols)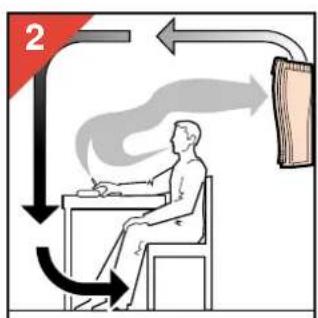
text_image
2text_image
3 ← 25 cm →
text_image
4 Min. 140 cmnatural_image
Illustration of a fabric or material sample with a tool and label '42' (no readable text or symbols)natural_image
Illustration of a 3D-printed plastic container with internal cavities and triangular cutouts, placed on a surface (no text or symbols)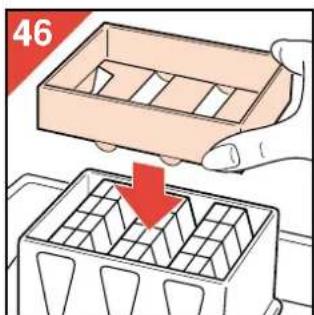
text_image
46natural_image
Illustration of a hand using scissors to cut a piece of tissue, no text or symbols presentnatural_image
Illustration of a hand pouring red granular material into a container with scattered items (no text or symbols)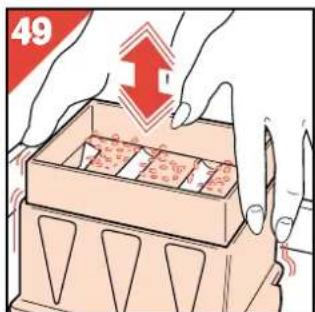
text_image
49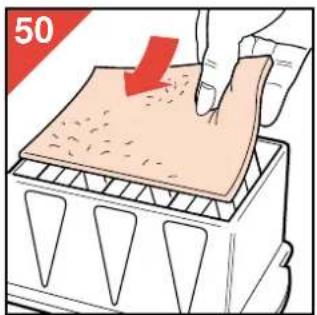
natural_image
Illustration of a hand pressing down on a textured surface with a red arrow indicating downward motion (no text or symbols)
natural_image
Hand pressing down on a silicone baking mold with circular cavities (no text or symbols)text_image
53 FILTER RESET 8:00 FILTER RESET 3 sec.natural_image
Interior view of a room with windows, a hanging bag, and a railing (no text or symbols)
text_image
2text_image
3 ← 25 cm →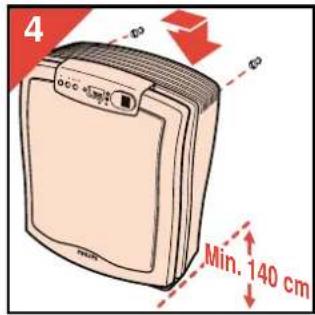
text_image
4 Min. 140 cmtext_image
11 AUTO FLOOD SETTING TIME SETTING + Clean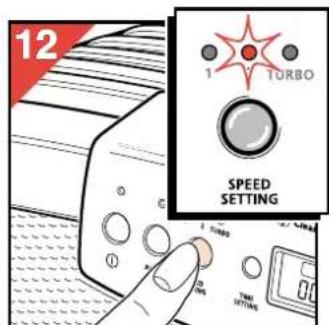
text_image
12 1 TURBO SPEED SETTING 10 10 10 TIME SETTINGtext_image
23 ① AUTO SPEED OPTIONS TIME OPTIONS ④ Clean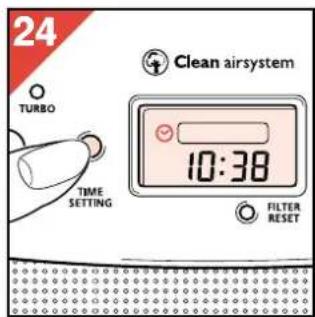
text_image
24 TURBO TIME SETTING Clean airsystem 10:38 FILTER RESETnatural_image
Illustration of a fabric or material sample with textured fill and a hanging hook, no text or symbols presentnatural_image
3D diagram of a rectangular box with internal compartments, placed on a surface (no text or symbols)
text_image
46natural_image
Illustration of a hand using scissors to cut a piece of tissue, no text or symbols present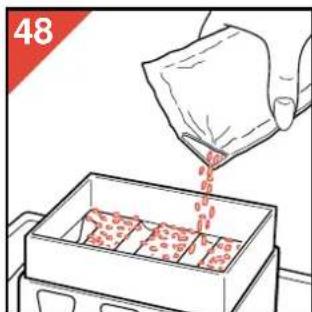
natural_image
Illustration of a hand pouring red granular substance into a container with food items (no text or symbols)natural_image
Illustration of a hand pressing down on a textured surface with a red arrow indicating downward motion (no text or symbols)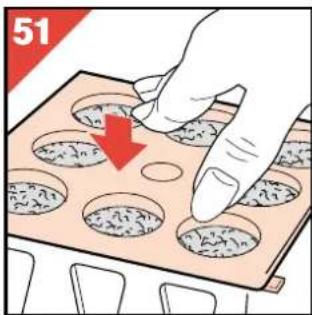
natural_image
Hand placing a chocolate chip into a silicone baking mold with a red arrow indicating the process (no text or symbols)
text_image
55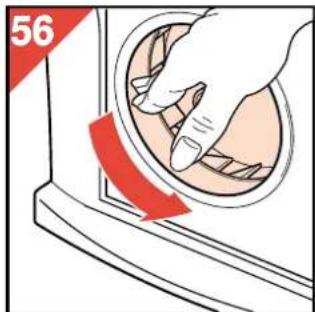
text_image
56text_image
53 FILTER RESET 8:00 FILTER RESET 3 sec.natural_image
Interior view of a room with furniture and a hanging bag, no visible text or symbols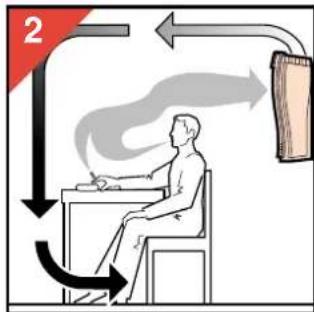
text_image
2text_image
3 ← 25 cm →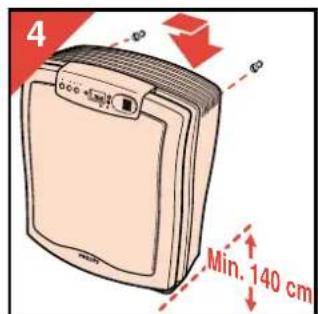
text_image
4 Min. 140 cmtext_image
5 000 x1000 X X X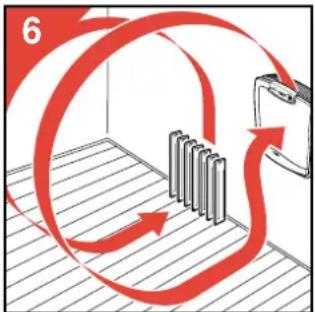
flowchart
graph TD
    A["Top Step"] --> B["Bottom Step"]
    B --> C["Rightmost Step"]
    style A fill:#f9f,stroke:#333
    style C fill:#bbf,stroke:#333
flowchart
graph TD
    A["Start"] --> B{Condition}
    B -->|Yes| C["Process Step 1"]
    B -->|No| D["Process Step 2"]
    C --> E["End"]
    D --> E
    style A fill:#f9f,stroke:#333
    style E fill:#bbf,stroke:#333
natural_image
Illustration of a fabric or mesh material with a red label '42' and a water droplet symbol (no text or symbols on the main subject)natural_image
3D diagram of a rectangular container with internal compartments and triangular cutouts, placed on a surface (no text or symbols)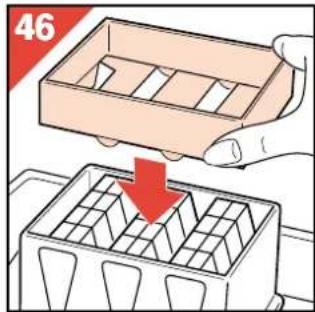
text_image
46natural_image
Illustration of a hand using scissors to cut a tissue sample, no text or symbols present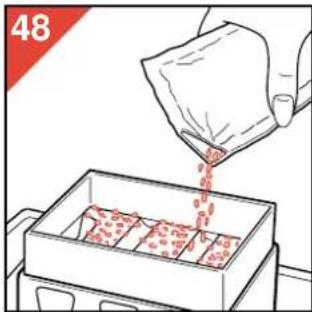
natural_image
Illustration of a hand pouring red granular substance into a box with patterned contents (no text or symbols)natural_image
Illustration of a hand pressing down on a textured surface with a red arrow indicating force (no text or symbols)natural_image
Hand placing a red arrow on a silicone baking mold with circular indentations (no text or symbols)text_image
3 ← 25 cm →
text_image
4 Min. 140 cm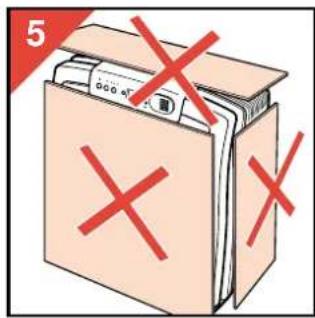
text_image
5 X X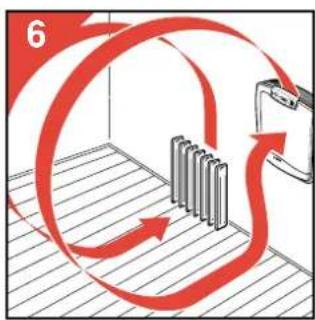
text_image
6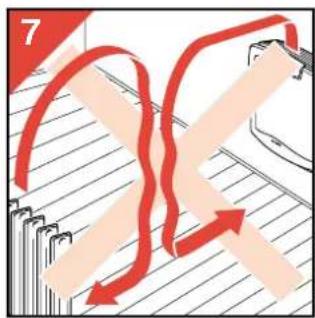
natural_image
Abstract diagram with red curved arrows and striped background, no readable text or symbols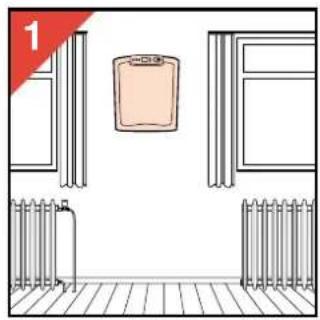
natural_image
Simple line drawing of a room with furniture and a wall, no text or symbols present
text_image
2| 1998 | 2000 | 2003 | |
| (£) | (£) | (£) |
# 0 # 0 # 3 # \* - - 1 # # # # # >
text_image
Diagram showing various directional and symbolic patterns with numbered circles, arrows, and symbols in a grid layout.
text_image
11 AUTO STOCK OPTIONS TIME OPTIONS ④ Clean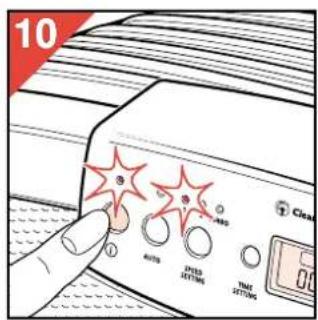
text_image
10 AUTO SPEED TAXING TIME SETTING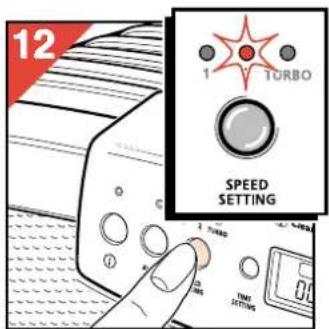
text_image
12 1 TURBO SPEED SETTING 2 Turbo 30 MHz TIME SETTINGS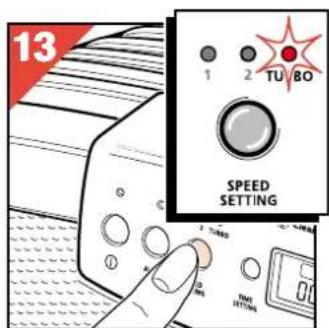
text_image
13 1 2 TU BO SPEED SETTING 2 TU BO 30 TMT SETTING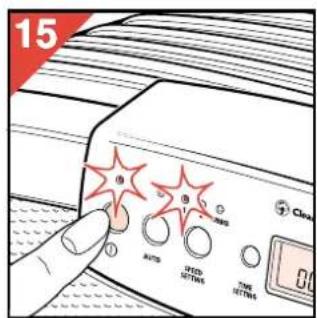
text_image
15 AUTO SPEED SETTINGS TYPE SETTINGS Clear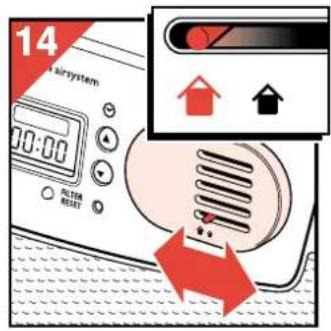
text_image
14 airsystem 7:00 FILTER RESET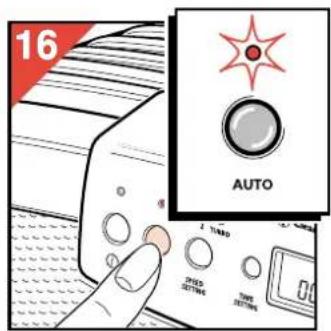
text_image
16 AUTO 2.100 PRED SETTING TIME SETTING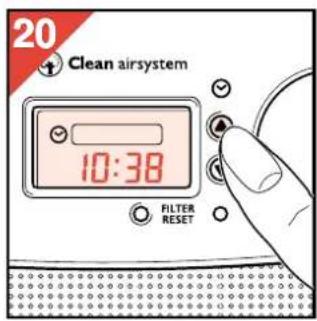
text_image
20 Clean airsystem 10:38 FILTER RESET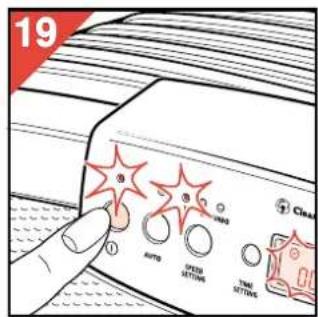
text_image
19 AUTO SPEED SETTINGS TIME SETTINGS Clean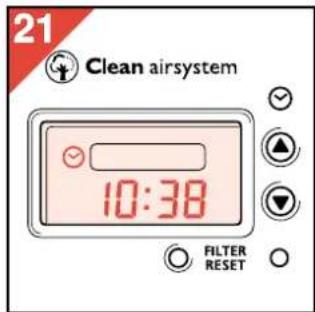
text_image
21 Clean airsystem 10:38 FILTER RESET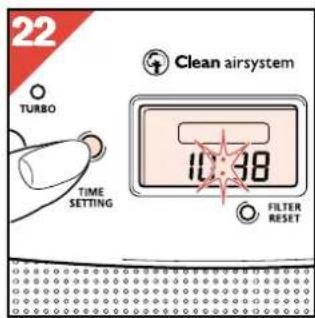
text_image
22 TURBO TIME SETTING Clean airsystem 10:38 FILTER RESET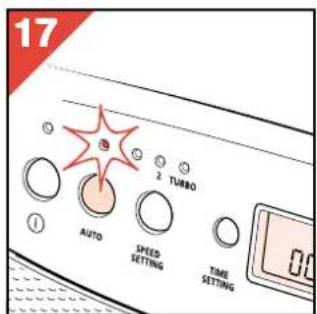
text_image
17 AUTO SPEED SETTING 2 TURBO TIME SETTING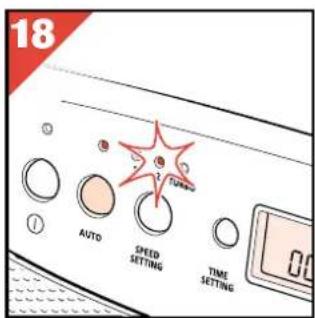
text_image
18 AUTO SHEED SETTING TIME SETTING
text_image
23 AUTO 3500 TAX AUTO 3500 TAX AUTO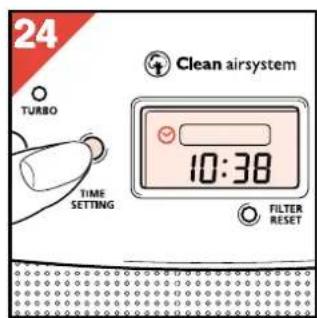
text_image
24 TURBO TIME SETTING Clean airsystem 10:38 FILTER RESET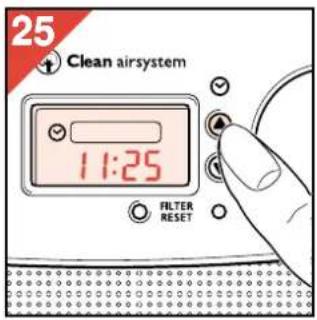
text_image
25 Clean airsystem 11:25 FILTER RESET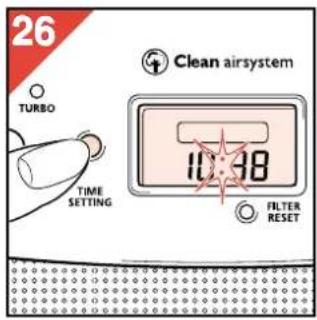
text_image
26 TURBO TIME SETTING Clean airsystem 10:38 FILTER RESET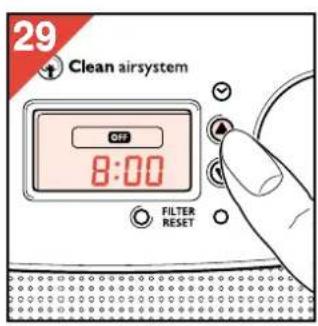
text_image
29 Clean airsystem OFF 8:00 FILTER RESET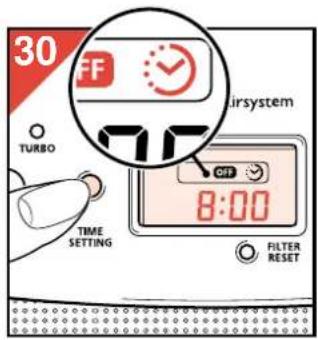
text_image
30 OFF TURBO 77 airsystem 8:00 TIME SETTING FILTER RESET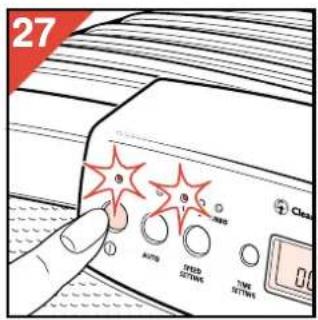
text_image
27 AUTO TPEED SETTING TIME SETTING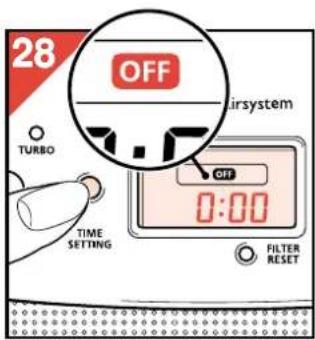
text_image
28 OFF TURBO AIRSYSTEM OFF 0:00 TIME SETTING FILTER RESET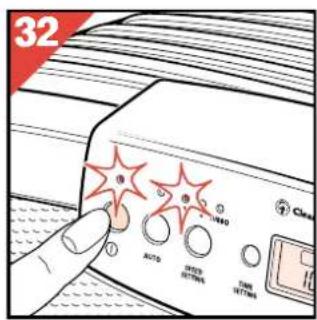
text_image
32 AUTO SPEED TAX TIME Climate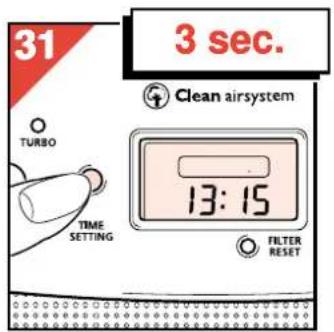
text_image
31 3 sec. Clean airsystem TURBO TIME SETTING 13:15 FILTER RESET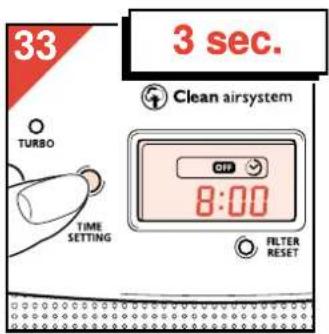
text_image
33 3 sec. Clean airsystem TURBO TIME SETTING 8:00 FILTER RESET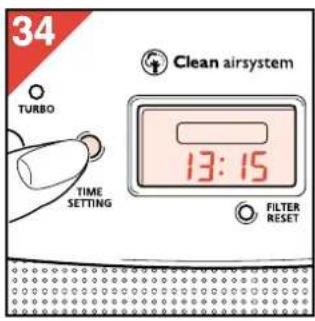
text_image
34 TURBO TIME SETTING Clean airsystem 13:15 FILTER RESET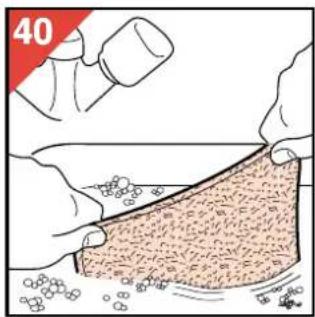
text_image
40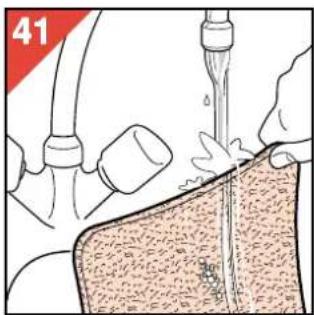
natural_image
Illustration of a hand pouring liquid into a container with a pipe outlet (no text or symbols)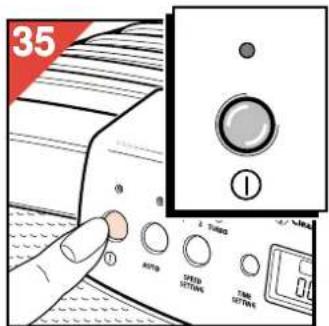
text_image
35 AUTO SPEED SETTINGS TIME SETTING
text_image
36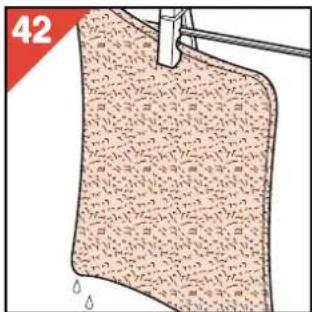
natural_image
Illustration of a fabric or material sample with a droplet symbol at the bottom (no text or symbols present)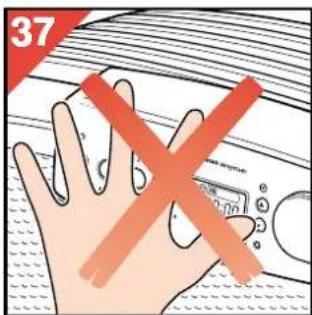
text_image
37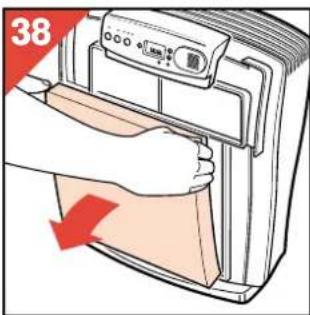
text_image
38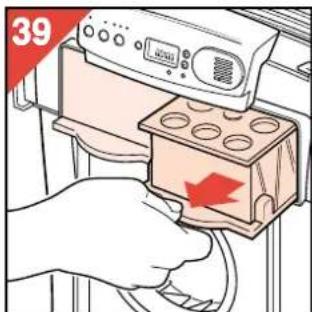
text_image
39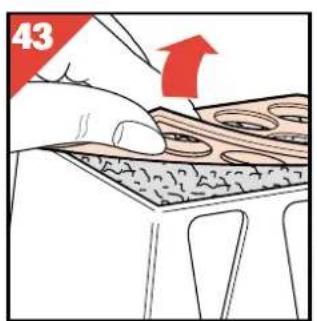
text_image
43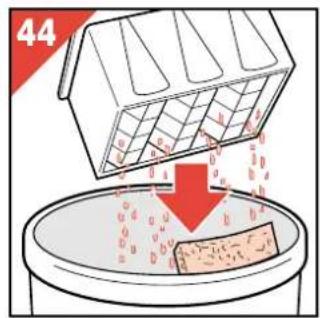
text_image
44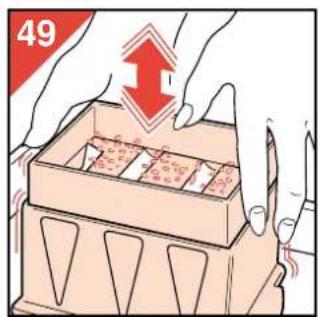
text_image
49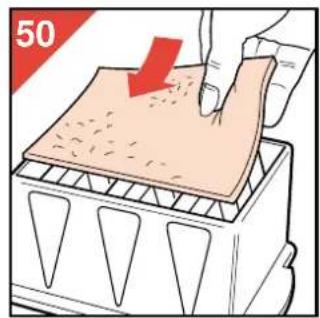
natural_image
Illustration of a hand pressing down on a textured surface with a red arrow indicating downward motion (no text or symbols)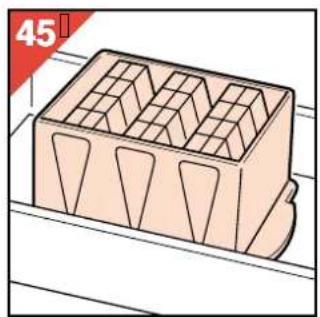
natural_image
3D diagram of a rectangular container with internal cavities and a side protrusion, no text or symbols present
text_image
46
natural_image
Hand placing a chocolate chip into a silicone baking mold with circular cavities (no text or symbols visible)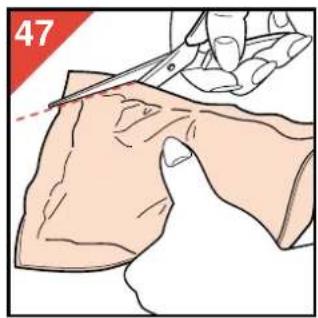
natural_image
Illustration of a hand using scissors to cut a piece of tissue, no text or symbols present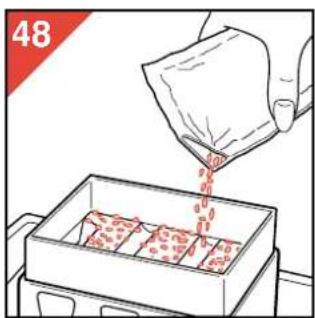
natural_image
Illustration of a hand pouring red granular substance into a container (no text or symbols)
text_image
52 AUTO SPEED OPTIONS TIME OPTIONS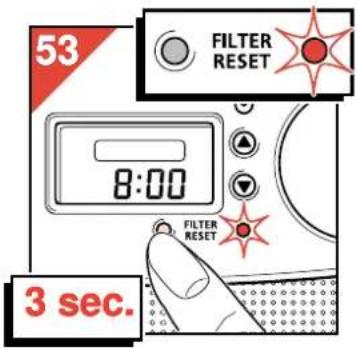
text_image
53 FILTER RESET 8:00 FILTER RESET 3 sec.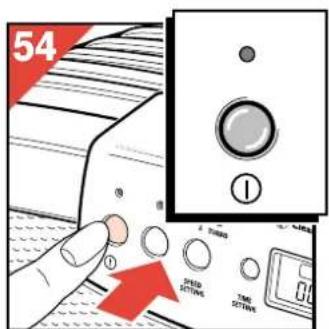
text_image
54 ① SPEED SETTING TIME SETTING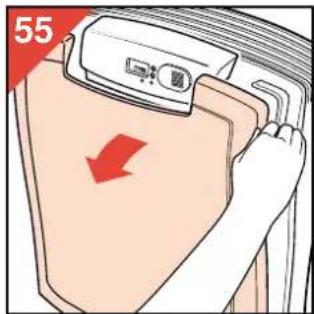
text_image
55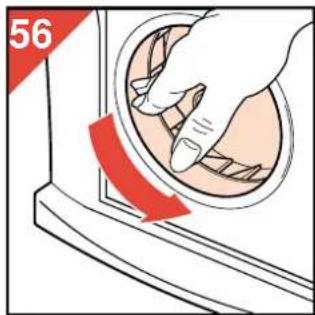
natural_image
Illustration of a hand using a tool to clean or remove a circular object, with a red arrow indicating the motion (no text or symbols)

