
DP3000 - Mini all-terrain transporter SCHEPPACH - Free user manual and instructions
Find the device manual for free DP3000 SCHEPPACH in PDF.
| Product type | Mini all-terrain transporter |
| Brand | Scheppach |
| Model | DP3000 |
| Engine | 6.5 HP (4-stroke) |
| Load capacity | 300 kg |
| Weight | 160 kg |
| Hopper dimensions (L × W × H) | 912 × 650 × 560 mm |
| Fuel tank capacity | 3.6 L |
| Recommended engine oil | SAE 10W-30 (capacity 0.6 L) |
| Transmission oil | 1.62 L (change every 1000 h) |
| Transmission | 3 forward gears + 1 reverse |
| Starting | Pull start (recoil starter) |
| Max. engine speed | 3600 rpm |
| Sound pressure (L_pA) | 84.7 dB(A) |
| Sound power (L_wA) | 100 dB(A) |
| Vibration left handle | 3.92 m/s² |
| Vibration right handle | 9.92 m/s² |
| Maximum slope | 12° |
| Fuel | Unleaded gasoline 90 octane, max 5% ethanol |
| Safety equipment | Hearing protection, goggles, safety shoes |
| Maintenance | Air filter every 30 h, engine oil every 50 h, spark plug every 10 h then 50 h, chain every 500 h |
| Wear parts | Spark plugs, belt |
Frequently Asked Questions - DP3000 SCHEPPACH
User questions about DP3000 SCHEPPACH
0 question about this device. Answer the ones you know or ask your own.
Ask a new question about this device
Download the instructions for your Mini all-terrain transporter in PDF format for free! Find your manual DP3000 - SCHEPPACH and take your electronic device back in hand. On this page are published all the documents necessary for the use of your device. DP3000 by SCHEPPACH.
USER MANUAL DP3000 SCHEPPACH
- Introduction 21
- Device description 21
- Scope of delivery 21
- Intended use 22
- Safety information 22
- Technical data 25
- Before starting up 26
- Functions and controls 26
- Maintenance 27
- Storage 29
- Transport 29
- Disposal and recycling 29
- Troubleshooting 30
14.Declaration of conformity 107 - Guarantee certificate 108
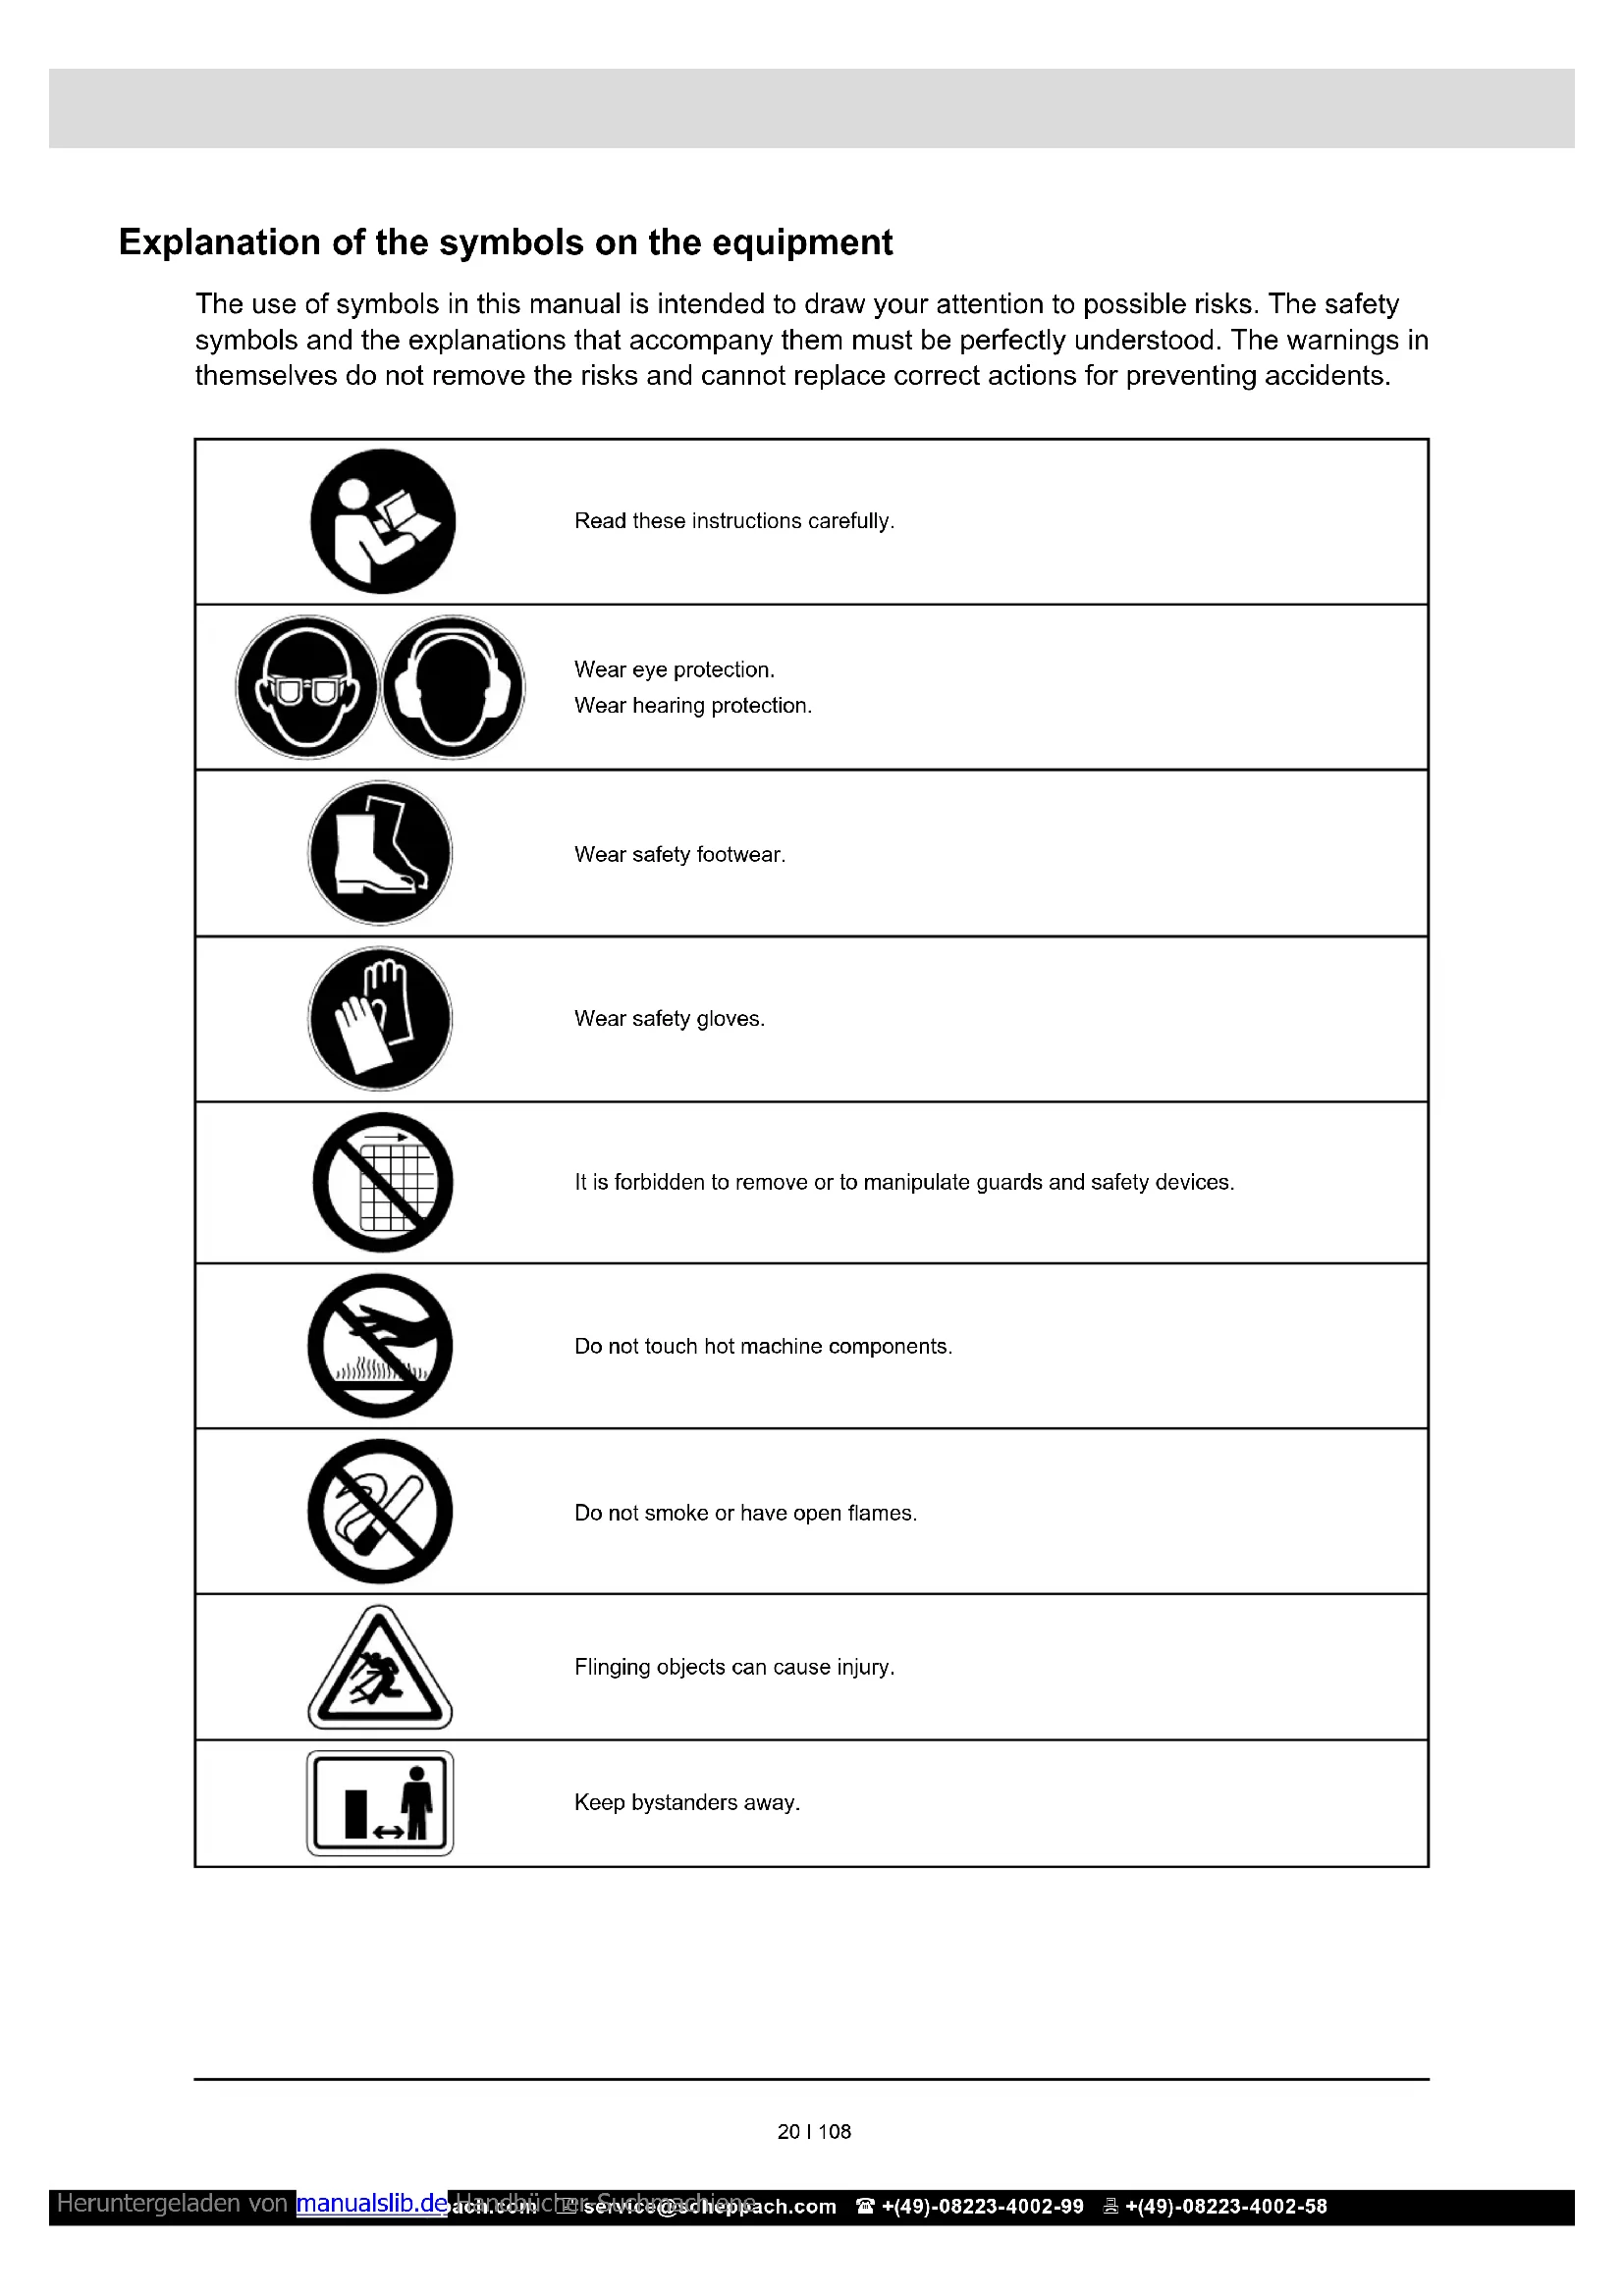
Explanation of the symbols on the equipment
The use of symbols in this manual is intended to draw your attention to possible risks. The safety symbols and the explanations that accompany them must be perfectly understood. The warnings in themselves do not remove the risks and cannot replace correct actions for preventing accidents.
| Read these instructions carefully. | |
| Wear eye protection. Wear hearing protection. | |
| Wear safety footwear. | |
| Wear safety gloves. | |
| It is forbidden to remove or to manipulate guards and safety devices. | |
| Do not touch hot machine components. | |
| Do not smoke or have open flames. | |
| Flinging objects can cause injury. | |
| Keep bystanders away. |
1. Introduction
Manufacturer:
scheppach
We hope you have a lot of fun and success using your new machine.
Note:
According to the applicable product liability laws, the manufacturer of the device does not assume liability for damages to the product or damages caused by the product that occurs due to:
- improper handling,
noncompliance of the operating instructions, - repairs by third parties, not by authorized service technicians,
- installation and replacement of non-original spare parts,
non-intended use, - A breakdown of the electrical system that occurs due to the non-compliance of the electric regulations and VDE regulations 0100, DIN 57113 / VDE0113.
We recommend:
that you read through the entire operating instructions before putting the machine into operation.
These operating instructions are to assist you in getting to know your machine and utilize its proper applications. The operating instructions contain important notes on how you work with the machine safely, expertly, and economically, and how you can avoid hazards, save repair costs, reduce downtime and increase the reliability and service life of the machine. In addition to the safety requirements contained in these operating instructions, you must be careful to observe your country's applicable regulations.
The operating instructions must always be near the machine. Put them in a plastic folder to protect them from dirt and humidity. They must be read by every operator before beginning work and observed conscientiously. Only persons who have been trained in the use of the machine and have been informed of the various dangers may work with the machine. The required minimum age must be observed. In addition to the safety requirements in these operating instructions and your country's applicable regulations, you should observe the generally recognized technical rules concerning the operation of identical machines.
2. Device description
Fig.1-20
- Throttle Control
- Engine Switch
- Right Steering Lever
- Clutch Control Lever
- Left Steering Lever
- Fixation dump box
- Gear Selection Lever
- Dump Box
- Gearbox
10.Wheel
Engine components
- Throttle
- Exhaust
- Spark plug
- Air filter
- Petrol valve
- Choke lever
- Recoil starter
- Handle Recoil starter
- Mounting screw service port
- Fuel cap
- Fuel tank
- Oil drain plug motor oil
- Oil filler opening / oil dipstick
- Drive chain
- Spark plug connector
- Adjusting device
- Counter nut
- Oil drain plug gear unit
- Oil filler gear oil unit
3. Scope of delivery
Dumper DP3000
Manual,
Plastic bag with mounting material
- Open the packaging and remove the device carefully.
- Remove the packaging material as well as the packaging and transport bracing (if available)
- Check that the delivery is complete.
- Check the device and its spare parts for possible damage caused by transportation. In the event of complaints, you must contact the distributor without delay. Claims at a later stage will not be accepted.
- If possible, store the packaging until the warranty period has expired
- Before handling the device, make yourself familiar with it by reading the operating instructions.
- For accessories, consumables and spare parts, only use original parts. Spare parts are available from your stockist.
- Include our item number, the device model and year of manufacture in your order.
Attention!
The device and packaging materials are not toys! Children must not be allowed to play with plastic bags, film and small parts!
DANGER
There is a risk of swallowing and suffocation!
4. Intended use
Be sure to observe the restrictions in the safety instructions. Purpose of the device is the transport of materials in the specified capacity range.
The machine is to be used only for its prescribed purpose. Any other use is deemed to be a case of misuse. The user / operator and not the manufacturer will be liable for any damage or injuries of any kind caused as a result of this. Please note that our equipment has not been designed for use in commercial, trade or industrial applications. Our warranty will be voided if the equipment is used in commercial, trade or industrial businesses or for equivalent purposes.
5. Safety information
These operating instructions provide places concerning your safety which are marked with this indication: Furthermore this manual contains other important sections which are marked with the word "ATTENTION".
Attention!
While using the machine some safety precautions must be observed to prevent injuries and damage. Read the directions with due care. If you give the equipment to any other person, give them these operating instructions as well. We assume no liability for injuries or damages which are a results of non-compliance of this manual and its safety notes.
DANGER
Failure to follow these instructions may cause serious danger to life of danger or fatal injuries.
WARNING
Failure to follow these instructions may cause danger to life or danger of serious injuries.
CAUTION
Failure to follow these instructions may cause light to medium risk of injury.
NOTE
Failure to follow these instructions may cause danger of damage of the engine or other property values.
General safety informations
1. Keep your work area tidy
- Disorder in the work area can lead to accidents.
2. Take environmental influences into account
- Never work with the machine in enclosed rooms or in rooms with poor ventilation. If the motor runs toxic gases are generated. These gases can be odourless and invisible.
- Do not expose the device to rain.
- Do not use electric tools in a damp or wet environment.
Take care on your secure footing on uneven ground - Make sure that the work area is well illuminated.
- Never use the machine in highly flammable vegetation or where fire and explosion hazards exist.
- Provide a fire extinguisher in drought conditions (fire hazard).
3. Keep other persons away
- Do not allow other persons to work with the device especially children and young people.
4. Securely store unused tools
- Unused tools should be stored in a dry, elevated or closed location out of the reach of children.
5. Do not overload your device
- They work better and more safely in the specified output range.
6. Wear suitable clothing
- Do not wear wide clothing or jewellery, which can become entangled in moving parts.
- Wear solid working shoes and work gloves. Gloves made out of leather offer good protection.
- Wear protective shoes with steel caps.
Always wear a working suit made out of solid material. - Tie long hair back in a hair net and wear a hardhat
7. Wear personal protective equipment
Always wear a protective headgear, safety goggles, work gloves, non-slip footwear and hearing protection.
8. Avoid abnormal working postures
- In use of the device ensure on your secure footing.
9. Work in full consciousness
- Do not work with the device when you are under the influence of alcohol, drugs, medication or other substances which might compromise the vision, dexterity and judgment.
10. Use the device for its prescribed purpose
- Any other use than intended is deemed to be a case of misuse.
Safety instructions for handling flammable supplies
- WARNING!: Petrol is highly flammable:
- Store fuel in containers specifically designed for this purpose.
- Refill the gasoline tank only outdoors and do not smoke meanwhile.
- Add fuel before starting the engine. Never remove the cap of fuel tank or add petrol while the engine is running or when the engine is hot.
- If petrol is spilled, do not attempt to start the engine but move the machine away from the area of spillage and avoid creating any source of ignition until petrol vapours have dissipated. Replace all fuel tank and container caps securely.
Adding fuel
- Always switch off the engine before refuelling.
Attention! Always open the fuel filler cap carefully to decompose slowly the excess pressure. - Whilst working with the machine high temperatures can attain on the case. Allow the engine to cool before refuelling.
Attention! In case of insufficient cooling of the machine the fuel may ignite and lead to serious burns during refueling.
- Make sure not to fill the tank with too much fuel. Immediately remove the fuel and clean the machine when spilling fuel.
Always close the screw plug on the fuel tank in order to avoid loosening which may occur by vibrations when using the machine.
DANGER
Never refuel the engine nearby open flames.
Additional safety instructions while hand-ling with combustion engines
DANGER
Combustion engines constitute a special danger during operation and refuelling. Always read and note the warnings. Failure to do so can lead to serious or even deadly injuries.
- No changes may be made to the device.
- Attention!
Danger of poisoning, Emissions, fuels and lubricants are toxic. Emissions shall not be inhaled.
- Attention!
Risk of burns. Do not touch the exhaust system or drive unit. - Never operate the machine in non ventilated rooms or in a highly inflammable environment. If you intend to operate the machine in rooms with good ventilation, the exhaust gases must be channelled directly outdoors through an exhaust hose.
Attention! Toxic exhaust gases can escape despite the exhaust hose. Due to the fire hazard, never direct the exhaust hose towards inflammable materials.
- Risk of explosion!
Never operate the machine in rooms with combustible materials.
-
Secure the device against shifting and toppling during transport.
-
Make sure that when you refuel the device no fuel is spilt on the engine or exhaust pipe.
-
Repairs and adjustment work may only be carried out by authorized trained personnel.
-
Do not touch any mechanically driven or hot parts. Do not remove the safety guards.
-
The values quoted in the technical data under sound power level (LWA) and sound pressure level (LpA) are emission values and not necessarily reliable workplace values. As there is a correlation between emission and immission levels, the values cannot be taken to reliably determine the possible need for additional precautions. Factors influencing the current immission level of the user/operator include the properties of the work area, other sound sources etc., e.g. the number of machines and other neighboring processes, and the time span over which the user/operator is subjected to the noise. Also, the permitted immission level can vary from country to country. Nevertheless, this information makes it possible for the user to be able to make a better assessment of the dangers and risks involved.
-
Never put any items into the ventilation openings. This applies even when the device is switched off. Non-observation may lead to injury, or damage to the device.
- Keep the generator free of oil, dirt and other impurities.
- Ensure the sound absorber and air filter work properly. These parts serve as flame protection in case of misfire.
-
Stop the engine:
-
whenever you leave the machine
-
before refueling
-
Always close the fuel valve when the machine is not in operation.
- Never use the choke lever to stop the engine.
Specific safety instructions for handling the device
- Thoroughly inspect the area to be worked, keep the working area clean and free of debris to prevent tripping. Operate on a flat level ground.
- Never place any part of your body where it would be in danger if movement should occur during assembly, installation, and operation, maintenance, repairing or moving.
- Keep all bystanders, children, and pets at least 23 meters (75 feet) away. If you are approached, stop the unit immediately.
- Do not mount on dump box and never carry passengers.
- Never park the machine in a place with unstable ground which could give way, particularly when it is full.
- Disengage clutch lever before starting the engine.
- Start the engine carefully according to instructions and with feet well away from the moving parts.
- Never leave the operating position when the engine is running.
- Always hold the unit with both hands when operating. Keep a firm grip on the handlebars. Beware that the machine may unexpectedly bounce upward or jump forward if the machine should strike buried obstacles such as large stones.
- Walk, never run with the machine.
- Do not overload the machine capacity. Drive at a safe speed, adjusting the speed to the slope of the land, the surface conditions of the road, and the weight of the load.
- Use extreme caution when in reverse or pulling the machine towards you.
- Exercise extreme caution when operating on or crossing gravel drives, walks, or roads. Stay alert for hidden hazards or traffic.
- On soft ground, drive at the first forward/reverse gear. Do not rapidly accelerate, turn sharply or stop.
Safety informations service/ maintenance and storage
- Only original parts may be used for maintenance and accessories.
- Replace faulty silencers.
- Before using, always visually inspect to see that the tools are not worn or damaged. Replace worn or damaged elements and bolts. Keep all nuts, bolts and screws tight to be sure the equipment is in safe working condition.
- Regularly check for leakage or traces of abrasion in the fuel system, such as porous pipes, loose or missing clamps and damage to the tank or tank cap. Before use all defects must be repaired.
- Before checking or adjusting the machine or the motor, the ignition plug and the ignition wire respectively must be removed to prevent accidental starting.
Storage
- Never store the equipment with petrol in the tank inside a building where fumes can reach an open flame or spark.
- Allow the engine to cool before storing in any enclosure.
- To reduce the fire hazard, keep the engine, silencer, battery compartment and petrol storage area free of vegetative material and excessive grease.
Long term storage/hibernation
- In case of long term storage drain out the complete fuel. Fuels are chemical compounds which change their properties during prolonged storage. If the fuel tank has to be drained out this should happen outdoors.
WARNING
Improper maintenance or ignoring/ not rectifying a problem during the operation may become a source of danger. Operate your machine only if regularly maintained.
Only in this way you can assume that your device is operating safe, economical and without malfunctions.
Do not clean, maintain, setup or repair the machine whilst running. Moving parts may cause serious injuries. Do not use fuel or other flammable solvents to clean the equipment.
WARNING
Vapours of fuels and solvents may explode.
Refix the security and safety equipment after reparation and maintenance work.
Keep the machine in safe work condition. Especially check the fuel system for tightness.
Always remove any dirt from the cooling fins of the engine.
Residual risks and accident prevention standards
Neglect of ergonomic principles
Negligent handling of personal protective equipment
Negligent handling or omission of the personal protective equipment may cause serious injuries.
- Wear prescribed personal protection equipment.
Human behaviour, misbehaviour
For any work be fully concentrated.
Residual risks - Cannot be entirely excluded.
Electrical residual risks
Electrical contact
Touching the spark plug may cause an electrical shock.
- Never touch the spark plug while the engine is running.
Thermal residual risks
burns, chilblains
Touching of the exhaust/ case may cause burns.
- allow motor driven machines to cool.
Danger from noise
hearing damage
Prelonged unprotected work with the device may cause hearing damage.
- Always wear ear-muffs
Danger caused by materials and other substances
Contact, inhalation
The emissions of the machine may cause damages to health.
- Only use the motor driven machine outdoors.
Fire, explosion
Fuel is flammable.
- During work and refuelling smoking and open flames are prohibited.
In case of emergency
In case of a possibly occurring accident take the necessary first aid steps as appropriate and obtain qualified medical aid as quickly as possible.
If you obtain aid please give the following informations:
- Where did it happen
- What happen
- How many injured
- Type of injury
- Who is reporting!
6. Technical data
| Engine 6,5 PS | |
| Transmission | 3F+1R |
| Load capacity 300 kg | |
| Box Length 912 mm | |
| Box width 650 mm | |
| Box Depth 560 mm | |
| Weight 160 kg | |
| Engine Type 4-stroke engine | |
| Idle speed 1400 1/min. | |
| maximum RPM 3600 1/min. | |
| Motor Starters Recoil starter | |
| Fuel | Unleaded fuel octane num- ber 90 and max. ethanol of 5% |
| Fuel tank capacity 3,6 l | |
| Required engine oil | SAE 10W-30 |
| max. slope | 12° |
| Max. Oil tank capac- ity | 0,6 l |
Subject to technical modifications!
Information concerning noise emission measured according to relevant standards:
Sound pressure L_pA = 84.7 dB(A)
Sound power L_wA = 100dB(A)
Uncertainty K_pA = 3,0 dB(A)
Wear ear-muffs.
The impact of noise can cause damage to hearing.
Vibration Left Steering Lever A_hy = 3,92m / s^2
Vibration Right Steering Lever A_hv = 9,92 ~m / s^2
Uncertainty K_PA = 1,5m / s^2
The specified vibration emission value has been measured according to a standardised testing procedure and can be used for comparison of one electric tool with another.
The specified vibration emission value can also be used for an initial assessment of the load.
WARNING
The vibration emission value can vary from the specified value during the actual use of the electric tool, depending on the type and the manner in which the electric tool is used. Try to minimise stress from vibrations as low as possible. Some examples of means for reducing the vibration stress are wearing gloves while using the tool and limiting work time. In the process all parts of the operating cycle must be taken into account (such as times in which the electric tool is switched off or time in which it is switched on, but is not running under a load).
Limit the noise and vibration to a minimum!
- Use only faultless device.
- Maintain and clean the unit regularly.
- Customize the way you work on the equipment.
- Do not overload the device.
If you unsure, bring the device to a service station - Switch off the unit if you do not use it.
7. Before starting up
ATTENTION!
Always check before starting the engine:
- Check the fuel level and top it up if necessary - the tank (21) should be at least half filled
- Make sure that the machine has sufficient ventilation
- Make sure that the ignition cable (25) is secured to the spark plug (13)
Condition of the air filter
Condition of the fuel lines - The external bolt connections for tightness
Filling with fuel
Recommended fuel
Fill the only clean fuel with min. 90 octane and max. 5% bio-ethanol content in the fuel tank (21).
NOTE
Fill tank to no more than 12.5mm (1 / 2^ ) below the bottom of the filler neck to provide space for expansion.
Use only fresh and clean fuel. Attention!
Water or impurities in the petrol damage the fuel system.
Refuel in a well-ventilated area with the stopped engine. If the engine has been running, allow it to cool first. Never refuel the engine inside a building where gasoline fumes may reach flames or sparks. Petrol is highly flammable and explosive. You can get burns or other serious injuries when handling fuel.
- Switch off the engine and keep it away from heat, sparks and flames.
- Refuelling only outdoors.
- Immediately clean up spilled petrol.
8. Functions and controls
Engine switch (Fig.1/Pos.2)
The engine switch (2) enables and disables the ignition system.
The engine switch (2) must be in the "ON" position for the engine to run.
The engine switch (2) must be in the "OFF" position to stop the engine.
Clutch control lever (Fig.1/Pos.4)
- Actuating the clutch control lever (4) - Clutch engaged (Press the latch (Figure 8/A), then you can press the clutch control lever downwards)
- Release the clutch control lever (4) - clutch disengaged.
Throttle control (Fig.1/Pos.1)
- It controls engine speed. Put the throttle control (1) on low speed (L) or high speed (H) or an intermediary position between L and H to increase or decrease the speed of engine.
Left steering lever (Fig.1/Pos.5)
Operate the lever (5) to turn left.
Right steering lever (Fig.1/Pos.3)
Operate the lever (3) to turn right.
Gear selection lever (Fig.1/Pos.7)
- It controls forward or reverse movements of the machine.
Fixation dump box (Fig.3/Pos.6)
- Pull the fixation dump box (Fig. 3/pos. 6) with the right hand in the direction A1 and Unlock the tipper lever (B).
After unlocking the dump box (8) it can be emptied by tilting (see Fig.2 pos.A3).
NOTE
If full loading or transporting heavy loads, the emptying of the dump box (8) is carried out with the help of a second person.
After emptying the dump box (8) you can lower shown like Fig. 2 Pos.A4. Lock the dump box (8) by selecting the fixation dump box (6) to position (A2) shown in Fig. 3.
Starting engine (Fig.1/4/14)
Cold starts
- Turn choke lever (16) on the engine to position (Fig.14).
- Set the throttle lever (1) on the handlebar at halfway-position.
- Turn the engine switch (2) on.
-
Set the fuel cock (15) to position
Pull the starting rope (18) slowly several times to allow the gasoline to flow into the engine's carburetor. -
Then hold the start handle (18) firmly and pull rope out a short distance until you feel some resistance.
-
Then pull the rope smoothly and briskly, and allow rope to return gently. Do not let the rope snap back. If necessary, pull the rope several times until the engine starts.
-
Allow the engine to run for several seconds to warm up.
- Allow the engine to run for several seconds to warm up. Then, gradually move chock lever (16) to position
NOTE
Restarting an engine that is already warm from previous running does not normally require use of the choke.
Warm starts
-
Set the throttle lever (1) on the handlebar at halfway-position.
-
Turn the engine switch (2) to pos. "ON".

- Set the fuel cock (15) to the position
- Pull the starting rope (18) slowly several times to allow the gasoline to flow into the engine's carburetor.
- Then pull the rope smoothly and briskly, and allow rope to return gently. Do not let the rope snap back.
Operating
After engine warms up, pull throttle lever (1) to accelerate engine speed (shown Fig.1 pos.H).
- Engage the required gear (7) and slowly squeeze the clutch control lever (4). Press the latch (Fig. 8 Pos.A) to operate with the clutch lever (4). If the gear does not engage straight away, slowly release the clutch lever (4) and try again.
Steering
The dumper has the steering levers (3) + (5) on the handlebars and this makes steering very easy. To turn right or left, simply operate the corresponding right (3) or left (5) steering lever.
The sensitivity of the steering increases in proportion to the speed of the machine and that with the empty machine, a light pressure on the lever is all that is needed to turn. While when the machine is loaded, more pressure is required.
Attention!
The dumper has a maximum load capacity of 300kg However, it is advisable to assess the load and adjust it according to the ground on which the machine will be used.
It is therefore advisable to cover such stretches using low gear and taking extra care. Avoid sharp turns and frequent changes of direction while driving on the road, in particularly on rough, hard terrains full of sharp, uneven points with a high degree of friction.
Remember that the unit has all-wheel drive but you need to be careful when working under adverse weather conditions (ice, heavy rain and snow) or at soil types that can lead to instability of the dumper.
Please note that this is a wheeled vehicle that considerable pitching when driving over bumps, holes and steps subject.
When the clutch control lever (4) is released, the machine will stop and brake automatically.
If you stop the machine on a steep slope, you should position a wedge in the direction of fall to secure the device.
Idle speed
Set throttle control lever (1) to its "L" position to reduce stress on the engine when working is not being performed.
Lowering the engine speed to idle the engine will help extend the life of the engine, as well as conserve fuel and reduce the noise level of the machine.
Stopping engine
Attention!
To stop the engine in an emergency, simply turn the engine switch (2) to the "OFF" position.
Under normal conditions, use the following procedure.
- Move the throttle lever (1) to the "L" position.
- Let engine idle for one or two minutes.
- Turn the engine switch (2) to the "OFF" position.
- Turn the fuel valve lever (15) contrary to the position
NOTE
Do not move choke control (16) to stop engine. Backfire or engine damage may occur.
9. Maintenance
A proper maintenance and lubrication will help the machine in a perfect working condition.
Preventive maintenance
WARNING
Turn off engine and disengage all command levers. Engine must be cool. Disconnect the spark plug cap (25) from the spark plug (13) (see Fig. 15).
Inspect the general condition of the unit. Check for loose screws, misalignment or binding of moving parts, cracked or broken parts, and any other condition that may affect its safe operation.
Remove all debris and other materials that may have accumulated to the wheels and unit. Clean after each use. Then use a premium quality lightweight machine oil to lubricate all moving parts.
Never use a "pressure washer" to clean your unit. Water can penetrate tight areas of the machine and its transmission case and cause damage to spindles, gears, bearings, or the engine. The use of pressure washers will result in shortened life and reduce serviceability.
Adjusting clutch (Fig.16)
As clutch wears out, the same lever could have a wider opening, being so uneasy to use. This means that it is necessary to adjust the cable, setting clutch lever on its original position acting on the adjustment device (26) and on counter-nut (27).
Adjusting steering (Fig.17)
If you have difficulty steering the unit, you will need to adjust the steering levers (3) + (5) with the special adjusters (26).
Slacken off the locknut (27) and unscrew the adjusters (26) to eliminate the play in the cable, which can occur after initial use or normal wear. Be very careful not to unscrew the adjusters (26) too much because this can create another problem: the loss of traction. Remember to tighten the locknut (27) when you have finished.
Lubrication
The gearbox is pre-lubricated and sealed at the factory.
Oil changes
Changing the transmission oil
The oil must be replaced every 1000 hours with the engine still warm. If necessary leave the engine running for a short time.
- Place a suitable container with a minimum of 2 litre capacity under the oil drain plug (see Fig.12 Pos.28).
- First, open the oil drain plug (28) and then the oil filler neck (29) and leave the entire engine oil flow (Fig.13).
- Close the oil drain plug (28) again.
- fill 1,62 litres of clean transmission oil into the oil filler neck (29). To do this, use a gear oil pump with hose. Insert the hose through the opening in the oil filler neck (see Fig.13).
Engine Oil
Check the oil level before each use. Remove the oil dipstick (23) and check the machine in horizontal position that the oil level is between the two marks. If necessary, add oil.
Changing the engine oil
The oil must be replaced every 50 hours. For this the motor must be warm and stopped. For this run engine for a short time. Afterwards drain oil into a suitable container. For this purpose remove the dipstick (Fig. 18 pos.23) and the oil drain plug (Fig. 18 pos.22). Maybe take a suitable hose or tube to help. After the oil has been completely drained mount the oil drain plug (22) again, fill in new oil and close the oil filler cap (23).
Recommended engine oil
SAE 10W-30 or SAE 10W-40 (depending on application temperature).
Dispose of waste oil properly at the local used oil collection point. It is forbidden to discharge waste oil into the ground or mixed with other waste.
Important hint in case of sending the equipment to a service station:
In case of delivery, please note that the unit must be free of oil and fuel to ensure safe shipment.
Air filter
Frequently cleaning of the air filter prevents carburetor malfunction.
Clean the air filter and change air filter inserts
The air filter (Fig.20/Pos.14) should be cleaned every 30 hours.
- Remove the air filter cover (Fig.19/Pos.A) by loosening the thumbscrew (Fig.19/Pos.B1)
- Loosen the thumb screw (Fig.20 / Pos.B2) and remove the air filter (Fig.20/Pos.14)
- Clean the air filter by tapping, replace if necessary.
- Reassemble in reverse order.
WARNING
NEVER use gasoline or cleaning solvents with a low flash point to clean the air fiiter element. A fire or explosion could result.
NOTE
Never run the engine without or with a damaged air filter. Dirt gets so into the engine, causing serious engine damage can occur. In this case, seller, and manufacturer disassociate from any warranty.
Check, clean and replace spark plug (13) (Fig.11/15)
Check the spark plug (13) after 10 hours on dirt and grime. If necessary, clean it with a copper wire brush. Maintenance the spark plug after 50 hours of operation.
- Remove the spark plug ignition cable (25).
- Remove any dirt from the base of the spark plug (13).
- Use a wrench to remove the spark plug (13).
- Check the spark plug (13) visually. Remove any debris with a wire brush.
- Look for discolouration on the top of the spark plug. By default, the colour should be bright.
- Check the spark plug gap. An acceptable gap width is 0.6 to 0.7mm (see Fig.11).
- Remove the spark plug (13) carefully by hand.
- If the spark plug (13) has been inserted, tighten them with a spark plug wrench.
- Attach the spark plug connector (25) at the spark plug (13).
Note
Loosen spark plug can overheat and damage the engine. And over tightening the spark plug can damage the threads in the cylinder head.
Lubrication drive chain (Fig.9-10)
Remove cover (Fig.9 Pos.A) concerning the screws (19).
Regrease drive chain (24) every 500 operating hours.
Recap the opening with the lid (Fig.9 Pos.A) and the screws (19) after servicing.
Disassembling wheels (Fig.6)
For maintenance disassemble the wheels as shown in figure 6.
Cleaning
- Keep all safety devices, air vents and the motor housing free of dirt and dust. Wipe the equipment with a clean cloth or clean it with compressed air at low pressure.
-
We recommend that you clean your device after each use.
-
Clean the unit regularly with a damp cloth and some soft soap. Do not use cleaning agents or solvents; they may damage the plastic parts of the appliance. Make sure that no water can get inside the unit.
Please note that the following parts of this product are subject to normal or natural wear and that the following parts are therefore also required for use as consumables.
Wear parts*: spark plug, belt
- Not necessarily included in the scope of delivery!
10. Storage
- Perform all general maintenance, which are in the User's Guide in the Maintenance section.
- Let the fuel out of the tank (Use a commercially plastic fuel pump from the hardware store).
- After the fuel is drained, start the machine.
- Let the machine in idlespeed running until it stops. That cleans the carburetor from the remaining fuel.
- Let the machine cool down. (about 5 minutes)
- Remove the spark plug.
- Fill a small amount of 2-stroke engine oil into the firing chamber. Pull out several times the starter cord gently to wet the internal components with the oil.
- Replace the spark plug.
- Clean the outer casing of the machine.
Do not use strong detergents or petroleum based cleaners when cleaning plastic parts. Chemicals can damage plastics.
- Store your machine on a straight bottom in a clean, dry building with good ventilation.
Do not store the machine with fuel in a nonventilated area where fuel fumes may reach flame, sparks, pilot lights or any ignition sources.
Recommissioning
- Remove the spark plug.
- Pull the starter rope out several times. It cleans the fi ring chamber of oil residues.
- Clean the spark plug contacts or install a new spark plug.
- Fill the tank.
11. Transport
WARNING
Let the engine cool down before transporting the machine or storing indoors to avoid burns or fire hazards. If you want to transport the unit empty the fuel tank before Clean the unit with a brush or a broom of coarse dirt.
12. Disposal and recycling
The disposal instructions are based on icons placed on the appliance or its package. A description of the individual meanings, is shown in chapter "Explanation of symbols on the device".
Transport package disposal
The package protects the appliance against damage during transport. Packing materials are usually chosen depending on their environmental friendliness and disposal method and can therefore be recycled. Returning the package to material circulation saves raw materials and reduces waste disposal costs.
Parts of packages (e.g. foils, styropor®) can be dangerous to children. Risk of suffocation! Keep parts of packages away from children and dispose them as soon as possible.
Troubleshooting
Important hint in case of sending the equipment to a service station:
Due to security reasons please see to it that the equipment is sent back free of oil and gas!
| Problem Cause Remedy | ||
| Engine fails to start. | 1. Spark plug wire disconnected.2. Out of fuel or stale fuel.3. Choke not in open position.4. Linked fuel line.5. Fouled spark plug.6. Engine flooding. | 1. Attach spark plug wire securely to spark plug.2. Fill with clean, fresh gasoline.3. Throttle must be positioned at choke for a cold start.4. Clean the fuel line.5. Clean, adjust gap, or replace.6. Wait a few minutes to restart, but do not prime. |
| Engine runs erratically. | 1. Spark plug wire loose.2. Unit running on CHoke.3. Linked fuel line or stale fuel.4. Vent plugged.5. Water or dirt in fuel system.6. Dirty air cleaner.7. Improper carburetor adjustment. | 1. Connect and tighten spark plug wire.2. Move choke lever to OFF.3. Clean fuel line. Fill tank with clean, fresh gasoline.4. Clear vent.5. Drain fuel tank. Refill with fresh fuel.6. Clean or replace air cleaner.7. Consult the service. |
| Engine overheats. 1. Engine oil level low.2. Dirty air cleaner.3. Air flow restricted.4. Carburetor not adjusted properly. | 1. Fill crankcase with proper oil.2. Clean air cleaner.3. Remove housing and clean.4. Consult the service | |
| Machine does not move while engine is running. | 1. Gear is not properly selected.2. Driving tracks not tight enough. | 1. Ensure gear lever is not in-between two different gears.2. Tighten driving tracks. |
Table des matieres:
Page:
Günzburger Straße 69
D-89335 Ichenhausen
CHER CLIENT,
Günzburger Straße 69
D-89335 Ichenhausen
Drogi kliencie
hereby declares the following conformity under the EU Directive and standards for the following article
FR
Subject to change without notice
Documents registrar: Andreas Pecher
Günzburger Str. 69, D-89335 Ichenhausen
Garantie DE
Apparent defects must be notified within 8 days from the receipt of the goods. Otherwise, the buyer's rights of claim due to such defects are invalidated. We guarantee for our machines in case of proper treatment for the time of the statutory warranty period from delivery in such a way that we replace any machine part free of charge which provably becomes unusable due to faulty material or defects of fabrication within such period of time. With respect to parts not
manufactured by us we only warrant insofar as we are entitled to warranty claims against the upstream suppliers. The costs for the installation of the new parts shall be borne by the buyer. The cancellation of sale or the reduction of purchase price as well as any other claims for damages shall be excluded.
Garantle FR

- Explanation of the symbols on the equipment
- Introduction
- Manufacturer:
- scheppach
- Note:
- We recommend:
- Device description
- Fig.1-20
- Engine components
- Scope of delivery
- Attention!
- DANGER
- Intended use
- Safety information
- WARNING
- CAUTION
- NOTE
- General safety informations
- Keep your work area tidy
- Take environmental influences into account
- Keep other persons away
- Securely store unused tools
- Do not overload your device
- Wear suitable clothing
- Wear personal protective equipment
- Avoid abnormal working postures
- Work in full consciousness
- Use the device for its prescribed purpose
- Safety instructions for handling flammable supplies
- Adding fuel
- Specific safety instructions for handling the device
- Safety informations service/ maintenance and storage
- Storage
- Long term storage/hibernation
- WARNING
- Residual risks and accident prevention standards
- Electrical residual risks
- Electrical contact
- Thermal residual risks
- burns, chilblains
- Danger from noise
- hearing damage
- Danger caused by materials and other substances
- Contact, inhalation
- Fire, explosion
- In case of emergency
- If you obtain aid please give the following informations:
- Technical data
- Subject to technical modifications!
- Before starting up
- Always check before starting the engine:
- Filling with fuel
- Recommended fuel
- Functions and controls
- Engine switch (Fig.1/Pos.2)
- Clutch control lever (Fig.1/Pos.4)
- Throttle control (Fig.1/Pos.1)
- Left steering lever (Fig.1/Pos.5)
- Right steering lever (Fig.1/Pos.3)
- Gear selection lever (Fig.1/Pos.7)
- Fixation dump box (Fig.3/Pos.6)
- Starting engine (Fig.1/4/14)
- Cold starts
- Warm starts
- Operating
- Steering
- Idle speed
- Stopping engine
- Maintenance
- Adjusting clutch (Fig.16)
- Adjusting steering (Fig.17)
- Lubrication
- Oil changes
- Changing the transmission oil
- Engine Oil
- Changing the engine oil
- Recommended engine oil
- Important hint in case of sending the equipment to a service station:
- Air filter
- Clean the air filter and change air filter inserts
- Check, clean and replace spark plug (13) (Fig.11/15)
- Lubrication drive chain (Fig.9-10)
- Disassembling wheels (Fig.6)
- Cleaning
- Storage
- Recommissioning
- Transport
- Disposal and recycling
- Transport package disposal
- Troubleshooting
- Table des matieres:
- Page:
- CHER CLIENT,
- Drogi kliencie
- Garantie DE
- Garantle FR
Brand : SCHEPPACH
Model : DP3000
Category : Mini all-terrain transporter