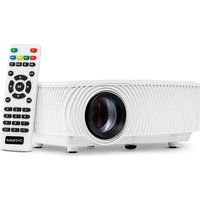
Multipic 2.4 - Projector Overmax - Free user manual and instructions
Find the device manual for free Multipic 2.4 Overmax in PDF.

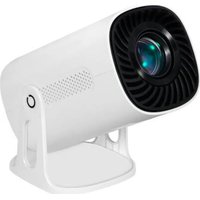
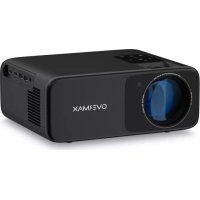
| Product Type | Portable Multimedia Projector |
| Brand | Overmax |
| Model | Multipic 2.4 |
| Power Supply | 220-240 V~, 50/60 Hz (via power cord) |
| Connectivity | HDMI, VGA, AV, USB-A, Mini-Jack (audio output), Built-in Wi-Fi |
| Main Functions | Image projection, multimedia playback (USB), wireless mirroring (Miracast / iOS Cast), keystone correction, manual focus |
| Native Resolution | Not specified (estimated: 800x480 or similar) |
| Brightness | Not specified (estimated: 150-300 lumens) |
| Contrast | Not specified (estimated: 1000:1) |
| Display Modes | Standard, Soft, Vivid |
| Aspect Ratio | 4:3, 16:9 |
| Supported Audio/Video Formats | Multimedia files via USB (movies, music, photos, text) |
| Dimensions (approx.) | Approximately 25 x 20 x 10 cm |
| Weight (approx.) | Approximately 1.5 kg |
| Safety | Do not look at the lens while operating, do not obstruct ventilation openings, avoid contact with liquids |
| Maintenance and Cleaning | Clean the exterior with a soft dry cloth; store in a dry and clean place |
| Spare Parts and Repairability | Remote control and power cord included; do not repair yourself, contact the seller or manufacturer |
| General Information | Compliant with EU directives; recycling via separate collection (WEEE) |
Frequently Asked Questions - Multipic 2.4 Overmax
User questions about Multipic 2.4 Overmax
0 question about this device. Answer the ones you know or ask your own.
Ask a new question about this device
Download the instructions for your Projector in PDF format for free! Find your manual Multipic 2.4 - Overmax and take your electronic device back in hand. On this page are published all the documents necessary for the use of your device. Multipic 2.4 by Overmax.
USER MANUAL Multipic 2.4 Overmax
natural_image
White projector with visible lens and ventilation grille (no text or symbols on body)CE
EN: The product complies with requirements of EU directives.
Pursuant to the Directive 2012/19/EU, this product is subject to selective collection. The product must not be disposed of along with domestic waste as it may pose a threat to the environment and human health. The worn-out product must be handed over to the electrics and electronics recycling center.
1. Zasilanie
PL
4. Zmiana języka
natural_image
Simple icon with a white arrow pointing right inside a rectangular box on a teal background (no text or symbols)natural_image
Green background with a white play button icon in the center (no text or symbols)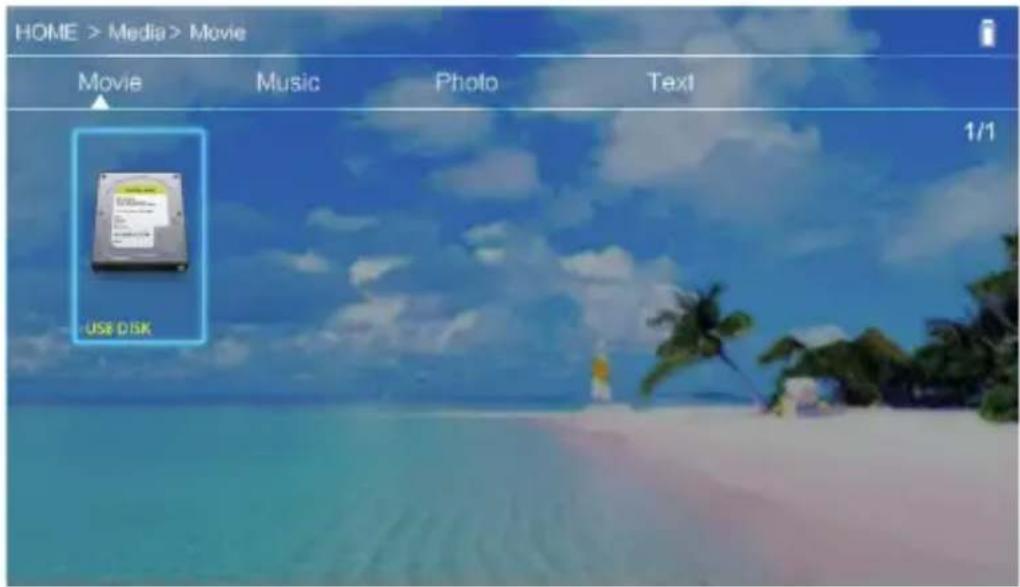
Thank you for placing trust in us and choosing Overmax.
Thanks to the use of high-quality materials and modern solutions, we provide you with a product perfect for everyday use. We are convinced that the product will satisfy your requirements as it has been designed with utmost care. Before you start using the product, please read this manual carefully.
Should you have any remarks or questions concerning the product, please do not hesitate to contact us:
Before using this projector, please read the manual carefully. Any wrong operation may cause electric shock or fire. Please comply with the following instructions when using and/or repairing the projector.
Keep this manual for future reference.
Warning:
- Before you use the product, please read this manual carefully.
- To assure stable power supply, please use a standard feeder cable which satisfies local power supply network parameters.
- Do not look into the lens when it operates.
- When the projector is on, make sure air holes are not covered. For this reason the device must not be placed on soft surfaces or be covered.
-
The projector is not waterproof and this is why you must not place any reservoirs with liquids on it or near it, such as flower pots, vases, cups, etc.
-
The projector must be stored and used in a dry and clean place.
- If you don't use the device for a long time, switch it off and unplug.
- When you move the product, please secure it with a film and other materials supplied.
- If you damage the projector, do not repair it on your own. Contact the seller or manufacturer to report the defect.
Notes:
When using the projector, please follow the guidelines included in this manual. In the event of any discrepancies between the manual and real features of the product, the latter shall apply.
Outlook
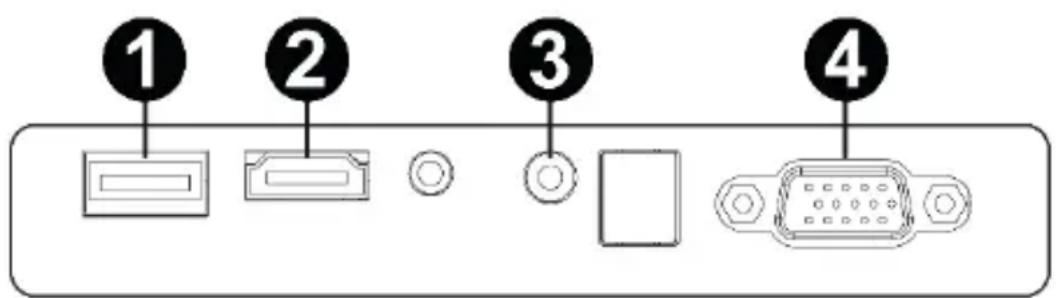
1. Rear panel
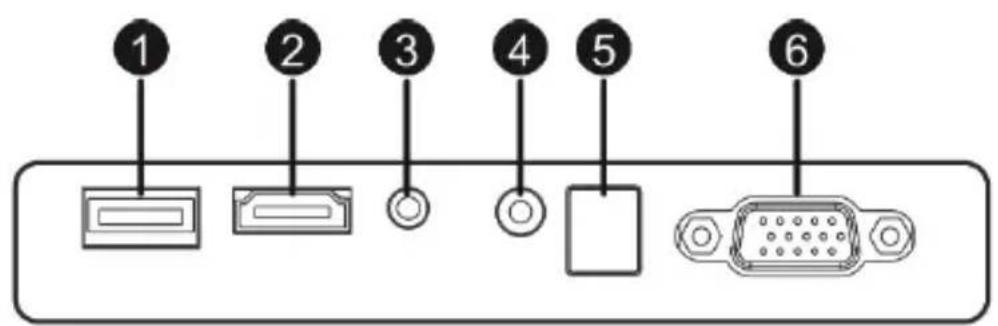
- USB-A port (input).
- HDMI port (input)
- Mini-Jack (audio output)
- AV port (input)
- IR signal receiver (remote control signal)
- VGA port (input)
EN
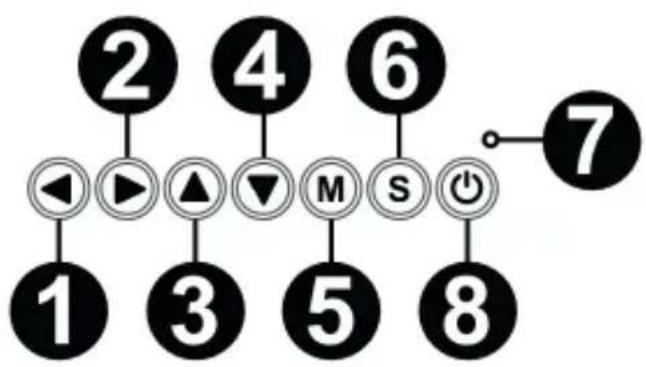
2. Top panel
- Go left
- Go right
- Go up
- Go down
- Menu/return key
- Select source of video signal
- Status LED
- On/off key
flowchart
graph TD
    1 --> 2
    2 --> 3
    3 --> 4
    4 --> 5
    5 --> 6
    6 --> 7
    7 --> 8
    1 --> 1
    2 --> 2
    3 --> 3
    4 --> 4
    5 --> 5
    6 --> 6
    7 --> 7
    8 --> 8
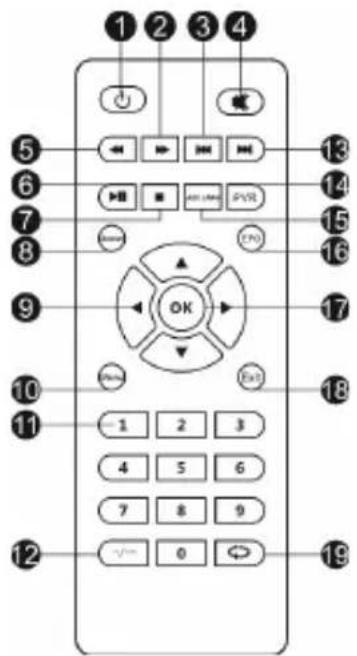
3. Remote control
- On/off switch
- Forward
- Previous
- Mute
- Rewind
- Play/pause
- Stop
- Select video source
- Menu navigation directions
- Options/return menu key
- Numerical keypad
- Edit numbers
- Next
- PVR function
- Audio language selection
-
Programs guide
-
Confir rm key
- Exit/back
- Switch between items
How to use the device:
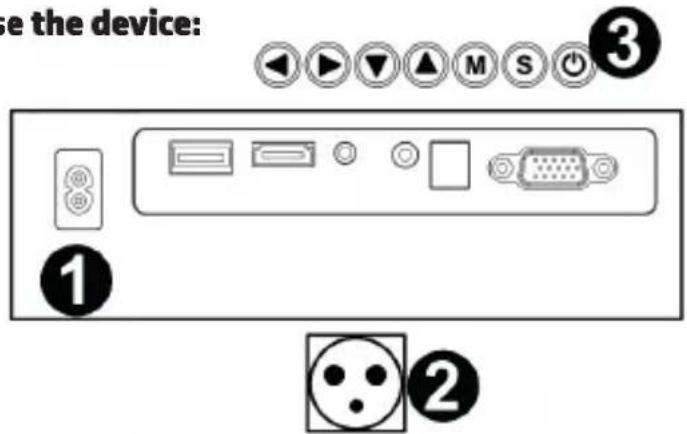
1. Power supply
Connect one tip of the feeder cable to the projector (1) and then another plug to power supply network port (2).
2. Switching on and off
To switch the projector on or off, press on/off key on the remote control or projector (3).
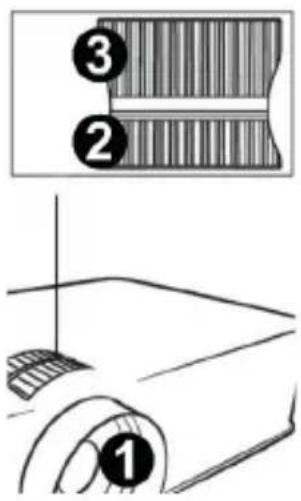
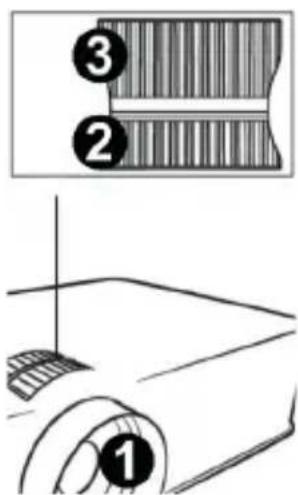
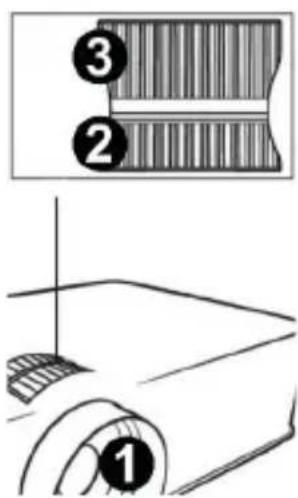
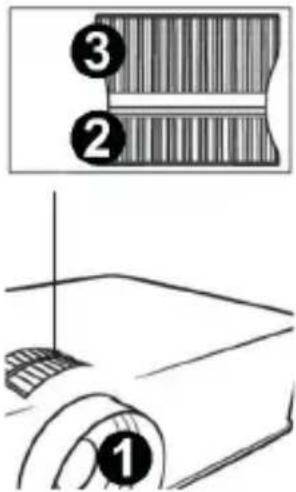
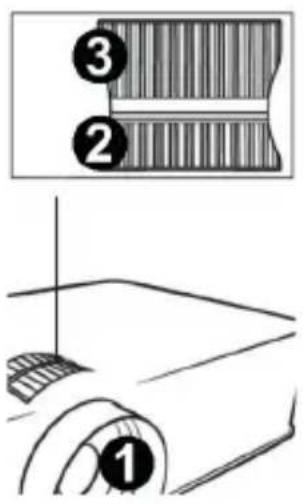
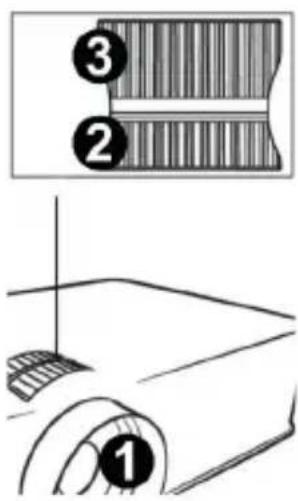
3. Sharpness and screen angle adjustment
Place the projector in a way that the lens is perpendicular to the wall or board on which the image is to be displayed. Once the device has been switched on, the main menu will be displayed:

To increase sharpness of the image, turn the sharpness knob (2) located behind the lens (1) so that the image gets sharper.
If the image is not displayed perpendicularly, it will be distorted.
Distorted image in the shape of the trapezoid (see figure below) can be adjusted with the use of a knob (3).

EN
EN
4. Language change
a) Use directional keys on the remote control to select sections (Settings) and confirm with (OK) key on the remote.
b) Select section (Advanced) and confirm your choice with (OK) key.
c) Select section (Language). Use arrows on the remote control (left, right) to set language.
d) Return to main menu by pressing (EXIT) key on the remote control.

5. Connection to Wi-Fi network
a) Use directional keys on the remote control to select sections (Settings) and confirm with (OK) key on the remote.
b) Selection section (Network) and confirm your choice.

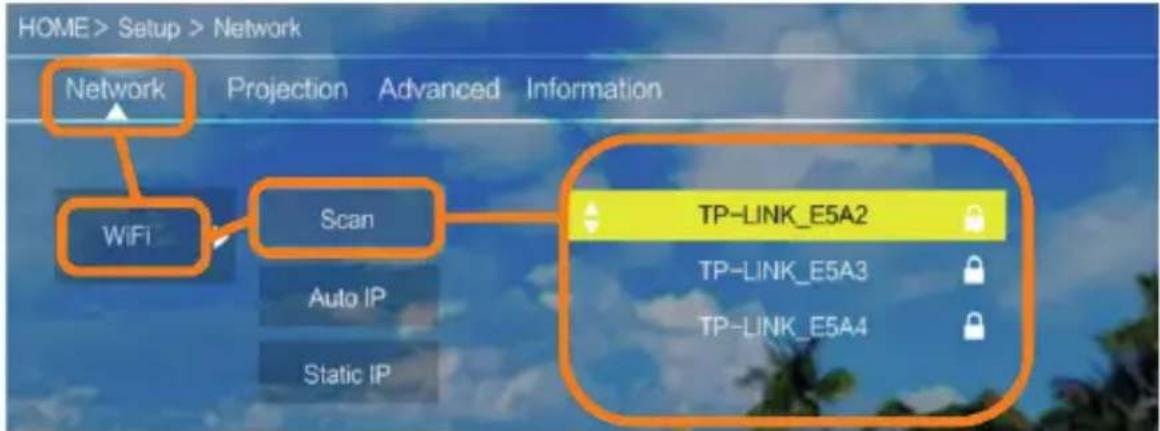
c) Selection section (Wi-Fi) and confirm your choice.
d) Select section (Scan) and confirm your choice. The projector will scan available Wi-Fi networks and display a list of networks.
e) Select name of Wi-Fi network you want to connect to and confirm your choice with (OK) key on the remote control.
f) If the network is secured with password, you will be required to enter it. Go to the fi eld (Password) and confi rm your choice.
g) The display with show a virtual keypad which you can use to enter the password. Use remote control keys to navigate it and confirm letters and digits with (OK) key. Upper-case letters can be enabled by selecting and choosing (ABC). Once you have entered a correct password, press (EXIT)
on the remote to leave the keypad. Confirm the password by selecting (Accept)/(Confirm) and press (OK).
h) To return to main menu, press (EXIT) key a few times on the remote control.
6. Connection to multimedia source through a cable
The projector allows displaying image from various devices. Depending on your device, you should use a relevant input at the back of the housing.
- USB input – such devices as pendrive, external drive
- HDMI input – such devices as PC, laptop, console, satellite receiver, telephone (supporting MHL and only through a dedicated MHL cable).
- Video-In (AV) input – such devices as console, satellite receiver.
- VGA input – such devices as PC, laptop, satellite receiver.
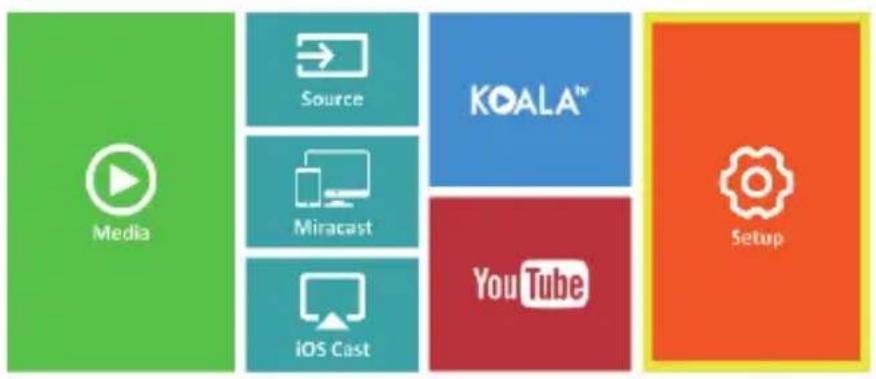
7. Selection of video source
If more than one video signal is connected to the projector, you must select the device from which the projector is to display the image.

natural_image
Simple icon with a white right-pointing arrow inside a rectangular box on a teal background (no text or symbols)a) Use directional keys on the remote control to select sections (Source) and confirm with (OK) key on the remote.
b) You will see a list of video sources (described in previous point).
c) Use directional keys on the remote to select the source from which the image is to be displayed and confirm your choice with (OK) key.
d) To return to the list of video sources, select (MENU) on the remote.
In video source selection section, you can also set image and sound parameters:
Image: display mode (standard, soft, vivid), proportions (4:3, 16:9), brightness, color, contrast, sharpness
Sound: sound mode (standard, messages, music, theater), bass, high tones, balance, equalizer.
EN
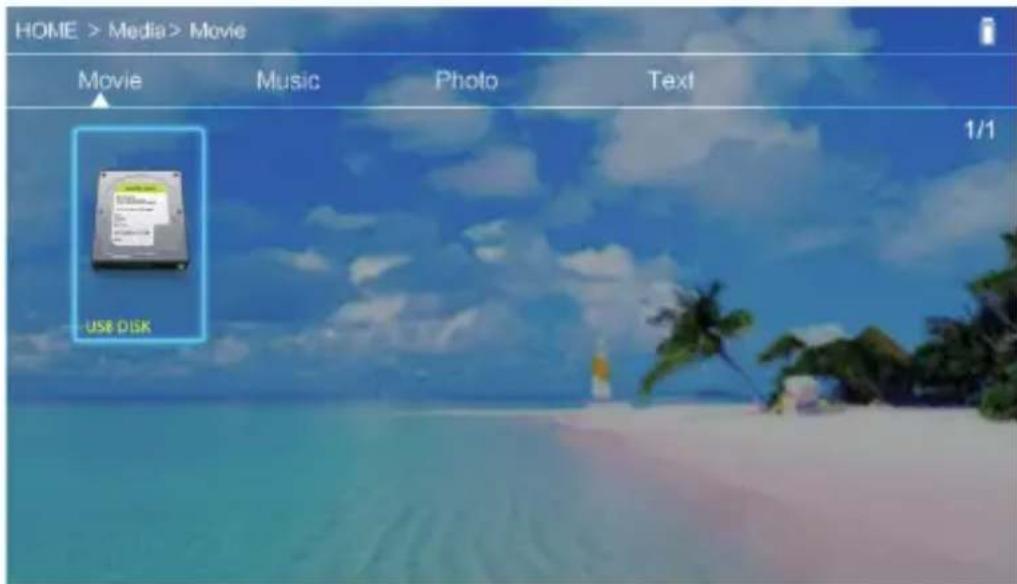
8. Connection to external drive
To play multimedia from pendrive or external drive, follow the steps below:
a) Connect the drive to USB-A port at the back of the housing.
b) Use directional keys on the remote control to select sections (Media) and confirm with (OK) key on the remote.

natural_image
Green background with a white play button icon in the center (no text or symbols)
If the drive has been detected properly, you will be able to browse its content by categories: fi lms, music, pictures, text.
The fi les in these categories may be browsed and displayed on the screen. To navigate between them, use directional keys on the remote control and confirm your choice with (OK) key.
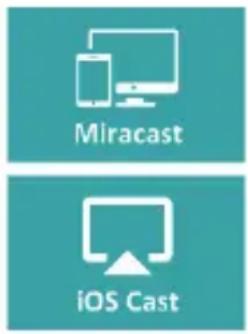
9. Wireless video connection to mobile devices
The projector is equipped with a wireless Wi-Fi connection unit which allows displaying image from mobile device without cables. Only mobile devices compatible with MIRACAST technology can transmit image to the projector.
a) Use directional keys on the remote control to select sections (Miracast) if you use Android-based device, compatible with Miarast. If you use Apple device with iOS system, choose (iOS Cast). Once you have selected, confirm it with (OK) key on the remote.
b) Enable Wi-Fi in mobile device.
c) Depending on the device, the connection through „Miracast“ may differ.
Android devices: search for settings defined as Miracast
or screen mirroring or connection with screen. Next enable searching for active wireless screens. Then find a device called „ZYCast” and connect to it. Apple devices with iOS system: Make sure the projector and device from which you want to display image are connected to the same Wi-Fi network. Enter the control panel and select screen mirroring, then find the device called „ZYCast” and connect to it.
If you have any connection issues, return to Wi-Fi network connection settings (described in point 5). Select (AUTO-IP) and confirm. Next return to connection screen (iOS Cast) and repeat the steps on the phone.
EINLEITUNG
DE
DE
natural_image
Simple icon of a right-pointing arrow inside a rectangular box on a teal background (no text or symbols)natural_image
Green background with a white play button icon in the center (no text or symbols)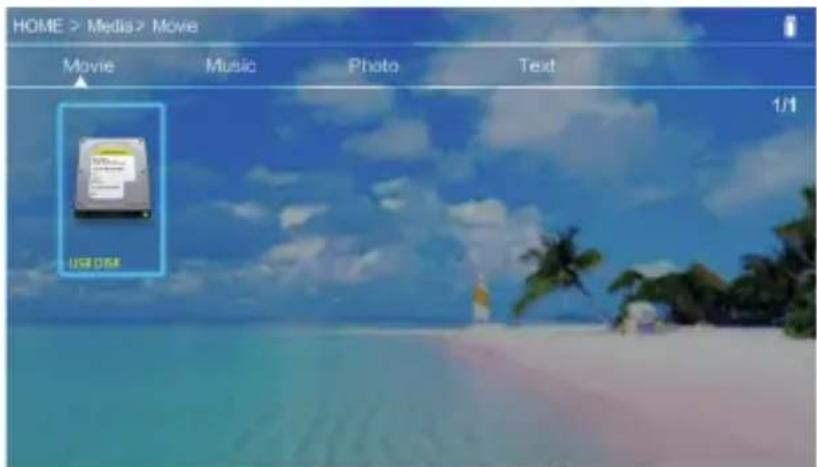
1. Alimentazione

IT
natural_image
Simple icon with a white right-pointing arrow inside a rectangular box on a teal background (no text or symbols)natural_image
Green background with a white play button icon in the center (no text or symbols)
1. Alimentation
natural_image
Simple icon with a white arrow inside a rectangular box on a teal background (no text or symbols)natural_image
Green background with a white play button icon in the center (no text or symbols)

4. Cambio de idioma
natural_image
Simple icon with a white arrow inside a rectangular box on a teal background (no text or symbols)natural_image
Green background with a white play button icon in the center (no text or symbols)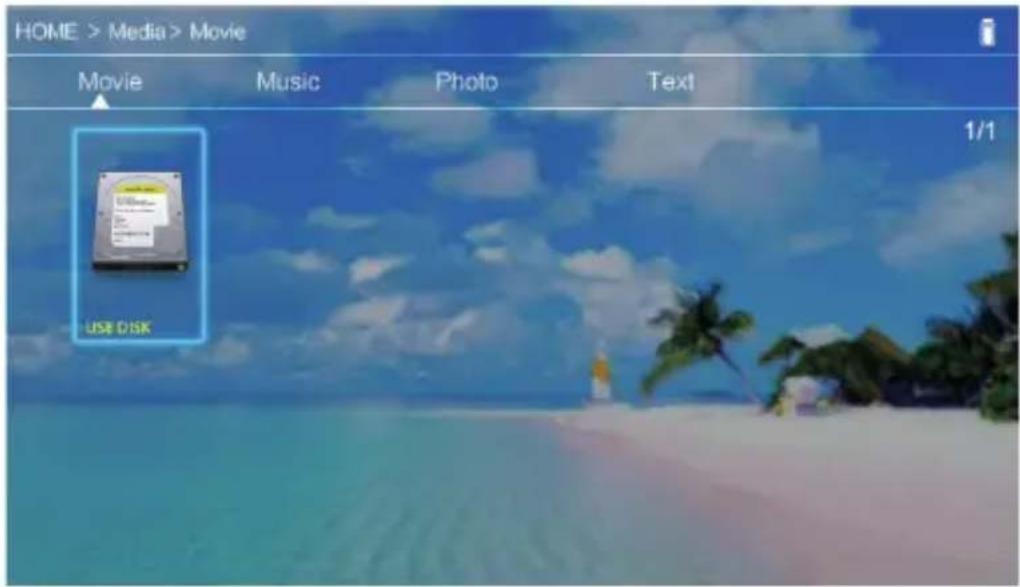
NL
4. De taal wijzigen
natural_image
Simple icon with a white right-pointing arrow inside a rectangular box on a teal background (no text or symbols)natural_image
Green background with a white play button icon in the center (no text or symbols)
1. Живлення
UK
4. Зміна мови
natural_image
Simple white arrow pointing right inside a rectangular box on teal background (no text or symbols)natural_image
Green background with a white play button icon in the center (no text or symbols)UK

natural_image
Simple white arrow pointing right inside a rectangular box on teal background (no text or symbols)natural_image
Green background with a white play button icon in the center (no text or symbols)LT

1. Napajanje
Da biste poboljšali oštrinu projicirane slike, okrenite prsten fokusa (2) iza leće (1) dok slika ne postane oštrija. Ako slika nije okomita, iskrivit će se. Trapezoidno iskrivljena slika (slika dolje) može se ispraviti okretanjem gumba (3).

HR
4. Promjena jezika
natural_image
Simple icon with a white arrow inside a rectangular box on a teal background (no text or symbols)natural_image
Green background with a white play button icon in the center (no text or symbols)