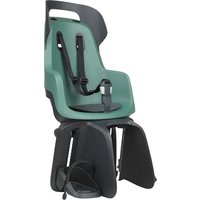
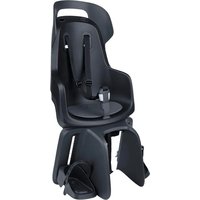
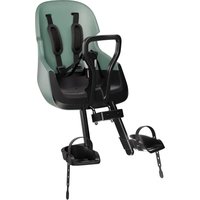
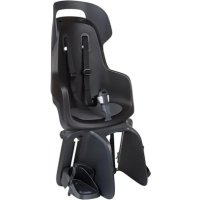
GO mini - Child bike seat Bobike - Free user manual and instructions
Find the device manual for free GO mini Bobike in PDF.

User questions about GO mini Bobike
0 question about this device. Answer the ones you know or ask your own.
Ask a new question about this device
Download the instructions for your Child bike seat in PDF format for free! Find your manual GO mini - Bobike and take your electronic device back in hand. On this page are published all the documents necessary for the use of your device. GO mini by Bobike.
USER MANUAL GO mini Bobike
bicycle safety seats

natural_image
Line drawing of a bicycle with a knife inserted into the seat (no text or symbols)
natural_image
Simple icon of a wrench inside a circle (no text or symbols)Assembly Instructions Quick Guide
natural_image
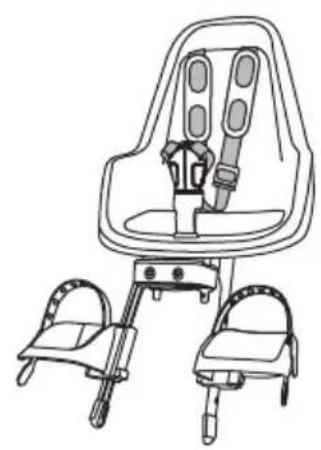
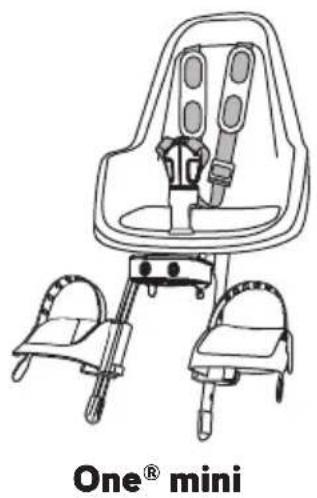
Line drawing of a baby car seat with two side seats and a backrest seat (no text or symbols)Go® mini
natural_image
Line drawing of a car seat with two side seats and a backrest seat (no text or symbols)One® mini
head tube mounthead tube mount

text_image
QR code image in white on black circular background, no readable text or symbols beyond the matrix pattern
text_image
QR code image in white on black circular background, no readable text or symbols beyond the matrix pattern
Extended Warranty
register your seat at
www.bobike.com
and get
1 extra warranty year
Icon Index
EN. ICONS INDEX
CS. INDEX IKON
FR. INDEX DES IMAGES
HR. INDEKS IKONA
HU. SZIMBÓLUMMUTATÓ
IT. INDICE DELLE ICONE
JP. アイコン索引
LT. PIKTOGRAMU RODYKLÉ
NL. ICONEN INDEX
PL. LISTA IKON
PT. ÍNDICE DE ÍCONES
RO. INDEX IMAGINI
RU. УКАЗАТЕЛЬ СИМВОЛОВ
SK. INDEX IKON
SL. KAZALO IKON
SV. IKONER INDEX
TH. ส ัญล กษณ
TR. SIMGE DIZINI
EN. ATTENTION! IMMINENT DANGER! Failure to comply with these operating instructions can lead to serious injury or death of the bicycle operator and/or child.
CS. POZOR! HROZÍ OKAMŽITÉ NEBEZPEČÍ!
FR. OK ! CORRECTEMENT ASSEMBLÉ
HR. OK! PRAVILNO SASTAVLJANJE
LT. NEGERAI! DRAUDŽIAMA
NL. NIET OK! VERBODEN
PL. NIEPOPRAWNE! ZABRONIONE
PT. ERRADO! PROIBIDO
RO. NU ESTE BINE! INTERZIS
RU. НЕПРАВИЛЬНО! ЗАПРЕЩЕНО
SK. NIE JE TO V PORIADKU! ZAKÁZANÉ
SL. NI V REDU! PREPOVEDANO
SV. INTE OK! FÖRBJUDEN
Specific Instructions for Use
recommended
child age
9 months to 3 years
Jérômez Aler des Kiesles
maximum
child height
maximale Kösterhöhe
93 cm / 36,61"
not for speed pedalecs
adjustable 3-point safety belt
cristelbauer
3 point Sicherheitsgare
water-proof cushion
wassendichres Kissen
natural_image
Simple line drawing of a bicycle and a human figure walking (no text or symbols)

NOT OK
NICHT OK
natural_image
Illustration of a person riding a bicycle with an arrow indicating direction, next to a stick figure (no text or symbols)

NOT OK
NICHT OK
natural_image
Illustration of a person riding a bicycle with motion lines indicating speed (no text or symbols)

NOT OK
NICHT OK
Product Index
EN. PRODUCT INDEX
CS. INDEX PRODUKTU
DA. OVERSIGT OVER PRODUKTET
FR. INDFX DU PRODUIT
HR. INDEKS PROIZVODA
HU. TERMÉKMUTATÓ
IT. INDICE DEL PRODOTTO
JP.製品索引
LT. GAMINIŲ RODYKLĖ
NL. PRODUCTEN INDEX
PL. LISTA PRODUKTÓW
PT. ÍNDICE DO PRODUTO
RO. INDEX PRODUSE
Specific Instructions for Use
flowchart
graph LR
    A["Person reading book with 'i'"] --> B[" wrench "]
    B --> C[" exclamation mark "]
EN. Carefully follow this quick guide for a correct and safe assembly. Important safety and assembly instructions are listed there. The reading of the instruction's user manual is mandatory.
text_image
I A babike AI E babike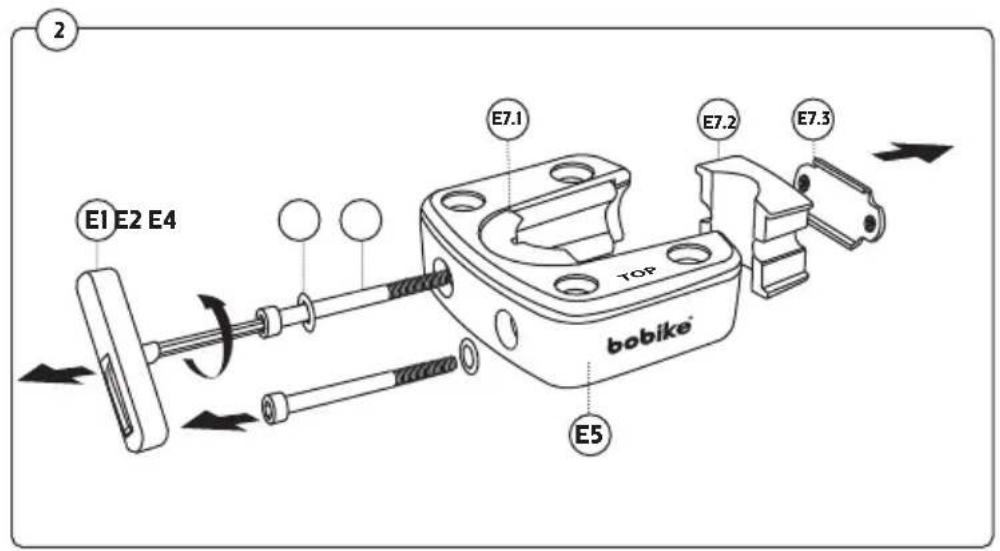
text_image
E1 E2 E4 E7.1 E7.2 E7.3 TOP bobike® E5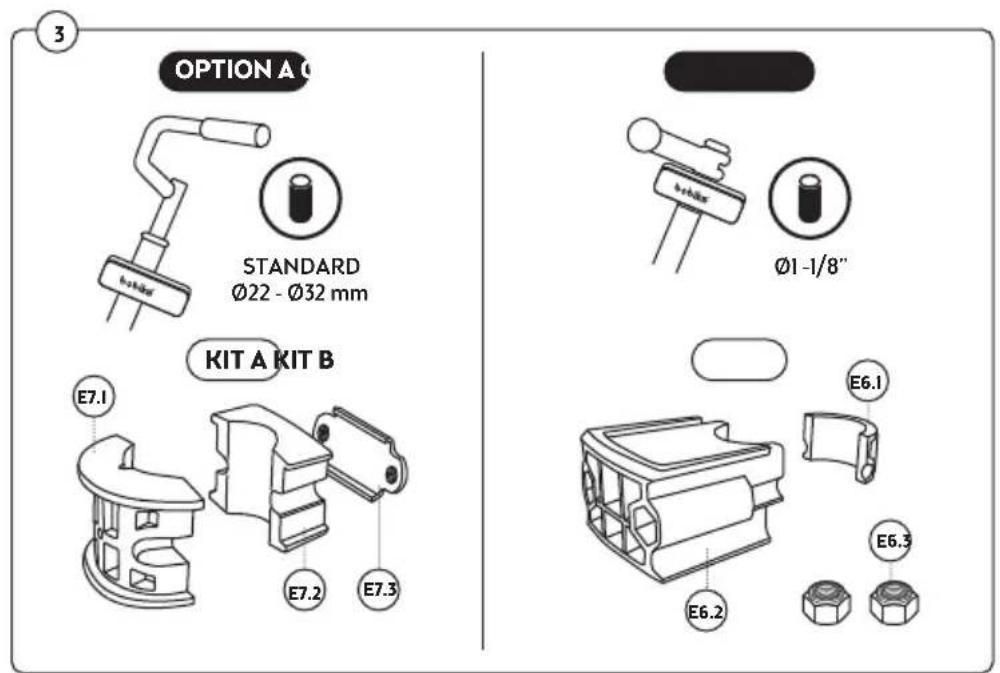
text_image
OPTION A STANDARD Ø22 - Ø32 mm KIT A KIT B E7.1 E7.2 E7.3 Ø1 -1/8" E6.1 E6.2 E6.3OPTION A
text_image
E1 E4+ E2 E7.1 E7.2 E7.3 TOP bobike® E5 TORQUE 6.N.m. bobike® bobike® TOP bobike®OPTION B
text_image
Diagram showing two hands operating a mechanical device with labeled parts 1 and 2, indicating different components or states.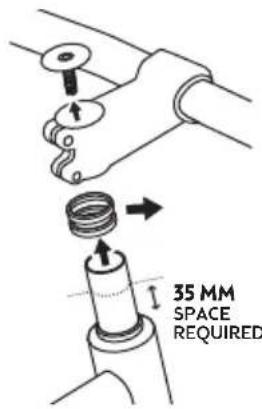
text_image
35 MM SPACE REQUIRED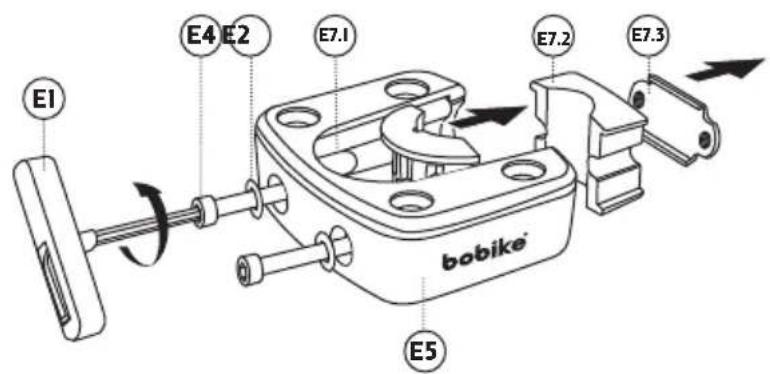
text_image
E1 E4 E2 E7.1 E7.2 E7.3 E5 bobike®!
natural_image
Technical line drawing of a mechanical component with no visible text or symbols
text_image
E6.1 E4 TOP E2 E5 E1
text_image
E6.2 E6.1 Bocke®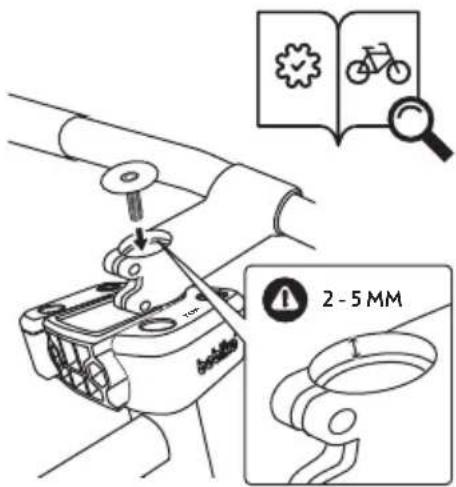
text_image
Diagram illustrating bicycle gear assembly with labeled parts and safety warning icon
text_image
E6.3
text_image
TORQUE 6.N.m. TOP bobike® EI4
text_image
OPTION A TOP TOP TOP ✓ ✓ E E5
text_image
A1 E5.1 TOP bobike E5 A TOP bobike E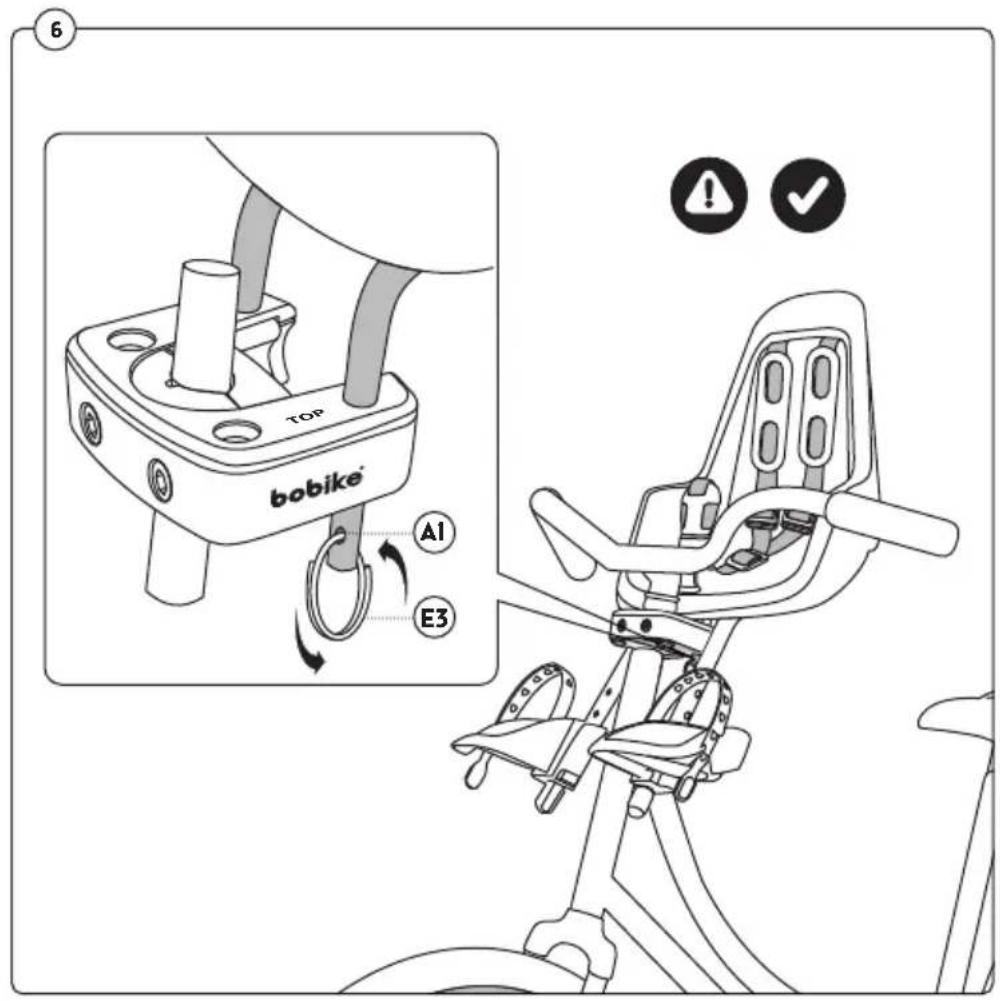
text_image
TOP bobike A1 E3 6 ! ✓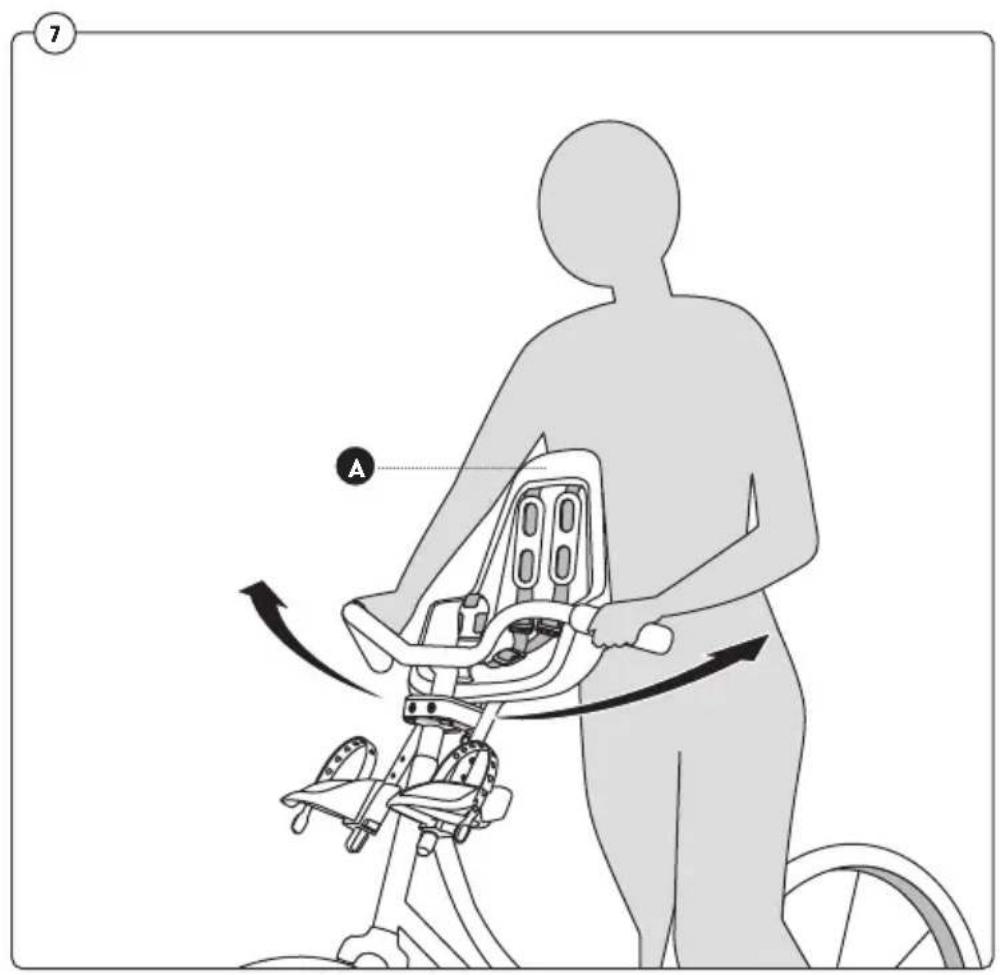
text_image
7 A1
OPTION A

How to Secure the Child in the Seat
text_image
1st B2.1 2nd BI 3th BI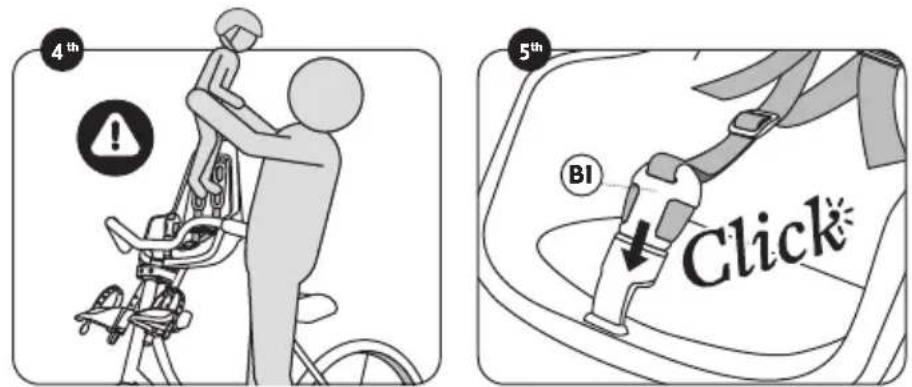
text_image
4th 5th BI Click*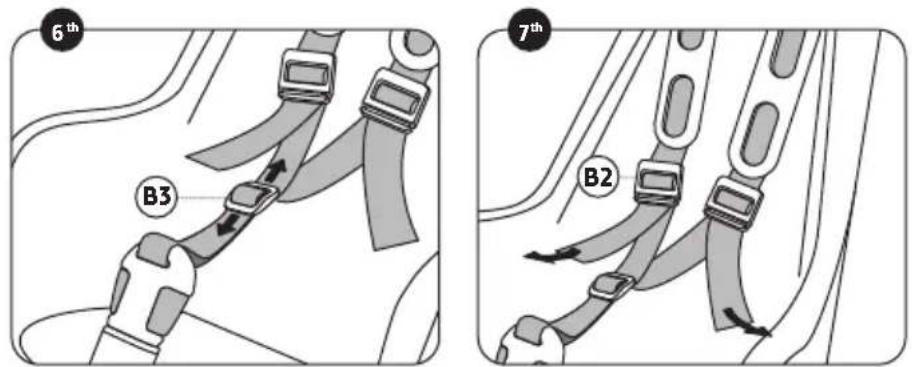
text_image
6th B3 7th B21
OPTION B

How to Secure the Child in the Seat
natural_image
Line drawing of a car seatbelt buckle assembly (no text or symbols)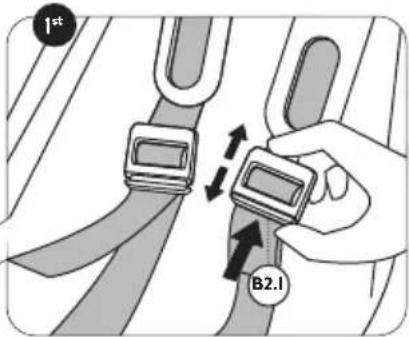
text_image
1st B2.1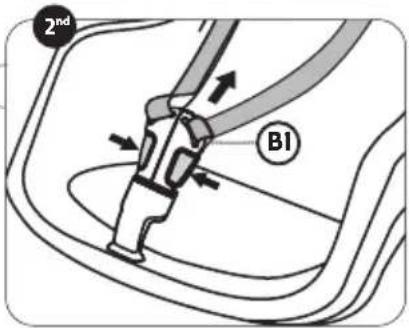
text_image
2nd B1
text_image
3th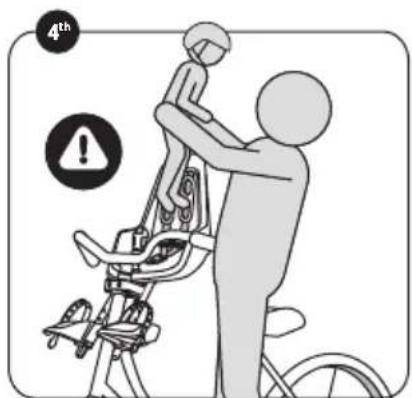
text_image
4th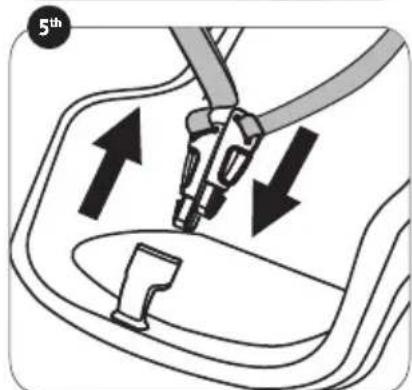
text_image
5th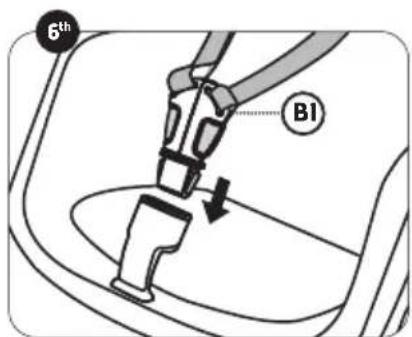
text_image
6th BI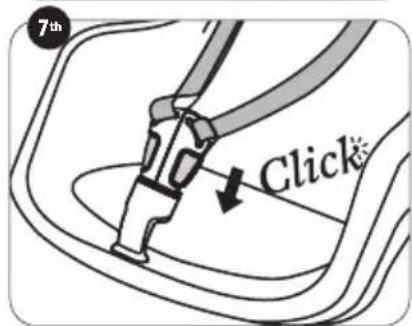
text_image
7th Click
text_image
8th B22
text_image
Technical diagram showing a child's seat and backseat assembly with labeled parts D2 and directional arrows indicating movement or adjustment.
text_image
DI
text_image
DI
text_image
Diagram illustrating safety instructions for a device, showing step-by-step installation with check and warning symbols.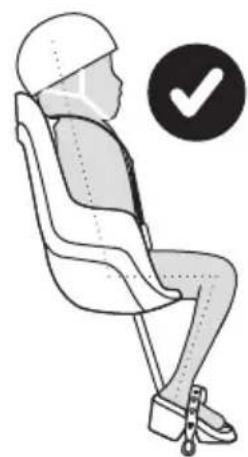
natural_image
Side view of a person seated in a chair with a checkmark icon (no text or symbols on the diagram itself)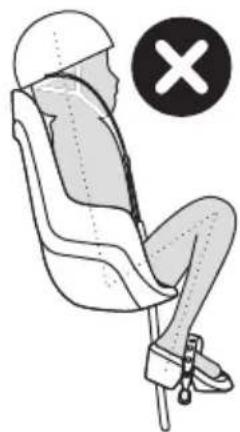
natural_image
Illustration of a person sitting in a chair with a cross symbol indicating no change or absence (no text or labels present)1
How to Remove the Seat from bicycle
text_image
TOP bobike® E3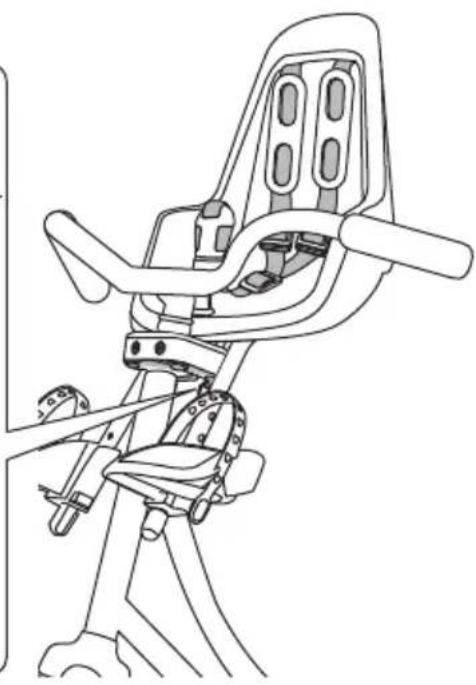
natural_image
Line drawing of a bicycle rear seat assembly (no text or symbols)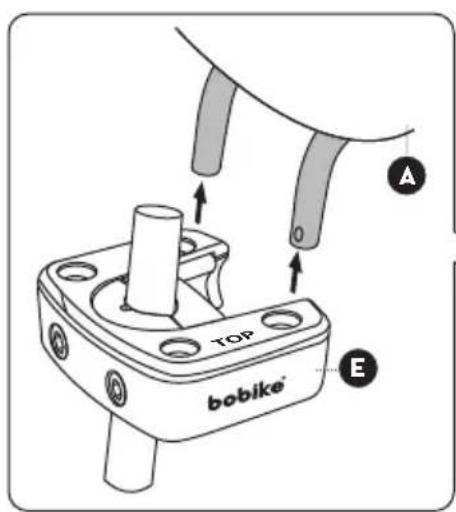
text_image
TOP bobike® A E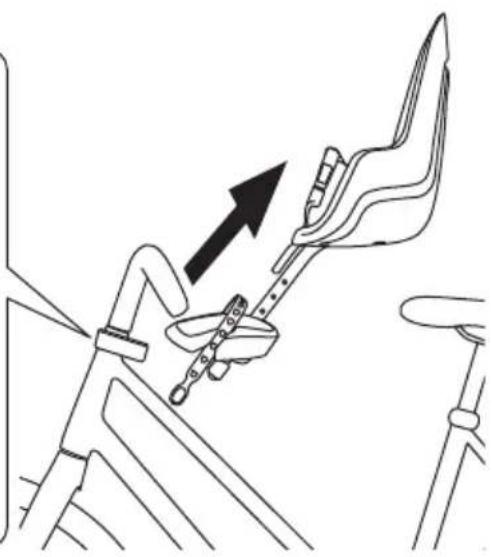
natural_image
Line drawing of a mechanical device with an arrow indicating direction (no text or symbols)bobike®
bicycle safety seats
natural_image
Line drawing of a bicycle with a flag-like object attached (no text or symbols)
natural_image
Symbolic icon of an open book with a lowercase 'i' inside, enclosed in a circle (no text or symbols present)Assembly Instructions
User Manual
Specific Instructions for Use
flowchart
graph LR
    A["Person with letter 'i'"] --> B["Person with checkmark and dot"]
    B --> C["Warning symbol"]
EN. The reading of instructions manual is mandatory. Carefully follow this instruction's user manual for a correct and safe assembly. The reading of the quick guide is mandatory.
natural_image
Line drawing of a Go mini car seat assembly (no text or symbols on the diagram itself)head tube mount
natural_image
Line drawing of a baby seat with two side seats and a backrest seat, labeled 'One® mini' below (no other text or symbols)head tube mount

text_image
Mounting Instructions Me
text_image
QR code image in white on black circular background, no readable text or symbols beyond the matrix pattern
Extended Warranty
register your seat at
www.bobike.com
and get
1 extra warranty year

Assembly Instructions
User Manual
Montageanleitung
Gebrauchsanleitung
EN. pag.4
CS. pag.8
DA. page 12
DE. pag.16
EL. pag.20
ES. pag.24
Fl. pag.38
FR. pag.32
HR. pag.36
HU. pag-10
IT. pag.44
JP. pag.48
LT. pag-52
NL. pag56
PL. pag.60
PT. pag.64
RO. pag.68
RU. mag.72
SK. pag.76
SL. pag.80
SV. pag.84
TH. pag.88
TR. pag.92
UK. pag.96
ZH. pag.100
Table of Contents of Product
A. Main seat
A1. Steel fixing rod ends
B. Retention system harness
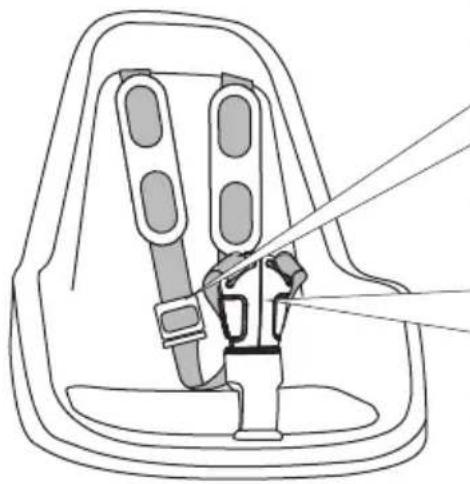
B1. Safety buckle
B2. Height strap adjusters
B2.1. Adjustment button
C. Cushion
D. Footrest
D1. Footrest strap
D2. Footrest adjustment button
D3. Footrest strap fixing peg
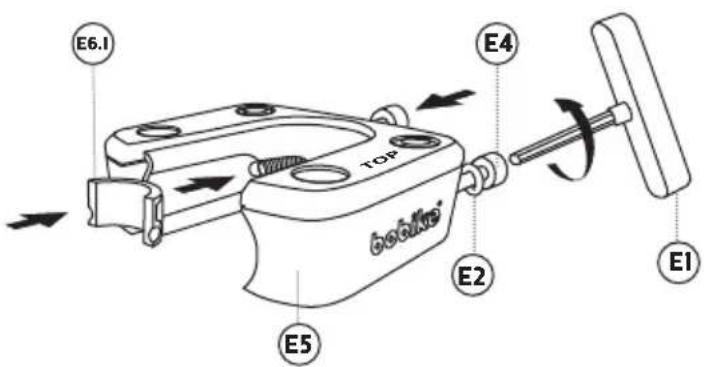
E. Mounting block
E1. Key
E2. 2 x Washers
E3. Split ring
E4. 2 x M6 bolts
E5. Mounting block body
E5.1 Holes to insert the A1 rods
E6. Kit B - for MTB Bicycle - 1-1/8"
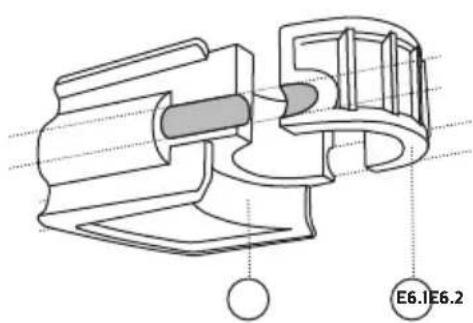
E6.1 Front spacer of KIT B
E6.2 Rear fastening part of KIT B
E6.3 2 x nuts for KIT B
E7. Kit A - Standard for ∅ 22-32 mm handlebars
E7.1 Front spacer of KIT A
E7.2 Rear fastening part of KIT A
E7.3 Steel fastening plate for KIT A
F. Batch serial number
ATTENTION
This product contains small parts like bolts, plastic bags, and small packaging hangers. Keep them out of reach of children to avoid suffocation hazards.
Specific Instructions For Mounting
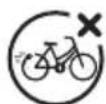
- This child bicycle seat must not be mounted in folding bicycles.
- This child bicycle seat must not be mounted to bicycles fitted with rear shock absorbers.
- This child bicycle seat must not be mounted to motorized vehicles such as mopeds and scooters.
- This child bicycle seat must not be mounted in bicycles with triangular, square, or carbon fiber frames.
- This child bicycle seat is only suitable for carrying children with a maximum weight of 15 Kg, and a maximum height of 93cm (and children with recommended ages ranging from 9 months up to 3 years of age - with the weight and height as the decisive variables).
- This child bicycle seat must be assembled on bicycles with round frames with diameters ranging from ∅22 to ∅32 mm.
- The child bicycle seat must be assembled on bicycles with wheels with diameters of 26", 27,5", 28 and 29".
• The total weight of the cyclist and the child transported must not exceed the maximum
permitted load permitted for the bicycle. Information on the maximum load can be found in the operating instructions of the bicycle. You can also contact the manufacturer for this question.
- The seat may only be mounted on a bicycle suitable for the attachment of such additional loads. Please consult your bicycle instructions manual.
• The position of the child bicycle seat must be adjusted so that the bicycle rider does not touch the child bicycle seat with the feet when in motion.
- It's very important to correctly adjust the seat and its component parts for optimum comfort and safety of the child. It's also important that the seat does not slope forward so that the child does not tend to slide out of it. It is also important that the backrest slope backward slightly.
- Check if all parts of the bicycle function correctly with the child bicycle seat mounted.
- Check the instructions of the bicycle, and if you have any doubts about fitting the child bicycle seat to your bicycle, please contact your bicycle supplier for further information.
Specific Instructions for Mounting the Seat in the Bicycle
-
Cut the security device so as to remove the mounting block (E) from the steel rod (A1). Then, pull the mounting block (E) down to release it.
-
Remove the 2 bolts (F4) and washers (F2) from the mounting block (F). Use the key (F1).
-
Choose kit A or B. Consider whether your bike
allows the Standard Kit (Option A) to be fitted or, in the case of an MTB bike, whether the special kit (Option B) is required.
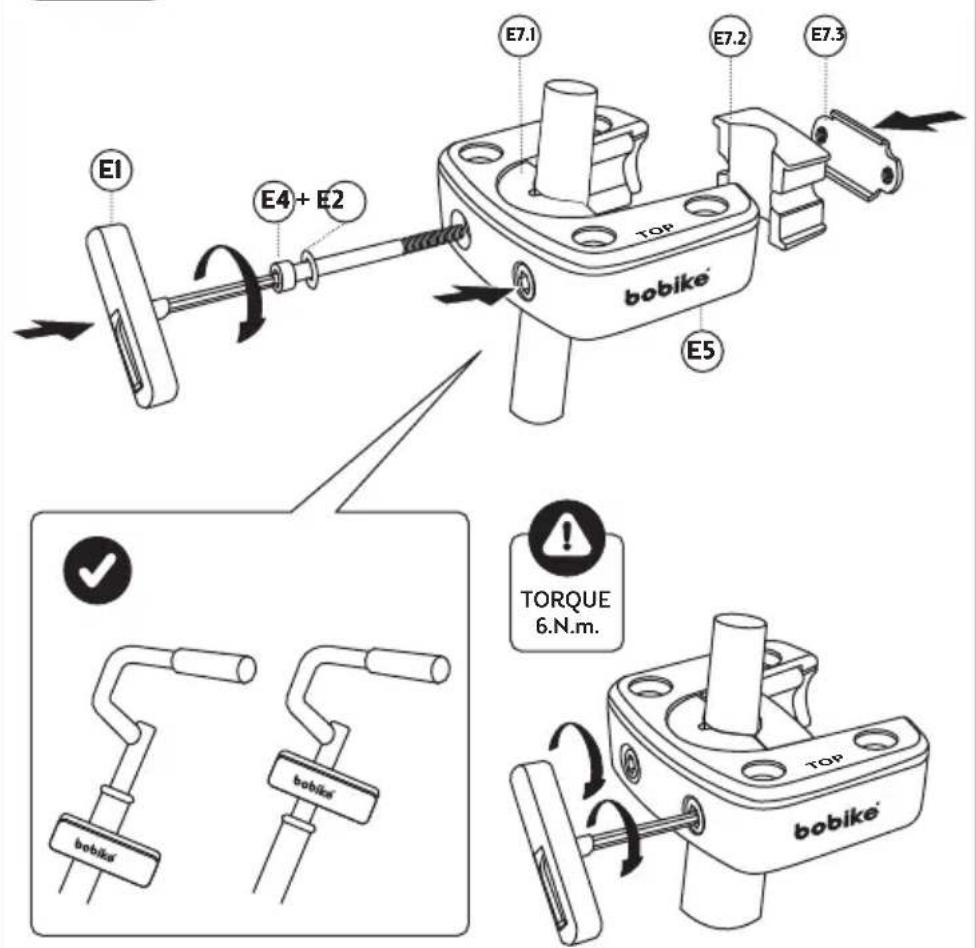
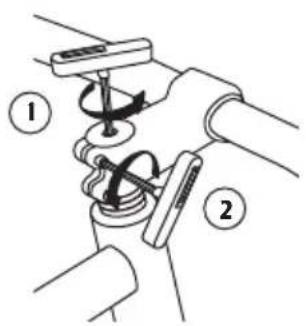
Option A: Assembling with standard kit for ∅ 22-32mm steering tubes.
First, make sure that the body of the block (E5) faces
up - the word "TOP" must face up. Then make sure that the front spacer of KIT A (E7.1) is correctly applied to the body of the Mounting Block (E5) as shown. Then offer up the assembly to the steering tube.
Next offer up the rear part (E7.2 + E7.3) so that the block entirely surrounds the steering tube. Then insert the 2 bolts (E4) and washers (E2) into the mounting block (E).
Finally tighten the bolts using the key (E1). Make sure that the mounting block (F) is tightly fixed and does not move - correct tightening is extremely important for the child's safety. We recommend tightening with a 6 N.m torque. This step is extremely important for child and cyclist safety.
Option B: Assembling the 1-1/8" kit on an MTB bike steering tube.
Firstly, if necessary, remove the handlebar to obtain the required space to assemble the block - remove the original spacers of the steering tube. Then loosen the bolts to remove the block (E7.1 + E7.2 + E7.3) that is by default applied to the metallic block. No need to remove the bolts.
Before inserting the Kit B (E6.1 + E6.2), make sure the two parts are aligned as shown in the picture and that the slots of both coincide.
Correctly place the front spacer of Kit B (E6.1) in the body (E5) of the block. The slot must be at the bottom to accommodate the bolts.
Make sure that the mounting-block body (E5) faces up - the word "TOP" must face up. Then place the kit on the steering tube as shown.
Position the mounting block (E5) as shown and slot in the rear part of Kit B (E6.2). Make sure that the slot of this part is at the bottom, aligned with the smaller part and with the bolts already inserted into the block (E5).
Having positioned the block (E5) and its Kit (E6), it will now be subject to final tightening. For the purpose place the nuts (E6.3) in the corresponding rear holes of the larger part of the Kit (E6.2). Please note that these nuts are self-threading, so they must be correctly fitted - the blue circle must face out.
Finally tighten the bolts using the key (E1). Make sure that the mounting block (E) is tightly fixed and does not move - correct tightening is extremely important for the child's safety. We recommend tightening with a 6 N.m torque. This step is extremely important for child and cyclist safety.
-
Having concluded option A or option B, make sure that the mounting block (E) is secure and properly aligned with the handlebar and the wheel. The mounting block (E) must be fitted as low as the steering tube allows.
-
To assemble the child seat insert the two ends of the steel rod (A1) of the child seat into the corresponding holes (E5.1) of the mounting block (E5). You will hear a slight click when the operation is complete and you will see that the ends of the steed rod (A1) appear beneath the mounting block (E).
-
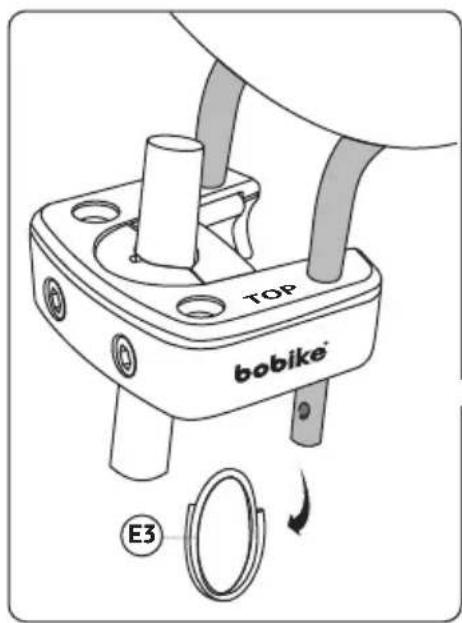
Having fitted the child seat (A) to the mounting block (E), conclude this stage by inserting the safety ring (E3) in the hole at the end of the steel rod (A1). This step is extremely important for the child's safety. Make sure the child seat is upright.
-
Then sit on the bike and make sure that steering and braking are not affected by any component of the child seat. Also make sure that there is enough space for the child between the seat and the handlebars.
How to safely place and secure the child on the seat
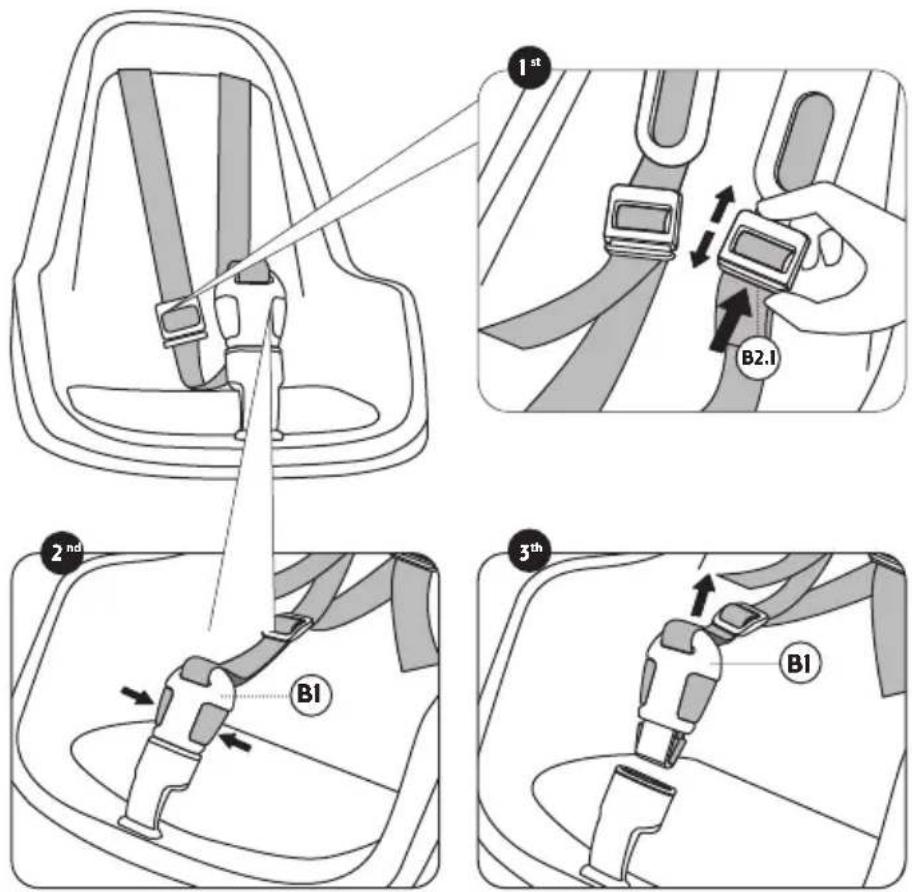
- To safely place the child on the seat you must place the bicycle on flat and solid ground for maximum bicycle stability. Even if your bicycle offers robust quick stands, you must always hold the bicycle, while placing/ removing the child. You must carry your child in your lap and safely place him on the seat. It's forbidden for the child to climb alone on the bicycle or using the footrests to reach the seat. To place the child in the seat, first fully extend the retention system harness (B), by pressing the adjuster button (B2.1) of the belt guide (B2), then pull it up - this makes it easier to put the child in the seat.
Option A: Open the safety buckle (B1) by pressing the safety buckle button. Seat the child, place the shoulder straps and then close the safety buckle, adjust the belt length using the strap adjusters, so that your child is securely restrained.
Option B: Open the safety buckle (B1) by pressing the safety buckle button, After releasing the buckle, detach both sides by sliding one up and the other down. Seat the child, place the shoulder straps and then connect it by sliding the two parts of the buckle together and close the safety buckle. Before fastening the buckle, ensure that both sides are securely connected.
Before starting the journey, always check that the child is secured and that the belt is snug but not so tight that it hurts the child. According to the child growth, current height, and weight, you can adjust the height of the retention system harness (B) on all the strap adjusters (B2), by pulling up or down the straps until reaching the desired size.
- To remove the footrest strap, lift it slightly to release it from the footrest peg (D3) and slide it upwards to disengage it from the footrest slot (D). Put the child's foot in place. To fix the strap (D1), place its narrower part of the footrest slot. Then pull the strap down to fasten the appropriate hole to the footrest pin (D3). On conclusion of these steps the footrest strap (D1) is securely fastened to the peg (D3).
Next, adjust the height of the footrest to the child's size. For the purpose, press the footrest button (D2) and slide the footrest (D) up or down as appropriate. Release the button to fix the footrest (D) in the desired position. You will hear a slight click when the operation is complete and the button (D2) will jump to its normal position. Note - The chosen position should cause the child's knee to be slightly straighter rather than bent, a more comfortable position.
How to Remove the Seat from the Bicycle
- To remove your child seat remove the split ring (E3) and pull the child seat upwards and backwards to release it from the mounting block (E).
Attention
Make sure you have followed and fulfilled all the instructions given. When done so, the child bicycle seat is ready for use.
IT IS MANDATORY TO READ the following chapter on safety instructions about using your child bicycle seat.
Specific Instructions for Use
- Remove the non-safety-related stickers from the child bicycle seat before use.
• The rider must be at least 16 years of age. - Check for any laws and regulations that might be in force in your country, relating to the carrying of children in seats attached to cycles.
- Carry only children that can sit unaided for a longer period, at least as long as the intended cycle journey.
- Do not carry a child less than 9 months of age in this child bicycle seat. To be a passenger, the child must be able to sit up straight with the head held upright while wearing a bicycle helmet. A doctor should be consulted if the child's growth is questionable.
- Make sure that the weight and height of the child do not exceed the maximum capacity of the seat, and check this at regular intervals. Check the weight of the child before using the child seat. Under no circumstances should you use the child bicycle seat to transport a child whose weight is above the permissible limit.
- Make sure to check from time to time that the weight and height of the child do not exceed the maximum permissible load of the seat.
• Make sure that it is not possible for any part of the child's body or clothing to come into contact with moving parts of the seat or bicycle and check this as the child grows. - You must cover any sharp or pointy objects on the bicycle (e.g. frayed cables) that may be reached by the child, in any situation.
- When the child bicycle seat is not in use, fasten the waist buckle of the security harness to prevent the straps from dangling and entering in contact with some turning part of the bicycle as wheels, brakes, etc. as these may be a hazard to the cyclist.
- Secure the child into child bicycle seat ensuring that all the safety belts and straps applied firmly but not so
tight as to cause discomfort to the child.
- Check the security of fastners frequently.
- You must ensure that you always use the restraint system, and that the child is secured in the seat.
- Dress the child in proper clothes according to weather conditions.
• Children in child seats need to be more warmly dressed than riders of cycles and should be protected from rain.
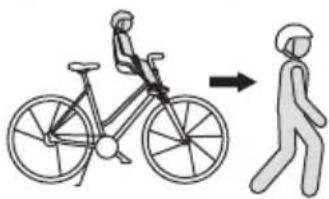
- Remove the seat when transporting the bicycle by car (outside the car). Air turbulence might damage the seat or loosen its fastenings or other suspended elements, which could lead to an accident.
- Accompanying persons should carefully consider stability / balance when placing the child on the bike in the seat.
- Make sure that children wear a suitable helmet that complies with EN 1078:2012+A1:2012 while riding in the seat. Not wearing a helmet exponentially increases the risk of death, long-term disability, head trauma, or other injuries. As bicycle seat manufacturers, we care about the safety of seat passengers, so we strongly recommend that children wear properly fitted and fastened bicycle helmets.
• The seat and cushion can get hot if under the sun for a long time. Make sure that they are not too hot before seating the child.
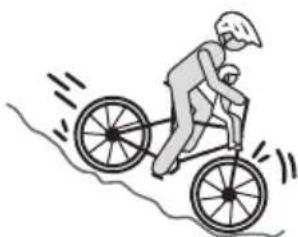
- This child seat is not suitable for use during sporting activities, or in extreme conditions as per example: enduro, hard mountain biking, big road holes, jumps and off-road ways.
- When riding for the first time with the seat fitted - to test ride the cycle in a safe/quiet environment before riding on the highway.
- When the steering angle to each side is reduced to less than 45^ , change the type of handlebar.

WARNINGS
WARNING: Do not attach any additional luggage to the child seat. If you carry extra luggage, the bicycle's carrying capacity must not be exceeded, and we recommend that it be placed at the back of the bike.
WARNING: Do not modify the seat.
WARNING: The cycle could behave differently with a child in the seat particularly with regarding to balance, steering and braking.
WARNING: Never leave the cycle parked with a child in the seat unattended.
WARNING: For any form of crack or if the surface starts to deconstruct, this indicates that the life of the seat has been reached and it should be

WARNINGS
replaced. A professional shall be contacted in case of doubt.
WARNING: Always check the surface temperature of the seat before any use.
WARNING: This child seat is not suitable for use during sporting activities.
WARNING: Always ensure that the head of your child is supported in reclined position.
WARNING: The movability of the handlebar could be reduced by the seat.
WARNING: Additional security devices are always to be attached.

Attention
Failure to comply with these operating instructions can lead to serious injury or death of the bicycle operator and/or child. Bobike is not liable for any damage to the product or persons resulting from improper installation, storage, or assembly (non-compliance with assembly instructions), improper maintenance, misuse or
use not in compliance with the technical or use specifications (non-compliance with maintenance and care instructions), modifications or repairs made by you or a third party. If you have any doubt, please get in contact with us or with your local shop so that we can assist you to assure you and your child safety while riding with the bicycle seat.
Maintenance
To keep the child bicycle seat in good working condition and to prevent accidents we recommend the following:
- Regularly check the mounting system of the seat to the bicycle to make sure it is in perfect condition.
- Check all the components to see if they work properly. Do not use the seat if any of the components are damaged. Damaged components must be replaced. To replace them you need to
visit your local authorized Bobike dealer to get the correct components for replacement. You can find them on the website: www.bobike.com.
- If you have suffered an accident with your bicycle and safety seat, we advise you to get a new safety seat. Even if there is no visible damage to the seat.
- Clean the seat with soap and water (do not use abrasive, corrosive, or toxic products). Leave it to dry at room temperature.
Warranty
3-YEAR WARRANTY: All mechanical components against manufacturer defects only. Register your product at www.bobike.com.
+ 1 EXTRA WARRANTY YEAR: Register your seat at www.bobike.com and get one more warranty year.
Important: you must register within 2 months of the date of purchase to receive the Bobike Extra Year Warranty.
WARRANTY CLAIMS
To obtain warranty service, you must have your original sales receipt. Items returned without a sales receipt will assume that the warranty begins on the date of manufacture. All warranties will be void if the
product is damaged due to user crash, abuse, system modification, or used in any way not intended as described in this operating manual.
To make sure you have all the required information to activate the warranty you need to keep the information that you have in your Traceability information label (F). You can also record here the info.
O.F
Date
* The specifications and design are subject to change without notice. Please contact Bobike for any questions.
A. Cadeira principal
B2. Passador vertical
O.F. ____.
Date ____.
O.F. ____.
Date ____.
Double-walled Design

Dutch Design and Made In Europe
Polisport Plásticos S.A. | Av. Ferreira de Castro, 818
3720-024 Carregosa | Portugal


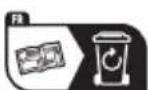
SEPARATE WASTE COLLECTION.
CHECK YOUR LOCAL MUNICIPAL GUIDELINES.