
TV3500 - Headphones Amplicomms - Free user manual and instructions
Find the device manual for free TV3500 Amplicomms in PDF.

| Product Type | Wireless headset for TV and Hi-Fi |
| Brand | Amplicomms |
| Model | TV3500 |
| Transmission | Digital, carrier frequency 1.8 GHz |
| Maximum Range | Up to 30 meters in open area |
| Frequency Response | 30 Hz – 20 kHz |
| Max. Sound Pressure Level | 125 dB SPL at 1 kHz |
| Harmonic Distortion | < 1.5 % |
| Signal-to-Noise Ratio | > 70 dB |
| Base Power Supply | 5 VDC, 550 mA (power adapter included) |
| Headset Power Supply | Lithium polymer battery 3.7 V, 450 mAh |
| Headset Battery Life | Up to 6 hours |
| Charging Time | Approximately 2 hours 30 minutes |
| Headset Weight | 61 g |
| Base Weight | 150 g |
| Input Connections | Optical TOSLINK, analog 3.5 mm, built-in microphone |
| Remote Control Functions | Volume, left/right balance, equalizer (4 profiles) |
| Microphone Button | Ambient listening / conversation |
| Ear Tips | Two sizes (S and L) provided |
| Box Contents | Headset, base, IR remote control, power adapter, optical TOSLINK cable, analog 3.5 mm cable, AAA batteries, user guide |
| Warranty | 24 months (parts and labor) |
| Standards | CE, directive 2014/53/EU |
| Maintenance | Soft lint-free cloth, avoid solvents |
| Safety | Do not use by children, high volume dangerous for hearing |
| Environment | Recycle at collection point, do not dispose of in household waste |
Frequently Asked Questions - TV3500 Amplicomms
User questions about TV3500 Amplicomms
0 question about this device. Answer the ones you know or ask your own.
Ask a new question about this device
Download the instructions for your Headphones in PDF format for free! Find your manual TV3500 - Amplicomms and take your electronic device back in hand. On this page are published all the documents necessary for the use of your device. TV3500 by Amplicomms.
USER MANUAL TV3500 Amplicomms
28 Boulevard Belle Rive
92500 RUEIL-MALMAISON France
RCS Nanterre 508 823 747
Atlinks UK Ltd, 3rd Floor, Waverley House
7-12 Noel Street, London, W1F 8GQ. UK
Company registration: 13809295
© ATLINKS 2022 - Reproduction interdite.
Getting Start 3
Description of headset 3
Description of base 4
Description of remote control 5
How to install Amplicomms TV3500 5
Connecting the base 5
Base set up 6
Changing the rubber ear buds
Installing batteries in the remote control 7
Registering the handset
Operation 8
Using the volume keys 8
Adjusting the sound level balance 8
Select audio profile (Equalizer) 9
Confirmation Tone 9
Using microphone button 9
Power save mode 9
Troubleshooting 10
Safety Information 10
Technical data 12
Warranty 12
Environment 14
Conformity 14
Thank you for having purchased the Amplicomms TV3500!
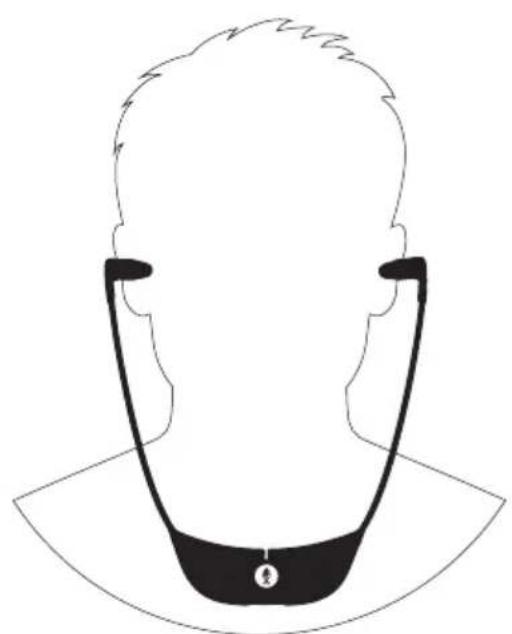
Amplicomms TV3500 enables to listen to a TV or HiFi device with a headset, using cordless transmission.
If you use hearing aids, you need to remove them before using the headset.
IMPORTANT: PLEASE MAKE SURE YOU HAVE READ ALL SAFETY INFORMATION ON PAGE 10 BEFORE YOU SET UP YOUR DEVICE.
NEVER LET CHILDREN USE THIS DEVICE.
Getting Start
Box contents
1 headset with rubber ear buds size "S" (small)
1 additional pair of rubber ear buds size "L" (large)
1 base
1 infrared remote control
1 power adapter for the base
- 1 optical TOSLINK Digital Audio cable (with plastic protection)
- 1 analog audio cable (both ends with 3.5mm jack stereo plug)
Multi-language user guides
2 AAA size batteries for remote control
Description of headset
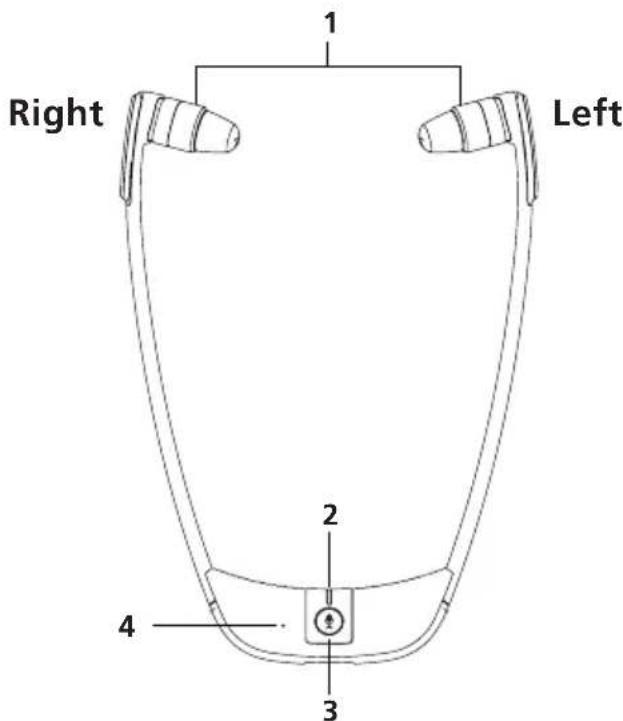
1.Left/Rightearpiece
2. LED indicator
3. Microphone button for room monitoring / Power ON/OFF / TV listening mode
4. Microphone hole
Description of base
Base top view
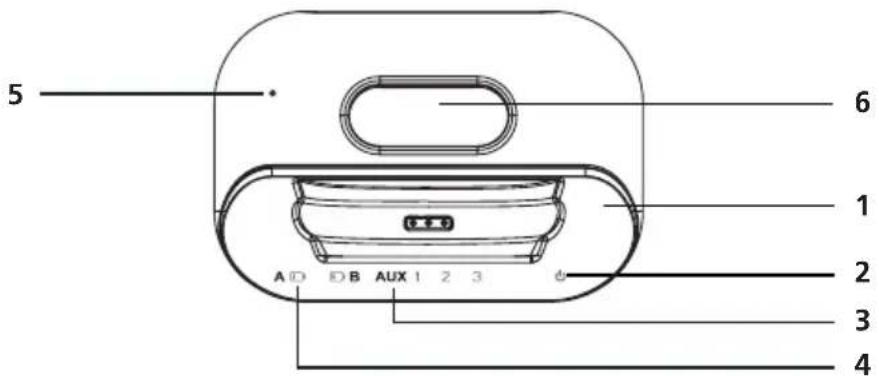
- Charging cradle
- Power LED indicator
- Input LED indicator ( 3 = Microphone, 2 = Analog input, 1 = Optical input/ TOSLINK )
- Battery low LED indicator
- Microphone hole
- Remote control support
Base rear view
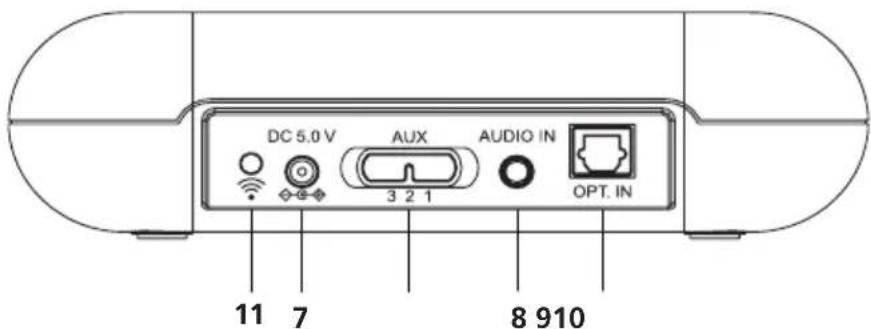
- Power supply socket
- Analog Audio In Socket (3.5 mm)
- Optical Audio In Socket TOSLINK
- 3 = Microphone, 2 = Analog input (3.5mm), 1 = Optical input/TOSLINK Aux Switch
- Pairing button
Description of remote control
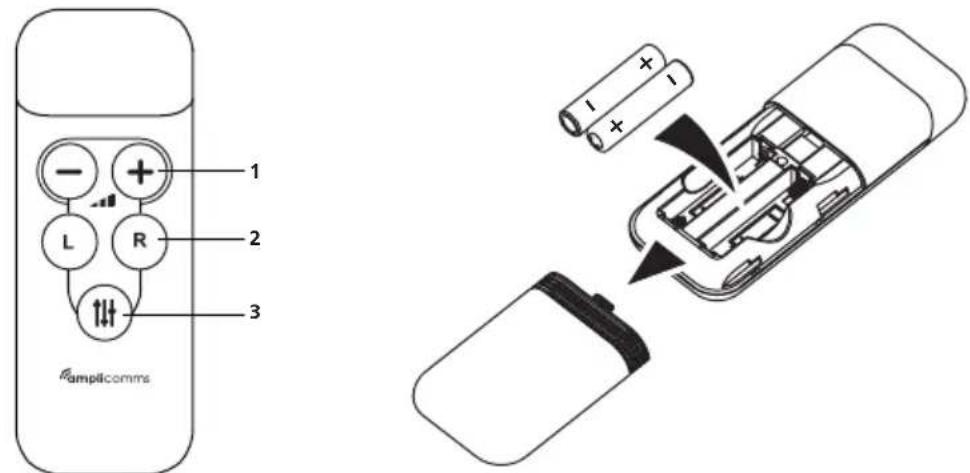
- Volume control
- Headset left/right balance
- Equalizer (Sound Clarity mode)
How to install Amplicomms TV3500
Connecting the base
- Connect the power adapter to the DC input socket located on the base rear panel.
- Connect the power adapter provided to an electrical outlet.
- Connect the base to your audio source.
There are 2 ways to connect the base to the audio source (TV/Hifi): either using one of the two supplied cables (analog or optical), or using TV/Hifi audio sound (if no audio output socket on your TV/Hifi device). Cable mode is preferred. Check on your TV / Hifi set which audio output solution is available (analog or optical).
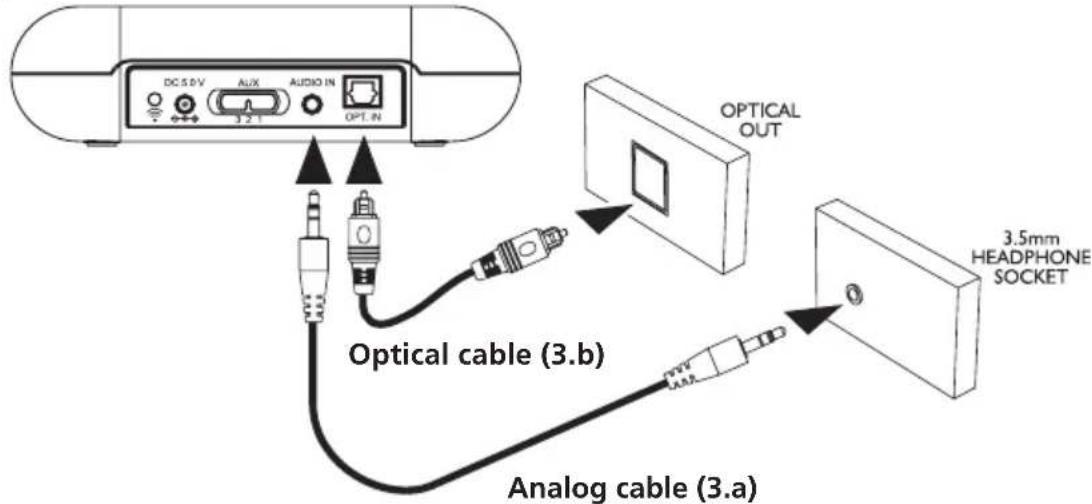
3.a. Using the analog audio cable.
Connect one side of the analog cable to the base and the other side to the analog audio output TV/Hifi socket. You may have to purchase adaptor plugs if your TV/Hifi output socket has no 3.5mm audio output (see drawings below).
Then on the base, move the switch (AUX) on position 2 = Analog input.
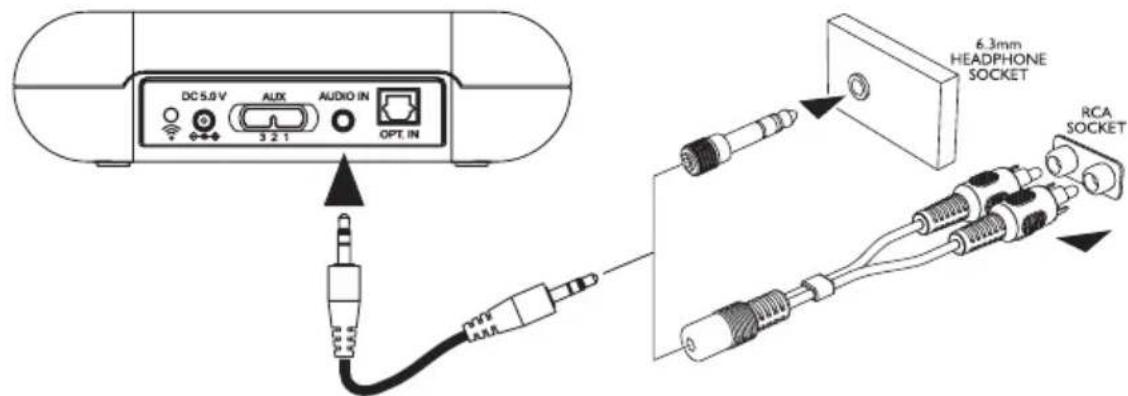
Note: Adaptor plugs are not provided
3.b Using the optical audio cable
Connect one side of the optical cable to the base and the other side to the TV audio optical output.
Then on the base, move the switch (AUX) on position 1 = Optical input.
This connection offers a higher sound quality and a lower susceptibility to electrical and magnetic interference.
Please make sure the optical TOSLINK digital audio cable does not get bent or folded! Avoid tight bending radii.
3.c Using base microphone (only if no audio output on TV).
-
If your TV set does not have any audio jack, you should use the microphone to pick up the signal. Put base close to your TV/Hifi lousdspeaker for better signal pickup. Then on the base, move the switch (AUX) on position 3 = Microphone.
-
Please start with low volume on the TV. Adjust the TV volume level up slowly so as to determine the suitable volume level. The position of the base also has a decisive influence on the volume - please determine the best position by experimentation.
Base set up
Charge the headset for about 2 hours and 30 minutes before first use. Place the headset on the charging cradle of the base. The headset LED indicator will be red and will turn to purple when the battery is fully charged.
- A fully charged battery provides up to 6 hours of listening enjoyment.
Advice: Always have the headset fully charged and operational, put the headset back on its charging base after use.
Changing the rubber ear buds
- For optimum user experience, we have provided 2 sizes of ear buds. Large and Small. If the small size fitted to the headset does not suit you, please try the alternative large size ear bud supplied in the box.
- For changing the ear buds pick the mounted ear buds at the end and gently pull them out. Then position the alternative ear buds onto the "open ends" and let them snap into the place.
Installing batteries in the remote control
- Insert AAA size batteries into the remote control with correct polarity.
- To test the functions, put the headset on your ears and turn on the TV. Point the remote control to the base and press the volume + buttons, or balance buttons or button to adjust the sound level and quality.
Registering the headset
The base and the headset are paired in advance. Normally, there is no need to pair them again.
- Press and hold the Pair button at the back of the base for 10 seconds. The power LED will flash continuously.
- Press and hold the button on the headset for 10 seconds. The LED will flash continuously.
- When registration is successful, the base and the headset LED will become steady on.
Operation
Caution: Hearing damage due to high volumes!
This headset is capable of producing high sound pressure levels. High volumes or long durations can cause hearing damage for persons with healthy hearing and especially children.
-
Do not continuously expose yourself to high volumes.
-
Before using the headset, set the volume on the remote control to a low value.
- Switch ON the audio source (TV/Hifi).
- If the headset is OFF, the LED will be OFF. Short press the button on the headset to turn on it.
- Spread the headset arms until the ear buds can be inserted in the ears. Please note the ear buds can be angled through a movement up, down or sideways so as to enter the ear a little deeper. This will improve the sound quality and volume. Gently press the ear buds further into the ear to find a comfortable position for the ear buds and or buttons from the remote control.
Note: When the headset battery level is low you will hear 2 beeps every minute in the headset.
Using the volume keys
Point the remote control at the base, press the + buttons to achieve a comfortable loudness.
Adjusting the sound level balance
Point the remote control at the base, press the b buttons to adjust the headset left or right receivers sound level balance.
Select the audio profile (Equalizer)
Point the remote control at the base, press the button to select one of the 4 available audio profiles.
| Setting Effect | |
| 1 Flat | |
| 2 Bass Boost | |
| 3 Treble Boost | |
| 4 Clarity |
Note : To go back to factory default settings, short press the pair button at the back of the base.
Confirmation Tone
There is a "beep" tone as confirmation for every effective key press on TV3500 remote control. Some special tone will be used for below listed case:
- 2 beeps will be heard when the volume level is reaching the maximum or minimum.
- 2 beeps will be heard when the left and right sound level difference is reaching the maximum.
- A long beep will be heard when the left and right sound level is equally balanced.
- 2 beeps will be heard when EQ1 ( Flat ) is selected.
Using microphone button
In active mode, press the button will switch from TV listening mode to transparency mode. The headset indicator will switch from blue to red. The microphone hole is at the front of the headset to pick up the sounds of your surroundings. Make sure that the microphone opening is not covered!.
When the microphone is switched ON, you will hear your surroundings louder. You can hear for example your door bell or your conversational partner even when you are wearing the headset.
To switch back to the TV listening mode, press the button again. The headset indicator will turn to blue and you will hear the sound from the audio source again.
Power save mode:
To save power, the headset will enter sleep mode when there is no signal detected for approximately 5 minutes. To wake up the headset, press button.
Note: To turn OFF the headset, press and hold the button for 3 seconds. The headset LED will turn OFF.
Troubleshooting
No sound
-
Ensure that the mains adapter is fully pushed into the power outlet and that its cable is properly connected to the DC IN connector on the base.
-
Ensure that the headset ON. Either red or blue LED is steady on.
-
The charge level of the headset battery may be too low. Put the headset on the charging cradle for 2 hours.
-
Ensure that the TV set, Hi-Fi system or audio device is switched ON and the input source selection/connection is correct (AUX switch).
-
The connected audio/video equipment may not be in playback mode. Start playback on the equipment.
-
The headset output level is set too low. Adjust the volume to a suitable level with the remote control.
-
Make sure that the optical output of the TV is set to "PCM".
Distortion
-
The headset may be too far away from the base. Move closer to it.
-
The audio signal input level is too low/high. Increase/decrease the volume from the audio source TV/Hifi.
Safety Information
Please read this operating instruction manual thoroughly.
Intended use
This device was developed to transmit audio signals from an audio source like TV or HiFi device to a headset, using cordless transmission. Any other use is considered unintended use. Unauthorised modification or reconstruction is not permitted. Under no circumstances open the devices or complete any repair work yourself.
Installation location and safety information
-
Prevent excessive exposure to smoke, dust, vibration, chemicals, moisture, heat and direct sunlight.
-
Furniture polish, over time, may disintegrate the rubber feet of the base which may stain your furniture. To avoid a potential stain, you may want to place the base on a pad or mat.
- This listener allows you to amplify sounds to a loud volume, but listening to earphones at a high volume over an extended period of time may damage your hearing; especially children. Thus, we suggest that you set the volume to a level that is comfortable to your hearing.
For users wearing a pacemaker
It is recommended that, if you have a pacemaker fitted, you check with a medical expert or your health adviser before using this product. Switch the device OFF immediately if you notice or suspect any adverse effects.
Power adapter plug
Attention: Only use the power adapter plug supplied since other power adapter plugs could damage the base. Ensure access to the power adapter plug is not obstructed by furniture or such.
Pay attention that the plug and cable are in perfect condition. Kinked or worn cable represents the risk of a fatal accident! The power adapter plug supplied fulfils the ecodesign requirements of the European Union (Directive 2005/32/ EC). This means that, both in an operating state and in an idling state, the power consumption is considerably lower compared to power adapter plugs with an older design.
Maintenance
- Clean the housing surfaces with a soft, fluff-free cloth.
- Never use cleaning agents or solvents.
Technical data
Carrier frequency: 1.8GHz Digital
Range: Up to 30 meters (open area)
Frequency response: 30Hz - 20kHz
Sound pressure level: max. 125 dB SPL at average 1 kHz
Distortion: < 1.5%
Signal-to-noise ratio: >70 dB
Operating voltage (Base): 5VDC, 550mA
Operating voltage (Headset): 3.7 V, 450 mA Lithium Polymer Battery
Operation time: With fully charged battery up to 6 hours
Charging time: For empty battery approx. 2.5 hours
Weight Headset: 61 g
Weight Base: 150 g
Warranty
Please read carefully the user guide included in this box. TV3500 is an approved equipment in accordance with the European regulations, attested by the CE marking. The product you just bought is a technological product, it must be handled with care.
Note: You have a legal warranty on this product in accordance with the regulations applicable to the sale of consumer goods in the country in which you made this purchase.
For any information regarding this legal warranty, please contact your dealer.
Without prejudice to the legal guarantee of the products, ATLINKS guarantees that the product in this box conforms to its technical specifications contained in the user guide included in the this box, and this during a warranty period, counted from the date of purchase of the new product, the date on your invoice or ticket checkout where is indicated the name of your reseller, and equal to: Twenty four (24) months for the headphone, excluding consumables, accessories and batteries. For any claim under this warranty during the warranty period, you must return the entire Product to your dealer, together with the proof of purchase, the invoice or receipt issued by your dealer, indicating the place of purchase and the serial number of the Product, following the appearance or discovery of the defect. ATLINKS undertakes to repair any defective item due to a defect in design, material or workmanship, at its expense, or to replace, at its expense, by an identical or at least equivalent element in terms of functionalities and performance. If the repair or replacement is impossible under normal commercial conditions, the Product will be refunded or replaced by a Product equivalent. Within the maximum limit allowed by the applicable law, the product or element replacement, which may be new or reconditioned, is warranted during a period of ninety (90) days from the date of repair or until the end date of the initial warranty period,
whichever is the earlier greater than ninety (90) days, it being specified that any period of immobilization of the Product of at least seven (7) days will be added to the warranty period remaining to run.
This warranty does not apply in the following cases:
- Installation or use not in accordance with the instructions in the guide of the user,
- Incorrect connection or abnormal use of the Product, especially with noncompatible accessories, as indicated in the user guide,
- Product opened, modified or replaced by means of non-approved parts, serial number deleted, illegible, damaged,
- Normal wear, including normal wear and tear on accessories, batteries and displays,
- Failure to comply with the technical and safety standards in force in the area geographical use,
- Product having suffered a shock or a fall,
- Product damaged by lightning, electrical surge, heat source or radiation, water damage, exposure to conditions of temperature, humidity or other excessive ambient conditions or any other cause external to the product,
- Negligence or faulty maintenance,
- An intervention, a modification or a repair carried out by a not authorized by ATLINKS.
If the returned Product is not covered by the warranty, you will receive a quote from repair that will mention the cost of analysis and transportation costs that you will be charged if you want the Product returned to you. This guarantee is valid in the country in which you regularly purchased the Product, provided that the country is a member of the European Union. Subject to the legal provisions in force, all warranties other than described herein are expressly excluded.
TO THE MAXIMUM EXTENT PERMITTED BY APPLICABLE LAW,
A) THIS WARRANTY IS EXCLUSIVE TO ALL OTHER WARRANTYES EXPRESS OR IMPLIED, INCLUDING, BUT NOT LIMITED TO, WARRANTYES OF MERCHANTABILITY OR FITNESS FOR A PARTICULAR PURPOSE PARTICULAR;
B) ATLINKS DISCLAIMS LIABILITY FOR LOSS OR DETERIORATION OF DATA, LOSS OF USE LOST TO WIN, LOSS OF CHANCE, DEREVENUES OR INCOME, LOSS OF OPERATION, DAMAGES INDIRECT, CONSEQUENTIAL, CONSEQUENTIAL OR INCIDENTAL;
C) ATLINKS LIABILITY IS LIMITED TO THE VALUE OF PURCHASE OF PRODUCT EXCEPT HEAVIL OR UNINTENTIONAL FAULT AND EXCEPT DAMAGE BODY
Environment

This symbol means that your inoperative appliance must be collected separately and not mixed with the household waste. Help us preserve the environment in which we live!
Conformity
CE UK CA
The logo printed on the products indicates the conformity with all essential requirements ( RED directive : 2014/53/EU ). You can download the Declaration of Conformity from our website: www.amplicomms.com Then: Download/DoCs
Maximum Output Power (NTP) : 24dBm
Frequency Range: 1880-1900MHz
www.amplicomms.com
ATLINKS Europe
28 Boulevard Belle Rive
92500 RUEIL-MALMAISON France
RCS Nanterre 508 823 747
Atlinks UK Ltd, 3rd Floor, Waverley House 7-12 Noel Street, London, W1F 8GQ. UK Company registration: 13809295
© ATLINKS 2022 - Reproduction prohibited.
The Manufacturer reserves the right to modify the specifications of its products in order to make technical improvements or comply with new regulations.
AMPLICOMMS and ATLINKS are registered trademarks.
INHALT
Erste Schritte 3
28 Boulevard Belle Rive
92500 RUEIL-MALMAISON France
RCS Nanterre 508 823 747
Atlinks UK Ltd, 3rd Floor, Waverley House
7-12 Noel Street, London, W1F 8GQ. UK
Company registration: 13809295
28 Boulevard Belle Rive
92500 RUEIL-MALMAISON France
RCS Nanterre 508 823 747
Atlinks UK Ltd, 3rd Floor, Waverley House
7-12 Noel Street, London, W1F 8GQ. UK
Company registration: 13809295
28 Boulevard Belle Rive
92500 RUEIL-MALMAISON France
RCS Nanterre 508 823 747
Atlinks UK Ltd, 3rd Floor, Waverley House
7-12 Noel Street, London, W1F 8GQ. UK
Company registration: 13809295
© ATLINKS 2022 - Reproduction prohibited.
The Manufacturer reserves the right to modify the specifications of its products in order to make technical improvements or comply with new regulations.
AMPLICOMMS and ATLINKS are registered trademarks.
INDICE
Iniciar 3
28 Boulevard Belle Rive
92500 RUEIL-MALMAISON France
RCS Nanterre 508 823 747
Atlinks UK Ltd, 3rd Floor, Waverley House
7-12 Noel Street, London, W1F 8GQ. UK
Company registration: 13809295
Atlinks UK Ltd, 3rd Floor, Waverley House
7-12 Noel Street, London, W1F 8GQ. UK
Company registration: 13809295
28 Boulevard Belle Rive
92500 RUEIL-MALMAISON France
RCS Nanterre 508 823 747
Atlinks UK Ltd, 3rd Floor, Waverley House
7-12 Noel Street, London, W1F 8GQ. UK
Company registration: 13809295
Amplicomms TV3500
A/W No.: 10002338 Rev.3 (FR/EN/DE/NL/ES/PT/IT)
