S510-C - Mobile Phone Amplicomms - Free user manual and instructions
Find the device manual for free S510-C Amplicomms in PDF.

User questions about S510-C Amplicomms
0 question about this device. Answer the ones you know or ask your own.
Ask a new question about this device
Download the instructions for your Mobile Phone in PDF format for free! Find your manual S510-C - Amplicomms and take your electronic device back in hand. On this page are published all the documents necessary for the use of your device. S510-C by Amplicomms.
USER MANUAL S510-C Amplicomms
In order to be able to use the smartphone optimally, we strongly recommend you to follow the installation steps one by one.
This user guide as well as tutorial videos can be found on our websites:
www.swissvoice.net
www.amplicomms.com
Thank you for purchasing this smartphone which benefits from a simplified interface.
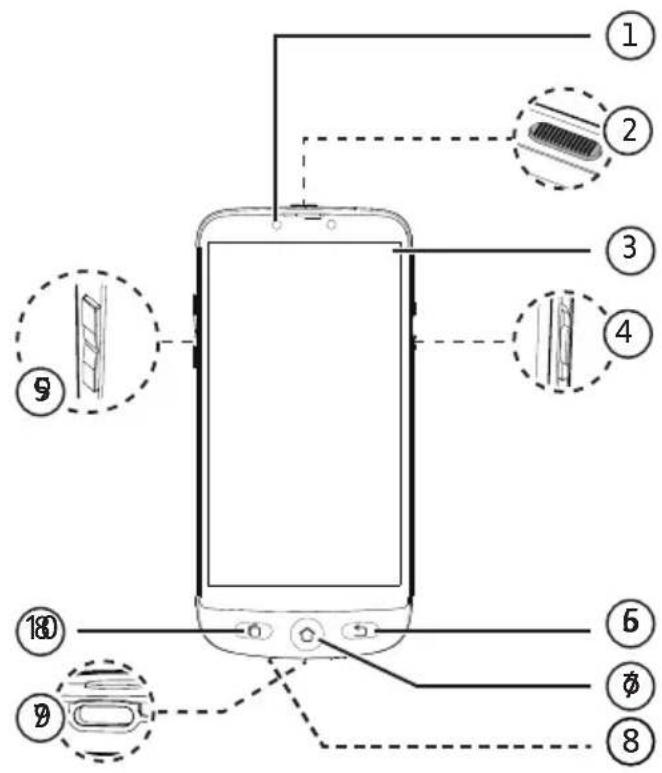
Smartphone overview
text_image
Diagram of a smartphone with labeled parts including connectors and internal components
text_image
Diagram of a smartphone rear panel with numbered parts and labeled connectorsSmartphone overview
| 1 | Front camera | 11 | Main camera |
| 2 | ON/OFF buttonPress to turn on/off the screen.Press and hold to switch on/off your device. | 12 | Camera flash |
| 3 | Touch screen with built-in protective film | 13 | SOS buttonPress and hold to dial out assistance numbers. |
| 4 | Torch switchSlide up/down to switch on/off the torch. | 14 | Loudspeaker |
| 5 | Hearing volume key (Up and Down) | 15 | Headset jack |
| 6 | Return keyReturns to previous menu/screen. | 16 | Torch |
| 7 | Home keyPress to go to the main screen | 17 | Notch to remove the battery cover |
| 8 | Microphone | ||
| 9 | USB Type-C port for charging battery | ||
| 10 | Recent task key in Android mode |
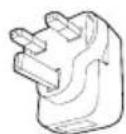
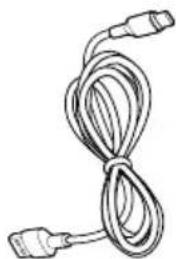
What's in the box?

natural_image
Line drawing of a smartphone with blank screen and control buttons (no text or symbols)① ABCFG

natural_image
Simple line drawing of a smartphone with a handle and screen (no text or symbols)O

O

D1
D2

O

O
S/M 510-M S/M 510-C

natural_image
Line drawing of a coiled cable with two connectors (no text or symbols)H
natural_image
Line drawing of a coiled cable with two connectors (no text or symbols)① L

O

O
What's in the box?
| A | Smartphone |
| B | Battery cover |
| C | Battery |
| D1 or D2 | Power adaptor: UEPower adaptor: UK |
| F | User manual |
| G | Technical sheet |
| H | USB Type-C cable with detachable magnetic tip (S/M 510-M) |
| I | USB Type-C cable (S/M 510-C) |
| J | Charging base (S/M 510-C) |
| L | Lanyard (S/M 510-C) |
| Getting started
What's in the box?
Smartphone elements (All models)
Accessories (model-dependent)
Smartphone overview
First installation 6
Install the SIM card (provided by your
mobile operator) 6
Install the battery 6
Tie the lanyard (only available for
S/M 510-C) 6
Replacing the battery cover 7
Charge your phone 7
Turn Smartphone ON 10
To turn ON 10
To turn OFF 10
Initial setup 10
Setup Wizard 15
| Smartphone Use 19
Smartphone menu/ interface Overview 19
Home screen overview 19
Call 20
Make a call 20
Answer a call/ Reject a call 20
Call a number in the phonebook 20
Calling on of the 3 speed dial icons 20
Calling from the call log 20
Adjust hearing volume/ Audio boost/
Handsfree 20
Ringer mode 21
Messages 21
Write a new message 21
WhatsApp (simplified access) 22
Write a WhatsApp message 22
Send a picture with WhatsApp 22
Place a Call with WhatsApp (Voice or Video call) 22
Receive a WhatsApp call (or video call) 22
Send a voice message through WhatsApp22
Use regular WhatsApp interface 23
Pictures 23
Take a picture 23
View and share pictures 23
Phone Book 23
Add a contact 23
Assign the 3 speed dial numbers 24
Edit contact 24
Add a photo 24
Fun 24
Weather 24
Games 24
Internet Radio 25
Apps 25
Add new applications 25
SOS Assistance button 25
Set SOS Assistance number 26
Call SOS Assistance number 26
Advanced Settings 26
Talking Digits 27
Rearrange applications in Apps menu 27
Rearrange the menu buttons 27
Manage messages filter 27
Android settings 27
| Learn more & Supports 28
FAQ's 28
Troubleshooting 30
| Conformity 33
Declaration of Conformity 33
Getting started
First installation
Install the SIM card (provided by your mobile operator)
- Insert the micro-SIM card as depicted. Contact your operator to get a micro-SIM card adaptor if necessary.

text_image
Micro Sim Card SD card (Not provided and not essential)
- Risk of swallowing small objects! The micro-SIM card and memory card can be removed. Small children can swallow them.
- Do not bend or scratch the micro-SIM card. Prevent any contact with water, dirt, or electrical charges.
Install the battery
Do not remove the transparent tape as it will help you to remove later the battery if needed.

text_image
Diagram showing two labeled parts of a smartphone with arrows indicating movement or change, including a card slot and battery cover.Tie the lanyard (only available for S/M 510-C)

text_image
510-C)Getting started
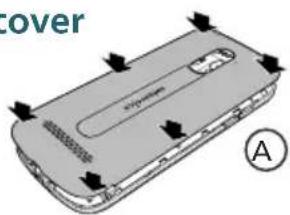
Replacing the battery cover
Press well on each side of the cover (see arrows). Ⓐ
In case you need to remove it: (see
⑰ "Smartphone overview") ⑱
text_image
cover A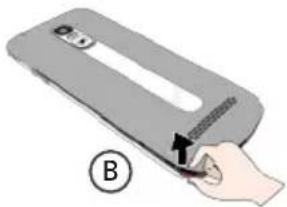
natural_image
Illustration of a hand holding a device with a tool, labeled B (no text or symbols on the device itself)Gently peel off the thin plastic film on the smartphone screen, by pulling the label
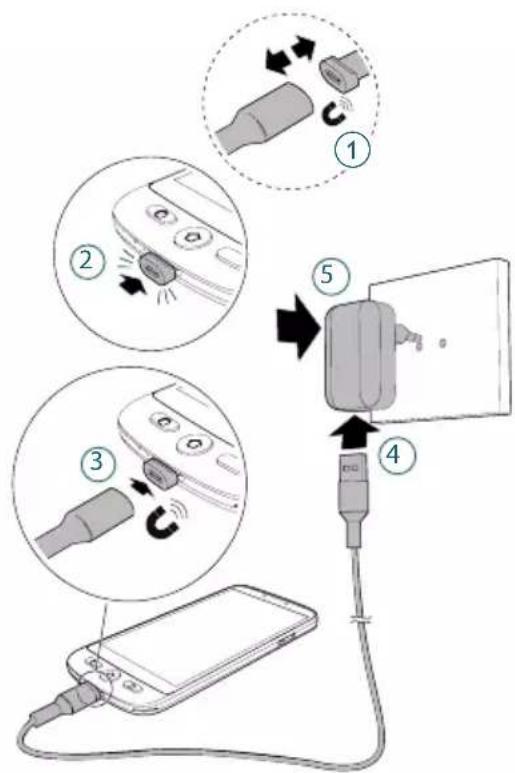
Charge your phone
Before first use, the smartphone has to be charged at least at 80%.
S/M 510-M
For effortless charging, the USB cable supplied with your smartphone is fitted with a detachable magnetic tip.
To install:
- Detach the small magnetic tip from the supplied cable.
-
Insert the tip in the smartphone USB-C port until a click is emitted.
-
Bring the USB cable magnetic end close to the magnetic tip until it adheres to it.
- Connect the other end of the USB cable to the USB outlet of the power adaptor.
- Plug the power adaptor to the power outlet and charging starts.
text_image
Diagram illustrating the step-by-step connection of a device to a plug, showing device disassembly and cable installation steps.| Getting started
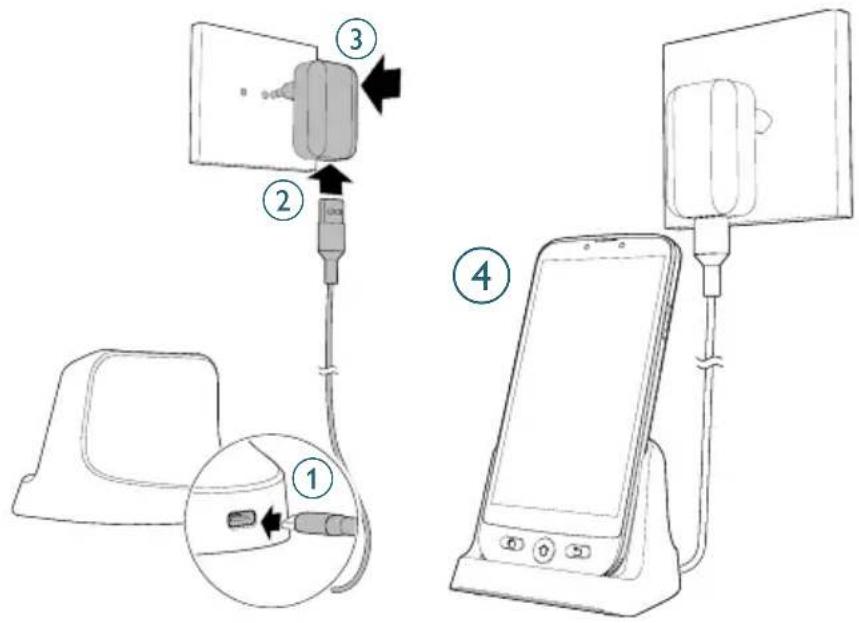
S/M 510-C model: 2 way for charging
A Using charging dock
- Insert the USB cable into dock's connector. Connect as shown.
- Insert the other end of the USB cable into the adaptor.
- Connect the power adaptor to the power outlet.
- Place your smartphone on the charging dock to charge.
text_image
Diagram showing four steps of a device connection: cable, plug, switch, and smartphone with labeled parts.Getting started
B Using USB Type-C cable
- Insert the USB cable directly into the phone's USB connector.
- Connect the other end of the USB cable to the power adaptor.

text_image
Diagram showing a device connected to a smartphone via cable, with labeled parts and an inset showing the cable being inserted into a device.- Plug the adaptor to the power outlet.
- While charging, the device and the charger may become hot. This usually does not affect the device's lifespan or performance, and is in the device's normal range of operation.

• To avoid injury or damage to your device, only use battery, charger and accessories that have been approved for use with this model. Connecting other accessories may be dangerous and invalidate the warranty.
Getting started
Turn Smartphone ON Initial setup
natural_image
Illustration of a smartphone with a close-up inset showing a textured object (no text or symbols)To turn ON
Press and hold the ON/OFF key (see ② in smartphone overview) a few seconds to turn on the smartphone, the screen lights up.
To turn OFF
Press and hold the ON/OFF key a few seconds, and the display shows Power off. Tap on it to Turn off.
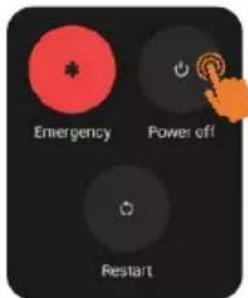
text_image
Emergency Power off RestartThe display lights up when the smartphone is on. You can now setup the smartphone.
• If your SIM card has a PIN code, enter it.
- Tap 📄 onfirm.

text_image
Enter SM PN for CAND T. 1 2 3 4 5 6 7 8 9 0 → Emergency Use
- Important: If the screen displays System update, select Update > Download > Click to update.
-
The phone will reboot automatically and install the update.
• The process can last a few minutes. -
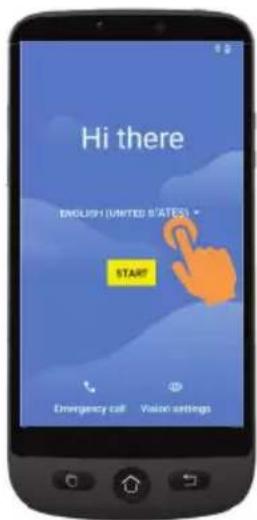
To change the language, point and tap ENGLISH (UNITED KINGDOM).
- Scroll to the desired language, and tap it to select.
text_image
Hi there ENGLISH (UNITED STATES) START Emergency call Vision settings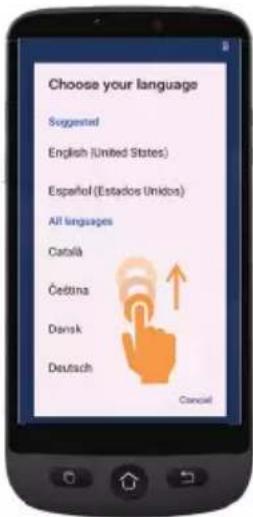
text_image
Choose your language Suggested English (United States) Español (Estados Unidos) All languages Catalá Četina Dansk Deutsch Cancel- If you have a WiFi router at home, connect your smartphone to it to save mobile data consumption.
Getting started
- Select your WiFi access point, and enter its password.
- If there is no WiFi access point available, tap Continue, and you can select Setup Offline. You can change this setting later.
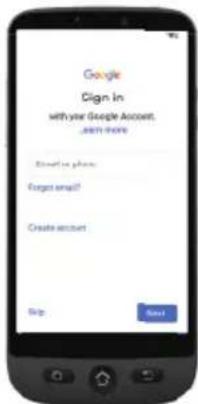
- If you have a Google account:
Enter your credentials > Tap Next > Enter your password > Next.

text_image
Connect to Wi-Fi Select a network ME Attinks Guest + See all Wi-Fi networks + Add new network Set up offices
text_image
Google Sign in with your Google Account. Learn more Email or phone: Forgot email? Create account Skip NextGetting started
5. If you don't have yet a "Google account"
It is recommended to have one as it is required to download new applications from Google Play store, receive apps and software updates or send and receive emails through Gmail.
• To create one: Tap Create account > Follow the on-screen instructions to fill in your information > Tap Next.
- Choose a password (with 8 characters minimum). - Enter your telephone number. You will receive a verification code on your smartphone and your Google account is created.
text_image
Google Sign In with your Google Account. START HERE Enter in phone Forget email! Create account Skip Next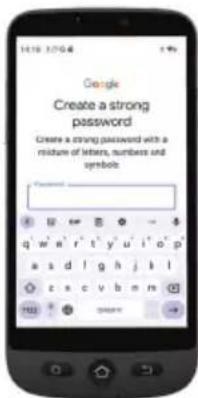
text_image
Google Create a strong password Create a strong password with a mixture of letters, numbers and symbols.- Tap I agree after going through Google agreement details.
- Swipe up and choose the Google services you want to enable or disable, and tap Accept.

text_image
Google services Tap to learn more about each service, such as how to turn it on or off later. Data will be used according to Google's Privacy Policy. Location Use location Allow space and services with location permitted to set your remote. Location Google may collect location data permission will you wait to Up again. MoreGetting started
-
Select your preferred search engine for searches over the internet (For example Chrome, Yahoo,..) and tap Next.
-
You will be asked to set a screen lock code.
Tap Skip to move to next step. Tap Skip anyway (highly recommended).

text_image
Set a PIN For adder security, set a fin to unlock the device PIN must be at least 4 digits Screen lock options Stop 1 2 ABC 3 GET 4 CH 5 JL 6 SND 7 RCK 8 TEO 9 MDDZ 0
text_image
Set a PIN For adderpenalty, set a Fox on minutes before closing. Skip screen lock? Device protection features won't be tanned on. You won't be able to prevent others from using this phone if it's lostor stolen. On hand Skip anythingGetting started
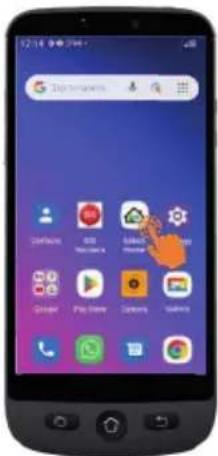
9. Tap on Select Home icon

. You
will get the following options:
text_image
Smartphone home screen displaying app icons with Chinese labels, including Android, iOS, and Google
- Select simple smartphone to access the simplified menu which we recommend for beginners.
- The following instructions refer only to this easy-to-use menu (Simple Smartphone).
- Select Android mode if you want to use this smartphone as a regular one (not detailed in this user guide).
10. Tap on SIMPLE Smartphone and press OK. The phone will restart.
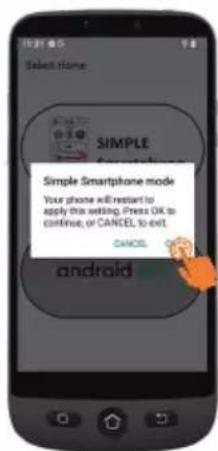
text_image
Select Home SIMPLE Simple Smartphone mode Your phone will restart to apply this setting. Press OK to continue, or CANCEL, to exit. CANCEL androidNote: At any time once you have selected Simple Smartphone mode, a notification may invite you to install a new version. If so, tap Install. The phone may restart. Enter the SIM card PIN code if asked.
11. To experiment the default long press on menu keys, Tap on Press here

text_image
Initial guidance All clicks are long click only until a vibration To practice, press hereGetting started
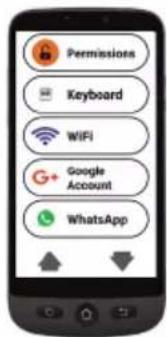
Setup Wizard
This menu will help you to program quickly main features.
Follow each Wizard menu option one by one. (Minimum recommended steps:
-
Permissions through 5. WhatsApp)
-
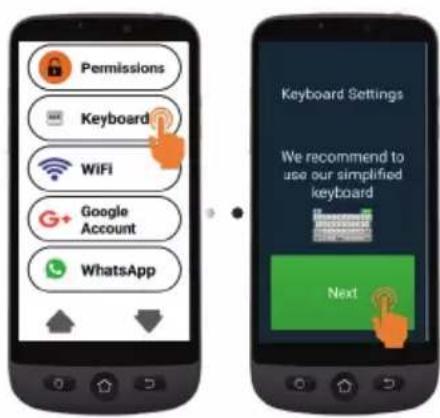
Permissions - Tap Next > Permission

text_image
Setup Wizard We will assist you with the essential settings of your Simple Smartphone Next Permissions Keyboard WiFi Google Account WhatsApp
text_image
Permissions Accessibility Installation Return to Wizard Install unknown apps Single Smartphone Allow from this source Your phone connected data are more unstable to switch for unknown apps. By installing apps from this source you want that you can be recommended that you should go to your phone to lose of help that may get the free home. Permissions Accessibility Installation Return to Wizard- Accessibility and Installation have to be in green
-
If one of them is in orange, tap on that function to activate and authorize it. It will turn into green. Tap Return to Wizard.
-
Keyboard - Tap Keyboard > Next
text_image
Permissions Keyboard WiFi Google Account WhatsApp Keyboard Settings We recommend to use our simplified keyboard NextGetting started

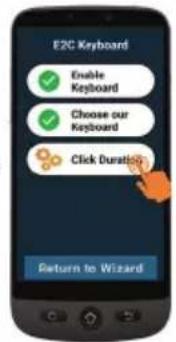
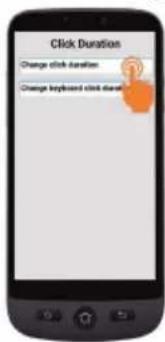
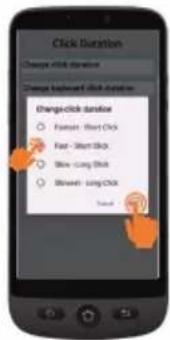
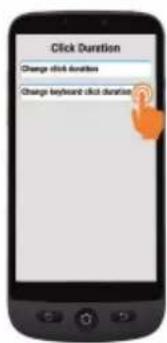
Click Duration
• To set up your preferred click choice for both menu and keyboard
- Tap Click Duration (menu) > Change Click Duration > Select one of the durations (according to user dexterity) > OK.
text_image
E2C Keyboard Enable Keyboard Choose our Keyboard Click Duration Return to Wizard。
text_image
Click Duration Change click duration Change keyboard click duration。
text_image
Click Duration Change click duration Change backward click duration Change click duration Forward - Short Click Fast - Short Click Slow - Long Click Slow - Long Click- Tap Click Duration (keyboard) > Change keyboard click duration > Long-press time > Select one of the durations (according to user dexterity) Tap 3 times to return to wizard.
text_image
Click Duration Change click duration Change keyboard click duration•

text_image
Long-press Time ○ Fast- Short Click ○ Fast - Short Click ○ Slow - Long Click ○ Slow- Short Click.
text_image
Permissions Keyboard WiFi Google Account WhatsAppGetting started
- WiFi (if available) - for WiFi setup (if it has not been done previously and if available)
- Google Account - If it has not been done previously, see page 12
If you did not set it up during Initial Setup steps, you can do it through the Wizard now.
This menu offers a simplified interface for most used functions in WhatsApp.
- Tap Setup and follow the instructions. Once Setup done,
icon turns green

- Tap Permissions and follow instructions
- Then, you need to allow Camera / Microphone / Phone / Contacts / Files & media in WhatsApp application: App info > Tap Permissions > and for each item, tap and authorize
- Press Return to Wizard
Once you are inside Whatsapp application, short tap may apply.

text_image
WhatsApp Set up WhatsApp and enable permissions for voice and video calls Next
text_image
WhatsApp Set up Permissions Return to Wizard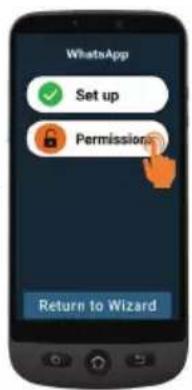
text_image
WhatsApp Set up Permissions Return to Wizard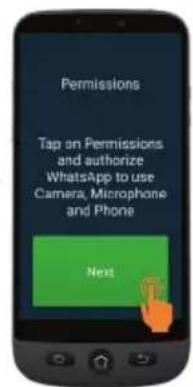
text_image
Permissions Tap on Permissions and authorize WhatsApp to use Camera, Microphone and Phone Next
text_image
App Info WhatsApp OPEN ACCESS FANCTION Notifications - No notifications per week Permissions Contacts and following details Storage & cache 32.40 MB used commercial storage Mobile data & Wi-Fi
text_image
App permissions Accessed Contacts Accessed in past 24 hours Not allowed Call logs Camera Files and media Location Microphone PhoneGetting started
- Copy Contacts from your SIM
- New Contact, see page 23
- SOS and Support to set your SOS and assistance numbers, see page 25
- Speed Dial to set the Home page speed dials, see page 24
- Favorite Contacts to select which contacts are displayed at the top of the list.
- ZoomLy - to get ready to participate in Zoom group calls easily.
- Advanced Settings
- Exit Setup
To exit from Setup Wizard menu at any step, Tap twice ▼ and select Exit Setup. Main Simple menu will appear.
To reach Setup Wizard later from Home screen.
- Tap ↓ until Settings displays.
- Tap Settings > Setup Wizard.

text_image
12:02 Call Messages Pictures
text_image
Settings Tools Power Off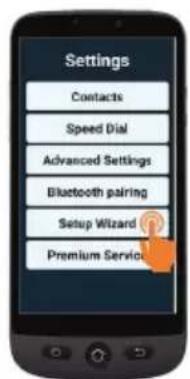
text_image
Settings Contacts Speed Dial Advanced Settings Bluetooth pairing Setup Wizard Premium Service
text_image
Permissions Keyboard WiFi Google Account WhatsApp x2 ZoomLy Advanced Settings My Info Exit Setup 12:02 Call Messages PicturesSmartphone menu/ interface Overview
When SIMPLE Smartphone mode is selected, your phone will look simpler and easier to use than regular smartphones.
Home screen overview
text_image
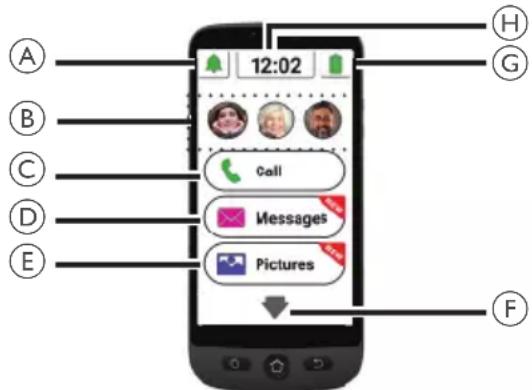
12:02 A B C D E H G Call Messages Pictures FA. Silent/Vibrate only/ Normal mode;
B. One Touch Speed Dial buttons (photo memories);
C. Call menu - Dial number, Phonebook, Call Log;
D. Message menu - SMS, Missed calls, WhatsApp, etc.;
E. Picture menu - View photos and videos, Use the camera;
F. Press this arrow to move to next menu, like Whatsapp, Phonebook, Applications, Settings, Listening to Internet radio, etc.;
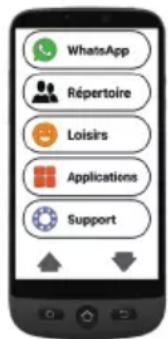
text_image
WhatsApp Répertoire Loisirs Applications SupportG. Battery status- tap to see charging level;
H. Time clock - tap to see time and date in large characters and set alarms.
- You can always return to the main screen
by pressing (see overview").
⑦ in "Smartphone
Use a simple tap to access each menu on the screen. You will feel a vibration whenever tap is valid. You can decide how long the tap should last to be valid, among 4 different values.
For details, go to Click duration in Setup Wizard menu page 16.
- For some menu buttons, you need to scroll (press and hold while sliding up) to view all applications.
| Smartphone Use
Call
Make a call
- Tap and then tap Dial Number.
- Use the dialpad (0-9) to enter the telephone number.
-
Tap Del to delete.
-
Tap to call.
- Tap to end the call.
Answer a call/ Reject a call
- Tap to answer a call.
- Tap to end or reject a call.
Call a number in the phonebook
-
Tap and then select the name (or tap to reach other pages and then select the name).
-
Tap to dial. • Tap to end the call.
Calling on of the 3 speed dial icons
-
Press one of the 3 One-Touch speed dials directly
-
Press to end the call
Calling from the call log
- Press Call
- Press Call Log to view the call log.
- Press the chosen number and press call back.
Adjust hearing volume/ Audio boost/ Handsfree
During a call, press Volume keys (see ⑤ in "Smartphone overview" on page 2 to adjust the loudness between levels 1 and 7 (default level is 5).
For extra sound amplification, use volume level 6 and 7. The display will show
BOOST ON
- Excessive exposure to loud sounds may cause hearing damage.
• To activate handsfree mode, tap on the screen.

- Tap again to deactivate handsfree mode.
Ringer mode
In idle mode, tap the ringer icon and select

- RINGER OFF (silent) - Red color
- -Vibration only (no ringer) - orange color
- -Ringer on - green color
Note: to modify the ringer melody and volume, see Other settings chapter, page 28.
Messages
All types of messages (SMS, WhatsApp, missed calls, etc.) are consolidated in
Messages. When there is a new message, the button will be highlighted with a notification.
To read the message, tap on the new items to read the details or tap Read old message.....
- Pictures received through MMS will be directly stored in Pictures center (Pictures)
Write a new message
Method 1
-
Tap, and then tap Write a new message.
-
Tap Dial number to enter the correspondant number and tap Next, or tap on one existing contact.
- Tap Keyboard.
- The screen will rotate.
- Type your message with the keyboard.
-
Tap Del to correct if needed
-
Tap Send.
-
Tap Yes to confirm, or No if not.
Method 2
- Follow steps 1 and 2 above to choose destination number.
- Tap one of the predefined messages.
- Tap Yes to confirm.
Smartphone Use
WhatsApp (simplified access)
Write a WhatsApp message
Tap > Write a new message.
• Follow the same steps as described page 21
Send a picture with WhatsApp
If there is already a picture
-
Tap . Pictures
-
Tap View Pictures.
-
Tap right arrow icon to select a picture.
-
Tap Options > Send > WhatsApp > Tap on desired contact > Tap Yes to confirm.
• The picture will be sent directly.
If there is no picture
-
Tap Take a Picture.
-
Tap Camera or Selfie > Capture > Save & Send (or Del to delete) > WhatsApp > Tap on desired contact > Tap Yes to confirm.
• The picture will be sent directly.
Place a Call with WhatsApp (Voice or Video call)
-
Tap >Voice Call (or Video Call).
-
Select a contact.
- Tap go through the list, or tap Search and enter the first character of the contact name to select a contact.
- Tap on the name of the contact.
To end the call, tap
To switch from Voice call to Video call, tap Camera during the Voice call.
Receive a WhatsApp call (or video call)
The screen shows Incoming Voice (or Video) Call from ... Do you wish to accept this call? Tap Yes to accept, or No to reject.
Send a voice message through WhatsApp
- Tap >Voice Message> Rec. to record your message.
• Maximum recording time: 60 seconds.
-
Tap Stop when complete, and then tap Send.
-
Select a contact:
- Tap to go through the list, or tap Search and enter the first character of the contact name to select a contact.
-
Tap on the name of the contact.
-
Tap Yes to confirm.
Use regular WhatsApp interface
Tap, and then WhatsApp app.
Pictures
Take a picture
-
Tap take tar picture.
-
Tap Camera or Selfie, and then • Capture to take a photo, or a selfie • Record for video recording,
-
Select Save, Save & Send, or Delete.
View and share pictures
-
Tap View Pictures.
-
Tap ▶ to move to the next...... • Tap All images to see all pictures; • Tap ▲/▼ to scroll through them.
-
Tap Options > Send.
- Select WhatsApp / SMS / Apps to share.
- Select a contact. Tap Yes to confirm.
Phone Book
Add a contact
-
Tap New Contact.
-
Tap Name, and then enter the name. (the keyboard will rotate to facilitate typing).
-
Tap Next.
-
Tap Number, and enter the number. Tap Next.
-
Tap Save.
- You will be asked if you wish to add a photo from Images or from Camera.
- Press Yes or No. Then, follow the on-screen instructions.
| Smartphone Use
Assign the 3 speed dial numbers
- The contacts for the 3-speed dial buttons on the home screen, have first to recorded in the phonebook.
-
Tap on an empty speed dial profile button on home screen.
-
Select an empty button.
-
Choose the name from the contact list.
- Tap to go to next page if needed.
- Tap Add contact to list.
- To add a photo on this speed dial number, Tap Phonebook then Photo, select the name, choose a photo from gallery or take a picture (camera + capture), select picture, press Save.
Edit contact
Tap

- Tap on the contact to edit, and then edit the name. Tap Next.
- Tap on the number, and then edit it. Tap Next.
- Tap Save.
Add a photo
- To associate a photo to a contact, tap

- Tap on the contact, and then select From Gallery or Camera.
- Choose or take a picture, and press Save.
Fun
- Wi-Fi or mobile data are required to use these features.
- Google account and sign-in to Google play required for Weather and Games.
Weather
Tap


the weather in your area of choice.
- A weather forecast app can be installed from Google Play Store first time you access.
Games
Tap


list of popular games.
- Tap on the game you wish to play.
- The game can be installed from Google Play Store first time you select it.
Internet Radio
Tap


a list of popular internet radio stations, according to your smartphone language.
Press on the desired radio to listen it. Tap back to return to the radio menu.
Apps
To launch any applications installed in your smartphone, you can use Apps menu.
- From Home page, tap


- Swipe with your finger to scroll the list of apps.
- Tap on the application you wish to open.
- You can change the order in which your apps are listed. See Advanced Settings.
Add new applications
Once you have logged in to your Google account, you can download extra applications from the Google Play Store.
- From Home page, tap then

Scroll down and tap
- Type the application name in the search bar and follow instructions.
- See "Google account" on page 12 if you have not associated a Google account to your phone yet.
SOS Assistance button
- Make sure the desired phone number exists in the phonebook
- One SOS number will be called and receive an emergency SMS with phone location.
- The five other SOS numbers will only receive an emergency SMS with phone location.
- Make sure to inform the recipient that you have set their numbers as your SOS Assistance numbers
• Additional cost may be charged for SMS messages.
| Smartphone Use
Set SOS Assistance number
- Tap > Advanced Settings.
- Tap SOS and Support > SOS numbers.
- To select the SOS number which will be called: Tap on Not selected and select the number from the Phonebook.

text_image
SQL Database will automatically call this question: Not Detected In addition to the previous call, SQL Database will save SQL database with the first instance for the last instance (zip for 5 numbers). Not Selected Not Selected Not Selected Not Selected Not Selected Not Selected- Tap Save.
- A confirmation SMS is sent to the selected person to inform that He/She is the contact in case of emergency.
- For the five other SOS numbers, repeat as above and tap Save.
- You may also assign a contact to receive alerts when your battery is low, in SOS and Support and then Caregiver Support Numbers.
Call SOS Assistance number
- You must set the SOS Assistance numbers first, in order to dial out.
• Network service must be active in order for SOS Assistance to work normally.
• Additional cost may be charged for SMS messages. - You must set the SOS Assistance numbers first, in order to dial out.
- Network service must be active in order for SOS Assistance to work normally.
- Additional cost may be charged for SMS messages.
Press and hold SOS button

3 seconds to dial out assistance numbers.
- The smartphone automatically enters handsfree mode and you can hear/speak to your SOS contact.
- SMS is sent to 5 recipients, including the recipient of this assistance call.
To stop the SOS action, press and hold CANCEL during the countdown.
Advanced Settings
Select to access the following options in Advanced Settings menu.
- Initial setting
- Contacts
- Personal Info
- SOS and Support
Tap

Settings.
Talking Digits
By default, while tapping the dialpad numbers, the smartphone will announce the digits, (except in silent mode). To disable this feature: Advanced Settings > Display & Sound Settings > Sound Settings > Read dialed digit out loud, Tap No > Tap Save
Rearrange applications in Apps menu
You can change the order in which apps are displayed in Apps menu.
- Go to Advanced settings> Display & Sound settings > Application filter.
- For each app, tap the arrow on the right side, scroll up or down to select the desired position, then tap Back.
Rearrange the menu buttons
You can change the order in which menu buttons (WhatsApp, Phonebook, Fun, ...) are displayed.
- Go to Advanced settings> Display & Sound settings > More menu sorter.
- For each element, tap the small arrow on the right side and scroll up or down to select the desired position, then tap Back
Manage messages filter
You can manage which apps will generate notifications in Messages menu.
- Go to Advanced settings> Display & Sound settings > Messages Filter.
- For each app, tap on the left square to allow or disallow the notification.
Android settings
There are several ways you can access Android settings.
Method 1
Go to Advanced settings> Android settings;
Method 2
Advanced settings> Exit system settings > once in Android tap Settings (or any other);
Method 3
From Home page, use the down arrow and tap Tools > Exit system.
To return to the main screen, simply press Home key (see ⑦ "Smartphone overview").
FAQ's
| Questions Answers | |
| I would like to change my smartphone language. | Language is part of Android System Settings.From Simple Smartphone home page:1. Tap twice > Settings > Advanced Settings > Android Settings.2. Scroll down > tap System > Languages & Input > Languages.3. Add your desired language. Press and hold the language name and drag it to the top of the list. |
| How can I modify ringer volume and melody? | From Simple Smartphone home page:1. Tap twice > Settings > Advanced Settings > Android Settings.2. Scroll down > tap Sound.3. To modify ringer volume, scroll to Ring & notification volume and select the desired volume.• By default the middle level is used.4. To modify ringer melody, scroll to Phone Ringtone Select one ringtone and tap OK.5. As usual, press Home key 7to return to the main screen. |
| How can I modify the listening volume for radio or videos in Simple Smartphone mode? | You can easily adjust Media volume while music or videos are playing, with the Volume keys.You can also do it through Android System Settings:From Simple Smartphone home page:1. Tap twice >Settings >Advanced Settings >Android Settings.2. Scroll down >tap Sound.3. Use the sliding bar to adjustMedia volumeto your needs.• By default the middle level is used.4. As usual, press Home keyto return to the main screen. |
| I have received on my smartphone a notification for updating it. What should I do? | Tap Downloadand follow instructions.• Once the download is done, phone will restart.If you have seen the notification but missed to install it, then press:Tools >Exit System >Settings/ About phone >System Update. Tap Download.• Once the download is done (can take few minutes), press:Install now >OK. The phone will restart. |
| I would like to use S/M 510 as a regular smartphone. Can I change back to Android mode? | Yes, you can always change mode.From Simple Smartphone home page:1. TapApps >Select Home.2. Tap Android.Select Homeis also available in Android mode, in case you want to switch back to Simple mode. |
Learn more & Supports
Troubleshooting
| Issues Solutions | |
| The mobile phone cannot be switched on. | No battery inserted; Battery is not charged. |
| The phone is requesting a PUK when I switch on the phone. | If you do not have the PUK for your SIM card, please contact your service provider. |
| A message appears in the display for some functions, indicating execution/ use is not possible. | Some functions can only be used after the respective service has been applied for. Contact your service provider. |
| Screen frozen or no response when pressing keys. | Remove the battery for 3 minutes and try again. |
| No connection to the mobile telecommunication network. | Contact your service provider. |
| The Insert SIM message appears in the display. | Make sure that the SIM card has been installed correctly. Contact your service provider. |
| The battery cannot be charged or is empty within a short time (S/M 510-M). | Battery may be defective.Make sure the magnetic tip is properly inserted into your smartphone USB jack.Approach the magnetic side of the USB cable to the magnetic tip, until they stick together.If you cannot hear any sound or you cannot see the charging icon on the phone screen, then make sure the power adaptor is properly connected to the mains.Charge the mobile phone for 4 hours. |
| The easy-charging dock does not work. I cannot charge my smartphone (S/M 510-C). | Place the smartphone on the easy-charging dock.If you cannot hear any sound or you cannot see the charging icon on the phone screen, then make sure the power adaptor is well connected and the smartphone properly positioned on the dock. |
| The mobile phone has accidentally got wet. | Switch off the phone immediately, and remove the battery to allow the unit to dry completely before powering it on again. |
Declaration of Conformity
The logo CE printed on the products indicates the conformity with all essential requirements (RED directive: 2014/53/EU).

The logo UKCA printed on the products indicates the conformity with all essential requirements (Radio Equipment regulations 2017).

You can download the Declaration of Confirmity from our websites: www.swissvoice.net www.amplicomms.com
Atlinks Europe
28 Boulevard Belle Rive | 92500 Rueil-Malmaison France |
RCS Nanterre 508 823 747
ATLINKS UK Ltd
3rd Floor, Waverley House |
7-12 Noel Street, London, W1F 8GQ, UK |
Company registration: 13809295
www.swissvoice.net
www.amplicomms.com
UG S/M 510 UK
ATL1426649
The Manufacturer reserves the right to modify the specifications of its products to make technical improvements or comply with new regulations.
Google, Android, and Google Play are trademarks of Google LLC.
Models : S/M 510-C, S/M 510-M
A/W No.: 10002746 Rev.0 (EN)
Printed in China
