Watch and Care V120 - Baby monitor Amplicomms - Free user manual and instructions
Find the device manual for free Watch and Care V120 Amplicomms in PDF.

User questions about Watch and Care V120 Amplicomms
0 question about this device. Answer the ones you know or ask your own.
Ask a new question about this device
Download the instructions for your Baby monitor in PDF format for free! Find your manual Watch and Care V120 - Amplicomms and take your electronic device back in hand. On this page are published all the documents necessary for the use of your device. Watch and Care V120 by Amplicomms.
USER MANUAL Watch and Care V120 Amplicomms
natural_image
Two white wireless telephones, one with a remote control and the other a child's photo on a stand (no visible text or symbols)Übersicht
At a glance
text_image
1 2 3 4 5 6 amplicomms Watch & Care V120
text_image
ON OFF 7 8 9natural_image
Technical line drawing of a mechanical or electrical component with no visible text or symbolsnatural_image
Pure diagram of a mechanical component with an arrow indicating downward force (no text or symbols)natural_image
Line drawing of a mobile phone casing with a lid and arrow indicating rotation (no text or symbols)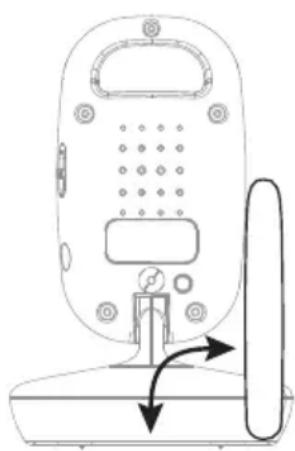
natural_image
Line drawing of a mobile phone with a scroll wheel and control panel (no text or symbols)Den Sender bedienen
Den Sender bedienen
natural_image
Pure technical diagram showing a mechanical or electrical component with no text, numbers, or symbolsMonitor unit (receiver)
1 Antenna (fold-out)
2 Sound level LEDs
3 Lullaby selector
4 On/Off switch
5 Menu button
6 Talk button
7 Play / Pause
8 Increase volume / menu options selection
9 Reduce volume / menu options selection
10 Power LED
11 Link LED
12 Socket for external vibration alert device
Camera unit (transmitter)
1 Night light
2 Light sensor
3 Camera lens
4 Antenna
5 Microphone
6 Power LED
7 ON/OFF switch
8 Socket for power adapter plug
9 Temperature sensor
Putting the Units into Operation....28
Checking the package contents 28
Connecting and aligning the transmitter 28
Connecting the receiver ....29
Mounting/dismounting the belt clip....30
Optimization of range 30
Operating the Transmitter ....32
Switching the transmitter on/off 32
Connecting and aligning the transmitter 32
Night vision 32
Operating the Receiver ....34
Switching the receiver on/off 34
Setting the brightness 34
Temperature option 34
Switching the night light on/off 35
Switching the vibration alarm on/off 35
Adjusting the VOX sensitivity ....35
Setting the zoom 36
Selecting a lullaby ....36
Intercom function ....37
Range 37
Registration 37
Multi camera mode....38
Appendix....40
Safety Information ....40
Intended use 40
Installation location and safety information ....40
Power adapter plug ....41
Rechargeable batteries ....41
Power failure 41
Medical equipment 41
Disposal 42
Helpline 42
Troubleshooting guide - Problems and solutions....43
Declaration of conformity....44
Maintenance 44
Technical data....45
Guarantee 46
Putting the Units into Operation
Putting the Units into Operation
Important: please make sure you've read the safety information on page 40 before you set up your system.
The data transmitted (image and/or sound) are digitally coded.
Checking the package contents
The package contains:
• One camera unit (transmitter)
• One monitor unit (receiver) with belt clip
• One rechargeable battery pack for the receiver
• One power adapter plug for the transmitter
• One charger with power adapter plug for the receiver
• One operating manual
Connecting and aligning the transmitter
Attention: Position the transmitter with a minimum distance of 1 m to other electronic devices, otherwise there is a risk of mutual disturbance. Point the upper section of the transmitter towards the baby or object you want to monitor. Check that the baby or object is suitably displayed on the receiver.
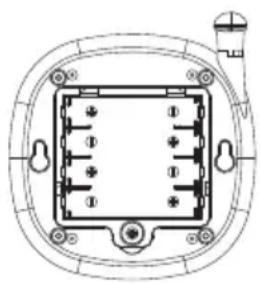
Operating with batteries (not supplied)
Use a small screwdriver to open the transmitter's battery compartment on the underside. Insert the batteries, paying attention to correct polarity. Refer to the diagrams in the battery compartment. Close the battery compartment again.
natural_image
Technical line drawing of a rectangular electronic component with pins and mounting holes (no text or symbols)The transmitter is operated by means of 4 AAA Alkaline batteries (not contained in the material supplied). The transmitter cannot be charged. Insert the batteries before connecting the power adapter plug.
In the case of a low battery charge, the Power LED flashes slowly. The batteries must be replaced.
Operating with a power adapter plug
Connect the transmitter as illustrated in the diagram. For safety reasons, only use the power adapter plug supplied.

text_image
Mains power outletConnecting the receiver
Attention: Position the receiver with a minimum distance of 1 m to other electronic devices, otherwise there is a risk of mutual disturbance.
Operating with a power adapter plug
Connect the receiver as illustrated in the diagram. For safety reasons, only use the power adapter plug supplied.

text_image
Mains power outletOperation with rechargeable batteries
- Open the battery compartment on the rear side of the receiver.
- Insert the battery pack, and connect it with the socket. The connector can only be fitted one way.
- Close the battery compartment again.
The receiver is powered by a Lithium-ion battery pack of 3.7 V, 1500 mAh. The rechargeable battery pack can be recharged directly in the receiver when it is inserted in the charging station. The Power LED lights up red when the receiver is being charged. In the case of a low battery charge, the Power LED flashes slowly. The battery pack must then be recharged.
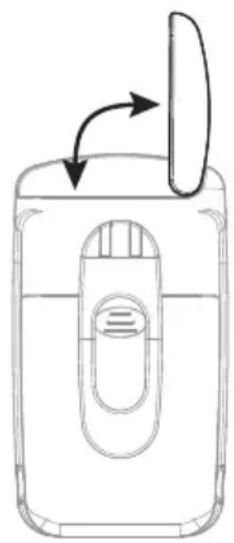
Mounting/dismounting the belt clip
Prize the latch (see figure) with a suitable tool (such as a small screwdriver) a little bit away from the chassis and move the belt clip down simultaneously. To attach the belt clip slide it into the guide towards the top until it snaps in.

natural_image
Pure diagram of a mechanical component with an arrow indicating downward force (no text or symbols)Optimization of range
Baby unit and parent unit come with fold-out antennas. If necessary, optimum range can be achieved if both the Baby unit and Parent unit antennas are extended vertically.
natural_image
Line drawing of a mobile phone casing with an open lid and internal panel (no text or symbols)
natural_image
Line drawing of a mobile phone rear panel with buttons and a scroll, showing no text or symbolsOperating the Transmitter
Operating the Transmitter
Check the transmitter and receiver are working properly each time before the equipment is put into operation.
Switching the transmitter on/off
Position the transmitter in a good position for the monitoring tasks required and align the camera lens to the area to be monitored.
Slide the switch to ON. The Power LED lights up.
The transmitter is now ready to operate.
To switch the unit off, slide the switch to OFF.
In the case of a low battery voltage, the Power LED flashes slowly. In this event replace the 4 x AAA batteries with fresh alkaline cells.
Connecting and aligning the transmitter
Attention: Position the transmitter with a minimum distance of 1 m to other electronic devices, otherwise there is a risk of mutual disturbance. Point the upper section of the transmitter towards the baby or object you want to monitor. Check that the baby or object is suitably displayed on the receiver.
Night vision
The transmitter is equipped with 6 infrared diodes. This enables the transmission of pictures from areas which are not illuminated. The night vision function is activated automatically when the light conditions make it necessary.
When the night-time vision function is activated, the screen display on the receiver turns to black and white.
Operating the Receiver
Operating the Receiver
Check the transmitter and receiver are working properly each time before the equipment is put into operation.
Switching the receiver on/off
Press and hold this button until the logo appears first then the image being taken by the transmitter camera.
Press and hold the button for approx. 1 second to switch the unit off.
In the case of a low battery charge, the Power LED flashes slowly. Place the receiver in the charger to recharge the battery pack.
Setting the brightness
Press the button once.
This icon appears in the display.
Use these buttons to adjust the brightness to one of five settings.
Temperature option
IMPORTANT INFORMATION The ideal temperature for a baby to sleep is 16^ - 18^ C. Please set or adjust the room temperature accordingly.
Press the button twice.
This icon appears in the display.
Use these buttons to set temperature measurement to OFF, °C or °F.
18°C The current temperature is displayed during the temperature measurement, e.g. in °C. An alert will occur if the temperature becomes outside the preset temperature range (15°C - 25°C).
Note: The upper and lower room temperature settings for the alarm are for guidance only and are not a substitute for personal supervision. In extreme temperature conditions during summer or winter the upper and lower temperature settings for the alarm may be exceeded and result in the room temperature warning being activated. Under such conditions appropriate actions should be taken by the parent or guardian to ensure the health and safety of the child and on the basis that the room conditions are considered satisfactory then the temperature warning option can be temporarily disabled.
Switching the night light on/off

Press the button three times.

This icon appears in the display.

Use these buttons to switch the night light on the transmitter on or off.
Switching the vibration alarm on/off

Press the button four times.

This icon appears in the display.

Use these buttons to switch the vibration alarm on or off.
When the vibration alarm is activated, the receiver vibrates when sounds in the room being monitored are so loud that the red Sound Level LEDs are activated.
Adjusting the VOX sensitivity
(VOX: Voice Operated Transmission = Sound detection)
The VOX function (sound detection) causes the system to start transmitting
automatically from the transmitter to the receiver immediately a voice or sound is detected.

Press the button five times.

This icon appears in the display.

Use these buttons to set VOX to OFF or adjust the sensitivity to one of 5 levels. When one of the five levels has been set, the VOX icon lights up in the display. The display goes out after 10 seconds.
The display is reactivated when a sound is detected or a button on the receiver is pressed.
- If the receiver is operated by battery power that the display will switch off after 10 seconds of inactivity, but will switch back on if triggered by the vox detector in the transmitter. However if the receiver is placed on the charger, or VOX is set to OFF, the display will remain on all the time.
Setting the zoom
You can zoom in on the image.

Press the button six times.
A magnifying glass icon appears on the display.

Use these buttons to set the zoom.
Selecting a lullaby

Switch on: press the button briefly.

This icon appears in the display.

Use the button to select one of the 5 lullabies (1-5).

Switch off: press the button briefly.
Intercom function

Press and hold the button.

This icon appears in the display.
Speak into the microphone to talk with the person near the other unit. When the talking button is pressed, any playing of lullabies will be aborted.
Range
When the distance between the transmitter and receiver is too far, the message "Out of Range" appears in the display and you hear a beep. Move the receiver nearer to the transmitter. If necessary, optimum range can be achieved if both the Baby unit and Parent unit antennas are extended vertically.
Registration
In delivery state the transmitter is pre-registered at the receiver. If necessary or if a another camera is added to the system, registration can also be completed manually:
1 Switch the transmitter off (switch set to OFF). Remove the batteries of the receiver for a few seconds if necessary.
2 Switch the receiver on.
3 Press the menu key repeatedly un[1][C1] appears in the display.
4 Use the ▲▼ buttons to select the desired camera [C1] ... [C4].
5 Press and hold down the button for approx. 2 seconds.

appears in the display.
6 Press the button briefly. The Link LED flickers for approx. 10 seconds.
7 Switch the transmitter on (switch set to ON).
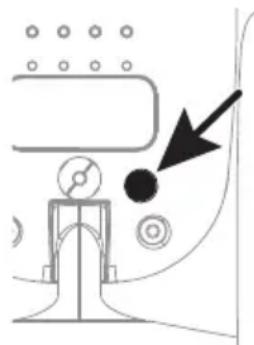
8 Press the registration key on the back side of the transmitter. After a short time the video from the transmitter will appear on the screen if the registration was successful. If the registration failed, "Out of Range" appears on the screen.
natural_image
Pure technical diagram showing a mechanical or electrical component with no text, numbers, or symbolsMulti camera mode
If you registered several cameras (up to 4) to your system, you can select a single camera or switch to scan mode. In scan mode, the signals from all cameras are continuously displayed alternately each for about 7 seconds.

Press the button seven times.
The number of the selected camera is shown.

Use these buttons to select a camera or the scan mode.
For each of the four cameras you can select the features settings individually.
Appendix
Appendix
Safety Information
Please read this operating instruction manual thoroughly.
Intended use
The surveillance system has been developed to monitor rooms. The transmitter sends acoustic and video signals from its point of installation to the receiver. Any other use is considered unintended use.
The use of this equipment does not substitute personal supervision, e.g. of a child. Users are not relieved of their personal liability. Unauthorised modification or reconstruction is not permitted. Under no circumstances open the device or complete any repair work yourself.
Installation location and safety information
• Never lay the transmitter in a baby's/child's bed or playpen.
- Ensure that the transmitter and power cable are out of reach of babies/children, i.e. they are at least one meter away.
- Pay attention that the components are sufficiently well-ventilated when in operation. Do not lay a cushion, towel or such over the devices.
- The devices are not intended for medical purposes. Warning and signal tones from respiratory or heartbeat monitoring equipment are not transmitted.
- The installation location plays a decisive role in ensuring proper operation. Therefore, maintain a distance of at least one meter from other electronic equipment, such as microwave ovens or hi-fi devices, otherwise they could cause mutual interference/faults.
- Prevent excessive exposure to smoke, dust, vibration, chemicals, moisture, heat and direct sunlight. Do not use the equipment in potentially explosive areas.
Power adapter plug
Attention: Only use the power adapter plugs contained in the material supplied since other power adapter plugs could damage the surveillance system. Ensure access to the power adapter plug is not obstructed by furniture or such.
When using the equipment with a power adapter plug, pay attention that the plug and cable are in perfect condition. Kinked or worn cable represents the risk of a fatal accident!
The power adapter plug supplied fulfils the ecodesign requirements of the European Union (Directive 2005/32/EC). This means that, both in an operating state and in an idling state, the power consumption is considerably lower compared to power adapter plugs with an older design.

• Energiesparend
• Economisant
ténergie
• A risparmio di
energia
• Energy efficient
Rechargeable batteries
Attention: Never throw batteries into a fire. Only use batteries of the same type! Pay attention to correct polarity.
Power failure
In the event of a power failure, the devices only operate through battery power. Disconnect the power adapter plugs from the devices in this case.
Medical equipment
Attention: Never use the devices in the vicinity of medical equipment. Effects on such equipment cannot be fully ruled out.
Disposal
In order to dispose of your device, take it to a collection point provided by your local public waste authorities (e.g. recycling centre). According to laws on the disposal of electronic and electrical devices, owners are obliged to dispose of old electronic and electrical devices in a separate waste container. The adjacent symbol indicates that the device must not be disposed of in normal domestic waste!
Batteries represent a hazard to health and the environment!
Never open, damage or swallow batteries or allow them to pollute the environment. They may contain toxic, ecologically hazardous heavy metals. You are legally obliged to dispose of power packs and batteries at the point of sale or in the corresponding containers provided at collection points provided by local public waste authorities. Disposal is free of charge. The adjacent symbols indicate that the batteries must not be disposed of in normal domestic waste and must be brought to collection points provided by local public waste authorities.

Packaging materials must be disposed of according to local regulations.
Helpline
If you need some help and you're in the UK, please first check and see if your problem can be solved using the troubleshooting guide below. If it can't , please call us on 0844 800 6503 (using a UK landline, at the time of going to print: calls cost 6p for connection charge and then 5p a minute. Mobile costs may vary). Lines are open Monday to Friday, 9am to 5pm, excluding public holidays.
If you've a claim on your 2-year guarantee, please contact your supplier.
Troubleshooting guide - Problems and solutions
Equipment does not function
• Transmitter and/or receiver are not switched on.
• The batteries are empty or defective.
• The power adapter plugs are not connected.
No reception
• Transmitter and receiver are not registered.
• Transmitter is too far from object being monitored, e.g. baby.
Observe the minimum distance of one meter.
• The receiver and transmitter are too far apart.
• The VOX sensitivity is set too low.
Reception interference
• The receiver and transmitter are too far apart.
• The battery power is too low.
• Other electronic devices are causing interference in the field of transmission.
Howling or squealing noise (acoustic feedback)
• Increase the distance between receiver and transmitter.
- Reduce the volume on the receiver.
Noise
• The battery power is too low.
Picture but no sound transmission
• Volume setting is too low.
Picture is in black and white
• The night vision function is active.
The battery pack in the receiver is not charged
• The power adapter plug is not connected.
Declaration of conformity

This device fulfils the requirements stipulated in the EU directive: 1999/5 EU directive on radio equipment and telecommunications terminal equipment and the mutual recognition of their conformity.
Conformity with the above mentioned directive is confirmed by the CE symbol on the device.
To view the complete Declaration of Conformity, please refer to the free download available on our website www.amplicomms.com
Maintenance
- Clean the housing surfaces with a soft, fluff-free cloth.
• Never use cleaning agents or solvents.
Technical data
Camera (transmitter) Socket: 6 V DC
Sensor: 1 night light sensor
IR diodes: 6
Monitor (receiver) Screen: 2,4" LC display
Socket: 6 V DC
Power supply (receiver) Power adapter plug, input:
100-240 VAC, 50-60Hz, 150 mA
Power adapter plug, output:
6 VDC, 800 mA
or Lithium-ion battery pack
3.7 Volt / 1500 mAh
Initial charging time for battery Up to 16 h
Power supply (transmitter) Power adapter plug, input:
100-240 VAC, 50-60Hz, 150 mA
Power adapter plug, output:
6 VDC, 800 mA
or 4 AAA Alkaline batteries
Range Up to 150 meters under optimum condi-
tions. Range is reduced in buildings
through walls, doors etc.
Frequency range 2.4 GHz (digital)
Permissible ambient temperature 0°C to 40°C
Transmission power (TX PA power) 15 \~ 17 dBm
Guarantee
AMPLICOMMS equipment is produced and tested according to the latest production methods. The implementation of carefully chosen materials and highly developed technologies ensure trouble free functioning and a long service life.
The terms of the guarantee do not apply to the rechargeable batteries or power packs used in the products. The period of guarantee is 24 months from the date of purchase.
All deficiencies resulting from material of production faults which occur during the period of guarantee will be eliminated free of charge. Rights to claims under the terms of guarantee are annulled following intervention by the purchaser or third parties. Damage caused as a result of improper handling or operation, incorrect positioning or storing, improper connection or installation, Acts of God or other external influence are not covered by the terms of guarantee.
In the case of complaints, we reserve the right to repair or replace defect parts or provide a replacement device. Replacement parts or devices become our property.
Rights to compensation in the case of damage are excluded where there is no evidence or intent or gross negligence by the manufacturer.
If your equipment shows signs of defect during the period of guarantee, please return to the sales outlet in which you purchased the AMPLICOMMS equipment together with the purchase receipt. All rights to claims under the terms of guarantee in accordance with this agreement must be asserted exclusively with regard to your sales outlet.
Two years after the purchase of our products, claims under the terms of guarantee can no longer be asserted.

text_image
4250711991296
mplicomms