
BigTel 1200 - Telephone Amplicomms - Free user manual and instructions
Find the device manual for free BigTel 1200 Amplicomms in PDF.


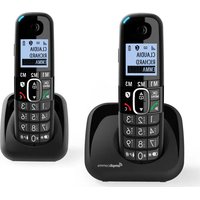
| Product type | Amplified landline phone for seniors |
| Brand | Amplicomms |
| Model | BigTel 1200 |
| Dimensions | 235 x 215 x 85 mm |
| Weight | 600 g |
| Power supply | Mains adapter 230 V |
| Sound amplification | Up to 40 dB gain |
| Display | Large backlit display with number display |
| Keypad | Large backlit keys |
| Main functions | Hands-free, 50-entry directory, last number redial, emergency button |
| Compatibility | Hearing aid (magnetic induction compatible) |
| Tone adjustment | 3 tone levels (high, medium, low) |
| Ringer | Adjustable ringer with light indicator |
| Connectivity | RJ11 telephone jack |
| Care and cleaning | Wipe with a slightly damp soft cloth, do not use solvents |
| Safety | Do not expose to water, use only the supplied adapter |
| Spare parts and repairability | Handset, base, adapter, telephone cord available |
| Warranty | 2 years |
| General information | Analog telephone for hearing impaired, ideal for seniors |
Frequently Asked Questions - BigTel 1200 Amplicomms
User questions about BigTel 1200 Amplicomms
0 question about this device. Answer the ones you know or ask your own.
Ask a new question about this device
Download the instructions for your Telephone in PDF format for free! Find your manual BigTel 1200 - Amplicomms and take your electronic device back in hand. On this page are published all the documents necessary for the use of your device. BigTel 1200 by Amplicomms.
USER MANUAL BigTel 1200 Amplicomms
Contents
Getting started 4

Connect the base station

1 Handset 2 Amplification key
R key 100/300/600 ms
Base code
Base reset
Short flash (100 ms),
medium (300 ms), long (600 ms),

Contents
Getting started....4
Check box contents 4
Set up your phone system .... 5
Location 5
Connect the base unit 5
Connect the cordless handset 7
Controls 8
Cordless handset. 8
Base unit....11
Display icons 12
Navigating the menu....13
Open main menu....13
Menu layout....13
First use 16
Making and receiving calls 17
Making a call, answering a call, ending a call. . . . . . . . . . . . 17
Handsfree. 17
Volume control 17
Mute 17
Redial 18
Call log 18
Chain dialling 20
Find handset 20
Join a call in progress 20
Internal call 21
Phonebook 21
Create a new entry 21
Using the phonebook 22
Settings 23
Ringtones 23
Tones 23
Set date and time 24
Set alarm 24
Handset settings 25
Base settings 26
Answering machine....27
Answering machine display 27
Operating the answering machine from the base ..... 28
Switching the answering machine on/off (handset).....28
Hear messages 28
Record a memo 29
Record personal announcement 30
Playback/delete personal announcement 30
Call screening 31
Call intercept 31
Delete messages 31
Answer machine settings 32
Remote access....33
Appendix. 35
Help and support. 35
Safety information 35
Intended use 37
Phone location....37
Power supply 38
Energy efficient power adapter 38
Medical equipment 38
Rechargeable batteries 38
Hearing aid compatibility 38
Disposal 39
Technical details 40
Maintenance 40
Guarantee 41
Declaration of conformity. 42
Getting started
Important: Please make sure you've read the safety information on page 35 before you set up your phone system.
Check box contents
If you have purchased a BigTel 1280 pack you should have:
- 1 base unit • 1 AC power adaptor for the base unit • 1 cordless handset • 2 rechargeable batteries AAA 400 mAh NiMH • 1 battery compartment cover • 1 telephone line cord
Important: Use only the power adaptors, telephone line cord and batteries supplied with your BigTel 1280, otherwise your phone may not work.
Set up your phone system
Location
Place the base unit near a mains socket and a telephone wall jack to ensure that the connection cables are long enough. Keep the unit approx. 1 m away from other electronic devices to prevent interference. The base unit uses radio signals to connect with the cordless handset. Signal strength depends on the base unit's location. The maximum range is 300 m based on an unobstructed line of sight; the range is shorter inside buildings because of walls and other obstacles.
Connect the base unit
- Plug the connector on the cable end into the corresponding jack on the rear side of the base and plug the power adaptor into the wall socket.
- Plug the small connector on the end of the telephone line cord into the corresponding jack on the base and plug the other end into the telephone jack.
Note: Guide the power adapter cable through the strain-relief tab on the base.

Important: Use only the power adaptors, telephone line cord and batteries supplied with your BigTel 1280, otherwise your phone may not work.
Do not block access to the wall power supply with furniture or other items.
Connect the cordless handset
- Open the battery compartment and insert the rechargeable batteries. Observe the correct polarity.
- Slide the battery compartment cover towards the centre of the handset until it clicks into place.


For a full charge, the handset must be left in the base unit for at least 16 hours (check the base unit's power supply!).
Important: Use only the batteries supplied with this product. If the batteries need to be replaced later, the same battery type must be used.
Controls
Cordless handset

1 Earpiece 2 Boost key
- To increase the volume in the handset. Press briefly during a call to switch the amplification on - pressing again switches the amplification off again.
If the amplifier function is activated, "Boost on" appears on the display and the incoming call light (6) lights up.
3 Direct call keys M1/M2
- In idle mode, press to dial the stored number.
4 Menu/Select
- Press to show the menu.
- Press to select an item or save an entry/setting while in a menu.
5 Call/Hands-free
- Press to make or answer a call.
- While in a call: switch hands-free on/off.
6 Incoming call light
- Flashes when there is an incoming call.
7 Volume keys
- Press to adjust the listening volume during a call or answer machine message playback.
8 Flash key
- Press to do a Flash function during a call.
- In predial, insert a 'R', it will do a flash function when press Call key.
9 Mute/Delete
- Press to mute the microphone during a call.
- Press to silence the handset ringer temporarily while the phone is ringing (the call can still be accepted if the caller hasn't hung up).
10 Phonebook/Up
- Press to review the phonebook when in idle.
- Press to scroll up while in menus or lists.
- Press to move the cursor to the left while entering names or numbers.
11 End call/Cancel
- Press to hang up during a call.
- Press to cancel an operation/return to idle mode while in a menu.
- Press and hold to switch off the handset when idle.
12 Redial/Pause
- In idle state: press to open redial list.
- Press to scroll down while in menus or lists.
- Press to move the cursor to the right while entering names or numbers.
13 Alphanumeric keypad
- Press to enter numbers or characters/*/#.
- Press and hold key "0" to enter a dialling pause.
- Press star key to switch between upper case and lower case while entering characters.
- Press and hold hash key to switch the ringer on/off.
14 Microphone
Base unit

1 Display
- Shows the number of messages and other information.
2 Delete
- Press to delete the current message/announcement. Press and hold to delete all old (already heard) messages.
3 Repeat
- Press once to repeat the current message.
- Press twice to play the previous message.
4/9 Volume keys
- Press to adjust the ringer volume when there is an incoming call with ringer sound.
- Press to adjust the listening volume during message playback.
5 Play/Stop
- Press to start or stop message playback.
6 Answering machine on/off
- Press to turn the built-in answering machine on or off.
7 Page
- Press to page all handsets when in idle.
8 Skip
- Press to skip to the next message during message playback.
Display icons

Battery is low; place handset in charger to recharge.

Full battery power level.

The handset speakerphone is in use.

Ringer off.

Keyboard locked.

Alarm activated.
Navigating the menu
This chapter describes how to use the menu to access features on the telephone.
Open main menu
- Press /OK
- Use and to select the desired menu item and press . →/OK
- Press to cancel an operation, back up to the previous menu, or exit that menu.
- Press to return to idle state.
Note: If a key is not pressed within 30 seconds, the telephone automatically returns to idle mode.
Menu layout
Call log Details
Delete
Delete all
Call
Store number
Call log type
Sound Ringer External Melody ...
Internal Melody ...
Ringer volume Level ...
Silent
Beep/Off
Tones
Key beep
Confirmation
Battery low
No coverage
Settings Handset settings Select base
Display Contrast
Handset name
Language
Auto answer
Memory keys
Register handset
Deregister
Handset reset
Base settings Ringer Ringtone
Ringer volume
Dial mode Tone/Pulse
Flash time 100/300/600 ms
System PIN
Base reset
Date/Time/Alarm Date/Time Time format
Date format
Enter time
Enter date
Alarm Alarm On/Off
Enter time
Ringtone
Answer machine Play messages
Delete messages
Answer On/Off
Record MEMO
Outgoing message Record message Answer/Record
Answer only
Play message Answer/Record
Answer only
Answer settings Answer mode Answer/Record
Answer only
TAM language Deutsch/English
Answer delay 2/4/6/8 rings
Recording time 30/60/120 s /
Unlimited
Call screening
Remote access Enable/Disable
First use
In delivery state the telephone is set to GERMAN language.
- Time/date input appears in the display.
- Press /OK
- Select 'Enter time' and press 📋/OK
- Enter the time (hours/minutes) and press 📋/OK
- Select 'Enter date' and press ↗/OK
- Enter the date (year/month/day) and press ✉/OK
- Press
Set the language
- Press ↗/OK
- Select 'Settings' and press ✦/OK
- Select 'Set handset' and press ⇌/OK
- Select 'Language' and press →/OK
- Select a language and press ✉/OK
Making and receiving calls
Making a call, answering a call, ending a call
To make a call
Enter the telephone number and press the call key.
- or -
Press the speakerphone key. When you hear a dial tone, enter the telephone number.
To answer a call
Press the call key.
To end a call
Press the end key or place the handset in the base station.
Handsfree
While in a call, press the speakerphone key. To deactivate, press the same key again.
Volume control
While in a call, press the volume buttons on the side.
Mute
The mute function allows you to hear the other party but the other party cannot hear you.
While in a call, press the mute key. Press again to resume the conversation.
Redial
The last 15 telephone numbers dialled are stored in the system memory.
- Press in idle state.
- Select the desired entry with ▲ and .
- Press to dial the telephone number.
Call log
Note: This function is only available if your telephone service provider has activated the CLIP (Calling Line Identification Presentation) service attribute. Please contact your service provider for more information.
You can determine whether all calls are recorded or only calls that were not accepted. Missed calls are indicated on the display.
In the call log, new entries are marked with ●. After querying the details or callback, the entries are marked with ○.
Received calls are displayed without marking.
Calling from the caller list
- In idle state press the menu key ⇌/OK
- Select Call log and press 📋/OK
- Select the desired entry with and .
- Press to dial the telephone number.
Saving an entry from the caller list to the phone book
- In idle state, press the menu key ☑/OK.
- Select Call log and press 📋/OK.
- Select the desired entry with ▲ and ▼.
- Press ☐/OK, select Store number, and press ☐/OK.
- Enter a name and press ⇌/OK.
- Edit the telephone number if necessary and press ☐/OK.
- Select a call group to assign the new entry to, and press ☐/OK.
Show details
- In idle state, press the menu key ☑/OK.
- Select Call log and press 📋/OK.
- Select the desired entry with ▲ and ▼.
- Press ☐/OK, select Details, and press ☐/OK. You will receive information about the date and time of the call.
Deleting entries
- In idle state, press the menu key ☑/OK.
- Select Call log and press 📋/OK
- Select the desired entry with and .
- Press ✉/OK, select Delete or Delete all and press ✉/OK.
- Confirm the following query with ≈/OK
Setting the call log type
- In idle state press the menu key ☑/OK
- Select Call log and press ✦/OK
- Press ⚡/ok Select Call log type and press . ⚡/ok
- Select All calls or Missed calls and press ✉/OK.
Chain dialling
Use this feature to initiate a dialling sequence from numbers stored in the phonebook, caller list or redial list whilst you are on a call.
- Press the menu key whilst in a call 📋/OK
- Select Phonebook, Redial log or Call log and press ✉/OK
- Select the desired entry and press to dial the telephone number.
Find handset
You can locate a missing handset or alert a handset user that they are wanted by causing the handset to beep from the base unit.
Start paging
Press the paging button on the base unit to page all registered cordless handsets.
Stop paging
On the base unit: press the paging button again.
On the cordless handset: press any key, or place the handset in the base unit/charger.
Join a call in progress
You can join a call already in progress on another device from up to 2 cordless handsets.
- Press to join the call.
- Press for place the handset in the base unit/charger to exit the call.
Internal call
Use the intercom feature for conversations between two system devices. These calls are free of charge.
- Press C/⊗
If only 2 devices are available the second one will ring right away. If there are several registered cordless handsets, choose one and press ✉/OK
Phonebook
The phonebook stores up to 100 entries that can be accessed by all devices. You can find a phonebook entry by entering the first letter of the stored name using the numeric keys. If necessary, use the arrow keys to select the desired entry. You can assign your phone book entries to a specific call group. You can set different ring melodies for these call groups.
Create a new entry
- In idle state press
- Press /OK
- Select New entry and press ✉/OK
- Enter the name and press ✉/OK
- Enter the telephone number and press ✉/OK
- Select one of the call groups to which you want to assign the new entry and press ✉/OK
Using the phonebook
Open the phonebook (☐) and select the desired entry.
Make a call
Press ↘
Edit an entry
- Press ☐/OK Select Edit and press . ☐/OK
- Edit the name if necessary and press ⇌/OK
- Edit the telephone number if necessary and press ⇌/OK
- Edit the call group if necessary and press ✉/OK
View entries
- Press ☑/OK to select View and press ☑/OK.
- Press and to view the details.
Deleting entries
- Press ☑/OK, select Delete or Delete all and press ☑/OK.
- Confirm the following query with ✉/OK
Check capacity
- Press /OK to select Capacity and press /OK.
- You will see the number of entries, for example "1 / 100". That means 1 entry stored of 100 entries in total.
Edit call groups
- Press ☑/OK, select Edit group and press ☑/OK.
- Select a call group and press ↗/OK
- Select Rename group and press ✉/OK, to edit the name of the call group
- or -
Select Set ringtone and press ✉/OK, to edit the ringtone for the call group.
Set speed dial
- Press ☐/OK, select Speed dial and press ☐/OK.
- Press the key you want to assign the entry to, and press ✉/OK.
To dial with speed dialing, press and hold down the relevant key for approx. 3 s.
Settings
Ringtones
- In idle state, press the menu key ⇌/OK.
- Select Sound and press ✦/OK.
- Select Ringer and press ⇌/OK.
- External: select the desired melody and press ✉/OK.
- Internal: select the desired melody and press ◎/OK
- Ringer volume: select the volume and press ☑/OK
- Silent: select Off, if the ringer should be switched off completely or select Beep, if you want to hear a short beep instead of the ring tone, and press ✉/OK
Tones
- In idle state press the menu key ⇌/OK
- Select Sound and press ⇌/OK
- Select Tones and press ⇌/OK
- Key beep: turn the key beep on or off and press ✉/OK
- Confirmation: turn the confirmation tone on or off and press ⇒/OK.
- Battery low: turn the low battery alert tone on or off and press ✉/OK.
- No coverage: turn the out-of-range alert tone on or off and press ✉/OK.
Set date and time
It is important for the entries in the caller list and messages on the answering machine that the correct date and time is set.
- In idle state press the menu key ☑/OK
- Select Settings and press ✦/OK
- Select Date/Time/Alarm and press ✉/OK
- Select Date/Time and press ✦/OK
- Time format: select the time format and press ✉/OK
- Date format: select the date format and press ✉/OK
- Enter time: enter the time and press ✉/OK
- Enter date: enter the date and press ✉/OK
Set alarm
- In idle state press the menu key ◎/OK
- Select Settings and press ✦/OK
- Select Date/Time/Alarm and press ≈/OK
- Select Alarm and press ↗/OK
- Select Alarm On/Off and press ⇌/OK
- Select On or Off and press ✉/OK
- Select Enter time and press ↗/OK
- Enter the time and press 📋/OK
- Select Daily or Once and press 📋/OK
- Select Ringtone and press 📋/OK
- Select a melody and press 📋/OK
Handset settings
- In idle state press the menu key ◊/OK
- Select Settings and press ✦/OK
- Select Handset settings and press ≈/OK
- Select base: if your handset is registered to several base stations, you can select the active base with ☑/OK
- Display: select Contrast and set the desired contrast - or -
Select Handset name and, if necessary, change the name for the handset.
- Language: select the display language.
- Auto answer: with this function activated, an incoming call is accepted directly when you take the handset from the base station - you do not need to press any key.
- Memory Keys: Select one of the direct dial keys from the list (M1 / M2), press and enter the number to be stored on this key.
- Register handset: select a new base station, enter the PIN of the new base station and perform the necessary steps at the base station.
Example: to register a new handset on the BigTel 1280, press the page button on the base station for approx. 5 s (beep). The PIN of the BigTel 1280 is in delivery state "0000".
- De-register: Enter the PIN of the base station and select the handset that you want to de-register. Answer the query with ✉/OK.
- Handset reset: You can reset the handset to delivery state. Enter the PIN (in delivery state "0000") and answer the query with ✉/OK
Base settings
- In idle state press the menu key ◊/OK
- Select Settings and press ✦/OK
- Select Base settings and press ✦/OK
- Ringer: select Ringtone and select the desired melody - or - select Ringer volume and select the volume.
- Dial mode: the standard dialling mode for analogue phones is "Tone". On some older phone systems the dialling mode must be set to "Pulse". Please see your phone system's user guide for more information.
- Flash time: select 100 ms, 300 ms or 600 ms. The use of supplementary services requires a flash signal of a specific length. You can obtain information about available supplementary services and the required flash time from your telephone service provider.
- System PIN: in delivery state, the system PIN is set to "0000".
- Base reset: you can reset the base station to delivery state. Enter the PIN (in delivery state "0000") and answer the query with. ✉/OK
Answering machine
Your BigTel 1280 has a built-in digital answering machine. The total capacity is about 15 minutes. You can operate the answering machine at the base or from each registered handset. With a touch-tone telephone, you also have a PIN-protected remote access to the answering machine.
Two operating modes are available:
- announcement with message record
- announcement only.
In delivery state, a standard announcement is already stored for each operating mode (German and English). This makes the answering machine immediately ready for operation.
When reaching the maximum recording capacity in "announcement with message recording" mode, the unit automatically switches to the "announcement only" mode.
Answering machine display
Display dark Answering machine is switched off
-- (flashes) Date / time not set
FF (flashing) Memory full / New messages recorded
FF (on) Memory full
0 (on) No messages
1 ... 99 (flashing) New messages
1 ... 99 (on) Old messages
A (flashes alternately with the message number)
Recording in progress.
A1 During a call shows that "announcement with message record" is switched on.
A2 During a call shows that "announcement only" is switched on.
LA During access to the answering machine.
Note: Resetting the base station to delivery state will delete your personal announcement and all recorded messages.
Operating the answering machine from the base
The key functions for operating the answering machine on the base station are described on page 11.
Switching the answering machine on/off (handset)
- In idle state press the menu key 📋/OK
- Select Answer machine and press 📋/OK
- Select Answer On/Off and press 📋/OK
- Select On or Off and press ↗/OK.
Hear messages
New messages are indicated on the display. The caller's telephone number, if transmitted, is stored in the call log. Date and time are displayed for each message.
- In idle state press the menu key ☑/OK
- Select Answer machine and press ✉/OK
- Select Play messages and press ◊/OK
The new messages are played back in sequence. During playback you can:
- adjust the volume with the volume keys on the side of the phone or by pressing ▲ or ▼
- skip to the next message with key 6,
- repeat the current message with key 4. Press key 4 twice to skip back to the previous message.
- delete the current message with C/⊗|
- switch the playback via earpiece or via the loudspeaker and vice versa with 📄
Record a memo
Memos are your own recorded messages used as reminders for yourself or others using the same answering machine. Play and delete them in the same way as incoming messages.
- In idle state press the menu key ☐/OK
- Select Answer machine and press 📋/OK
- Select Record MEMO and press ◊/OK
- Speak your memo after the tone and press when done.
- Your memo will be played back for review. You can delete the memo during play with C/⊗|
Record personal announcement
You can record an announcement of up to 90 seconds in length, but any announcement shorter than two seconds will not be recorded.
- In idle state press the menu key ☑/OK
- Select Answer machine and press 📋/OK
- Select Outgoing message and press ☑/OK
- Select Record message and press ✉/OK
- Select Answer/Record or Answer only and press ✉/OK.
- Speak your announcement after the tone and press when done.
- Your announcement will be played back for review and is from now on the new announcement. You can delete the announcement during playback with C/⊗
Playback/delete personal announcement
- In idle state press the menu key 📋/OK
- Select Answer machine and press 📋/OK
- Select Outgoing message and press 📋/OK
- Select Play message and press ✉/OK
- Select Answer/Record or Answer only and press ✉/OK.
- You will hear the current announcement.
- Press to stop playback. Press to delete your personal announcement. The default announcement is reactivated. Note: the default announcements cannot be deleted.
Call screening
You can listen to incoming messages via the handset's loudspeaker while they are being recorded.
- Screening? is shown.
- Press /OK
When screening the call is not accepted.
- To end the call screening, press C/⊗
Note: You can listen to incoming messages at the base station if this function is activated in the "Answer settings" menu.
Call intercept
When a caller is leaving a message on the answering machine and you hear the message being recorded, you can intercept the call.
Press ↗.
Delete messages
You can only delete old (reviewed) messages.
- In idle state press the menu key ⇔/OK
- Select Answer machine and press 📋/OK
- Select Delete messages and press ✉/OK
- To confirm press →/OK
Answer machine settings
- In idle state press the menu key ⇌/OK
- Select Answer machine and press 📋/OK
- Select Answer settings and press ◊/OK
- Answer mode: select whether you want to operate the answering machine in the recording or announcement only mode.
- TAM language: select a language for the default outgoing messages.
- Answer delay: select 2, 4, 6, or 8 rings.
- Recording time: set the maximum recording time for each message. Select 30 s, 60 s, 120 s, or "Unlimited".
- Call screening: select whether call screening at the base station is switched on or off for incoming calls.
Remote access
Remote access is only possible if this function is activated.
To get access to your answering machine remotely from any touch-tone telephone, you have to enter the four-digit remote access code.
Activate / deactivate remote access
- In idle state, press the menu key ◊/OK.
- Select Answer machine and press ✉/OK.
- Select Remote access and press ✉/OK.
- Select whether remote access should be enabled or disabled, and press ✉/OK.
If you enable remote access, you are prompted to enter a PIN (the old PIN is in the delivery state "0 0 0 0." Each time remote access is enabled, you must enter a new 4-digit PIN that must not be "0 0 0 0"). This is the current PIN, which must be entered with each remote query in order to gain access to the answering machine.
Using remote access
To access your answering machine from a remote touch-tone phone, you must enter the remote access PIN.
- Dial your telephone number.
- When switched off, the answering machine takes the call after approx. 16 ring signals in "Answer only" mode.
Press the star key during the announcement to initiate remote access and enter the four-digit remote access PIN of your telephone. You then have the following options.
- or -
When switched on, the answering machine takes the call after the set number of rings.
Press the star key during the announcement to initiate remote access and enter the four-digit remote access PIN of your telephone. You then have the following options:
- key 5 - start playback
- key 7 - turn on the answering machine
- key 9 - turn off the answering machine
While a message is playing:
- key 2 - delete current message
- key 4 - repeat current message. Press key 4 twice to skip back to the previous message.
- key 5 - stop the current message playback
- key 6 - skip to the next message
- key 8 - stop the current message playback.
Note: The connection will be cut off after three incorrect PIN entries.
Appendix
Help and support
If you need help and you're in the UK, please first check and see if your problem can be solved using the troubleshooting guide below. If not, please call us on 0844 800 6503 (using a UK landline, at time of going to print: calls cost 6p for connection charge and then 5p a minute. Mobile costs may vary). Lines are open Monday to Friday, 9am to 5pm, excluding public holidays. If you've a claim on your 2-year guarantee, please contact your supplier.
Some issues may be resolved by simply disconnecting the power to the unit. Switch off the power to the base station and remove the batteries in the handset for about 20 minutes. Reconnect everything to determine if the issue has been resolved.
Safety information
When using your telephone equipment, basic safety precautions should always be followed to reduce the risk of fire, electric shock and injury, including the following:
- Read and understand all the instructions.
- Follow all warnings and instructions marked on the product.
- Unplug this product from the wall outlet before cleaning. Do not use liquid cleaners or aerosol cleaners. Use a damp cloth for cleaning.
- Do not use this product near water (for example, near a bath tub, kitchen sink, swimming pool).
- Do not overload wall outlets and extension cords as this can result in the risk of fire or electric shock.
- Unplug this product from the wall outlet and refer servicing to your supplier under the following conditions:
- When the power supply cord or plug is damaged or frayed.
- If the product does not operate normally by following the operating instructions.
- If the product has been dropped and the cabinet has been damaged.
- If the product exhibits a distinct change in performance.
- Avoid using a telephone (other than a cordless type) during an electrical storm. There may be a remote risk of electric shock from lightning.
- Do not use the telephone to report a gas leak in the vicinity of the leak.
- For pluggable equipment, the socket-outlet (power adaptor) shall be installed near the equipment and shall be easily accessible.
Rechargeable batteries
- Use only the supplied NiMH (Nickel Metal Hydride) batteries! The operation periods for the handsets are only applicable with the default battery capacities
- The use of other battery types or non-rechargeable batteries/primary cells can be dangerous. These may cause interference and/or unit damages. The manufacturer will not be held liable for damage arising from such non-compliance.
- Do not use third party charging bays. The batteries may be damaged.
- Please note the correct polarity while inserting the batteries.
- Do not immerse batteries in water, do not place in fire.
- Risk of explosion if battery is replaced by an incorrect type.
- Dispose of used batteries according to the instructions. They must be disposed of at the point of sale or at the appropriate collection points provided by the public waste authorities.
Caution: risk of explosion if the battery is replaced by an incorrect type. Dispose of used batteries according to the instructions.
Intended use
This phone is suitable for use on either a public telephone network or on an approved Private exchange (PABX). Any other use is considered unintended use. Unauthorised modifications are prohibited. Do not attempt to carry out repairs yourself.
Phone location
Make sure your phone:
• is on a dry, flat and stable surface - isn't a trip hazard with its power cable • is at least one metre from other electrical appliances - isn't exposed to smoke, dust, vibration, chemicals, moisture, heat and direct sunlight.
Please take care that the power supply isn't obstructed by furniture.
Power supply
Important: Use only the power adaptors supplied with your BigTel 1280.
Energy efficient power adapter
The included mains adaptor meets the ecodesign requirements of the European Union (Directive 2005/32/EC). Thus, its power consumption is considerably lower, both in operating and in idle mode, compared with the previous design.
Medical equipment
Do not use your phone:
• near emergency or intensive care medical equipment • during an electrical storm
It is recommended that if you have a pacemaker fitted you check with a medical expert or your health adviser before using this product.
Rechargeable batteries
Do not throw the batteries into a fire or water.
Hearing aid compatibility
Your phone works with most popular hearing aids. However, given the wide range of hearing aids available, we are unable to guarantee that your phone will function fully with every hearing aid.
Disposal
In order to dispose of your device, take it to a collection point provided by your local public waste authorities (e.g. recycling centre). According to laws on the disposal of electronic and electrical devices, owners are obliged to dispose of old electronic and electrical devices in a separate waste container. The symbol indicates that the device must not be disposed of in normal domestic waste!
Batteries represent a hazard to health and the environment!
Never open, damage or swallow batteries or allow them to pollute the environment. They may contain toxic, ecologically hazardous heavy metals. You are legally required to dispose of batteries and rechargeable batteries safely, either at a retailer that sells batteries or at an appropriate collection point that provides a suitable container. Never put batteries in the household waste. Disposal is free of charge.
Lithium batteries and battery packs of all kinds should be fully discharged before you drop them off. Be sure to take precautions against short-circuits, e.g. by covering poles with adhesive tape, to prevent the risk of a fire.
Packaging materials must be disposed of according to local regulations.


Technical details
Standard DECT
Power supply (base unit) Input: 100-240V 50/60Hz
Output: 6VDC 450mA
Range Outdoors approx. 300m,
Indoors approx. 50m
Standby Up to 100hrs
Maximum Talk Time Up to 10hrs
Maximum earpiece volume +26 dB
Rechargeable battery AAA, 1.2 V, 400 mAh NiMH
Dialling mode Tone (DTMF) / Pulse
Recall time (Flash) Short (100 ms), Medium
(300 ms), Long (600 ms)
Optimum ambient temperature 0°C to 45°C
Optimum relative humidity 20% to 80%
Maintenance
- Please clean your equipment's surfaces with a soft, lint-free cloth.
- Never use cleaning agents or solvents.
Guarantee
AMPLICOMMS equipment is produced and tested according to the latest production methods. The use of carefully chosen materials and highly developed technologies ensures trouble-free functioning and a long service life. The terms of the warranty do not apply where the cause of the equipment malfunction is the fault of the telephone network operator or any interposed private branch extension system. The terms of the warranty do not apply to the rechargeable batteries or power adaptors used in the products. The warranty period is 24 months from the date of purchase.
All deficiencies resulting from material or production faults which occur during the warranty period will be eliminated free of charge. Rights to claims under the warranty terms are voided following intervention by the purchaser or third parties. Damage caused as a result of improper handling or operation, incorrect positioning or storing, improper connection or installation, Acts of God or other external influences are not covered by the warranty.
In the case of complaints, we reserve the right to repair or replace defective parts or provide a replacement device. Replaced parts or devices become our property.
Rights to compensation in the case of damage are excluded where there is no evidence of intent or gross negligence by the manufacturer.
If your equipment shows signs of a defect during the warranty period, please return it to the sales outlet where you purchased the AMPLICOMMS equipment together with the purchase receipt. All claims under the warranty terms in accordance with this agreement must be asserted exclusively with regard to your sales outlet.
The right to assert a warranty claim expires two years after the purchase of our products.
CE
Declaration of conformity
This device fulfils the requirements stipulated
in the EU directive: 1999/5 EU directive on radio equipment and telecommunications terminal equipment and the mutual recognition of their conformity. Conformity with the above mentioned directive is confirmed by the CE symbol on the device.
To view the complete Declaration of Conformity, please refer to the free download available on our website
www.amplicomms.com.
Table of contents

- Ring delay: Select 2, 4, 6 or 8 rings.



- CONTENTS
- GETTING STARTED
- CONNECT THE BASE STATION
- SET UP YOUR PHONE SYSTEM
- CONTROLS
- DISPLAY ICONS
- NAVIGATING THE MENU
- FIRST USE
- MAKING AND RECEIVING CALLS
- PHONEBOOK
- SETTINGS
- ANSWERING MACHINE
- APPENDIX
- CHECK BOX CONTENTS
- LOCATION
- CONNECT THE BASE UNIT
- CONNECT THE CORDLESS HANDSET
- CORDLESS HANDSET
- PHONEBOOK/UP
- END CALL/CANCEL
- REDIAL/PAUSE
- ALPHANUMERIC KEYPAD
- MICROPHONE
- BASE UNIT
- DISPLAY
- DELETE
- REPEAT
- VOLUME KEYS
- OPEN MAIN MENU
- MENU LAYOUT
- IN DELIVERY STATE THE TELEPHONE IS SET TO GERMAN LANGUAGE
- SET THE LANGUAGE
- MAKING A CALL, ANSWERING A CALL, ENDING A CALL
- TO MAKE A CALL
- TO ANSWER A CALL
- TO END A CALL
- HANDSFREE
- VOLUME CONTROL
- MUTE
- REDIAL
- CALL LOG
- CALLING FROM THE CALLER LIST
- SAVING AN ENTRY FROM THE CALLER LIST TO THE PHONE BOOK
- SHOW DETAILS
- DELETING ENTRIES
- SETTING THE CALL LOG TYPE
- CHAIN DIALLING
- FIND HANDSET
- START PAGING
- STOP PAGING
- JOIN A CALL IN PROGRESS
- INTERNAL CALL
- CREATE A NEW ENTRY
- USING THE PHONEBOOK
- MAKE A CALL
- EDIT AN ENTRY
- VIEW ENTRIES
- CHECK CAPACITY
- EDIT CALL GROUPS
- SET SPEED DIAL
- RINGTONES
- TONES
- SET DATE AND TIME
- SET ALARM
- HANDSET SETTINGS
- BASE SETTINGS
- ANSWERING MACHINE DISPLAY
- OPERATING THE ANSWERING MACHINE FROM THE BASE
- SWITCHING THE ANSWERING MACHINE ON/OFF (HANDSET)
- HEAR MESSAGES
- RECORD A MEMO
- RECORD PERSONAL ANNOUNCEMENT
- PLAYBACK/DELETE PERSONAL ANNOUNCEMENT
- CALL SCREENING
- CALL INTERCEPT
- DELETE MESSAGES
- ANSWER MACHINE SETTINGS
- REMOTE ACCESS
- ACTIVATE / DEACTIVATE REMOTE ACCESS
- USING REMOTE ACCESS
- HELP AND SUPPORT
- SAFETY INFORMATION
- RECHARGEABLE BATTERIES
- CAUTION: RISK OF EXPLOSION IF THE BATTERY IS REPLACED BY AN INCORRECT TYPE. DISPOSE OF USED BATTERIES ACCORDING TO THE INSTRUCTIONS
- INTENDED USE
- PHONE LOCATION
- PLEASE TAKE CARE THAT THE POWER SUPPLY ISN'T OBSTRUCTED BY FURNITURE
- POWER SUPPLY
- ENERGY EFFICIENT POWER ADAPTER
- MEDICAL EQUIPMENT
- HEARING AID COMPATIBILITY
- DISPOSAL
- BATTERIES REPRESENT A HAZARD TO HEALTH AND THE ENVIRONMENT
- TECHNICAL DETAILS
- MAINTENANCE
- GUARANTEE
- DECLARATION OF CONFORMITY
- TABLE OF CONTENTS
Brand : Amplicomms
Model : BigTel 1200
Category : Telephone