
BigTel 1502 - Telephone Amplicomms - Free user manual and instructions
Find the device manual for free BigTel 1502 Amplicomms in PDF.
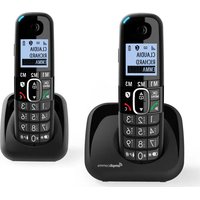


| Product type | Corded amplified telephone |
| Brand | Amplicomms |
| Model | BigTel 1502 |
| Dimensions (main unit) | Approx. 220 x 180 x 75 mm |
| Weight | Approx. 480 g |
| Power supply | 120-240V AC adapter, 6V DC output |
| Maximum amplification | 30 dB gain |
| Tone control | Adjustable bass/treble slider |
| Large buttons | Oversized keypad for easy dialing |
| Visual ring indicator | Flashing LED on incoming call |
| Ringer volume | Adjustable, up to 90 dB |
| Handset volume | Amplified with adjustable control |
| Compatibility | Works with analog POTS lines |
| Hearing aid compatible | Yes, HAC rated |
| Programming buttons | 10 memory keys for speed dial |
| Display | Backlit LCD with large digits |
| Mounting options | Tabletop or wall-mount capable |
| Cleaning instructions | Wipe with a soft, dry cloth |
| Safety note | Use only supplied power adapter |
| Spare parts availability | Handset cords and adapters available |
Frequently Asked Questions - BigTel 1502 Amplicomms
User questions about BigTel 1502 Amplicomms
0 question about this device. Answer the ones you know or ask your own.
Ask a new question about this device
Download the instructions for your Telephone in PDF format for free! Find your manual BigTel 1502 - Amplicomms and take your electronic device back in hand. On this page are published all the documents necessary for the use of your device. BigTel 1502 by Amplicomms.
USER MANUAL BigTel 1502 Amplicomms
1. GETTING TO KNOW YOUR PHONE......4
1.1. Handset Overview....4
1.2. Base Station Overview....6
1.3. Display Icons and Symbols....6
2. PRECAUTIONS......7
3. INSTALLING YOUR PHONE....7
3.1. Connecting the Base Station....7
3.2. Installing and Charging the Batteries......8
3.3. Connecting the Charger(s)(for Duo/Trio models)......8
3.4. Menu Tree....9
4. USING YOUR PHONE....10
4.1. Make a Call....10
4.1.1. Preparatory Dialing....10
4.1.2. Direct Dialing....10
4.1.3. Dial from Direct Memory Keys....10
4.1.4. Call from the Redial List....10
4.1.5. Adjust Earpiece and Handsfree Volume......11
5. PRIVATE PHONEBOOK....11
5.1. Add a New Phonebook Entry......11
5.2. Call from the Phonebook....11
6. CALLER DISPLAY (NETWORK DEPENDENT)*......12
6.1. View the Call List.....12
6.2. Call from the Call List....12
7. REDIAL THE LAST NUMBER......12
8. PHONE SETTING......12
8.1. Set the Ringer Melody for Internal/External Calls.....12
8.2. Set the Ringer Volume....12
8.3. Set the Speed Dial....13
8.4. Set handset Settings....13
8.5. Set Base....14
9. REGISTRATION....14
10. CALL BLOCK....14
10.1. Manual call block mode....15
10.1.1. Enable MANUAL mode....16
10.1.2. Add numbers to Blacklist....16
10.1.3. Edit numbers in Blacklist....16
10.1.4. Delete numbers in Blacklist....17
10.1.4.1. Delete a number from blacklist....17
10.1.4.2. Delete all numbers from blacklist....17
10.2. Automatic call block mode....17
10.2.1. VIPs only....17
10.2.2. Contacts only....17
10.3. Anonymous call block mode....18
10.3.1. Block Private Calls....18
10.3.2. Block All Anonymous Calls....18
10.3.3. Set Block Anonymous Calls OFF....18
-
TECHNICAL DETAILS....19
-
TROUBLESHOOTING....20
- SAFETY......20
- ENVIRONMENT......20
- CONFORMITY......21
Package Contents
The package contains the following items:
- Cordless handset
- Cordless base unit
- Mains power adaptor
- Telephone line cord
- Telephone plug convertor (optional)
- 2 pcs of AAA 300mAh NiMH rechargeable batteries
- User Guide
The additional duo and trio package contains the following items:
- Cordless Handset(s)
- Cordless handset charger(s)
- Mains power adapter(s)
• AAA 300mAh NiMH rechargeable batteries
1. GETTING TO KNOW YOUR PHONE
1.1. Handset Overview
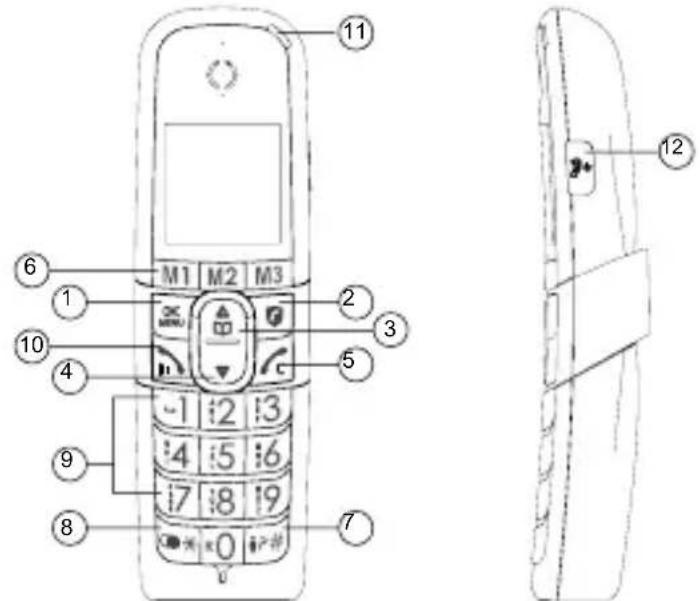
- OK MENU
In idle mode: Press to access the main menu.
In sub-menu mode: Press to confirm the selection.
During a call: Press to access Intercom/Phonebook/Redial List/Call List.
2.
*In main menu mode: Press to go to Call Block Setting menu
In ringing mode: Press to block incoming call* if Block Set. is set to ON
3.
In idle mode: Press to access the phonebook.
In menu mode: Press to scroll up the menu items.
In Phonebook list / Redial list / Call List: Press to scroll up the list.
During a call: Press to increase the volume.
In ringing: Press to increase the ringer volume.
4.

In menu mode: Press to scroll down the menu items.
In Phonebook list / Redial list / Call List: Press to scroll down the list.
During a call: Press to decrease the volume.
In ringing: Press to decrease the ringer volume.
5.

During a call: Press to end a call and go back to idle screen.
In menu / editing mode: Press to go back to previous menu.
In menu / editing mode: Press and hold to go back to idle screen.
In editing / predialing mode: Press to clear a character / digit.
During ringing: Press to set ring volume off.
- M1, M2, M3
In idle mode /During a call: Press to dial pre-recorded number stored in Direct Mem.
7.

Press to insert

In idle mode: Press and hold to access the call list.
In predialling mode / during a call: Press and hold to insert pause.
8.

Press to insert

In idle mode: press and hold to access the redial list.
- ALPHANUMERIC KEYPAD
Press to insert a digit / character /

0 key in predialing / number editing mode:
Press and hold to insert a flash
1, 2, 3 key in idle/off hook mode, press and hold to dial the stored direct memory number.
0 key during a call:
Press and hold to start conference call (in intercom mode).
10.

In idle / predialing mode : Press to make a call.
In Redial list / Call List / Phonebook entry:
Press to make a call to the selected entry in the list.
During ringing: Press to answer a call.
During a call: Press to switch to speaker mode.
- HANDSET LED

During charging: On steadily.
In ringing mode / Paging mode: Flashing quickly.
When new voice mail: Flash slowly
- AUDIO BOOST

During a call: Press to audio boost on/off(inactive in speakerphone mode).
1.2. Base Station Overview
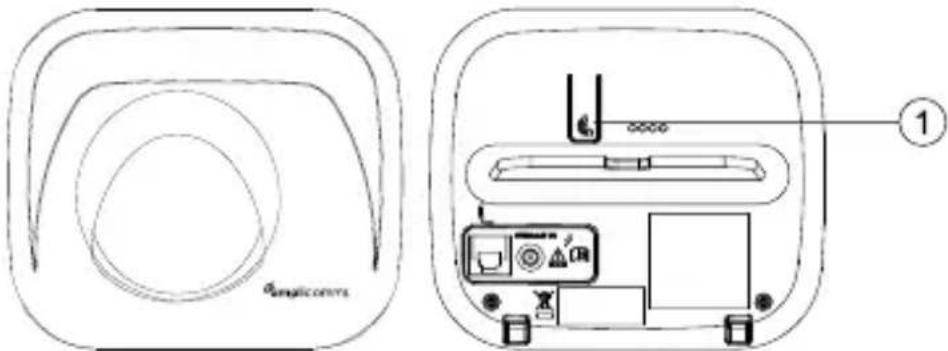
1.

Press the Page on the base station to page your handset. It will ring for approximately 60 seconds.
Press and hold on the base station for about five seconds, the base station will enter into registration mode and is ready for handset registration.
1.3. Display Icons and Symbols
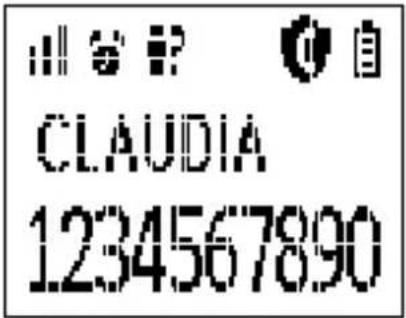

On indicates either Call Block Setting is set to ON or Block Anonymous tting is set to ON..
Steadily on when the handset is in range of the base.

lashes when out of range of the base or not registered to the base.

Steadily on indicates a call is in progress.

Flashes when there is an incoming call.

Indicates that handsfree is being used.

Steadily on when an alarm is set.
Flashes when the alarm time set before reaches.

Indicates when there are received new Voice Message Waiting (VMWI)
not yet read.

Indicates that the ringer is switched off.
Indicates when the battery is fully charged.

Whole icon flashes when the battery performs initial charging.
Internal block icon flashes when the battery is in final charging stage.

Flashes when low battery power level is detected.

On indicates it's a new call which has not been read in call log and * will
He shown in the end of call number or name. After read, * will disappear.
Flashes when the call list is being accessed.

On indicates audio boost is on (earpiece of handset will be louder).

Flashes when phonebook is being accessed.

Flashes when redial list is being accessed.
Hearing Aid Compatibility:
- Special feature which helps to eliminate background noise and interference when you use this telephone with a hearing aid.
2. PRECAUTIONS
The signal quality will depend on the location and environment of the base and handset.
Position your BigTel 1500 / 1502 /1503 away from sources of excessive heat (radiators, direct sunlight, etc.) and protect it from vibrations and dust. Never allow your telephone to come into contact with water or other liquids, or with aerosols. To reduce the risk of interference and optimize reception, take particular care not to install the base in the immediate vicinity of windows, large metal objects, reinforced concrete, televisions, music centres, halogen lamps or heating devices, fluorescent lighting, burglar alarms, microwave computers, etc.
This telephone requires an electrical power supply in order to function. To clean your BigTel 1500 / 1502 /1503 use an antistatic cloth lightly moistened with water.
3. INSTALLING YOUR PHONE
3.1. Connecting the Base Station
- Plug one end of the telephone line cord into the telephone jack on base bottom.
- Plug the small end of power adapter into a power jack on base bottom.
- Plug the large end of power adapter into a wall power outlet.
- Plug the other end of the telephone line cord in to the telephone jack or micro-filter.
- Always use the cables provided in the box.
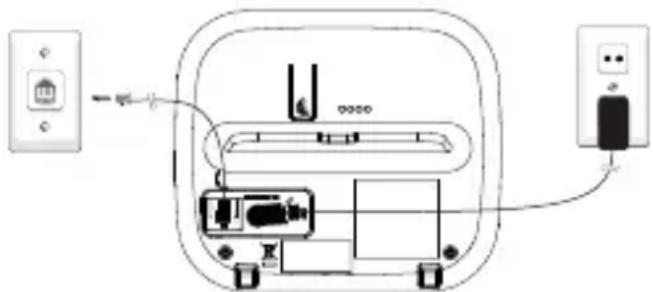
If you have broadband service, a micro-filter(not included) is required.
3.2. Installing and Charging the Batteries
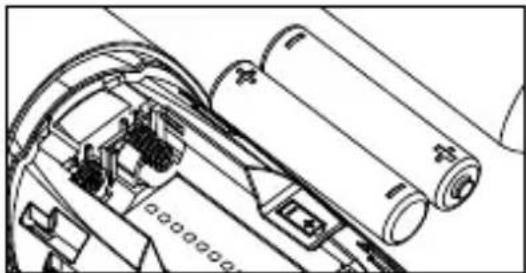
- Slide down to open the battery compartment cover.
- Place the 2 batteries as indicated. Pay extra attention to direction of Respect polarity.
- Slide the battery compartment cover back.
- Put the handset on the base and charge for 8 hours before using the handset for the first time. The handset will give a beep when it is properly placed on the base or charger.
Notes:
- Use only NiMH rechargeable batteries.
- If the handset will not be used for a long time, disconnect and remove the batteries to prevent possible leakage.
3.3. Connecting the Charger(s) (for Duo/Trio models)
Plug the power adapter into a 230Vac, 50Hz mains socket.
After first time power up (base unit is connected to AC ma mode (country) will appear on the screen:
![graph TD A["Country\nEngland\nItalia\nFrance"] --> B["Resetting\nPlease Wait"] B --> C["Pis Set Time\nDate & Time"] C --> D["OK/RR/WR"] D --> E["OK/RR/WR"] E --> F["OK/RR/WR"] F --> G["OK/RR/WR"] G --> H["OK/RR/WR"] H --> I["OK/RR/WR"] I --> J["OK/RR/WR"] J --> K["OK/RR/WR"] K --> L["OK/RR/WR"] L --…](/content/2026/08/1653867/images/8b68958fde809402455deaea02d19432f40f0a39a6a7faba324dfd969ce2cf78.jpg)
Note: For Duo or Trio versions, all you have to do is configure a single handset, the other handset (s) will be automatically set identically.
Change language (Handset)
-
Press on the handset in idle mode.
-
Press ▲ or ▼ to select "HS Settings"(1), then press
OK MENU
| EN | FR | DE | IT |
| HS Settings | Régl. Comb. | Mt-Einstel. | Imposta Port |
| NL | ES | PT | |
| Handset Inst | Conf Telef. | Config. Term |
(1)
- Press or to the menu "Language"(2), then press . OK MENU
| EN | FR | DE | IT |
| Language | Langue | Sprache | Lingua |
| NL | ES | PT | |
| Taal | Idioma | Idioma |
(2)
- Press or to the desired language, then press . OK MENU
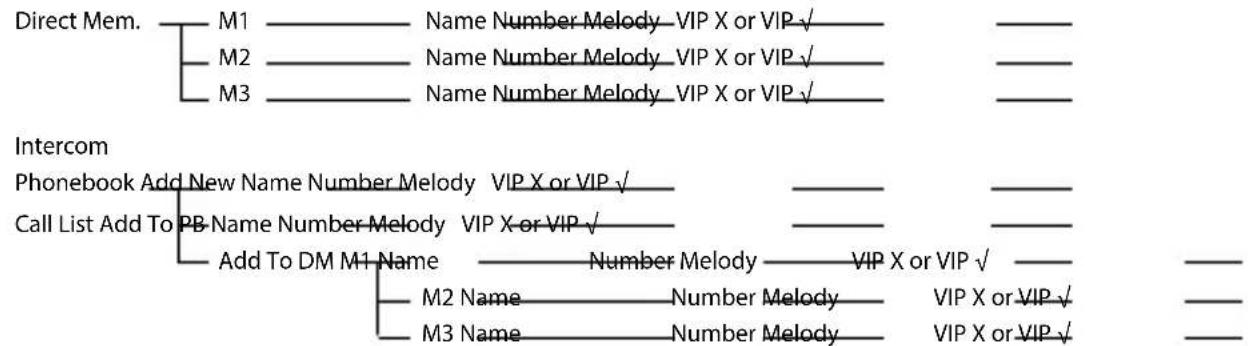
3.4. Menu Tree
![graph TD A["Call Block"] --> B["Block Set."] B --> C["Off"] B --> D["On"] B --> E["VIP OK"] B --> F["Contacts OK"] B --> G["Blocklist"] G --> H["Add New"] G --> I["Block Anonym"] I --> J["Off"] I --> K["Private"] I --> L["All"]](/content/2026/08/1653867/images/1d8395094a53e37a78ed00f04b16ce0e64cff6a4b8937a7b174403a42baee80e.jpg)
![graph TD A["HS Settings"] --> B["Ring Setup"] A --> C["Tone Setup Key Tone"] A --> D["LCD Contrast"] B --> E["Ext. Ring"] B --> F["Int. Ring"] B --> G["Ring Volume"] C --> H["Battery Tone"] C --> I["Out of Range"] D --> J["Level 1 to 5"] E --> K["Melody 1 to 10"] F --> L["Melody 1 to 10"] G --> M["V…](/content/2026/08/1653867/images/32536f04c598b05eccfe6ac26b8bcaf05f61cf52b7e2a915cb2c1710c2afd9be.jpg)
![graph TD A["Equalizer Natural"] --> B["Bass"] A --> C["Treble"] D["Language"] --> E["English, Italian, Français, Deustch, Netherlands, Español, Português"] F["Date & Time Date Format"] --> G["DD-MM-YY"] F --> H["MM-DD-YY"] F --> I["Time Format"] I --> J["12 HR"] I --> K["24 HR"] L["Rename HS"] --> M…](/content/2026/08/1653867/images/ae619f0de1c454875a100458467cccbebea505258fc94e543a27c8e6ab823737.jpg)
4. USING YOUR PHONE
4.1. Make a Call
4.1.1. Preparatory Dialing
Enter the phone number and press 📋 to dial the number. Press 📄 to clear the entry.
4.1.2. Direct Dialing
Press to take the line and enter the phone number.
4.1.3. Dial from Direct Memory Keys
In idle or off hook mode,
Press M1, M2 or M3 to dial the stored number.
Press and hold -1/2/3 to dial the direct memory number. You have to store number to the related key first. See section 8.3 for reference.
4.1.4. Call from the Redial List
Press and ✱ hold to access the redial list and press ⚠ / ▼ to select the desired redial number.
Press 📂 to dial out to the selected redial number.
4.1.5. Adjust Earpiece and Handsfree Volume
There are 5 levels (Volume 1 to Volume 5) to choose from for each of earpiece and handsfree volume.
During a call:
Press ▲ / ▼ to select volume 1-5. The current setting is shown. When you end the call, the setting will remain at the last selected level.
The current volume is displayed on the screen.
When you end the call, the new volume setting sound remains valid for subsequent calls.
For the sound level of the handset, if this is not loud enough, press 34, the audio boost will be activated. To turn off audio boost, press again the key 34.
5. PRIVATE PHONEBOOK
Your phone can store up to 100 private phonebook entries with names and numbers. Each phonebook entry can have a maximum of 24 digits for the phone number and 12 characters for the name.
You can also select different ringtones for your phonebook entries. Phonebook entries are stored alphabetically by name.
5.1. Add a New Phonebook Entry
In idle:
-
Press ▲ to access the phonebook. OR Press OK and ▲/ ▼ to select Phonebook main menu item and then press OK to access the phonebook.
-
Press OK to select Add New.
-
Press OK to enter the name.
-
Press OK to enter the number.
-
Press OK and ▲ to select the desired ringtone for your phonebook entry.
-
Press OK to confirm the melody.
-
Press / ▲ to select VIP X or VIP √.
-
Press OK to confirm to save it as normal contact list (VIP X) or save it in VIP list (VIP √).
Note: ! appears in the end of name of VIP entry.
5.2. Call from the Phonebook
In idle:
-
Press ▲ to access the phonebook. OR Press OK and ▲/ ▼ to select Phonebook main menu item and then press OK to access the phonebook.
-
Press to dial out to the selected phonebook entry. Phonebook is stored in base unit which is shared with duo, trio handsets.
6. CALLER DISPLAY (NETWORK DEPENDENT)*
This feature* is available if you have subscribed the Caller Line Identification service with your telephone service provider. Your phone can store up to 50 received calls with date/time information in the Call List. The number will be shown on the LCD when the phone is ringing.
If the caller number is disabled to send caller information, "Withheld" will display.
If the caller number is not provided, "Out of Area" will display.
In standby, if three unanswered calls are received, "3 New Calls" will be displayed.
6.1. View the Call List
All received calls are saved in Call List with the latest call putting at the top of the list. When the call list is full, the oldest call will be replaced by a new call.
The unanswered call which has not been read is marked with 📄.
-
Press and hold # key. OR Press OK MENU and ▲/ ▼ to select Call list, press .
-
Press / to select the desired entry.
6.2. Call from the Call List
In idle:
-
Press and hold # key. OR Press and 🔒 / ▼ to select Call list, press OK MENU
-
Press to dial out to the selected phonebook entry.
7. REDIAL THE LAST NUMBER
You can redial up to 10 of the last numbers called.
In idle mode, press and hold ✱ key to access the redial list.
- Press / ▲ to browse the redial list.
- Press to dial the selected redial number.
8. PHONE SETTING
8.1. Set the Ringer Melody for Internal/External Calls
- Press OK and ▲/ ▼ to select HS Settings.
- Press OK and ▲/ ▼ to select Ring Setup.
- Press OK and ▲/ ▼ to select Int Ring or Ext Ring.
- Press OK and ▲/ ▼ to select the desired ringer melody from the melody list.
Note: The respective ringer melody will be played while browsing the melody list.
- Press to confirm.
8.2. Set the Ringer Volume
- Press OK and ▲/ ▼ to select HS Settings.
-
Press OK and ▲/ ▼ to select Ring Setup.
-
Press and / to select Ring Volume.
-
Press OK and ▲/ ▼ to select the desired ringer volume (a total of 6 ringer volume levels including OFF).
Note: The respective ringer volume will be played during your selection.
If OFF is selected, icon will display.
- Press to confirm.
8.3. Set the Speed Dial
-
Press OK and ▲ or ▼ to select Direct Mem.
-
Press, and then press the memory key M1 / M2 / M3 / -1/ 2/ 3.
For M1/M2/M3:
-
Press OK to input name.
-
Press OK to enter number.
-
Press OK to browse the melody list, and then press to confirm the melody,
-
Press ▲ or ▼ to select VIP X or VIP √.
-
Press OK to confirm to save it as normal contact list (VIP X) or save it in VIP list (VIP √).
For -1/2:3
- Press OK to input number, and then press to confirm.
8.4. Set handset Settings
-
In standby mode, press the menu key OK MENU .
-
Select HS Settings and press OK MENU
- Display: Select Contrast and set the desired contrast
• or
- select Rename HS and change the name for the handset if necessary.
- Date & Time: Select Date & Time and set Date Format, Time Format and Set Time/Date.
- Tone Setup: Select Tone Setup and set on or off in Key Tone, Battery Tone or Out of Range.
- Language: Select the setting for the on-screen language.
- Automatic answer: If this function is activated, an incoming call is accepted directly when removing the handset from the base station, you do not need to press any button.
- Reset phone: Select Default, you can reset the system to its factory default state. Enter the PIN (default "0000") and confirm the security question with OK MENU
- Equalizer: This function allows you to modify the sound quality of the handset. During the call, press the menu key OK Select Normal, Bass or Treble and press OK to save the setting.
8.5. Set Base
- In standby mode, press the menu key

- Select BS Settings and press

- Dial mode: Select Tone or Pulse. The normal dialing procedure for analog connections is "Tone" (tone dialing). When operating with certain older telephone systems the dialing procedure should be changed to "Pulse" (decadic pulse dialing).
- Delete HS: Enter the PIN of the base station and select the handset you want to delete. Confirm the security question with OK MENI.
- Flash duration: Choose 100 ms, 270 ms or 600 ms. In order to use the network performance characteristics, a certain flash signal with a certain length is required.
- Change PIN: Select Change PIN?, and enter Old PIN, press OK, and then enter New PIN, press OK to confirm.
- Eco Mode: Select On or Off and press OK MENU.
9. REGISTRATION
Your handset and base station is pre-registered.
Up to 4 handsets can be registered to a single base station.
If for some reason, the handset is not registered to the base station µµ flashes even when the handset is near the base station).
- Press and hold 📁 on the base station for about five seconds, the base station is entered into registration mode.
- Press OK and ▲/ ▼ to select Registration.
- Press OK and select the destination base you would like to register to.
- Press OK and you are requested to enter the 4-digit system PIN. Enter the 4-digit system PIN (default PIN is 0000).
- Press OK to confirm.
If the handset registration is successful, you will hear a confirmation to and the µµ will stop flashing.
If the handset registration is unsuccessful, the µ will still flash.
10. CALL BLOCK
This telephone is built-in with Smart Call Block feature*.
This feature will help you avoid nuisance calls by only allowing some numbers to make your phone ring.
Default setting of Smart Call Block in this telephone is OFF but you can enable it via your phone settings, as explained in the following paragraphs.
*This feature requires a subscription of Caller Line Identification service telephone service provider.
CALL BLOCK OVERVIEW
| Settings Explanations | |
| Off Call | Block function (Block all call with numbers) is Disabled.This is the default mode. |
| On Call | Block function is set to Manual.Numbers registered in the black list will not go through and the phone will ring silently.Numbers can be added to the list while the phone is ringing and / or after a call(to enable, see part 10.1). |
| Contacts In | this automatic mode, any number not registered to your phonebook will be automatically be blocked and not cause your phone to ring.All calls from contacts registered to your phonebook will proceed normally.When this mode is chosen, Contacts OK is displayed on LCD in idle mode unless you have unread messages/missed calls (to enable, see part 10.2.2). |
| VIPS In | is second automatic mode, only calls from contacts registered as VIP in your phonebook will go through and cause your phone to ring.Any other number will not ring. When this mode is chosen, VIPS OK is displayed on the LCD in idle mode unless you have unread messages / missed calls (to enable, see part 10.2.1). |
| Anonymous | This extra feature allows you to block call that do not have a number attached to them (ie private calls, international calls, etc).This option can be enabled on top of any of the previous four (to enable, see part 10.3). |
10.1. Manual call block mode
Manual call block is the easiest option when starting out. When you chose ON in the call block settings, all calling numbers registered in your blacklist will be blocked. You can add/remove numbers from that list at any time.
How to block an incoming call:
When the phone is ringing and before answering, press 📄. It will terminate the call and offer you the option to register the number to the blacklist in one click.
Then to confirm the registration of this number in the blacklist, press OK IMPORTANT: if you don't confirm, the number will not be added to the blacklist and the next call will go through normally.
10.1.1. Enable MANUAL mode
| Menu Call block Block set. | Off |
| On* | |
| VIP OK | |
| Contacts OK |
- Press, press or to select Call Block.
- Press OK MENU press or to select Block set.
- Press OK MENU, press or to select ON (manual mode). Or
In idle mode, press 📁 to access Block set. directly. After you enable this option, the call block icon 📁 will be displayed on the LCD.
10.1.2. Add numbers to Blacklist
In idle mode,
-
Press key, Block set. is displayed, or Press OK to press or to select Call block, press OK to show Block set.
-
Press ▲ or ▼ to select Blocklist.
-
Press OK, press ▲ or ▼ to select Add, enter number to be blocked, press OK to save.
NOTE: 2 more ways to add incoming and outgoing call numbers in Block list:
-
From incoming call numbers
-
Press OK, press or to select Call list or press and hold key.
- Press OK, press or ▼ to select call list entry.
- Press OK, press or ▲ to select to Add to Block.
-
Press OK to show selected number, press *to save to Block list.
-
From outgoing call numbers
-
Press and hold * key, press or to select redial list entry.
- Press OK MENU, press ▲ or ▼ to select to Add to Block.
- Press OK to show selected number, press OK to save to Block list.
10.1.3. Edit numbers in Blacklist
In idle mode,
- Repeat step 1 and 2 in Section 10.1.2.
- Press OK, press or to select Edit, press or to select number to be edited, press OK to edit, and then press OK to save.
10.1.4. Delete numbers in Blacklist
10.1.4.1. Delete a number from blacklist
In idle mode,
-
Repeat step 1 and 2 in Section 10.1.2.
-
Press OK MENU, press or to select Delete, press or to select number to be deleted, press OK MENU Confirm? is shown, and then press to confirm.
10.1.4.2. Delete all numbers from blacklist
In idle mode,
-
Repeat step 1 and 2 in Section 10.1.2.
-
Press OK MENU, press ▲ or ▼ to select Delete all, press OK MEND Confirm? is shown, and then press OK MEND to confirm.
10.2. Automatic call block mode
10.2.1. VIPs only
In this restrictive automatic mode, only calls from numbers registered as VIP in your phonebook will go through and make your phone ring.
| Menu Call block Block set. | Off |
| On | |
| VIP OK* | |
| Contacts OK |
-
Press ,press or to select Call Block.
-
Press OK MENU, press or to select Block set.
-
Press OK, press or to select VIP OK (Automatic mode).
10.2.2. Contacts only
In this broad automatic mode, only calls from contacts registered in your phonebook (normal and VIP) will go through and make your phone ring.
| Menu Call block Block set. | Off |
| On | |
| VIP OK | |
| Contacts OK* |
-
Press press or to select Call Block.
-
Press OK MENU, press or to select Block set.
-
Press OK, press for select Contacts OK (Automatic mode).
10.3. Anonymous call block mode
This feature allows you to block numbers that do not display a number on your phone. It can be enabled or disabled independently from the previous call block modes.
| Menu Call block Block anonym | Private* |
| All | |
| Off |
- Press press or to select Call Block.
- Press OK MENU, press or to select Block anonym.
- Press OK MENU, press or to select one of the options.
10.3.1. Block Private Calls
This mode will block incoming calls that have been purposely kept their numbers private from you.
In idle mode,
-
Press key, Block set. is displayed, or Press OK, press ▲ or ▼ to select Call block, press OK to show Block set.
-
Press ▲ or ▼ to select Block anonym.
-
Press OK MENU, press or to select Private, press to confirm.
-
will be displayed on the lower side of LCD.
10.3.2. Block All Anonymous Calls
This mode will block all incoming calls, including private calls, international calls, pay phone and other out-of-area calls.
In idle mode,
- Repeat step 1 and 2 in Section 10.3.1.
- Press OK, press or to select All, press to confirm.
- will be displayed on the lower side of LCD.
10.3.3. Set Block Anonymous Calls OFF
In idle mode,
- Repeat step 1 and 2 in Section 10.3.1.
- Press OK, press or ▼ to select Off, press OK confirm.
-
will only disappear from the LCD if the regular call block (see 10.1. And 10.2.) is also set to OFF.
-
TECHNICAL DETAILS
| Free Field Range Up to 300 metres* | |
| Indoor Range Up to 50 metres* | |
| Handset Battery Life (average values) | 10 hours talk time**100 hours standby** |
| Number of Handsets(total) Up to 4 | |
| Intercom Mode Yes | |
| Three-Way Conference(1 outside correspondent + 2 internal correspondents) | Yes |
| Electrical Connection / Base Mains Adaptor / Charger | Base & Charger main adaptor:Model No.: EU versionAT-337E-060045A or 1-CHEUA451-081Model No.: UK versionAT-536B-060045B or 1-CHUKA451-082Input: 100-240 V/50-60 Hz / 0,15 AOutput: 6 V CC / 450 mA, 2.7WOnly use the adaptors supplied with the telephone Single-phase AC, excluding IT installations defined by the EN62368-1 standard.Caution: The network voltage is classified as a hazard by the criteria of this standard. |
| Telephone Connection Appliance designed for connection to a TRT3 class (telecommunications network voltage) analogue telephone line as defined by the EN62368-1 standard. | |
| Batteries AAA - 1.2 V - 300mAh (NiMH rechargeable)Only use the batteries supplied with the telephone.Use any other type of battery presents a risk of explosion. Used batteries must be disposed of in compliance with current environmental protection regulations. | |
| Operating Temperature From 5°C to 40°C | |
* Values may vary according to environment.
** Depending on initial battery charge.
12. TROUBLESHOOTING
If you have difficulty with your phone, please try the suggestions listed below. As a general rule, if a problem occurs, remove the batteries from all the handsets in your installation for about 1 minute, then disconnect and reconnect the power supply to the base and reinstall the handset batteries.
| Problem Cause Solutions | ||
| No dialing tone when pressing 📊 key | a. The connection cord of the base station is not plugged in.b. The adapter cord is not plugged in correctly in the base station.c. The line is busy, as another handset is used. | a. Check the connections.Unplug and plug back in the mains.Check that the telephone line cord has been plugged into the base station and the phone socket.b. Check the base station plug and the 220V plug (remove and plug-in).c. Use the original connection cord. |
| Out Of Range is displayed. | a. Base station out of range.b. Base station not connected to mains. | a. Reduce the range.b. Connect base station to mains. |
| The call does not work. | Service not activated or wrong operator or wrong setting | Check your Subscription with network. |
| No display. Empty battery Recharge battery | ||
13. SAFETY
This telephone is not designed for Emergency calls when the main power fails.
Do not use your telephone to notify a gas leak or other potential explosion hazard.
Do not open your device or its power supply to avoid risk of electrical shock.
Do not attempt to open the batteries, as they contain hazardous chemical substances.
Your telephone must be located in a dry place away from hot, humide and direct sunlight condition. To avoid radio signal interference, place the phone at least 1 meter away from other electrical appliances or other phones.
14. ENVIRONMENT

This symbol means that your inoperative electronic appliance must be collected rately and not mixed with the household waste. The European Union has elemented a specific collection and recycling system for which producers are responsible.
Help us protect the environment in which we live!

15. CONFORMITY
Hereby, ATLINKS EUROPE declares that the radio equipment is in compliance with Directives 2014/53/EU. The full text of the EU declaration of conformity is available at the following internet address: www.amplicomms.com
Average power per channel: 10mW
Maximum Output Power (NTP) : 24dBm
Frequency Range : 1880-1900MHz
Hereby, ATLINKS EUROPE declares that the radio equipment type DECT is in compliance with Legislation : Radio Equipment Regulations 2017 (SI 2017/1206). The full text of the UKCA declaration of conformity is available at the following internet address:
www.amplicomms.com

www.amplicomms.com
ATLINKS Europe
28 Boulevard Belle Rive
92500 RUEIL-MALMAISON France
RCS Nanterre 508 823 747
ATLINKS UK Ltd
3rd Floor, Waverley House
7-12 Noel Street, London, W1F 8GQ - UK
Company registration 13809295
© ATLINKS 2022 - Reproduction prohibited.
The Manufacturer reserves the right to modify the specifications of its products in order to make technical improvements or comply with new regulations.
AMPLICOMMS and ATLINKS are registered trademarks.

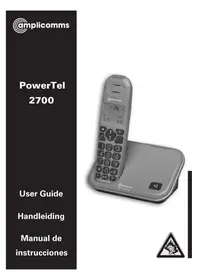

- GETTING TO KNOW YOUR PHONE
- PRECAUTIONS
- INSTALLING YOUR PHONE
- USING YOUR PHONE
- PRIVATE PHONEBOOK
- CALLER DISPLAY (NETWORK DEPENDENT)
- REDIAL THE LAST NUMBER
- PHONE SETTING
- REGISTRATION
- CALL BLOCK
- PACKAGE CONTENTS
- THE PACKAGE CONTAINS THE FOLLOWING ITEMS
- THE ADDITIONAL DUO AND TRIO PACKAGE CONTAINS THE FOLLOWING ITEMS
- HANDSET OVERVIEW
- BASE STATION OVERVIEW
- DISPLAY ICONS AND SYMBOLS
- HEARING AID COMPATIBILITY
- CONNECTING THE BASE STATION
- INSTALLING AND CHARGING THE BATTERIES
- NOTES
- CONNECTING THE CHARGER(S) (FOR DUO/TRIO MODELS)
- CHANGE LANGUAGE (HANDSET)
- MENU TREE
- MAKE A CALL
- PREPARATORY DIALING
- DIRECT DIALING
- DIAL FROM DIRECT MEMORY KEYS
- CALL FROM THE REDIAL LIST
- ADJUST EARPIECE AND HANDSFREE VOLUME
- ADD A NEW PHONEBOOK ENTRY
- CALL FROM THE PHONEBOOK
- VIEW THE CALL LIST
- CALL FROM THE CALL LIST
- SET THE RINGER MELODY FOR INTERNAL/EXTERNAL CALLS
- SET THE RINGER VOLUME
- SET THE SPEED DIAL
- FOR M1/M2/M
- SET HANDSET SETTINGS
- SET BASE
- MANUAL CALL BLOCK MODE
- HOW TO BLOCK AN INCOMING CALL
- ENABLE MANUAL MODE
- ADD NUMBERS TO BLACKLIST
- EDIT NUMBERS IN BLACKLIST
- DELETE NUMBERS IN BLACKLIST
- DELETE A NUMBER FROM BLACKLIST
- DELETE ALL NUMBERS FROM BLACKLIST
- AUTOMATIC CALL BLOCK MODE
- VIPS ONLY
- CONTACTS ONLY
- ANONYMOUS CALL BLOCK MODE
- BLOCK PRIVATE CALLS
- BLOCK ALL ANONYMOUS CALLS
- SET BLOCK ANONYMOUS CALLS OFF
- TROUBLESHOOTING
- SAFETY
- ENVIRONMENT
- CONFORMITY
Brand : Amplicomms
Model : BigTel 1502
Category : Telephone