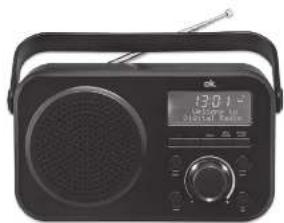
ORD 210 DAB+ - Radio OK - Free user manual and instructions
Find the device manual for free ORD 210 DAB+ OK in PDF.

| Product Type | DAB+/FM Radio |
| Brand | OK |
| Model | ORD 210 DAB+ |
| Mains power supply | 230 V~, 50 Hz |
| Battery power supply | 6 V — 4 x 1.5 V (type C/LR14, not included) |
| Power consumption in operation | 5 W |
| Power consumption in standby | < 1 W |
| DAB tuning range | 174 - 240 MHz |
| FM tuning range | 87.5 - 108 MHz |
| FM tuning step | 0.05 MHz |
| Dimensions (W x H x D) | 170 x 101.2 x 52.8 mm |
| Weight | Approximately 0.3 kg |
| DAB station memory | Up to 30 stations |
| FM station memory | Up to 30 stations |
| Main functions | DAB/DAB+ Radio, FM Radio, alarm, sleep timer, auto scan, presets, radio information display, brightness adjustment |
| Maintenance and cleaning | Disconnect before cleaning; use a slightly damp cloth; do not use harsh or chemical cleaners |
| Safety | Do not expose to rain or moisture; do not open the case; use only under normal temperature and humidity conditions; observe battery safety instructions |
| Spare parts and repairability | Entrust repairs to an approved repairer; do not attempt to repair yourself |
| General information | For household use only; EU declaration of conformity available online; dispose in accordance with WEEE |
Frequently Asked Questions - ORD 210 DAB+ OK
User questions about ORD 210 DAB+ OK
0 question about this device. Answer the ones you know or ask your own.
Ask a new question about this device
Download the instructions for your Radio in PDF format for free! Find your manual ORD 210 DAB+ - OK and take your electronic device back in hand. On this page are published all the documents necessary for the use of your device. ORD 210 DAB+ by OK.
USER MANUAL ORD 210 DAB+ OK
IM_ORD21U DAB+_TS0424_VOS
www.unile.com


ORD 210 DAB+
DAB+ RADIO TRAGBAR // DAB+ RADIO PORTABLE// RADIO DAB+ PORTÁTIL // RADIO DAB+ PORTABLE
| DE | DENAUCHSAMMEZUNO 3 |
| EN | USER MANUAL 17 |
| CS | MANUAL DES UNAIDIO 21 |
| FR | MODE D'EMPLOIS |
| OH | DAFFICE XMOIE |
| HU | HASZMALATUTAUTATO |
| 26 |
| 30 |
| IT | MANUALE UTENTE 32 |
| NL | GEORUNSAAMWIZING 15 |
| PL | FESTRUMERA CHILION 104 |
| PT | MANUAL DE UTILIZAÇÃO |
| SE | DRUNSAWIZING |
| TR | RULLAWM RILAVUZU |
| 12 |
| 134 |
| 147 |
M ORD2100NB, 190424 V05 HR.00F 1
2442019 14.0x
6230 - 16
M ORD2100NB, 190424 V05 HR.06 2
2442019 14.0x
HERZLICHEN GLÜCKWUNSCH!
Thank your for purchase of an ok. product. Please read this manual carefully and keep it for future reference.
IMPORTANT SAFETY INSTRUCTIONS. READ CAREFULLY AND KEEP FOR FUTURE REFERENCE.
1.

The exclamation point within an equilateral triangle is intended to alert the user to the presence of important operating and maintenance instructions in the literature accompanying the device.
2.

reasons, this class II product is provided with double or reinforced insulation as indicated by this symbol.
3.
Danger! Excessive sound pressure from earphones and

headphones can cause hearing loss. If you listen to loud music for a long time, your hearing may be impaired. Set to a moderate volume.
-
This product is only intended for audio entertainment. Do not use the product for any other purpose than described in this manual in order to avoid any hazardous situation. Improper use is dangerous and will void any warranty claim.
-
For household use only. Do not use outdoors.
-
Danger of suffocation! Keep all packaging material away from children.
-
Only use under normal room temperature and humidity conditions.
-
The product is only suitable for use at moderate degrees of latitude. Do not use in the tropics or in particularly humid climates.
-
Do not move the product from cold into warm places and vice versa. Condensation can cause damage to the product and electrical parts.
-
Do not use attachments or accessories other than recommended by the manufacturer or sold with this product. Install in accordance with this user manual.
-
Do not install near any heat sources such as radiators, heat registers, stoves or other products (including amplifiers) that produce heat.
-
Do not shift or move the product when powered on.
EN
18
-
Do not touch, push or rub the surface of the product with any sharp or hard objects.
-
Danger! To reduce the risk of fire or electric shock, do not expose this product to rain or moisture.
-
The product shall not be exposed to dripping or splashing and no objects filled with liquids, such as vases, shall be placed on the product.
-
Care should be taken so that no objects or liquids enter the enclosure through openings.
-
No naked flame sources, such as lighted candles, should be placed on the product.
-
Refer all servicing to authorised service agent. Do not attempt to repair the product yourself. Servicing is required when the product has been damaged in any way, such as the supply cord or plug are damaged, liquid has been spilled, objects have fallen into the product, the enclosure is damaged, the product has been exposed to rain or moisture, does not operate normally, or has been dropped.
-
Before connecting the product to a socket outlet, make sure the voltage indicated on the product corresponds to your local mains.
-
If the supply cord is damaged, it must be replaced by the manufacturer or its service agent or similarly qualified person in order to avoid hazard.
-
Regularly check if the supply cord, product or extension cable is defective. If found defective, do not put the product into operation. Immediately pull the plug.
-
Place the supply cord and, if necessary, an appropriate extension cable in such away that pulling or tripping over it is impossible. Do not allow the supply cord to hang down within easy reach.
-
Do not jam, bend or pull the supply cord over sharp edges.
-
The power plug is used as the disconnect device; the disconnect device shall remain readily operable. To completely disconnect the power input, disconnect the mains plug.
-
The product may not function properly or not react to the operation of any control due to electrostatic discharge. Switch off and disconnect the product; reconnect after a few seconds.
-
Protect the supply cord from being walked on or pinched particularly at the plug, convenience receptacles and the point where it exits from the product.
-
Never pull the plug by the supply cord or with wet hands.
-
Disconnect the power plug in case of faults during use, during lightening storms, before cleaning and when not using the product for a longer period of time.
-
Danger! Before cleaning, switch the product off and disconnect the power plug from the socket.
-
When the product has reached the end of its service life, make it defective by disconnecting the plug from the socket and cutting the cord in two.
-
Caution! There is danger of explosion from improper replacement of the batteries. Replace batteries only with the same or equivalent type of battery.
-
Always change the entire battery pack. Do not mix old and new batteries, or batteries with different charge state.
-
Make sure the batteries are correctly inserted. Observe the polarity (+) plus / (-) negative on the battery and the housing. Improperly inserted batteries can lead to leakage or, in extreme cases, a fire or an explosion.
-
Remove used batteries. Remove the batteries if you know that the product will not be used for a longer period of time. Otherwise, the batteries could leak and cause damage.
-
Non-rechargeable batteries must not be recharged.
-
The connections must not be short-circuited.
-
Remove the batteries from the product before disposal.
-
Never expose batteries to excessive heat (e.g. bright sun, fire), and never throw them into fire. The batteries could explode.
-
Keep batteries out of reach of small children. If batteries have been swallowed, seek immediate medical attention.
-
If the batteries leak, remove them with a cloth and dispose of them accordingly. Prevent battery acid from coming into contact with skin and eyes. If you do get battery acid in your eyes, flush them thoroughly with lots of water and consult a physician immediately. If battery acid comes into contact with your skin, wash the affected area with lots of water and soap.
-
When installing the device, leave sufficient space for ventilation. Do not install in bookcases, built-in cabinets or the like.
-
Do not impede ventilation by covering the ventilation openings with items, such as newspapers, table-cloths, curtains, etc. Do not insert any objects.
EN
20
INTENDED USE
This product is intended for audio playback via DAB-Radio and FM-Radio. Any other use may result in damage to product or injuries. This product is designed for household use only and not intended for commercial use.
The Imtron GmbH assumes no liability for damage to the product, for property damage or for personal injury due to careless or improper usage of the product, or usage of product which does not meet the manufacturer's specified purpose.
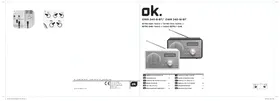
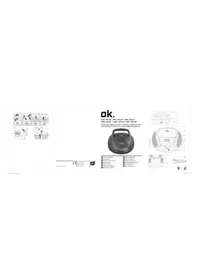
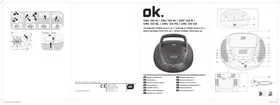
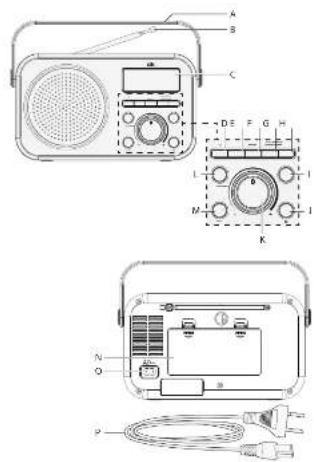
CONTROLS AND COMPONENTS
A. Handle
B. Telescope antenna
C. Display
D. Back button
E. Forward button
F. PRESET-button
G. INFO/DIMMER-button
H. SEARCH/ALARM -button
I. MENU button
J. Standby
K. Volume dial - / +
L. ENTER button
M. MODE button
N. Battery compartment with lid
O. Power socket AC\~
P. Power cord
DELIVERY CONTENTS
1 x Power cord
1 x User manual
BEFORE FIRST TIME USE
Remove the product and accessories carefully from the original packaging. Inspect the delivery contents for completeness and damages. Should the delivery contents be incomplete or damaged, contact your sales outlet immediately.
LANGUAGE
The default language of your radio is English. You change the language under SYSTEM SETTING.
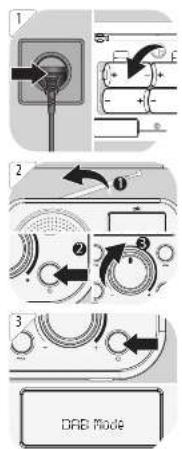
POWER SUPPLY
If operation by mains power is not possible the radio can be powered by batteries.

1 Operation by mains
Insert the AC plug into the power socket AC \~ on the back. Then plug the mains plug into a mains socket.
2 Operation by batteries
- Open the battery compartment.
- Insert 4 x 1.5 V battery (type C/LR14, not included). Make sure the polarity is correct as indicated.
- Close the battery compartment.
Attention!
- Do not use this product with AC supply and battery operation simultaneously.
- Remove all of the batteries when operating this product via power supply.
OPERATION

Adjusting the antenna
For optimal reception, extend the antenna, move to fully extend and adjust it.
Turning the unit on/off (standby)
Press the ⏻ button to turn on/off the unit.
Adjusting the volume
The volume can be adjusted during playback with the volume control.
EN
22
DAB RADIO
3 Press MODE to select DAB mode.
When the radio is switched on for the first time, it will automatically do a full scan of DAB/DAB+ stations. The list of stations is then stored, eliminating the need for another full scan when the radio is turned on next time.
When the scan is complete, the stations are stored in alphabetical order. The first available station will be played back.
Note
If there is no DAB reception at any time, change the position of the unit or adjust the antenna.
CHANGING DAB/DAB+ STATIONS
- Press the buttons < / > in DAB mode to navigate available DAB/DAB+ stations.
- Press ENTER to confirm.
DAB MODE-AUTO SCAN
Press the button MENU in DAB mode and then the buttons < / > buttons until
The unit scans all available DAB/DAB+ stations and plays the first available station. Alternative, you can activate the auto scan function by long pressing SEARCH/ALARM.
Note
New stations and services are added to the stored DAB/DAB+ stations. In order to make new DAB/DAB+ stations and services available on your radio, run a full scan at regular intervals.
DISPLAYING STATION INFORMATION
- Select a DAB station.
-
During DAB/DAB+ radio playback, press MENU repeatedly to display the following information (if available):
-
Ensemble
- Frequency
• Signal frequency error
• Audio state and bit rate - Time
- Date
- Radio text
- Signal strength
- Programme type
• Power status (Mains or battery)
MANUAL STORING DAB STATIONS
You can store up to 30 preset DAB/DAB+ stations.
- Select the desired station.
- Press and hold PRESET until
appears on the display. - Repeat steps 1 to 2 to store more DAB/DAB+ stations.
SELECTING PRESET DAB STATIONS
- Press MODE to select the DAB/DAB+ mode.
- Press PRESET to access the Preset menu "Preset Recall" <#: stored station name>.
- Use the buttons < / > to select a preset number and confirm your selection by pressing ENTER.
EN
24
USING THE DAB/DAB+ MENUS
In DAB mode press MENU and display shows [Full scan] and use the buttons < / > to browse the menu options. To confirm your selection press ENTER every time.
•
Searches for all available DAB/DAB+ stations.
-
Manual tuning adjustment, for example aligning the antenna or adding stations.
•
Dynamic Range Control setting boosts the volume of quieter sounds in a noisy environments.
Off / low / high
-
Removes all invalid stations from the station list.
-
PRUNE
Deleting inactive DAB stations
- Press the buttons < / > until
appears and confirm with ENTER. - Select
with and confirm with ENTER.
FM RADIO
SELECTING FM STATIONS

- Press the MODE button to select FM stations.
- The radio plays the last station selected.
SELECTING FM STATION FREQUENCIES
- Select a FM station.
- Manual frequency selection
Press the buttons < / > to change the frequency at intervals of 0.05 MHz.
- Automatic frequency selection
Press the buttons < / > for 1-2 seconds and the radio will stop searching once an active station has been found.
AUTOMATIC SEARCH AND PROGRAM MEMORY
- In FM radio mode, press the SEARCH/ALARM button.
- The unit will search and save all received stations one by one until the end of the frequency band is reached or until all 30 program memories are occupied, whichever comes first.
STORING FM STATIONS
You can store up to 30 preset FM stations.
- Select the desired FM station.
- Press and hold PRESET until
appears on the display. - Repeat steps 1 to 2 to store more FM stations.
SELECTING A PRESET FM STATION
- Press PRESET to access the Preset menu.
- Use the buttons < / > to select a preset number and confirm your selection by pressing ENTER.
USING THE FM MENU
-
Press MENU in FM mode and select a menu option with the buttons <//>:
-
-
-
Confirm selection with ENTER.
SCAN SETTING
- Press MENU in FM mode and select with the buttons </>
. - Press ENTER to confirm the selection.
- Select a menu option with the buttons < / > and confirm with ENTER.
•
Scans for stations with strong signals
-
Scans all available stations
EN
26
SYSTEM SETTING
5 Press MENU in any mode and select
Following menu options are available:
SLEEP SETTING
- Select menu option
with the buttons and confirm with the button ENTER. - Press the buttons < / > repeatedly until you have set the desired time, between 120 and 5 minutes and off. The activated sleep function is indicated by the symbol 27 .
- After the preset time has elapsed, the radio will automatically switch to standby.
SETTING THE TIME
- Select menu option
- Use the buttons < / > to select the desired sub-menu:
-
•
-
-
FACTORY SETTINGS
Select menu option
DISPLAYING THE SOFTWARE VERSION
Select menu option
SET ALARM
Note:
• The alarm can only be set when the radio is switched off.
• Make sure the time is set correctly.
1. Press and hold the SEARCH/ALARM button for at least 1 second. The hours are flashing.
2. Press the buttons < / > button to set the hours and confirm the entry with the SEARCH/ALARM button. The minutes are flashing.
3. Press the buttons < / > button to set the minutes and confirm the entry with the SEARCH/ALARM button. The display now flashes FM mode.
4. Press the buttons < / > button to set the alarm mode, FM mode (FM radio, the last station listened to), BUZZER (alarm signal) or DAB mode (DAB radio mode, last station listened to) and confirm with the SEARCH/ALARM button. The settings are now complete and the alarm is set and activated. The activated alarm is indicated by the alarm symbol 1 to the left of the time.
5. Use the volume dial to set the radio volume for alarm.
6. To deactivate the alarm again, briefly press the SEARCH/ALARM button. The alarm symbol 1 turns off. To activate the already preset alarm, briefly press the SEARCH/ALARM button again. The alarm icon 1 appears to the left of the time.
7. To turn off the sounding alarm, press SEARCH/ALARM button and the alarm is switched off.
GENERAL SETTING
SENDER INFORMATION
Briefly press the INFO/DIMMER button each time to display various information such as radio text, station name, time, etc.
DISPLAY DIMMING
Press the INFO/DIMMER button each for at least 1 second to change the backlight. There are 3 levels to choose from.
CLEANING AND CARE
• Unplug the adaptor from the socket before cleaning the unit.
- Attention! Do not let water penetrate into the unit.
- Clean the housing with a lightly dampened cloth.
- Do not use sharp, scouring or aggressive cleaners.
- Do not use chemicals (such as gasoline or alcohol) to clean the housing.
EN
28
TROUBLESHOOTING
If there are any problems during operation, please refer to the following table. If problems cannot be solved as indicated under Solution, please contact your manufacturer.
| Problem Possible causes Solution | ||
| Product does not function | • Interrupted power supply | • Check the power supply or change batteries |
| No Sound | • Volume is very low | • Adjust the volume |
| Poor radio reception quality | • Poor radio reception | • Place the product to another place and adjust the antenna again. |
TECHNICAL DATA
Input: 230 V\~, 50 Hz
Batteries : 6 V
= 4 × 1.5 ~V (type C/LR14)
Operation power consumption : 5 W
Standby power consumption : < 1 W
Tuning range (Tuner DAB) : 174 - 240 MHz
Tuning range (Tuner FM) : 87.5 - 108 MHz
Tuning Grid (Tuner FM) : 0.05 MHz
Dimensions (W x H x D) : 170 X 101.2 X 52.8 mm
Weight : Approx. 0.3 kg
DECLARATION OF CONFORMITY
Hereby, Imtron GmbH declares that the radio equipment type
ORD 210 DAB+ is in compliance with Directive 2014/53/EU. The full text of the EU declaration of conformity is available at the following internet address: http://de.ok-online.com/nc/de/suche.html
DISPOSAL

Do not dispose of this appliance as unsorted municipal waste. Return it to a designated collection point for the recycling of WEEE. By doing so, you will help to conserve resources and protect the environment. Contact your retailer or local authorities for more information.
Please dispose of batteries in an environmentally friendly manner Do not put batteries into the household waste. Please use the return and collection systems in your community or contact the dealer where you purchased the product.
ES
30
ENHORABUENA
DÉCLARATION DE CONFORMITÉ
Removes all invalid stations from the station list.
-
ΚΛΑΔΕΜΑ
HANDMATIG DAB STATIONS OPSLAAN
WYBÓR ZAPROGRAMOWANYCH STACJI DAB
WYBÓR STACJI RADIOWYCH FM