Arena 9 - Speaker STEELSERIES - Free user manual and instructions
Find the device manual for free Arena 9 STEELSERIES in PDF.
User questions about Arena 9 STEELSERIES
0 question about this device. Answer the ones you know or ask your own.
Ask a new question about this device
Download the instructions for your Speaker in PDF format for free! Find your manual Arena 9 - STEELSERIES and take your electronic device back in hand. On this page are published all the documents necessary for the use of your device. Arena 9 by STEELSERIES.
USER MANUAL Arena 9 STEELSERIES
PRODUCT INFORMATION GUIDE
CONTENTS
Product Overview 5
Main Setup 8
Optional Connections 9
Controls 11
OLED Control Pod Menu 12
Rear Speakers 13
Translations
Espanol 15
简体中文 19
繁體中文 22
日本語 26
中国国 30
Deutsch 34
Pycckn 38
Francais 42
Italiano 47
Portugues 51
Polish 55
Regulatory
60
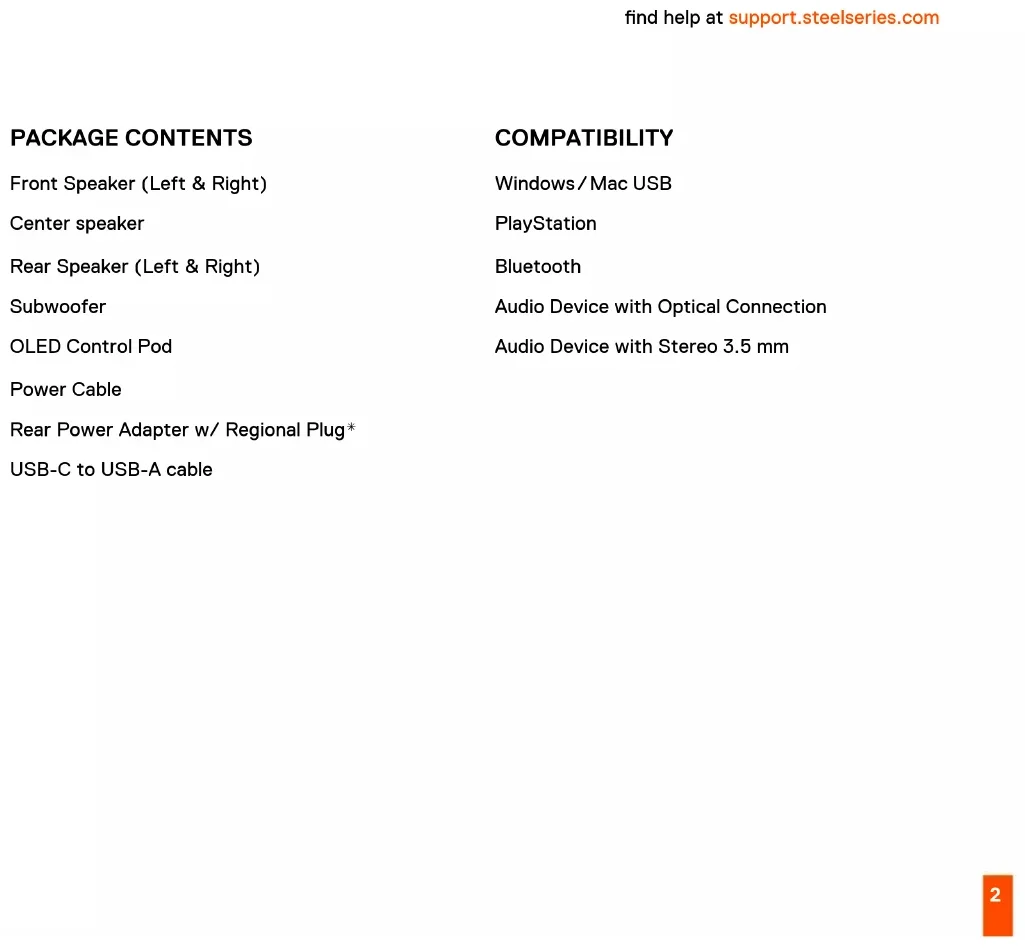
PACKAGE CONTENTS
Front Speaker (Left & Right)
Center speaker
Rear Speaker (Left & Right)
Subwoofer
OLED Control Pod
Power Cable
Rear Power Adapter w/ Regional Plug*
USB-C to USB-A cable
COMPATIBILITY
Windows/Mac USB
PlayStation
Bluetooth
Audio Device with Optical Connection
Audio Device with Stereo 3.5 mm
STEELSERIES AUDIO CUSTOMIZATION SUITE
Get the powerful audio customization suite for virtual surround sound,
EQ settings, and more by visiting
steelseries.com/setup/arena-9
WELCOME TO THE ARENA
Game developers, sound designers, and composers spend thousands of hours creating the captivating soundscapes that transport you into your favorite games. Whether you're revisiting old worlds or getting lost in new ones, we created the Arena speaker series to stay true to the masterfully-crafted audio experience. Enjoy your gaming audio in pure and glorious detail.
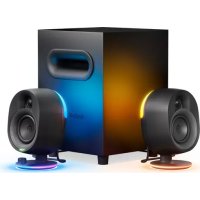
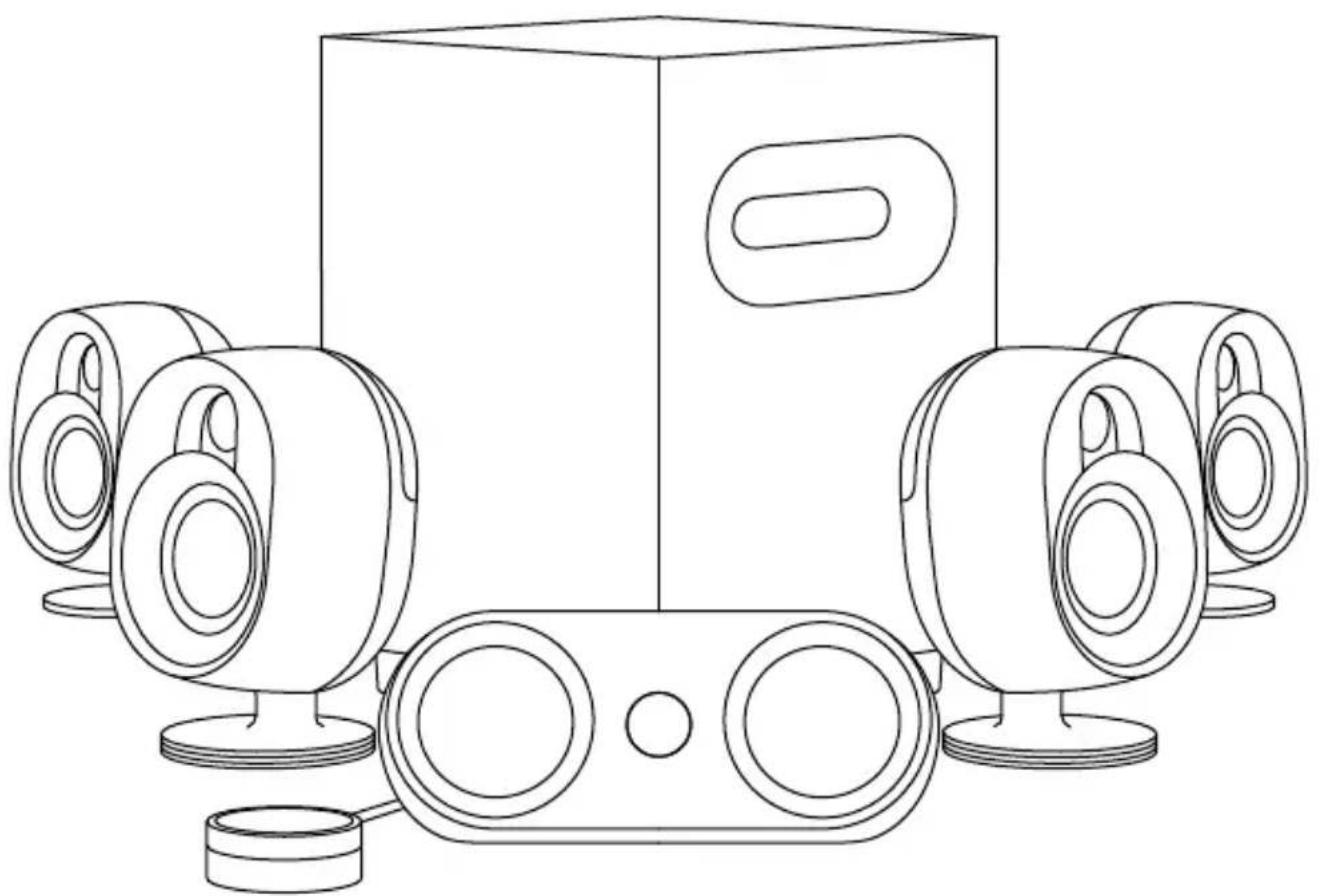
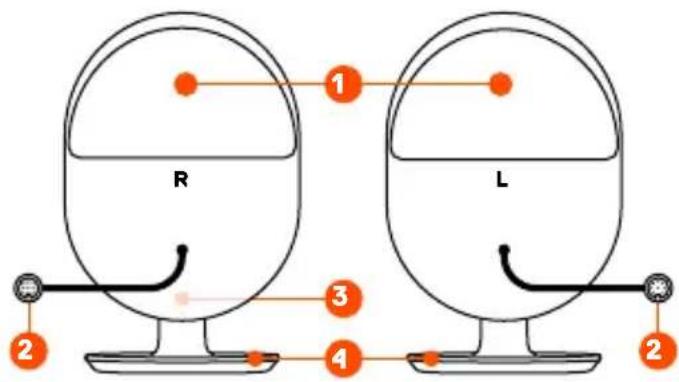
PRODUCT OVERVIEW
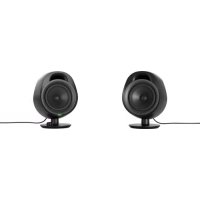
FRONT SPEAKERS
1 LED Zones Back
2 Speaker Cables (L & R)
3 LED Indicator
4 LED Zones Base
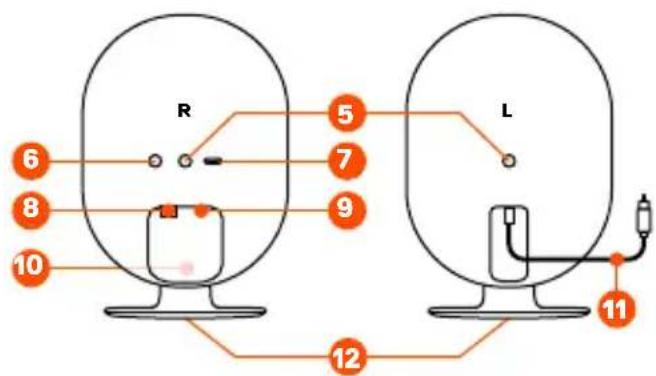
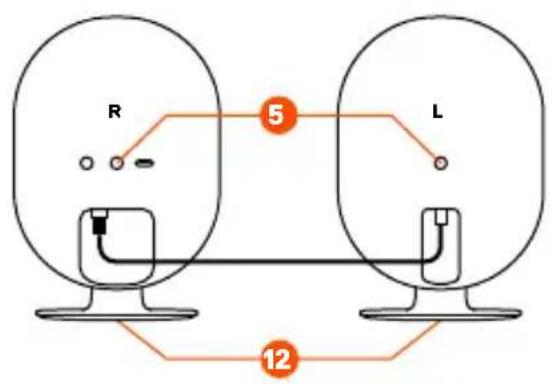
REAR SPEAKERS
5 Wall Mount Connector
6 Pairing Button
7 USB-C Firmware Update
8 Left Speaker Audio Input
9 Power Input
10 Rear LED Indicator
11 To Right Speaker Cable
12 Stand Removal Screws
*Find replacement parts at steelseries.com/gaming-accessories
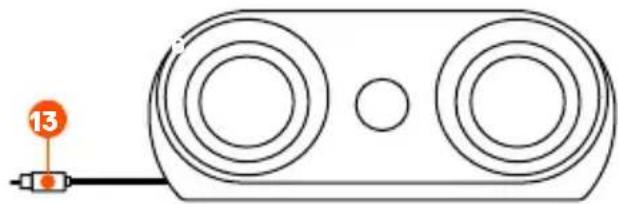
CENTER CHANNEL
13 Speaker Cable (C)
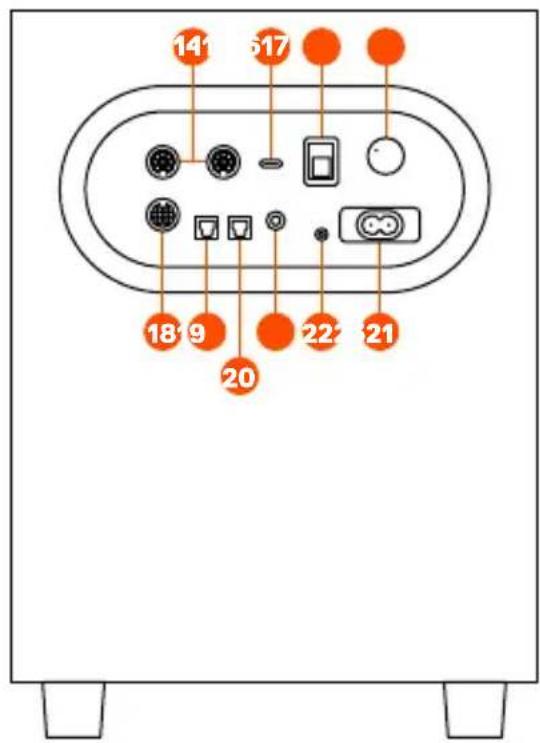
SUBWOOFER
14 Speaker Inputs (L & R)
15 USB-C PC Input
16 Power Switch
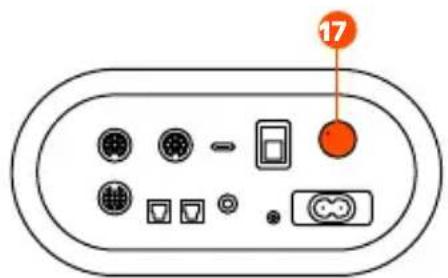
17 Subwoofer Volume Control
18 OLED Control Pod Input
19 Optical Audio Input
20 Optical Audio Passthrough
21 Speaker Input (C)
22 Auxiliary Input
23 Power Cable Input
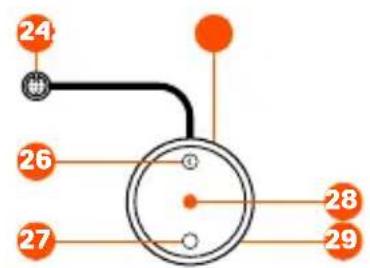
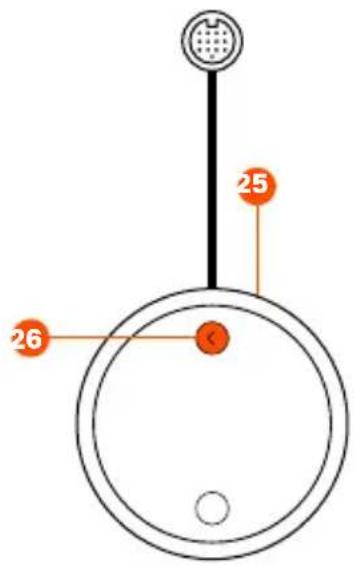
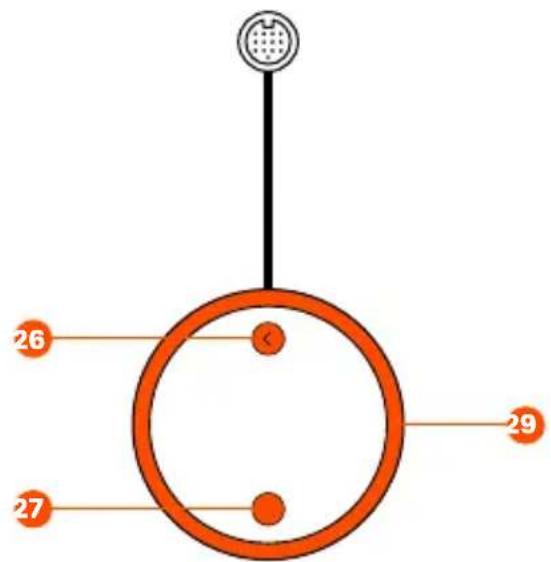
OLED CONTROL POD
24 To Subwoofer Cable
25 Headset Audio Jack
26 Multi-Function Button (Mute/Headset Toggle/Back)
27 Enter Button
28 OLED Screen
29 Control Wheel
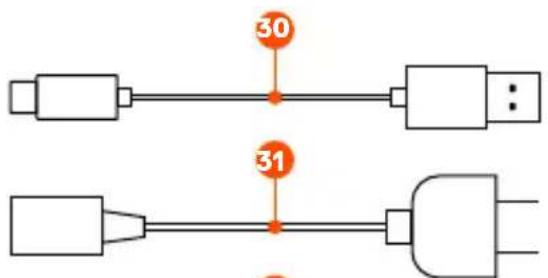
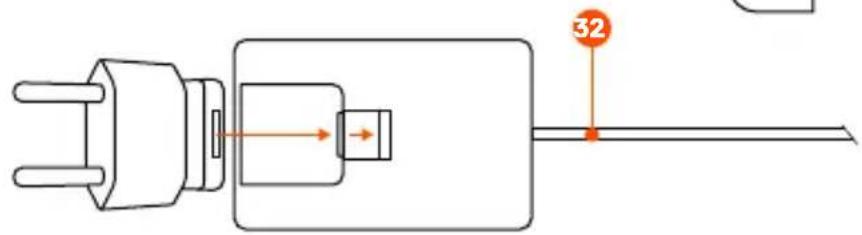
CABLES
30 USB-C to USB-A Cable
31 Power Cable
32 Rear Speaker Power Adapter w/ Regional Plug*
MAIN SETUP
More detailed product information at steelseries.com/setup/arena-9
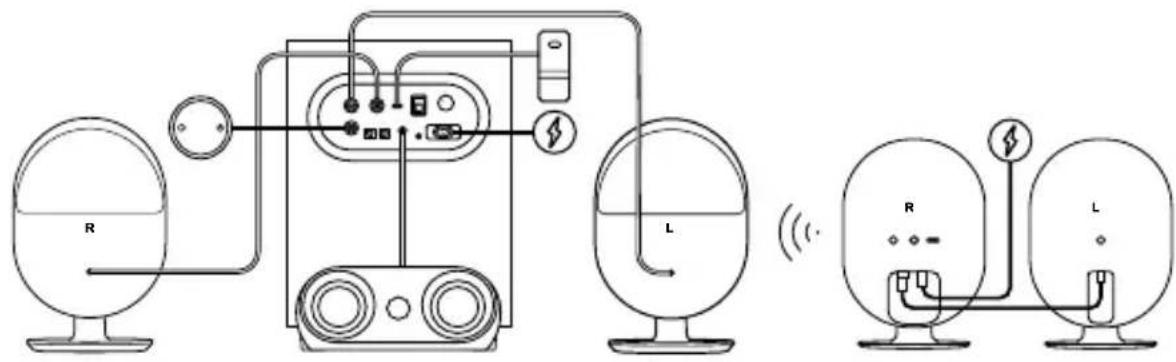
FRONT SPEAKERS & CONTROL POD
1 Connect the Speaker Cables (L & R) (2) to the Speaker Inputs (L & R) (14) on the Subwoofer.
2 Connect the Speaker Cable (C) (13) to the Speaker Input (C) (21) on the Subwoofer.
3 Connect the To Subwoofer Cable (24) to the OLED Control Pod Input (18) on the Subwoofer.
4 Connect the USB-C to USB-A Cable (30) from Subwoofer's USB-C PC Input (15) to your PC.
5 Plug the Power Cable (31) into your Subwoofer's Power Cable Input (23) and then plug into matching power source.
REAR SPEAKERS
6 Plug the Left Speaker's attached cable (labeled To Right Speaker Cable (11)) into the Left Speaker Audio Input (8).
7 Attach the Regional Plug to the Rear Speaker Power Adapter (32) and plug it into the Power Input (9). Plug the Wall Adapter into an appropriate power source.
COMPLETE SETUP
8 Turn Power Switch (16) to on.
9 Select Arena 9 as your 5.1 Surround Playback source.
OPTIONAL CONNECTIONS
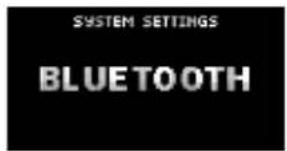
BLUETOOTH
Using the OLED Control Pod. Select SYSTEM SETTINGS | BLUETOOTH | PAIR to pair with your Bluetooth enabled device.
Please note: Bluetooth audio will mix with other audio sources. The LED Indicator (3) will appear Blue.
HEADSET AUDIO JACK
Plug your headset audio cable into the OLED Control Pod's Headset Audio Jack (25). The speakers will automatically mute and activate your headset audio. To toggle back to speakers, press the OLED Control Pod Multi-Function Button (26). Arena 9 supports wired headset microphone usage. Make sure Arena 9 is selected as your Recording Device in Windows.
PLAYSTATION SUPPORT
Please note: PlayStation will only playback 2.1 stereo but not 5.1 surround over USB and Optical connections. To use all your speakers with PlayStation please use the 5.1 Upmix feature.


AUXILIARY AUDIO INPUT
Plug a 3.5 mm Audio Cable into the Auxiliary Input (22) on Arena 9 Subwoofer from your audio device.
Please note: Auxiliary audio will mix with other audio sources.
OPTICAL AUDIO INPUT
Connect a Toslink optical cable (not included) from your audio device to the Optical Audio Input (19) on the Subwoofer.
OPTICAL PASSTHROUGH AUDIO OUTPUT
Connect a second Toslink optical cable (not included) from the Subwoofer's Optical Audio Passthrough (20) to another audio device. When in headset mode, optical audio will pass to the connected audio device.

CONTROLS
CONTROL POD WHEEL
Turn the Control Wheel (29) to the right to increase speaker volume, and to the left to decrease speaker volume.
CONTROL POD BUTTONS
Button Function
Enter Button (27) Enter and select in menu structure.
Multi-Function Button Home screen: (26) Mute/toggle to headset In menu structure: Back
SUBWOOFER VOLUME
Turn the Subwoofer Volume Control (17) to the right to increase the Subwoofer volume, and to the left to decrease the Subwoofer volume.
OLED CONTROL POD MENU
AUDIO
Audio Settings > EQ
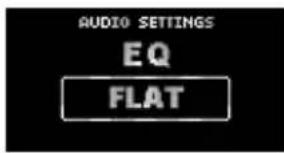
Select an EQ preset or make your own custom EQ.
Audio Settings > 5.1 Upmix
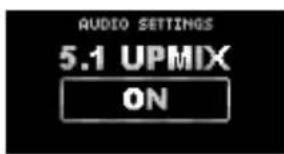
Expand stereo content to use your center and rear speakers. Please note, it is highly recommended you turn this feature off before playing true 5.1 surround audio content.
LIGHTING
Lighting Settings > Lighting
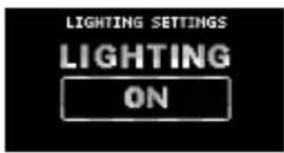
Turn all the LEDs on and off.
Lighting Settings > Modes
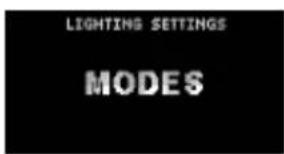
Change RGB LED modes.
REAR SPEAKERS
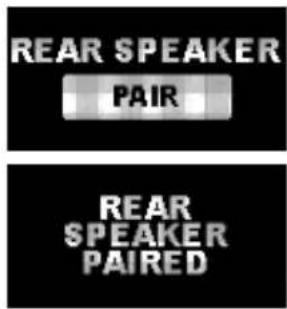
PAIRING
The Rear speakers will be paired by default. If you ever need to re-pair them please follow these instructions:
1 Push the Pairing Button (6) on the back of the Rear Right speaker for 5 seconds. The Rear LED Indicator (10) will blink Green.
2 Using the OLED Control Pod go to System Settings/Rear Speaker/Pair (Press the Enter Button (27))
3 The Rear LED Indicator (10) will become solid green when paired.
REAR SPEAKER LED INDICATOR
Green
Connected
Red
Unpaired
Green blinking Pairing mode

WALL MOUNT
1 Please remove the rear speaker stands by unscrewing the 2 Stand Removal Screws (12) on the bottom of the speakers.
2 Please insert threaded 1/4"-20 mounting hardware into the rear speaker Wall Mount Connectors (5).
ESPÁÑOL
steelseries.com/setup/arena-9
RESUMEN DEL PRODUCTO
ALTAVOCES FRONTALES
请访问:steelseries.com/setup/arena-9
产品概览
前置音箱
請造訪:steelseries.com/setup/arena-9
產品概览
前置音箱
support.steelseries.com 4
support.steelseries.com将通过登录到
STEELSERIES OMOO SAONGJI ZHENG
*steelseries.com/gaming-accessories[here]
[here]
[here]
基本定理
甲奏S形&克三
播ReiHaHaiJiIiIiIiIiIiIiIiIiIiIiIiIiIiIiIiIiIiIiIiIiIiIiIiIiIiIiIiIiIiIiIiIiIiIiIiIiIiIiIiIiIiIiIiIiIi
主明
王 皂 王 皂
载在LED上,或者在LED上贴上。
steelseries.com/setup/arena-9
PRODUKTÜBERSICHT
VORDERE LAUTSPRECHER
support.steelseries.com
IAKET NHCTPYMEHTOB IIA KACTOMN3AUIN 3BYKOBbIX HACTPOEK STEELSERIES
IOnyuHTe MoUHbI naKeT HnCTpyMeHTOB IaKACTOMu3aCn 3ByKOBoBix HaCTpOeK dIa BnptyAlbHOro 06bemHOrO 3ByKa,
HactpoKn 3KBaIaI3epa n MHoroe dpyroe doCTynHO Ha caTte
steelseries.com/setup/arena-9
OB3OP IPOykTA
NEPEHNE KOLOHKn
1 3aДнЯ панель co CBeTOДиОДноупocdCBETKoI
2 Akyctuneckne Ka6eJn dJa KOLOHOK (JeBOI n npaBOi)
3 CBeToDnOdHbI INHdNkATOp
4 Ba3a co CBeToDIOHOH NOcCBETKoI
3ADHNE KOJIOHKN
5Pa3bEmnHaCTeHHoroMOHTaXa
6 Khonka coprajekhen
7 06HOBJIeHHe MnKpOIpOrpaMMHO o6ecneueHn USB-C
8 AyuIOBxOJ IeBOI KOIOHKn
9 BxOД nITaHnIa
10 3aHn CBeToIONoHBi INHnKaTOp
11 K Ka6eJIO npaBOI KOJOnHKn
12 BnHTbI nla NpOCTaBKn
CEHTPAJIbHbI KAHAJ
13 Ka6eI nДЯ KOJIOHOK (JIeBOI n npaBoI)
CA5BByΦEP
14 Pa3bEmblI IJIIOKJIUOHeHnK OJIOHOK (JIeBOI n npaBOI)
15 BxoD USB-C nIa PIK
16 BbIKIyOaTeIb
17 PeryIaTOp rpoMkoCTn ca6ByΦepa
18 BxoD nane nn ynpabneHnOLED
19 OnTnueckn aydnoBxOa
20 Otnueckn npoxoHou aydnopa3bem
21 BxOД ДЯ КОЛОнКИ (цЕТралььно)
22 DOnOpHnHTeJIbHbI BXoD
23 BxoD shHpa nTaHnA
NAHEJIb yNPABJEHnOLED
24 Kka6eIIO ca6ByΦepa
25 AynopazbemIpoKluoyenrnapHNTypbl
26 MHorofoyHKUHOHaJIbHaJ KHONKa (OTKIIuOeHne 3Byka/pepeKIOUaTeIb dIra rapHHTypbl/Ha3aI)
27 KhoNka BbOda
28 3KpaH OLED
29 PeryjTOp ynpabNeHn
KABEJIIN
30 Ka6eJb USB-C-USB-A
31 UHyp nTaHn
32 AanTep nntaHn 3aHne KOnOHKn C BnIKoN, COOTBeTCTByOuSei peHNOHaIbHbIM CTaHdapTaM*
*3anachbte qactn moxho haHTn Ha caTe steeleries.com/gaming-accessories
OCHOBHBIE HACTPOJKN
NEPEHNE KOJOHKNI NAHEJIb YIPABJEHNA
1 PoiKJIouHTe AkyCTnueCKe Ka6eN JI KOLIOHOK (JeBOH n npaBoH) (2) K Pa3beMbl IJIa PoiKJIIOUeHnK OLOHOK (JeBOH n npaBoH) (14) Ha ca6ByΦepe.
2ПОДКЛЮЧИТe Ka6eIиДЯ KОLOHOK (JeBOI
n npaBoi) (13) K BxoI dIy KOIOHKn (cHTpaIbHo) (21) Ha ca6Byohepe.
3 IopKnIouHte K ka6eIIO ca6ByΦepa (24) K BxoJ naHeIy npabLeHnA OLED (18) Ha ca6ByΦepe.
4 ΠоДкнluчиTe Ka6eЛb USB-C - USB-A (30) ot ca6ByΦepa BxOД USB-C nЯ ПК (15) KПК.
5 IopKnHouTe UHp nHTaHnA (31) K BxoD uHypa nHTaHnA (23) ca6Byepea, a 3aTeM K COOTBeTCTByUoIeMy NCTOuHkY pNTaHnA.
3ADHNE KOJIOHKN
6 IopKIOUHTe npnlaeMbI Ka6ebJIeBOI KOLOHKn (c MapKnipOBKOI K Ka6eIIO npaBOI KOLOHKn (11) K AydnoBxOJ NeBOI KOLOHKn (8).
7 PnpcoeHnHTe BnIky, COOTBeTCTByIOuIyOp eRHOHaJIbHbIM CTaHdApTaM, K AanTpep NtAHHa 3aHHeKoLOHKn C BnIKoN, COOTBeTCTByUOSeJ peRHOHaJIbHbIM cTaNdApTaM* (32) INoDknIOuHTe ee K Bxod NtAHHa (9). IOnkNoHTe ceTeBOa aAnTpep K COOTBeTCTByIOuIeMy NCTOuHNKy NtAHHa.
3ABEPUHEHNE HACTPOIKN
8 BkIIOuHTe BbIKIOuHaTeIb (16).
9 BbI6epnTe Arena 9 BA KeueCTBe NcToUHnKa BocnpOn3BedeHnO6bEmHOro 3Byka 5.1.
Bolene noipno6Hyu nHΦopMaunO npodykTe moKHO haTn Ha caTse steelseries.com/setup/
arena-9
dONOHHTeIbHbIe BAPNAHTbl NOKJIouEHHy YEPE3 BLUETOOTH
IcnoJIb3OBAHHe nAHeJynpaBJeHnA OLED.BbI6epnte IAPAMETPbICNCTEMbl | BLUETOOTH|COIPRAJKEHNE dJa coipraKeHnC Bluetooth-ycTpoiCTBOM. 06paTne BHNMaHHe:3ByK,pepeDaBaEmbl uepe3Bluetooth,6ydt CMeuBaTBcA c DpyrMMN NCTOCHNKaMn.CBeToDnOHDhIN HdNKaTop (3)3aTOpNTc CNHM.
AUYINOPA3bEM IJIYIIOKJIIOUeyHnRA TAPHHTyPbI
IopKnIOHTe aydnoKa6ebI rapHnTpybl
K Aynpa3bem nla nockluoyenra
rarpHnTpybl (25) naheN ynpabLeHnA OLED. 3Byk B KOLOHKax aBTOMaTneCKn OTKIOUaETcra N BKIOUaETcra 3ByK B raphNtpe.
YTo6bI BerHyTB 3ByK KOLOHOK,HaKMnTe
MHorOphiYNkuOnHaJIbHaN Ka
(OTKIOUeHne 3Byka/NepeKluOaTeJb
Ira raphNtpybl/Ha3ad) (26) Ha naHeiynpaBleHn OLED.Arena 9 noDepKnaBaet
ncNoIb3OBaHne MmKpOfoHa OT npoBOHOI raphNtpybl.Y6eINTEcb,yTo Arena 9 Bbl6paHa
B KaueCTBe 3aNNCbIBaIOUeRo yCTpoNCTBa B Windows.
IIOIDEPKKA PLAYSTATION
06paTHe BHMaHne:PlayStation 6yJeT BOCPOn3BOAnTb TOJbKO cTepeo 2.1, Ho He o6bemHbI 3ByK 5.1, Ypee3 USB n onTnueckne
coeHHeHn. YTo6bI nCNoB3OBA Tb BCE mHeuHecra KoloHKn dJa PlayStation, nCnoB3yInTe fynKcNIO 5.1 Upmix.
DONOHINbHbI AYNOXBOD
IoiKIOUHTe ayINOka6eJIb 3,5 MM OT ayIOuOCTpoiCTBa K OOnOHNTeHbHbI BXoD (22) Ha ca6Byfepe Arena 9.
06paTne BnHMaHHe: 3ByK, nepeJaBaembIypee3doONHHTeBHy aynOBXoD, 6yTeCmeWNBaTbCdpyrHMN NCTOCHKaMn.
ONTNUCHEKNI AYINOBXOJ
IopKnIOUHTe ONTNUeCKn Ka6ebb Toslink (He BXoJNT B KOMnJIeKT)OT BaJero ayNoOyCTpOuCTBa K ONTNUeCKn ayDnOBxOa19Ha ca6Bypepe.
ONTNUeCKN PPOXODHOy AUYNOBbIXOJ
IopKnIOHTe BTOPOI ONTNUeCKn Ka6eB Toslink (He BXoNT B KOMNKeT)OT OnTneckn npoxOHO ayOpa3bem (20) ca6ByΦepa KdpyROMy aynOocToPcTBy. BpeKmE raphNtpybIO nTNUeCKn 3Byk 6ydet nepeDaBaTbcra Ha NpOKJIooHoe ayNooyCTpoiCTBO.
OPRAhblyYPABJIeHnA
PEYIATOP HA PAHEEN YPABJEHNA
NobepHnTe PeryIaTOp ynpabLeHnna (29) BnpaBO,TO6bIyBENuHTb rPOMKocTB,INN
BNeBO, yTo6bl yMeHbIuNTb rPOMKoCTb.
KHONKHA HANAEJIN YNPABJEHNA
KhonkaФункця
KpacbI ConpJxKeHne pa3OpBaHo
Miraet3eJeHbIM Pekim cnpjKeHH
HACTEHHbIMOHTAK
1 CHNIMnte NOCTaBKN 3aHnX KOJHOK, OTBnHTnB 2 BnHTbI nOcTaNk (12), paCNOJIOKeHHbIX CN3y KONOHOK.
2 BCTaBbTe KpeIeKHbIe DeTaJIc c pe3b6oJ 1/4"-20"В Pa3bEm IЯ HAcTeHHORO MOHTaJa (5) 3aДнeK OJOLHKn.
Caisson de basse
steelseries.com/setup/arena-9
APERCU DU PRODUIT
HAUT-PARLEURS AVANT
visitando steelseries.com/setup/arena-9
PANORAMICA SUL PRODOTTO
ALTOPARLANTI ANTERIORI
VOLUME DEL SUBWOOFER
Europe - EU Declaration of Conformity
Hereby, SteelSeries ApS. declares that the equipment which is compliance with directive RoHS 2.0 (2015/863/EU), R.E.D (2014/53/EU), EMC Directive (2014/30/EU), and LVD (2014/35/EU) which are issued by the Commission of the European Community.
The full text of the EU declaration of conformity is available at the following internet address: https://steelseries.com/SteelSeries ApS. hereby confirms, to date, based on the feedback from our suppliers indicates that our products shipping to the EU territory comply with REACH (Registration, Evaluation, Authorization, and Restriction of Chemicals - (EC) 1907/2006) compliance program. We are fully committed to offering REACH compliance on the products and posting accurate REACH compliance status for the all of products.
Frequency bands and Powers
a. Frequency band(s) in which the radio equipment operates: 2.400 - 2.4835 GHz
b. Maximum radio-frequency power transmitted in the frequency band(s) in which the radio equipment operates:
EIRP: n/4-DQPSK: 7.78 dBm (Subwoofer)
EIRP: GFSK: 9.57 dBm (Subwoofer)
EIRP: n/4-DQPSK: 9.32 dBm (SR Speaker)
c. Firmware Version: V1.5.9 (Subwoofer); V1.2.7 (SR Speaker)
WARNING
To prevent the spread of fire, keep candles or other open flames away from this product at all times.
WEEE
This product must not be disposed of with your other household waste or treat them in compliance with the local regulations or contact your local city office, your household waste disposal service or the shop where you purchased the product.

Federal Communication Commission Interference Statement
This device complies with Part 15 of the FCC Rules. Operation is subject to the following two conditions: (1) This device may not cause harmful interference, and (2) this device must accept any interference received, including interference that may cause undesired operation.
This equipment has been tested and found to comply with the limits for a Class B digital device, pursuant to Part 15 of the FCC Rules. These limits are designed to provide reasonable protection against harmful interference in a residential installation. This equipment generates, uses and can radiate radio frequency energy and, if not installed and used in accordance with the instructions, may cause harmful interference to radio communications. However, there is no guarantee that interference will not occur in a particular installation. If this equipment does cause harmful interference to radio or television reception, which can be determined by turning the equipment off and on, the user is encouraged to try to correct the interference by one of the following measures:
Reorient or relocate the receiving antenna.
- Increase the separation between the equipment and receiver.
- Connect the equipment into an outlet on a circuit different from that to which the receiver is connected.
- Consult the dealer or an experienced radio/TV technician for help.
FCC Caution:
Any changes or modifications not expressly approved by the party responsible for compliance could void the user's authority to operate this equipment.
This transmitter must not be co-located or operating in conjunction with any other antenna or transmitter.
Radiation Exposure Statement:
This equipment complies with FCC radiation exposure limits set forth for an uncontrolled environment. This equipment should be installed and operated with minimum distance 5cm between the radiator & your body.
FCC ID: ZHK-SP00003
FCC ID: ZHK-SP00003SR
| Regions Contact Information | ||
| USA SteelSeries ApS., 656 W Randolph St., Suite 3E, Chicago, IL 60661, USA +1 312 258 9467 | ||
More information and support from https://steeleries.com/
IMPORTANT SAFETY INSTRUCTIONS
- READ these instructions.
- KEEP these instructions.
- HEED all warnings.
-
FOLLOW all instructions.
-
DO NOT use this apparatus near water.
- CLEAN ONLY with dry cloth.
- DO NOT block any ventilation openings. Allow sufficient distances for adequate ventilation and install in accordance with the manufacturer's instructions.
- DO NOT install near any heat sources such as open flames, radiators, heat registers, stoves, or other apparatus (including amplifiers) that produce heat. Do not place any open flame sources on the product.
- DO NOT defeat the safety purpose of the polarized or grounding type plug. A polarized plug has two blades with one wider than the other. A grounding type plug has two blades and a third grounding prong. The wider blade or the third prong are provided for your safety. If the provided plug does not fit into your outlet, consult an electrician for replacement of the obsolete outlet.
- PROTECT the power cord from being walked on or pinched, particularly at plugs, convenience receptacles, and the point where they exit from the apparatus.
- ONLY USE attachments/accessories specified by the manufacturer.
- USE only with a cart, stand, tripod, bracket, or table specified by the manufacturer, or sold with the apparatus. When a cart is used, use caution when moving the cart/apparatus combination to avoid injury from tip-over.

- UNPLUG this apparatus during lightning storms or when unused for long periods of time.
- REFER all servicing to qualified service personnel. Servicing is required when the apparatus has been damaged in any way, such as power supply cord or plug is damaged, liquid has been spilled or objects have fallen into the apparatus, the apparatus has been exposed to rain or moisture, does not operate normally, or has been dropped.
- DO NOT expose the apparatus to dripping and splashing. DO NOT put objects filled with liquids, such as vases, on the apparatus.
- The MAINS plug or an appliance coupler shall remain readily operable.
- The airborne noise of the Apparatus does not exceed 70dB (A).
- Operate this product within its specified operating temperature range 0 to +40^ .
- To reduce the risk of fire or electric shock, do not expose this apparatus to rain or moisture.
- Do not attempt to modify this product. Doing so could result in personal injury and/or product failure.
| A | This lightning flash with arrowhead symbol within an equilateral triangle is intended to alert the user to the presence of uninsulated dangerous voltage within the product's enclosure that may be of sufficient magnitude to constitute a risk of electric shock to persons. |
| ! | The exclamation point within an equilateral triangle is intended to alert the user to the presence of important operating and maintenance (servicing) instructions in the literature accompanying the product. |
WARNING: Voltages in this equipment are hazardous to life. No user serviceable parts inside. Refer all servicing to qualified service personnel. The safety certifications do not apply when the operating voltage is changed from the factory setting.
Apparatus shall not be exposed to dripping or splashing and no objects filled with liquids, such as vases, shall be placed on the apparatus."
Industry Canada Statement:
This device complies with Industry Canada license-exempt RSS standard(s). Operation is subject to the following two conditions:
- This device may not cause interference, and
- This device must accept any interference, including interference that may cause undesired operation of the device.
This Class B digital apparatus complies with Canadian ICES-003.
This device and its antenna(s) must not be co-located or operating in conjunction with any other antenna or transmitter, except tested built-in radios.
The County Code Selection feature is disabled for products marketed in the US/ Canada.
This equipment complies with IC RSS-102 radiation exposure limit set forth for an uncontrolled environment. This equipment should be installed and operated with minimum distance 5 cm between the radiator and your body.
These servicing instructions are for use by qualified service personnel only. To reduce the risk of electric shock, do not perform any servicing other than that contained in the operating instructions unless you are qualified to do so."
"The mains plug or appliance coupler is used as the disconnect device, the disconnect device shall remain readily operable." or equivalent.
More information and support at steelseries.com
Product Name (產品名稱/产品名称): 5.1 Wireless Speaker System (5.1 譽道無線環繞音箱系統/5.1 声道无线环绕音箱系统)
Model No.(型號/型号): SP-00003
Rated(規格/規格):100-240V 50/60Hz,200W
EMC Directives 2014/30/EU and Low Voltage
Directives 2014/35/EU Compliance. (European)
Commission)

FCC Compliance. (USA Approval)

Alternating Current

learn more at steelseries.com