ROG Kunai 3 - Controller ASUS - Free user manual and instructions
Find the device manual for free ROG Kunai 3 ASUS in PDF.
| Product type | Game controller |
| Brand | ASUS |
| Model | ROG Kunai 3 |
| Dimensions (portable mode) | 260.7 x 106.3 x 37.9 mm |
| Dimensions (all-in-one controller mode) | 154.75 x 110.25 x 66.8 mm |
| Dimensions (mobility mode) | 117.2 x 106.3 x 40.9 mm |
| Weight (portable mode) | 136 g |
| Weight (all-in-one controller mode) | 198.8 g |
| Weight (mobility mode) | 135 g |
| Connections | Wired USB Type-C, Bluetooth v4.2 |
| Battery | At least 6 hours of battery life in Bluetooth mode |
| Buttons | A, B, X, Y; D-Pad; Left and right joysticks with push button; RB, LB; RT, LT (analog); M1, M2; 4 shortcut buttons |
| Aura lighting | Static, breathing, color cycle, strobe (wired mode) |
| Package contents | 1 controller, 1 USB-C to USB-A cable, 1 protective pouch, 1 manual, 1 warranty card |
| Usage modes | Portable (with ROG phone cradle), Mobility (on charger), All-in-one (charger + grip) |
| Operating temperature | 5°C to 35°C |
| Power supply | Recharge via USB-C (power adapter not included) |
| Safety - Battery | Non-removable, do not attempt to remove (voids warranty) |
| Safety - Usage | Do not immerse in water, do not short-circuit, do not throw into fire |
| Maintenance | Wipe with a soft dry cloth. Do not use abrasive products. |
| Warranty | Warranty card included (refer to ASUS warranty terms) |
Frequently Asked Questions - ROG Kunai 3 ASUS
User questions about ROG Kunai 3 ASUS
0 question about this device. Answer the ones you know or ask your own.
Ask a new question about this device
Download the instructions for your Controller in PDF format for free! Find your manual ROG Kunai 3 - ASUS and take your electronic device back in hand. On this page are published all the documents necessary for the use of your device. ROG Kunai 3 by ASUS.
USER MANUAL ROG Kunai 3 ASUS
ROG Phone Accessory (ROG Kunai 3 Gamepad)
Model: ZS661KSCL
Contents
English....3
简体中文....14
繁體中文 25
Français 36
Deutsch......47
Italiano ....58
Русский....69
日本語 80
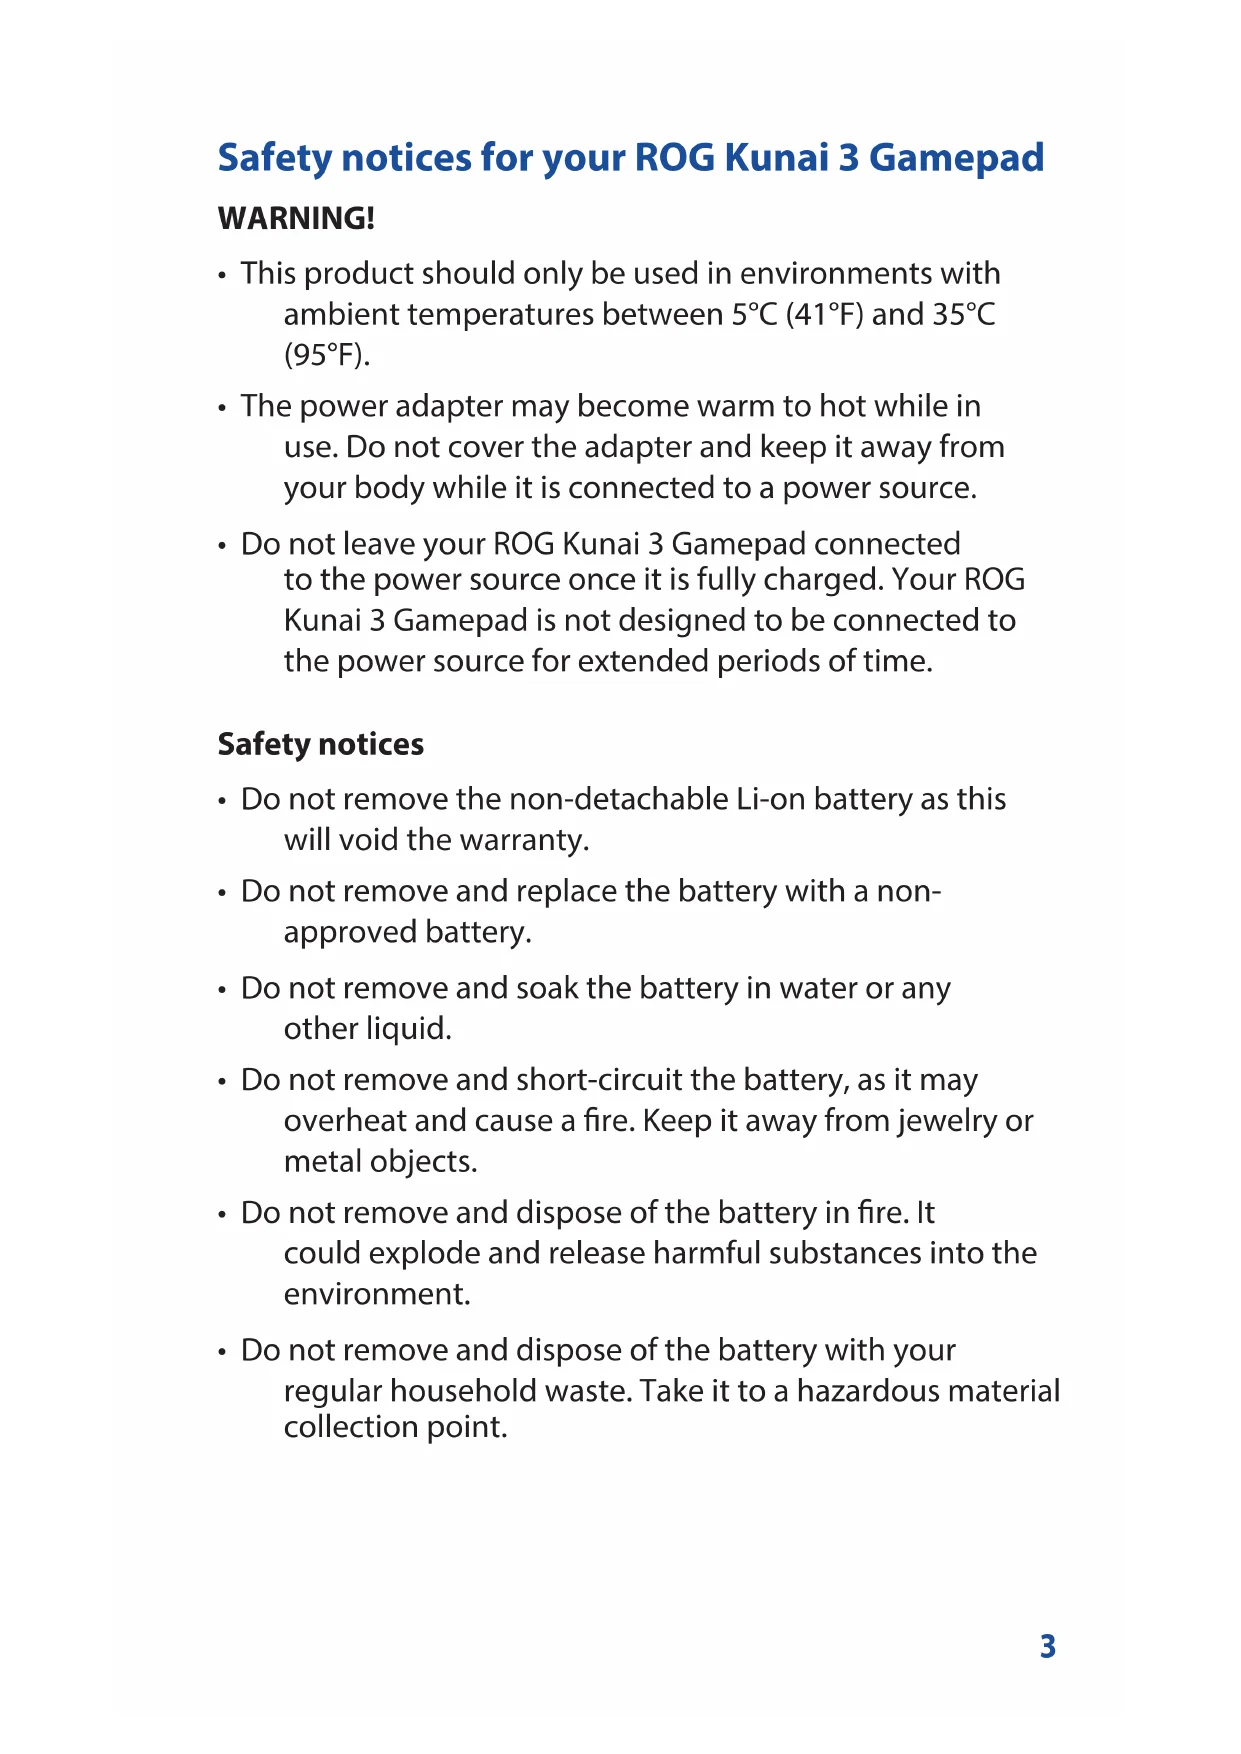
Safety notices for your ROG Kunai 3 Gamepad
WARNING!
- This product should only be used in environments with ambient temperatures between 5°C (41°F) and 35°C (95°F).
- The power adapter may become warm to hot while in use. Do not cover the adapter and keep it away from your body while it is connected to a power source.
- Do not leave your ROG Kunai 3 Gamepad connected to the power source once it is fully charged. Your ROG Kunai 3 Gamepad is not designed to be connected to the power source for extended periods of time.
Safety notices
- Do not remove the non-detachable Li-on battery as this will void the warranty.
- Do not remove and replace the battery with a non-approved battery.
- Do not remove and soak the battery in water or any other liquid.
- Do not remove and short-circuit the battery, as it may overheat and cause a fire. Keep it away from jewelry or metal objects.
- Do not remove and dispose of the battery in fire. It could explode and release harmful substances into the environment.
- Do not remove and dispose of the battery with your regular household waste. Take it to a hazardous material collection point.
Specifications summary
| Product name ROG Kunai 3 Gamepad | |
| Model name ZS661KSCL | |
| Dimensions | Handheld Mode:260.7 x 106.3 x 37.9mm |
| Gamepad Mode (All-in-One):154.75 x 110.25 x 66.8mm | |
| Gamepad Mode (Mobility):117.2 x 106.3 x 40.9mm | |
| Weight | Handheld Mode: 136g |
| Gamepad Mode (All-in-One): 198.8g | |
| Gamepad Mode (Mobility): 135g | |
| Connection | Wired USB Type-C |
| Wireless Bluetooth v4.2 | |
| Battery At least 6 hours in Bluetooth mode | |
| Control buttons | A,B,X and Y buttons; D-padLeft joystick with a push-buttonRight joystick with a push-buttonRB, LB; RT, LT (Analog input)M1, M2; 4 x Shortcut keys |
| Light indicators | Status indicator / Charging indicator |
| Aura lighting | Static/ Breathing/ Color Cycle/ Strobing (in the wired connection mode) |
| Package contents | 1 x ROG Kunai 3 Gamepad1 x Type-C to USB A cable1 x Protective pouch1 x User guide1 x Warranty card |
Product overview
ROG Kunai 3 Gamepad is portable, providing you with both an indoor and outdoor gaming experience. To achieve this goal, we have modularized the Gamepad, and integrated the ROG series of accessories to fulfill different using scenarios.
 ROG Kunai 3 controllers ROG Kunai 3 controllers | The ROG Kunai 3 controllers have basic action buttons and can be applied on either the ROG Kunai 3 charger or the ROG Kunai 3 bumper. |
 ROG Kunai 3 charger ROG Kunai 3 charger | The ROG Kunai 3 charger charges the battery in the ROG Kunai 3 controller. |
 ROG Kunai 3 bumper ROG Kunai 3 bumper | A ROG Phone 3 proprietary bumper, which provides a wired connection between the mobile and ROG Kunai 3 controllers to achieve nearly zero latency. |
 ROG Kunai 3 grip ROG Kunai 3 grip | The ROG Kunai 3 grip, improves the ergonomic feeling, allowing you to play longer without soreness. |
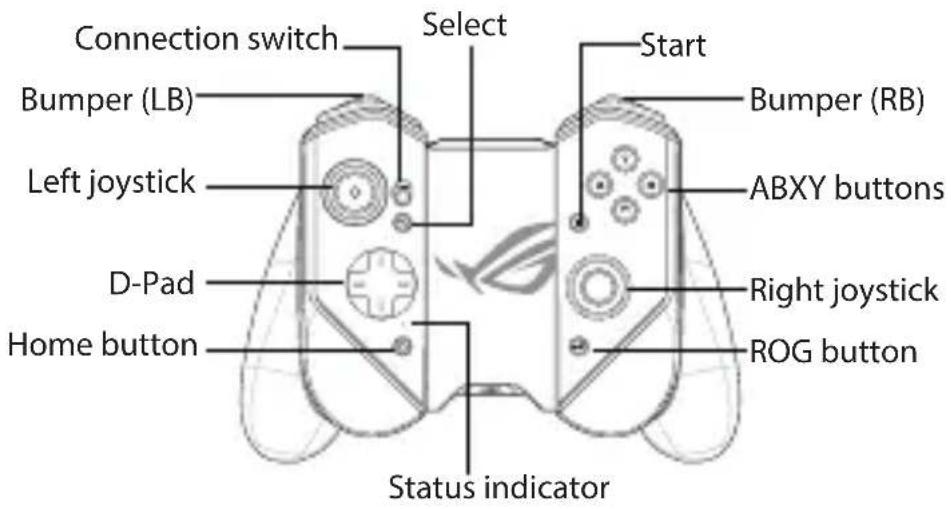
Hardware features Front view
text_image
Connection switch Bumper (LB) Left joystick D-Pad Home button Select Start Bumper (RB) ABXY buttons Right joystick ROG button Status indicatorRear view
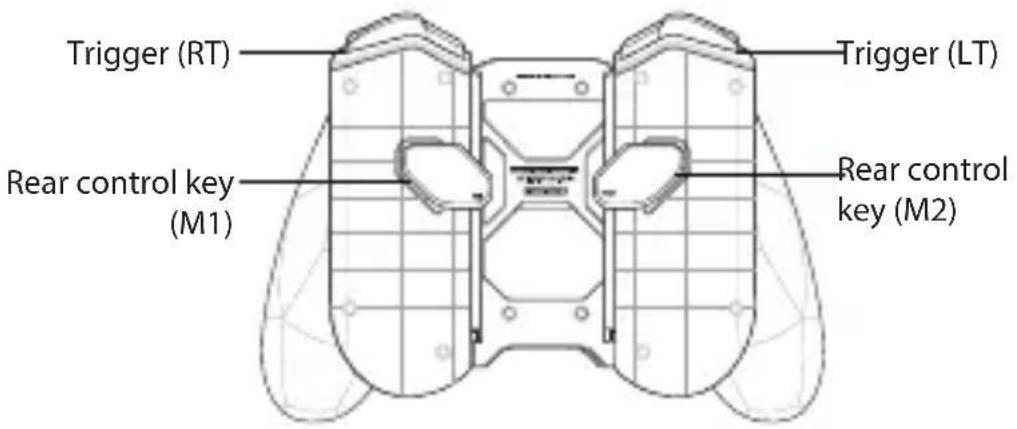
text_image
Trigger (RT) Trigger (LT) Rear control key (M1) Rear control key (M2)Top view
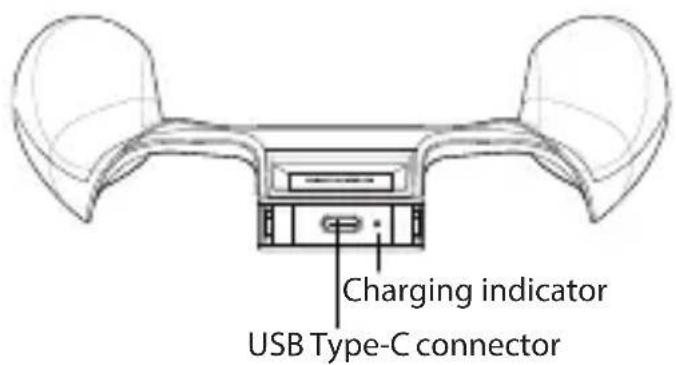
text_image
Charging indicator USB Type-C connectorDevice charging
To charge your ROG Kunai 3 Gamepad:
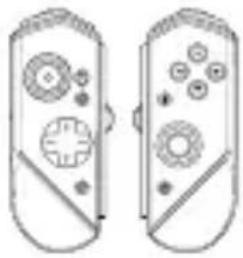
- Slide down the ROG Kunai 3 controllers onto the ROG Kunai 3 charger.
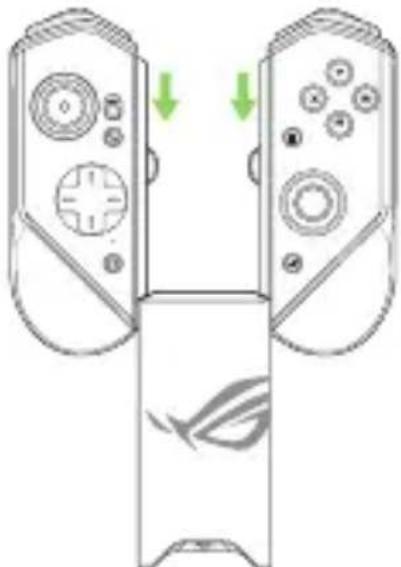
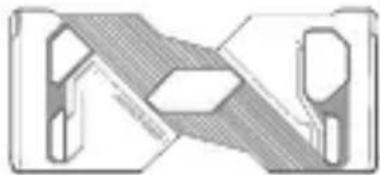
natural_image
Diagram of two remote control devices with directional arrows indicating movement or change (no text or symbols present)- Connect the USB cable to your Gamepad and a power adapter.
NOTE: The charging indicator turns solid white when the charger charges your Gamepad.
Device installation
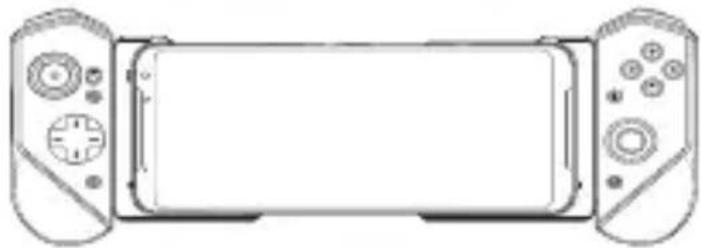
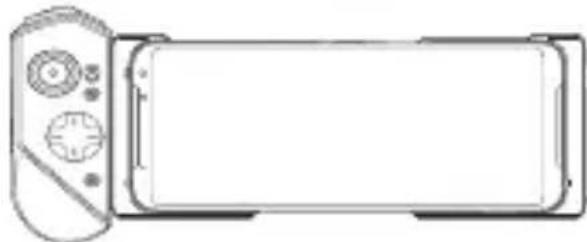
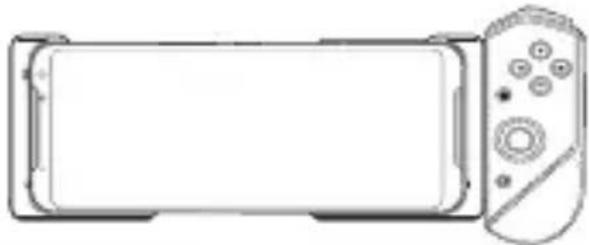
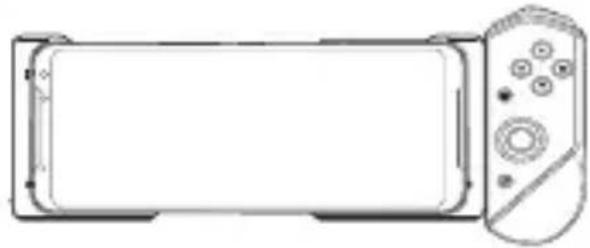
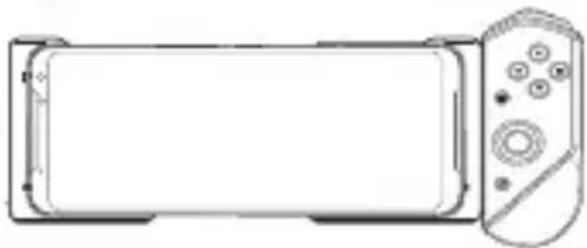
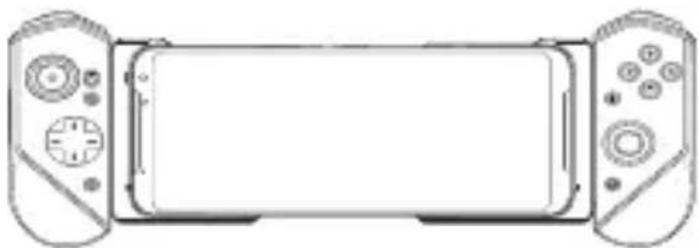
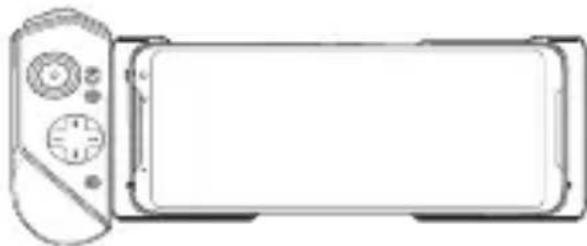
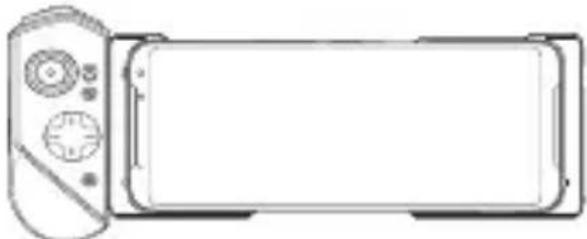
A. Handheld Mode
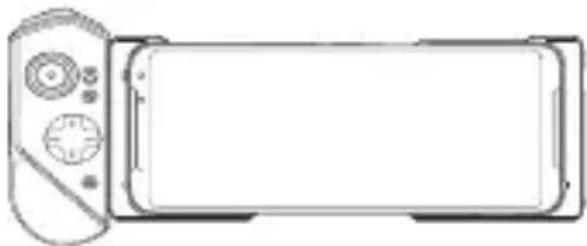
- Place your ROG Phone 3 into the ROG Kunai 3 bumper.
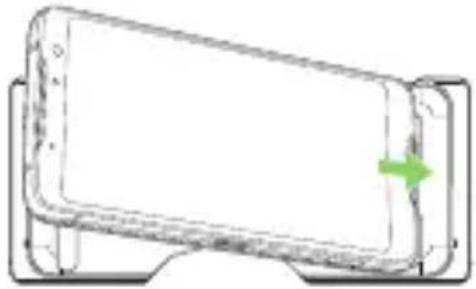
natural_image
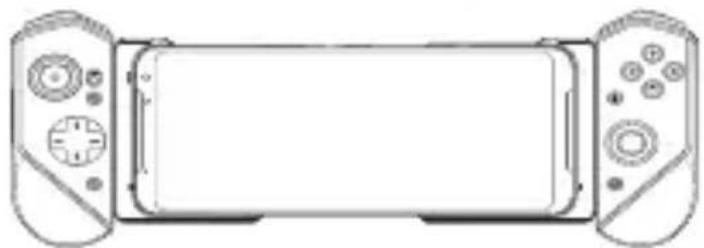
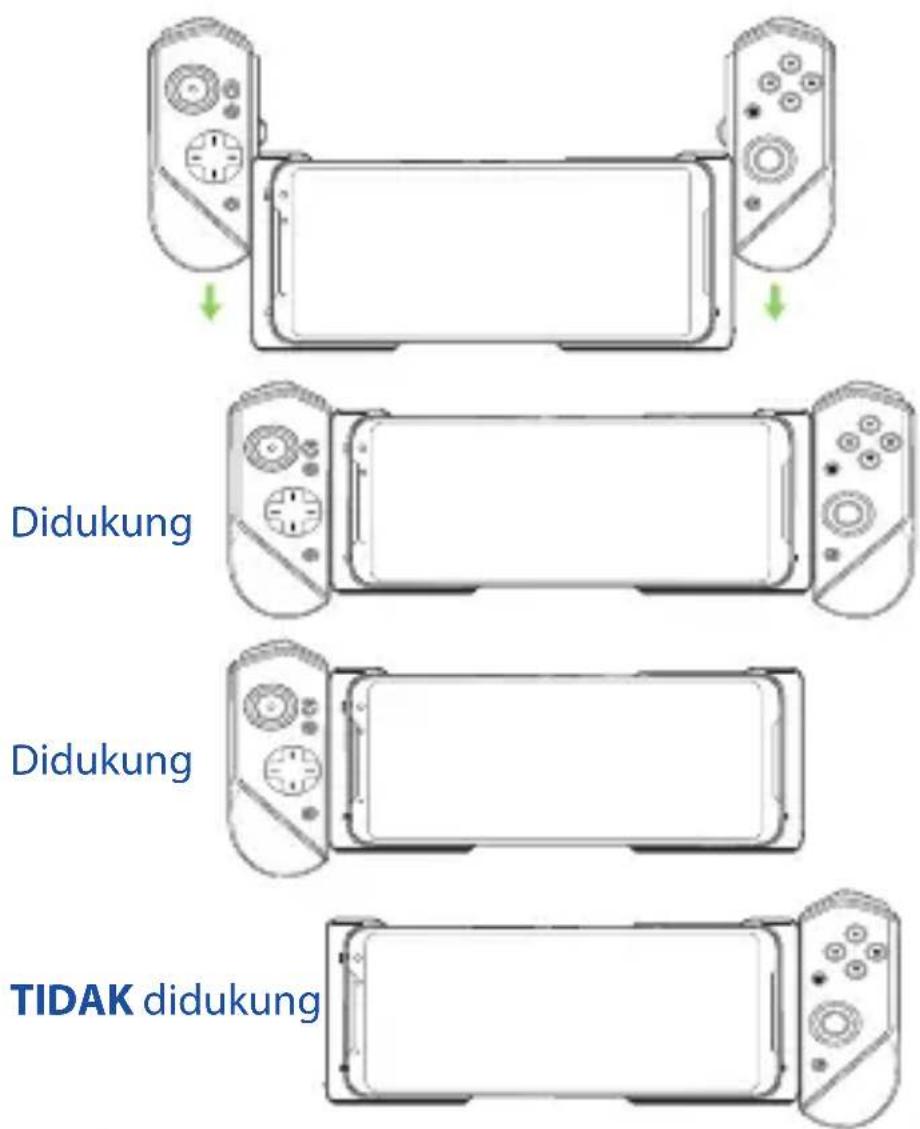
Line drawing of a smartphone with a green arrow indicating the front portion (no text or symbols)- Slide down the ROG Kunai 3 controllers onto the ROG Kunai 3 bumper.

text_image
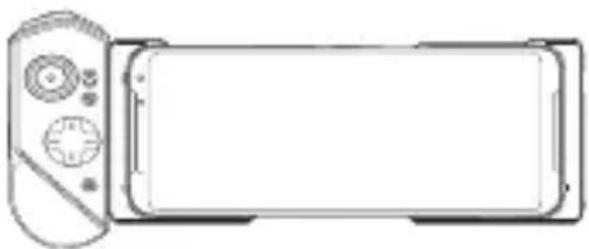
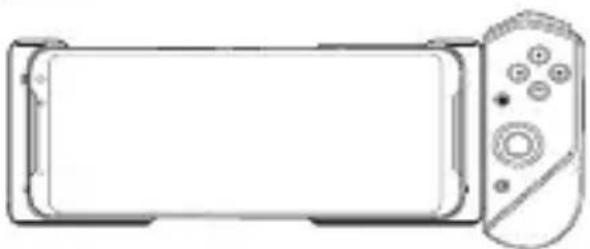
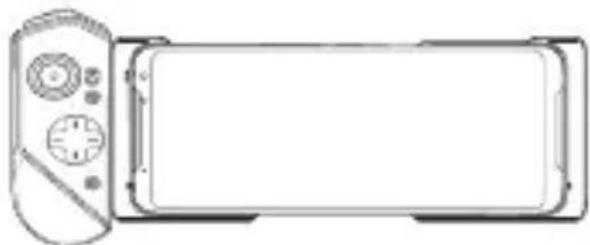
Supported Supported NOT supportedNOTE: We recommend that you use USB connection for Handheld Mode.
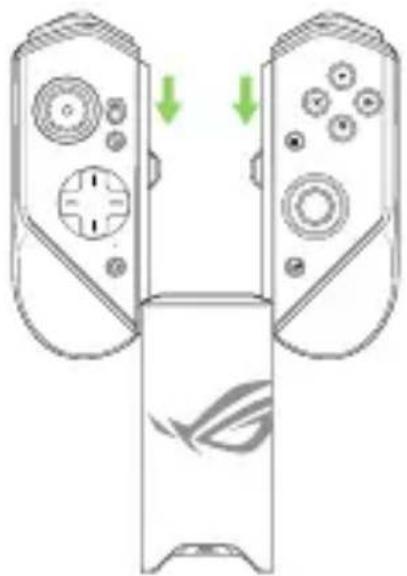
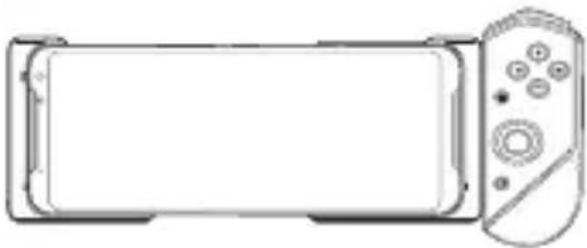
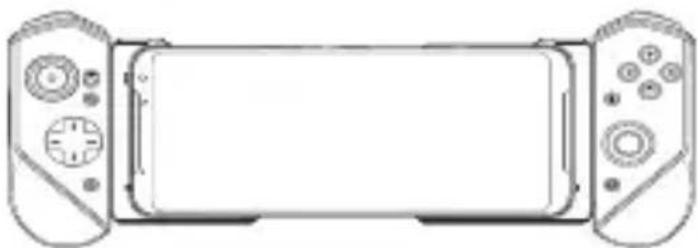
B. Gamepad Mode (Mobility)
- Slide down the ROG Kunai 3 controllers onto the ROG Kunai 3 charger.
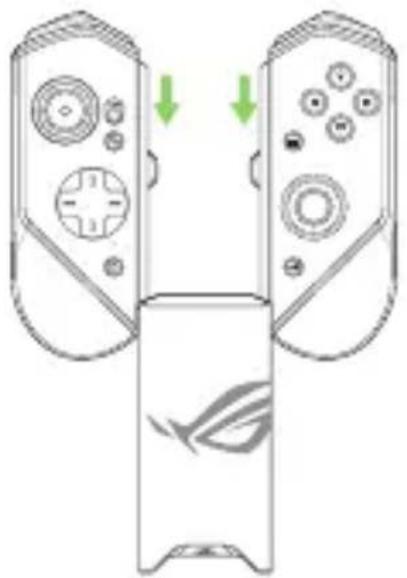
natural_image
Diagram of two remote control devices with directional arrows indicating movement or change (no text or symbols present)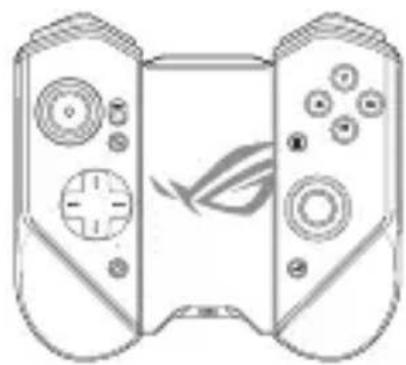
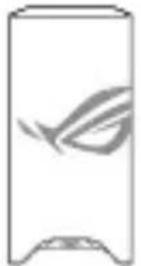
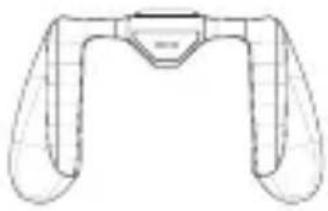
natural_image
Line drawing of a dual-stage game controller with controllers and a stylized bird logo (no text or symbols)NOTE: Refer to the Frequently Asked Questions (FAQs) section for the details on Bluetooth pairing.
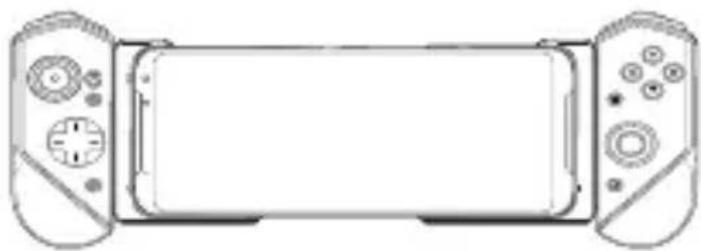
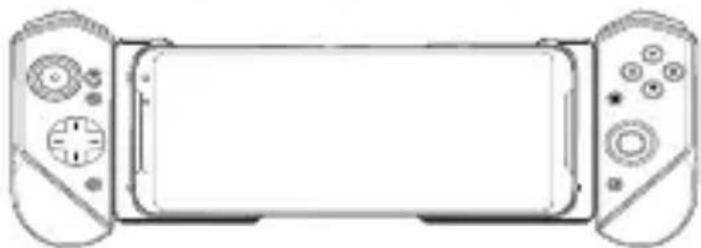
C. Gamepad Mode (All-in-One)
- Slide down the ROG Kunai 3 controllers onto the ROG Kunai 3 charger.
natural_image
Diagram of two remote control devices with directional arrows indicating movement or change (no text or symbols present)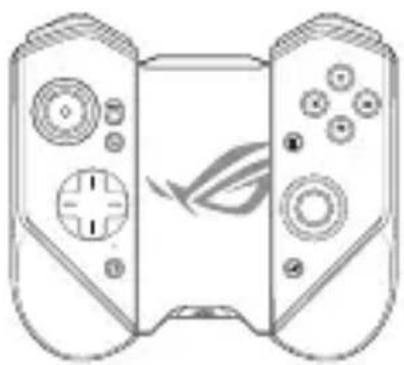
natural_image
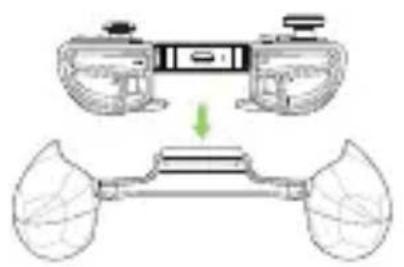
Line drawing of two identical gaming controllers with control knobs and buttons (no text or symbols)- Put the ROG Kunai 3 charger into the ROG Kunai 3 grip, and gently push down the charger until you hear a click.
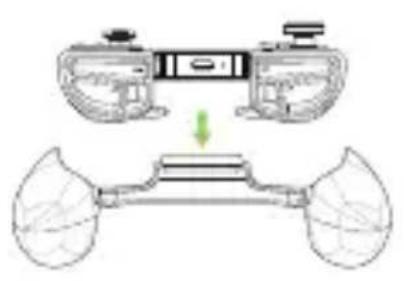
natural_image
Diagram showing a vehicle chassis with two motors and a lower body frame, no text or symbols present.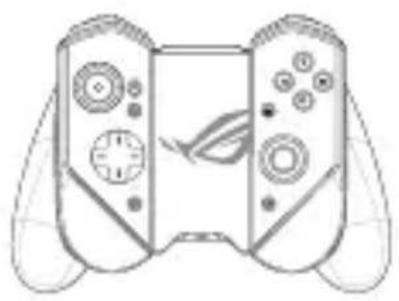
natural_image
Line drawing of a handheld game controller with multiple controllers and a stylus (no text or symbols)NOTE: Refer to the Frequently Asked Questions (FAQs) section for the details on Bluetooth pairing.
LED indicators
Charging indicator
| LED status Indications | |
| Solid white Charging | |
| Off Not charging |
Status indicator (USB Mode/Bluetooth Mode)
| LED status | Indications | |
| Controller status Remark | ||
| Blinking blue rapidly | Waiting for pairing | N/A |
| Blinking blue slowly | Waiting for auto pairing | N/A |
| Solid red Connected/Paired | Battery level: 0% - 25% | |
| Solid yellow Connected/Paired | Battery level: 25% - 90% | |
| Solid green Connected/Paired | Battery level: 90% -100% | |
| Off Off N/A | ||
Frequently Asked Questions (FAQs)
Q1: How to pair my ROG Kunai 3 Gamepad with my ROG Phone for the first time?
A1: 1. Move the connection switch on the left controller to Bluetooth.
2. Press the Home button on your Gamepad once to power it on. The status indicator blinks blue slowly.
3. Press and hold the Home button on your Gamepad for 3\~5 seconds then release it. The status indicator blinks blue rapidly indicating that the Gamepad is ready for pairing.
4. Turn on Bluetooth on your ROG Phone and search for Bluetooth devices.
5. Tap ROG Kunai 3 Gamepad in the list of available devices to pair it with your phone.
NOTE: If your ROG Kunai 3 Gamepad turns off before pairing with your phone successfully, repeat steps 2\~5.
Q2: How to pair my ROG Kunai 3 Gamepad with my previously paired ROG Phone?
A2: Press the Home button on your Gamepad once to power it on. The Gamepad will automatically pair with your previously paired phone.
Q3: How to turn off my ROG Kunai 3 Gamepad?
A3: • In the Bluetooth mode, press the Home button on your Gamepad for around 10 seconds until the status indicator turns off.
- In the USB mode, physically disconnect your Gamepad from your phone. The status indicator turns off.
双控手柄 3 全配版安全注意事项
警告!
natural_image
Diagram of two remote control devices with directional arrows indicating movement or change (no text or symbols present)natural_image
Line drawing of a smartphone with a green arrow indicating the left side (no text or symbols present)natural_image
Diagram of a gaming controller with two controllers and a screen, showing directional arrows (no text or symbols)支持
natural_image
Line drawing of a mobile game controller with front and back controllers (no text or symbols)支持
natural_image
Line drawing of a flat-screen remote control unit (no text or symbols)不支持
natural_image
Line drawing of a mobile phone with front panel and right-side control knob (no text or symbols)natural_image
Two identical game controllers shown in side-by-side diagrams, one with green arrows indicating motion or change, the other with a fish design (no text or symbols)natural_image
Two identical remote control devices shown in line drawings, one with green arrows indicating left-hand side and the other with fish design (no text or symbols)natural_image
Diagram of a handheld device with two wheels and a central body, showing no text or symbols.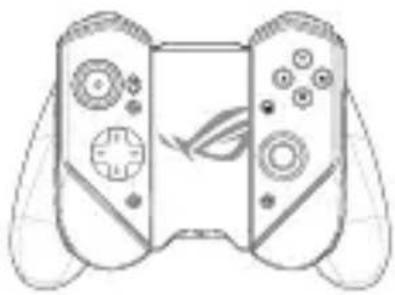
natural_image
Line drawing of a handheld game controller with multiple controllers and a stylized leaf (no text or symbols)natural_image
Diagram of two remote control devices with directional arrows indicating movement or change (no text or symbols present)natural_image
Line drawing of a smartphone with a green arrow indicating the right side (no text or symbols)natural_image
Diagram of two remote control devices with directional arrows indicating movement or change (no text or symbols present)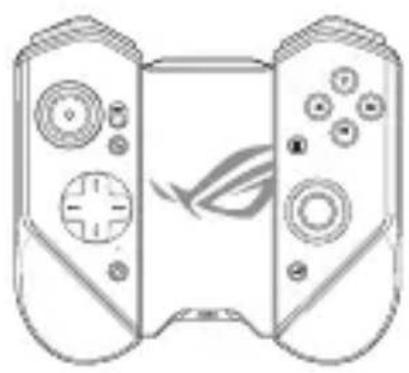
natural_image
Line drawing of a dual-stage game controller with multiple controllers and a stylized 'G' logo (no text or symbols)natural_image
Diagram of two remote control devices with directional arrows indicating movement or change (no text or symbols present)
natural_image
Line drawing of a two-stage game controller with controllers and a stylized bird graphic (no text or symbols)natural_image
Diagram showing a vehicle chassis with two motors and a lower body frame, no text or symbols present.
natural_image
Line drawing of a handheld game controller with multiple controllers and a stylus (no text or symbols)natural_image
Diagram of two remote control devices with directional arrows indicating movement or change (no text or symbols present)natural_image
Line drawing of a smartphone with a green arrow pointing to the side panel (no text or symbols)natural_image
Diagram of two gaming controllers with directional arrows indicating movement or control (no text or symbols)Pris en charge
natural_image
Line drawing of a gaming controller with two controllers and a central screen (no text or symbols)Pris en charge
natural_image
Line drawing of a flat-screen device with control panel and screen (no text or symbols)NON pris en charge
natural_image
Line drawing of a rectangular device with a remote control panel on the right side (no text or symbols)natural_image
Diagram showing a device with two arms and a central body, connected by a green arrow (no text or symbols present)
natural_image
Line drawing of a handheld game controller with multiple controllers and a leaf symbol on the front panel (no text or symbols present)natural_image
Diagram of two remote control devices with directional arrows indicating movement or change (no text or symbols present)natural_image
Line drawing of a smartphone with a green arrow pointing to the side panel (no text or symbols)natural_image
Diagram of a gaming device with two controllers and a screen, showing directional arrows (no text or symbols)Unterstützt
natural_image
Line drawing of a gaming controller with two controllers and a blank screen (no text or symbols)Unterstützt
natural_image
Line drawing of a rectangular device with control knobs and a front panel, no text or symbols presentNicht unterstützt
natural_image
Line drawing of a rectangular device with a remote control (no text or symbols)natural_image
Diagram of two remote control devices with one showing a stylized fish design and the other with green arrows indicating direction (no text or symbols)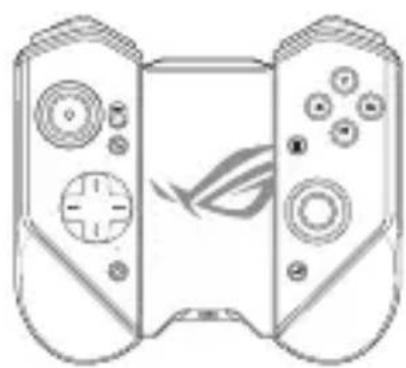
natural_image
Line drawing of a dual-stage game controller with multiple controllers and a stylized 'G' logo (no text or symbols)natural_image
Diagram of two remote control devices with directional arrows indicating movement or change (no text or symbols present)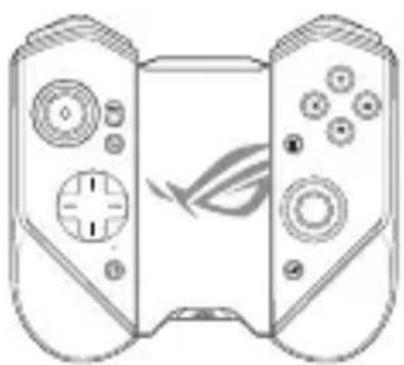
natural_image
Line drawing of two identical handheld gaming controllers with control knobs and buttons (no text or symbols)natural_image
Diagram showing a device with two wheels and a top-mounted device, no text or symbols present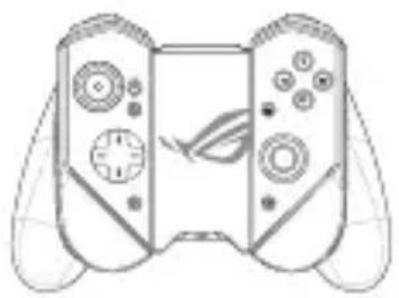
natural_image
Line drawing of a handheld game controller with multiple controllers and a stylus (no text or symbols)natural_image
Diagram of two remote control devices with directional arrows indicating movement or change (no text or symbols present)natural_image
Line drawing of a smartphone with a green arrow pointing to the side panel (no text or symbols)natural_image
Diagram showing a device with two arms and a leafy base, no text or symbols present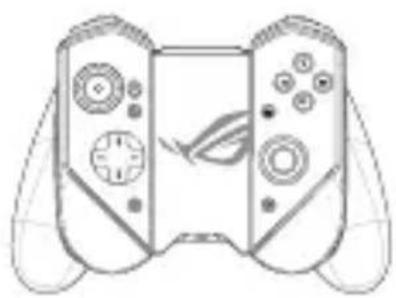
natural_image
Line drawing of a handheld game controller with multiple controllers and a stylized face (no text or symbols)natural_image
Diagram of two remote control devices with directional arrows indicating movement or change (no text or symbols present)natural_image
Line drawing of a smartphone with a green arrow pointing to the side panel (no text or symbols)natural_image
Diagram of a gaming controller with two controllers and a screen, showing directional arrows (no text or symbols)Поддерживается

natural_image
Line drawing of a handheld gaming controller with front and back buttons (no text or symbols)Поддерживается

natural_image
Line drawing of a rectangular device with control knobs and a front panel, no text or symbols presentНе поддерживается
natural_image
Line drawing of a rectangular device with a remote control panel on the right side (no text or symbols)natural_image
Diagram of two remote control devices with directional arrows indicating movement or change (no text or symbols present)
natural_image
Line drawing of a dual-stage game controller with controllers and a stylized 'Blue' logo (no text or symbols)natural_image
Diagram of two remote control devices with directional arrows indicating movement or change (no text or symbols present)
natural_image
Line drawing of two identical gaming controllers with control knobs and buttons (no text or symbols)natural_image
Diagram showing a vehicle chassis with two motors and a lower body frame, no text or symbols present.
natural_image
Line drawing of a handheld game controller with multiple controllers and a stylus (no text or symbols)natural_image
Diagram of two remote control devices with directional arrows indicating movement or change (no text or symbols present)natural_image
Line drawing of a smartphone with a green arrow indicating the left side (no text or symbols present)natural_image
Two identical line drawings of a handheld gaming controller with control buttons and scrollouts, shown from different angles (no text or symbols)natural_image
Two identical game controllers shown in line drawings, one with green arrows indicating motion or movement, the other with a fish design (no text or symbols)natural_image
Diagram showing a device with top and bottom views of a mechanical assembly, no text or symbols present.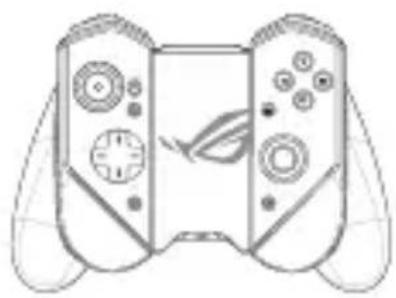
natural_image
Line drawing of a handheld game controller with multiple controllers and a stylus (no text or symbols)natural_image
Line drawing of two remote control devices with directional arrows indicating movement or change (no text or symbols)natural_image
Line drawing of a smartphone with a green arrow indicating the front portion (no text or symbols)- Geser pengontrol ROG Kunai 3 ke bawah ke bantalan ROG Kunai 3.
text_image
Didukung Didukung TIDAK didukungnatural_image
Diagram of two remote control devices with directional arrows indicating movement or change (no text or symbols present)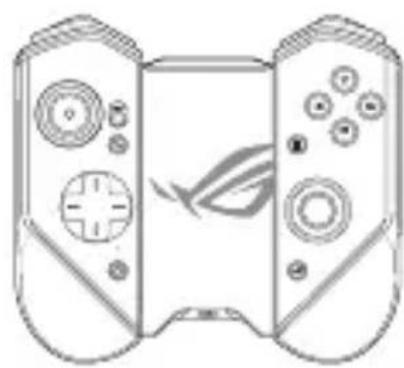
natural_image
Line drawing of two identical gaming controllers with control knobs and a stylized eye logo (no text or symbols)natural_image
Diagram of two remote control devices with directional arrows indicating movement or change (no text or symbols present)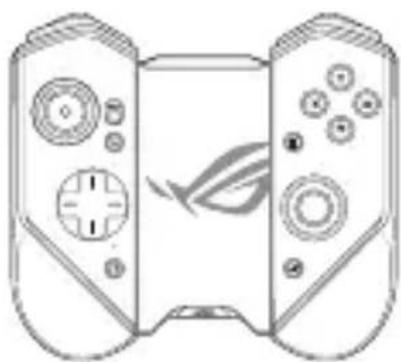
natural_image
Line drawing of two identical game controllers with control knobs and a stylized bird graphic (no text or symbols)- Masukkan pengisi daya ROG Kunai 3 ke dalam pegangan ROG Kunai 3, lalu dorong pengisi daya secara perlahan hingga terdengar bunyi klik.
natural_image
Diagram showing a device with two motors above and a vehicle chassis below, no text or symbols present.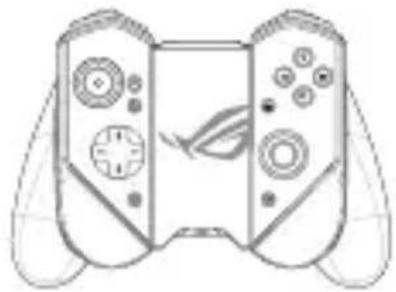
natural_image
Line drawing of a handheld game controller with multiple controllers and a stylized face (no text or symbols)natural_image
Diagram of two remote control devices with directional arrows indicating movement or change (no text or symbols present)natural_image
Line drawing of a smartphone with a green arrow indicating the right side (no text or symbols)natural_image
Diagram of two gaming controllers with directional arrows indicating movement or positioning (no text or symbols)Disokong
natural_image
Line drawing of a mobile game controller with two controllers and a blank screen (no text or symbols)Disokong
natural_image
Line drawing of a smartphone with front panel and control buttons (no text or symbols)TIDAK disokong
natural_image
Line drawing of a rectangular device with a remote control (no text or symbols)natural_image
Diagram showing a device with two arms and a leafy base, no text or symbols present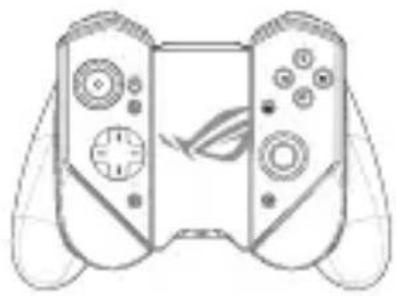
natural_image
Line drawing of a handheld game controller with multiple controllers and a stylus (no text or symbols)natural_image
Diagram of two remote control devices with directional arrows indicating movement or change (no text or symbols present)natural_image
Line drawing of a smartphone with a green arrow pointing to the side panel (no text or symbols)natural_image
Diagram of two gaming controllers with directional arrows indicating movement or orientation (no text or symbols)Stöds
natural_image
Line drawing of a mobile game controller with two controllers and a blank screen (no text or symbols)Stöds
natural_image
Line drawing of a microwave oven with control panel and front panel (no text or symbols)Stöds INTE

natural_image
Line drawing of a rectangular device with a remote control panel on the right side (no text or symbols)natural_image
Diagram of two remote control devices with directional arrows indicating movement or change (no text or symbols present)
natural_image
Line drawing of a dual-stage game controller with multiple controllers and a stylized 'G' logo (no text or symbols)natural_image
Diagram of two remote control devices with directional arrows indicating movement or change (no text or symbols present)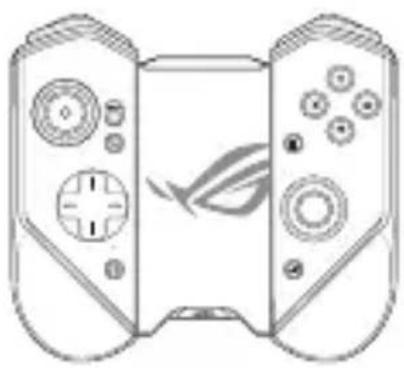
natural_image
Line drawing of two identical Nintendo game controllers with control panels and buttons (no text or symbols)natural_image
Diagram showing a vehicle chassis with two motors and a lower body frame, no text or symbols present.
natural_image
Line drawing of a handheld game controller with multiple controllers and a stylus (no text or symbols)natural_image
Diagram of two remote control devices with directional arrows indicating movement or change (no text or symbols present)natural_image
Line drawing of a smartphone with a green arrow pointing to the side panel (no text or symbols)natural_image
Diagram of two gaming controllers with directional arrows indicating movement or orientation (no text or symbols)รองรับ
natural_image
Line drawing of a handheld gaming controller with front and back panels (no text or symbols)รองรับ
natural_image
Line drawing of a flat-screen device with control panel and screen (no text or symbols)ไม่รองรับ

natural_image
Line drawing of a rectangular device with a remote control panel on the right side (no text or symbols)natural_image
Two identical game controllers shown in side-by-side diagrams, one with green arrows indicating movement or change, the other with a fish design (no text or symbols)natural_image
Two identical remote control devices shown in line drawings, one with green arrows indicating left-hand side and the other with a fish design (no text or symbols)natural_image
Diagram of a vehicle chassis with two wheels and a central body, showing no text or symbols.
natural_image
Line drawing of a handheld game controller with multiple controllers and a stylus (no text or symbols)natural_image
Line drawing of two remote control devices with one showing a stylized eye logo (no text or symbols)natural_image
Line drawing of a smartphone with a green arrow indicating the front portion (no text or symbols)natural_image
Diagram of two remote control devices with one showing a green downward arrow and the other a gray fish design (no text or symbols)
natural_image
Line drawing of a dual-stage game controller with multiple controllers and a stylized 'G' logo (no text or symbols)natural_image
Diagram of two remote control devices with directional arrows indicating movement or change (no text or symbols present)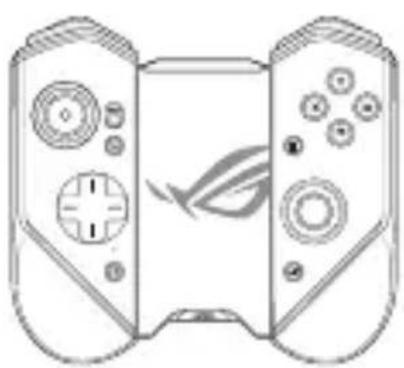
natural_image
Line drawing of two identical handheld gaming controllers with control knobs and a stylized bird graphic (no text or symbols)natural_image
Diagram showing a vehicle chassis with two motors and a lower body frame, no text or symbols present.
natural_image
Line drawing of a handheld game controller with multiple controllers and a stylus (no text or symbols)Federal Communications Commission Statement
This device complies with Part 15 of the FCC Rules. Operation is subject to the following two conditions:
- This device may not cause harmful interference.
- This device must accept any interference received including interference that may cause undesired operation.
This equipment has been tested and found to comply with the limits for a Class B digital device, pursuant to Part 15 of the FCC Rules. These limits are designed to provide reasonable protection against harmful interference in a residential installation. This equipment generates, uses and can radiate radio frequency energy and, if not installed and used in accordance with manufacturer's instructions, may cause harmful interference to radio communications. However, there is no guarantee that interference will not occur in a particular installation. If this equipment does cause harmful interference to radio or television reception, which can be determined by turning the equipment off and on, the user is encouraged to try to correct the interference by one or more of the following measures:
- Reorient or relocate the receiving antenna.
- Increase the separation between the equipment and receiver.
- Connect the equipment to an outlet on a circuit different from that to which the receiver is connected.
- Consult the dealer or an experienced radio/TV technician for help.
This device complies with FCC's radiation exposure limits set forth for an uncontrolled environment.
CAUTION! The use of shielded cables for connection of the monitor to the graphics card is required to assure compliance with FCC regulations. Changes or modifications to this unit not expressly approved by the party responsible for compliance could void the user's authority to operate this equipment.
CE Mark Warning
CE
English ASUSTeK Computer Inc. hereby declares that this device is in compliance with the essential requirements and other relevant provisions of related Directives. Full text of EU declaration of conformity is available at: www.asus.com/support
RED RF output table
| Function Frequency Maximum Output Power (EIRP) | |
| Bluetooth 2402-2480 MHz 8.48 (dBm) | |
India RoHS
This product complies with the “India E-Waste (Management) Rules, 2016” and prohibits use of lead, mercury, hexavalent chromium, polybrominated biphenyls (PBBs) and polybrominated diphenyl ethers (PBDEs) in concentrations exceeding 0.1% by weight in homogenous materials and 0.01% by weight in homogenous materials for cadmium, except for the exemptions listed in Schedule II of the Rule.
VCCI: Japan Compliance Statement
VCCI Class B Statement
Regional notice for Singapore
Complies with IMDA Standards DB103778
This ASUS product complies with IMDA Standards.
746: ROG KUNAI 3 GAMEPAD (ZS661KSCL)
text_image
QR code image containing encoded data, no visible human-readable textnánb. | ไตรคุมนาคม
Per FCC Part 2 Section 2.1077

Responsible Party: Asus Computer International
Address: 48720 Kato Rd, Fremont, CA 94538.
Phone/Fax No: (510)739-3777/(510)608-4555
hereby declares that the product
Product Name : ROG Kunai 3 Gamepad
Model Number : ZS661KSCL
compliance statement:
This device complies with part 15 of the FCC Rules. Operation is subject to the following two conditions: (1) This device may not cause harmful interference, and (2) this device must accept any interference received, including interference that may cause undesired operation.
Ver. 180620
聲明