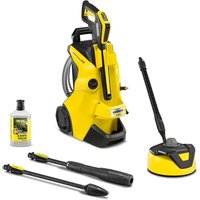
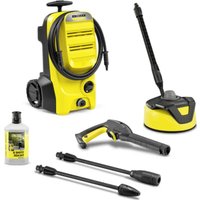
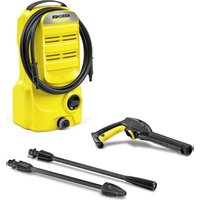
WR 100 - Pressure washer Kärcher - Free user manual and instructions
Find the device manual for free WR 100 Kärcher in PDF.
User questions about WR 100 Kärcher
0 question about this device. Answer the ones you know or ask your own.
Ask a new question about this device
Download the instructions for your Pressure washer in PDF format for free! Find your manual WR 100 - Kärcher and take your electronic device back in hand. On this page are published all the documents necessary for the use of your device. WR 100 by Kärcher.
USER MANUAL WR 100 Kärcher
natural_image
Pure mechanical linkage diagram with three articulated arms and wheels, no text or symbols present
text_image
WR 50 WR 20 WR 50 WR 100 7 5 1 7 1 1 7 5 1 7 5 6 6 °C °F °C °F
natural_image
3D diagram of a mechanical device with a close-up inset showing internal components (no text or symbols)text_image
6.869-075.0text_image
Illustration showing a red prohibition symbol and a green checkmark on a broom, indicating anti-smoking or cleaning actions.Hinweis
natural_image
Mechanical component diagram showing a yellow sun icon on a vehicle chassis with arrows indicating motion direction (no text or symbols)natural_image
Illustration of a manual lawn mower with green grass blades and a tool, no text or symbols presentPlease read and comply with these original instructions prior
to the initial operation of your appliance and store them for later use or subsequent owners.
Contents
Danger or hazard levels ..... EN 1
Safety instructions..... EN 1
Environmental protection .... EN 1
Use as intended ..... EN 1
Device elements ..... EN 2
Flow restrictor ..... EN 2
Spray bar.... EN 2
Installing the spray bar . EN 2 Installing chassis and Suspension (WR 50) ..... EN 3
Operation ...... EN 3
Temperature display . . . EN 3 Weed removal . . . . . . . EN 4
Shutting down ..... EN 4
Care ...... EN 4
Transport..... EN 4
Storage ..... EN 4
Troubleshooting ..... EN 4
Accessories and Spare Parts. EN 4
Technical specifications ..... EN 4
Danger or hazard levels
⚠️DANGER
Pointer to immediate danger, which leads to severe injuries or death.
⚠ WARNING
Pointer to a possibly dangerous situation, which can lead to severe injuries or death.
△CAUTION
Pointer to a possibly dangerous situation, which can lead to minor injuries.
ATTENTION
Pointer to a possibly dangerous situation, which can lead to property damage.
Safety instructions
⚠️DANGER
Risk of injury! The appliance may not be modified.
⚠️DANGER
High-pressure jets can be dangerous if improperly used. The jet must not be directed at persons, animals, live electrical equipment or at the high pressure cleaner itself.
⚠ WARNING
Danger of burns from hot surfaces and risk of scolding.
Please wear safety gloves and -goggles when working with the appliance.
Please observe the safety instructions of your high pressure cleaner.
Environmental protection

The packaging material can be recycled. Please do not place the package to the ordinary refuse for disposal, but ge for the proper recycling.

Old appliances contain valuable materials that can be recycled. Please arrange for the proper recycling of old
appliances. Please dispose your old appliances using appropriate collection systems.
Notes about the ingredients (REACH)
You will find current information about the ingredients at:
www.kaercher.com/REACH
Use as intended
The appliance is suitable for performing weed control when used in combination with a high pressure cleaner.
Using the nozzles on the spray bars, uncompressed hot water (max. 100^ C) is applied to the plants.
Any other use is prohibited.
Device elements
Illustration on the inside of the front cover
1 Screw connections
2 Star handle screw
3 Holder for spray bar
4 Chassis and suspension (WR 50)
5 Spray bars
6 Nozzles spray bars
7 Temperature indicator
Flow restrictor
In order to maintain a consistently high temperature (above 90^ C) of the water, a power nozzle must be inserted into the screw connection of the spray bar to restrict the flow.
Note
The necessary power nozzle is matched to the corresponding high-pressure cleaner and must be ordered separately.
| Hot water high-pres- sure cleaner | Order number Power nozzle |
| HDS 6/14 C 2.113-070.0 | |
| HDS 6/14-4 C 2.113-070.0 | |
| HDS 7/12-4 M 2.113-006.0 | |
| HDS 7/16 C 2.113-041.0 | |
| HDS 8/17 C 2.113-071.0 | |
| HDS 8/18-4 C 2.113-071.0 | |
| HDS 8/18-4 M 2.113-071.0 | |
| HDS 9/18-4 M 2.113-005.0 | |
| HDS 10/20-4 M 2.113-021.0 | |
| HDS 12/18-4 S 2.113-010.0 | |
| HDS 13/20-4 S 2.113-025.0 | |
| HDS 1000 De 2.113-071.0 | |
| HDS 1000 Be 2.113-071.0 | |
| HDS 13/20 DeTr.1 2.113-026.0 | |
| HDS 17/20 DeTr.1 2.113-026.0 |
Note: Power nozzles for hot water high-pressure cleaners not listed here must be requested from the service partner.
Spray bar
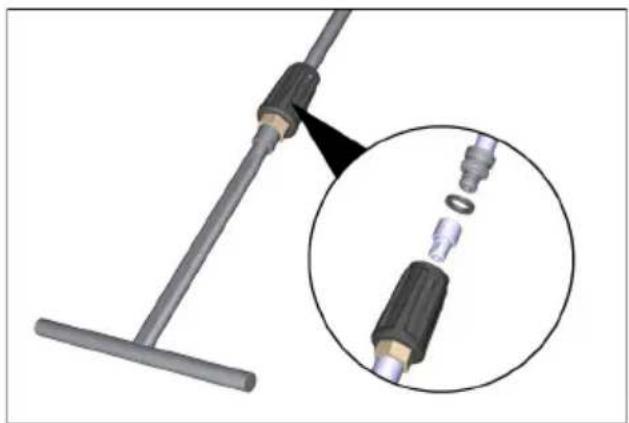
Installing the spray bar
natural_image
Close-up of a mechanical tool with a magnified inset showing internal components (no text or symbols visible)→ Push power nozzle into the screw connection.
→ Insert the sealing ring between the power nozzle and the spray lance.

text_image
6.869-075.0→ Apply metal glue 6.867-075.0 (provided) to the thread of the spray lance.
→ Screw the spray bars onto the spray lance.
Note
Observe drying time of the metal glue!
Note
The connection can no longer be loosened after the metal glue has hardened.
text_image
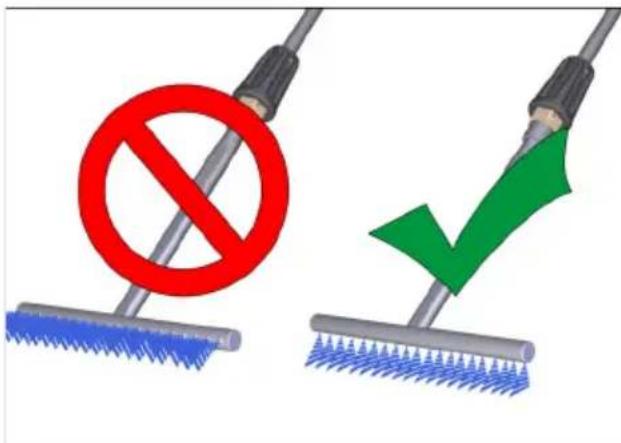
Illustration showing a red prohibition symbol and a green checkmark on a broom, indicating anti-smoking or cleaning actions.Note
The openings of the spray bar must face downwards not forwards.
Installing chassis and Suspension (WR 50)
Note
If necessary, the WR 50 can be used with the chassis and suspension.
natural_image
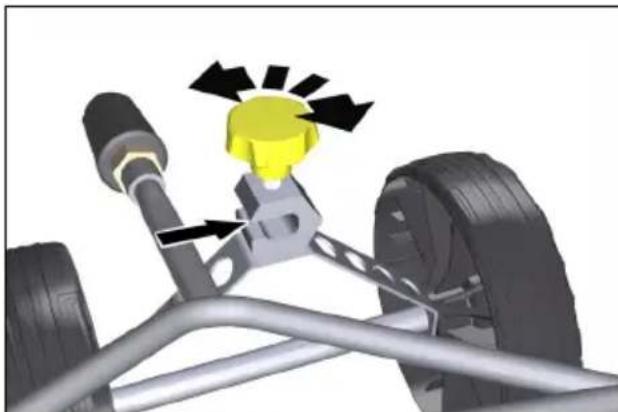
Mechanical component diagram showing a yellow sensor or sensor mounted on a vehicle chassis with arrows indicating motion direction (no text or symbols)→ Insert spray bar into the chassis and suspension support.
Note
On the support, adjust the clearance between the spray bar and the surface (ap-prox. 50 mm - 100 mm above the surface).
→ Loosen the star handle screw.
→ Move the spray bar in the holder.
→ Tighten star handle screw.
Operation
⚠ WARNING
Risk of burns! The spray bar must be installed in such a way that the outlet openings face downwards.
Do not direct the water jet on persons or animals.
Do not touch WR 20/ WR 50 / WR 100 or reach into the water stream during operation.
→ Set the device switch on the high-pressure cleaner to max. 98 °C.
→ If installed, set the Servo Control to the max. setting.
Note
Depending on the high-pressure cleaner in use, the heating-up time can last between 2 and 5 minutes.
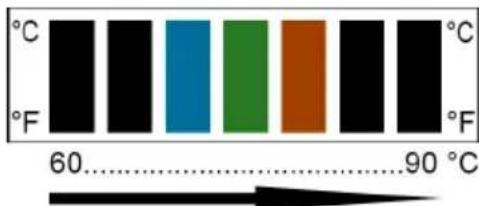
Temperature display
The temperature indicator provides information on when the required water temperature has been reached.
text_image
°C °F 60....90 °C→ Switch on the high pressure cleaner and pull the lever of the high pressure gun.
→ Wait until hot water emerges from the spray bar.
→ The temperature indicator changes with the increasing water temperature.
The colour of the indicator fields changes from left to right from black to brown.
→ When the bar is coloured completely green at the right, the device is ready for operation.
Weed removal
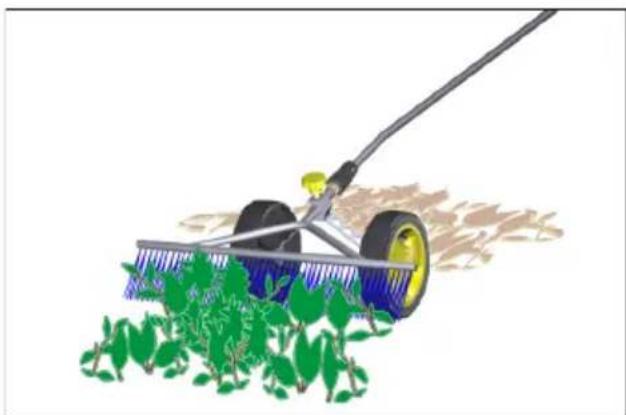
natural_image
Illustration of a manual lawn pusher with green leaves, no text or symbols present→ Guide the spray bar slowly over the weed.
→ Repeat the procedure several times if required.
Note
The optimal effect has been achieved when the hot water flows with almost no pressure and a light steam formation.
Shutting down
⚠ WARNING
Risk of burns! Allow WR20 / WR 50 / WR 100 to cool before removal.
→ After the operation, operate the spray bar with cold water for two minutes in order to cool it down.
→ If necessary, rinse the spray bars and chassis and suspension (WR 50 / WR 100) with clear water.
Care
→ Protect the appliance against frost.
→ remove any dirt, soil and plant residue from the chassis and suspension (WR 50 / WR 100)
→ Regularly check the nozzles on the spray bar for blockages.
Transport
Mind the weight of the appliance during transport.
Storage
■ Consider the weight of the appliance when storing it.
■ Store the appliance in a frost free area.
Troubleshooting
Steam is coming out of the spray bar:
→ Reduce the temperature setting on the high-pressure cleaner.
The emerging water pressure is too high:
→ Mount power nozzle in screw connection.
→ Select a suitable power nozzle (see table).
High-pressure cleaner switches off/the high-pressure cleaner burner does not start:
→ Check the nozzles on the spray bar for soiling.
→ Check the nozzles on the spray bar for calcification.
The wheels of the chassis and suspension (WR 50 / WR 100) cannot be turned:
→ Check wheel axle and bearings for soiling.
Accessories and Spare Parts
Only use original accessories and spare parts, they ensure the safe and trouble-free operation of the device.
For information about accessories and spare parts, please visit www.kaercher.com.
Technical specifications
| WR 20 WR | 50 WR 100 | ||
| Working width 200mm 500mm 1000mm | |||
| Input temperature min. 90°C | |||
| Max. feed temperature 100°C | |||
| Input amount l/min | 5.8 - 8.3 | 8.3 - 16.7 | 8.3 - 16.7 |
| Weight (kg) | 0.3 | 2.2 | 1.2 |
Entreposage .... FR 4
Assistance en cas de panne .. FR 4
www.kaercher.com/REACH
natural_image
3D diagram of a mechanical device with a close-up inset showing internal components (no text or symbols)text_image
6.869-075.0text_image
Illustration showing a red prohibition symbol and a green checkmark on a broom, indicating anti-smoking or cleaning actions.Remarque
natural_image
Mechanical component diagram showing a yellow sun icon on a vehicle chassis with arrows indicating motion direction (no text or symbols)natural_image
Illustration of a manual lawn pusher with green leaves spraying water (no text or symbols)www.kaercher.com/REACH
natural_image
Diagram of a mechanical device with a close-up inset showing internal components (no text or symbols)text_image
6.869-075.0text_image
Illustration showing a red prohibition symbol and a green checkmark on a broom, indicating anti-smoking or cleaning actions.Nota
natural_image
Mechanical component diagram showing a yellow sun-like object on a vehicle chassis with arrows indicating motion direction (no text or symbols)natural_image
Illustration of a manual lawn pusher with green leaves, no text or symbols presentwww.kaercher.com/REACH
natural_image
Close-up of a mechanical tool with a magnified inset showing internal components (no text or symbols visible)text_image
6.869-075.0text_image
Illustration showing a red prohibition symbol and a green checkmark on a broom, indicating anti-smoking or cleaning actions.Opmerking
natural_image
Mechanical component diagram showing a yellow light bulb mounted on a vehicle chassis with arrows indicating motion direction (no text or symbols)natural_image
Illustration of a manual lawn mower with green grass blades and a tool, no text or symbols presentwww.kaercher.com/REACH
Uso previsto
natural_image
3D diagram of a mechanical device with a close-up inset showing internal components (no text or symbols)text_image
6.869-075.0text_image
Illustration showing a red prohibition symbol and a green checkmark on a broom, indicating anti-smoking or cleaning actions.Aviso
natural_image
Mechanical component diagram showing a yellow sun-like object mounted on a vehicle chassis with arrows indicating motion direction (no text or symbols)natural_image
Illustration of a manual lawn pusher with green leaves, no text or symbols presentwww.kaercher.com/REACH
natural_image
Close-up of a mechanical tool with a magnified inset showing internal components (no text or symbols visible)text_image
6.869-075.0text_image
Illustration showing a red prohibition symbol and a green checkmark on a broom, indicating anti-smoking or cleaning actions.Aviso
natural_image
Mechanical component with highlighted yellow sun and directional arrows, no visible text or symbolsnatural_image
Illustration of a manual lawn pusher with green leaves, no text or symbols presentwww.kaercher.com/REACH
natural_image
3D diagram of a mechanical device with a close-up inset showing internal components (no text or symbols)text_image
6.869-075.0text_image
Illustration showing a red prohibition symbol and a green checkmark on a broom, indicating anti-smoking or cleaning actions.Bemærk
natural_image
Mechanical component diagram showing a yellow light source with black arrows indicating motion direction (no text or symbols)natural_image
Illustration of a manual lawn mower with green grass blades and a tool, no text or symbols presentwww.kaercher.com/REACH
natural_image
3D diagram of a mechanical device with a close-up inset showing internal components (no text or symbols)→ Skyv powerdysen inn i tilskruingen.
→ Sett tetningsringen mellom powerdysen og stålrøret.

text_image
6.869-075.0text_image
Illustration showing a red prohibition symbol and a green checkmark on a broom, indicating anti-smoking or cleaning.Merknad
natural_image
Mechanical component diagram showing a yellow sensor or sensor mounted on a vehicle chassis with arrows indicating motion direction (no text or symbols)→ Skyv sprøytelisten inn i chassisets holder.
Merknad
natural_image
Illustration of a manual lawn mower with green grass blades and a tool, no text or symbols presentwww.kaercher.com/REACH
natural_image
Close-up of a mechanical tool with a magnified inset showing internal components (no text or symbols visible)text_image
6.869-075.0text_image
Illustration showing a red prohibition symbol and a green checkmark on a broom, indicating anti-smoking or cleaning.Obs!
natural_image
Mechanical component diagram showing a yellow sun-like object mounted on a vehicle chassis with arrows indicating motion direction (no text or symbols)natural_image
Illustration of a manual lawn pusher with green leaves spraying water (no text or symbols)www.kaercher.com/REACH
natural_image
Diagram of a mechanical tool with a close-up inset showing internal components (no text or symbols)text_image
6.869-075.0text_image
Safety warning symbols: no prohibition sign and checkmark on a broom, indicating anti-corruption or anti-corruption.Указание
natural_image
Mechanical component diagram showing a yellow sensor or sensor mounted on a vehicle chassis with arrows indicating motion direction (no text or symbols)natural_image
Illustration of a manual lawn pusher with green leaves, no text or symbols presentnatural_image
Black silhouette of a hand giving a thumbs-up gesture (no text or symbols)THANK YOU!
MERCI! DANKE! iGRACIAS!

Register your product and benefit from many advantages.
www.kaercher.com/welcome


Rate your product and tell us your opinion.
natural_image
Icon showing a gear and wrench inside a square frame (no text or symbols)www.kaercher.com/dealersearch
Alfred Kärcher SE & Co. KG
Alfred-Kärcher-Str. 28-40
71364 Winnenden (Germany)
Tel.: +49 7195 14-0
Fax: +49 7195 14-2212