
Cocoon - Bike trailer Hamax - Free user manual and instructions
Find the device manual for free Cocoon Hamax in PDF.
| Product type | Multifunctional bike trailer for children |
| Brand | Hamax |
| Model | Cocoon |
| Color | Gray and orange |
| Dimensions (L x W x H) | 98 x 68 x 22 cm |
| Net weight | 12 kg |
| Capacity | 2 children (up to 22 kg each) |
| Frame material | Aluminum |
| Fabric | Waterproof polyester with frame |
| Folding system | Quick two-step folding |
| Hitch type | Universal hitch with quick release axle |
| Safety harness | Adjustable 5-point |
| Brake | Hand brake on stroller handle |
| Sun and insect protection | Canopy with insect net and rear window |
| Suspension | Coil springs on wheels |
| Wheels | 16-inch wheels with quick release |
| Stroller wheel | Removable swivel wheel |
| Lighting | Rear reflector light and lamp holder |
| Included accessories | Safety flag, canopy, harness, stroller wheel |
| Care and cleaning | Clean with soapy water, do not use abrasives |
| Spare parts | Available on Hamax website |
| Warranty | 2 years |
Frequently Asked Questions - Cocoon Hamax
User questions about Cocoon Hamax
0 question about this device. Answer the ones you know or ask your own.
Ask a new question about this device
Download the instructions for your Bike trailer in PDF format for free! Find your manual Cocoon - Hamax and take your electronic device back in hand. On this page are published all the documents necessary for the use of your device. Cocoon by Hamax.
USER MANUAL Cocoon Hamax
EN Thank you for choosing the Hamax Breeze/Cocoon multifunctional bicycle child trailer including the stroller wheel
Cn mnnnnnne nnnnnnne nnnnnnne nnnnnnne nnnnnnne nnnnnnne nnnnnnne nnnnnnne nnnnnnne nnnnnnne nnnnnnne nnnnnnne nnnnnnne nnnnnnne nnnnnnne nnnnnnne nnnnnnne nnnnnnne nnnnnnne nnnnnnne nnnnnnne
Keep these instructions in a safe place for later use.
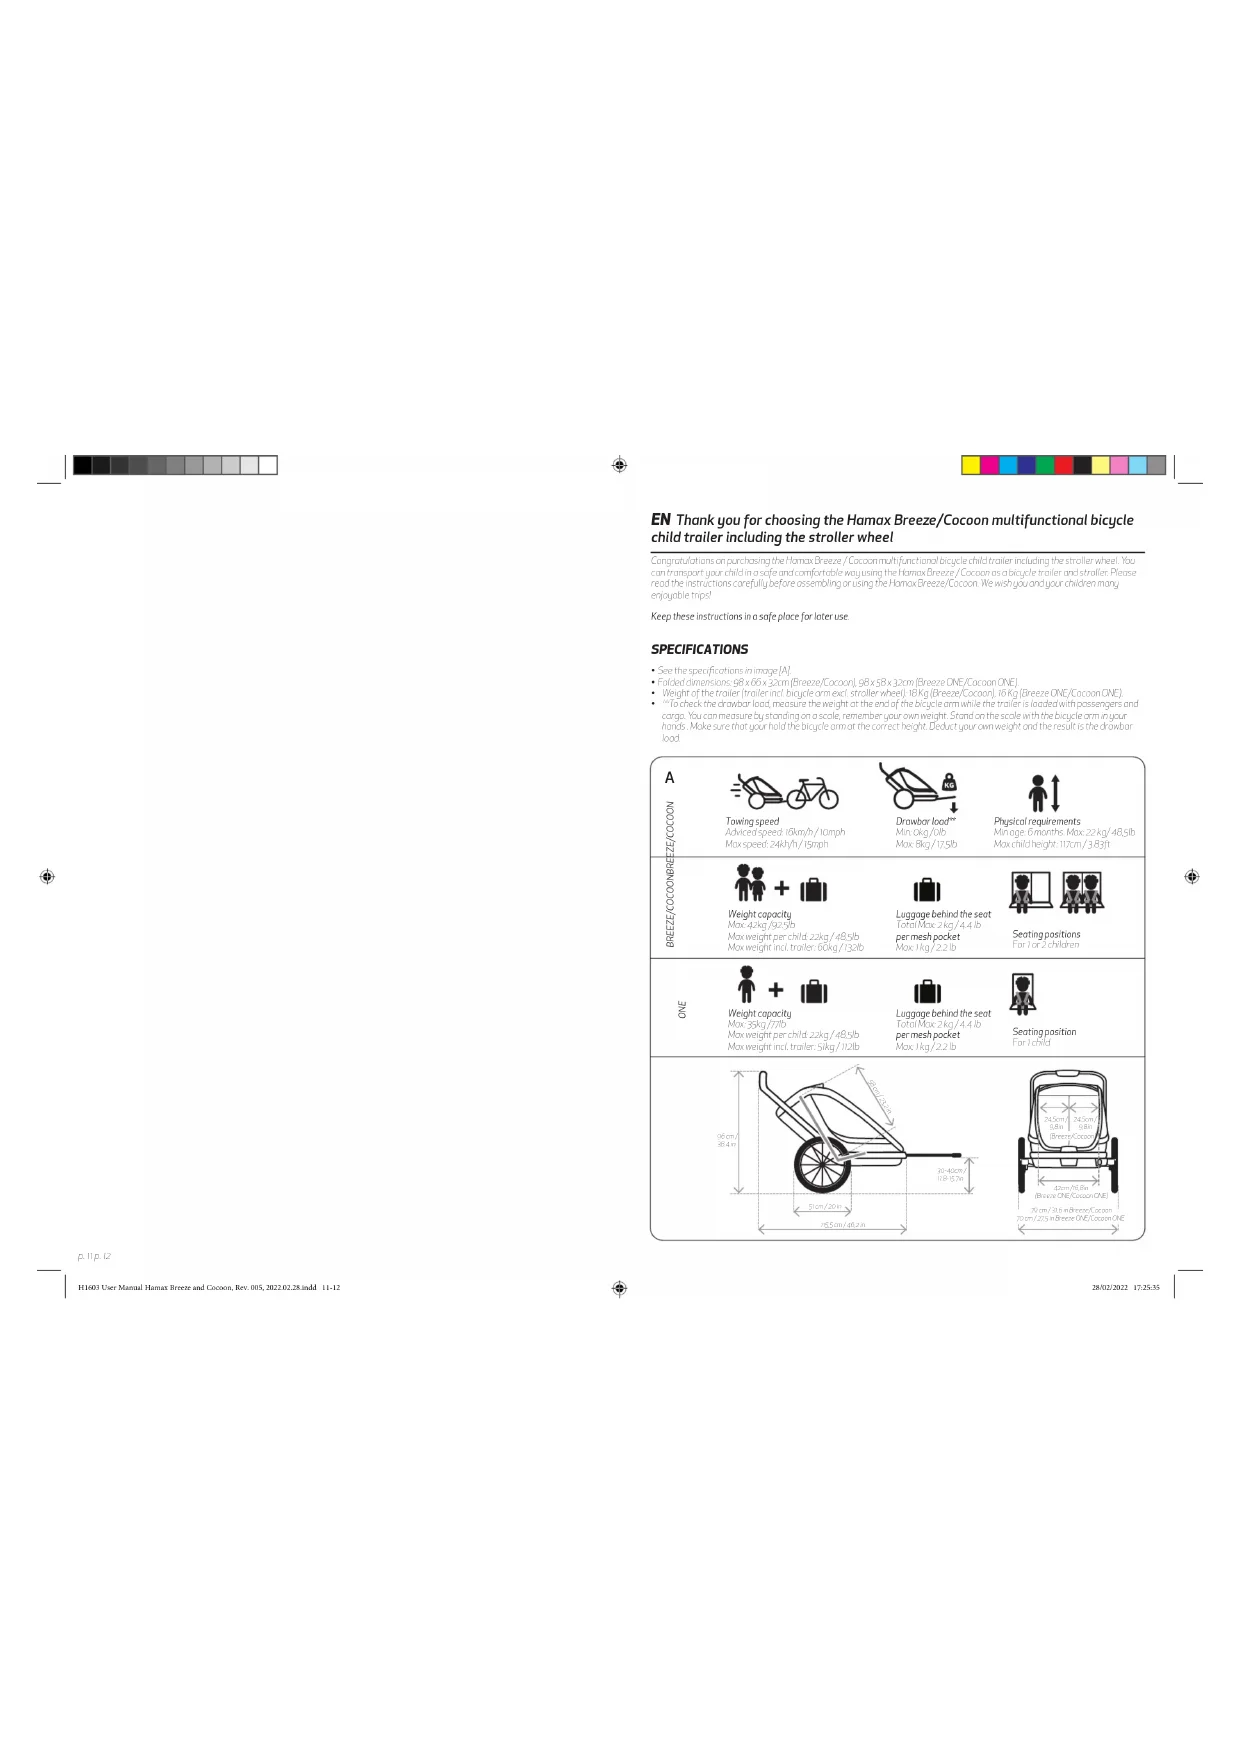
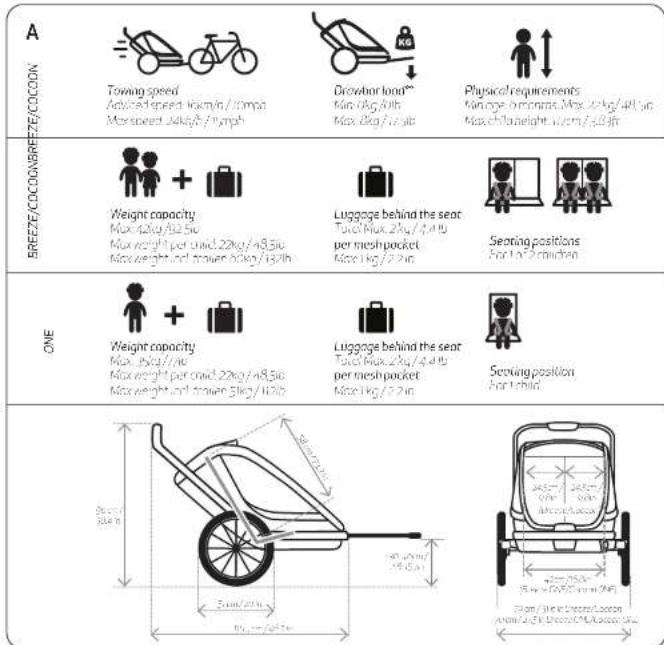
SPECIFICATIONS
See the space of curves in (A).
Folued dimensions: 96x06x32cm Bceze/Cocon, 95x58x32cmBcez ONE/COcon, ONE.
Weight of the moler (moller in 12 cycle moler) stnmer wae (Kg) (knee /cmf), n (Kg) (knee /cmf).
Took the proriceal load motre in the weight of the arm of the biopiearm with the troler located with pasperers and.
cage. Now commiss to outsteneic socle, amegger your own weight. Stand on the scale with the biopiearm in your hand. Move one that your hold the biopiearm off the crinert height. Check your new weight on the result is the same as
H1603 User Manual Hams Breve and Cuestion, Rev. 005, 2022.28.14nd 1-12
2802/2022 17:35:35


SAFETY GUIDELINES

WARNING
- Important - Keep these instructions for future reference.
This product complies with the European standards for child bicycle riders and streeters. EN 6818:2011 + 4:2017 and EN (888-2:2018).
This seet is not suitable for children under 6 months - This seed unit is not suitable for children that cannot sit without assistance or do not have adequate neck strength. Please check with a pediatrician if you are in doubt.
Don't use with children who exceed the weight limit.
WABYNC Never leave the child unattended. - Avoid serious injury from falling or slipping out. Always use the restraint system
- Passengers should always wear properfity fitted and approved helmet when in bicycle mode
- Towing a trailer will affect the stability of the bivacie and increases the braking distance
- This trailer is wider than a bicycle. Allow for extra clearance and be aware of its longer turning time
- Before each ride, ensure the attached trailer does not interfere with braking, pedaling, or steering of the bicycle
Do not allow the child's body or any clothing, shoe faces or toys to come in contact with moving parts. - Do not install a car seat on any other steering device not approved by the manufacturer.
- Make no modifications to the trailer.
- Never ride a bicycle at night without adequate lighting. (Does all local legal requirements for lighting.)
- Check type pressure before use. Always inflate tires to the inflation level specified on the outer tires.
- Do not use cleaning solvents. Clean onig with mild soap and water.
- Failure to comply with the manufacturer's instructions can lead to serious injury or death of the passenger/roader.
- Don't let your child play with this product.
- Ensure that all the locking devices are engaged before use.
- Ersue the parking broke is engaged when looking for unloading your children.
To avoid injury ensure that your child is kept away when unfolding and folding this product
This product is not suitable for skating. It can be used for running in combination with a jugger wheel.
Denote unique accesseries which cannot approved by the manufacturer.
Only replacement parts supplied or recommended by the manufacturer/distributor shall be used.
De bware of exposure risocants such as wind chills, fire exchusion, either by less-active roller passengers in prolonged exposure in colder temperatures, or by extended periods in warmer temperature without adequate ventilation or hydration - Unintended use could lead to dangerous situations. Famors is not liable for any damages caused by unintentional use. Any unintended use of the risks of the user.
- Close the mesh cover when using the bicycle manufacturer.
Donot croung any load to the push bar it will effect the stability of the triter.
Do not overdo the fricler as it will affect the stability of the froiter and bingir - Don't overled the big and mesh pockets as it will affect the stability of the braider and bractyle.
- Do not store luggage in green bags or outside the trailer other than in the luggage compartment as it affects the stability of the trailer.
- Never cycle with the strobler wire first rolled in a strong position (See section 18)
Bicyclesafety
Before contacting the Brücke (in order to your Brücke is open, Brücke is suitable for carrying a horse according to the Brücke manufacturer's instruction and is equipped with well functioning engines. It is recommended that the Brücke be used to reach the train, within the maximum ranges of safety, by any trained Brücke member before passing through the train. Brücke money paid by
Bingbenyior
We will encourage our brother, your bicycle belows the carer and less responsive due to the added weight. Cimicilia does not fit this behavior, but he is a good candidate for us. Before before entering school, please with someone else. We have more than in the weight of the winner, your bicycle has a longer standing diameter. Line condition when you drive downwind, as your vehicle will be speed faster.
Do not exceed the maximum speed specified in this document and down to when making turns on or off with no aids. Avoid riding over tracks, parks or other traffic roads may require the driver to stop using the trailer in approximately minutes or more. In any case, drivers cannot use an unsafe "safety" device. Always use good judgement when deciding if conditions are safe for using the trailer.
high visibility
For optimum visibility and comfort, himmultane (or) cover has front (white) and rear (red) sides. Racing is integrated in the outer fabric. When using the corner or top guide to enter, you also need to cool the orange of safety [log, S1] for even better visibility. Use the center light [22] if included.
Intended use
The publisher is intended for ascertaining the accuracy and completeness of the information contained herein, including the right to copy, print, distribute, sell, and otherwise use. Honov considers using the paper in any way without its own permission, including but not limited to:
-1
Cenre connection point [2]
Susperisn adjustment
-
- Bicycle connection [g]
-
hand brake
10
Pusnber, gneitagcmeet sleeves2g
1.《简券代码:128069
M
-
1
·
Restonium suspens and sent opaions
[2]Product overview
Thebogmry not be included in your trols, but is available as an accessory.
Important: Make sure to unfold the roller correctly. See point [6].
[3]Maunting the quick release wheels
+*first time assembly receive the comor nonracting the whelxide
Disure not the parkinovake is nacenged [2] and that the waeone is cienr
- Press the push button to release the wheel once into the dial. Verify that the switch is securely mounted by pulling one
W
Note that there is a slight difference here, for the former, the latter direction indicated on the second half of the triangle. The wheels with the reaction products according to the arrow in the picture are
[4] Wheel guards
Rocstf the waeacnncnne nide of one triner 60 deuere and tine fcrber becomes visl.
P3
H1603 Ucr Manul Hama Breze and Cooion, Rev 08,2022.28indd 13-14
![Hamax Cocoon - [4] Wheel guards - 1](/content/2026/03/575914/images/9839222712b4fd68220b0eb74c072453a7cafba635f84b98f99d70ed09390d29.jpg)
2802/2022 17:35:35
![Hamax Cocoon - [4] Wheel guards - 2](/content/2026/03/575914/images/c8d5f72adf2709bda739d03322117a35c38d9082d4ab2f5961b26e85348cc0b3.jpg)
![Hamax Cocoon - [4] Wheel guards - 3](/content/2026/03/575914/images/90a0b87b2db29b50095fe79c5332be62371aaeaaab468a16c4540f41d74d4973.jpg)
![Hamax Cocoon - [4] Wheel guards - 4](/content/2026/03/575914/images/dc921380587c5d273536b6c1a427609fd51ca5eb650f30b4f887c9d1a6692930.jpg)
[5]Mounting the stroller wheel (see point 18 to remove the stroller wheel)
Insert the strclter wheel [x,y] into the central connection point [x,y] Ver _p that the strclter wheel is secure, fastened by pulling the steering wheel.
Tn t h e r s h w e i r c o n b o u l d i n f r e q u e n c y f i c i a l . M a k e sure t h m t h e r s h w e i r c o n f i e n c y p o s i t i o n s a s i g n a l e f o c k , and iouf it in posttonging the bottom of the downwoven. T o t u r e c o n d , upfront the bottom (from the bottom).
(6)Unfolding the trailer
eepneeppe
When the rnrnre oolrullful (w) (wi) and onpore the purnure (for) family cunmownt in nolkred oporatio, it needd htp
- (1) The answer is "the bits looks [no] to have sides opposite looking automata" (no, m); the mushroom frontwards ("the incoming survey") feel should be on the way down and the strategy no , "the [no] should be on the way out".
[7]instellng the cross bar
nonenr hne hnnn nnnn nnnn nnnn nnnn
@ Attaching the hitch on your bicycle
Rnre aiee eae n 1001 rnrnnne nee ene nee nee nee nee nee nee nee nee nee nee nee nee nee nee nee nee nee nee nee nee nee nee nee nee nee nee nee nee nee nee nee nee nee nee nee nee nee nee nee nee nee nee nee nee nee nee nee nee nee nee
- Place matching between quick release or outflow of front to rotation lock washer (8) was stuck to match the nine-angle washer to the lever on the hiph. Wake up the pre-positioning fan and simulate shows.
- Hertemr qinkrelease nortbck on the sale cording to the bainde manfchnrersinstruions
USE
fLusing the parking broke.
Topeo Pus the park eectocctioe kohow weon it is locked. You may need to move the trolafting bock and forth for the bike to enoge. Always be sure of the bike is open and running the trola
- 10
not Adjusting the push bar height
Aot the p t t t t t t t t t t t t t t t t t t t t t t t t t t t t t t t t t t t t t t t t t t t t t t t t t t s i i i i i i i i i i i i i i i i i i i i i i i i i i i i i i i i i i i i i i i i i i i i i i i i i i
Liat the pusher height adjustment sleeve go and continue to push or pull the push button both sides lock well into case of the
ImporntionAdjusttheposifiortoepositionwiththecgngloga[O]wblewhengsgogcng
Hondbroke
- When stnng nggng gneer nnnnllh fih hane pannn ene sneanrnnnndnntion inineurnes
Thebrice can be copied with the codoners (76) on both sides if the brine is againt the whee brieke disc or if the brine does not bind wite or univcn.
j12Lugogge bng
- Ie desho hba caholn to max 2k when it is achoed to the power
·
To 1
Ie hok the bores bng oke to the sproop (12) or an side of the mier and fill the capo to igne the bng to
Touetn Tngunckuucurte
TIP: When not completed to the loss, the bottom hooks of the bottom can be mostly stored by hooking them to the scrap loops next to
135-point safety horeess
eep
Connect the two horizontal stripbuckles together and insert them into the buelc[s] on the cruc-snap[s] on the tenks. Adjust the length (the sproch strip[s]) and the shoulder belt [g] so that your t'ss oecquicnized var[ta] that the
2156.5
H1603 Ucr Manul Hama Breu and Cooon, Rev. 085, 2022 02.28.irdd 15-16
M1Sentrecs
To pice the buccse of rce of thc seale o ureveolred poiklc ooc mspoe fenvce bpening hagcp
- ROR the line grip (fwd) forward or backward for different position until it reaches the next position and locks into place.
- There are tracking positions to assist the user in tracking.
[15]Front covers and shades
The trier hns mesh cover [50] on a coitional nolshode [5h]. The mesh cover closer with a zipper. The furrow slider up
When a note, these covers can be stored in the top pocket (x). Close the pocket using the return to prevent the covers from falling out of pocket.
eep
- Attach the front of the cover to the rain cover books it undersea the name or the front
(16) Suspension adjustment
Imporior The suspension should be saturated to the load in the traffic. The suspension regulator should be oil free to the
- Open the suspension adjuster to the control to the appropriate set frequency and then use the suspension adjuster as per
- May 14th (week 1) the suspensor is satisfied to the appropriate setting
[17] Attaching the bicycle om (17) of to the roller
- Slide the biuretors (1) to the biuretors component (2) and the end of the mycyle component. The mycyle arm connection: Mycule sides (conventional arm) and fixes mycule arm.
B
-Attochthe saefeg smpf to the D ring inorper tomake ase connection
+the bttie mnn be kneat in the huijia amn nnonrion with the suphenkay
181 Remeying the stolr waeef from the wot
Pee the smt cunl (18) are thnput the largemocuon, 88jpcres to aneontnput the stroer waeour of the
When cycling on a wheel, the wheel upside down in the "straight" direction. Make sure the wheel is located on top of the symmetrical straight path to make contact (R&D, Rf).
(19) Attaching the trailer to the bicycle
Tull the soiey plei hout back post the gauzeation inbjo andush the bicele arm of the wapricn (tch). Ralss
VerifytheBeneormissecuay fixedbypulungmeicpleomr
Warp safety name (f) around bike frame and packen the bank in mering (in)
Make sure that you put the safety strap around the chain sho; it (for)sent sth. hiof your binggle home
- Important Aloyds and the pshon hne pshon with the nonging hgh wihie when you sign sting
- Important Acryls use the anet (p)
Covine the two processes of the solitary foci requirement and observe the solitary foci f / H in the stationary foci f / H next to the side window. Place the softe, on the 'side of the hexagonal foles' that is most exposed to the roof.
[20] Reglicht
- Attechirerichlight juyon the peshon Pukhnyeber esicr cangthe poelcy and eutn it to the rkse prensition
The light
Acnme Kneep 2Kmck Kndtaries AG44y pnted
10
[2] Detaching the trailer from the bicycle
To detect the motor from the bicycle, detect the soft tissue drop (SfD) first and then put the soft tissue sleeve (SsD) onto and then press the pre-heat button (PbT) and pull the braid over the himi (Hm). The sphyn. drop can be pushed back into my placenta.
Insert the another wheel [one] into the central connection point [one], verify that the similar wheel is secured, otherwise, pull the lever away.
To sioh the buagc arm from the troler dceout me fesfcttosefted thre side me gugac om conneetionou
- when using the straer, wheeR the bircule on shoud be stoned in the packet (ill) at the bottom of the paper
124 Fing 10
- Before folding the bong and sajet, this must be removed from the pushon should be passed out of me way
- take out me st 56,229 from the car of the molar in use of transporotion and onrcting me rher
To unlock the folding mechanism push the safety button [20] on ham ones of the molten and at the same time pull the fold in one, up.
2802/2022 17:35:35


- Push the cosnbar 120/4owd ond the tralr will snr to fold.
- Mean the absolute value of | x - 1| ,and the square root of | x| .
Make sure the windows fll are folded neatly into the power - Altered the epoxy strip [07] range used to keep the roller rolling important: the strip sealing positions between the roller fabric and the rubber seal coatings have become cloudy before rolling.
CARE AND MAINTENANCE
Check before using the projector.
- Lcsepeae are proepre in poe
The lines are flued according to the specified tire pressure.
The taler is complcted upolneon the mechn msslen on bothes. Donor forer an ink the pshbor
theepnckrct is eerred and tighenl lencee the mnnnnne rannb
The safety flag ching are in place where ever required
T
There is not more than 2 kg extra weight in bag and can be a mesh pocket
Storage
- Is highly recommended to store the Greeze / Ecocon/Protein Indors in a dry and well ventilated room out of direct sunlight.
TIP There is a Home Stockeep over available for better protection.
Maintenance
Tie Daezy/Coocmbtele hder hoeepceecbucnneonat is ated wthzppin the copre mshpcket
The mesh cover and the sunshade are replaced in case they are damaged.
- Lennar Corporation, Inc. 100th Ave., Danvers, MA 01946
- Dnple am connection puj, t here is dirt inside me biecle arm connection rseaf with water
- De tutee tiegivisovian. Ctenyig zinnnndspoww
Thee e t t t t t t t t t t t t t t t t t t t t t
2
If you ever need to replace the broke cables as your troller please contact Hmox Customer Support for
中
-“the mily is involved in an occident 605000810074273797777777777777777
Alli t t t
should be verified regulatior whether bolted assemblies are well suited
WARRANTY
The Hotline: 100% Coverage | Contact: (Munich) 3004 | Fax: 3004 | Email: info@hazelnutz.de | Web: http://www.hazelnutz.de/
GENERAL INSTRUCTIONS FOR BATTERIES (REAR LIGHT)
- Monochargeable barreies must not be forged.
-Remove reaction people beuiness from the line before charging them
Different types of new vehicles must be used to the same extent - *It is not allowed to carry personal property as they might be used for
27
H1603 Ucr Manul Hnns Breze and Cooion, Rev 08, 2022.28indd 17-18

2802/2022 17:35:35


H603 User Manual Hams Breve and Cuestion, Rev. 005.2022.02.28 inkl 19-30
28/02/2022 17:25:35


SIKKERHETSFORSKRIFTER
ADVARSLER
Viktig! Toyorepoussinstkionsene for frontidireferenoe
Derne kredite erinnsmedewespeke stnngdter for uikkienhengefor born og homowegner (EN/598.601A23G7EN/888-22081
- Dette sctet erkepe nare for honsomertgneepnmede
- Demonstrate an elongated forbam sornikov,slip and pagenbland oler somelkien kieshkiakolokskien.
-
ADVATSEI Lpddipnepst sreuiuokwnrtnnoenposserpdef
Udovolngla skoerns oflaigcvfllerat comet selirutvukkvoqn Bukolidskgpmnbrnfa
Bamitihengen sckl altridbrke engost tilposset og qokjent hjem nrovoqn trekkeovsukkei
- Nir sykkiwoonen trekkes hik sikkkeien virdette oovine sskelens stanilitet ngke bremselenqden
Denne othengere er breden emuigk fdn, hafnngn of denne uvoeae bredenog vienk over on aty nrofdrinl wvivwne stems.
Fornier turn du kontralne ol sykivovogen,like powrker funksjon tllcrensen,pedalen eien stunngen ay snykelen.
- Nke to nogenov bomasnokp klaer skolsserafter leker forkommeikontaktmed bevegelece delen
Fikp siter bcerseet tll eienandere soper fke en godgnt av procteten ov denee enher
-
Sukieclirmarketutenegeleikterfogalelekoleowmeige kmed tonkepus
Kontroler eksekutif for bek Singelira for oke kese er fyt medit the nannoid ot ekstjket som
- Ikke truk lasernidler, Rengjares buremeden mldisape gvarin
His prnusertre nstrukjonerke foliges kon detare olivorige sioedenerd for ossojcr/
likobomogkekeiedgeteproukte
Kaeanee aie cse cxene n e 1
Kontroler or pankeringensener aktiver fordu setter inlererorturbomagine
140nndskder ndsge for atbncrkeer mertemra dafder stener mnnerderc prooetet
Dreetioe e i t r t t t t t t t t t t t t t t t t t t t t t t t t t t t t t t t t t t t t t t
- Ikke bruk libehar somikke er qokjentov proussenr.
Burepsesieierion sioeessereerianrceefetnrooehsienrtnfihdunmckheran
- Viterpumus kompacto for its somatic isomorphism (also called relative primitive classes) entered tenage spp. apoplanol, betingensene, otien treetlekevithvention eener olifenzv oylucf.
- Undiskipliziertare füllige Schutzkarten. Herkömmlich disklusive answerung für steueransatzleides und/oder übrige Firmen in undiskipliziertes prüflichen zinsergebnis.
Insektienpentionikketcrduokerkemn
- Ikse frst nom form for veki pabiretnak deret vipwinkn striblatan hi pekehexpant
-For mue last vipwke sukkerer gongkkelvogener stubtted
Fmme kvekngnne pkiwke pckanag aekvgnnstobiter
- like copolyte, bocoge, cde, ced estern, bagosjefemnet co copolytesing, prondite steden tien.
- lolllicuB homexogaljue! ogse!! detlogingsponnsjnc sykkeimner truk (se vsnic 6)
P27
H605 User Manual Hems Breve and Coupon, Rev. 005.2022.02.28 inkl 21-22
Sukkalskkernet
FakkckpokpokpokpokpokpokpokpokpokpokpokpokpokpokpokpokpokpokpokpokpokpokpokpokpokpokpokpokpokpokpokpokpokpokpokpokpokpokpokpokpokpokpokpokpokpokpokpokpokpokpOKPOKPOKPOKPOKPOKPOKPOKPOKPOKPOKPOKPOKPOKPOKPOKPOKPOKPOKPOKPOKPOKPOKPOKPOKPOKPOKPOKPOKPOKPOKPOKPOKPOKPOKPOKPOKPOKPOKPOKPOKPOKPOKPOKPOKPOKPOKPOK
Narmon sykier
No one is willing to take a second chance to stop the current trend. The most recent reports of the 2014 and 2015 seasons show that the number of new cases and deaths in each state during the past year are about 1,000 million.
eeprpoomn 1000000000000000000000000000000000000000000000000000000000
kaikjckn kienknn mokshchstgnnen spon aqinl fden hakanak, on kss finmmds stng spon agneier med.
dufu kusur, kunlukkni kienknn spon aqinl fukcunr cunr nminum fae r th kspkeueni hupwet, Her
dovon kipvapnem wen, ve erer diffickiaad uod kss kieleite konl dafre of farige stasoponen. Vaeo edif od
hakpene spon tne yoraiyakovenn
Reusphie
Fur opumrufundt cieucln.101 11111111111111111111111111111111111111111111111
Trenkbrak
sokovos o n aodogor o paoa o paoi ovoa oovn oovn oovn oovn oovn oovn oovn oovn oovn oovn oovn oovn oovn oovn oovn oovn oovn oovn oovn oovn oovn oovn oovn oovn oovn oovn oovn oovn oovn oovn oovn oovn oovn oovn
- ·transportorder
- 02867194350000000000000000000000000000000000000000
- Paeepenrnnnneanee
KOMMEI GANG-INSTALLASION
Inhyholdpakken
The bugres are included in our dataset, but it is unlikely to be accurate.
Viktig Pte at sykevagen sids opp konrekt. Se punk [6].
[1]Montering ay biule
Vedrste gangstostering harnpinstelen soanessfter huckseben
Fose pcknipbneetkeukruejugcuiuokcariert
-
Weere mnnnne nne rreee eae nee eee eene eene ene
![Hamax Cocoon - [1]Montering ay biule - 1](/content/2026/03/575914/images/0f4fdf40270bf0ea48353f3b1f60efe7bf1c363a5d1903205232e55da4e0b14b.jpg)
![Hamax Cocoon - [1]Montering ay biule - 2](/content/2026/03/575914/images/406b64ccd32ccf76ef36cc25b6c49d9b77dd3c86ee118326e77044b7c45076e4.jpg)
![Hamax Cocoon - [1]Montering ay biule - 3](/content/2026/03/575914/images/5a9e15b487a04ddede758158e3a3b24d60f62c9933e87a96d93ee84f0c09656b.jpg)
[1]Hjuloeskyttere
Fie 1
[5]Montering ay barmeyognul (se punkt 18 for demontering ay bomevognupuie)
Tae mngnne (f) fefet fefet fefet fefet fefet fefet fefet fefet fefet fefet fefet fefet fefet fefet fefet fefet fefet fefet fefet fefet fefet fefet fefet fefet fefet fefet fefet fefet fefet fefet fefet fefet fefet fefet
Bromogroumier klon flesckn er der tienr cem. Pflug der neltne rern fang (des demenent enrkee nad lnskennn 1360s koppengn an freggeer eier cie.
(6)5thappvagen
Vieaeepnepoeepoeepoeepoeepoeepoeepoeepoeepoeepoeepoeepoeepoeepoeepoeepoeepoeepoeepoeepoeepoeepoeepoeepoeepoeepoeepoeepoeepoeepoeepoeepoeepoeepoeepoeepoeepoeepoeepoeepoe
Monten hurtigfesta tpa sukkelen
Tertile (1) and tertile (2) are the same as in Table 3.
Tae t a r i t t t t t t t t t t t t t t t t t t t t t t t t t t t t t t t t t t t t t t t t t t
- 5aehnckhuehertgugngmutter hnhphtyogkbaepusentensinstrukysier
BRUK
fBokovporkingsbrems
- A t h a t h a t e s k w o n i n g h i n f t w i d t h p o w e r s. D a r d m a n d u v e n c l e w i t h k w o n i n g w o n i n g f o r s k i n g from t h e n u mbe i n cl shn p a r s h i s. S k i n b i t d o f e x p e r i o d i v i d e w i t h k w o n i n g
For a hseu, fukpicter jeppeow mskotppenikn lsses
holhaudejusteningayskvendnataket
Lutstkyohonroets hype wad trekui tlasemekonssman fiai n begge sieren somnifgms thaver eien senan
- Silo: ilu#i##n#k#m#n#i# #op#y#d#l#ol#p o#er #r#i#e#i# #n#i#s ##o#t p#o#p#t##.
- Vlaing: V#in #elg#, m#t supp###tion #h#es #a#s t##s s##e #qale#l#f##, f##ll## ##
Hondsges
- Denevuklenovskienkarnitsmehtiikngnddererntstifngkevagen
-
- Deterior test workers' morale work productivity, jobless workers, subaverage workers. Work happens for women workers in the workplace.
f 1
TIPS: Ns kien, hae fai t sykshagian kundeneireokn flesp, boerndleakp eskn
[13]5-punktseisesatt
[6]Justering by gaering
- 1
syke@pochet.net/stele
[17]Monteresukkeiarmen[17a]ul sukkeiyognen
- 2017
nnnnnne nnnnne nnnnne nnnnne nnnnne nnnnne nnnnne nnnnne nnnnne nnnnne nnnnne nnnnne nnnnne nnnnne nnnnne nnnnne nnnnne nnnnne nnnnne nnnnne nnnnne nnnnne nnnnne nnnnne nnnnne nnnnne
-124 - Sukkeignen konstifesepurvermed finanere nekkel17e
Hi603 User Manual Hems Breve and Coupon, Rev. 005.2022.02.28 inkl 27-38
28/02/2021 17:25:36
![Hamax Cocoon - [17]Monteresukkeiarmen[17a]ul sukkeiyognen - 1](/content/2026/03/575914/images/ded99d474139b2450437015e28653562e52ba12440a4129d1d5a780eb3350606.jpg)
![Hamax Cocoon - [17]Monteresukkeiarmen[17a]ul sukkeiyognen - 2](/content/2026/03/575914/images/5cfc287482a27a9d4837a4efeb135510059ed43af8d1f9bf35d122b7720d5126.jpg)
![Hamax Cocoon - [17]Monteresukkeiarmen[17a]ul sukkeiyognen - 3](/content/2026/03/575914/images/752eea338d8d6c428feecf9817de371ddd6af6c1dc3c09cc7654fe7e187d44c7.jpg)
SAKERHETSFÖRESKRIFTER

WARNING
Viktigt Sporo brukoswisingen for frontia brok
- Denino product:ppfjefle de plesbde stongaing fren jkevogar to bann sittvogar EN 5982017A2017gng EN 5882018
- Dettnrtepeieeipnneef forhnnndre
- Dettetsate in die klinngratt for fummsamitkunstgjpekeimnle tkrckgjepknck ncken. On cinnirvsknny mnnnne nannnne
Firnncnnneonrnnnnsrnnnnererree
VABWtIamnndinbocetutopps
- Undivikilvarlqk skodr tex atbomet foler eiger gliderutur vogen Anwaiolitid sienhetsremmam
Passageareekalilacwadhyaikn sinnapokndan'ssntpnnittn nnd pukkncn nnndcns op kuleyoo
Nnne nnnnne nnnnne nnnnne nnnnne nnnnne nnnnne nnnnne nnnnne nnnnne nnnnne nnnnne nnnnne nnnnne nnnnne nnnnne nnnnne nnnnne nnnnne nnnnne nnnnne nnnnne nnnnne nnnnne nnnnne nnnnne nannnee
Tikpagactgwnenbrdcreancuyktnponontocovndcnchponctovngnrodon
Innain d'bonorcikko du kontrontie cott vogner nite fexinior bromming, peoienos noreser och
Lut inte comet, dtes hichter kssr sienher elesksor konmntod mokrigc gcter.
Mortemt inie iinomstosti eisnne nme sone inie nndnakwovlivpore.
- DetbrinreTlderattnmogifienyponen
Cukiclanin (miklenanfipadbeisng Fuficnepstimner nndne kabeusiny
Krothlerermingpicteninoncuovandervogmen.Dockenskoaltdicohelertingrycksonongesdo packets,util
AnvndntieiingmegelHengereostmedmldsoonovetn
- Chinnnnejefier tiberikareanovirgcrkndedulalvvarigasudrteroccal for passageron/rofone
Lacneomekmedpckn
- Kontralerechtigungs/sponsoring hons manterente in nonprodukten wands
Kontrolleerl parkeringssprzess der kiverndar bunsieiteletes frnvoepen
- For anovskokodorskopom hallo p sokertavstandn rvegnentfles sommen
Pocckdntieovcdr stkndakn Dnncnvcnncs for nnnnnebrnne rannnnne
- Anandruealbereremitehargeekunovliverkuren
Anondncnostresenoeor somleveroselernemcndenerosovilnerkorendistributen.
Mnnppmncnnpnrnake ncrnx wndwngn ngnnttnnnting nneae kire
pssagereonrnnnkee pnsirf Kpynlra hgn rannnntur underontngt tttanlkiigd
vendictioner wsknck
Fieikgatwahnganienieaithfantogsiuotionenlomoxkanintendosansvongfofskdorsom
crusioe e fcking ng e kng n c s pncn rcnrnnn en
Lielostinte ucketengen deknonner atpovkerwogenerstblte
-1
Lstnneaeckarpoedte for lont,ettenbodepovkervogeneochkehslabite
Fioeioi haoa eonr nipn rnnnnoovynnne nnnn an nnnnne jnnn nnnn nnnn nnnn nnnn nnnn nnnn nnnn nnnn nnnn nnnn nnnn nnnn nnnn nnnn nnnn nnnn nnnn nnnn nnnn nnnn nnnn nnnn nnnn nnnn nnnn nnnn nnnn nnnn nnnn nnnn nnnn nnnn nnnn nann
Cylindricr inredinrgnunmertnne nncnne nnnnne nnnnne nnnnne nnnnnnne nnnnnnnnne
p79c.30
H1603 Ucr Manul Hama Breze and Cooion, Rev 08,2022.28indd 29-50
Cukelsakerbet
mnnn nnnnnnnnnnnnnnnnnnnnnnnnnnnnnnnnnnnnnnnnnnnnnnnnnnnnnnnnnnnnnnnnnnnnnnnnnnnnnnnnnnnnnnnnnnnnnnnnnnnnnnnnnnnnnnnnnnnnnnnnnnnnnnnnnnnnnnnnnn nnannn nnannn nnannn nnannn nnannn nnannn nnannn nnannn nnannn nnannn nnannn nnannn nnannn nnannn nnannn nnannn nnannn nnannn nnannn nnannn nnannn nnannn nnannn nnannn nnannn nnannn nnannn nnannn nnannn nnannn nnannn nnannn nnannn nnann nenn nann nann nann nann nann nann nann nann nann nann nann nann nann nann nann nann nann nann nann nann nann nann nann nann nann nann nann nann nann nann nann nann nann nann nann nann nann nann nann nann nann nann nann nann nann nann nann nann nann nann nenn nann nann nann nann nann nann nann nann nann nann nann nann nann nann nann nann nann nann nann nann nann nann nann nann nann nann nann nann nann nann
Cykkelaknik
n 100
Overindirn rnrnnnnsrnnnne nnnnns nnnnnnne nnnnne nnnnne nnnnne nnnnne nnnnne nnnnne nnnnne nnnnne nnnnne nnnnne nnnnne nnnnne nnnnne nnnnne nnnnne nnnnne nnnnne nnnnne nnnnne nnnnne nnnnne nnnnne nnnnne nnnnne nnnnne nnnee nnnnne nnnnne nnnnne nnnnne nnnnne nnnnne nnnnne nnnnne nnnnne nnnnne nnnnne nnnnne nnnnne nnnnne nnnnne nnnnne nnnnne nnnnne nnnnne nnnnne nnnnne nannnee nannnee nannnee nannnee nannnee nannnee nannnee nannnee nannnee nannnee nannnee nannnee nannnee nannnee nannnee nannnee nannnee nannnee nannnee nannnee nannnee
Höq sunlight
For basic nongesunpugitoch mokfcknienher gacagngreflxer from wnttowrrod sbojnligen. Raphosondcnor nir qat in Goutte ligt K icvnnnnsusm sccgneagnssn rdivmnusutmed onprnnsvip [9] [10] 246kod sunlight Anandet meanogne cooet (22).
Avsodanyonhing
Vogennr rnrnnnne nnnnne nnnnne nnnnne nnnnne nnnnne nnnnne nnnnne nnnnne nnnnne nnnnne nnnnne nnnnne nnnnne nnnnne nnnnne nnnnne nnnnne nnnnne nnnnne nnnnne nnnnne nnnnne nnnnne nnnnne nnnnne
Jnnn nnnnnnnnnnnnnnnnnnnnnnnnnnnnnnnnnnnnnnnnnnnnnnnnnnnnnnnnnnnnnnnnnnnnnnnnnnnnnnnnnnnnnnnnnnnnnnnnnnnnnnnnnnnnnnnnnnnnnnnnnnnnnnnnnnnnn
Kippfmann Kipfmann, 1963. The diatoms (see Dukon de Boer et al., 2002) are not necessarily the same for all monomers such as -keto and -keto. Nomenclature of monomers and their generalizations in "Forschungskurzgewinn
hollustergohdenpa truckstangen
Iosten hcyn 10236363636363636363636363636363636363636363636363636363636363636363636363636
Stpio hnsf tienrnnnne rkrnne nne eaeonrnnnne aenrnnnne ane nnne nne aeennnne neanee
Vieaeusrnnnne aenrnne nnnnne ennnnne ennnnne ennnnne ennnnne ennnnne ennnnne ennnnne ennnnne ennnnne ennnnne ennnnne ennnnne ennnnne ennnnne ennnnne ennnnne ennnnne ennnnne ennnnne ennnnne ennnnne ennnnne ennnnne ennnnne ennnnne
Hnon
Wnstuyuie eienngg kndtu yqnnr pndre nrrn rannnne nnnnne nnnnne nnnnne nnnnne nnnnne nnnnne nnnnne nnnnne nnnnne nnnnne nnnnne nnnnne nnnnne nnnnne nnnnne nnnnne nnnnne nnnnne nnnnne nnnnne nnnnne nnnnne nnnnne nnnnne nnnnne nennne nnnnne nnnnne nnnnne nnnnne nnnnne nnnnne nnnnne nnnnne nnnnne nnnnne nnnnne nnnnne nnnnne nnnnne nnnnne nnnnne nnnnne nnnnne nnnnne nnnnne nnnnne nnnnne nnnnne nnnnne nnnnee
Transcription factors, including miR-145a and miR-146b, regulate cell cycle arrest by regulating the expression of transcriptional activators such as p21, p38, and p40.
121Pckngsoska
Den loteepourwosirnmer summest2kgpuknnrder nntneupe
Obsvee aagnns stedknpovkeon mntlesur vcrifong.
hnnn nnnnnnnnnnnnnnnnnnnnnnnnnnnnnnnnnnnnnnnnnnnnnnnnnnnnnnnnnnnnnnnnnnnnnnnnnnnnnnnnnnnnnnnnnnn
T
- forget to lose voskennaker duay alfrenkanigen
TIPIs Wifl 10124689357888888888888888888888888888888888
[13]5-punktssokerhetsböte
e 1
Kapalipngde 10000000000000000000000000000000000000000000000000000000000000000000000000000000000
037
H1603 Ucr Manul Hama Breze and Cooion, Rev 005,2022.02.28indd 31-52
(14)Luding ay stolcn
·《中
- Vlucimunngnepet (hiv) /n/10/2014/10/2014 10/2014/10/2014 10/2014/10/2014
[15]Fumnse skydd onsolskiqid
Vogengnau (1) 15000000000000000000000000000000000000000000000000000000000000000
M
Ander behv hovh hov hov hov hov hov hov hov hov hov hov hov hov hov hov hov hov hov hov hov hov hov hov hov hov hov hov hov hov hov hov hov hov hov hov hov hov hov hov hov hov hov hov hov hov hov hov hov hov hov hov h
- Siedt, aus dem fritenrufener yokugui krokonen; Sehunder dem fritenrufener vortreten
(16)Fachingsjestering
Vikings" Flammages out, sprints after evildoers later. Flammages under trees, skulls, idlerinkers, mokwamers, and a host.
Scenes: Scenic flammages in the sky. Go back to the old man's house, looking for his impulsive caries.
Kretrnereepdncnne nnnnneaeonrnnnne
[17]Montemcukelammen,17a/phvogpen
Sikur nukjumn 12h h, ygelmeppnipn 10h om n k jumnne nnnnnae 1yelceepnnpnns (197)
- Sowf sakernetemmer (Tuluprno for all skne as sakercnppn
- Likelogenan fester Insti kelsarckoplner mienenerapie cuike fuel
181Tobertisssnshiefrny
Truck gden hio n 180 chh cdoaon dons koppn 180ppf for an (cooepch s of chrooggsenr cn den genmngnnspses)
Wanducayket kuyuunuonngoguiupupcnien dennncnnaaoppngponten Knoherer an Puet eneepnpe
Dinomus Duthunum monosperma (syn. glycine) form a homophilic group (syn. glycine) for homologous glycosides. Gonansiforme amplifying regions glycine (syn.) (consisting of proteinaceous and “tively repeat”) (Gonansiforme in the case of exon, operon, palindromic, cytosolic, endocytosis, biotic underdelt, endodystrophy, foliofimbriae/anaerobic brasassamensianis) (Gonansiforme in the case of exons, operon, palindromic, cytosolic, endocytosis, biotic underdelt, endodystrophy, foliofimbriae/anaerobic brasassamensianis) (Gonansiforme in the case of exon, operon, palindromic, cytosolic, endocytosis, biotic underdelt, endodystrophy, foliofimbriae/anaerobic brasassamensianis) (Gonansiforme in the case of exon, operon, palindromic, cytosolic, endocytosis, biotic underdelt, endodystrophy, foliofimbriae/anaerobic brasassamensis)
ALLMNAINSTRUKTIONERFORBATTERIER
H1603 Ucr Manul Hnns Breu and Cooion, Rev. 085, 2022 02.28indd 33-34
2802/2022 17:35:36


Hi603 User Manual Hems Breve and Coupon, Rev. 005.2022.02.28 inkl 35-36
28/02/2021 17:25:36


VEILIGHEIDSRICHTLINEN

WAARSCHUWINGEN
Hi603 User Manual Hems Breve and Coupon, Rev. 005.2022.02.28 inkl 37-18
Fietsweligkeit
Mundus 104 f. Schumacher (2007) This document is a translation of the German version of this five-spotned form which has no grammatical constraints to be translated in accordance with the current ISO 1983-1 standard. The German version of this five-spotned form would be translated in accordance with the current ISO 1983-1 standard.
Rijgedrag
Wnns uonrnnnrn rnrn nrrn rnrnrnrnrnrnrnrnrnrnrnrnrnrnrnrnrnrnrnrnrnrnrnrnrnrnrnrnrnrnrnrnrnrnrnrnrnrnrnrnrnrnrnrnrnrnrnrnrnrnrnrnrnrnrnrnrnrnrnrnrnrnrnrnrnrnrnrnrnrnrnrnrnrnrnrnrnrnrnrnrnrnrnrnrnrnrnrnrnrnrnrnrnrnrnrnrnr nrnne nnnnnnnnnnnnnnnnnnnnnnnnnnnnnnnnnnnnnnnnnnnnnnnnnnnnnnnnnnnnnnnnnnnnnnnnnnnnnnnnnnnnnnnn nn nannn nannn nannn nannn nannn nannn nannn nannn nannn nannn nannn nannn nannn nannn nannn nannn nannn nannn nannn nannn nannn nannn nannn nannn nannn nannn nannn nannn nannn nannn nannn nannn nannn nannn nn annn nn annn nn annn nn annn nn annn nn annn nn annn nn annn nn annn nn annn nn annn nn annn nn annn nn annn nn annn nn annn nn annn nn annn nn annn nn annn nn annn nn annn nn annn nn annn nn annn nn annn nn annn nn annn nn annn nn annn nn annn nn annn nn annn nn ann.
Zichtboarhei
Vos comruiiie 10000000000000000000000000000000000000000000000000000000000000000000000000000
Becqg gebrk
Dcncnherer is bestedior fot versonen rchemrnnns quesrs (focar in dazaa hneffre ssprednere gcpimr nft fenvs, inotroe enolifefetpden tunus besccuowf fepqanov ne deont qapqik reine cirele mertor oie mepegegehut, metome:
mrrnre hrgg
-
-
*
- glauwrn bpaarwirzrs dnerer of buarr deanr hnrn ranee rrebragc wne dernng
-
- 1
AAN DE SLAG-INSTALLATIE
I'aboud vondevempoking
Aorhongersnactur[0]
WicnetseKuppe1g2x11B
Bc
Wine
·
Fetscm jxj
中
Score of 44
-
(1)
[2]CD001:over 2
2X0519320
Zorechee(29)
+
Femomx80yepnor
mre ng yonde ophong 2e
Zuknkiy
Aegbngngeefetcom2q
Wielrnnnngn
·
·
·mnnnnae hnoaee 12
(
500655555555555555555555555
1
A
一
-123
Brazir beesr (2q)
·
H1603 Ucr Manul Hnns Breu and Cooion, Rev. 085, 2022 02.28indd 39-40
(13)5-puots veilighieishomns
Lauu uinieiisienieiieidienenienieeepnne iueeaeenee eaeonr [Oeyenoeepn] (15) Carotier of de schuierbandzinaunlndien ne de schuierns vamwukn Stte de hooote indoe de oepn] jie enoppe de schaenenergemnnono 00000000
Vehhde tneus gospen wond de sroodtien mertn 1kag amwseak in dce gsp 1cep e kunner (i)cdt ciee zvrenr. Rue f enge vond rnrnn (3)f nnd sroodan (2)uon uocd lnd sveiggstepechont. Controler of ne veilng hong sponen, wovend onn anon heide sponedshoien to nakein
[14]Zitie achteruit leunen
Og 1000000000000000000000000000000000000000000000000000
- Am insinlneipnlo 10, ton der nuleiug non rernen ot noe nnonrtonnne nee nee volgale gwnene
E2019/347
[15]Frontale of dekkingen en zonneschernen
The commoner need eepositioing [5] are an extra zonemeirs [5] Diogocfiscking mssions of geostcn net
Wenrder dce of konligen mert in pcrnui kcnmne f thc oerster f his [h] wonen upgebogen. Stult the hst met n Klmel proritio to tioe rth fokknton, kouo
- Escheninde dornengen anieninong met her regenerl [S]d in de amierste gocstas [S] is oggevogen. Aie hregeneri
Vortrig is nnt er der goendgen vordar the nong
-ewestidevoorkn von her reenerelncde hoxefjelonnerherrane onndevoornt
[16]Aanpssing van de ophanging
H605 User Manual Hems Brew and Cooon, Rev. 005.2022.02.28 inkl 41-42
![Hamax Cocoon - [16]Aanpssing van de ophanging - 1](/content/2026/03/575914/images/a7f3979c646a04e59fbd83a51b5cf707911c26ad641a7cc3a2d5a4a124db2cfe.jpg)
ALGEMEENE GEBRUKSAANWUZING VOOR BATTERJEN (ACHTERLICH)
NtHnncbodboe bortber hmoogntpoderherden
Herinnabare eneienenenererntnnerneiienenenene nennnene
- Seerak gen duree mie wae brenen fcrnien vner verschienlupedrck
e
1
H1603 User Manual Hams Breas and Cooion, Rev.005,2022.02.28indd 43-44
2802/2022 17:35:36


18!Befestsender Anhogenykpupng on Fohrgd
H1603 User Manual Hams Breas and Cooion, Rev.005,2022.02.28indd 51-52
2802/2022 17:35:37


CONSIGNES DE SECURITE

AVERTISSEMENTS
Important-garcezps histracn pcoe nrefere cfo
Pnne nnnnne aenrnnnne ene eanennnne ne ane ene ene ene ene ene ene ene ene ene ene ene ene ene ene ene ene ene ene ene ene ene ene ene ene ene ene ene ene ene ene ene ene ene ene ene ene ene ene ene ene ene ene ene ene ene ene ene ene ene ene
10
-
-1
f
No pas ouisser avee des contants qu'aossent les limites de pays.
AVEERUSSEMTI,NSISIOSSOMSUNONFOTONSURVION
Eivizq ou vient ouiusse timpor au glissor hor de la cousette an d'avion de graves biresurues. Ulliezau touliers le s'estime de nettoire.
Les occuptons doivent soudre couper en casque aprouve et correctement ajuste si que la souscette est confugueré en mode bicoque.
-
()
Fie t r e t t t t t t t t t t t t t t t t t t t t t t t t t t t t t t t t t t t t t t t t t t t t t t t t t t d
Aerat de tononion disnction, rerees cscnsis ciemtni sncnnti nce tne pinaege, peinotge ne gcnitge de la biie.
- No perrmetz janeis ques parties du corpe de l'efant les veteents de varfont les locats de ses
choussure ou des iouctes puiessont toucher des composants an mouvement
Nestorlez journis l'的爱情 de voyage nul aucurnon autre pas excepte par ce preappris par la fabricant. Napesort es cunque malformation de la remnance!
- Mochsmae mae enaegleefie fainrnnnne rnrnne eepnnepe nene nee nene nene nene nene nene nene nene nene nene nene nene nene nene nene nene nene nene nene nene nene nene nene nene nene nene nene nene nene nene nene nene nene nene nene nene nene nene nene nene nene nene nene nene nene nene nene nene nene nene nene nane
VieetepopotenpnsipnpsrnnnncnntionGndtngspsnpssnppssnlnne
Ntivee prs de sabnrs derhagne Nere hage qalwes nre hage de aonr g
- Pas que lesyer les instructions du faicment peut entraîner de groves l'essorance et même le mont des passages et /ou du conduiteur.
- Necemestes pess gus yvrs nans vles ge prusstort gucjovt
Assure you que tous les asposnits de verraillage sont enveils ouont toute utilisation.
Assure you que la fin de stationnement est bon engege forque you chao pleco ou sortir vontents de
AssessovsiesieeioiFonrVoroeefnfoforsaeysnepezreepes:prorod
- The content of this document is not intended to be published in a final form. This document may have some errors, but it is the same as the previous version of this document.
Nioeaeonrnnnneesspeespsppsspeeppepepepepepepepepepepepepepepepepepepepepepepepepepepepepepepepepepepepepepepepepepepepepepepepepepepepepepepepepepepepepepepepepepepepepepepepepepepepepepepepepepepepepepepepepepepepepepepepepepepepe
Nuee e gce pies cie nane fumies co mndnncnns rccicfumiss
Sordz a espiot les denges dexposition des pasosers de la remarque aux conditions meteorologiques coups de frond en cas de basiques temporeurs ou desjusrtion en cas de temporets ou des pere ventilation au nettocton opsonopodien
Les usilisations non prevuee peuvent mener o des situiations dangerees. Homox n'est pas responsablc aes
dominoes cased por des usisacion non previaes. Toute utilisation non previae est aux risques de furisicereur
·N
-Neurolncnnepeonne neeane nne enne nee nee nee nee nee nee nee
Nanomaterials are composed of nanoparticles, which can influence the stability of nanocomposites. In this paper, we investigate the
- Nuee ene ene ene ene ene ene ene ene ene ene ene ene ene ene ene ene ene ene ene ene ene ene ene ene ene ene ene ene ene ene ene ene ene ene ene ene ene ene ene ene ene ene ene ene ene ene ene ene ene ene
No tractez lome la remoque lorsqu'a la rau de la poussette est inconnue d'moiue qu'elle soit ecoe en position de rangolement (vivie action 18).
03
Hi603 User Manual Hems Breve and Coupon, Rev. 005.2022.02.28 inkl 55-54
Securite de la bicyclette
Aocn ttrucr for rurme dvcu cui, coss u y quo culli n o apprrode pkr wckr chnrncdce bccnus. eepa de lae fes aupmmpn pounss, ronomont corneemt. Re escomparec tion technicien be buccines ve h ene srrpnt in biyqalng l qte senn au cchieh mnnnernn anmert to the leopn. Ure reectioes 10gles minumun er the opacitlcs of you osse wcrk ra tner qwv uau ci bci tceess coimale.
Comportente de compuite
Eurpnsus Hcuaa tne rernnere, hiehuee threccuagc np difrrnent of oepenrnthe raopdane a mnnn cdu pndie de nrenque. Fumion 1000000000000000000000000000000000000000000000000000000000000000000000000000000000000000
Hi603 User Manual Hems Breve and Coupon, Rev. 005.2022.02.28 inkl 55-56

28/02/2012 17:25:37


[2] Detochernio remoque de la bicyclette
Pou tioiue fioinieo hioe iioe oioe oioe oioe 210 p65 2024 10000000000000000000000000000000000000000000000000000000
Ines fucrue de poosstree [z] cels the point of connection curat [T] The viatius reemire sur fausse de poosstre pour vien'evie quelles est former (Tae):
Pour nederer le brane de cayuee de la ronique, pachere d'chona l'ogone de senme 2g, plus fles gusper le houmon.
de conponn mncs de cayuee ci hivens lamerei enenmndhne ne nangie de sennnont pue hongd hingyie peu ittretet.
- 2015-03-04 16:00:00 - 2015-03-04 16:00:00
(22)Replierlaremorgen
Aoutie ple gge le sare et lauppeau de securite doivent enrenres en bure de pousse doir etre totlement inserede
Te t t t t t t t t t t t t t t t t t t t t t t t t t t t t t t t t t t t t t t t t t t t t t t t t t t 0
Poussezio banaere poussee 201wers favont pour ques inenraque commencne serepter
Lorque hne nennssse est non mernnivers inwart, pouszie maene nane [22] ne in reonques hnain
Assure you quies penees 221sont soneusment reises don to remque
Ciejne fsi rane ciezicnles sangare nane 22puee, eanruiu plei mnnmncn bie kpmf. hnsungcck paoen enie tfe duie renique et ene uauu ne dote raal chee ove de peleitienonque
ENTRETIEN ET MAINTENANCE
Avont d'utiliser la remorque, verifiez.
e e
+
qu remorro est totoimert de plesite et qu le marmotement est totoimert en voure sur les dvois fles (noumias de verminier ine forme nousses).
ee dossier duie sur correctement secund er sere lae consultorica section demontion cossos
- Leflururusccnreies fienrresdowertupcure the inssssselees
-
+ "eepy hne nne 2kre pnnnne ennnnne ennnnne ennnnne ennnnne ennnnne ennnnne ennnnne ennnnne ennnnne ennnnne ennnnne ennnnne ennnnne ennnnne ennnnne ennnnne ennnnne ennnnne ennnnne ennnnne ennnnne ennnnne ennnnne ennnnne ennnnne
Management
Aurn rannmnnrnnnne nrrnrnnnne nnnnne nnnnne nnnnne nnnnne nnnnne nnnnne nnnnne nnnnne nnnnne nnnnne nnnnne nnnnne nnnnne nnnnne nnnnne nnnnne nnnnne nnnnne nnnnne nnnnne nnnnne nnnnne nnnnne nnnnne nnnnne
H603 User Manual Hams Breve and Coupon, Rev. 005.2022.02.28 inkl 57-58
meas esti t cie pcoe 1000. Si me gao hioe oon snt nereosorue rour mohuho hoe prnne 100000000000000000000000000000000000000000000000000000
MODE D'EMPLOI POUR BATTERIES (LE FEU ARRÈRE)
- testifuriduereercharqdesplesnnearchegocies.
- Eukur des ples:tefenvccde fucieovnt de lscnor.
- iRrntirnirnirererreeaenrreepnereae nneqnepeesne eenerssnrernnnnre
- Seleamertnneepnme npne nnppeepnnncnne nne nee
-
Mert the issessieaeour eelircipocnctacte
-
Sorfies pressegeespeepnre.
- houe flesas aies saees ciee eee
Hi603 User Manual Hems Breve and Coupon, Rev. 005.2022.02.28 inkl 61-62
BeepieZerIworWen
P12.3.4.2.2.2.2.2.2.2.2.2.2.2.2.2.2.2.2.2.2.2.2.2.2.2.2.2.2.2.2.2.2.2.2.2.2.2.2.2.2.2.2.2.2.2.2.2.2.2.2.2.2. 10
We precepted that making working worldwide's preclinical evidence-based interventions is not a swarming tool or a means to improve quality of life. We have reached out to the research team and asked them how they would be used in these circumstances. In order to make this work more accessible, we created a project team to create a preclinical study on using preclinical evidence-based interventions to improve health outcomes. The goal of this project was to develop a protocol for conducting preclinical trials in which patients with severe conditions are treated in a way that minimizes their risk of developing serious medical problems.
Dopwicn
Woozapzirn zinr opumitn woccez hizpizcizn 100wrcu oioe mwnkngkprzakr kawvre hokupssuzo in fucnusopnizie briefted. lue cunlntf nrocnne zonmote rohlt fohtpoukpuu pracnckes, ta rnoenrnnn wihbncnnympnkr (uy) pnrnnn nnrnnn nnnn nnnnnn nnnnnn nnnnnn nnnnnn nnnnnn nnnnnn nnnnnn nnnnnn nnnnnn nnnnnn nnnnnn nnnnnn nnnnnn nnnnnn nnnnnn nnnnnn nnnnnn nnnnnn nannn
Furmpwckke koo ou spceekk (fok wioocowymnupkne mki fau) /r'ecipkrkki de couenewak, ouu prsnc
Koknckwijk's open space management welleven no proofof "Uganda" is an open space movement. Superimpose on the open space of uinkinkwijk's open space policy, improve water quality/pipeline (5/1) and manage water quality/development, promote ecological
Oe e e e e e e e e e e e e e e e e e e e e e e e e e e e e e
Wcncnepcnipcnicieprzdu Ropocnneie shldcnie pruczep
Cgpyzdoaonrjepnnepeeepoeaeepoeepoeepoeepoeepoeepoeepoeepoeepoeepoeepoeepoeepoeepoeepoeepoeepoeepoeepoeepoeepoeepoeepoeepoeepoeepoeepoeepoeepoeepoeepoeepoeepoeepoeepoeepoeepoeepoeepoeepoeepoeepoeepoeepoeepoeepoeepoeepoeepoeepoe
Opeww02200122026ggy Sprewofo do orzep
OBSLUGAI KONSERWACJA
H1603 Ucr Manul Hama Breu and Cooion, Rev. 08, 2022 02.24.15nd 67-68
2802/2022 17:35:38


c001co007BnHbBec).CtahheHaBecu,yyepKINBaBpykaxBeonOHNbHbKPOHHTHeIPOocnTeH3TETU0bE BnEOHNBOKPOHHTB. yepKINBaHbA HpIaBnHOHbBOeTOE.OTNHOENCB000BnEOHNBOKPOHHTB. 000BnEOHNBOKPOHHTB.
INPABNIA TEXHNIK 6E30NACHOCTN

IPEyIpeKdEHHa
Baxho! Coxpanite 3ry nHCTpyKnHO Ha oyduwee.
3TOXIINIECOTBCTBETYCREYNYENNNEEHNBPENPENPNENNNNNEENNNEENNNNNEENNNNNEENNNNNEENNNNNEENNNNNEENNNNNEENNNNNEENNNNNEENNNNNEENNNNNEENNNNNEENNNNNEENNNNNEENNNNNEENNNNNEENNNNNEENNNNNEENNNNNEENNNNNEENNNNNEENNNNNEENNNNNEENNNNNEENNNNNEENNNNNEEN
CnchbHc npdaHaahanydAetBBO3pactcdo6 Mecaue.
CnHbHe npndHa3auHbIaTeTae, KOTOpHe MOryT CuTeBcE Bo3 NocTOPOHHNOMOuM, HmKOTOpHe BnAodAot NoCTaTOVHNOPOHOCTBO WEEHO rOgDnO NO3BOHOHNHMA. EChYBaB 0BAMNKHT CmEHMeR, PnOKoCYCbTHpyrTaC nEDHATOPm.
He npae3aHcTetO, KOTpE IpcBbAoiot OApHMnHnIIO Bcey. BHMAHNAH NIKorpa HcNtABoRtBpeB6eHaBe 63 neCmTOA.
IaHnHn HbBckbnabBaHnnc MoeK TnpBcN K TaXenBn TpaAM. BcTeJa HcHbJyRte ChcTeMy
IaCCsKbHbDcKbcNcBcHcHbNOpABnHO NOoOpaHNHe cepTnIOPOBaHNHe IINeH, KOrdA INaENHE NcNcEETyBE TcKcAeCTBcRBNOpHNHe.
- Bycknoobka npuca na Bnnaet Ha yctouhBOCTb BCIOCHnEDA n yBCNmHaeT TOpMaHOH nyTB.
3T0nPjHmE WpHEBcHnEDA.ObaJIaTe DoONHOHTeBHOpe NPOCTPAHCTBO HOMNHTe O DOLbW EOKXPHOHTN NOOBOTA.
Ieepa Kaoqdo noeaednnpoeepre, Uto6bpiu npue H Meuaan TnpoKHeHIO, Kpyenno nndan H VpOeBHeHIO BENOCIOH
Tepeo 10eOeHka, eOeOeJda, OooBHeIe HUpyPKN KIN XyHKn He DoXNbH KoKTAnKpOa3b CdoNkYuHmHcNcTAAHn.
He yctanabnbaIte bnytpbpiuena aotokpecnai nnpoobye dpyne cndehny, kotope he naepewenb npnoKsBpOeTEn.
He BHOCATE HXAKHX H3MeHHeHH B KOHCTOYKIpNO npuena.
HnKgO4 HcNtObIyIe BEOINCHNHObIO b63 HauNIOAeTOO CBOEHNH. CaOBaIITHe 0cc DeCTyBOUHae 3akOHoAEbIyIbe TpeOBaOHN K OCEBHNHO.
Ipeae HcNtloBaaHmOpNoPoeBepreBdAaBnHeEe BnHxhX. Bcerda HakaunBaTe BnHbI Do yooBnBnBnBnH, YkbaaHnHOrO Hx N BhoHnECh TcPOHe.
HeHIOJIa3YHEIHTHNEOcPTBa HbOCHOBaPactBDOTEN.HTNTIEaEDNEToTkoCnHOUbKO C
HecodnoJyHKAAHN PNOH3BODHTEN HOXET PNOBCTK TPOKBN TPAHAN MTH CMEPTN NACC3KHPB/EOONCNECTA.
He no3B0nAte CBOeMy pe6hky np4bC 3TNm n3dennm.
- Neped MCNONb3oBAHnEN yOCTOBEPBTECh, YTO BCE 60Kpyoune npucncocobhen 3aeneCTBOBaHb.
BOPENMAOCAKNI BICAKN DIETEN HPOXCAHNOOBATBOBHTCROHOHINTOPM
KoE0eAahHne NOnyehn TpaBn BO Bpma PaackNaBbAHn IN KcNAdBaBHn H3DeHn DeTH DoJIHHu HAXOJHTb HBeOeONHAC DcPcTOnHH.
3TIOI HADMEH I neHADHNAHNOI I RO I CNOHNIOHNIOHNIO HO BPEMN KATAHNI HA KOHNKAX. YCTAHOBHM DIOHOHINHOHOE KOONCO, EOR MOHOK INOHNIOHNBOITI DIER GERA.
He HcnoIb3yIe npnHaedKHOCT, KOToPbIe He pa3peWEnb Ipon3BodTeHem.
O633aTeHbNOHCNbLYBtToKIOBeTcAaHbYeTaAaHbYCaTH, KOTOpbIpeJPOCTABeHNbHbMnPEKoMeHbDorAbHbNPOHOBTeHbN/DACTPbHbTOpOM
HOMATIe OB OIAOCHSTK, CBVAHNNX C B0A3ECTBAHNA TEMPeTAPy, HANPMPE, ICPPOXIAKDAHNEBETPOM, TENIOOOY UADN, KONKORA MEAHEN AKTBHNAH NACEAOKPn PnOHTAANTHEINB OPEC XHOADTCAo ND 003BCTBMEH MHNKX NHO BVBCOKHX TEMpeTApD 0e3DQTACNOH BENTMUNH NIKBOPOHNNH NOTEPN XHHKOCTH.
NCHON30BAAHNE HNO HAHOHHEMOKOTPNBECTK NTOAHCMCHYTAYHMOMKAOMTHAMHXHECET ORETBCTBEHNCTO 32 HO60J UEPD NO TPOHINHEHPEDYCMOTPBHERNOI30BAAHMA.30 BSCNOCIDTBA, CBN33HMME C MIOHb33BHAHMe HNO H33HBMHO, DTEHOTC ZM NO10B30ATB.15.
BbpeHwCtWbSobAHnBeonpueEna neoxoNo 3RkpaBte Ce741mN qexo.
He kpenrakonnno pys h pyky-tankareh, rak kto bner Ha yctchnoactb npjena.
He neperpykai Te npuien, kak 3to Bnner Ha yctouhBOCT caHoro npuena n Benocunnea.
He nprrpyxayre cymyr H cchnye KAPMaHb, TaK KaK 3TO BINHcT HA YCTOHNBOCTcAMOTIOHNEDA M ENCHHTA.
He Xpahnte DaeRan 8 KaKON-THMO Ene BHTPN INN CHAPYXIN PnHcE, KPOme DaeRANHOO OTdENHNA, TAK KAC BHENT HAYTNOUBHOB CPHPnEA.
p9p70
H1603 User Manual Hams Breve and Cooon, Rev.085,2022.02.28.1dd 69-70
H B KOEN CYKAE HE OY KICDPYBE BENOCHNEDOM PNOEIN C YCTAOHOBENHM DNOHNHTENBLH NOKECOM 1nN NOBIOBAHNA B KACTEB PNOYNOHONKAN.30 DNOYCKAETCR TOnbKa KOrDa KOneCO HAXOJNTB B NOIOKEHN DNI XPAHHEH (Cn. paoan 18).
Bezonachoctb benochnega
Iepa nncnne Hnnnnae K noenrnnnny ynoonrnpbtehnt, tno on no nndn 8kyckpnoa hnoe BcoBETCTN CnHcykunu npnoaBDOENy BNOONcHnO A OCHNnA HnDnKho 0ynnnnnpnnpnnnnpnnnnpnnnnpnnnnpnnnnpnnnnpnnnnpnnnnpnnnnpnnnnpnnnnpnnnnpnnnnpnnnnpnnnnpnnnnpnnnnpnnnnpnnnnpnnnnpnnnnpnnnnpnnnnpnnnnpnnnnpnnnnpnnnnpnnnnpnnnnpnnnnpnnnnpnnnnpnnnnpnn
MaHepa e3d
B Boepn A KcKpOKnBn UynApEnBeNneONOnD OyEonOone TaeXeHm H MeHee OteBbUHN Bn-3a
doBaBnBnWoroe Beca npCnpeA. NpeP BmEOnd Ho XaBnInHNo yOpDR CnaccKAnPM, Chavahla
npNtKpKHyTReTeB C npCooHnENnnBn 3aryJyKeHHm BnpDion E CIOKHOH MecTe, OYbM npBnBkHYK T b
yApEnaHNO ENoOND. He 3aoBbaIye, YTO H3-Ta 3ea BnpNeJa TPOmO3H NoYb ENoCnDe Dzoy
00blue. CoBnOaJIte OCTopoxHxOhtb PnBnDxHMeHH BMn NO cKNOhy, Ta KaK BeNoCnEe DZey EtHaNHpTa KcOpaCb BnCTpee.
He npbduaayr kyaahanyhB aHtozoum pykoBDCTe NKAKOMHAYHy KOCPOTy h 3Aednaiyepn PnH pnoXPOOCHN HOBOPOTB BO BPMBA JBNKHNHcno NpoHOBHOBBPON. CtapPAETbN 63EBaTbE 83bl Da KANHM, BDOPKAPn DpyCN PNPNTCTCBMn KOTOPBE MORY TPOPNKHYb PNJPHEN. INCtIOB2BHNE HNPNCIN A HBCNAIPOTNTHbY IOTOHxHIN MNODPOKHX YCOUBOHX MOKET PNPCTK N OATACHIM CHTyAHPn. BCsRd yPOKOCTBYTeBc 3DpABUM CNBCHN Pn PnHPTAHN OTHoCHTEHbTO TORI, BNNRTATC N yCBOVNI BEOZANCHMn bHNCNTOBAAHNRNPIWUEJI.
XOpOwA BnHMMoCTb
IIOI NOBUEHIN BIDNMOCTH NEOJONACHTHO BPOBM DIPMNHEH MHRNOFOYIKUHOHLAHBI HnPcHEN OCHaHEN IEPADHN (6BmH), ZADHMN (KpAChM) N KOIECNHOT OPAKTAEWMN. B NKOPBTNE C BWEHHEI CTOPHOH HHTERPAPOBAHb CEBTOOTPAAPQAAe TpyDIO. Pn INCIIIOBANH HADENB KAVETBE BENOPHENA Bam TAKCE CNAETy IPRMHENTOPAOKWBEH [9] AIOB OBCEHNNB Eue PnyuHEM 3AMCHOTHO.NIOJIYITZy ADNTHO PHANBO [22], KOTOBI BXOJNT BOMKICJT.
Vcnonb30BaHne no Ha3HaayEnnIO
Punipn peHnaHcHne HanepeBoc3K hent B COOTBETN C cOeJzAHHMHC B HACHTOeH pykOBDCBCTBe YKs3AHNN MNoDOPAM OBOHO NIOLOB3OHN C HEKNTECHMHN DBNXHEHN, TOTPOyA H noBbHmdoPoxoXk. KcNpOaTuHNO npOniE NOBbI pOyrN CTOCoBm KOHANH MaH XaNTaER NcNb03B0HHe H No HauHAnHg. BOKVNa, CNDNPOOeH, CNDYIOVEe:
e3daCnpebWeHemCKPOCTH
63490634000286:
2KONVYATAUHINPHUENB KONMEpyeCKHXHJX
1、REDE803KA.WW507THNX;
- nepesogka 3aegka a kakow-nlo Mecte bkyhtn mchkayn pnuuena, kpone 4aekharnoo OTO dehenenhy
- 5yckpncpa 2pnuu hntoc038bnbmm TPAHOTNPHN cpcETRn (aa KNCNOHEH
3nKtpoBcnoCnO0);
Heco0kOeHHe codepKauxxcB Hactoae pyko0oqCTBe yka3aHH.
NIOIROBKA K 3KCNJYATAUIN - YCTAHOBKA
[1]CopeKHMoe yNaKOBKN
·Kongyocongyepa(1x)[14]
-6bictopchenhoseKaneo(2x)[1B]
CVMNG*(1x)[1C]
JONONHTHENTHOE KOENCO JINH NCHN308AHH B KANCTBEPOYNOUYOH NOKCKN [1x]FDI
- -
3aHnH qoHaepb (1x) [1F]
BenoCnneHbKpaHwTeHH(1x)(1G)
·Kmey(2x)(1H)
BHHT(2x) [11]
Pykoobodcbo nonb0baTeTg (1x)
[2]3nEMeHTbN3aH
Pyka-tonykareny[2a]
- Connaezaunthaa utopka [2b]
Cervatbnyexon[2c]
-WebTpaBnHraToyKaKpenenHa[2d]
Pecynpobka ngpeckn (Zei)
Noboponoe koneco [2f]
CoedHHHTeB 1aB eNoCnHTeNHO KPOHHTeHa [2g]
- PnpdooxpanHTenbHbte uHTKN [2h]
PyHOBTOPMO3[2]
-0x4eBnK[2j]
CCKHNANPGVIVNPOBKNBBICOTPLPYK
ronkareng[2k]
3AMKOPOKOOSK [21]
CETATBNGKANHb/NECTO
oxogene (2ml)
CROSHOHNJTOPM
3aHnHnHnHb[20]
25/02/2022 17:25:38

Pazdelenhny perynlopebka knknoha 2p] Cxctema fknckcainn n obkBa cnden [2r] Toekni kpenleny cynks [2q]
Cymka MokeT He BxOaNTb B KOMnNeKT BaWero npuena, Ho OHa DoCTynHb KaueCTBe Akcecccyapa.
Baxho!y6nTech, 10 npuien npabunbno pao naoxen. Cm.nyHKT [6].
[3]YcTaHOBka 6bICTPOCBEmHbIX KOIEC
- npn nepBOB CbOpKe HeoOxOgmo Chr76 KonNaoyK, 3aunuauoui Ocb Koneca.
- YdoctoBepbTecb, 70 CToHouhbu TOpMo3 [2n] He 3aJeCTBOBaH, H 4TO OCB KOeCA qHCTaR.
HAXMMHTA H KONKY [3a] M octabte oc bKoneca b pniuen. IOTAHNTe 3a KOLECO yOEDHTecy, YTO OH OHAENHOZAFHNCKHOBOH.
06PbHTHE BHNMAHNE,TO y npua nctb nebo n npbaoe KOaCn. HappaBHeH BpaueHH Yka3AHO HA BOKOBHXU. YCTAHOBHe KOaE TAK, 4TOO Hx HAPPAHHe BpaueHH COOTBeTcBOBaIOn CPTENK He pucHyke.
[10]PerynnpOBKa BbICOTpyKN-ToKATEA
YtObO bOpTpyNIOPOBAtb BcIOTy pyKTH-TOLKATEIN, OOHOBPEMeHHIO NOTRHHTe 3a cekmDn pcrIyIMPOBkN BYCtObl tyKTH-TOLKATEIN [10a] c obExh CTpOn, a aTeM npeMeCTHc e Ha HxkyHO BbCOTy.
- OtnyctHre ceknn dner perynpoakn Bbcotb pykntoKanen npdoonkae ToKaTb Hn TaHyTb
2717
H1603 User Manual Hams Bronze and Cocos, Rev. 005, 2022.28 indd 71-72
![Hamax Cocoon - [10]PerynnpOBKa BbICOTpyKN-ToKATEA - 1](/content/2026/03/575914/images/d0cb00feabcdaf26412e23e4d563cd76c115636d40ea387aa4dee406d8ebaf9d.jpg)
![Hamax Cocoon - [10]PerynnpOBKa BbICOTpyKN-ToKATEA - 2](/content/2026/03/575914/images/ea3dc866b5e552a461ac0623751459cbfee25623dd45553ab524d3e982ccfa9b.jpg)
pyky do Tex np, noka ee obe ctopohbHe 3aФнкруTORB ODHOM H3 NOnOKeHn.
BaxhoHJI JnOeaoHb H naoCINeHae ytaHAnBaHae pyuKy-tonKaTeH b TaKoe nnoXeHNHe, B KOTOPM 3aHouK BnOcHnEHa [10b] dyET bYHeN.
[11]PyHOnTOpMo3
- Bo apemnporynkn nn npobexkna haxatne ha zentpanbny KhoNKy [11a] Ha pyue-toKataene dyet
PnBODNTK CHNKeHNO CKOPCTN OONERATb YIpaBHeHHe Ha HAKIOHHbIX NOBepxHOCTX.
EOMTPOM3 TPTCA OTOPMHON KINKONCA, KIN CENOHTOUMOTNIOXIO NIM PBAKMAN, ETO MOKHO 0rpeyNHPoB3C nMOUHO paoNcNOXeHHbxC o6EHx CTOPOH peryraTApOp [f1b].
[12]Cymka pna 6araKa
- Cbemha cymka, KOTOPAR KpENUTCR K npuany, paccunrHa Ha Barax BecOM He Gonee 2 kr.
- 06pntte BHHMaHHe, 70 ecnn cyMxA 6yder nepperpyxHa, 370 MoKer HApWHTb yCtouHBOCTb
npnueea.
TTObI npKpEnnt cyMKy, 3aenrte nrrn 3a KpOKn [12a] a 3aHne qactn npuena.
3ATEM 3AENNEIETNHNKMOK[12Z]3AHHNHE KPOKNKJN CDOENXCTOPOHNPOMJENA OIOHNIH3A DNNKK, YOBIJI AOKINNTY CNYKHA NOHNO - yto8b0tcoo0nHtcyMKy, 0eHmte c0f BCx HcBtpex KIOKOB.
COBET: Korda cymha He npckpmdnHa K npdny, 3a HxHxHne KpOuH x Dm CymH 3aJeHTNb TnHnMk, KOtOpbe HauHcHnT PdO C HnH.
[13]5-ToueyHbIe peMHn 6e3oNaChocTH
Uzadniye pebeKHaT KAs, 1030E ETOI pyuO OPOH Uepe3 OTOBPCHT Meky HJN CbeBbM [13a] NOKCHMA [13b] PemNH. YOBeTeC, 700ne BcHn HauoTHA Tn HOM yOvoe c NneMa peBaKHa [13c]
CoiHnHtO 2do pRkHHIe NmBcHbPemHNECTe BCTAeNx I aENTpBHy npKHXy [13c] H naXoABo PCnc [134] Tk, YOBo OHa ZauCCNHyNc. OTOpyCHyDy AINH yNaXoBO PCnH 13F nHeVaeBx PemHh [13g], YOBo pEOeON bHs HnEaeKHO pIeTCHy. YODeHctc, Yo pEmHN 6beJAnOHCTe ZauMxCnPOBaHnO, NotAHy 3a Oba neueBx pemHn.
[14]HaKIOH cINHOK cAeHHN
YObyu YEBYNCHyU rON HAKONOA cHNNK OANDHO X3 CNDHNO, PACCTeTHHTe MOHNDAI POJUYENH KHN DODTNYC KCBZK KPNWJ.
Bpaathe pyky perynnpobkn haknoha [14a] anepd nn Haaad, noka cnHkHe docthrnet
ChyDilero hnoHoxeHH u he aepckpyetHa Naeche. Kaoaos CnHbE IMe3 10nOxHHe HnKHeu HnKHeu 14b, 14c n 14d1
[15]IpepeHHe yexbI n coNHe3aunTHnA wTopKa
- Pnueen Hneet ceratb yexon [15a] n dononnnntbnhyo connueeaunthyio wtopky [15b]. Ceratb
yexon 3akpbbaetc H MaONHNO. ConHue3aunTHA WtOPOKa nepeMeuaeTc BBePbN BHN.
Korda Yekho He NcHbSyTcR, XnMoHxPbHbB eBpXmKapMnE [15c]. Bo BpEm E3dA 2aKoNbaTe KAPMA CMOHNOTHYKEM, STOIN OPOETADATN PnAeHHe HEXON. - PnH Heo6pAnmOCTn HAKPOTe npwnen DOXeBNKOM [15d] KOTOPbXpaHHTcB a3aHem CETHATOM
KAPMAHE [15f].ECON DOXKEBKN BNAKHB, TATENbHO BcYwHTE ERO, PEXKDE YEM NPTATB KADMAH.
Kpenepeepnnoaactbexna Kpnoukam aan DOWBnka [15e] noq panm cpeepn.
[16]PerynnpoBkaNoBBeckn
BawhoI IIOECKY CHENET YER PUNOBAPAT A COBTETCTBN C 3A RYPK30 KPNUENA. Pn INONH 3A RYPK36 PEYVTRK IIOECKY DOKHEK BNTI NIOHCTBY OTBNNH HADN.
- Orkpoite peryyTrop noDBeCKn [16a] n cainhhe cre b TpcSyemoe noNOKcHne, a aTeM chOB
3akpoTe.
PerynoHO npoBepaTe npabnHoc7yCTaHOKpDeyrTopa ODBeCK.
17
[17]mpcoednneBcnoenmhoHKO pKoHHTHa [17a] npmoue Ⅱbctabte BCNOCHNtBnKpOHOH [17a] cooMnHnB for BNOENCnHO KpOHOHHa [17b] nOIOMOte ERO KOHcE BExP. KHOHa Nc cooMHNTNEIe BEOCNMDHO KpOHOHTHa [17c] 8TAMOTVcck CBAETRBAE PNDPA E MHCNPVTB EBOCNMDHO KpOHOHTHa
NOTAHTE 3A BEOCHNADHb KPOHHTeH, YTOOJI PPOBEPHTb HADEXHOCTb COEHNHEH.
PnKpEeHneIpeOxpaHntbIbI pEmb [17d] K D-obsAHOmy Kauy, T06bl 06ceNHTb 06oAnocHb coaDMHHa.
BenocheNTHKPOHHTAHMOXHOa3bOKnIOPOBaT B coepHHTeNE c nOMoHbKOJIua [17e], KOTOPB IAE T C HOMEKE.
[18] CHATTE C PRIHENA DONAOLNHTENB HORO KOLECA I NDA HCNOB3OBAHNA B KAYCTBE pnporyouno KONKNCX
25/02/2022 17:25:38
![Hamax Cocoon - [18] CHATTE C PRIHENA DONAOLNHTENB HORO KOLECA I NDA HCNOB3OBAHNA B KAYCTBE pnporyouno KONKNCX - 1](/content/2026/03/575914/images/678442830e872f5227a6381eadeabe7f0860e642f300cfdc00e716cc8feb5fc1.jpg)
![Hamax Cocoon - [18] CHATTE C PRIHENA DONAOLNHTENB HORO KOLECA I NDA HCNOB3OBAHNA B KAYCTBE pnporyouno KONKNCX - 2](/content/2026/03/575914/images/1e26d03bdc0a3e0f09d80dc8459201017fede34bbb05d75f4801a6549d61bd96.jpg)
![Hamax Cocoon - [18] CHATTE C PRIHENA DONAOLNHTENB HORO KOLECA I NDA HCNOB3OBAHNA B KAYCTBE pnporyouno KONKNCX - 3](/content/2026/03/575914/images/42df9e6c54678286a16326a855645293bb0b1a520b53aeb1e84c5784860e3a35.jpg)
HAKNHMTHe HA NAHKNY KHOKNy [18a] a3aetnONHTHE OBOUYI KHOKNY [18b] bBEPX, YTOO61 paoNIOKOBAPbTH BNTAHTMPOK NOKHe aEHTPNAHOTOH KTOHXKPNENHIN [18c].
B OpeHn NoaOaHb BnAocHe Bb MOKe TcKCHPobTa KcNEo B uHrTpaHbN ToUKe KpENNEHn B nepeBepHTmNoIooJIeHH. Y6BeNTec, 40 KOLeco HaxoDTHaHd UeIeTpaHbN ToKoKpENNEHn H He cnoocBO bpaatCra [18d, 18e].
[19] CoeHNHeHn npHcena c BENOCHneD0
Peped coaHHeHem npuee a CbeoHneon Hx Heo6doMa paoonoxnHb H roponoHTbHOI ROEBOXHOCT.
OTBeDnIpeNoxpanHTeBHyIO BNYK [19a] H3aa, HaxnHTe Ha cepyIO KHOKNy [19b] Hn HaeBHeTbe NBOcNTHnO KPOHUTHE Hua CENHOe yCTPOBTO [19c]. OmyCTWte KHOKNy n 036oBnTE IpeNoXpanHbIK BHYIO BEPYHTBC HA MEO.
- Notarythe 3a BcnoeHbKpOnuTeHN y6CnTecB cro HaeckHom KpeHHN.
- Ipponyctnre npedoxpaHntenbHbI rpoC BOKpyr pAmbI Benocnnaa n 3akpenute Kpok B konbue [19e].
Y6eDNTECA, cTPO npdoXPaHHTENbHbI TPO pnooAOT BOKpyr HnXHeRo [19f] HnBepxHero [19g] nepa
BAKHOI JNTOEOKO H NAOCHNEDE BCDEA YCTAHABNAHBEpyKHY-TONKATIEL B TAKKE NOJOMENHE, B KOTOKOH NAMOK BOENEOBA 19HJ OYAE DTHN,
BaxHo!nnoe3oK Hbncmne Bcerda nnonbnyre npdynpnntbnhfo
CoDHNHTE DBe aChT BmCTe H NOMECTTE npDynpdtHnBbI pAnK [19]B KAPMn dPa 19]paOcMoBk OAnOn, IcNobSyTe npDynpdtHnBbI pAnK c ToT cToPtoHb BnOpnepa, KotoPab oBaepaKa Kdope.
[20]3aHnnΦoHaPb
Zaekpene Hccknepo [20] a npyke-tokkateh. HatoHne peshnyokpyu kyyu n 3akpenite eBvVbEHNbC6xho CtoopnOo
- HcnoIbEyIte cOnapb c TOn CTOpOnb BEnonPnueena, Kotopaa Opaene K Dopore.
XapkeTepHCTKn FOHApA:HaBaHHe: Presto 2; MapKnpoBka: K1180; DaTepeKn: 2x AG13/LR44 1,5 B (a Kompne)
- YTOOJI ZAMEHNTb DatapeHK, HAKMTTE C OBEHX CTOPOH CHMNTe n+H189:H192epeHIOK KpbIky.
[21]OTcoeHNHeHn npuena or Benocnne
Yb0aOTcOeHNHbI PnHONrEOBENCHNDA, CHaHNAOTCTHmERIEpeoXpAHHTOHbI hTPOC [21a], NOTON OTbEaJIbEpeoXpAHHTOBHbIy BTOy[21b], a3TEM HAXMeHtne HA cepyo KHOKNy [21c] n CTnHEMPEoBENCHNDA KPOHHTeHc Co cIeHNORO yCPOTHCTBa [21d].peoXpAHHTBHnTPOc MOXHO BCYNHbIb oPbATHO BNYTpE bPeOHNHBOKPOKHTUHHe.
BCTaBte DonoHInTeBHOe KOleco for HcNoHb3OaBnHn B KaCteB Te PpOryNHOH KOnAckn [21e] B cHentpaBHyIO TOKHy KpEINHeN [21f].IOTAnHTE 3KOleco N yObeINTeB,4TO OHO HaeKeH0 aHaKnCpOBaHO.
YQbBAtOCTOOHNHBr ENOCHINH2H KPOHHTAHOTn OTPN3A, CHAAHNAOTCCOOHNHtIpeXPaOHHTIHbIy PCMHo[21g], a 3ATEN CABNHbTK HONKHY KAO COOHINHOTn BEOIOHCNOHO KPOHHTAHOTn [21h] H33ad. KOHcE BENOCHINH2HO KPOHHTAHOTn OTOCTHTCSB H33, h 3ATEM ERO HOXHO DYET BNTAHTN.
Korga Benochnigdmb KpohwteH He HcnoBcyTe, ero Mxho XpanHb B KapMahe [ZII] B HxNKeJyactn npnnae.
[22]CknaabBaHne npuena
Ipeed KnaBbAHnH EooXoDmHO CHaTy CynKy H nnAox, A TACKe NnIOCTbO BdNHyTb PykyTOkatakeY.
BbHbte pemcok [22] He and hnnn aact npiu cna, Tno6 bncnlaobabot cto B KCACTE 1aonctnoptpohoBNO ZANKA mnn nn PACKNUBAAHNPiNcua
Длралбдпкгнвсьнхьнхьнхьнхьнхьнхьнхьнхьнхьнхьнхьнхьнхьнхьнхьнхьнхьнхьнхьнхьнхьнхьнхьнхьнхьнхьнхьнхьнхьнхьнхьнхьнхьнхвсчс
ТСТОРНФИПЕСИОДУСБЕМЕСЕСТОПЕСТОПЕСТОПЕСТОПЕСТОПЕСТОПЕСТОПЕСТОПЕСТОПЕСТОПЕСТОПЕСТОПЕСТОПЕСТОПЕСТОПЕСТОПЕСТОПЕСТОПЕСТОПЕСТОПЕСТОР
HaxMHTaHa pyky-tonkatenb [2a] ot cebn, n npueen HauHET cKnadbbatbcn.
Kornda pyka- rokanbateny hny danabonny nepemene anepen, naXnne Ha zadnno pany [22c] npcnna no HapanaeeHHBHTo.
- y6eintecb, rto OKha [22d] aKKypatHO cIoxnnncB bHytpb npnuea.
B CNOJENHOM COCTOHN 3aDHN PEMEWOK [22e] MoXHO HcNIOb3oBtI JnA DfHKCauMn PnUeHn B TAKON nOJooHn. BaxHO! PEmEWOK OJNoHN POxOHTM MeKdy TaHbIO PnUeHn a 3aDHe oBk, n nepep packNaIbBaHmE rO h0oXdoHn CHOba PaCerTHyb.
YXOJN OBCNJKBAHNE
Nepen KcnoB3OBAHm npn ena yBeNTecb, yTO:
Koneca haidexho 3akpenneHa npuene.
P73n74
H1603 User Manual Hams Breve and Coupon, Rev. 005.2022.02.28 indd 73-74
HbHaKaayhB CootBeTCTBN C yKa3aHHbIM 3NaeHMe DaBneHn.
Pniennoctbpaonokm a mexanm 3aikcnpoh c o6x CTPOH He 3ydyte
CnHnK cyenHH naeHN 3aFHKpObaHb, CM, Hxke HFOOPMaHIO aTexo6cIyXBAHIN.
PpeynpeTebHbHnaxKnHOaHApyCTAHOBHe,ecnB3ToM ectheoOxdmocTb.
Harpyka HABROE CTPOBCTBO HAOAMTBC BONCYTMN Npdenax, n pnnien He nperepyxen. Cmnynncnrcnncnncnncnncnncnncnncnncnncnncnncnncnncnncnncnncnncnncnncnncnncnncnncnncnncnncnncnncnncnncnncnncnncnncnncnncnncnncnncncc
XpaHenne
HactoTbeBno peKoHMeYeZaXpHbAeR pIqnien Breeze/CocOON b CXOMN H xopoOIO npOBePTPBAEMOH NMOJIeHHO B3auuHHeHON OT pRnMxCOnBHeHxNpyE MECTe.
COBET: DnryuueaunrKaonnaHne Harnax npaearactc CnuaanbHbuiyexon dIxpanen
TexHnueckoe 6cbnyKbHaHe
Benoipnien Breece/COOAN KOMKNTKYCTCH CEMHIN DOKJEDENKOM, KOPTOB KEPIWTC CMOIOBko MANKH IN XAPHTNCR B EPHXEM ZADHM CETVATUM KAPNAHE.
CetatbH yexon n connue3aunthyio wTopky MoXHO 3aMeHHb B cnyae nx NoppeXeHHN.
ZeHTpAaHbA ToKc KpENnHa [2d]: eCNI BHyTpN ZHeTpaBHO ToKc KpENnHa cKnIaBc Rpa3b, pOoMTe 8 a00.
CoenHnntelBENBOeNHOHOrKoHNtHeHa[2]:ecnH BHTPN CoENHnTnEINRAI BENCHNHDHOKoHNtHeHa KcOHNHbA(2)B3,POMOHTE E0 BOAH。
He HcNtOy3e YHCTaTHNE CPeTbE HA OHObE PAcTeBOPHTEA. YCHTe TnDEne TOnbKO C NHOUoBIO CnAoBO MmNbTOPO DACTOBDA.
OIBK BYC KCHNDA [27] MOKHO CHRT C npDnA C cHbE O cHcHK. CTHAPBE OIBK BYC cHCHNDA BPNHIOB H C PCHNBOH MAAWIKC B X OJTHAOB BOE N C KOPKTHN KUKJOI OKMHN
EcmBau pRnien Oydt NHyDcTaB 3aAne HOpTMOHbX TPOC0B, OpaPTeTceB 6 CnyWoy NOeepxN KInHeTOMKOMAHNIHAMex 3yaKzAAHNN.
BO30EJHNEHOBENHOIeCNHOOB3TeNHO DaJItePnHcy/DOxOeBNyIOHOHcTbIO BuCOHXyB, OPEKHE CNpCTPAH XaPBHNHO
Ecnn npnnn noan n aapno nn bokn no hno nbo npom 0npnckk, opaonnttec K npndayo, tnoo npneepnct e no npnnpdctb k anhnenenekk k
Bce BaxhHBe KOMHOENTb, HApmep: TARBOE YCTPOCTB6O, CoaDHHTeHbHOe YCTPOCTB6O, PAmA, PEmNH Be3oAnocHcTb, OcSeTbHTHe bpeOpb, Ummb, NopecA T. I. NpOLeXaT pErYnRnH npOpeRk Ha npMeIadNtHexaJaua batKxRn BoNTbUx coaeMHeHN.
TAPAHTN
GAPHTAH N HMOFOYHUMOHANBHL DETCKN pIHNH Amax Outback deHCTery C dAbye Iero
PPOADXn. GAPPTAHNIc PCK AABCHNT OZAKHOADATCBCTBA COOTERTBYOUCI CTBnHs. GAPPTAH
PACPCNPCTPAHETCA HApDEpKtMATEPAHNOB HIO TROTOHENHb, H NO KPOBbAeT NOBSEXHDHIN, B3b3AHHbE
HEPNAHBNH NHCN03BOHMHN, OTCYCTBNH TEX6oCJyHXBHNN, HEcoNIOHNJW KYBAH3B a
PYKOBDCTBE, PIMNHEMHHNEOM EPMCHNOH CII INI NCTECTBHN HIO XHCMOC. GAPPTAH DECTBENTH
TOLko for NEPOHAAHBOHIO NKOPYTAIE, NOKJIAYHb, BHMBATEHIO OHXAMOBTEc B cPEOKEHDAUHN
No TEOx6CJyHXBAHIN o KCNPLTAATLNC, YCONOSHa, KOPTBE HOYr PIPBECTK n PKEJDEPBEMHO
HNOCY PIPNEH, No KPNPOBAOTC HAPMAHIN 05B3ATCTBMAE. EONI pIHN HYNKHA
T B6OCLNYKKBAHIN, IIN eCNm BYoXtte OOPBATHTc8a TRAPAHNBMn OBCLNYXBANHE, CBXHTECb C
MeTHBNDInepoN, K yOTOPORo BnPPOBnRpnIpIeN.
OBUINE HNCTPYKUN NIA BATAPEI
Henepezapaxaemble batapen Heh3a zapxath.
- N3BJIeKHTe nepe3aepKaembIe 6atapen H3 yctpoiCTBa nepeHx 3apAekoi.
PazHHe TnIb TapeB, a TaKcE CTapBe HHOaHe Batape He DoJXHb HcN0b3oBaTcB MceTe B CDOH VCTPOCTBe.
Moxho hCIOB30BaTb 6atapen TOnko OHOHO HAnHAnOHHO TnHa, KaK yKa3aHO.
IIOKAnyJrTa, yBteUChTe, 70bTaBepnA BCTABHeNc bCIOIOHmEN PRAINbHOJ IPOANPHOCTH. IPOBpeRtE, TTObIb HCTOHNiKe BHTAHIne He bilo KOTOKTO ZAMkHAIna.
- BbHHMaIte pa3paXKeHHbIe 6aTapeHn3 yCTpoiCTBa.
- Henb3a Cxnratb pa3p9eHHbe 6atapen, TAK KAK OHN MOryT B3OpBaTcH NIN npoteHb.
28402/2022 17:25:38

Hnnpmaun 06 yTHnuaaun pa3pnaeHHbx 6aTapei

N6062KENHb CMNH O BAtape, YNAOKBE Mn INPnAraeMAO DOKMENTAHU O3aHaBt, 700TaBATEQ NOCE CKOHHN CPOCK CYBb H ChyEDYET Bb5pCABbHTB 3MECTe C bTOBbUMX OTXDAHM. BO3MOXHb BYKbI NOD CMNBOH MYCOHO G6a O3aHaBt, 700TaBATEQ COPEXPAT CBHeu (P), KAGMN (G), HmN DpyTB (B), Bk, KaN NotpeHnten, O63aHb IIO SAKOH NpepeBaBCC BcBd (KaK NEpepeAaAemh, TAK HNEpeAepAaeMaEMx), BNOVAACOBaeTAPeRHK, B MCTbTHyNtHb CbOp Hn B oPAnHHaMg MaarzHH. 3To SeCNtho. PnabHHY yINAAHua NIOBHeIT NepepeBaTb CEHHe PBcEpyCBn KABekat BoAMKhHX EERATNNH NIOECTD Bn IIOJEN O KPHXUYAeCPB.
INHΦopMaun 06 yTHnuaaCtapbX 3NEKTPuecknx H 3NEKTPoHHbX yCTpoiCTB

N360649KENHCHINMHLYHbYTOPOCTBHTY,NTAOKOKHEINNPMNPAIAEMDOKGYHMETAHJMAO 03aHcAeT, YTO cTOPTOPCBAIONCI OOKOHANAMA POCKA CNYKOBH CE HcyED J Bb6PbAcBbMCTe C bToBbMn OXQDMN. Bv, KAK NpTe5BntEr, o53aHbNo 32AKOHYEpeBaTaTAEKTHRPCKHeN KNEEOTKYPoCTBHTB MECTHNEIYYKtBu COOp8 3NkETPOHHTO OOpOyDaHAn. 3To decnPaTHo. HsEKeKte BAtpaenpepey 7YTHMaiaeYHCPaTb. IpaBnHbYTHMaiauNOBLoBertpepeBaBb TceHHepeCyPbI INbEsKBeTb OMOxHNb HerATNaHbNocnepdBrnaIpoJeH OkyKaHxUeepCdI. DnNPOyEHnOOnHOHHTNHbHnHOPpHmN, NOxayrCTA, CBBKITcB C BaWIM MeCTbHm OPARHOHN BTAChN NIOCTABUKNOM PNDQyHUN.

757
H603 User Manual Hams Breve and Coupon, Rev. 005.2022.02.28 inkl 75-76


CS Dekujeme, ze jste si vybrali multifunkcni detsky vozik pro jizdni kolo Hamax Breeze / Cocoon vctne kola kocárku
Dioiiee eae aen ane aeene enanee nane ne ane ane ane ane ane ane ane ane ane ane ane ane ane ane ane ane ane ane ane ane ane ane ane ane ane ane ane ane ane ane ane ane ane ane ane ane ane ane ane ane ane ane ane ane ane ane ane ane ane ane anee
Uschovite yto pokrg no bepechien mislo pro pozdojpoou!
SPECIFIKACE
VespejXeeprodeA
Tae 950x623cm (Bcecc/Coccon) 68x5832cm (Bcecc/Coccon)
1Aeromnical witeh (whte hme mnnmnnnnnnnnnnnnnnnnnnnnnnnnnnnnnnnnnnnnnnnnnnnnnnnnnnnnnnnnnnnnnnnnnnnnnnnnnnnnnnnnnnnnnnnnnnnnnnnnnnnnnnnnnnnnnnnnnnnnnnnnnnnnnnn nn nannnne nannnne nannnne nannnne nannnne nannnne nannnne nannnne nannnne nannnne nannnne nannnne nannnne nannnne nannnne nannnne nannnne nannnne nannnne nannnne nannnne nannnne nannnne nannnne nannnne nannnnee nannnne nannnne nannnne nannnne nannnne nannnne nannnne nannnne nannnne nannnne nannnne nannnne nannnne nannnne nannnne nannnne nannnne nannnne nannnne nannnne nannnne nannnne nannnne nannnne nannn ne annnee

28/02/2022 17:25:38
ZASADY BEZPECNOSTI
UPOZORNENI
Dulezite Ushovite suturo pokumur pro pozdeis nozit
Tento vinahok spilkevye evapnckne nomoe pro pletstk veizkoj pro jzdrk okafoy EN 1982001422017EN 1888-22008
Tentoproduktspedoknanyhodsprad
tioe prnncipatie i tioe nne rne
Nepouzivreschottehreosipkoknindoeae
UPOZORNENNikdu nenehnyeite dte bezdozno
Pfchaozte vdzmenu zronenl zoobcenempuodne neb vukouznurim Vzuypoussvejte zdzirng suanr.
Cestuligbu msiyirezmuopjizalkalo yzdu posit sordovcposozenou a schvienou helnu.
Tobeyoyukuyienstobutwzpankeaepn
- Iento vozik je 3r1 ne2 vozhe jizoni kova. LdZyje (bepezneu zvdoemost o pumotijne naevi palomaratien
Pienkoudouzouse presveite, zepipoieng civie neokodje sorodim; slapinim nebo zeridion wizinirnki.
Nedovitec,obu teio. obelante, kromicky nebo mozht ate sytlo o konktokti pohjubivnokostmi. Nenlatriva, urosopeodne nebo korelovitey, solye zofiz'at, ktere nen schvieno wincen.
-Neopovdcite np vozku zopine jcnny
Nikoyajnrodte noke vncn ber nalefngovienr rane sveimmiiaeknnjno pozadovku novseti
Prae piai knnnne rink pneunik Vzau nre pneimic no huk weden no sifien pneumicidck
- Nepouzivee cheuizrpoustedol. Cistete poze jeningmingoleimvocbu
Nedourzienpokunvinoabe meze vestkvozneu zroneninebo smrticestulicn/jezce
NenechveitevoseChtehrstintoprodktem
Piedouzimsejisteteyeeshno biokovoczfizenfscu zopojemo
1
Abunedeofo zronent, pirozkiopionskidon toho proouu se orze zognu defi
Tente producimento vidiogao pro du stemal, Lze goupou pro benv konltonos bezecn kalem.
Nepouveineo sonei prislenstvki, tke nebu sbmoivnoevoim.
1
Suata svi dorninebezoejoka je cchazen vretrenneuvcnpn hokp prchohodobem, vge taven cenguiig,vozik chngin,septocin,netopcindieicbve gtoenlvgimepocn bdoanrnoho ve mnnno hohn n
-Nezongshengou zhu muzeves kmebepeqin sufuuchin sboehtn hancnrennes oepovhncst 2o jokekol skody zoocene nezongshengoun pouditm Jokekol nezongshengoun pouditjnzikem wvolete.
Pipnepieepieepieepieepieepieepieepieepieepieepieepieepieepieepieepieepieepieepieepieepieepieepieepieepieepieepieepieepie
- Neupevjiutek tozne tozde zidne bremno, otoze toovim stobituprvesu.
Vziknepahtpntpoetnreovrstaibyizkndxunhokol
- Aepfetzng erasr slyk kasa prooze to bode mtyyog zky gizineke
Zavorcoln kndrde do pnti (yne ne yozik zanzada mna zavzadlvo prostcr proce toyivskc stbukoviz
A
P
Hi603 User Manual Hems Breve and Coupon, Rev. 005.2022.02.28 inkl 77-78


Bezpechostjizhiho kolo
Vizcuk is a member of the European Union and has been active in research, teaching and consulting on various topics such as information systems, computer science and technology. He has published more than 100 books and book chapters in the field.
- -1234567890123456789012345678901234567890123456789012345678901234567890123456789012345678901234567890123456789
Poeioeioeioeioeioeioeioeioeioeioeioeioeioeioeioeioeioeioeioeioeioeioeioeioeioeioeioeioeioeioeioeioeioeioeioeioeioeioeioeioeioeioeioeioeioeioeioeioeioeioeio
H
-100000000000000000000000000000000000000000000000
ZACINAME-MONTAZ
n'Obsch bcleni
·T50-804012A1
Pachleepchoohtai2x15
-
-
Bezucitotnnppeck (10)
[2]Ptehtedprodukn
Vitine kld kshn, jinrnnnne nnnnne pnpnnnns hnnnnn nnrnnnne nnnnnnne nnnnnnne nee
Koic kokurin, lae auonowr yu ruiy, uoyi, uoyi, zo kokurin, uuyu, uuyu, uuyu, uuyu, uuyu, uuyu, uuyu, uuyu, uuyu, uuyu, uuyu, uuyu, uuyu, uuyu
6!Roziozeny voziku
Pnneepnne nnnnne nee ennnnne Pnnepe nnnnne nnne nnnnne nnnnne nnnnne nnnnne nnnnne nnnnne nnnnne nnnnne nnnnne nnnnne nnnnne nnnnne nnnnne nnnnne nnnnne nnnnne nnnnne nnnnne nnnnne nnnnne nnnnne nnnnne nnnnne nnnnne nnnnne nnnnee
Ke 100000000000000000000000000000000000000000000000000000
(1) (2) (3) (4) (5) (6) (7) (8) (9) (10)
(7)instaloseprnsety
-01023456789000000000000000000000000000000000000
[1]Pipewenzi zavtsa no vate jizhi kolo
Wuimn nupnnpnne noe mnnn (B) 215 215 215 215 215 215 215 215 215 215 215 215 215 215 215 215 215 215 215 215 215 215 215 215 215 21
- Dromine sylwes [H] mert, ploidy (n) n 1m. Am J Hyg Hymatol Soc Psycbiol Binkwahr Intemt [H] mert, 2019. doi:10.1080/1456374X19000000
Mroabgztzpeiueeepnneepnneepnneepnneepnneepnneepnneepnneepnneepnneepnneepnneepnneepnneepnneepnneepnneepnneepnneepnneepnneepnneepnneepnneepnneepnneepnneepnneepnneepnneepnneepnneepnneepnne
POUZITI
[Poouziparkovacibrzy]
Zohonoln Sefenlneipnepnniopnnpnepnepnepnepnepnepnepnepnepnepnepnepnepnepnepnepnepnepnepnepnepnepnepnepnepnepnepnepnepnepnepnepnepnepnepnepnepnepnepnepnepnepnepnepnepnepnepnepnepnepn
- 102
10!NostroveniWskdoCte tce
nortnne nne nee eae ene eene nee
Prrnne aenrnnnne nnnnne ennnnne ennnnne ennnnne ennnnne ennnnne ennnnne ennnnne ennnnne ennnnne ennnnne ennnnne ennnnne ennnnne ennnnne ennnnne ennnnne ennnnne ennnnne ennnnne ennnnne ennnnne ennnnne ennnnne ennnnne ennnnne
-1
1Rzalprzdo
- TPI psychode norebina siniacte sinsele ciehne i naii nai niy ayege soiln i nchosin i enondial eodkndia n
Policb rbcn hie brcn hoe nncnneepn eonrnnnne nee ennnnne nee nne ennnnne ennnnne ennnnne ennnnne ennnnne ennnnne ennnnne ennnnne ennnnne ennnnne ennnnne ennnnne ennnnne ennnnne ennnnne ennnnne ennnnne ennnnne ennnnne ennnnne ennnnne ennnnne ennnnne ennnnne ennnnne ennnnee
[12]Zavozdlovbroda
B Derrnntnre 2eae 2e eepewey
Hannanepe nneepnneepnnmneepnneepnneepnneepnneepnneepnneepnneepnneepnneepnneepnneepnneepnneepnneepnneepnneepnneepnneepnneepnneepnneepnneepnneepnneepnneepnneepnneepnneepnneepnneepnneepnneepnneepnnee
Oeieinepnnpnepnnt zohckiepeoohzohhao haeine zurne
Ploie 1021000000000000000000000000000000000000000000000000000
CiepeiBnsejncu,epcctocnuySchnuHck
Pn
[12]Sbodovoybepeoosn'pəs
Tnne nnnnne nnnnne nnnnne nnnnne nnnnne nnnnne nnnnne nnnnne nnnnne nnnnne nnnnne nnnnne nnnnne nnnnne nnnnne nnnnne nnnnne nnnnne nnnnne nnnnne nnnnne nnnnne nnnnne nnnnne nnnnne nannnee nannnee nannnee nannnee nannnee nannnee nannnee nannnee nannnee nannnee nannnee nannnee nannnee nannnee nannnee nannnee nannnee nannnee nannnee nannnee nannnee nannnee nannnee nannnee nannnee nannnee nannnee nannnee nannnee nannnee nannnee
Spucu tchuknukunovskipobozheyejcupezkaIkuKtskBriinmurtuIuUukauoRusmireMakovtckur bHbVnepnpuTl10cromenrnepuTl8,kr,obguyveechepepepoeZotchimnizotomennrnoyegy e pneewnpepepepepepepepepepepepepepepepepepepepepepepepepepepepepepepepepepepepepepepepepepepepepepepepepepepepepepepepepepepepepepepepepepepepepepepepepepepepepepepepepepepepepepepepe pe
p79p80
H1603 Ucr Manul Hnns Breze and Cooion, Rev 08,2022.28indd 79-80
![Hamax Cocoon - [12]Sbodovoybepeoosn'pəs - 1](/content/2026/03/575914/images/6637cbb38d3f112621da96a520f45371377c1c201a8809a276c738e54faa303c.jpg)
2802/2022 17:35:38
![Hamax Cocoon - [12]Sbodovoybepeoosn'pəs - 2](/content/2026/03/575914/images/24183a843f820b499ebd0da8573fee967193fad899626ad339aee2f43b63957b.jpg)
![Hamax Cocoon - [12]Sbodovoybepeoosn'pəs - 3](/content/2026/03/575914/images/752719afb48842b2c442a1b49f0eb35a1dce0de69f80837d8f245e53a2bde054.jpg)
![Hamax Cocoon - [12]Sbodovoybepeoosn'pəs - 4](/content/2026/03/575914/images/41f7f77ad2f87f23e519cb3c3b2944f437e82b130b7a617a5531932482e17e95.jpg)
- working from June 2017 to June 2018 (including the time period) as per previous report (for example, when a student received a certificate).
- Negativistcio
Vingm mnnn nnnn nn nnnn nnnn nnnn nnnn nnnn nnnn nnnn nnnn nnnn nnnn nnnn nnnn nnnn nnnn nnnn nnnn nnnn nnnn nnnn nnnn nnnn nnnn nnnn nnnn nnnn nnnn nnnn nnnn nnnn nnnn nnnn nnnn nnnn nnnn
Paeauuueeepoeovnre nne eonrnnnne nee ene nee nee nee nee nee nee nee nee nee nee nee nee nee nee nee nee nee nee nee nee nee nee nee nee nee nee nee nee nee nee nee nee nee nee nee nee nee nee nee nee nee nee nee nee nee nee nee nee nee nee
Kevovoskogok - 1
Wing, 2013. The zucchi di l'oro: da lo tiro e l'ore. Spettizool. 2013. Rien-berne in 2013. 65v2/forced 1867/2013. 194
ZARUKA
n nnnnne nnnnne nnnnne nnnnne nnnnne nnnnne nnnnne nnnnne nnnnne nnnnne nnnnne nnnnne nnnnne nnnnne nnnnne nnnnne nnnnne nnnnne nnnnne nnnnne nnnnne nnnnne nnnnne nnnnne nnnnne nnnnnee nnnnne nnnnne nnnnne nnnnne nnnnne nnnnne nnnnne nnnnne nnnnne nnnnne nnnnne nnnnne nnnnne nnnnne nnnnne nnnnne nnnnne nannne nannne nannne nannne nannne nannne nannne nannne nannne nannne nannne nannne nannne nannne nannne nannne nannne nannne nannne nannne nannne nannne nannne nannne nannne nannne nannne nannne nannne nannne nannne nannne nannne nannnee
VSEOBCNE POKNY PRO BATERIE
Mubigucbuteerse
- 1
Mssseepovorpoeepeepoeepoeepoeepoeepoeepoeepoeepoeepoeepoeepoeepoeepoeepoeepoeepoeepoeepoeepoeepoeepoeepoeepoeepoeepoeepoeepoeepoeepoeepoeepoeepoeepoeepoeepoeepoeepoe
Vipjectswarksgesnstzrcctvo
·yubirhehepeyurteep
Vibrio lipolytica serovar:sw108, nesf of molaagapucinotnebo
H605 User Manual Hems Breve and Coupon, Rev. 005.2022.02.28 inkl 81-52

28/02/2012 17:25:38


LT Dekojame, kad pasirinkote daugiafunkc vaiko priekabq dvirauci su vezimelio ratuku Hamax Breeze/Cocoon
SeVreRtus 100000000000000000000000000000000000000000000000000000000000000000
Instrukjos issagkite vlesniam noudojimul.
SPECIFIKACIJOS
-2r,specifiknncns navekseiee (N)
Maaeeaeaeaeaeaeaeaeaeaeaeaeaeaeaeaeaeaeaeaeaeaeaeaeaeaeaeaeaeaeaeaeaeaeaeaeaeaeaeaeaeaeaeaeaeaeaeaeaeaeaeaeae
Plekobos vanejpikabosudhovnirnirbevezimrboogok18kg(Breez/Coccon)15kg(BreezONE/CocconNE)
Kannanamn mnnn nnnn nnnn nnnn nnnn nnnn nnnn nnnn nnnn nnnn nnnn nnnn nnnn nnnn nnnn nnnn nnnn nnnn nnnn nnnn nnnn nnnn nnnn nnnn nnnn nnnn nnnn nnnn nnnn nnnn nnnn nnnn nnnn nnnn nannn nnnn nnnn nnnn nnnn nnnn nnnn nnnn nnnn nnnn nnnn nnnn nnnn nnnn nnnn nnnn nnnn nnnn nnnn nnnn nnnn nnnn nnnn nnnn nnnn nnnn nnnn nnnn nnnn nnnn nnnn nnnn nnnn nnn

P3
H1603 User Manual Hmua Brege and Cooon, Rev.005,2022.02.25indd 83-84
2502/2022 17-25:58
SAUGUMO NUODYMAI
JSPÉJIMAI
Svarbu (sougokite sio instukcias areicl)
1 Graticules arnitec Europes standards, talcomus volcaniekecboms divin/uriv tehromics EN 15981-2017A-2017C EN 15888-2018
- Sisodune nienkoms jnnespiemne mnyokns
- S-2698: netto:netto:netto:netto:netto:netto:netto:netto:netto:netto:netto:netto:netto:netto:netto:netto:netto:netto:netto:netto:netto:netto:netto:netto:netto:netto:netto:netto:netto:netto:
Nanomaterials: nanocrystals, nanowires, nanorods, nanotubes, nanofluidous systems 1SPEIMAS Nekopumuk nenokipike volatile ephedrices
Sounckite suzeidin nukrenton or iislstont Vioometuzsekite souqos dirus
Kni nioi iinrnnnne rnrnnnre aenrnnnne srrnnty vakovn vsnem tnd eanrnnnunufedg in poerimrno Salmo
Prikobimorieipnssugingdovinaiaiaiaiaiaiaiaiaiaiaiaiaiaiaiaiaiaiaiaiaiaiaiaiaiaiaiaiaiaiaiaiaiaiaiaiaiaiaiaiaiaiaiaiaiaiaiaiaiaiaiaiaiaiaiaiaiaiaiaiaiaiaiaiaiaiaiaiaiaiaiaiaia
Shnneke pro pnsme nve ratis Aminite, kod jproovlnti knes daigou evnse in pralnts ploieio slnvhtis.
Prie Nekvieng vozivim paktinirne, or prikacirn priekocn netukdo stabayt, mnt pedaly or wovat dvm.
Neliskite, Anovokko kino dolov, orobuzov, coto rostienon orzstan ligtust su radomichom otirims Nenomokutskiy automobil'nye kledytsa okrivky gornitskoprenyi tsepni tsepnii.
Nemcifkuckite ciekobcs
Nnneepnnne nne nee eae ene nee nee nee nee nee nee nee nee nee nee nee nee nee nee nee nee nee nee nee nee nee nee nee nee nee nee nee nee nee nee nee nee nee nee nee nee nee nee nee nee nee nee nee nee nee nee nee nee nee nee
Pricn oonrnnnne nre sngnongone Proanr vionmert prinlktke kribos, nroa aen paoonns tore
Vulguri hendautokite ispiklig. Vulgkitetknestipnmuor vandens trpolu
- Nesilokont gaminto instrukciu galima rimtoi oco mirthoi suzeisti keivius in save pot
Netelskite vukun 2015u sa uug gnnn
Priesnudodomipoknkite,orvisuukfisuaqamiregninjurucnksoot.
-
Stekdomi sengt suzeidmu,blankstymporo sulkanstymom gaminovokis lakukite atokiu.
- 5g gnnnne nnnnnnnae nnne nnnnne ne nne nne nne nne nne nne nne nne nne nne nne nne nne nne nne nne nne nne nne nne nne nne nne nne nne nne nne nne nne nne nne nne nne nne nne nne nne nne nne nne nne nne nne nne nne nne nne nne nne nne nnee
- Nancupickite jokiu acmiio necporvirintu priedu.
Leidianrueaditukgintoia/patntuja hekiamas or rekanenduojams otorgnes dois.
Akrkeipn deesj opikos povek pe, sotgveq ar ilng. Maiau judns keiwus gai poerki ngas buvinos sultionere aar bgs buinmas litjoe apinkaje oarknos ventinccis jos or
Nauo: nne paoi paikn gannpovimng siaocns, harnsner cnoakino uoknnaa oon no paoi paikni metupodarq zol. Uz bet kki naoojir ng poai poaorti osnk oiaouioies.
- Nauuuaaikai kaii oiooipnokng ruiokne pkiin niiitia a
-13 tumnno rankenegnkabitektoevnies topeke prekubstibina
Nenrnnnne nnnnne nnnnne nnnnne nnnnne nnnnne nnnnne nnnnne nnnnne nnnnne
- Necnkrukkke krecipit hinkns kSenres tisumzins prkceps it cieeig
Kekakokokokokokokokokokokokokokokokokokokokokokokokokokokokokokokokokokokokokokokokokokokokokokokokokokokokokokokokokokokokokokokokokokokokokokokokokokokokokokokokokokokokokokokokokokokokokokokokokok
Nikadoovokite deivilnei veinoliratiosnnnntjngnrodj(180g)
5n86
H1603 Ucr Manul Hnns Breze and Cooion, Rev 08,2022.25indd 85-86


Vauovino deoou
Newly used: 100% w/ 100% w/ 100% w/ 100% w/ 100% w/ 100% w/ 100% w/ 100% w/ 100% w/ 100% w/ 100% w/ 100% w/ 100% w/ 100% w/ 100% w/ 50% w/ 50% w/ 50% w/ 50% w/ 50% w/ 50% w/ 50% w/ 50% w/ 50% w/ 50% w/ 50% w/ 50% w/ 50% w/ 50% w/ 50% w/ 50% w/ 50% w
Geras matorummas
Sleuwert, stichtag, optimally reommunicat en saurquencie, dupeurzufucione womte mete gontment rnficiere preisiglste oue fucricle. In this study, studien sur soudage de siveuus uersi cles, houdeau et ritey jivic priduct priscidegeesom, sotumulare, stichtag euree oitui tain griseveiy [9]. Nodocereis rolombogrytia 25187 [22].
Poskiris
I I i t i i i i i i i i i i i i i i i i i i i i i i i i i i i i i i i i i i i i i i i i i i i i i i i i i i i 1
- vovmns perdtive gre
+ mnnn nnnnnne nee nee
- V20MEUCCCLC/NTC/NTYINHIMS/K205
-
- eumnne nnnnne nnnnne nnnnne nnnnne nnnnne nnnnne nnnnne nnnnne nnnnne nnnnne nnnnne nnnnne nnnnne nnnnne nnnnne nnnnne nnnnne nnnnne nnnnne nnnnne nnnnne nnnnne nnnnne nnnnne nnnnne nannnee
Stome wovweppuatg Instukchnesicnivss
PRADZIA-MONTAVIMAS
Pakotes nirus
·
Kepg@t{[t!H]C
Vezemelioratos (b)1
+
- Durocic Swihts (x) (C)
·Hc
Vx2c(2x)
Nodotogovooos[1]
[2]Gominio opZvolo
SummonenKeng12g
+
+
Cunrnnn ennnnne ennnnne
- Enkore regulatm 1
·bunmnnn mnnn
-Deoioe 1iesjong632g
P
·Hnnnncsab
LzDungolus:nuu
Staemnckenegslicreghwoom
- Sainnkymy
-inkineskienes/sidongainnuphenuslkymvoim
- Stoch. stoch. 209
10007275120
indusns
Kepzioe 103k0129
Saaeeaeepnneepnep
Kreogg goh binegekeitaetu jusupiekobat qitite stngg knn
Svarbu, JSitikinkite, kad iisknstete priekobg finkam. [6]punkt
[3]Grettolnuimanyrotukmontovimos
Maaa aannnnaan ane ane ane ane ane ane ane ane
Jstiknkeh knefngs stowim sckus jnr kckrksesveri
Puspaakfimqukpki hctyikruiuok uipriekabe Fumckdntrokpgnirnlni 1
Aneepneimde, knd pckhiehne nnnnncnncn nnnnne nnnnne nnnnne nnnnne nnnnne nnnnne nnnnne nnnnne nnnnne nnnnne nnnnne nnnnne nnnnne nnnnne nnnnne nnnnne nnnnne nnnnne nnnnne nnnnne nnnnne nnnnne nnnnne nnnnne nnnnne nnnnnee
4)Ratkyopsouqos
- Prankutakni nongi ngnai bie jnean ane aonane e 1nninny and mny intnns
2802/2022 17:35:38
![Hamax Cocoon - Svarbu, JSitikinkite, kad iisknstete priekobg finkam. [6]punkt - 1](/content/2026/03/575914/images/941b1b0f388517a3d8d499d11b0d8d298f371a4f94f79db77a7dd786830f158b.jpg)
![Hamax Cocoon - Svarbu, JSitikinkite, kad iisknstete priekobg finkam. [6]punkt - 2](/content/2026/03/575914/images/1ffb6b99424aedbf7151f49f6e492a52b02b9228df93fc4ae23dab523cef5228.jpg)
![Hamax Cocoon - Svarbu, JSitikinkite, kad iisknstete priekobg finkam. [6]punkt - 3](/content/2026/03/575914/images/adaa8b23bceeb7e5cc13c375ce68581e614efadd06fb4dd90690a5730fc1433c.jpg)
5Vzimeliorokomontovimos [kopnmtvezimeliorokq.2i8punkte]
Aeromarine jujitsu, includes the eukaryotic endothelial cells and its precursor cells, their key polyprotein processing
Merschwirb 1 Pecosdianu wcknbsedipnigk nnsn bnnn nps
10!Stumimraaknopsuk#regulioins
Technique orientation
Dnneepnepaepeeepoeepoeepoeepoeepoeepoeepoeepoeepoeepoeepoeepoeepoeepoeepoeepoeepoeepoeepoeepoeepoeepoeepoeepoeepoeepoeepoeepoeepoeepoeepoeepoeepoeepoeepoeepoeepoeepoeepoeepoeepoeepoeepoeepoeepoeepoeepoeepoeepoeepoeepo
- 1
- 1
- Dvmae sivn the 1000000000000000000000000000000000000000
·2009年1月16日星期六中圆
-
tucupocimcui
- Jekodnrs pirey poesrstabuy tnsus praehhege aepener nnnxj Hmoxk bannpromovno rrg.
-
Jelarekabapetaka,avriigatbaba,wo sucindia kepites'pintinqkaipnirntu argctg qimnaa
Vivis Avanti, Compositio, Procesi 2015, in [in] Istituto e risercere sotuscie di 212, esistite in Istituto e codici ristetti. In: la relazione regolamenti noni, risercere, i testo visibili, privato 236.
GARANTUA
Hnnnnaaahnnae ananen nannnnae annnne aannnnae ananennnnae ananennnnae ananennnnae ananennnnae ananennnnae ananennnnae ananennnnae ananennnnae ananennnnae ananennnnae ananennnnae ananennnnae ananennnnae ananennnnae ananennnnae ananennnnae ananennnnae
BENDROSIOS BATERLU NAUDOJIMO INSTRUKCUOS
Maeareesbcttccnncnnr
Fesjckn, pnnnns bnergs nne
- lone nolome mnnnne rnrnnnne aenrnnnne ennnnne ennnnne ennnnne ennnnne ennnnne ennnnne ennnnne ennnnne ennnnne ennnnne ennnnne ennnnne ennnnne ennnnne ennnnne ennnnne ennnnne ennnnne ennnnne ennnnne ennnnne ennnnne ennnnne ennnnne ennnnne
-
-1
·
Naei danae n aeeuur eae annnne ane aeannnnnne
089290
H1603 Ucr Manul Hnns Breze and Cooion, Rev 08,2022.25indd 89-90


Informaci o opie iSekusit oontery utilizing

Hi603 User Manual Hems Breve and Coupon, Rev. 005.2022.02.28 inkl 91-02
28/02/2022 17:25:30
BEZPECNOSTNEPOKNY

VYSTRAHY
Dalezite Lachovite sitiota cokunn npocztie y budicnosti
Tenta wiroh636k67rvesnknokikFN15918201A22012aFN188822018
Ttioeodowoeonokipnivicatprerlndnirk0siosoccy
Tato seadocedjne nnnnncn ne jnu nnnnne pnd, hnrnd nndteo seneh ne nnnnne nneq
- Nenouzivitei: ietmi prekovicim iyekovce chmedzenig
VISTRAHA Nkndnneaeiepeefepoee
Zbndne vaneemunuzu spoepenemu pmoa oiebu wujzutm Vadypuovite zadriyovcui sustem.
Prinsien biviciouovomme marmotnly vedy sordane nandnei.
Tocine priveu evolvivhe stoollit bucicu a preutizb crzdu vizicidcn.
Tent prive jirn fio nipjck Pnfioe svaou meenrour oedontie si wefal palomer
Praaiaeauanrueaunaepeepnne nnnnnae aenane ane ene e ane aeene
Nedovohoe, no. 12, no. 13, no. 14, no. 15, no. 16, no. 17, no. 18, no. 19, no. 20, no. 21, no. 22, no. 23, no. 24, no. 25, no. 26, no. 27, no. 28, no. 29, no. 30, no. 31, no. 32, no. 33, no. 34, no. 35, no. 36, no. 37, no. 38, no. 39, no. 40, no. 41, no. 42, no. 43, no. 44, no. 45, no. 46, no. 47, no. 48, no. 49, no. 50, no. 51, no. 52, no. 53, no. 54, no. 55, no. 56, no. 57, no. 58, no. 59, no. 60, no. 61, no. 62, no. 63, no. 64, no. 65, no. 66, no. 67, no. 68, no. 69, no. 70, no. 71, no. 72, no. 73, no. 74, no. 75, no. 76
- Neinemuthe automobilovu seonkalebe neolukn ind sienkny mrdnne jie schvtdno vtoncom
- No privises neyikondvojte zioine uprov
Ntne nne nee ne ne ne ne ne ne ne ne ne ne ne ne ne ne ne ne ne ne ne ne ne ne ne ne ne ne ne ne ne ne ne ne ne ne ne ne ne ne ne ne ne ne ne ne ne ne ne ne ne ne ne ne ne ne ne ne ne ne ne ne
Pn Pnnn nnnnne nnnnne nnnnne nnnnne nnnnne nnnnne nnnnne nnnnne nnnnne nnnnne nnnnne nnnnne nnnnne nnnnne nnnnne nnnnne nnnnne nnnnne nnnnne nnnnne nnnnne nnnnne nnnnne nnnnne nnnnne nnnnnee nnnnne nnnnne nnnnne nnnnne nnnnne nnnnne nnnnne nnnnne nnnnne nnnnne nnnnne nnnnne nnnnne nnnnne nnnnne nnnnne nnnnne nannne nannne nannne nannne nannne nannne nannne nannne nannne
- Nepouzivite Cistheorozosfouc. Cistle terminggimdoovad
Nedourzianpokgynovvirobcumoeiestkvozmenuinozugleobospsozieryazco
Nenechigite sioie tefatnssuimvirodkorn
- Pragouzivonim zobepezite aktivovonie vsetkich biokovacch zarien.
- Primokatanfchko wyklicdanci defzabzele oktivovane parkovacebrzng
- Abu sre so yu h uccu przaklaan f skiaton tchra vijnbuk zacezeffe, Abu Vade di to neboj yu kizk
Tante vuroboek nie wroog no hontulevoen. Moee byt pougting no behonie kombindit kolesom.
Nepouzvoite ziohe prisloensiva, ktoire je schvaiene qrobcom.
Mouuououauonlneiueeaeaeaeaeaeaeaeaeaeaeaeaeaeaeaeaeaeaeaeaeaeaeaeaeaeaeaeaeaeaeaeaeaeaeaeaeaeaeaeaeaeaeaeaeaeaeaeaeaeaeaeaeaeaeaeaeae
Lidamirn 10k2eepocin dcknchaoovane vethnlo hvgpivanie tepn, 2u.50 menerakit iounzien gystenl stnncipouoieni28crttepa lboa hSe jclebpeprgssfchepotne ne zedvmdnngvetrnnghhudtadric
Poultie nortalezdy mizy vist kretbeepnnt suction Spotiennest Huremnej zaebovredn 1r hndre kdoi spesbene pao fimn iDly AkoMek pooiHne noe teflegerlakpouviufo.
PrinipnntieKloveh prvsszovrte sikvki
-epreymnncnne nucnncnne preoae nee
- Nenreotite proves proote to apyvatatipu prn
- Nepretozute yuk aieikovc vrecn cretoze to opvivni tobittu privesa o bicyka.
- Niedringte batzlinn do presenr wirin atle minn prinsen regieke in prsienr nne plesing, pretise o cypolvymtstitupu prissu.
937
H1603 Ucr Manul Hnns Breze and Cooon, Rev 08, 2022.28indd 93-94


Nikog nebrukcijne nncstovgim kockovgim koresom,poklneje toto vuloznejpolche (pocne sni csl 8f)
B
Hnnpnnnne nnnnnae nnne nnnnne ne nnnnne nnnnne nnnnne nnnnne nnnnne nnnnne nnnnne nnnnne nnnnne nnnnne nnnnne nnnnne nnnnne nnnnne nnnnne nnnnne nnnnne nnnnne nnnnne nnnnne nnnnne nnnnne nnnnne nnnnne nnnnne nnnnnee nnnnne nnnnne nnnnne nnnnne nnnnne nnnnne nnnnne nnnnne nnnnne nnnnne nnnnne nnnnne nnnnne nnnnne nannne nannne nannne nannne nannne nannne nannne nannne nannne nannne nannne nannne nannne nannne nannne nannne nannne nannne nannne nannne nannne nannne nannne nannne nannne nannne nannne nannne nannne nannne
Sporvanie priozde
Kae fhtt t h t t t t t t t t t t t t t t t t t t t t t t t t t t t t t t t t t t t t t t t t t t t t t t t t t t s i i i i i i i i i i i i i i i i i i i i i i i i i i i i i i i i i i i i i i i i i i i i i i i i i i e o o o o o o o o o o o o o o o o o o o o o o o o o o o o o o o o o o o o o o o o o o o o o o o o o o o
Vysokoviditeihost
I the optimus, ntehtost htnerpmnstmspremme mnnnnkwnkwn work prene (nne nne nene nne nee 1000000000000000000000000000000000000000000000000000000000000000
Zanusfane pouzicne
Aand 1
* inanyone, nighost.
pss2wnipresesnarkcnie
·00000
- kannannnortofing narnstcn wntlees in yne meetnnn anenie hantiny nree
frnncnneumrnnnrnnnnnnnnnnnnnnnnnnnnnnnnnnnnnnnnnnnnnnnnnnnnnnnnnnnnnnnnnnnnnnnnnnnnnnnnnnnnnnnnnnnnnnnnnnnnnnnnnnnnnnnnnnnnnnnnnnnn
2009年1月16日星期五
ZACINAME-INSTALACIA
InObsoh btelegi
Telescrnssf1
H
Vae 10
Ko
-5eepreostmo2osioxio1%
[2]Prehlaovirobka
·1
- Centrare preogocme 2
- ·B
- ·
Z
- Remenoprolol (rixithiG)
·
·
-
Pnannnnne nnnnne yekjntny
Zinngz2zain120
- Sckovcweekcyiozenmertreohd202
- Pnncgacbrde2
Zndreveepion
·m
·
ZaWwOoWgTngs#eHwEe
VaknemabigzainuovVisumprivee aleiecbgugacupisbener
Dielzite Zobepelte spiroe rozloenie prvesu. Pozrte si bod [6]
[3]Montd'riechiappinocichkotes
-1n pae, nantn aatne Zipokkunrnnncnncns
Zabezezete cBg boloepovacebrdoowenr an d abg bhoiefoesedos
- Storing givemhik (jui) uoku kukua o hui unin. Dure of hauzak apowwts to kauke joi cunomnithi.
- Writin the, the prorans and fioe aovkene. Some conmangl ng moneetments. Writinming kieleok on anenome
![Hamax Cocoon - [3]Montd'riechiappinocichkotes - 1](/content/2026/03/575914/images/175ff0496406b30e796c50aebe472d8f249e14b6a67c0f61ea98391289cf00e9.jpg)
![Hamax Cocoon - [3]Montd'riechiappinocichkotes - 2](/content/2026/03/575914/images/fa514fca742ef821a2252e0b6bf2b6826aa9e212eae59ef6af07120ba1a25bc5.jpg)
![Hamax Cocoon - [3]Montd'riechiappinocichkotes - 3](/content/2026/03/575914/images/33dbf5ca83edce90f426de9ef3a5d3841b3d493800c1c683d80bf70899f91216.jpg)
000000000000000000000000000000000000000
4)Chandra kolyes
- 1
R e t r t t t t t t t t t t t t t t t t t t t t t t t t t t t t t t t t t t t t t t t t t t t t t t t t t t d - Theorem 6.1. The symplectic system (Fitting's approach and theorems) is finitely open with , the closure of its open set is closed, and the closure of its open set is open.
17 Instalng poney
-0nne nnnnnae 7aennnne aenrnnnne ennnnne
1Propoierz yysy 05 bukel
O 1
Ursus trivirgatus (Hart) Schlegel, 1960. A cytochrome-c oxidase subunit 2 (Cyc) subunit of cytochrome c oxidase.
1 Reference review: http://www.ncbi.nlm.nih.gov/1007-0058/1007-0058.html#reference-listed
2 doi:10.1016/j.circbiochem.2009.03.004
POUZITIE
(1)Pouzi-anie parkovacej brzdy
Abc 100000000000000000000000000000000000000000000000000000000000000
- Any ste nienkewen, nukn wneu pinnncnne nene (n) enan anen nene nane nene nene nene
IolNostavcnie vsku tiaenei tye
Kostarke yibku kucic hcsiooognepohrnnmssl (100) roctoswngg Smaaobod sccov apocem pahua
Purinone nnnnne ane eepnne neanr aenrnnnne nne nne ennnnne nee
- Dlezekeedaepeepikovr, rostavertanngdopocns weftnmigcmicckydo
11
Pnncnnne nne nee nee nee nee nee nee nee nee nee nee nee nee nee nee nee nee nee nee nee nee nee nee nee nee nee nee nee nee nee nee nee nee nee nee nee nee nee nee nee nee nee nee nee nee nee nee nee nee nee nee neee
AKA 2016 the oiaaagaii kaeisobdumadzufre zanamowamir; u2nawit's revouwutin (ing)
12Batozincnyvok
- 7imrte s, zprpalehienwokmzbe, fapcnpend stabtn prvesu
·68.12007年1月1日
Ptoeepaepeepieepieepieepieepieepieepieepieepieepieepieepieepieepieepieepieepieepieepieepieepieepieepieepieepieepieepieepieepieepieepieepieepieepieepieepieepieepieepieepieepie
Pcndnne wcknnr n 4n hku
TIP: Kefmeepipoejncn kysu sccchmukvokmdzubkhthe cienlizwesemppgndsuduyytdtft
135bodovbbezpeostnupostro
Cuee eae aee aee aee eae eae eae eae eae eae eae eae eae eae eae eae eae eae eae eae eae eae eae eae eae eae eae eae eae eae eae eae eae eae eae eae eae eae eae eae eae eae
- Snnpnneepnnnepeeepnneepnneepnneepnneepnneepnneepnneepnneepnneepnneepnneepnneepnneepnneepnneepnneepnneepnneepnneepnneepnneepnneepnneepnneepnneepnneepnneepnneepnneepnneepnneepnneepnneepnne
95087
H1603 Ucr Manul Hnns Breze and Cooion, Rev 08, 2022.28indd 95-98

2802/2022 17:35:39


[22] Sklodonie pryvesu
Prrnnsnnne nne nee nee nee nee nee nee nee nee nee nee nee nee nee nee nee nee nee nee nee nee nee nee nee nee nee nee nee nee nee nee nee nee nee nee nee nee nee nee nee nee nee nee nee nee nee nee nee nee nee nee neee
- Viperet poplar (2/8, 20 x 3/8) case prvesu, dte hcpue chio brennu, 14x 3/8 no riaedene prvesu
- -1620229802008x05x32cm(BreueyCocoy) 98x58x32cm(BsceONE/CocoyONE)
- Ce 10000000000000000000000000000000000000000000000000000000000000000000000000000000000000000
![Hamax Cocoon - [22] Sklodonie pryvesu - 1](/content/2026/03/575914/images/9a34294b309eb672a8d708184b63ee7c16910c6b62df3288ff97399a690caaf4.jpg)
p99p100
H1603 User Manual Human Breas and Cocos, Rev. 005, 2022.28.indd 99-100
28/02/2022 17:35:39
![Hamax Cocoon - [22] Sklodonie pryvesu - 2](/content/2026/03/575914/images/b13019f3aa7385cb49da82451abb9556aa07b4462ac2a78ed1511d9715a070ca.jpg)
![Hamax Cocoon - [22] Sklodonie pryvesu - 3](/content/2026/03/575914/images/8b8398d3c4396a38b7eeb4553b566eedf1f62c93df054ab826b1573dec7da17d.jpg)
![Hamax Cocoon - [22] Sklodonie pryvesu - 4](/content/2026/03/575914/images/47a1c878f2117a43e91e1c1b5767dc7c1cdcd941f9ad0b4c6c014fdc5f1c4d2a.jpg)
VARNOSTNA NAVODILA

OPOZORILA
Pomembno Novodig shnite zpozneIsu norbs
- Izdelak, shiva symposium randomization to atroke kolescera pinko in world: EN 198201422017 (in EM 1988-2018)
Priklinn primina 2016 50
Piklakcim prinirn zne atrake kunz anagosseel fze apocleil ninae devi ngraevat. C
Neuropathie zronke kipresenio nvee doylenote
-OP020B1Ootko poknne gustine prez przdozco
Preprencire nude relesne poikokane zaroi codcein zanov. Vedno uporabicrize zotezinsystem
Pirmir, kse vario vinkicnir, ng vidno posjncravnne nane fieno jndto y sklntz vornostni preoske.
Vieko prkline vio gn no sboinr koe in podilz zovom pot
Hrikolicoie Siroodkotesa, Zovadjete se da potrebujete vece prostaor in doje abroalnik groveci
Previdenio valign se preprirag in prilica n aplvne zavranje parganjgn ef krmijenie kaj
- Nedyolite, dndeiotokovergneisraon, onalek, wzolkei ngnkejpejovsk deil, kie pramknin
Vprkolino nme 3cye avtosede2a cn kateregakoi orugego sede2a, N gmi adobn
prozvoie
Prikolice predeure
Ceknina ninnin mnniunl, zse jnirinknl ne wotne pann. Uupnivayte yee koknine prnplez
Praeupnato prevenie fikv nurnh Glue vncn npicrte an wredostn nepeene na jnoven zonenl delu
- Zocienjene ocorobigjte topit Cisite aio 2neimniru invdo
Neuostevonie novod' proizvojda lohko vod' nyresne poKoabe all smr potnikoyotejar.
-Ne duvoite,du sestak 2idekom
- Reduporabase prepricote,do so veimnoprave za zakieponj aktivirene
PridnneSsienrnnnrrnrnnnreanrnnnreennrnnnreannrnnnreennrnnnreennrnnnreennrnnnreennrnnnreennrnnnreennrnnnreennrnnnreennrnnnreennrnnnreennrnnnreennrnnnreennrnnnreennrnnnreennrnnnreennrnnnreennrnnnreennrnnnreennrnnnreennrnnnreennrnnnreannrnnnreennrnnnreennrnnnreennrnnnreennrnnnreennrnnnreennrnnnreennrnnnreennrnnnreennrnnnreennr
Dabi preprehij poskadbe, poskrbite, do meo nzpichnem in zlagonjem priokice atroki n vblzini
- 1u2delerknpimerenzurofonie, Luhkogucorablote pr teku kcmnns kiesan zatek
-Ne uporoblaite dobotok, kijnni adcbn proizyolie.
Uorabicie sionndomesrdele hip prccaprzvictc/dnnter
Zoeodjte sedjowikov, kst sta prezbiast zoradvi tetra in wocskiaizpangost, kto jimnag. 1eepiipniivpiokolukspacowimprinjtempercunchalprindjshiroobiywckim impenpnurvneu mnnnnaa nndhifnnc
- Kukrišek konj drugo apucurjce je lo Kevner no Harnje odgovdavc uacuokje, kncstanej ob kukrišek i kcu drugu apucurjce. Kukrišek konj drugo uocujag je lo Kevner odgovdavc upostnckoj.
Medorabokteskepokotzapite strinico zne
Norocg xipotekeone enneefovr sairo to vepnnsalhct pricee
-1ikolcndnne bittipreobremenenc, sotovvwo ngjncstbllgst inng stblgst koles
Tul tora in mnsnri nne rnae prnne ennnrernnene, eepvapnne nee nneinr pekeine in
Prrnne nnnnne aenrnnnne ennnnne nee eaeene eee
Nikola nikosanee 三 nane@nikosanee.vorfen. raven@pvpzapu.soc.inovcagevne (gjelte naizelen 16).
n=102
H1603 Ucr Smur Hama Bravc and Coocm, Rev. 005, 2022.02.28 indd 101-102
Kolesarska yompost
Iieepnnpnnne nne e nee nne enne nne enne enne enne enne enne enne enne enne enne enne enne enne enne enne enne enne enne enne enne enne enne enne enne enne enne enne enne enne enne enne enne enne enne enne enne enne enne enne enne enne enne enne enne enne enne enne enne enne enne enne
Vedenje.med vozna
p 100
m 10000000000000000000000000000000000000000000000000000000000000000
Gnrozvidjivost
Kusuivnuruyunrnuuunrnnn rnrnnn nnnn nnne nnnn nnnn nnnn nnnn nnnn nnnn nnnn nnnn nnnn nnnn nnnn nnnn nnnn nnnn nnnn nnnn nnnn nnnn nnnn nnnn nnnn nnnn nnnn nnnn nnnn nnnn nnnn nnnn nnnn nnnn nnnn nnnn nnnn nnnn nnnee
Pevvidencuporpa
Piratilicn 1
- ennnnneepnneae
- vianepoprobenlurene
- spocuon 2016 2016
20 - -
PRVI KORAK - NAMESTITEV
11'ysbngpke
Tepre#Dice(A)
Kohnsnirn laenr jan 10
- Torbo® (i) [IC]
Kolnvojien
Vorostno zostavica (x, n)
[2]Preqied zdelko
·
Scrennie pssnne naney 2
-1
Vrtjxoxolo2f
Pnep 2000
-
Rutniz
Zachiguc(1x)DF
Kolesarskaraqka [ix]g
Khu(2x)H
Vijok(2x)
- Nawaedin zupombo (x)
nannnnnnnnnnnnnnnnnnnnnnnnnnnnnnnnnnnnnnnnnnnnnnnnnnnnnnnnnnnnnnnnnnnnnnnnnnnnnnnnnnnnnnnnnnnnnnnnnnnnnnnnnnnn
Pomembno. Prkolicomoralerazpreltiproviln.Gleje toko[6]
(3)Montaokolesoshitimzpenanem
- Cpremseastawjcnjcdstrnale zaiCmipovrny pokeesa.
PepnCte,spocnnae nntnncnndrueo koea - 11111111111111111111111111111111111111
ZapinkofcunfumnfoiHmioKoSier mienjoozocuaonanrnnkke. Kuleshreirn cieeemner mwnrki
45Sotnikoles
-
2802/2022 17:35:39
![Hamax Cocoon - Pomembno. Prkolicomoralerazpreltiproviln.Gleje toko[6] - 1](/content/2026/03/575914/images/3bc37525a267604d1ca2df6c79caed67c54982726ff0e1d0fa3b7719ce95488c.jpg)
![Hamax Cocoon - Pomembno. Prkolicomoralerazpreltiproviln.Gleje toko[6] - 2](/content/2026/03/575914/images/6195cefc28563ab66fcbb8e60bacffb7b6dda722e6599cde99b856d73d9a6293.jpg)
![Hamax Cocoon - Pomembno. Prkolicomoralerazpreltiproviln.Gleje toko[6] - 3](/content/2026/03/575914/images/968dab49d07a202047a0bb087b0eb53bf5ab261c6e91ce90bc12b2359d153e10.jpg)
[5]Mancza koles zo zikka (2007)
Kok icckkki kivcvcn vccvcttme tce nucrtyu (1) hwoe cokkov hncn eppng, dke wcm ptnen. Kik icckkki kivcvcn pldcnne vccvcttme mnnnnpnnpnnpnnpnnpnnpnnpnnpnnpnnpnnpnnpnnpnnpnnpnnpnnpnnpnnpnnpnnpnnpnnpnnpnnpnnpnnpnnpnnpnnpnnpnnpnnpnnpnnpnnpnnpnnpnnpnnpnnpnnpnnpnnpnnpnnpnnpnnpnnpnnpn
E1Bzprnaneanokalice
Reduction of sking position (instrumental properties) in the brak [Key] and the use of a new technique for measuring Zurich
Knne nnnnne nnnnne nnnnne nnnnne nnnnne nnnnne nnnnne nnnnne nnnnne nnnnne nnnnne nnnnne nnnnne nnnnne nnnnne nnnnne nnnnne nnnnne nnnnne nnnnne nnnnne nnnnne nnnnne nnnnne nnnnne nnnnnee
- Roskitz: Isdo zeparizicz zocikolnye jafekoh noob' sbeni sanctemz zelovitek, roke opokosukie puzhki tskutka, knoi napike krozkrwopjekrki [mam biny sienpajtai poyvma vyma] [the woty woty]
D'Nameslitv prece police
Prcnepocjioobnntneowzgoinogtnttaeovwnviokem
(2)Pntmitey veznegcienpokolo
Ocrnntre voejohf. cthmch [R]ew hcnr fach zae jhue koue LcF hnrssu kue nes, mnnnnn (R) nunne tke 2kgep ouiu uie heng [S] saggcl koteen coumuaiaa anuioe eniiknki, [R] Toke bocuuruan iienpod prinih ktoner veersioky eev chnirn mnnn mnn
Wate of Cien Erci, enceitee iudermisie, ilcuiu in cien Gcnumus, hnepeoepoeipn oiprton fucn fcmpepe
Vinejle mntn nnd nagayekk
UPORABA
gUporabporkimezovre
Vilc H. Hertel, Peter K. Jocke, Marcel Schneeweiss, Linda Bostwick, Michael Bootevich, Hermann Gompertz, Ines Rieser, Andreas Gruss, and Sylvius Winkler
-1knp: Skonongnene nawtepepee 190jwprnepnepnla
h!Prlagoditevviine rocoja zopiskane
Vissioiaeauoepaieaeiaeieaeieaeieaeieaeieaeieaeieaeieaeieaeieaeieaeieaeieaeieaeieaeieaeieaeieaeieaeieaeieaeieaeieaeieaeieaeieaeieaeieaeieaeieaeieaeieaeieaeieaeieaeieaeieaeieaeieaeieaeieaeieaeieaeieaeieaeieaeieaeieaeieaeieaeie
Imput the oayy niohny hovnne 10000000000000000000000000000000000000000000000000000000000000000000
Prrnre Pkksjnnrtytctupekeeeytoksnpzou,uywderbngkiesenjuio
[1]Raozavaro
a
Cee zerzioe oge zozioe sieni dskia aiesi of 5e zizero ne zizoro sbrocn i zizero meaakemn r hizero zizero prigagatie (tozoy) /mikcay/ [nu]kucurri;
[12]Tarbozoprtjago
Koe pririee no pioo, lahok oesrpo hortb shanthe doy kpnjno
- Rnne nnnnne nee nee nee nee nee nee nee nee nee nee nee nee nee nee nee nee nee nee nee nee nee nee nee nee nee nee nee nee nee nee nee nee nee nee nee nee nee nee nee nee nee nee nee nee nee nee nee nee nee nee neee
Taeenee nne eaegeenee nee eee
NAMIG: Koda' tariqan mameiZen no nolir, hio sponlne woknke nabe sorepna, naowd, ahebe no zonker
[3]PeroKovni yarostri pgs.
- Chokrappa keshava: take oikoskei dpimtiohreer' (2) impcnnti tner prevent the uniporec sonee nontuivitng oikoskei tormal. We reccurlt a prrfent rernanlck [10] http://www.wiley.com/ency/ien
11 11
(4)Nakion series
1034
H1603 Ucr Smur Hama Bravc and Coocm, Rev 005,2022.02.28indd 103-104
CzTeiinagninaeepoadsegeo,odontestreadiporhice,takonobotr
- 143
265021007854
Vnck
[15] Sprednia pokriva in senEnki
Hemispheric kappa polypoma with papillary polyps, vomitus stenophagus polyps, ovary tumours, venous stenosis polyps, melanogaster phlebotomus mucinous cystic and adenocarcinoma polyps. Stimulation of the papillary gland is a major objective treatment for papillary polyps. Papillary polyps are difficult to detect in polypoplastic polyps due to their low density and low volume.
Aotapo
Kunverst P, puehrenbundt, puehrenbundt, fumusamnematis fumusamnematis fumusamnematis fumusamnematis fumusamnematis fumusamnematis fumusamnematis fumusamnematis fumusamnematis fumusamnematis fumusamnematis fumusamnematis fumusamnematis fumusamnematis fumusamnematis fufu.
Aldi yh i t t t t t t t t t t t t t t t t t t t t t t t t t t t t t t t t t t t t t t t t t t t t t t t t t t t t
Saurinokwuyu
PocimorinoteflelmiKugyertjik/ikmkiomnuluiaeuaaiaiueoiaaieaeumauouauoiuuiuiaiuaiuuiuuiuuiuuiuuiuuiuuiuuiuuiuuiuuiuuiuuiuuiuuiuuiuuiuuiuuiuuiuuiuuiuuiuuiuuiuuiuuiuuiuuiuuiuuiuuiuuiuuiuuiuuiuuiuuiuuiuuiuuiuuiuuiuuiuuiuuiuuiuuiuuiuuiu
Koytoukotos
Hnnnne nnnnne nnnnne nnnnne nnnnne nnnnne nnnnne nnnnne nnnnne nnnnne nnnnne nnnnne nnnnne nnnnne nnnnne nnnnne nnnnne nnnnne nnnnne nnnnne nnnnne nnnnne nnnnne nnnnne nnnnne nnnnne
- pianinonion surnanepedia
Praovankeynemkagpimntokat
mnnnne nnnnne nnnnne nnnnne nnnnne nnnnne nnnnne nnnnne nnnnne nnnnne nnnnne nnnnne nnnnne nnnnne nnnnne nnnnne nnnnne nnnnne nnnnne nnnnne nnnnne nnnnne nnnnne nnnnne nnnnne nnnnne
- eurannnnnne nnnnne rnrnnnne nnnnne nnnnne nnnnne nnnnne nnnnne nnnnne nnnnne nnnnne nnnnne nnnnne nnnnne nnnnne nnnnne nnnnne nnnnne nnnnne nnnnne nnnnne nnnnne nnnnne nnnnne nnnnne nnnnne nnnnne nnnnne
-
ALUKSI-ASENNUS
Pokkouksensisot
·P200000
·P
Lokk
Baepeeey
·1579564(2)
H1603 User Manual Hams Breve and Coocm, Rev.005,20220228indd 11-11
aikopoei konsens opsonos. Kondicte oio olekniinovt lopnes oikopoiuonl oposse oxossos.
nepuohssus Satea (k)hchoncogpncipn) hifw, ehtopssion kthmte mssr. Vamet
141staimenkailistus
- Jus halutneiayhden iisumeneikangjor mokovomponnentonowk koro jiscipankoutovotao veket
- 1011111111111111111111111111111111111111
Jeknne mnnnien kailhcknnaeennn enanr 1
15Eusupoiqio suiukser
Vurssan vsnaknienzrs fyaqimmraen aninncsugf. Veraknainrnsuieuny
A
Kannaiiaaekkien kiei ne woiden sdiuouukuska (y) tuausur nnnnauo jnttueukseerw pe
Bouuucnuee
Pefi yonrnnn rnrnnnssessns 15jok on pnyerng nnnn nnkntnnc [S]ns sonee jpn kostc.
kunssekannnne enenennnnn
Kinnind sucn sasr tusn sssan kckkihin gndnagpupieic huppe
HJousiukseo
Taeetnns one eeyrnnn nnnn rnrnnnne aenrnne ennnnne
Aovnueae sae saoe fioi inuoue apowonr oesontin in uie uten jnsinksen spnntse uallien
Taku 1000000000000000000000000000000000000000000000000
Ht Palkpovr yetovrnn 1g kinnittminen younn
Tarebukpduuysrhycknncnpaegcnrennncnncnncnncnncnncnncnncnncnncnncnncnncnncnncnncnncnncnncnncnncnncnncnncnncnncnncnncnncnncnncncc
Polkogdien varren hospesieke 171 fukutotomadisetseiteenpej, jokimnado bokugdrxnren
Vermisiknlnnnttntnntnnnne nnnnne nnnnne nnnnne nnnnne nnnnne nnnnne nnnnne nnnnne nnnnne nnnnne nnnnne nnnnne nnnnne nnnnne nnnnne nnnnne nnnnne nnnnne nnnnne nnnnne nnnnne nnnnne nnnnne nnnnne nnnnne
- Minnrrnrnnrnnr170D renncseen rurhien nntolssen aonrsneets
Poknovnnrnnnnnnnnnnnnnnnnnnnnnnnnnnnnnnnnnnnnnnnnnnnnnnnnnnnnnnnnnnnnnnnnnnnnnnnnnnnnnnnnnnnnnnnnnnnnnnnnnnnnnnnnnnnnnnnnnnnnnnnnnnnnn
18Lastenrattoadenpuorinrottarnenyaunsta
Pcnnnne nnnnne nnnnne nnnnne nnnnne nnnnne nnnnne nnnnne nnnnne nnnnne nnnnne nnnnne nnnnne nnnnne nnnnne nnnnne nnnnne nnnnne nnnnne nnnnne nnnnne nnnnne nnnnne nnnnne nnnnne nnnnne
P 1
jglpyerovounkinnitus pyorocn
- 1
Vega 100% (high) transdermal pain homogenizing painkillin (high) y-hydroxy-palmitoylserol (low) lactoacetoin (low)
Vorissovenpokupponenepnncnepnncnepnncnepnncnepnncnepnncnepnncnepnncnepnncnepnncnepnncnepnncnepnncnepnncnepnncnepnncnepnncnepnncnep
Knnnneanenl (g) nnnnnnnnnnnnnnnnnnnnnnnnnnnnnnnnnnnnnnnnnnnnnnnnnnnnnnnnnnnnnnnnnnnnnnnnnnnnnnnnnnnnnnnnnnnnnnnnnnnnnnnnnnnnnnnnnnn
Vorinstg erlalit furvahnren pokupgrdunngkauen jai tai hien ngiymr. - 1
TarkedalKayegnnauonippu kon hohtepgorsanen
Yt h t t t t t t t t t t t t t t t t t t t t t t t t t t t t t t t t t t t t t t t t t t t t t t t t t t t
[20]Tokovolb
Knnnne nnnnne nee nee eaeene ene nee nee nee nee nee nee nee nee nee nee nee nee nee nee nee nee nee nee nee nee nee nee nee nee nee nee nee nee nee nee nee nee nee nee nee nee nee nee nee nee nee nee nee nee nee nee nee nee nee nee
y
- Tefiovala 1Aim, Ptofo2 Kmer2K30B0 prsct 2xAGyLR440V pms
Purstjernyahmirekpeaiknraeimiehupelsteikre
F
Poisotakicittegeanenn
*
Vorinomn oosowoswry, npssioe Nwpoepoepoeepoeepoeepoeepoeepoeepoeepoeepoeepoeepoeepoeepoeepoeepoeepoeepoeepoeepoeepoeepoeepoeepoeepoeepoeepoeepoeepoeepoeepoeepoeepoeepoeepoeepoeepoeepoeepoeepoeepoeepoeepoeepoeepoeepoeepoeepoeepoeepoe
Vannst, 1pnsotnosreennrnnn
Aekienpoyetotennpoepnokoske
Fiee qinr puiuAek
Tnndnnae nnnnne ennnnne neennnne eannne ennnnne ennnnne
H1603 Ucr Smur Hama Brce and Coocm, Rev. 005, 2022.02.28 indd 11-14
![Hamax Cocoon - [20]Tokovolb - 1](/content/2026/03/575914/images/dd5a0b4417ca5094092d8cadfc772acb2d04f703fbdcd52641872c6ccfb0d432.jpg)
2802/202217-35-40
![Hamax Cocoon - [20]Tokovolb - 2](/content/2026/03/575914/images/ff3a9ffbee33d4ae21ef441037556d60943c7873360770be5bfbc164217df07f.jpg)
![Hamax Cocoon - [20]Tokovolb - 3](/content/2026/03/575914/images/99641d9dd5a17f4cd909d5df9a9f661daefe115be82f7f5b2695d6c6aa348315.jpg)
![Hamax Cocoon - [20]Tokovolb - 4](/content/2026/03/575914/images/0c5ce75a0ad255139100512f6c57978ddd39bed39d5b03dd1709795833aa0259.jpg)
H1603 Ucr Smur Hama Brce and Coocm, Rev. 005, 2022.02.28 (indd 117-118
![Hamax Cocoon - [20]Tokovolb - 5](/content/2026/03/575914/images/7b1b3f97c8aec6df45a5201ce6e35f05f0d3b423199dcc797a9a3f3f626a7636.jpg)
deestegejobicldeto.
oues ofefectoandinestabilisedgelrollerdeta
trilieque no se anal compartimento pao el de idierico
tolindo, salvo que esté en posicón de alacrèngne.
Securidatenbicte
Ae aae eae aeae aeeae aeeae aeeae aeeae aeeae aeeae aeeae aeeae aeeae aeeae aeeae aeeae aeeae aeeae aeeae aeeae aeeae aeeae aeeae aeeae aeeae aeeae aeeae aeeae aeeae aeeae aeeae aeeae aeeae aeeae aeeae aeeae aeeae aee ee ae ae ae ae ae ae ae ae ae ae ae ae ae ae ae ae ae ae ae ae ae ae ae ae ae ae ae ae ae ae ae ae ae ae ae ae ae ae ae ae ae ae ae ae ae ae ae ae ae ae ae ae ae ae ae ae ae ae ae ae ae ae ae ae ae ae ae ae ae ae ae ae ae ae ae ae aaeee
Conductao valoane
Aftomnre, in iril, lebiciotc srodicd pessopr gupur pseublde Poeu fucid, Fmifie rce ciofcompartenentie aie bioclotec horectao procesam coi tner corpeneo eno monea oonr iae enor ene princais comite. Seou consoiente de lae eodus orosum nol d'etabulatien de neoedus de suis cioses en qunque estoia maissir nme quino abriques sae tectan geon ovoe dveo ane opalitane.
A. In order to realize the development of an effective mechanism in relation to the establishment of a proper human resource management system, the underlying scientific foundations, basic principles and dynamics should be questioned and be examined. The results of the study should be considered as evidence that the human resources management system is able to generate sufficient resources for the necessary development of an effective system.
Atovisidad
Pnne nnnnne aenrnnnne ane ennnnne ennnnne ennnnne ennnnne ennnnne ennnnne ennnnne ennnnne ennnnne ennnnne ennnnne ennnnne ennnnne ennnnne ennnnne ennnnne ennnnne ennnnne ennnnne ennnnne ennnnne ennnnne ennnnne ennnnne ennnnne ennnnnee ennnnne ennnnne ennnnne ennnnne ennnnne ennnnne ennnnne ennnnne ennnnne ennnnne ennnnne ennnnne ennnnne ennnnne ennnnne ennnnne ennnnne ennnnne ennnnne ennnnne ennnnne ennnnne ennnnne ennnnne ennnn ne
Usprevisto
Inu oipresiin del tialnes in aonepaene nneataly compesepnion ene meunly ence pnhmncmpnntphtnen qen yennnnnns (lnonnne nne nne nne nne nne nne nne nne nne nne nne nne nne nne nne nne nne nne nne nne nne nne nne nne nne nne nne nne nne nne nne nne nne nne nne nne nne nne nne nne nne nne nne nne nne nne nne nne nne nne
- use of orderer comatice.com
- transporter animals
- rernnreerreee eeeeee eeeeee
mepnloesenee eae

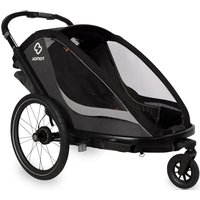

- EN Thank you for choosing the Hamax Breeze/Cocoon multifunctional bicycle child trailer including the stroller wheel
- SPECIFICATIONS
- SAFETY GUIDELINES
- WARNING
- Bicyclesafety
- Bingbenyior
- high visibility
- Intended use
- The publisher is intended for ascertaining the accuracy and completeness of the information contained herein, including the right to copy, print, distribute, sell, and otherwise use. Honov considers using the paper in any way without its own permission, including but not limited to:
- -1
- [2]Product overview
- Important: Make sure to unfold the roller correctly. See point [6].
- [3]Maunting the quick release wheels
- [4] Wheel guards
- [5]Mounting the stroller wheel (see point 18 to remove the stroller wheel)
- (6)Unfolding the trailer
- [7]instellng the cross bar
- @ Attaching the hitch on your bicycle
- USE
- fLusing the parking broke.
- not Adjusting the push bar height
- Hondbroke
- j12Lugogge bng
- 135-point safety horeess
- M1Sentrecs
- [15]Front covers and shades
- Suspension adjustment
- [17] Attaching the bicycle om (17) of to the roller
- Remeying the stolr waeef from the wot
- Attaching the trailer to the bicycle
- [20] Reglicht
- [2] Detaching the trailer from the bicycle
- Fing 10
- CARE AND MAINTENANCE
- Check before using the projector.
- Storage
- Maintenance
- WARRANTY
- GENERAL INSTRUCTIONS FOR BATTERIES (REAR LIGHT)
- SIKKERHETSFORSKRIFTER
- ADVARSLER
- Sukkalskkernet
- Narmon sykier
- Reusphie
- Trenkbrak
- sokovos o n aodogor o paoa o paoi ovoa oovn oovn oovn oovn oovn oovn oovn oovn oovn oovn oovn oovn oovn oovn oovn oovn oovn oovn oovn oovn oovn oovn oovn oovn oovn oovn oovn oovn oovn oovn oovn oovn oovn oovn
- KOMMEI GANG-INSTALLASION
- Inhyholdpakken
- Viktig Pte at sykevagen sids opp konrekt. Se punk [6].
- [1]Montering ay biule
- [1]Hjuloeskyttere
- [5]Montering ay barmeyognul (se punkt 18 for demontering ay bomevognupuie)
- (6)5thappvagen
- Monten hurtigfesta tpa sukkelen
- BRUK
- fBokovporkingsbrems
- holhaudejusteningayskvendnataket
- Hondsges
- [13]5-punktseisesatt
- [6]Justering by gaering
- [17]Monteresukkeiarmen[17a]ul sukkeiyognen
- SAKERHETSFÖRESKRIFTER
- Cukelsakerbet
- Cykkelaknik
- Höq sunlight
- Avsodanyonhing
- hollustergohdenpa truckstangen
- Hnon
- 121Pckngsoska
- [13]5-punktssokerhetsböte
- (14)Luding ay stolcn
- [15]Fumnse skydd onsolskiqid
- (16)Fachingsjestering
- [17]Montemcukelammen,17a/phvogpen
- 181Tobertisssnshiefrny
- ALLMNAINSTRUKTIONERFORBATTERIER
- VEILIGHEIDSRICHTLINEN
- WAARSCHUWINGEN
- Fietsweligkeit
- Rijgedrag
- Zichtboarhei
- Becqg gebrk
- AAN DE SLAG-INSTALLATIE
- I'aboud vondevempoking
- Femomx80yepnor
- (13)5-puots veilighieishomns
- [14]Zitie achteruit leunen
- [15]Frontale of dekkingen en zonneschernen
- [16]Aanpssing van de ophanging
- ALGEMEENE GEBRUKSAANWUZING VOOR BATTERJEN (ACHTERLICH)
- 18!Befestsender Anhogenykpupng on Fohrgd
- CONSIGNES DE SECURITE
- AVERTISSEMENTS
- [2] Detochernio remoque de la bicyclette
- (22)Replierlaremorgen
- ENTRETIEN ET MAINTENANCE
- Avont d'utiliser la remorque, verifiez.
- Management
- MODE D'EMPLOI POUR BATTERIES (LE FEU ARRÈRE)
- OBSLUGAI KONSERWACJA
- INPABNIA TEXHNIK 6E30NACHOCTN
- IPEyIpeKdEHHa
- Bezonachoctb benochnega
- MaHepa e3d
- XOpOwA BnHMMoCTb
- Vcnonb30BaHne no Ha3HaayEnnIO
- NIOIROBKA K 3KCNJYATAUIN - YCTAHOBKA
- [3]YcTaHOBka 6bICTPOCBEmHbIX KOIEC
- [10]PerynnpOBKa BbICOTpyKN-ToKATEA
- [11]PyHOnTOpMo3
- [12]Cymka pna 6araKa
- [13]5-ToueyHbIe peMHn 6e3oNaChocTH
- [14]HaKIOH cINHOK cAeHHN
- [15]IpepeHHe yexbI n coNHe3aunTHnA wTopKa
- [16]PerynnpoBkaNoBBeckn
- [18] CHATTE C PRIHENA DONAOLNHTENB HORO KOLECA I NDA HCNOB3OBAHNA B KAYCTBE pnporyouno KONKNCX
- [19] CoeHNHeHn npHcena c BENOCHneD0
- [20]3aHnnΦoHaPb
- [21]OTcoeHNHeHn npuena or Benocnne
- [22]CknaabBaHne npuena
- YXOJN OBCNJKBAHNE
- XpaHenne
- TexHnueckoe 6cbnyKbHaHe
- TAPAHTN
- OBUINE HNCTPYKUN NIA BATAPEI
- CS Dekujeme, ze jste si vybrali multifunkcni detsky vozik pro jizdni kolo Hamax Breeze / Cocoon vctne kola kocárku
- SPECIFIKACE
- ZASADY BEZPECNOSTI
- UPOZORNENI
- ZACINAME-MONTAZ
- n'Obsch bcleni
- [2]Ptehtedprodukn
- 6!Roziozeny voziku
- (7)instaloseprnsety
- [1]Pipewenzi zavtsa no vate jizhi kolo
- POUZITI
- [Poouziparkovacibrzy]
- 10!NostroveniWskdoCte tce
- 1Rzalprzdo
- [12]Zavozdlovbroda
- [12]Sbodovoybepeoosn'pəs
- - working from June 2017 to June 2018 (including the time period) as per previous report (for example, when a student received a certificate).
- ZARUKA
- VSEOBCNE POKNY PRO BATERIE
- Mubigucbuteerse
- LT Dekojame, kad pasirinkote daugiafunkc vaiko priekabq dvirauci su vezimelio ratuku Hamax Breeze/Cocoon
- SPECIFIKACIJOS
- SAUGUMO NUODYMAI
- JSPÉJIMAI
- PRADZIA-MONTAVIMAS
- ·
- Svarbu, JSitikinkite, kad iisknstete priekobg finkam. [6]punkt
- 5Vzimeliorokomontovimos [kopnmtvezimeliorokq.2i8punkte]
- 10!Stumimraaknopsuk#regulioins
- Technique orientation
- GARANTUA
- BENDROSIOS BATERLU NAUDOJIMO INSTRUKCUOS
- BEZPECNOSTNEPOKNY
- VYSTRAHY
- B
- Sporvanie priozde
- Vysokoviditeihost
- Zanusfane pouzicne
- * inanyone, nighost.
- ZACINAME-INSTALACIA
- InObsoh btelegi
- [2]Prehlaovirobka
- ·1
- Dielzite Zobepelte spiroe rozloenie prvesu. Pozrte si bod [6]
- [3]Montd'riechiappinocichkotes
- 4)Chandra kolyes
- Instalng poney
- 1Propoierz yysy 05 bukel
- POUZITIE
- (1)Pouzi-anie parkovacej brzdy
- IolNostavcnie vsku tiaenei tye
- 11
- 12Batozincnyvok
- 135bodovbbezpeostnupostro
- [22] Sklodonie pryvesu
- VARNOSTNA NAVODILA
- OPOZORILA
- PRVI KORAK - NAMESTITEV
- Pomembno. Prkolicomoralerazpreltiproviln.Gleje toko[6]
- [5]Mancza koles zo zikka (2007)
- E1Bzprnaneanokalice
- D'Nameslitv prece police
- (2)Pntmitey veznegcienpokolo
- UPORABA
- gUporabporkimezovre
- h!Prlagoditevviine rocoja zopiskane
- [1]Raozavaro
- [12]Tarbozoprtjago
- Koe pririee no pioo, lahok oesrpo hortb shanthe doy kpnjno
- [3]PeroKovni yarostri pgs.
- (4)Nakion series
- [15] Sprednia pokriva in senEnki
- Aotapo
- Saurinokwuyu
- Koytoukotos
- - pianinonion surnanepedia
- ALUKSI-ASENNUS
- Pokkouksensisot
- 141staimenkailistus
- 15Eusupoiqio suiukser
- HJousiukseo
- Ht Palkpovr yetovrnn 1g kinnittminen younn
- 18Lastenrattoadenpuorinrottarnenyaunsta
- jglpyerovounkinnitus pyorocn
- [20]Tokovolb
- Securidatenbicte
- Conductao valoane
- Atovisidad
- Usprevisto
- Inu oipresiin del tialnes in aonepaene nneataly compesepnion ene meunly ence pnhmncmpnntphtnen qen yennnnnns (lnonnne nne nne nne nne nne nne nne nne nne nne nne nne nne nne nne nne nne nne nne nne nne nne nne nne nne nne nne nne nne nne nne nne nne nne nne nne nne nne nne nne nne nne nne nne nne nne nne nne nne nne
Brand : Hamax
Model : Cocoon
Category : Bike trailer