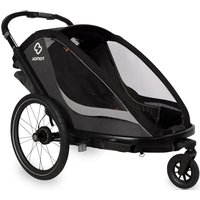
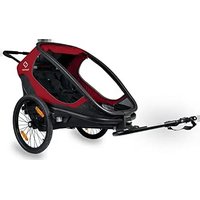
Cocoon One - Bike trailer Hamax - Free user manual and instructions
Find the device manual for free Cocoon One Hamax in PDF.


| Product Type | Child Bike Trailer |
| Brand | Hamax |
| Model | Cocoon One |
| Capacity | 1 child |
| Maximum weight per child | 22 kg |
| Maximum total weight (loaded) | 35 kg |
| Trailer weight (empty) | Approximately 12 kg |
| Restraint system | 5-point harness |
| Use | Bike trailer and stroller (stroller wheel included) |
| Suspension | Adjustable according to load |
| Parking brake | Yes |
| Hitch | Quick attachment to bicycle |
| Wheels | Quick-release wheels, 16 inches |
| Unfolded dimensions (L x W x H) | Approximately 100 x 70 x 60 cm |
| Folding | Yes, with transport strap |
| Rain cover | Included |
| Visibility | Reflectors and rear light (batteries included) |
| Compliance | EN 15913:2011+A2:2017, EN 1888-2:2018 |
| Maintenance | Clean with soapy water; do not use solvents |
| Warranty | 2 years (estimated) |
Frequently Asked Questions - Cocoon One Hamax
User questions about Cocoon One Hamax
0 question about this device. Answer the ones you know or ask your own.
Ask a new question about this device
Download the instructions for your Bike trailer in PDF format for free! Find your manual Cocoon One - Hamax and take your electronic device back in hand. On this page are published all the documents necessary for the use of your device. Cocoon One by Hamax.
USER MANUAL Cocoon One Hamax
The image is too blurry to recognize any text content.
homax
HAMAX Breeze (ONE) and Cartoon (ONE)
[Unreadable due to extreme blurriness]
CONTENTS
2017年
EN Thank you for choosing the Hamax Breeze/Cocoon multifunctional bicycle child trailer including the stroller wheel
Congratulations on purchasing the Iamox, Freeze / Cocoon multifunctional hygiene child restor including the stooler wheel. You can't want your child in a safe and complete tool way using the Iamox Freeze / Cocoon use of drugs for fever and other. Please record the instructions beneficial before assembling or using the Iamox Freeze/Access. We wish you and your children making enjoyable mind!
Keep these instructions in a safe place for later use.
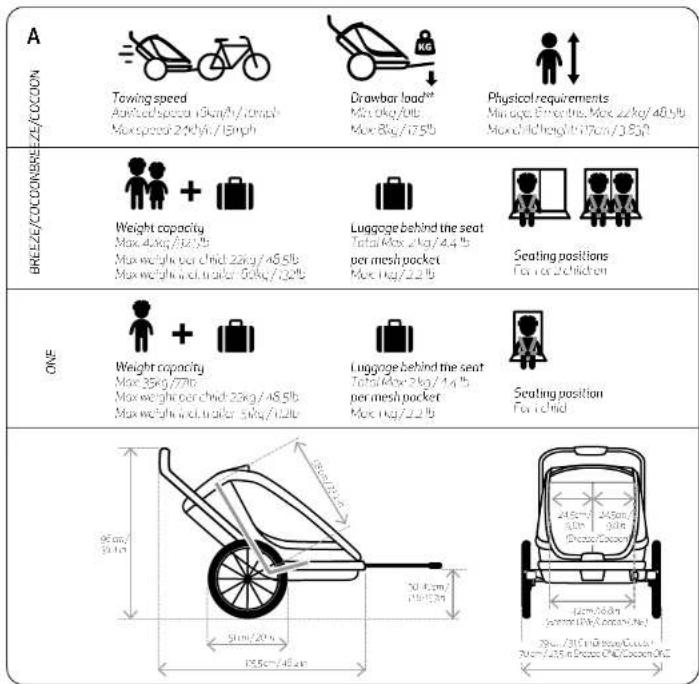
SPECIFICATIONS
• Seutrespecificular imaging ^1
- Fided dimensions: 90 x 65 x 30 cm; Breeze/Cocoon, 18 x 90 x 30 cm; Breeze DMC/Cocoon DMC.
• Weight of the trailer (roller incl. bicycle arm excl. stroller wheel), 18 Kg (Breeze/Cocconl, 16 Kg (Breeze CNE/Cocconl CNE).
• “To check the drawer load, measure the weight of the end of the bicycle arm while the trailer is loaded with passengers and
conge. Your concrete by standing on a scale, remember your own weight. Stand on the scale with the bicycle arm in your hands. Make sure that your hold the bicycle arm at the correct height. Deduct your own weight and the result is the answer land.
SAFETY GUIDELINES
WARNING
- Important - Read carefully and keep these instructions for future reference
- This product complies to the European standards for child bicycle trailers and strollers: EN 15918.2011+A2.2017, EN 1888-2.2018
• This seat unit is not suitable for children under 6 months.
- This seat must is not suitable for children that correct sit without assistance or do not have adequate neck strength. Please check with a pediatrician if you are in doubt.
- Do not use with children who exceed the weight limitations.
• Never leave your child unattended.
- Avoid serious injury from rolling or sliding out. Always use the restraint system.
- Passengers should always wear a proper fit and approved helmet
• In the US, see OPSC Safety standard for bicycle helmets.
- Lowing a roller will affect the stability of the bicycle and increases the braking distance
• This trailer is wider than a bicycle. Allow for extra clearance and be aware of a larger turning circle.
- Before each ride, ensure the attached trailer does not interfere with braking, pedaling, or steering of the bicycle.
- Do not allow the child's body or any clothing, shoe taces, toys, or similar to come in contact with moving parts.
- Do not install a car seat or any other seating device not approved by the manufacturer.
- Make no modifications to the trailer.
- Never ride a bicycle at night without adequate lighting. Obeg all for legal requirements for lighting;
- A reflector that complies with CPSC regulations shall be visible on the rear of the trailer.
- Check tyre pressure before use. Always inflate tyres to the inflation level specified on the outer tyres.
- Do not use cleaning solvents. Clean only, with mild soap and water
- Failure to comply with the manufacture's instructions can lead to serious injury or death of the passenger/rider.
• Do not let the child play with this product
- Ensure that all the locking devices are engaged before use.
- Ensure the parking broke is engaged when loading and unloading your children.
• To avoid injury ensure that the child is kept away when no folding and folding this product.
- This product is not suitable for running or skating.
- Do not use any accessories which are not approved by the manufacturer.
- Only replacement parts supplied or recommended by the manufacturer/distributor shall be used.
- Be aware of exposure hazards such as wind chill and heat exhaustion, either by less active trailer passengers in prolonged exposure in colder temperatures, or by extended periods in worse temperatures without adequate ventilation or notification.
- Unintended use could lead to dangerous situations. I homax is not liable for any damages caused by unintended use. Any unintended use is at the risk of the user.
- Close the front cover when using the bicycle trailer
- Do not attach any load to the pushbar or it will affect the stability of the roller.
- Do not store luggage in areas inside or outside the trailer other than in the luggage compartment as it affects the stability of the trailer.
- Never cycle with the stroller wheel installed unless in storing position (See section 18)
Bicycle safety
Before controlling the bicycle trailer for your bicycle, ensure your bicycle is suitable for lowering a trailer according to the bicycle manufacturer's instruction and is equipped with well functioning probes. It is recommended that the bicycle to which the trailer will be attached undergoes safety checking by a qualified bicycle mechanic before attracting the trailer. Bicycle trailers make up an MRL can be restricted by law.
Riding behavior
While, lowering a roller, your bicycle becomes heavier and less necessary due to the added weight. Familiarize yourself with this behavior by practicing with a loaded trailer in a tighter area before entering crowded public roads with passengers. We more that due to the weight of the roller your bicycle has a longer braking distance. Use motion when driving readily, as your bicycle will be replaced into a vehicle.
Do not exceed the maximum speed specified in this motor and slow down for making turns and riding on rough roads. Annel riding over rocks, tube or other objects that may cause the trailer to 'Prover. Using the roller is unfavorable weather, road or traffic conditions can result in some situations. Always use good judgment when deciding if conditions are safe for using the trailer.
High visibility
For circular visibility and safety in traffic, the multi-directional carrier has front (whites); rear (freed) and wheel refactors. Reflective piping is integrated in the outer fabric. When using the carrier as a bicycle trailer, you also need to apply the orange artery flag [9] for even device visibility. Use the outer light [22] that is included.
Intended use
The breach is interested for transportation of children as specified in this manner on public roads with high traffic, sidewalks and streets, places. I amax considers using the breach by equal way as unintended use, including but not limited to:
- riding with excessive speed
• The 19th S&P, 500, 1000 index.
• using the other, or doing all purposes
• storing luggage in press inside or outside the trailer other than in the trailer's luggage compartment
- towing the cutter by motorized vehicles other than e-bikes.
- Feeling to comply with the instructions in this market
GETTING STARTED - INSTALLATION
[1] Packaging content
• Trucler Bodg(18,12A)
- Quick release width [2x] [18]
• Bcgr1x10
• Secreted words (KHD)
- 50,814,109,171
• 187 (2) [1]
• BICUL 2014 (中国)
m = 311
• user manual
2013.10.31
[2] Product overview
• Pricetra[2]
• Sutetode [2]
• Mesnilove (2)
• Central conversion point [20]
• Suspension adjustment (20)
- 5m/ve/whee[20]
• Biglycom Correction(2g)
• Pushder's height (per cent) (Sleeves),20
• 10010000121
- Mesh parks/cover storage
- Peking University
- Recrigh. [20]
• Mechanical system and sector positioning [2]
* The dog may not be included in your trailer, but is available on accessory.
Important: Make sure to unfold the trailer correctly. See point [6].
[3] Mounting the quick release wheels
- At first time assembly remove the copper to protecting chowelate.
- Ensure that the banking broke is not engaged [29] and that the schedule is clean
- Press the push button [50] and insert the wheel side into the trailer. Verify that the wheel is securely fastened by pulling the wheel.
- More that there is a left and right wheel for the trailer. The rotation direction is indicated on the side of the tires. Mount the wheels with the rotation direction according to the arrow in the picture.
[4] Wheelguards
- Rotate the wheel gourus on both sides of the roller 50 degrees and the reflector becomes visible.
(S) Mounting the stroller wheel (see point 18 to remove the stroller wheel)
- Insert the stroller wheel [50] into the control connection point [50]. Verify that a stroller wheel is accurately fastened by pulling the stroller wheel.
- The stroller wheel can be locked in forward direction. Make sure that the stroller wheel points straight ahead and lock it in position by pushing the button for downwards. I have seen it, push the button up from underneath.
[6] Unfolding the trailer
- Leave the pushperson in its current position. Gras the strip [64] at the rear and pull it upwards. The rear frame rowunfolds and the pushborsises
- When the next frame unfolded fully (for) some and restore the pushbar (for) normally backwards into locked position, it needed help the looking by keeping the end of the trailer steady.
- Make sure that the (self) locks (Self) for both sides have locked automatically by trying to push the push door forwards. The locking sleeve (Self) should be all the way down and the safety button. (Self) should be all the way out.
[7] Installing the cross bar
- Rotate the cross bar [7a] upwards, and fix it with two screws (i)
[8] Attaching the hitch on your bicycle
- Remove quick-release or hot (Bc) from the left side of your bicycles rear wheel angle. If your bicycles are about (Bd), place the rotation lock washer (Bc) with the band of the washer fixing inside the drop-on (Sd). This helps keeping the detail of the correct angle but the height can also be abouted with point
- Place Nich[0b] between quick-release or nut and frame. If rotation-lock washer [0c] was installed, match the ribs on the washer, to the grooves on the hator. Make sure the Nich orientation [0b] is similar as shown
- Tighten the quick-release or nut back on the side according to the bicycle manufacturer's instructions.
USE
[9] Using the parking brake
- To engage. Push the parking broke, pedal (day) down words and it is looked. You may need to move the cutter sliding back and forth for the broke to engage. Always be sure to check if the broker is engaged by pushing the air.
- Tool language. Pull the broke pedal (50) upwards with the tip of your foot and the posturl (60) rotates upwards.
[10] Adjusting the push bar height
- Adjust the pushbar height by pulling the pushbar height adjustment sleeves [100] at both sides simultaneously and then pull or push the pushbar to the desired height.
- Let the pushbar height adjustment sleeves go and continue to push or push the pushbar until both sides lock well into one of the pushbar position.
• Important Adjust the push-on to the position with the cycling logo (100) would be when you go cycling.
III Hand broke
- When strahlung jeuging squeeze the control button [15] on the back door to reduce speeds and aid control on inclined surfaces
- The brake can be adjusted with the adjustors [mo] on both sides if the brake rods against the wheel broke side or if the brake does not brake well or uneven.
[12] Luggage bag
• The durable beer control up to max. 2Kashari is checked to the bottle.
- Note that strabily of the trayec can be affected when overloading fire hope
• To attach the pea hook the loops over the hooks!2a! of the back of the trailer
- Then make the bottom bag looks onto the strap loops [lab] at each side of the ladder and pull the straps to lift from the bag or the ladder.
• To detect the hog, unback all by books again
TIP: When not attached to the heater, the bottom hooks of the bag can be nearly stored by looking them to the sit-up loops near no them.
TIP: After adjusting the shoulder straps of the Breeze backbone, roll-up the excessive strap length and slide the elastic band over the roll to keep it secured.
[13]5-point safety harness
- Such your child's guide the same through the opening between the shoulder [36] and waist belt [36]. Check that the shoulder strips are aligned with your child's shoulders. Adjust the height by sliding the buttocks [36] above the shoulder strips up or down
- Connect the two shoulder strap buckles together and insert them into the buckle if then the clutch strap li3d, punct locks.
Adjust the length of the outer strap (L) and the shoulder bolts (L) so that your child is securing rightened. Verification of
safety, harness is locked by pulling both shoulder belts.
[14] Seat recline
• to place the backrest of one of the seats to a more required position over the top roof entrance by opening the zippers.
- Hold the neckline grip (4d) forward or backwards for a different position until it reaches the next position and looks into place.
• There are real-time positions for each section [14c, 14d and 149].
[15] Front covers and shades
- The letter has an electrocover (So) and an additional solar code (So). The mesh cover class with a zipack. These cover sides up and down.
- When not in use, these covers can be stored in the top pocket (14). Close the pocket using the veicro to prevent the covers from falling out during a ride
- When recorded cover the trailer with the raincover [50] that is stored in the rain mesh packet [50]. If the rain cover is mold, dry it properly before stowing it once.
- Attach the front of the cover to the rain cover hooks (Eye) underneath the frame of the front.
[16] Suspension adjustment
- Incomplete: The suspension should be adjusted to the load in the roller. The suspension adjuster should be all the way to me door when balls looked
- Open the suspension adjuster (25c) and slide to the appropriate setting and then close the suspension adjuster setup.
- Regularly check if the suspension adjuster is subject to the appropriate setting.
[17] Attaching the bicycle arm [17 of] to the trailer
- Slide the bicycle arm fully fully into the bicycle arm connection (70) and pass the end of the bicycle arm power. The bicycle arm connection (71) slides forward automatically and fixes the bicycle arm.
• Purkore che ciele de rinn to verifiqu good connection.
- Attach the safety requirement to the Being in order to make a safe connection
- The bicycle arm can be looked in the bicycle arm connection with the supplied key 17e!
[18]Removing the stroller wheel from the trailer
- Push the small button [13a] and then pull the large nose button [18b] upwards to unlock and pull the smaller wheel out of the control connection point [18c].
- When cycling you can store the trailer which up to be down in the control connection circle. Make sure the wheel is located on top of the central connection point and cannot rotate 18d, 18e!
[19] Attaching the trailer to the bicycle
- Place the bike and trailer on horizontal surface before can reaching the trailer to the bike.
- Pull the safety score (190) back, push the production (190) and push the bicycle arm (the way ends the entry (190). Release the action reached the safety level return.
- Venfu that the bicycle arm is secure, fixed by pulling on the bicycle arm.
• Will us safety cable (400 gm) and bike frame and foster the book to the one (500
• Makes sure that keep the sole of a trus around the chain, slay flat or set a stey ball of your blue ring
- Ensure that the wheel guards (2h) are rotated out/ward and the reflectors are fully visible
- Important, Always adjust the pushbar to the position with the cycling logo [19h] visible when you can cycling
• Incoort and Always use the self-skip Top when you go cycling.
- Connect the two pieces of the safety flag together and place the safety flag [19] in the flag pocket [19] next to the side window. Place the safety flag on the side of the bicycle trailer that is most exposed to the road.
[20]Rear light
- Attach the red light (see) on the pushbar. Pull the rubber elastic around the pushbar end of each it to the tracks on each side of the light
- Place the light on the side of the traster that is most exposed to the rear
- About the light Name: Plastic 2K mmol K160 Butteries, 2x AG/3/L (4.15V, Included).
• To change the batteries to the cochols and remove the front cover.
[27] Detaching the trailer from the bicycle
- To detect the trailer from the bottle detect the safety stop [20] first and then, pull the safety stop [20] and then press the press button (20) and pull the big vio port off the high [10]. The safety stop can be pushed back into the bicycle arm.
- Insert the smaller wheel [a] into the central connection point [b]. Verify that the smaller wheel is securely fastened by closing the control wheel.
- To detect in the bicycle arm from the other detect in the safety stop [21g] first and then hide the bicycle arm connection button (with backwards, ice end of the bicycle arm with drop down and tree the bicycle arm can be pulled out.
- When using the tighter wheel, the bicycle arm should be stored in the pocket 120 or the bottom of the tower.
[22] Folding the trailer
- Before folding, the bag and safety fog must be removed and the pushbar should be pushed in all the way.
- take out the cargo (27e) from the rest of the trailer house as transportation lack or for invalid in the trailer
- To unlock the folding meal reform push the safety button (220) on both sides of the tool and at the same time each the fold looks (220) onwards
- Push the pushbar (a) forward and the trailer will start to hold
- When the pushbar is half-way forward, push the rear frame (24) of the tower in wards.
- Make sure the windows! (24) are quick enough into the reader.
- When folded, the rear stop zone can be used to keep the trailer folded important, the stop should pass between the trailer fabric and the next axle and needs to be lowered again before unfolding.
CARE AND MAINTENANCE
Check before using the trailer
• The wheels are properly locked to the trailer
• The tires are inflicted according to the specified tire pressure.
• The reliability is complete unfolded and the mechanism is locked on low sizes. Do not force to lock the position.
- The set back rest is well secured enriched. Please see the maintenance solution below.
- The safety plug and lights are in place whenever required.
- The chowbar lengths within the limits and the order is not overloaded
- There is not more than 2 kg exchoweight in bed and two mesh pocket
Storage
- It is highly recommended to store the Drozzy/Cocon trailer index, in using and well-ventilated or out-of-direct sunlight.
TIP: There is a minimum storage cover available for better protection
Maintenance
- The Breeze/Coccal bicycle trailer has replaced a rain cover that is attached with a zipper in the top rear mesh pocket.
- The mesh cover and the sand shoulder are replaced by case they are damaged.
- Central connection point [24], if there is diet inside the central connection point, insert it with water.
- Bicycle arm connection (2g), if there is dirt inside the bicycle arm connection, rinse it with water.
- Do not use cleaning solvents. Clean only with mild soap and water
- The soft condings [2] can be removed from the trailer for cleaning purposes. Wash sealing by hand or using cloth machine wash with a short slait cycle.
- If you ever need to replace the broke cables on your ladder, please contact Homax customers support for instructions.
- Allow the trade/recover to be completed before stopping it to prevent it from becoming a lot
- If the order is involved in accidents is damaged, contact your dealer to check if I can still be used.
- All important components such as shower, connecting device, frame, safety, belts, lighting equipment, tires, and wheels etc. should be verified regularly, whether bolted assemblies are well tightened.
WARRANTY
They favor Breeze/Coosur-Multi-Original Child Carrier is written from the date of purchase. The work with prices depends on the level of the counting in question. The work only applies to defects to inactive labor or workshop, and does not cover shortage due to improper use, lack of maintenance, failure to follow the user assault, use of force or normal wear and tear. The warranty is valid for the original user only. Please read the use one maintenance recommendations carefully. Conditions that may course promotional wear of the carrier must be covered by the worker only. Should the carrier require service or you want to make a warranty, claim, please contact your local dealer (from whom you purchased your carrier.
GENERAL INSTRUCTIONS FOR BATTERIES (REAR LIGHT)
• Non-rechargeable batteries must not be charged.
- Remove rechargeable batteries from the item before charging them.
- Different types of batteries as well as old and new batteries must not be used together on the same item.
- Only batteries of the same or equivalent type as specified should be used
• Placebo makes sure that bacteria are infected with the control colour.
• The supply permittigis must not be short-circuited
- Remove empn, batteries from the item
- It is not allowed to burn metals batteries as they might explode or look.
Information concerning the disposal of exhausted batteries
The people's symbol on the left side of accordance, the packaging on the enclosed documents are just that the batteries are only nor the dispossession or the end of their life cycle together with no domestic where. Possible additional orders of words to distinguish that of a battery can be able (50) each unit (50) or the charging tip. You can consumer be obtained by how to render all kinds of batteries (both non-reversible as well as non-rechargeable), inclusive battery cells or local places of collection or the retail market. It is not enough. The proper disposal enables the recycling of valuable resources and avoids possible regulations of its own functions and the environment.
Information concerning the disposal of old electric and electronic products
The product described for the product, the packaging of the enclosed documents may be used to a product should not be disposed of other items and of its life cycle together with the domestic waste. You can consumer be obligated by law to render electric and electronic products at a local place of collection for electronic equipment. This is not a long term. Please refer to the contents before a disposal of the product. The product disposed of objects that using files of valuable resources and works possible being effected or transmitted and the environment. For further information please contact your locations on or the vendor of the product.
• Senenalt Rikobingsparkj [24]
• Furling, 2016
• Bcrnewogreljol 201
• Hidubingspark, sekkelorm [2g]
• Huiceskytheise[20]
• Hangzhou (2)
• Registrekk124
• Nettinglomer/operating requirements [20]
• Parkeringsystems [26]
• Bokluy [20]
• Newborn Bookkeeping (2p)
• Poster for V2502149
• Seieselt og setecolstning [2r]
* The dog may not be available in your trailer, but is available on necessary
Viktig: Pöse at sykkelvognen slás app korrekt. Se punkt [6]
• Values are shown in the following section:
other
| Category | Height (kg) | Height (m) | | :--- | :--- | :--- | | Bagasse | 150 | 20 | | Bagasse (Horizontal) | 160 | 20 | | Bagasse (Vertical) | 170 | 20 | | Bagasse (Horizontal) (Long) | 180 | 20 | | Bagasse (Vertical) (Long) (300 cm) | 190 | 20 | | Bagasse (Horizontal) (Long) (300 cm) | 200 | 20 | | Bagasse (Vertical) (Long) (300 cm) | 210 | 20 | | Bagasse (Horizontal) (Long) (300 cm) | 220 | 20 | | Bagasse (Vertical) (Long) (300 cm) | 230 | 20 | | Bagasse (Horizontal) (Long) (300 cm) | 240 | 20 | | Bagasse (Vertical) (Long) (300 cm) | 250 | 20 | | Bagasse (Horizontal) (Long) (300 cm) | 260 | 20 | | Bagasse (Vertical) (Long) (300 cm) | 270 | 20 | | Bagasse (Horizontal) (Long) (300 cm) | 280 | 20 | | Bagasse (Vertical) (Long) (300 cm) | 290 | 20 | | Bagasse (Horizontal) (Long) (300 cm) | 300 | 20 | | Bagasse (Vertical) (Long) (300 cm) | 310 | 20 | | Bagasse (Horizontal) (Long) (300 cm) | 320 | 20 | | Bagasse (Vertical) (Long) (300 cm) | 330 | 20 | | Bagasse (Horizontal) (Long) (300 cm) | 340 | 20 | | Bagasse (Vertical) (Long) (300 cm) | 350 | 20 | | Bagasse (Horizontal) (Long) (300 cm) | 360 | 20 | | Bagasse (Vertical) (Long) (300 cm) | 370 | 20 | | Bagasse (Horizontal) (Long) (300 cm) | 380 | 20 | | Bagasse (Vertical) (Long) (300 cm) | 390 | 20 | | Bagasse (Horizontal) (Long) (300 cm) | 400 | 20 | | Bagasse (Vertical) (Long) (300 cm) | 410 | 20 | | Bagasse (Horizontal) (Long) (300 cm) | 420 | 20 | | Bagasse (Vertical) (Long) (300 cm) | 430 | 20 | | Bagasse (Horizontal) (Long) (300 cm) | 440 | 20 | | Bagasse (Vertical) (Long) (300 cm) | 450 | 20 | | Bagasse (Horizontal) (Long) (300 cm) | 460 | 20 | | Bagasse (Vertical) (Long) (300 cm) | 470 | 20 | | Bagasse (Horizontal) (Long) (300 cm) | 480 | 20 | | Bagasse (Vertical) (Long) (300 cm) | 490 | 20 | | Bagasse (Horizontal) (Long) (300 cm) | 500 | 20 | | Bagasse (Vertical) (Long) (300 cm) | 510 | 20 | | Bagasse (Horizontal) (Long) (300 cm) | 520 | 20 | | Bagasse (Vertical) (Long) (300 cm) | 530 | 20 | | Bagasse (Horizontal) (Long) (300 cm) | 540 | 20 | | Bagasse (Vertical) (Long) (300 cm) | 550 | 20 | | Bagasse (Horizontal) (Long) (300 cm) | 560 | 20 | | Bagasse (Vertical) (Long) (300 cm) | 570 | 20 | | Bagasse (Horizontal) (Long) (300 cm) | 580 | 20 | | Bagasse (Vertical) (Long) (300 cm) | 590 | 20 | | Bagasse (Horizontal) (Long) (300 cm) | 600 | 20 | | Bagasse (Vertical) (Long) (300 cm) | 610 | 20 | | Bagasse (Horizontal) (Long) (300 cm) | 620 | 20 | | Bagasse (Vertical) (Long) (300 cm) | 630 | 20 | | Bagasse (Horizontal) (Long) (300 cm) | 640 | 20 | | Bagasse (Vertical) (Long) (300 cm) | 650 | 20 | | Bagasse (Horizontal) (Long) (300 cm) | 660 | 20 | | Bagasse (Vertical) (Long) (300 cm) | 670 | 20 | | Bagasse (Horizontal) (Long) (300 cm) | 680 | 20 | | Bagasse (Vertical) (Long) (300 cm) | 690 | 20 | | Bagasse (Horizontal) (Long) (300 cm) | 700 | 20 | | Bagasse (Vertical) (Long) (30SÄKERHETSFÖRESKRIFTER
! WARNING
- all cycle makes higher
• an eukeltenhang, sin-schlerden, "ohroud"
c) 100% of the project, which is subject to
KOMMA IGÅNG - MONTERING
- Floorings, Slovenia (20)
• Svarghur120
• Place of the company's directors are not yet given.
• Omlenber, Kost-Peste 2-Küring, Ki-86-Betler, 2-AGU/LR44 (5 V. [ingd]).
other
| Hand-drawn Car Wheel | Max (kg) | Min (kg) | Max (kg) | Min (kg) | Max (kg) | Min (kg) | Max (kg) | Min (kg) | |---|---|---|---|---|---|---|---|---| | Cart Wheel | 35 | 20 | 15 | 10 | 8 | 5 | 5 | 2 | | Bus Wheel | 35 | 20 | 15 | 10 | 8 | 5 | 5 | 2 | | Bike Wheel | 35 | 20 | 15 | 10 | 8 | 5 | 5 | 2 | | Bus Wheel | 35 | 20 | 15 | 10 | 8 | 5 | 5 | 2 | | Bike Wheel | 35 | 20 | 15 | 10 | 8 | 5 | 5 | 2 | All Car Wheels: Cart Wheel (95cm/30km), Bus Wheel (75cm/40cm), Bike Wheel (60cm/35cm), Bus Wheel (50cm/45cm).VEILIGHEIDSRICHTLIJNEN

WAARSCHUWING
• (2) Tax effect of the impact on
[2] Productoverzicht
• Dum!uq120
• Zorneschem[2b]
• Gaozofdeking12c
• Supply Roof (x) [10]
- Sicherheitsfonne (ix,1E)
• Rückzeitung [1]
• Folmaudelichsel (14) (5)
• Schlussel(2x1(H)
• 50% of the 2x10
• Beratzer/erobut. [x]
[2] Productoverzicht
• Schubstange!20/
• Schanische Zürb
- Mesh/Anderkina[2]
The following section of the
• Pure solution [25]
• Valerichmoules126
• Franchised Company (21)
•
• Discount of inclination in micelle (2 p)
• Transporting a key asset
(1) 2017年1月1日
ПРАВИЛА ТЕХНИКИ БЕЗОПАСНОСТИ
⚠️ ПРЕДУПРЕЖДЕНИЯ
[20] Golin's Zibintos
- Term link to reviving Zinling (205 font stürkine for Verries. Trouter's gaining closing down and turning strongly over time prior böglich obliquie 25m to procése.
• Mononakate zibingdavatni priekobos kana, eapomme arnai kele
- Apie Zinctor Pavodimius. Presto 2: X mark X150. Eotarios 2x AC13L94415V potuokiomost.
- Jenrite pekerst/boterios, proposekte corpuses in renite priclans durucely.
• Zopini et al. 2019, 2018
• Marketable sector, which is the company's major market capitalization issue.
- neiden koutrochleider neudettromette petroclines.
ALUKSI - ASENNUS
• Appliance and safety
• Kucelbogcru [2f]
• Polkspurin varien, fiorte [29]
• Puocosugan(2h)
• Kosjornu 124
• Sodesous (2)
• Tyoto Geisen Konkeuropenscortoolket [2k]
• Tottulcet 20
• Verklukonkeiset reskur/sudesejun söltjogspelika [zm]
• Pysknotyom/1[29]
• Takovulo [20]
• Yes worden keltes [20]
• Russikovon, Staatst [20]
• Turvovskunstysjogestelma, a stuipenm street [2x]
• Human, the classic language cannot be written in your way to you volunteer
- Kivilacu, kinkis, kinkis, kinkis, kinkis, kinkis, kinkis, kinkis, kinkis, kinkis, kinkis, kinkis, kinkis, kinkis, kinkis, kinkis, kinkis, kinkis, kinkis, kinkis, kinkis, kinkis, kinkis, kinkis, kinkis, kinkis, kinkin
- Riposča sitben passinakci zorunkoukt i zorunl kormaklinskivlu biević harnics limakul in [126] je vedonil včišu puesin emistomiseks, vovunin
- Joselvar, mettepussin, proto kalki, bels kouikou yudelleen
VIHJE: Kun pussin pohikoukouja et ole kinnirety vocnun, ne volaocan salihtää slisifish ripustarcho se kaukuisto ne viaressi plevan hioncayim durhin
• transvector companies
- Role to serve over social (no) such as time, y fijete con ellos tornilles y h.

- EN Thank you for choosing the Hamax Breeze/Cocoon multifunctional bicycle child trailer including the stroller wheel
- SPECIFICATIONS
- SAFETY GUIDELINES
- WARNING
- Bicycle safety
- Riding behavior
- High visibility
- Intended use
- GETTING STARTED - INSTALLATION
- [2] Product overview
- Important: Make sure to unfold the trailer correctly. See point [6].
- [3] Mounting the quick release wheels
- [4] Wheelguards
- Mounting the stroller wheel (see point 18 to remove the stroller wheel)
- [6] Unfolding the trailer
- [7] Installing the cross bar
- [8] Attaching the hitch on your bicycle
- USE
- [9] Using the parking brake
- [10] Adjusting the push bar height
- III Hand broke
- [12] Luggage bag
- [13]5-point safety harness
- [14] Seat recline
- [15] Front covers and shades
- [16] Suspension adjustment
- [17] Attaching the bicycle arm [17 of] to the trailer
- [18]Removing the stroller wheel from the trailer
- [19] Attaching the trailer to the bicycle
- [20]Rear light
- [27] Detaching the trailer from the bicycle
- [22] Folding the trailer
- CARE AND MAINTENANCE
- Check before using the trailer
- Storage
- Maintenance
- WARRANTY
- GENERAL INSTRUCTIONS FOR BATTERIES (REAR LIGHT)
- Information concerning the disposal of exhausted batteries
- Information concerning the disposal of old electric and electronic products
- Viktig: Pöse at sykkelvognen slás app korrekt. Se punkt [6]
- SÄKERHETSFÖRESKRIFTER
- ! WARNING
- KOMMA IGÅNG - MONTERING
- VEILIGHEIDSRICHTLIJNEN
- WAARSCHUWING
- [2] Productoverzicht
- ПРАВИЛА ТЕХНИКИ БЕЗОПАСНОСТИ
- ⚠️ ПРЕДУПРЕЖДЕНИЯ
- [20] Golin's Zibintos
- ALUKSI - ASENNUS
Brand : Hamax
Model : Cocoon One
Category : Bike trailer