Foodi SP101EU - Oven NINJA - Free user manual and instructions
Find the device manual for free Foodi SP101EU NINJA in PDF.
| Product Type | Multifunction Oven |
| Brand | Ninja |
| Model | Foodi SP101EU |
| Voltage | 220-240 V ~ 50/60 Hz |
| Power | 2400 W |
| Cooking Capacity | Up to 6 slices of bread, 6 bagel halves |
| Cooking Functions | Air Fry, Roast, Grill, Bake, Toast, Bagel, Dehydrate, Keep Warm |
| Temperature Range | 40°C to 230°C depending on function |
| Timer | Up to 12 h (dehydrate), 2 h (roast), 1 h (Air Fry) |
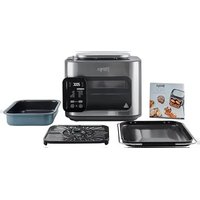
| Included Accessories | Air Fry basket, oven tray, wire rack, removable crumb tray |
| Door Material | Tempered glass |
| Control Type | Digital panel with rotary dial |
| Interior Light | Yes, with dedicated button |
| Cleaning | Hand wash accessories, wipe main unit with damp cloth |
| Safety | Do not immerse, do not cover air intakes, do not use aluminum foil |
| Warranty | 2 years (legal warranty + Ninja commercial warranty) |
| Spare parts and accessories | Available at ninjakitchen.eu |
| Country of Manufacture | China |
| Intended Use | Household use only |
| Weight (approx.) | Approximately 9 kg |
Frequently Asked Questions - Foodi SP101EU NINJA
User questions about Foodi SP101EU NINJA
0 question about this device. Answer the ones you know or ask your own.
Ask a new question about this device
Download the instructions for your Oven in PDF format for free! Find your manual Foodi SP101EU - NINJA and take your electronic device back in hand. On this page are published all the documents necessary for the use of your device. Foodi SP101EU by NINJA.
USER MANUAL Foodi SP101EU NINJA
GUIDE D'INSTRUCTIONS
ET GARANTIE NINJA
ISTRUZIONI
INSTRUCTIES
INSTRUKSJONER
OHJEET
INSTRUKTIONER
MULTIFUNKTIONEL OVN MULTIFUNKTIONSOFEN MULTIFUNCTION OVEN HORNO MULTIFUNCIÓN FOUR MULTIFONCTION FORNO MULTIFUNZIONE MULTIFUNCTIONELE OVEN MULTIFUNKSJONSOVN MONITOIMIUUNI MULTIFUNKTIONSSUGN

text_image
18:35 200°C -CRISP CONTROL- AIR FEY ROAST GRILL BAKE DEHYDRATE KEEP WARM TOAST BAGEL START PAUSE TIME BLOCK TEMP DIMENSIONS NINJAMANGE TAK
natural_image
Line drawing of a portable electronic device with ventilation grilles and control panel (no text or symbols)
Luftfriturekurv
(bruges i øverste skinneposition)


Ovnbakke
(skal altid placeres oven på risten)


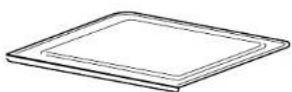
Rist
(opbevares i nederste skinneposition)

Aftagelig krummebakke
(skal altid placeres under nederste varmeelement)

natural_image
Simple line drawing of a battery cell with an external power outlet (no text or symbols)natural_image
Line drawing of a computer monitor with cable and plug (no text or symbols)TILBEH∅R, DER KAN TILK∅BES
natural_image
Illustration of hands holding a grid-like object with directional arrows indicating rotation or movement (no text or symbols)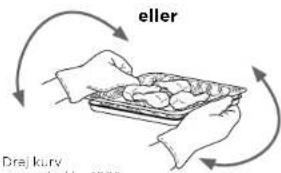
text_image
eller Drej kurv 2021natural_image
Line drawing of a microwave oven with a tray holding a food item (no text or symbols)natural_image
Line drawing of hands using a tool to press or adjust a device on a flat surface (no text or symbols)6 Når tilberedningen er faerolig, bipper apparatet,
Bake (Bagning)
natural_image
Line drawing of a toaster with multiple food rolls (no text or symbols)natural_image
Line drawing of a toaster oven with food tray (no text or symbols)natural_image
Illustration of a hand holding a tray with a computer monitor open, no text or symbols presentnatural_image
Line drawing of hands installing or adjusting a rectangular device with internal components (no text or symbols)2 Løft og vip aparatet opad.

natural_image
Illustration of hands installing or adjusting a device with a grid inside, showing a curved arrow indicating rotation (no text or symbols present)3 Sæt apparatet i lodret position under opbevaring eller ved grundig rengøring.
natural_image
Line drawing of a rectangular electronic device with lid and mounting feet (no text or symbols)FEJLFINDING
FEJLMEDDELELSER
"CALL CUSt SrVC" efterfulgt af "Er1" - "Er7"
OFTE STILLEDE SP∅RGSMÅL
natural_image
Line drawing of a portable air conditioner unit (no text or symbols)
Luftfrittierkorb
natural_image
Diagram of a battery cell with an external power outlet connected to the right side (no text or symbols present)natural_image
Line drawing of a device with a coiled cable and ventilation slots (no text or symbols)KAUFBARES ZUBEHÖR
natural_image
Line drawing of a toaster oven with a flat-screen die on the tray (no text or symbols)natural_image
Line drawing of hands using a handheld device to press or install a printer (no text or symbols visible)natural_image
Line drawing of a toaster oven with multiple grilles (no text or symbols)natural_image
Line drawing of a toaster oven with open tray holding circular objects (no text or symbols)natural_image
Line drawing of a device with hands holding an open lid (no text or symbols visible)natural_image
Illustration of hands installing or adjusting a microwave oven into a rack (no text or symbols visible)natural_image
Line drawing of a rectangular electronic device with lid and mounting base (no text or symbols)for purchasing the Ninja® Foodi® Multifunction Oven

REGISTER YOUR PURCHASE

ninjakitchen.eu

n QR code using mobile device
RECORD THIS INFORMATION
Model Number: ____
Serial Number: ____
Date of Purchase: ____
(Keep receipt)
Store of Purchase: ____
TECHNICAL SPECIFICATIONS
Voltage: 220-240V-50-60Hz
Watts: 2400W
TIP: You can find the model and serial numbers on the QR code label located on the base of the unit.

This marking indicates this product should not be disposed of with other household wastes throughout the EU. To prevent possible
harm to the environment or human health from uncontrolled waste disposal, recycle it responsibly to promote the sustainable reuse of material sources. To return your used device, please use the return and collection systems or contact the retailer where this product was purchased. They can take this product for environmentally safe recycling.
CONTENTS
Important Safeguards....38
Parts....40
Accessory Placement 41
Before First Use....41
Using the Control Panel 42
Functions 43
Control Panel Display & Operating Buttons 43
Power Cord Management....44
Accessories for Purchase....44
Using Your Foodi® Multifunction Oven ....45
Using the Cooking Functions....45
Air Fry 45
Roast 46
Grill 46
Bake 47
Toast 47
Bagel 48
Dehydrate 48
Keep Warm....48
Cleaning, Maintenance & Storage....49
Everyday Cleaning 49
Deep Cleaning 49
Flip-Up-And-Away Storage 50
Troubleshooting 51
FAQ 51
Product Registration....52
IMPORTANT SAFEGUARDS
HOUSEHOLD USE ONLY • READ ALL INSTRUCTIONS BEFORE USE
When using electrical appliances, basic safety precautions should always be followed, including the following:
⚠ WARNING
1 Read all instructions prior to using the oven and its accessories.
2 This appliance can be used by persons with reduced physical, sensory or mental capabilities or lack of experience and knowledge if they have been given supervision or instruction concerning use of the appliance in a safe way and understand the hazards involved.
3 To eliminate a choking hazard for young children, discard all packaging materials immediately upon unpacking.
4 Take inventory of all contents to ensure you have all parts needed to properly and safely operate your oven.
5DONOT use an extension cord. A short power-supply cord is used to reduce the risk of children grabbing the cord or becoming entangled and to reduce the risk of people tripping over a longer cord.
6NEVER use socket below worktop.
7 Keep the appliance and its cord out of reach of children. Do not allow the appliance to be used by children. Close supervision is necessary when used near children.
8DONOT let cord hang over edges of tables or counters or touch hot surfaces, including stoves and other heating ovens.
9NEVER leave the oven unattended while in use.
10DONOT cover crumb tray or any part of the oven with metal foil. This will cause the oven to overheat or cause a fire.
11 NEVER place aluminum foil on top of the oven tray or wire rack. This traps grease and can cause a fire.
12 To protect against electrical shock DO NOT immerse cord, plugs or main unit housing in water or other liquid.
13 DO NOT use the oven with damage to the power cord or plug. Regularly inspect the oven and power cord. If the oven malfunctions or has been damaged in any way, immediately stop use and call Customer Service.
14 DO NOT cover the air intake vents or air socket vents while unit is operating. Doing so will prevent even cooking and may damage the unit or cause it to overheat.
15 DO NOT insert anything in the ventilation slots and do not obstruct them.
16 DO NOT place items on top of surface while unit is operating except for authorised recommended Ninja accessories.
17 Before placing any accessories into the oven ensure they are clean and dry.
18 Intended for worktop use only. DO NOT place the oven near the edge of a worktop. Ensure the surface is level, clean and dry.
19 This oven is for household use only. DO NOT use this oven for anything other than its intended use. Misuse may cause injury.
20 DO NOT store any materials, other than supplied accessories, in this oven when not in use.
21 DO NOT use outdoors. DO NOT use in moving vehicles or boats.
22 DO NOT use accessory and attachments not recommended or sold by SharkNinja.
23 When using this oven, provide adequate space above and on all sides for air circulation.
24 A fire may occur if the oven is covered or touching flammable material, including curtains, draperies, walls, or the like when in operation. DO NOT place anything on the oven during operation.
25 This oven has a tempered glass door and is more resistant to breakage. Avoid scratching door surface or nicking edges.
26 DO NOT use the oven without the wire rack installed, except when using Air Fry Basket.
27 DO NOT spray any type of aerosol spray or flavoring inside the oven while cooking.
28 Use caution when inserting and removing anything from the oven, especially when hot.
29 Socket voltages can vary, affecting the performance of your product. To prevent possible illness, use a thermometer to check that your food is cooked to the temperatures recommended.
30 Prevent food contact with heating elements. Excessive food loads may cause personal injury or properly damage or affect the safe use of the oven.
31 DO NOT place any of the following materials in the oven: paper, cardboard, plastic, roasting bags and the like.
32 Extreme caution should be exercised when using containers constructed of any materials other than metal or glass.
33 DO NOT touch hot surfaces. Oven surfaces are hot during and after operation. To prevent burns or personal injury, ALWAYS use protective hot pads or insulated oven mitts and use available handles and knobs.
34 Spilled food can cause serious burns. Extreme caution must be used when the oven contains hot food. Improper use may result in personal injury.
35 Please refer to the Cleaning & Maintenance section for regular maintenance of the oven.
36 Cleaning and user maintenance shall not be made by children.
37 Press the power button to turn oven off and allow to cool completely before cleaning, moving and flipping for storage.
38 Unplug from socket when not in use. To unplug, grasp the plug by the body and pull from the socket. Never unplug by grasping and pulling the flexible cord.
39 DO NOT clean with metal scouring pads. Pieces can break off the pad and touch electrical parts, causing a risk of electrical shock.
40 DO NOT use the oven as a source of heat or for drying.

Indicates to read and review instructions to understand operation and use of product.

Indicates the presence of a hazard that can cause personal injury, death or substantial property damage if the warning included with this symbol is ignored.

Take care to avoid contact with hot surface. Always use hand protection to avoid burns.

For indoor and household use only.
SAVE THESE INSTRUCTIONS
PARTS

Main Unit
(attached power cord not shown)

natural_image
Line drawing of a portable kitchen appliance with ventilation grilles and control panel (no text or symbols)
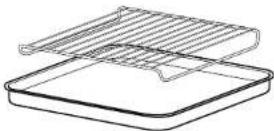
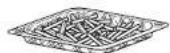
Air Fry Basket
(use in the top rail position)
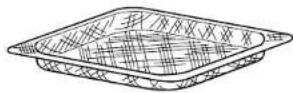

Oven Tray
(always layer on top of the wire rack)


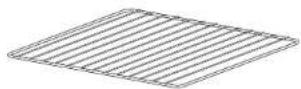
Wire Rack
(keep in the bottom rail position)


Removable Crumb Tray
(always place below the bottom heating element)
To order additional parts and accessories visit ninjakitchen.eu

41injakitchen.eu
ACCESSORY PLACEMENT

text_image
B C D EBEFORE FIRST USE
1 Remove and discard any packaging material, promotional labels and tape from the unit.
2 Remove all accessories from the package and read this manual carefully. Please pay particular attention to operational instructions, warnings and important safeguards to avoid any injury or property damage.
3 Wash the air fry basket, oven tray, wire rack and removable crumb tray in warm, soapy water, then rinse and dry thoroughly. NEVER clean the main unit in the dishwasher.
4 We recommend placing all accessories inside the oven and running it on Air Fry at 200°C for 20 minutes without adding food. Make sure the area is well ventilated. This removes any packaging residue and odour traces that may be present. This is completely safe and not detrimental to the performance of the oven.
NOTE: For longevity, we recommend hard-washing the accessories.
ninjakitchen.eu
USING THE CONTROL PANEL

text_image
1 Time display 8:8:8:8 SLICE 8:8:8 C DARK PRE 3 Preheat indicator 4 FishRows in Time display 2 Temperature display 5 HOT unit indicator — CRISP CONTROL — AIR FRY ROAST GRILL BAKE DEHYDRATE KEEP WARM TOAST BAGEL START/PAUSE 7 START/PAUSE button AND 8 Function/Time/ Temperature dial 9 TIME/SLICE button TIME SLICE | TEMP DARKNESS 10 TEMP/DARKNESS button 11 Light button 12 Power buttonFUNCTIONS
AIR FRY: Make foods that would traditionally be fried—such as chicken wings, French fries and chicken nuggets—with little to no added oil.
ROAST: Achieve a crispy outside and perfectly cooked inside for full-sized oven tray meals, thicker proteins and roasted veggies.
GRILL: Grills meat and fish and evenly browns the tops of casseroles.
BAKE: Evenly bakes everything from your favourite cookies to homemade pizzas.
TOAST: Evenly toasts up to 6 slices of bread to your perfect level of darkness.
BAGEL: Perfectly toast up to 6 slices of bagels halves when they're placed cut-side up on the wire rack.
DEHYDRATE: Dehydrates meats, fruits and vegetables for healthy snacks.
KEEP WARM: Keeps food warm up to 2 hours.
NOTE: The DEHYDRATE and KEEP WARM functions are not included on all models.
CONTROL PANEL DISPLAY & OPERATING BUTTONS
1 Time display: Shows the cook time. The time will count down when cooking is in progress.
2 Temperature display: Shows the cook temperature.
NOTE: Time and temperature will always return to the cook time and temperature that was set the last time the oven was in use.
3 PRE flashes when the unit is preheating.
4 FLI appear on the time display when the unit is cool enough to flip up for storage or cleaning.
5 🌐 illuminates when the unit is hot and will turn off when the oven is cool enough to be flipped up for storage or cleaning.
6 SLICE and DARK will illuminate when using the Toast or Bagel function.
7 START/PAUSE button: Press to start or pause cooking.
8 Function/Time/Temperature dial: Turn to select a cooking function or adjust time and temperature (or number of slices and darkness level when using the Toast and Bagel functions).
NOTE: Press and hold the START/PAUSE button for 3 seconds to return to the function selection.
9 TIME/SLICE button: To select a cook time, press the TIME button, then use the dial to adjust the time. When using the Toast or Bagel function, this button will adjust the number of slices instead of the time.
10 TEMP/DARKNESS button: To adjust temperature, press the TEMP button and use the dial to adjust the temperature. When using the Toast or Bagel function, this button will adjust the darkness level instead of the temperature.
NOTE: The cook time and temperature may be adjusted at any time during the cooking cycle.
11 (Light) button: Press to turn the oven's interior light on and off.
NOTE: The light will automatically turn on when there are 30 seconds of cook time remaining.
12 ⏻ (Power) button: Press to turn the unit on and off.
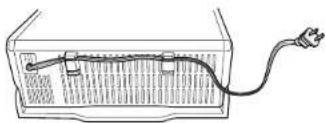
POWER CORD MANAGEMENT
Our cord-management system is designed so it will not interfere with the oven's flip-away functionality.
Option 1 Socket on the left
natural_image
Diagram of a battery cell with an external power outlet connected to the right side (no text or symbols present)Option 2 Socket on the right

Option 3 Socket behind the oven

natural_image
Line drawing of a computer monitor with a cable inserted into the screen (no text or symbols)ACCESSORIES FOR PURCHASE
We offer a range of accessories custom made for your Ninja® Food® Multifunction Oven. Visit ninjakitchen.eu to expand your capabilities and take your cooking to the next level.
- Grilling Rack
• Casserole Dish/Baking Pan (5cm deep)

- Egg Bite/Muffin Tray

USING YOUR Foodi® MULTIFUNCTION OVEN
USING THE COOKING FUNCTIONS
To turn on the unit, plug the power cord into the wall, flip oven down into cooking position, and press the ⏻ button.
NOTE: The unit preheats quickly, so we recommend prepping all ingredients before turning on the oven.
Air Fry
1 To select the function, turn the dial until AIR FRY illuminates. The default time and temperature settings will display.
2 Press the TIME/SLICE button and use the dial to select your time up to 1 hour. To set the time, press the TIME/SLICE button again.
3 Then press the TEMP/DARKNESS button and use the dial to select a temperature between 120°C, 200°C. To set the temperature, press the TEMP/DARKNESS button again.
4 Press START/PAUSE to begin preheating.
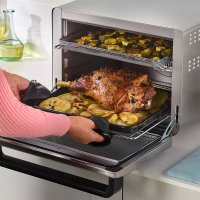
5 Place ingredients in the air fry basket. If ingredients are fatty, oily, or marinated, place the basket on the oven tray.
Use air fry basket for dry ingredients.

Use air fry basket with oven tray underneath for fatty, oily or marinated ingredients.
6 Slice the basket into the upper rails of the oven. If also using the oven tray, slide both into the oven at the same time, with the basket in the upper rails and the pan on the wire rack beneath the basket. Close oven door.
NOTE: The timer will start counting down as soon as the unit has preheated. If ingredients are not ready to go into the oven, simply turn the dial to add more time.
7 For more even browning and crispiness, loss ingredients or turn the basket 180" halfway through cooking cycle.

natural_image
Illustration of hands holding a tray with arrows indicating motion or force (no text or symbols)
text_image
or Turn basket and oven tray 180°.8 When cook time is complete, the unit will beep.
USING YOUR Foodi® MULTIFUNCTION OVEN - CONT.
Roast
1 To select the function, turn the dial until ROAST illuminates. The default time and temperature settings will display.
2 Press the TIME/SLICE button and use the dial to select your time up to 2 hours. To set the time, press TIME/SLICE button again.
NOTE: If cooking for less than 1 hour the clock will count down by minutes and seconds. If cooking for more than 1 hour, the clock will count down by hours and minutes.
3 Press the TEMP/DARKNESS button and use the dial to select a temperature between 120°C-230°C. To set the temperature, press the TEMP/DARKNESS button again.
4 Press START/PAUSE to begin preheating.
NOTE: Food cocks faster when using the Air Roast function than when using the Bake function, so for traditional oven recipes, lower the cook time 30% and lower the temperature 10°C.
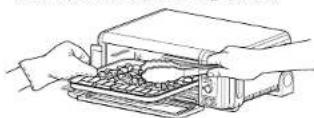
5 Place ingredients on the oven tray. When the unit beeps to signify it has proheated, immediately place the oven tray on the wire rack. Close oven door.
NOTE: The timer will start counting down as soon as the unit has preheated. If ingredients are not ready to go into the oven, simply turn the dial to add more time.
6 During cooking, you can open the oven door to check on or flip ingredients.
7 When cook time is complete, the unit will beep.
Grill
1 To select the function, turn the dial until GRILL illuminates. The default time and temperature settings will display.
2 Press the TIME/SLICE button and use the dial to select your time up to 30 minutes. To set the time, press the TIME/SLICE button again.
3 Press the TEMP/DARKNESS button and use the dial to select either HI or LO. To set the temperature, press the TEMP/DARKNESS button again.
4 Place ingredients on the oven tray. Place the sheet pan on the wire rack and close the oven door, press START/PAUSE to start cooking.
natural_image
Line drawing of a toaster oven with a flat-screen die on the tray (no text or symbols)5 During cooking, you can open the oven door to check on or flip ingredients.
natural_image
Line drawing of hands using a printer to press or install a sheet of paper (no text or symbols present)6 When cook time is complete, the unit will beep
Bake
1 To select the function, turn the dial until BAKE illuminates. The default time and temperature settings will display.
2 Press the TIME/SLICE button and use the dial to select your time up to 2 hours. To set the time, press the TIME/SLICE button again.
NOTE: If cooking for less than 1 hour the clock will count down by minutes and seconds. If cooking for more than 1 hour, the clock will count down by hours and minutes.
3 Press the TEMP/DARKNESS button and use the dial to select a temperature between 120°C-230°C. To set the temperature, press the TEMP/DARKNESS button again.
4 Press START/PAUSE to begin preheating.
5 Place ingredients on the oven tray. When the unit beeps to signify it has preheated, immediately place the oven tray on the wire rack. Close oven door.
NOTE: The timer will start counting down as soon as the unit has preheated. If ingredients are not ready to go into the oven, simply turn the dial to add more time.
6 During cooking, you can open the oven door to check on or flip ingredients.

7 When cook time is complete, the unit will beep.
NOTE: For best results with baked goods such as cookies, line the Ninja® Oven tray with baking parchment paper.
Toast
1 To select the function, turn the dial until TOAST illuminates. The default amount of slices and darkness will be displayed.
2 Press the TIME/SLICE button and use the dial to select the number of bread slices. You may toast up to 9 slices at once. To set the number of slices, press the TIME/SLICE button again.
3 Press the TEMP/DARKNESS button and use the dial to select a darkness level. To set the darkness level, press the TEMP/DARKNESS button again.
NOTE: There is no temperature adjustment available for the Toast function, and the unit does not preheat in Toast mode. It is very important to select the exact number of slices to avoid over- or under-toasting
4 Place bread slices on the wire rack. Close oven door and press START/PAUSE to begin cooking.

natural_image
Line drawing of a toaster with a tray of food inside (no text or symbols)5 You do not need to flip the slices during cooking. When cook time is complete, the unit will beep.
USING YOUR Foodi® MULTIFUNCTION OVEN - CONT.
Bagel
1 To select the function, turn the dial until BAGE. Illuminates. The default number of slices and darkness level will display.
2 Press the TIME/SLICE button and use the dial to select the number of slices. You may toast up to 6 bagel slices at once. To set the number of slices, press the TIME/SLICE button again.
3 Press the TEMP/DARKNESS button and use the dial to select a darkness level. To set the darkness level, press the TEMP/DARKNESS button again.
NOTE: There is no temperature adjustment available for the Bagel function, and the unit does not preheat in Bagel mode. It is very important to select the exact number of slices to avoid over- or under-toasting.
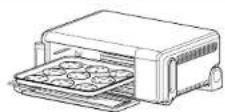
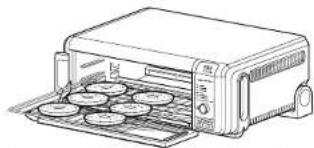
4 Place bagel slices, cut-side up, on the wire rack. Close oven door and press START/PAUSE to begin cooking.
natural_image
Line drawing of a toaster oven with food tray (no text or symbols)5 You do not need to flip the slices during cooking. When cook time is complete, the unit will beep.
Dehydrate
1 To select the function, turn the dial until DEHYDRATE illuminates. The default time and temperature settings will display
2 Press the TIME/SLICE button and use the dial to select a time up to 12 hours. To set the time, press the TIME/SLICE button again.
3 Press the TEMP/DARKNESS button and use the dial to select a temperature between 40°C-90°C. To set the temperature, press the TEMP/DARKNESS button again.
4 Place ingredients in the air fry basket and place basket in oven. Close oven door and press START/PAUSE to begin cooking.

5 During cooking, you can open the oven door to check on or flip ingredients.
6 When cook time is complete, the unit will beep.
Keep Warm
NOTE: The Keep Warm function is not included on all models.
1 To select the function, turn the dial until KEEP WARM illuminates. The default time setting will display.
2 Press the TIME/SLICE button and use the dial to select a time up to 2 hours. To set the time, press the TIME/SLICE button again.
NOTE: There is no temperature selection available for the Keep Warm function.
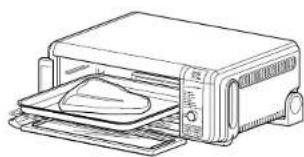
3 Place food on the oven tray or in an oven-safe container and place the pan or container on the wire rack. Close oven door and press START/PAUSE to begin warming.
NOTE: The unit does not preheat in Keep Warm mode.
4 When warming time is complete, the unit will beep.
CLEANING, MAINTENANCE & STORAGE
EVERYDAY CLEANING
The unit should be cleaned thoroughly after every use.
1 Unplug the unit from the socket and allow it to cool down before cleaning.
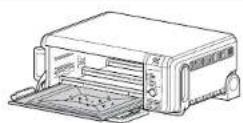
2 Empty crumb tray by sliding it out of the oven when the oven is in the flipped-down position.
NOTE: Empty crumb tray frequently Hand-wash when necessary.
natural_image
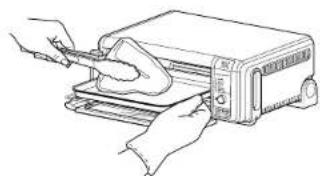
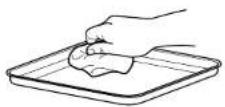
Illustration of hands using a device to open a microwave oven (no text or symbols visible)3 To clean any food splatter on the interior walls of the unit, wipe them with a soft, damp sponge.
4 To clean the exterior of the main unit and the control panel, wipe them clean with a damp cloth. A non-abrasive liquid cleanser or mild spray solution may be used. Apply the cleanser to the sponge, not the oven surface, before cleaning.

DEEP CLEANING
1 Unplug the unit from the socket and allow it to cool down before cleaning.
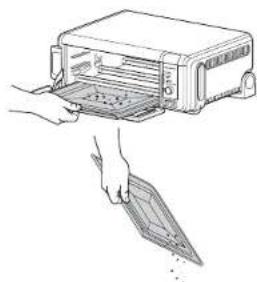
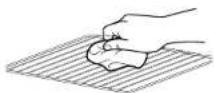
2 Remove all accessories from the unit, including the crumb tray, and wash separately. Use a non-abrasive cleaning brush to more thoroughly wash the air fry basket.
3 Flip up the oven into the storage position.
4 Press the push button to release the back door to access the oven's interior.
5 Use warm, soapy water and a soft cloth to wash the oven's interior. DO NOT use abrasive cleaners, scrubbing brushes, or chemical cleaners, as they will damage the oven.
CAUTION: NEVER put the main unit in the dishwasher or immerse it in water or any other liquid.

Continued on next page
CLEANING, MAINTENANCE & STORAGE - CONT.
6 To prolong use of accessories, hand-wash with warm, soapy water.
7 Thoroughly dry all parts before placing them back in the oven.


TIP: For stuck on food residue, leave accessories to soak in soapy water overnight.
FLIP-UP-AND-AWAY STORAGE
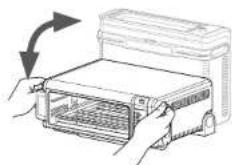
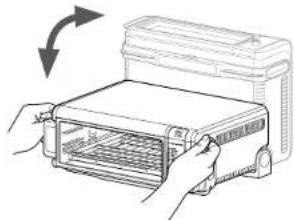
1 DO NOT flip oven up when illuminated. Wait for over to cool down before handling. Hold handles on each side of the unit.

natural_image
Line drawing of hands installing or adjusting a device into a rectangular housing (no text or symbols visible)2 Lift and flip unit upward.
natural_image
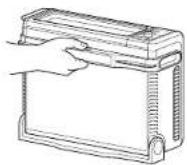
Illustration of hands operating a device with a rotating arrow indicating rotation (no text or symbols)3 Leave the unit in the upright position when storing or for deep cleaning.

natural_image
Line drawing of a rectangular electronic device housing with ventilation slots and mounting feet (no text or symbols)TROUBLESHOOTING
ERROR MESSAGES
"CALL CUSt SrVC" followed by "Er1" - "Er7"
Power off the unit and call Customer Service at 0800 000 9063. So we may better assist you, please register your product online at nlnjakitchen.eu and have the product on hand when you call.
FAQ
Why won't the oven turn on?
- Oven needs to be in flipped-down position in order to power it on.
- Make sure the power cord is securely plugged into the socket.
- Insert the power cord into a different socket.
- Reset the circuit breaker if necessary.
- Press the power button.
Can I use the oven tray instead of the air fry basket with air fry function?
• Yes, but crispiness results may vary.
Do I need to adjust the cook times and temperatures of traditional oven recipes?
- When preparing traditional oven recipes using the Roast function, lower cook time by 30% and temperature by 10°C.
Can I restore the unit to its default settings?
- The oven will remember the last setting used for each function, even if you unplug it. To restore the oven's default settings for each function, press the TIME/SLICE and TEMP/DARKNESS buttons simultaneously for 5 seconds.
Why do the heating elements appear to be turning on and off?
- This is normal. The oven is designed to control temperature precisely for every function by adjusting the heating elements' power levels.
Why is steam coming out from the oven door?
• This is normal. The door is vented to release steam created by foods with a high moisture content.
Why is water dripping onto the counter from under the door?
• This is normal. The condensation created by foods with a high moisture content
(such as frozen breads) may run down the inside of the door and drip onto the counter.
Why Is there noise coming from the control panel?
- When the oven is hot, a fan turns on to cool down the control panel.
Can foil or baking paper be used?
- Aluminium foil should not be used. However, baking paper or greaseproof paper is recommended for when baking or for generally keeping the tray clean.
Are the accessories dishwasher safe?
- For longevity we recommend hand washing accessories. For stuck-on residue, leave to soak before cleaning.
PRODUCT REGISTRATION
TWO (2) YEAR LIMITED GUARANTEE
When you buy a product in Europe as a consumer, you get the benefit of legal rights relating to the quality of the product (your "statutory rights"). You can enforce these statutory rights against your retailer. However, at Ninja we are so confident about the quality of our products (the "Products") that we give you a manufacturer's guarantee of two years. This guarantee only applies to the Product if it is bought in new and unused condition. These terms and conditions relate to our guarantees only - your statutory rights as a buyer are unaffected. Please note that the 2 year guarantee is available in all EU countries.
The conditions below describe the prerequisites and scope of our guarantees which are issued by SharkNinja Germany GmbH, Kurt-Braum-Platz 8, 63450 Hanau (Germany) ("us", "our" or "we"). They do not affect your statutory rights or the obligations of your retailer and your contract with them. The same applies if you have purchased the product directly from Ninja.
Ninja® Guarantees
A household kitchen appliance constitutes a sizeable investment. Your new machine needs to work properly for as long as possible. The guarantee it comes with is an important consideration - and reflects how much confidence the manufacturer has in its product and manufacturing quality.
Our customer service helpline (0800 000 9063) is open from 9.00am to 6.00pm Monday - Friday. It's free to call, and you'll be put straight through to a Ninja representative. You'll also find online support at www.ninjakitchen.eu.
How do I register my guarantee?
You can register your guarantee online within 28 days of purchase. To save time, you'll need the following information about your machine:
- Model no.
- Serial Number (only if available)
• Date of purchase of the Product (receipt or delivery note)
To register online, please visit www.ninjakitchen.eu
IMPORTANT
- The guarantee covers your Product for 2 years starting on the date of purchase.
- Please keep the receipt at all times. Should you need to use your guarantee we will need the receipt to verify the information supplied to us is correct. The inability to produce a valid receipt will invalidate your guarantee.
What are the benefits of registering my guarantee?
When you register your guarantee, you can choose to receive our newsletter containing tips, advice and competitions. Hear the latest news about new Ninja technology and launches. If you register your guarantee online, you'll get instant confirmation that we've received your details.
For details of our privacy policy please visit www.ninjakitchen.eu
How long are our Products guaranteed for?
Our confidence in our design and quality control means that your Product is guaranteed for two years.
What is covered by the guarantee?
Repair or replacement (at Ninja's discretion) of your Product, including all parts and labour in case of any defect in design, materials and workmanship (including transport and shipping costs). Our guarantee is in addition to your legal rights as a consumer.
What is not covered by the guarantee?
• Normal wear and tear.
- Accidental damage, faults caused by negligent use or care, misuse, neglect, careless operation or handling of the kitchen appliance which is not in accordance with the Ninja® Instruction Manual supplied with your machine.
- Use of the kitchen appliance for anything other than normal domestic household purposes
- Use of parts not assembled or installed in accordance with the operating instructions.
- Use of parts and accessories which are not Ninja® Genuine Components.
- Faulty installation (except where installed by Ninja®).
- Repairs or alterations carried out by parties other than Ninja or its agents, Repairs or alterations carried out by parties other than Ninja or its agents, unless you can show that the repairs or alterations carried out by others are not related to the defect for which you exercise the guarantee.
What happens when my guarantee runs out?
Ninja does not design products to last for a limited time. We do appreciate that there may be a desire for our customers to want to repair their kitchen appliance after the guarantee has elapsed. In this case please contact our free phone customer service help line and ask about our guarantee program, on 0800 000 9063.
Where can I buy genuine Ninja spares and accessories?
Ninja spares and accessories are developed by the same engineers who developed your Ninja kitchen appliance. You'll find a full range of Ninja spares, replacement parts and accessories for all Ninja machines at www.ninjakitchen.eu
Please remember that using non-Ninja speres may invalidate your manufacturer's guarantee. However, your statutory rights are unaffected.
GRACIAS
natural_image
Line drawing of a portable electronic device with ventilation grilles and control panel (no text or symbols)
natural_image
Diagram of a battery cell with an external power outlet connected to its side (no text or symbols present)natural_image
Line drawing of a computer monitor with an attached cable (no text or symbols)ACCESORIOS QUE ADQUIRIR
natural_image
Line drawing of a toaster oven with a flat-screen die (no text or symbols)natural_image
Line drawing of hands using a tool to press or install a flatboard on a toaster (no text or symbols present)natural_image
Line drawing of a toaster oven with multiple grilles (no text or symbols)natural_image
Line drawing of a toaster oven with food tray (no text or symbols)Dehydrate (Deshidratar)
natural_image
Line drawing of a hand inserting a card into a printer (no text or symbols)natural_image
Line drawing of hands holding a rectangular device with internal components (no text or symbols)natural_image
Illustration of hands installing or opening a device into a rectangular box (no text or symbols visible)natural_image
Line drawing of a rectangular electronic device with lid and mounting base (no text or symbols)natural_image
Line drawing of a portable electronic device with ventilation grilles and control panel (no text or symbols)
Panier Air Fry
KEEP WARM (MAINTENIR AU CHAUD) :
natural_image
Simple line drawing of a container with a cable and plug, no text or symbols presentnatural_image
Line drawing of a device rear panel with a cable inserted (no text or symbols)ACCESSOIRES VENDUS SÉPARÉMENT
natural_image
Line drawing of a microwave oven with a tray holding a food item (no text or symbols)natural_image
Line drawing of hands using a tool to press or install a toaster into a tray (no text or symbols)natural_image
Line drawing of a toaster oven with multiple food trays (no text or symbols)natural_image
Line drawing of a toaster oven with food tray (no text or symbols)natural_image
Illustration of two hand-drawn photos of a toaster oven with a tray, showing internal components and the exterior (no text or symbols)natural_image
Illustration of hands installing or opening a device into a tray (no text or symbols visible)natural_image
Line drawing of hands holding a rectangular device with internal components (no text or symbols)natural_image
Illustration of hands operating a device with a rotating arrow indicating rotation (no text or symbols)natural_image
Line drawing of a rectangular electronic device with internal components and mounting brackets (no text or symbols)RÉSOLUTION DES PROBLÈMES
MESSAGES D'ERREUR
natural_image
Line drawing of a portable electronic device with ventilation grilles and control panel (no text or symbols)
natural_image
Diagram of a device with a cable plugged into a rectangular chamber (no text or symbols)natural_image
Line drawing of a computer case with a cable inserted into the socket (no text or symbols)ACCESSORI DIS- PONIBILI
natural_image
Line drawing of a toaster oven with a flat-screen die on the tray (no text or symbols)natural_image
Line drawing of hands using a microwave oven to press or install a tray (no text or symbols)natural_image
Line drawing of a toaster oven with multiple grilles (no text or symbols)natural_image
Line drawing of a toaster oven with food tray (no text or symbols)natural_image
Illustration of two kitchen appliances: a front-mounted oven and a closed microwave oven, with hands holding a tray (no text or symbols)natural_image
Illustration of hands holding a device with a curved arrow indicating rotation (no text or symbols)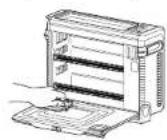
Continue all pages successive
natural_image
Line drawing of hands holding a rectangular device with internal shelves (no text or symbols)natural_image
Illustration of hands holding a device with an arrow indicating rotation (no text or symbols present)natural_image
Line drawing of a rectangular electronic device with lid and mounting brackets (no text or symbols)Roast (Braden)....118
Grill (Grillen) 118
Bake (Bakken) 119
Toast....119
Bagels....120
natural_image
Line drawing of a portable electronic device with ventilation grilles and control panel (no text or symbols)
Air Fry-mand
natural_image
Simple line drawing of a battery cell with an external power outlet (no text or symbols)natural_image
Line drawing of a computer monitor with cable plugged into the case (no text or symbols)ACCESSOIRES TE KOOP
natural_image
Line drawing of a toaster oven with a tray holding a food item (no text or symbols)natural_image
Line drawing of hands using a tool to press or install a grater (no text or symbols present)natural_image
Line drawing of a toaster with open tray and control panel (no text or symbols)natural_image
Line drawing of a toaster oven with food tray (no text or symbols)natural_image
Illustration of a hand inserting a card into a device into a rack (no text or symbols visible)natural_image
Four-step line drawing showing hand positioning on a textured surface, no text or symbols presentnatural_image
Line drawing of hands installing or adjusting a rectangular device with internal shelves (no text or symbols)natural_image
Illustration of hands operating a device with an arrow indicating rotation (no text or symbols present)natural_image
Line drawing of a rectangular electronic device with a lid and mounting base (no text or symbols)PROBLEMEN OPLOSSEN
FOUTMELDINGEN
Flip-up-and-away oppbevaring....140
Feilsøking 141
natural_image
Line drawing of a portable electronic device with ventilation grilles and control knobs (no text or symbols)
Luftfrityrkurv
natural_image
Simple line drawing of a battery cell with an external power outlet (no text or symbols)natural_image
Line drawing of a computer monitor with cable plugged into the screen (no text or symbols)EKSTRA TILBEH∅R FOR KJ∅P
natural_image
Illustration of hands holding a tray with arrows indicating motion or force (no text or symbols)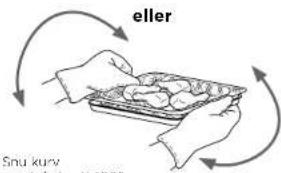
text_image
eller Snu kurv Makarath 2007natural_image
Line drawing of a toaster oven with a flat-screen die on the tray (no text or symbols)natural_image
Line drawing of hands using a tool to press or install a device on a flat surface (no text or symbols)natural_image
Line drawing of a toaster oven with multiple food trays (no text or symbols)5 Du trenger ikke å snu skivene under matlaging. Enheten piper när tilberechningen er over.
BRUK AV DIN Foodi® MULTIFUNKSJON OVN - FORTS.
Bagel
natural_image
Line drawing of a toaster oven with multiple food items on the tray (no text or symbols)5 Du trenger ikke å snu skivene under matlaging. Ovnen piper när tilberedningen er over.
Dehydrate (Dehydrere)
RENGJ∅RING, VEDLIKEHOLD OG OPPBEVARING
DAGLIG RENGJ∅RING
natural_image
Illustration of a hand inserting a card into a microwave oven (no text or symbols)natural_image
Line drawing of hands opening a rectangular device with a mesh chamber (no text or symbols)natural_image
Illustration of hands holding a device with a rotating arrow indicating rotation (no text or symbols)natural_image
Line drawing of a rectangular electronic device with a lid and mounting brackets (no text or symbols)FEILS∅KING
FEILMELDINGER
natural_image
Line drawing of a portable electronic device with ventilation grilles and control panel (no text or symbols)
(aseta aina alimpaan tasoon)


Irrotettava murualusta
(aseta aina alemman
natural_image
Diagram of a battery pack connected to a wire, showing internal circuitry (no text or symbols)natural_image
Line drawing of a car front panel with a cable inserted into the socket (no text or symbols)SAATAVANA OLEVAT LISÄVARUSTEET
natural_image
Illustration of hands holding a grid-patterned object with directional arrows indicating movement (no text or symbols)
natural_image
Line drawing of a toaster oven with a dough bag on the tray (no text or symbols)natural_image
Line drawing of hands using a handheld device to press or install a device (no text or symbols visible)natural_image
Line drawing of a toaster with tray and front panel (no text or symbols)natural_image
Line drawing of a toaster oven with food tray (no text or symbols)PUHDISTUS, HUOLTO JA SÄILYTYS
PÄIVITTÄINEN PUHDISTUS
natural_image
Illustration of hands using a microwave oven to clean or transfer a tray (no text or symbols visible)natural_image
Line drawing of hands installing or adjusting a rectangular device with internal components (no text or symbols)natural_image
Illustration of hands installing or adjusting a device with a grid panel, no text or symbols presentnatural_image
Line drawing of a rectangular electronic device with internal components and mounting brackets (no text or symbols)VIANMÄÄRITYS
VIRHEILMOITUKSET
"CALL CUSt SrVC", jonka jäljessä on "Er1" - "Er7"
natural_image
Line drawing of a portable electronic device with ventilation grilles and control knobs (no text or symbols)
Luftfriteringskorg
TILLBEHÖRENS PLACERING

text_image
B C D EFÖRE FÖRSTA ANVÄNDNING
natural_image
Diagram of a battery cell with an external power outlet connected to the right side (no text or symbols present)natural_image
Line drawing of a computer case with a cable inserted into the internal panel (no text or symbols)TILLBEHÖR FÖR INKÖP
natural_image
Illustration of hands holding a tray with arrows indicating movement or force (no text or symbols)
natural_image
Line drawing of a toaster oven with a dough bag inside (no text or symbols)natural_image
Line drawing of hands using a tool to press or install a device on a flat surface (no text or symbols)natural_image
Line drawing of a toaster oven with multiple grilles (no text or symbols)natural_image
Line drawing of a toaster oven with food being placed on a tray (no text or symbols)natural_image
Line drawing of hands opening a rectangular device with internal shelves (no text or symbols)natural_image
Illustration of hands holding a device with a grid inside, showing a rotating arrow (no text or symbols)natural_image
Line drawing of a rectangular electronic device with lid and mounting feet (no text or symbols)FELSÖKNING
FELMEDDELANDEN
Illustrations may differ from actual product. We are constantly striving to improve our products; therefore the specifications contained herein are subject to change without notice.
FOODI AND NINJA ARE REGISTERED TRADEMARKS OF SHARKNINJA OPERATING LLC.
PRINTED IN CHINA