Smartmig 152 - Welding machine GYS - Free user manual and instructions
Find the device manual for free Smartmig 152 GYS in PDF.
| Product type | Semi-automatic MIG/MAG welding machine |
| Brand | GYS |
| Model | Smartmig 152 |
| Power supply | Single-phase 230 V, 50/60 Hz, 16 A plug type CEE7/7 |
| Welding mode | MIG (active gas: pure argon) / MAG (gas: Argon + CO₂) / No Gas (flux-cored wire) |
| Compatible wire diameters | Steel/Stainless: 0.6 / 0.8 mm; Aluminum: 0.8 mm; No Gas: 0.9 mm |
| Spool type | Diameter 100 or 200 mm |
| Power | Direct current (DC) |
| Weight | Not specified (estimated ~20-30 kg) |
| Dimensions (L x W x H) | Not specified |
| Thermal protection | Indicator light, automatic cooling (5 to 10 min) |
| Protection rating | IP21 |
| Operating temperature | -10°C to +40°C |
| Storage temperature | -20°C to +55°C |
| Relative humidity | ≤ 50 % at 40°C, ≤ 90 % at 20°C |
| Max. altitude | 1000 m |
| EMC class | Class A (professional, non-residential use) |
| Standards | IEC 61000-3-11, not compliant with IEC 61000-3-12 |
| Routine maintenance | Dust removal with blower 2 to 3 times per year; check electrical connections |
| Safety | Wear flame-resistant clothing, insulating gloves, welding helmet; avoid any contact with live parts |
| Available spare parts | EURO torch, reversible drive rollers, contact tips, nozzles, Teflon liner for aluminum, pressure regulator, wire spools |
| Warranty | 2 years (parts and labor), excluding normal wear and misuse |
Frequently Asked Questions - Smartmig 152 GYS
User questions about Smartmig 152 GYS
0 question about this device. Answer the ones you know or ask your own.
Ask a new question about this device
Download the instructions for your Welding machine in PDF format for free! Find your manual Smartmig 152 - GYS and take your electronic device back in hand. On this page are published all the documents necessary for the use of your device. Smartmig 152 by GYS.
USER MANUAL Smartmig 152 GYS
INSTALLATION - FONCTIONNEMENT PRODUIT
DESCRIPTION
ANOMALIES, CAUSES, REMÉDES
Read and understand the following safety recommendations before using or servicing the unit. Any change or servicing that is not specified in the instruction manual must not be undertaken.
The manufacturer is not liable for any injury or damage caused due to non-compliance with the instructions featured in this manual. In the event of problems or uncertainties, please consult a qualified person to handle the installation properly.
ENVIRONMENT
This equipment must only be used for welding operations in accordance with the limits indicated on the descriptive panel and/or in the user manual. The operator must respect the safety precautions that apply to this type of welding. In case of inadequate or unsafe use, the manufacturer cannot be held liable for damage or injury.
This equipment must be used and stored in a place protected from dust, acid or any other corrosive agent. Operate the machine in an open, or well-ventilated area.
Operating temperature: Use between -10 and +40^ (+14 and +104^)
Store between -20 and +55^ (-4 and 131^ ). Air humidity: Lower or equal to 50% at 40^ (104^) .
Lower or equal to 90% at 20^ (68^) Altitude: Up to 1000 meters above sea level (3280 feet).
INDIVIDUAL PROTECTIONS AND OTHERS
Arc welding can be dangerous and can cause serious and even fatal injuries. Welding exposes the user to dangerous heat, arc rays, electromagnetic fields, noise, gas fumes, and electrical shocks. People wearing pacemakers are advised to consult with their doctor before using this device. To protect oneself as well as the other, ensure the following safety precautions are taken:

In order to protect you from burns and radiations, wear clothing without cuffs. These clothes must be insulated, dry, fireproof and in good condition, and cover the whole body.

Wear protective gloves which guarantee electrical and thermal insulation.

Use sufficient welding protective gear for the whole body: hood, gloves, jacket, trousers... (varies depending on the application/ operation). Protect the eyes during cleaning operations. Do not operate whilst wearing contact lenses.

It may be necessary to install fireproof welding curtains to protect the area against arc rays, weld spatters and sparks. Inform the people around the working area to never look at the arc nor the molten metal, and to wear protective clothes.
Ensure ear protection is worn by the operator if the work exceeds the authorised noise limit (the same applies to any person in the welding area).
Stay away from moving parts (e.g. engine, fan...) with hands, hair, clothes etc... Never remove the safety covers from the cooling unit when the machine is plugged in - The manufacturer is not responsible for any accident or injury that happens as a result of not following these safety precautions.
The pieces that have just been welded are hot and may cause burns when manipulated. During maintenance work on the torch or the electrode holder, you should make sure it's cold enough and wait at least 10 minutes before any intervention. The cooling unit must be on when using a water cooled torch in order to ensure that the liquid does not cause any burns. ALWAYS ensure the working area is left as safe and secure as possible to prevent damage or accidents.
WELDING FUMES AND GAS

The fumes, gases and dust produced during welding are hazardous. It is mandatory to ensure adequate ventilation and/or extraction to keep fumes and gases away from the work area. An air fed helmet is recommended in cases of insufficient air supply in the workplace. Check that the air intake is in compliance with safety standards.
Care must be taken when welding in small areas, and the operator will need supervision from a safe distance. Welding certain pieces of metal containing lead, cadmium, zinc, mercury or beryllium can be extremely toxic. The user will also need to degrease the workpiece before welding. Gas cylinders must be stored in an open or ventilated area. The cylinders must be in a vertical position secured to a support or trolley. Do not weld in areas where grease or paint are stored.
FIRE AND EXPLOSIONS RISKS

Protect the entire welding area. Compressed gas containers and other inflammable material must be moved to a minimum safe distance of 11 meters.
A fire extinguisher must be readily available.
Be careful of spatter and sparks, even through cracks. It can be the source of a fire or an explosion.
Keep people, flammable objects and containers under pressure at a safe distance.
Welding of sealed containers or closed pipes should not be undertaken, and if opened, the operator must remove any inflammable or explosive materials (oil, petrol, gas...).
Grinding operations should not be directed towards the device itself, the power supply or any flammable materials.
GAS BOTTLE

Gas leaking from the cylinder can lead to suffocation if present in high concentrations around the work area.
Transport must be done safely: Cylinders closed and product off. Always keep cylinders in an upright position securely chained to a fixed support or trolley.
Close the bottle after any welding operation. Be wary of temperature changes or exposure to sunlight.
Cylinders should be located away from areas where they may be struck or subjected to physical damage.
Always keep gas bottles at a safe distance from arc welding or cutting operations, and any source of heat, sparks or flames.
Be careful when opening the valve on the gas bottle, it is necessary to remove the tip of the valve and make sure the gas meets your welding requirements.
ELECTRIC SAFETY

The machine must be connected to an earthed electrical supply. Use the recommended fuse size.
An electrical discharge can directly or indirectly cause serious or deadly accidents.
Do not touch any live part of the machine (inside or outside) when it is plugged in (Torches, earth cable, cables) because they are connected to the welding circuit.
Before opening the device, it is imperative to disconnect it from the mains and wait 2 minutes, so that all the capacitors are discharged.
Do not touch the torch or electrode holder and earth clamp at the same time.
Damaged cables and torches must be changed by a qualified and skilled professional. Make sure that the cable cross section is adequate with the usage (extensions and welding cables). Always wear dry clothes in good condition, in order to be insulated from the electrical circuit. Wear insulating shoes, regardless of the environment in which you work in.
CEM CLASSIFIED MATERIAL

These Class A devices are not intended to be used on a residential site where the electric current is supplied by the public network, with a low voltage power supply. There may be potential difficulties in ensuring electromagnetic compatibility on these sites, because of the interferences, as well as radio frequencies.
SMARTMIG 142-152-162-182:
This equipment does not comply with IEC 61000-3-12 and is intended to be connected to private low-voltage systems interfacing with the public supply only at the medium- or high-voltage level. On a public low-voltage power grid, it is the responsibility of the installer or user of the device to ensure, by checking with the operator of the distribution network, which device can be connected.
SMARTMIG 182:
This equipment complies with IEC 61000-3-12, provided that the power of the short-circuit Ssc is equal to or greater than 1,4 MVA at the interface between the machine and the mains power network. It is the responsibility of the installer or user of the equipment to ensure if necessary by consulting the operator of the mains electricity, that the equipment is only connected to a power supply where the power of short-circuit ssc is equal to or greater than 1,4 MVA.
This equipment complies with the IEC 61000-3-11 standard.
ELECTROMAGNETIC INTERFERENCES
The electric currents flowing through a conductor cause electrical and magnetic fields (EMF). The welding current generates an EMF field around the welding circuit and the welding equipment.
The EMF fields may disrupt some medical implants, such as pacemakers. Protection measures should be taken for people wearing medical implants. For example, access restrictions for passers-by or an individual risk evaluation for the welders.
All welders should take the following precautions in order to minimise exposure to the electromagnetic fields (EMF) generated by the welding circuit:
- position the welding cables together - if possible, attach them;
- keep your head and torso as far as possible from the welding circuit;
- never enroll the cables around your body;
- never position your body between the welding cables. Hold both welding cables on the same side of your body;
- connect the earth clamp as close as possible to the area being welded;
- do not work too close to, do not lean and do not sit on the welding machine
- do not weld when you're carrying the welding machine or its wire feeder.

People wearing pacemakers are advised to consult their doctor before using this device.
Exposure to electromagnetic fields while welding may have other health effects which are not yet known.
RECOMMENDATIONS TO ASSESS THE WELDING AREA AND WELDING INSTALLATION
Overview
The user is responsible for installing and using the arc welding equipment in accordance with the manufacturer's instructions. If electromagnetic disturbances are detected, it is the responsibility of the user of the arc welding equipment to resolve the situation with the manufacturer's technical assistance. In some cases, this remedial action may be as simple as earthing the welding circuit. In other cases, it may be necessary to construct an electromagnetic shield around the welding power source and around the entire piece by fitting input filters. In all cases, electromagnetic interferences must be reduced until they are no longer bothersome.
Welding area assessment
Before installing the machine, the user must evaluate the possible electromagnetic problems that may arise in the area where the installation is planned.
In particular, it should consider the following:
a) the presence of other power cables (power supply cables, telephone cables, command cable, etc...) above, below and on the sides of the arc welding machine.
b) television transmitters and receivers;
c) computers and other hardware;
d) critical safety equipment such as industrial machine protections;
e) the health and safety of the people in the area such as people with pacemakers or hearing aids;
f) calibration and measuring equipment
g)The isolation of the equipment from other machinery.
The user will have to make sure that the devices and equipments that are in the same room are compatible with each other. This may require extra precautions;
h) make sure of the exact hour when the welding and/or other operations will take place.
The surface of the area to be considered around the device depends on the building's structure and other activities that take place there. The area taken in consideration can be larger than the limits determined by the companies.
Welding area assessment
Besides the welding area, the assessment of the arc welding systems installation itself can be used to identify and resolve cases of disturbances. The assessment of emissions must include in situ measurements as specified in Article 10 of CISPR 11. In situ measurements can also be used to confirm the effectiveness of mitigation measures.
RECOMMENDATION ON METHODS OF ELECTROMAGNETIC EMISSIONS REDUCTION
a. National power grid: The arc welding machine must be connected to the national power grid in accordance with the manufacturer's recommendation. If interferences occur, it may be necessary to take additional preventive measures such as the filtering of the power supply network. Consideration should be given to shielding the power supply cable in a metal conduit. It is necessary to ensure the shielding's electrical continuity along the cable's entire length. The shielding should be connected to the welding current's source to ensure good electrical contact between the conduct and the casing of the welding current source.
b. Maintenance of the arc welding equipment: The arc welding machine should be be submitted to a routine maintenance check according to the manufacturer's recommendations. All accesses, service doors and covers should be closed and properly locked when the arc welding equipment is on.. The arc welding equipment must not be modified in any way, except for the changes and settings outlined in the manufacturer's instructions. The spark gap of the arc start and arc stabilization devices must be adjusted and maintained according to the manufacturer's recommendations.
c. Welding cables: Cables must be as short as possible, close to each other and close to the ground, if not on the ground.
d. Electrical bonding : consideration should be given to bonding all metal objects in the surrounding area. However, metal objects connected to the workpiece increase the risk of electric shock if the operator touches both these metal elements and the electrode. It is necessary to insulate the operator from such metal objects.
e. Earthing of the welded part : When the part is not earthed - due to electrical safety reasons or because of its size and its location (which is the case with ship hulls or metallic building structures), the earthing of the part can, in some cases but not systematically, reduce emissions It is preferable to avoid the earthing of parts that could increase the risk of injury to the users or damage other electrical equipment. If necessary, it is appropriate that the earthing of the part is done directly, but in some countries that do not allow such a direct connection, it is appropriate that the connection is made with a capacitor selected according to national regulations.
f. Protection and plating : The selective protection and plating of other cables and devices in the area can reduce perturbation issues. The protection of the entire welding area can be considered for specific situations.
TRANSPORT AND TRANSIT OF THE WELDING MACHINE

The machine is fitted with handle(s) to facilitate transportation. Be careful not to underestimate the machine's weight. The handle(s) cannot be used for slinging.
Do not use the cables or torch to move the machine. The welding equipment must be moved in an upright position.
Do not place/carry the unit over people or objects.
Never lift the machine while there is a gas cylinder on the support shelf. A clear path is available when moving the item. The removal of the wire reel from the machine is recommended before undertaking any lifting operation.

Stray welding currents/voltages may destroy earth conductors, damage electrical equipment or cause components to warm up which may cause a fire.
- All welding connections must be firmly secured, check regularly!
- Check that the metal piece fixation is strong and without any electrical problems!
- Attach or hang all the electrically conductive elements, such as the trolley and slinging equipment, in order to insulate them
- Do not place any electrical equipment, such as drills or grinders, on top of the welding machine without insulating them!
- Always place welding torches holders on an insulated surface when they're not in use!
EQUIPMENT INSTALLATION
- Put the machine on the floor (maximum incline of 10^ ).
- Ensure the work area has sufficient ventilation for welding, and that there is easy access to the control panel.
- The machine must not be used in an area with conductive metal dusts.
- The machine must be placed in a sheltered area away from rain or direct sunlight.
The machine protection level is IP21, which means - Protection against access to dangerous parts from solid bodies of a ≥ 12.5mm diameter and,
- Protection against vertically falling drops.
The power cables, extensions and welding cables must be fully uncoiled to prevent overheating.

The manufacturer does not incur any responsibility regarding damages to both objects and persons that result from an incorrect and/or dangerous use of the machine.
MAINTENANCE / RECOMMENDATIONS


- Maintenance should only be carried out by a qualified person. Annual maintenance is recommended.
- Ensure the machine is unplugged from the mains, and wait for two minutes before carrying out maintenance work. DANGER
High Voltage and Currents inside the machine. - Remove the casing 2 or 3 times a year to remove any excess dust. Take this opportunity to have the electrical connections checked by a qualified person, with an insulated tool.
- Regularly check the condition of the power supply cable. If the power cable is damaged, it must be replaced by the manufacturer, its after sales service or an equally qualified person.
- Ensure the ventilation holes of the device are not blocked to allow adequate air circulation.
- Do not use this equipment to thaw pipes, to charge batteries, or to start any engine.
INSTALLATION - PRODUCT OPERATION
DESCRIPTION
Thank you for choosing this machine. To get the best from your machine, please read the following carefully :
The SMARTMIG is a traditional machine for welding semi-automatic MIG/MAG (DC current). These machines can weld all types of wire : Steel, Stainless Steel, Aluminium, flux (no gas).
Adjustment and Setting of these machines is easy with their SMART feature.
ELECTRICITY SUPPLY
Smartmig 142/152/162/182 :
This machine is fitted with a 16A socket type CEE7/7 which must be connected to a single-phase 230V (50 - 60 Hz) power supply fitted with three wires and one earthed neutral.
The absorbed effective current (I1eff) is displayed on the machine, for optimal use. Check that the power supply and its protection (fuse and/or circuit breaker) are compatible with the current needed by the machine. In some countries, it may be necessary to change the plug to allow the use at maximum settings.
Smartmig 183:
The welders are fitted with a 1XX A socket type EN 60309-1 which must be connected to a three-phase 400V (50 - 60 Hz) power supply fitted with four wires and one earthed neutral.
The absorbed effective current (I1eff) is displayed on the machine, for optimal use. Check that the power supply and its protection (fuse and/or circuit breaker) are compatible with the current needed by the machine. In some countries, it may be necessary to change the plug to allow the use at maximum settings.
DEVICE PRESENTATION (FIG-I)
1- Power Switch Off/On
2- Power Cable
3-Rear handle
4-Wire Reel Support
5- Quick Gas Connector
6- Front Handle
7- Control panel and table for SMART feature
8- Drive Reel
9- Rear Wheels (162 & 182 only)
10- EURO torch connector (152, 162 & 182 only)
11- Front Wheels (162 & 182 only)
12- Fixed Power Cable (142, 162, & 182 only)
13- Case protected against polarity reversal (142, 152, 162 & 182 only)
14- Fastening chain for bottles. Warning: fasten the bottles correctly.
SEMI-AUTOMATIC WELDING FOR STEEL / STAINLESS STEEL (MAG MODE) (FIG-II)
These machines can weld Steel and Stainless Steel wires of 0.6/0.8 or 1.0mm (except SMARTMIG 142/152) (Fig II - A)
The machine is delivered equipped to function with 0.8mm Steel/Stainless steel wire, and the contact tip, roller throat and the sleeve of the torch supplied are suitable for this application.
Should you wish to use 0.6mm wire, you will need to change the contact tip. The wire reel is reversible (0.6 / 0.8mm) and will need to be inserted into the machine so that the figure 0.6 is visible. For welding with 1.0mm wire, you will need to use a specific roller and contact tip.
For welding with Steel or Stainless Steel it is necessary to use
For use with Steel/Stainless Steel, the gas requirement is Argon + CO2 . (Ar+CO2).. The proportion of CO2 required will vary depending on the use.
For specific gas requirements, please contact your gas distributor. The gas flow in steel is between 12 and 18 Litres/minute depending on the environment and experience of the welder.
SEMI-AUTOMATIC WELDING FOR ALUMINIUM (MIG MODE) (FIG-II)
The SMARTMIG 152, 162, 182 & 183 are delivered equipped for welding with Aluminium wire Ø 0.8 or 1.0mm (fig II-B)
The SMARTMIG 142 is delivered equipped for welding Aluminium of 0.8mm (Occasional and non-intensive). In this case the wire used should be stiff to facilitate wire feeding.
For use with aluminium, the gas requirement is pure argon (Ar). For the specific gas requirements please contact your distributor. The gas flow in Aluminium is between 20 and 30 Litres/minute depending on the environment, and the experience of the welder.
Below are the differences between welding with Steel and Aluminium :
- Specific rollers are needed for welding with Aluminium.
- Adjust the pressure of the drive rolls to prevent the wire being crushed.
- Only use a capillary tube for welding with Steel or Stainless Steel.
- Use a special Aluminium Torch with a teflon sheath to reduce friction.
DO NOT cut the sheath close to the joint, it is used to guide the wire from the the rollers. - Contact Tube : Use a special aluminium contact tube specific to the diameter of wire being used.
GASLESS WIRE WELDING (FIG. III)
These machines are capable of «Gasless» wire welding (cored wire) provided that the polarity is reversed.
To do this, turn the machine off, open up the machine (14) and make the electrical connections described in Figure C of the page below. The Machines are originally configured for Gas welding.
PROCESS OF REELS AND TORCHES ASSEMBLY (FIG-V)
Remove the Nozzle (fig V-E) from the torch by turning clockwise and then remove the contact tip, leaving the support and the spring on the torch (fig V-D).
- Open the door of the machine
FIG V-A: Position the reel on to the support. - In case of 100mm (142, 152, 162) wire reel use, do not install the adapter (1).
- Adjust the reel break (2) to avoid reel movement tangling the wire when welding stops. Be careful not to tighten too much - the reel must rotate without straining the motor.
- Tighten the plastic screw (3).
FIG V-B: Installing the drive roller. - Choose the correct diameter reel for the type of wire. The visible diameter indicated on the roller when fitted in place is the diameter currently in use (ie. 0.8mm is visible for use with 0.8mm wire).
FIG V-C: To select the adjustment of the drive rollers, proceed as follows : - Loosen the drive roller knob as far as possible.
- Insert the wire until it exits the other side by about 2cm , tighten the knob again slightly.
- Start the motor by pressing the trigger of the torch.
- Tighten the knob (fig V-C) whilst pressing the trigger until the wire starts to move.
Nb : When welding with Aluminium, use the minimum possible pressure to avoid crushing the wire - Pull the wire out of the end of the torch by approximately 5cm, then attach the contact tip suitable for the wire used and then the nozzle (fig V-E).
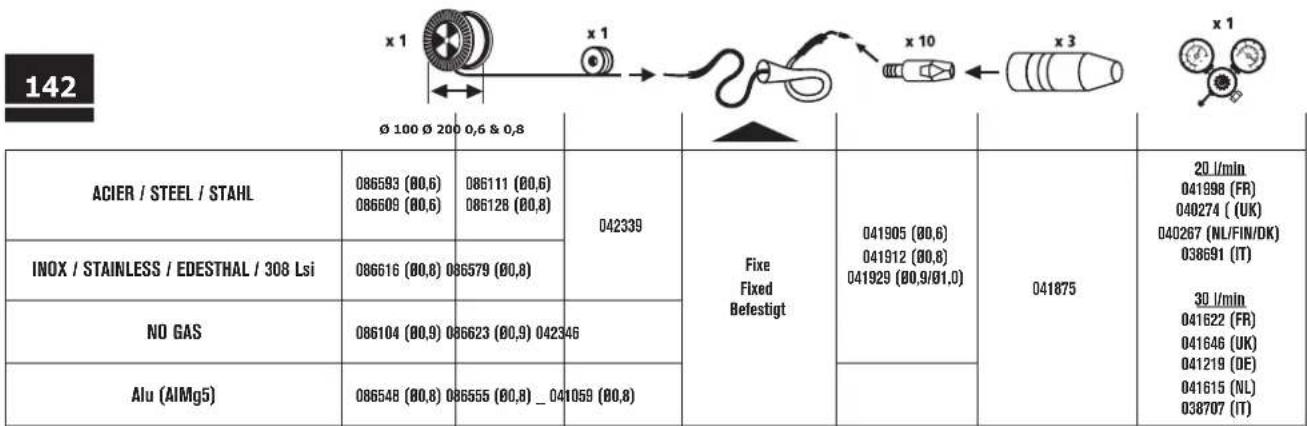
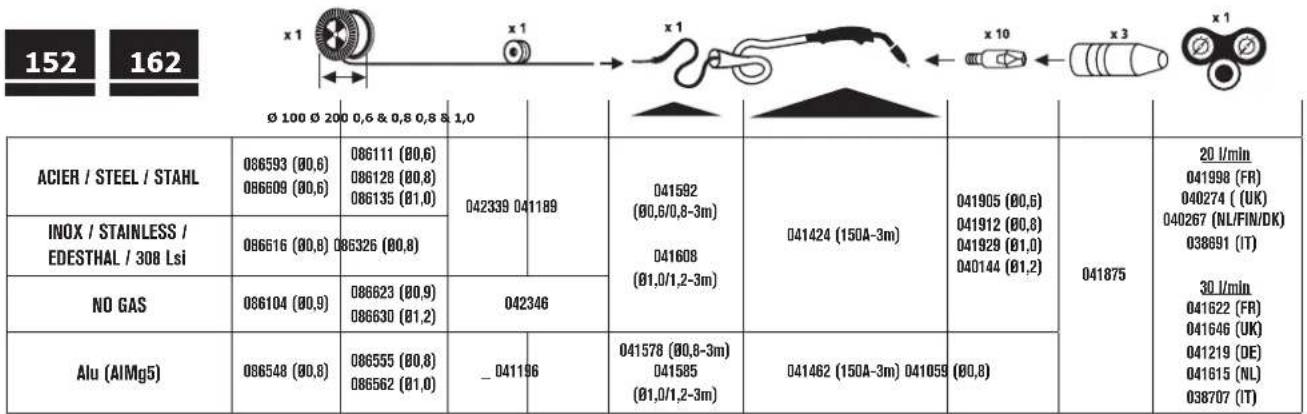
The SMARTMIG 142, 152, 162 machines can accommodate coils of 100 or 200mm diameter.
The SMARTMIG 182 machines can accommodate coils of 200 or 300mm diameter. To place a 200mm wire reel, first install the adapter (ref. 042889) on the support.
Below are the different combinations possible :
| Smartmig 142/152 162 182 183 gaz | |||
| steel/stainless steel | 0,6/0,8 0,6 | /0,8/1,0 Argon + | CO2 |
| Alu* - 0,8/1,0 Pure Argon | |||
| No Gas 0,9 0,9/1,2 | |||
- We recommend a teflon sheath (ref. 041578) and special Aluminium contact tip (Ø 0.8 ref. 041059 - Ø 1.0 ref. 041066)
To help you select the diameter of wire suitable for the job you want to perform, refer to the table on page 4 (FIG IV).
GAS COUPLING
-
Connect a pressure regulator to the gas bottle. Connect the welding machine using the pipes supplied, and place the two clamps to avoid leakages.
-
Set the gas flow by adjusting the dial located on the pressure regulator.
NB : to help facilitate the adjustment of the gas flow, operate the drive rollers by pressing the trigger of the torch (ensure that the drive roller is completely loose so the wire is not fed through).
This procedure does not apply to «Gasless» welding mode.
CONTROL PANEL (FIG. VI)
| Smartmig 142/152/162/182/183 |
| 1- Voltage selection button A / B |
| 2- Voltage selection button min/max. |
| 3- Wire speed regulator. |
4-«SMART» settings table MIG/MAG
5- Thermal Protection light.
6- positions switch
DIRECTIONS OF USE (FIG VI)
MIG/MAG MODE:
SMARTMIG feature allows you to adjust the voltage and the wire speed.
Use the SMART table to find the correct settings based on the type of wire, and the thickness of the metal workpiece.
Then based on the recommendation indicated, simply select :
- The voltage (buttons A/ B & min/max for SMARTMIG 142, 152 & 162
- Wire speed - adjust the regulator (3) to the colour zone indicated.
Examples
To weld 0.8mm thick steel, use 0.6 mm diameter steel wire (SMARTMIG 142, 152 & 162): - Move button (1) to the A position
- Move button (2) to the « min » position
- Move the regulator (3) to the zone of lightest colour and adjust « by sound » if required.
ADVICE AND THERMAL PROTECTION
- Respect the normal rules of welding
- Leave the machine plugged in after welding to allow it to cool
Thermal Protection : The LED will illuminate. Cooling will take between 10 and 15 minutes depending on the ambient temperature.
RISK OF INJURY DUE TO MOVING PARTS

The wire feeders contain moving parts that may catch hand, hair, clothes or tools which can lead to injuries! Take extra care.
- Do not lay a hand to swivel or moving components or parts to the drive!
- Ensure that the housing covers or protective covers remain closed during operation!
MAINTENANCE
- Maintenance should only be carried out by a qualified person.
- Switch the machine off, ensure it is unplugged, and that the ventilator inside has stopped before carrying out maintenance work. (DANGER High Voltage and Currents).
- GYS recommends removing the steel cover 2 or 3 times a year to remove any excess dust. Take this opportunity to have the electrical connections checked by a qualified person with an insulated tool.
- Regularly check the condition of the power supply cord. If damaged, it will need to be replaced by the manufacturer, its' after sales service or a qualified person.
- Ensure the ventilation holes of the device are not blocked to allow adequate air circulation.
SYMPTOMS, CAUSES, REMEDIES
symptoms Possible causes remedies
| The welding wire speed is not constant. | Debris is blocking up the opening. | Clean out the contact batch or change it and replace the anti-adherence product. Ref.041806 |
| The wire skids in the rollers. | Control the roller pressure or replace it. Wire diameter non-compatible with roller Covering wire guide in the torch non-compatible. | |
| The wire-feeder motor doesn't operate. | Reel or roller brake too tight. Release the brake and rollers. | |
| Electrical supply problem. | Check that the power switch is in the "On" position. | |
| Bad wire feeding. | Covering wire guide dirty or damaged. Clean or replace. | |
| Reel brake too tight Release the brake. | ||
| No welding current. | Bad connection to the main supply. | Check the mains connection and look if the plug is fed by 400 V (3PH) power socket. |
| Bad earth connection. | Check the earth cable (connection and clamp condition). | |
| Torch trigger inoperative. Check the torch trigger / replace torch. | ||
| The wire jams (after the rollers). | Guide wire sheath crushed. Check the sheath and torch body. | |
| Wire jammed in the torch Clean or replace. | ||
| No capillary tube. Check the presence of capillary tube. | ||
| Wire speed too fast Reduce the wire speed. | ||
| The welding bead is porous. | The gas flow rate is not sufficient. | Adjust flow range 15 to 20 L / min. Clean the working metal. |
| Gas bottle empty. Replace it. | ||
| Gas quality unsatisfactory. Replace it. | ||
| Air flow or wind influence. Prevent drafts, protect welding area. | ||
| Gas nozzle dirty. Clean or replace the gas nozzle. | ||
| Poor quality wire. Use suitable wire for MIG-MAG welding. | ||
| Surface to weld in bad condition. (rust, etc...) Clear the metal before welding. | ||
| Very important flashing particules. | Arc voltage too low or too high. See welding settings. | |
| Bad earth connection. Adjust the earth cable for a better connection. | ||
| Insufficient gas flow. Adjust the gas flow. | ||
| No gas flow at the end of the torch. Bad gas connection. | Check the gas connection at the welding machine. Check the flowmeter and the solenoid valves. | |
N3MeHeHnI pemOH, He yKa3aHHbIe B 3ToI INHCTpyKUnn, He DOJXKnbl 6bItb npeDnpNHrTbI.
POnH3BODHTJIb He HecET OTBETCTBEHHOCTH 3a TpaBMbl MATEpnaIbHbIe NOBpeJdeHnra C8raHHbIe C HECOTBeTCTByIOUIM DaHHoINHCTpyKcIM nCNoJIb3OBAHNem annapata.
B cnyae npo6JIembl nIIN comHeHn, o6paTntecb K KBaIIpHcIpuOBAHOMy cneuaNCTy dI pyaBbHOrO IcNoIb3OBAHn yCTaHOBN.
OKPYKAIOA CPEDA
3To 6opdyoBaHne DOnJXHO 6bIb NcONb3ObaHO NCKIOHTeBHO nR CBAPOHbIX pa60, OrpaHUYBaCb yka3AHmN 3aBOJcKn IuIN INCTpykUIn. Heo6xOIMo co5JIaDAtb dIpeKTNBbl No MePam 6e3OanacHocTn. B cnYae HeaKeBAthoro nn Onachoro nCpONb3OBAHn npOn3BOJNTenb He HecET OTBeTCTBeHHOCtN.
Annapat doJikhen 6bIb yctaHOBnE H nomeueHH 6e3 nbHIn, KmCIOtB, B03ropaEmbIX rA3OB, nIN dpyrnx Koppo3nHbX BeuecTB. TaKe Jxycobn DOnKhbl 6bIb co6nOedHb drr er OxaHHeN. Y6eDntecB pnpcyTCTBn BEHTnlauPn npncnbsOBAHN annapata.
TemnepaTpHbI npeJIbI:
IcnoB3oBaHHe:OT-10do+40°C(OT+14do+104°F).
XpaHHeH:OT-20do+55°C (OT-4do131°F).
BnaxKHOBT Bo3Dyxa:
50% nnnn Hnke npn 40^ 104F
90% nii Hnke np2 20^ (68°F).
BbicoTaHaIypoBHeM MopA:
1000MBbICOTbHaD ypoBHeM MOp8 (3280 FOyTOB).
HnKOrJa He ChnMaIte 3aunThb KOpNyc C CnCTeMbI OxJaXKeHn, KorDa NcToUHk NOd HapJxKeHnEM. Ppon3BouNTeB He Hecet OTBeTCTBeHHOCTN B CInyae HeCuaCTHO R OyAra.
ToIbKO yTO CBapeHHBte DetanH rOpauH mOryT bbl3BaTbOxKOrn npKoHTaKe T C HMM. Bo Bpemr Texo6cnykBAHnR opeKN nnn 3JIeKtpoDoepKaTeJy 6eDInTEcb, YTO OHN DoCTaTOH OXnAdnncb N IOdoXnnte KaMmHmMyM 10 MHyT nepeH naOM paBOT. PnNcNoIb3OBAHn rOpEKN C KUnDKocTHbIM OxnaXdEHNm CnCTema OxnaXdEHnA DoJXHa 6bITb BKIOueHa, YTO6bI He o6xeHcra KINKOCtBu.
OeHb BaXHO o630nacntb pa6oyu 3ohy nepei TEM, kae ee nOKHyTb, yTO6bl 3aunNTb IIOe N mMyIecTBO.
CBAPOHbIE DbIM Ia3

BbIeJIeMble npn CBapke IbIM, ra3 n nbIb onaChbl dIy 3OpOBb. BeHTINJNua DOJXHa 6bIT bOCTaTOHoi, m MoKet noTppeBoBaTcR daONHHTeJIbHa naDauva Bo3dyxa. Pn HEDocTaTOUHO BHTINJNcu moKHO BOCNOJB3OBA TcR MaCKoI CBAPuNka-pecnnpaTopom.
PpOBepeBte, UTO6bI BCacBbAHne BO3dyxa 6bINO 3ΦΦeKTHBbIM B COOTBeTCTBnC HOpMaMn 6e3OnaCHOCTN.
Bdyte BHMATEbHb: CBapKa B He6oJIbXnx NOMEeEHnX Tpe6yET Ha6JIIOeHnHa 6e3OnaHOM pacCTOHN. Kpome TorO, Cbapka HekOTopbIX MeTaNIOB, cOePxaunxC BnHeU, KaDMn, uHK, pTyTB nN daXe 6epuIIN, MoKet 6bIT bpe3BbuaHBOpeHOn. CneDyET OUnCTNTb OT Xnpa Detann nepeD cbapKOi.
Ta3OBbIe 6aJIIOHbI dONJHbI bItb cKnAIDIOBaHb I OTKpbIbIX ININ XOPOIO npOBETpNBaeMbIX NOMEueHnX. OH IOJXbI bItb B BePTNKaJIbHOM NOLOXHeHHN 3AKpePJIeHbI Ha CTOnKe ININ TENeKke.
Hn B Koem cIyuae He Bapntb B6JIn3N Jknpa nn Kpackn.
c. Cbapouhhe Ka6en: Ka6en DOnKhbI 6bItb KaMoxHO KopoHe N OmeueHbI dpyr PAnOM c Dpyrom B6n3N OT nona nn Ha nony.
d. 3KBNIOTeHnAIBhIE CoeHNHeHn: Heo6xOIMo OBeCneHTb CoeHNHeHn BcEx MeTaNIIuecknx PpeMeTOB OkpyaIooJIe 30hbl. Tem He MeHee, MeTaNIIuecknx PpeMeTbI, CoeHNHeHbE Co CBAPNAeMoI DeTaNbHO, YBENuHbAOIT PnCK IINr NtB3OBaTeRy yDapa 3NEKTPUeCKM TOKOM, ECNI OH ONDHOPEMeHHO KOCHETCr 3TNX MeTaNIIuecknx PpeMeTOB n3NEKTPoJa. OepaTOP DoJKeH 6bITb N3ONIPoBaH OH TaNX MeTaNIIuecknx PpeMeTOB.
e. 3aemne HcBapBaemn Detann: B cnyae, ecnn cbapBaemn deTaNb He 3aemnHa no coo6paXeHnM 3neKtpueckOn 6e0NaCHocTN nIN B cnly CBOHX pa3mepOB IN CBOero paCNOLOXeHnA, KAK, HANPMep, B cnyae Kopnyca CyDn HA INI METALIOKHOCTpykUIN NpOmbuHNHeORO o6bEKA, TO CoeHNHeNe DEaTIcN C 3emn MOKET B HE KekOTbX CNYaA, HO He CNCTeMaTHueCK, KOpaTNT bbl6poCb. HeoBXoIMNo I3eRatb 3aemne HnE DeTaN, KOtPb MoTIN B BYeNNuHTB DnA NOB3oBATEeN PUCKn PAHEN INI Xe NOBpeNTb DpyrE 3neKTPoyctAHOBKn. Pn HADoBHOCTN, CNEJdHAPMyIO NOcEOINHbDeTaN KEMNE, HO H BEKOTbX CTPAHAX, KOtPbIE Hp aPeSIAOT prrMOeNOcEOHHeHne, erO Hyxho CdeNaTb C NOMOsbIO NOxODaIeRO KOHDeHCATOpA, Bb6paHHoro B 3aBCMnOCTOn NT HaUNOHaHbHoro 3aKOHDoTeNbCTBa.
f. 3aunita n 3kpaHn3nyouaon onlTeKa: BbIbOpOHnA 3aunTa n 3kpaHn3nyouaon onlTeKa dpynx KaBene n O6OpyDobAHn, HaxOJaXxCBA 6bn3Jekaem paOohem yacTke, NOMoKet ORpaHnHTb npo6bneMbI, CBraHHbI c NOMexAmN. 3aunTa BCEBcBapOHOH 30Hb MoKet paccMaTPNBtBCR B HeKOTopbix ocobix cnuyax.
TPAHCNOPTIPOBKA I TPAH3NT AIIAPATA

NcToHnKa CBapOHHo TOka OChaueh pykamn DnA TpaHCnopTPOBKn, No3BOJIOUcIMN NpeHocNTb annapaT. ByIbTe BHNMaTEbHi: He HeDOOeHbAte Bec annapata. PyKoRTKa(-n) He MoKeT(-rYT) 6bITb NCNoJIb3OBaHa(-bl) dna CTponOBkn.
He noJIb3yIeTcB Ka6eIaMn IINr ropeKoI rIpepeHOCA nCTOCHNkCa CBAPOHOro ToKa. Ero moXHO nepeHOCHTb TOnbKO B BeptNKaIbHOM NOIOKeHN. He nepeHOcITb nCTOCHNk ToKa HAD IIObMn IINr ppeMeTaMn.
HnKOrda He nOdHMaIe ra3OBbI 6aIIOH N IcTOUHK TOKa OJHOBpeMeHHO. Ix TpaHCnOpTHbe HOpMbI pa3NmuAOTcR.
KeNaTeJIbHO CHrTb 6o6nHy npOBONKnpeed TEM, KaN NOdHMaTb NnN npeHocNTb IcTOuHk CBapOCHoro TOka.

Bnykaioue CBAPouHbte ToK MOrTy pa3pyuHT b3aemnIOUe npOBOda, nobpeuTb o6OpyOBaHne n 3JIeKtpnueckne np6Opby N BblBaTb HArpeBaHHe KOMPKeTKUoXu, YTO MOKeT npNBecTu K Noxapy.
Bce cbapouhble coeHneHndoJnxHbKpeNko depXaTbcra. PpOBepaTe ux perynpHO!
- Y6eDntecb TOM, YTO KpennneHne DetanPi npouHoe N 6e3 npo6Jem 3neKtpnKi!
CoEINHtE BmecTe HIN NIOBcBe Tce BCE 3IeMeHTb CBapOuHoro IcToHnKa, PPOBOJuaue 3NeKtpuYeCTBO, TaKe, KaK Waccn, TeNExKa IN IOBemHbte 3IeMeHTb, YTO6b H3OJIUPoBaTb Hx!
- He KlaaIte Ha cBapOHHb I nCToHnK, Ha TeJeKBy IIN Ha NoJbEmHbI eJemeHTbI TaKne npi6Opbl, KaK DpeJI, ToUInhBbIe MaunHKn N T.D., ecnn OH He H3OnIpOBaHb!
Bcerda knaune cbapouhhe ropeKn uHneKtpoodepkaTeHa H3OpOBaHHyIO NOBepxHOCTb, KOrDa Bblnx He nONb3yeTe!
YCTAHOBKA ANNAPATA
- NocTaBbTe HcToUHnK CBapOuHOro ToKa Ha NoJ, MaKcImaJIbHbI HaKJIIOH KOtOporo 10^
- PnpDycmToPte DoCTaTOH NoBbwoe npocTpaHCTBO DnX XPOWero npoBepuBaHn NcTOUHnKa CBapOHHOro TOKa NDOCTyNa KynpabNeHIO.
- He nCnoJb3ObaT B cpeDe coDepKaauei MeTaIINuYeCKyU nbIb-NpOBOdHnK.
- NCTOCHNK CBAPOHORO TOKA DOJIXeH 6bITb yKpbIT OT npoINBHOrO DoXdI r He CTOrTb Ha coJIHcE.
-060pyoBAAHnE HMeeT 3aunTy IP21,TO O3Haay
-3auntyOT nonanaHnB onacHbte 30hbl TBepdbx TeI dnaMeTpOM>12,5MMn
-3aunTyOTBepTnKaJIbHbIXKaneIbBoDbl
Hyp nntaHn ydnHnTeB nCBapOchN Ka6eB DonKhbl NnHOctbO pa3MoTaHb BO n36exHaHe nepepeBa.

POn3BODHTeH He HecET OTBeCTBEHNOCN OTHOCNTeHbHO yuepe6a, HaneceHHOro NnI pEmTaM, n3-3a HnpabnBHorO nOnachoro nCnOLb3OBAHNA 3T0R o6OpydoHAHn.
OBCJLYXKBAHNE / COBETbl


- TexHueckoe 06cnyKBAHne DoJNKHO pOON3BOINbCra TOnbKO KBaINΦuPObAHbIM CNeuaJIInCTOM. COBetyETcIPOBOIDtBeXeRODHe Texo6cnyKBAHne.
- OTKHIOHTe NITAHNE, BbIDepHyB BNIKy IN3 PO3ETKN, IN DOXJNTecb OCTaHOBKn BEHTNtTopa nepe TEm, KAK pNCTYINTB K TeXOBcIyKINBAHHIO. BHyTpN annapapa BbICOKne IN onaChbE HanpJxHHe N TOK.
- Perynpho OtkpbBaIte annapat I npOyBaIte erO, YTObI OChTb OT nbIIN. Heo6xOIMMo TaKcKe npOBepaBt Bce 3JekTpueckne coeHNHeHc nOMoubIO H3ONIpOBaHHoro IHCTpymeHTa. IpOBepKa DOJXHa OCyUecTBnTbCk KBaIIuPmUpoBaHHbIM CNEUJIYNCTOM.
- Perylnapno npoBepaTe coCToHne npoBoa nHTAHn. EcInu Hpy nHTAHn NOpeXJeH, OH doJxhen 6bItb 3ameHe npOn3BOOnTeJIem, erO cepBnCHOn CnyKbOu KBAInuNpOBoAHbIM CNEuaNtCtOM BO u36exHane OnaCHOCTn.
- OctabnIte OTBepCTna IcToUHnKa CBapOuHOro ToKa CBo6OdHbIMn DnI npoxokdeHn BO3dyxa.
He nCnoB3OBAb TaHHb annapat daP a3Mop03Kn Tpy6, 3apAkn 6aTapei/AKKyMaIrTOPOB HIN 3anycka DnRarTeNei.
YCTAHOBKA - 三等奖TOBAPOB
PPECTABJIENHE
Cnacn6o 3a Bawb6op! YTo6bI NOHOCbIO NcONb3OBaTb BO3MOxHOCTn annapata, NoXaNyICTa, O3HaKOMbTEcB C daHHo INHCTpyKuNe.
AnnapaTbI SMARTMIG YBnHOTc CBAPOHbIMn annapaTAMn TpaHCΦopMaTOPHO Tnna DJI NaJyABOMaTHueCKO CBAPKN (MIG nIN MAG) HnocToHHOM Toke (DC). OHN peKomeHdyOTc dNra CBAPKn IIO6bIM BIDOM npOBOLOK: cTaN, HepXaBeiKa, aIOMHIn, fliOCoBa npOBOLoka (6e3 ra3a).
YnpoehnHaHnacpOka 6naOpaFyHKcN SMART.
3NEKTPNUECKOE NNTAHNE
Smartmig 142/152/162/182 :
Danhoe o60pOBOAHnE nocTbIeTcB BnIKo16 A Tnna CEE7/7 ndoKhbl 6bItb NODcoEINHeHb K 3JIeKTPnueckoYcTaHOBe Ha 3 npOBda,230 B (50-60 _ ), c 3a3emHeHnOH NeITpaIbI.
3HbE 11e) nncn0b0aHn npMaKcMnBbix yCNOBx yKa3aHO Ha annapate. IpOBePte TTO nTahme n ero 3aunTb (nabknn npedoxpahnTe b/nu nnpepbBaTe) coBmecTmbc TOKOM, He6xodmbim da paobtbn annapata. B heKOTopbx cTpaHax Bo3MOXHO NOHa06bTc NomeHrT bNky dner nCNoB3OBaHn npMaKcMnBbIX ycNOBnx.
Smartmig 183 :
Danhoe o6opdyoBaHne nocTabnTcra BnIKoX X A Tnna EN 60309-1 n doJHKHO 6bITb NpDKHoueHO K Tpexfao3HO 3JIeKTPnueckOyctaHOBKe 400B (50-60 Tc) C cTbpbma npBOoDAmN i C 3a3emHeHHbIM HyeBBM npBOoDM.
3HnH 11e) nncn0b0aBnB MaKcMnBbix yCIOBnx yka3HO Ha annapate. PpOBepte TTO nTahme n ero 3auntb (nnabknn npedoxpaHntel n/nnnppebBaTeB) COBmecTmbi C TOKOM, Heo6xOumbIM da pa60tbn annapata. B heKOToPbIX cTpaHax BO3MOXHO NOHaOobTCNOMeHTb BNky dnnncn0b3OBaHn pni MaKcMnBbix ycNOBnx.
ONICAHNE ANIAPATA (PNC-I)
1-BbIKHouaTeNb BKN/BBKn
2- Lhnp nntanra
3-TbIbHna pyKoTka
4-Дерхателкатушк
5-BbICTpeo noKluOeHne ra3a
6- PpeHry pyKoRTka Ira nepeHoCKn
7-Панель"Smart"perynipobknnapaMeTpoB
8-ПодаюшемусторICTBO
9-3aHne KoIeca (ToIbKO n1 162 n 182)
10-PaBem ropeKn ebPoctaHdapTa (ToIbKO dIg 162 n 182)
11-PepeHne Koneca (ToIbko Iyra 162 n 182)
12- CtaqnoHapbI KabeMb MaccbI (ToIbKO 142, 152, 162 n 182)
13-Kopo6ka nHbepcnn noJrphocTn (ToIbko dnn 142,152,162 n 182)
14-LenIgIa3akpeIeHn6aIIIOHO.BHIMAHHe: npabInbHo
3akpenite 6aJIIOHbI
IOLYABTOMATUeCKA CBAPKA CTALN /HEPKABEOUcE CTAJIN (PEKIM MAI) (PNC-II)
3Tu annapabmy Moryb Bapntb CtaIbHyIO npOBoIOKy HepKaeKy 0,6/0,8 n 1,0, (3a NcKJIoueHnEm 142/152) (pnc II-A).
AnnapaIbI 3NaayalbHO yKOMIIeKTOBaHbI dIyCBAPKn CTaJIbHO IIN HePJaBeHOeI npBOJIOKO J0,8. KOHTAKTHA Tpy6Ka, JKeIO6 Ha pOInke n OboOnuKa rOpEnIK PpeDcMOTpeHbI dIy 3TOrO HcNtB3OBAHnE. EcIN Bbl NCIOB3YEte npBOJIOKyo DnaMeTpOM 0,6 - Heo6XoIMo 3aMeHnTB KONTAKTHUo Tpy6Ky. POInk NpDAIoUeO yCTPOiCTBA DByxCTOPOHnH 0,6/0,8. B 3TOM CUYaeero HxKHO YCTAHOBnTB TaKIM O6pa3OM, YTO6bI 6bIa BUnIMa HADnCb 0,6. DnB CBAPKn 0,1,0 Bam Heo6XoIMbI COOTBETCTBYUOHe POInk N KOHTAKTHA Tpy6Ka.
Cbapkn cTann nnn HnepkabeyKn Tpe6yET nCnoB3oBaHnna CneuDnueckoro rata a proh + CO2. Iponopunca CO2 3aBnCnT OT nCnoB3oBaHnna. DnBb60pa rata o6pnttecb 3a CoBcTOM K Baaemy nctpn6bIOTOpy. Pacxod rata npn cbapke cTann doJKeH 6bIb MeKdy 12 n 18 n/MnH B 3aBncmoctnOT OKpykaioe cpebl n onblra nonb3oBaTeN.
IOLYABTOMATUeCKA CBAPKA AJHOMHHN (PEKIM M) (PNC-II)
SMARTMIG 152, 162, 182 n 183 moryt 6bityb o6opyoBaHbI dny CBAPKn aHOMHHn npOBOLOKO ot 0,8 do 1,0 (pnc II-B). SMARTMIG 142 moryt no clyauo 6bityb nONb3OaHbI dny HeHHTeHCNBHO CBAPKn AHIOMHHn 00,8. B 3TOM clyuae, dny obnerueHNn noDAuH npOBOLOKa DoJxHa 6bityk XeCTKo.
IJIcBAPKAnIOHMnHHeo6xOaMnCneuAIBhBnra3-uaCTbAproH(Ar).IJIaBbOpaRa3aOpaNTecb3aCOBETOMKdNCTPb6bHTOPy.PacxoJra3a npiCBAPKeAIOHMnHa:20-30n/MnH B3aBNCmOCTOnOTOkpykaIoUe CpeblnONbTa CBAPsika.
Hnke npBedeHb pa3nue HcnoIb3ObaHn IaTaN aIOMNHNIA:
- IcnoIb3ynte CneuaJIbHbIe POJIKn DnA CBAPKn aIOMHHNIA.
-Давленье ппжимьх роликов подаюцero менизma на поболуку: Otpуглиштейдаменье Ha миниму, утобы He pa3daBnTb npoboloky. - NcnoB3yIte KaunnnaPHyU Tpy6ky ToIbKO dIe CtaJIbHOH I HepkBaEIoUe npOBOJIOKn.
- Podrotbka ropeknДЯ aHOMHnna Tpe6yet npucstalbHoro BHMnna. OHa ochaueHa TefoHOBOr Tpy6ko, KOtopa cmraeT pene. HE OBPE3ATb Tpy6ky no Kpaio CTbKa, OHa dOJxHa 6bIb DmHHee KaunllpHoi Tpy6Kn, KOtopyo OHa 3aMeHReT. 3Ta Tpy6Ka nOlb3yETcI HapabneHn npOBONkOr O pNIKOB.
- KoNTaKTHaT py6ka: nCnOJIb3yIte CNEILJNAJIbHYIO KOtAaKTHyIu Tpy6ky dIra aJIOMHInr 0,8 (apT: 041059-He BXoIIT B KOMPJIeKT).
CBAPKA B PEXKIME «БE3 ΓA3A» (PNC. III)
3n annapatbmyr BAPNTB PIOBOJOKy No Gas》,ecn nOmeHtPnoIpyHOCTcb CBAPKn.ДЯ 3TOrO OTKIOUHTe annapaT O HApJxKeHn,3aTe OTKpOte Iok(14)и cIeDyIte INCTpykUnn POKJIIOUHeHn,yKa3aHHoHa pncyHke III ctp.2 3abODckA hAcTpoKa annapaTa - Ha peXmCBAPKn C Fa30m (Gas).
YCTAHOBKA KATYLIIEK N BOBHH (PNC-V)
- Bo3bMnTE ropeKy 3a pyKOaTKI n CHIMITE HAKOHeuHk (pnc V-E), oTKpyuBaI NO YAcOBIO CTpeLKe, 3aTeM BbIHbTe KOHTaKTHyIO Tpy6Ky (pnc V-D), OCTaBn DEpkatEn b npKHy Ha MeTe.
- OTkpoIe IIOK annapaTa
PNC V-A:YctaHOBnTe 6oBuH Na depKaTeIb.
-При ИСПОЛБОВАМИ 606инbl 100 MM HeT Heo6xOДMOCTN yctaHabIMBaTb aanTeP (1). - OtperynnpyTe TpO3 (2) 6oBnbl TaK, YTObI npN octaHOBKe CBAPKn 6oBnHa no nHe 3anyTala npOBOLky. He 3axkmaTe cnliKOM cnIbHO! BoBnHa dONKHa NOBopauMbTaBc8 Be3 ycInn dIra MoTopa.
3aKpyTnTepeKpTaTeJIb6oMHbI(3).
PNC V-B: YctaHOBnTE Bedyun polnk. - Bb6epnTe poNik, noDxOJaunI dIy DnAmEtpa I TnIa npOBONK, yCTaHOBnTe erO Ha nOdaUoJee yCtpoCTBO TAKIM 06pa3OM, UTO6bl BVINM
NCIOb3yEmbI DnAmEtP
PNC V-C:Дяperynipobkn daBneHn poNkoB, cnyTe npBedeHHbIM Hxke yKa3aHnM:
MaKcMaJIbHo pa3BnHbTNe KOIEcNko nOnyCTne erO.
BCTaBBTe npOBOLOKy TAK, UTO6bI OHa BbICTynpA npIMePHo Ha 2 cm, 3aTeM 3akpoTte DeepKaTeNb pOIIka.
BkIIOUHTe annapaT n 3anyCTte DnBaTeNb HauKaTeMa Ha Kypok ropEnK. - 3abHbTte KOlencko (puc V-C), npoJOnkaj HaxmMaTb Ha Kypok, noka npobonka He NaHcHt npoxOHTb, 3aTe mpeKpaTnTe 3abHcHaBHe.
PpIMeAHHe: IaIOMHnBOB npOBONK DaBJIeHne DoJXHO 6bITb MmHMaJIbHbIM, YTO6bl He pa3dABNTb ee. - BbInyCTnTe npoBOIOky n3 rOpEJIKN Ha 5 cm, 3aTeM nOmeCTnTe Ha KOHeU rOpEJIKN, nOxOJaIyIO K npoBOIOke KOtAOKHyIO Tpy6Ky (pnc V-D) n HAKOHeuHk (pnu V-E).
AnnapaTbSMARTMIG 142,152,162 pa6oTaOT c 6o6nHa m dnaMeTpOM 100 nnn 200 MM.
AnnapaTb SMARTMIG 182, 182 pa6oTaIc c 6o6nHa m n DaMaTePOM 200 nn 300 MM. Iy UcTaHOBKn 6o6nHbI 200 MM yCTaHOBIne ChauJaHa depeKataIb nepexOdnIK.
Hnke npBedeHb pa3nHbE BO3MOxHbE KO6Ha:
Smartmig 142 / 152 162 182 183 gaz
WAARSCHUWING - VEILIGHEIDSINSTRUCTIES
ALGEMENE INSTRUCTIES

INSTALLATIE VAN HET APPARAAT
During intensive use (> duty cycle) the thermal protection can activate, if this event the arc switches off and the thermal protection indicator switches on. The welding machine has a constant current output in MIG/MAG. Note: the running hot tests have been carried out at atmosphere temperature and duty cycle has been determined at 40^ by simulation.
The warranty covers faulty workmanship for 2 years from the date of purchase (parts and labour).
The warranty does not cover:
- Transit damage.
Normal wear of parts (eg.: cables, clamps, etc.). - Damages due to misuse (power supply error, dropping of equipment, disassembling).
- Environment related failures (pollution, rust, dust).
In case of failure, return the unit to your distributor together with:
- The proof of purchase (receipt etc ...)
- A description of the fault reported
HERSTELLERGARANTIE
ACCESSIONS/ ACCESSORIES / ZUBEHÖR / ACCESSORIES / AKCECCYAPBI / ACCESSORIES / ACCESSORI
| ACIER / STEEL / STAHL | 086111 (00,6) | 086166 (00,6) | 042339 041189 | 041582 (00,5/0,8-3m) | 041424 (150A-3m) | 041905 (00,6) | 041875 | 20 l/min | |
| 086128 (00,8) | 086227 (00,8) | 041998 (FR) | |||||||
| 086135 (01,0) | 086135 (01,0) | 040274 (UK) | |||||||
| INOX / STAINLESS / EDESTHAL / 30B Lsi | 086326 (00,8) | 086357 (01,0) | 041608 (01,0/1,2-3m) | 041912 (00,8) | 041929 (01,0) | 040267 (NL/FIN/DK) | |||
| 086340 (01,0) | 040144 (01,2) | 038891 (IT) | |||||||
| NO GAS | 086623 (00,9) | 086386 (01,0) | 042346 | 30 l/min | |||||
| 086630 (01,2) | 086395 (01,2) | 041822 (FR) | |||||||
| Alu (AIMg5) | 086555 (00,8) | _ | _041196 | 041578 (00,8-3m) | 041462 (150A-3m) | 041059 (00,8) | 041646 (UK) | ||
| 086562 (01,0) | 086524 (01,0) | 041585 (01,0/1,2-3m) | 041066 (01,0) | 041219 (DE) | |||||
| 041615 (NL) | |||||||||
| 038707 (IT) | |||||||||