
DRC300 - Robot vacuum MAKITA - Free user manual and instructions
Find the device manual for free DRC300 MAKITA in PDF.

| Brand | Makita |
| Model | DRC300 |
| Product type | Robot vacuum cleaner |
| Dimensions (L × W × H) | 500 mm × 500 mm × 204 mm |
| Weight | 10.6 kg (with two BL1860B batteries) |
| Power supply | 18V DC lithium-ion battery (sold separately) |
| Compatible batteries | BL1815N, BL1820B, BL1830B, BL1840B, BL1850B, BL1860B |
| Compatible chargers | DC18RC, DC18RD, DC18RE, DC18SD, DC18SE, DC18SF, DC18SH, DC18WC |
| Runtime | Approximately 240 minutes (with two BL1860B batteries, smooth floor, fan on) |
| Dust collector capacity | 3.0 L |
| Wireless communication | Bluetooth 4.2 (remote control), Wi-Fi 2.4 GHz (smartphone) |
| Bluetooth range | Approximately 10 m |
| Wi-Fi range | Approximately 20 m or less |
| Sensors | LiDAR (Class 1 laser), ultrasonic, vertical obstacles, camera |
| Cleaning modes | Free, mapping (up to 5 rooms), manual (remote control or app) |
| Special features | ON/OFF timer, light and sound localization, forbidden zones via app, magnetic boundary detection |
| Brushes | Main brush and two side brushes (spare provided) |
| Filter | Washable (refer to manual for maintenance) |
| Smartphone app | Yes (iOS and Android) |
| Noise level | Not specified in manual |
| Operating temperature | Not specified in manual |
| Safety | Automatic stop in case of anomaly, drop detection (vertical sensors), battery protection |
| Included accessories | Remote control, two spare side brushes, AAA batteries (depending on country) |
| Warranty | Refer to Makita warranty |
Frequently Asked Questions - DRC300 MAKITA
User questions about DRC300 MAKITA
0 question about this device. Answer the ones you know or ask your own.
Ask a new question about this device
Download the instructions for your Robot vacuum in PDF format for free! Find your manual DRC300 - MAKITA and take your electronic device back in hand. On this page are published all the documents necessary for the use of your device. DRC300 by MAKITA.
USER MANUAL DRC300 MAKITA
ENGLISH (Original instructions)
Table of Contents
- Warning 2
- About the Robotic Cleaner 2
Major features- 2
Applicable battery cartridge and charger 2 - Intended use- 3
- Symbols- 3
- Declarations of Conformity 3
- Safety precautions 3
- Safety precautions for use of the robotic cleaner - - - - - - - - - - - - - - - - - - - - - - - - - - - - - - - - - - - - - - - -
- Precautions regarding radio waves 7
Respective trademarks and registered trademarks 7 - Names of parts 8
- Standard accessories 93
Prepare Before Cleaning 10
About carrying the robotic cleaner 10
About cleaning by the robotic cleaner 10 - To prevent the robotic cleaner from falling 10
- Tidy ing up a place to clean- 11
Preparation For Use 13 - Attaching the side brushes 13
Unpacking the dust box 13 - Installing batteries in the remote control 13
- Indicating the remaining battery capacity- 14
- Installing and removing batteries (sold separately) 14
- Turning the power on/off 15
What to set up before cleaning 15
How To Use 16 - Cleaning 16
- Cleaning a room with mapping 16
- Deleting mapping information 17
- Suspending or ending cleaning 18
- Switching the vacuum fan on/off 18
Using the location beacon function 18
Using the ON timer/OFF timer 18 - Controlling the cleaning range 20
- How to attach, remove, and use separately sold items - 21
How to dispose of garbage- 21 - Setting the Robotic Cleaner 22
- Setting the time of day 22
- Setting up Wi-Fi® (robotic cleaner and smartphone) 22
Making a sound setting 22 - Resetting the settings 23
· Care 24 - Maintenance- 24
About repair 27 - Notification and Error Indication 28
- Canceling a notification and error indication 28
- Notification of a need of care, etc. 28
- Error notification 28
- Troubleshooting 29
Storage 32 - Optional Accessories 32
- Smartphone App (For the DRC300) 33
Table of contents 33
What you can do with the app 33
How to install the app 33
Home screen 34 - Cleaning with the app 34
- Checking the history of cleaning 37
- Adding, changing, or deleting mapping information- 38
- Changing and checking settings 42
- Error message/dialogue 44
Appendix 45 - Notice Regarding Open Source Software 45
For European countries 45
Warning
This appliance can be used by children aged from 8 years and above and persons with reduced physical, sensory or mental capabilities or lack of experience and knowledge if they have been given supervision or instruction concerning use of the appliance in a safe way and understand the hazards involved. Children shall not play with the appliance. Cleaning and user maintenance shall not be made by children without supervision.
About the Robotic Cleaner
Major features
| Major feature Model:DRC300 | ||
| Voltage D.C. 18 V | ||
| Continuous run time*1 *2 Approx. 240 minutes | ||
| Dust collection volume 3.0 L | ||
| Dimensions 500 mm (L) × 500 mm (W) × 204 mm (H) | ||
| Weight*2 10.6 kg | ||
| Wireless communication Communication system 1. Robotic cleaner-to-remote control :Bluetooth2. Robotic cleaner-to-smarphone: Wi-Fi® (SoftAP) | ||
| Estimated communication distance | 1. 20 m or less2. 10 m or less | |
| Wireless LAN Frequency band | 2.4 GHz | |
| Maximum radio-frequency power | 17.48 dBm (EIRP) | |
| Wireless LAN standards IEEE 802.11 b/g/n | ||
| Encryption method WPA/WPA2 | ||
| WPS version | Version 2.0 | |
| Bluetooth | Frequency band 2402.0 - 2480 | 0 MHz |
| Maximum radio-frequency power | Remote controller: -4 dBm (EIRP) | |
| Transmission range | Approximately 10 m | |
| Bluetooth® version | 4.2 (Bluetooth low energy) | |
| Laser output | Wave length | LiDAR sensor: 775 - 800 nmCliff sensor: 845 - 850 nm |
| Output | 1 mW or less (IEC 60825-1:2014 Laser Class 1) | |
- Please note that the major features, shape, and other characteristics are subject to change for improvement.
The laser distance sensors of this product are Class 1 laser products as defined by international standard IEC 60825-1:2014 on the safety of laser products.
1. When used on smooth flooring such as vinyl floor tiles with the vacuum fan turned on. The run time varies depending on the conditions of the running location, the kind of the floor, the battery conditions, the room temperature, etc. In addition, the run time can be shorter in low-temperature environments because of the characteristics of a lithium-ion battery.
2. When equipped with two BL1860B batteries.
Applicable battery cartridge and charger
| Battery cartridge | BL1815N / BL1620B / BL1830B / BL1840B / BL1850B / BL1860B |
| Charger | DC18RC / DC18RD / DC18RE / DC18SD / DC18SE / DC18SF / DC18SH / DC18WC |
- Some of the battery cartridges and chargers listed above may not be available depending on your region of residence.
WARNING
Only use the battery cartridges and chargers listed above. Use of any other battery cartridges and chargers may cause injury and/or fire.
About cord connected power sources
Cord connected power sources cannot be used for this product. If used, they may cause injury or an accident.
Intended use
This product is a robot vacuum cleaner intended for cleaning indoor floors. Some operations and settings can be performed with the remote control and the dedicated app.
Symbols
The followings show the symbols which may be used for the equipment. Be sure that you understand their meaning before use.
Read the instruction manual.

Take particular care and attention.

A representative battery applicable to this product.

Only for EU countries
Due to the presence of hazardous components in the equipment, waste electrical and electronic equipment, accumulators and batteries may have a negative impact on the environment and human health.
Do not dispose of electrical and electronic appliances or batteries with household waste!
In accordance with the European Directive on waste electrical and electronic equipment and on accumulators and batteries and waste accumulators and batteries, as well as their adaptation to national law, waste electrical equipment, batteries and accumulators should be stored separately and delivered to a separate collection point for municipal waste, operating in accordance with the regulations on environmental protection.
This is indicated by the symbol of the crossed-out wheeled bin placed on the equipment.
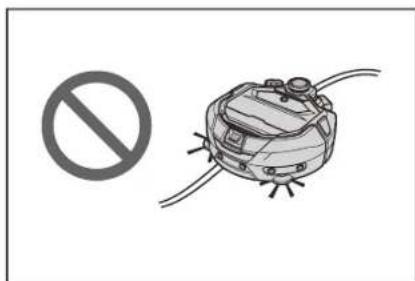
Do not step or pul objects on the robotic cleaner.

Do not use the robotic cleaner near an open flame or flammable and/or dangerous materials.

Clean the cliff sensors on the bottom face if they are dirty or wet.

CLASS 1 LASER PRODUCT
CONSUMER LASER PRODUCT
EN 50689:2021
CONSUMER LASER PRODUCT EN 50689:2021
Declarations of Conformity
For European countries only
The Declarations of conformity are included in Annex A to this instruction manual.
Safety precautions
About the meaning ofWARNING,CAUTION,and NOTICE in
precautions
Considerations for using this product are classified into 巧 _ 一 WARNING
CAUTION, and NOTICE
Their respective meanings are as follows.
WARNING
A precaution to indicate a risk of death or serious injury of the user when the product is handled improperly.
CAUTION
A precaution to indicate a risk of injury of the user or a risk of property damage when the product is handled improperly. Note that a matter described
as CAUTION may possibly lead to serious consequences depending on the situation.
Be sure to observe these precautions as all of them are important for safety.
Important precautions for handling of the product and its accessories.
- Be sure to observe the "Safety precautions" in order to prevent an accident such as fire, electric shock, and injury before it happens.
- Before using the product, read all of this "Safety precautions" thoroughly to ensure proper use of the product.
- After reading it, be sure to place it in safekeeping for use at any time by those who use the product.
- When lending the product to another person, give it together with the user's manual.
The following pictorial signs are used to classify and explain things to observe.
Examples of pictorial signs

This pictorial sign indicates a "prohibited" thing, that is, what you must not do.

This pictorial sign indicates a "mandatory" thing, that is, what you must always do.
These illustrations are for reference purposes. Note that their design varies depending on the product.
WARNING

Do not wash the product in water. Do not use this product in a moist or wet place such as a bathroom.
- Entry of water into the motor can cause a short, heat generation, or ignition.
- Some components can be washed in water. Refer to "Care" on page 24.
Never disassemble, repair, or modify the product.
- Doing so can cause ignition or abnormal operation, resulting in injury.
Do not let children play with this product or the charger.
- A moment's carelessness can result in serious injury.
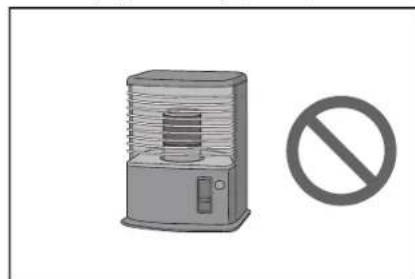
Do not use this product outdoors.
Do not use this product in an unstable place such as stairs or a steep slope.
- This product may tip over or fall, causing injury.
Do not use items other than Makita-specified accessories and separately sold items.
- Using an item other than the accessories and separately sold items given in this user's manual and our catalog may cause an accident or injury.
Do not place this product near flames, heating devices, etc.
- Doing so may cause a short circuit or ignition due to deformation of the product.
Do not use the product or charge the battery near flammable substances (gasoline, benzine, thinner, gas, etc.).
- Doing so can cause explosion or fire.
Do not store this product in a place where the temperature can reach 50^ (122°F) (metallic box, the inside of a car in summer, etc.).
- Doing so can cause a short circuit or ignition due to deformation of this product.
The battery may deteriorate, causing smoking or ignition.
Do not charge in the following conditions, as doing so may cause fire.
- On paper such as corrugated cardboard, cloth such as a cushion, a carpet, vinyl, etc.
- A charger with air holes is used but the air holes are blocked during charging. Or, metals or combustible things are inserted into air holes.
In a dusty place, for example, with cotton dust.
Do not charge in the rain, or remove or insert the power plug or battery with wet hands.
Do not allow foreign matter such as pieces of metal or water near the terminal of the charger.
- Doing so may cause electric shock or injury.
Do not use a charger other than the dedicated charger.
- Doing so can cause leakage, heating, or rupture of the battery.
- Do not use the charger for purposes other than charging.
Do not use the charger for purposes other than charging. Do not use the battery and charger for equipment other than specified by Makita.
NOTICE
| WARNING | |
| Do not abuse the cord of the charger. ·Do not carry the charger while holding the cord or do not yank the plug cord to disconnect from the power receptacle. ·Keep the cord away from heat, oil, chemicals, and sharp corners. ·Be careful with the place for charging to prevent the cord from being stepped on, being caught, or being damaged due to excessive force. Electric shock or a short circuit may result, causing ignition. | |
| Do not use if the cord of the charger is damaged or if the power plug is not firmly inserted. ·Electric shock, a short circuit, or ignition may result. | |
| The battery mounting part of the charger has a charging terminal. Do not allow foreign matter such as pieces of metal or water near the charging terminal. | |
| Do not cover the battery and the charger with a cloth or something during charging. ·Charge the battery in a well-ventilated place. Otherwise, heating, rupture, or ignition may result. | |
| WARNING | |
| Be sure to turn off the power and remove the batteries before care and inspection to prevent this product from starting accidentally. | |
| When inserting the battery into this product, be careful not to turn on the power. ·When you install the battery in conditions where the power can possibly be turned on (for example, when your finger is rested on the start/stop button), this product may begin to move suddenly, causing an accident. | |
| In the event of an inadvertent drop or collision, carefully check this product, etc. for damage, cracks, and deformation. ·Damage, cracks, and deformation can be a cause of injury. | |
| Move this product gently to prevent the product from being deformed and damaged. ·Damage, cracks, and deformation can be a cause of injury. | |
| If this product is not working properly or an abnormal sound is produced when you use the product, turn off the power immediately and stop using the product. Then, ask the shop from which you made a purchase or our sales office to do inspection and repair. ·If you continue to use the product, injury or an accident may result. | |
| Check for damaged parts. ·Before using the product, thoroughly inspect for damage on components and check that the product works properly and provides predetermined functionality. ·Check movable parts for proper positioning and tightening, and check components for damage and proper fitting. Then, check all other areas that can influence the operation to see if there is any abnormality. ·For replacement and repair of damaged components, follow the user's manual. If no description is given in the user's manual, ask the shop from which you made a purchase or our sales office to do repair. | |
| Carefully keep this product in good condition. ·For replacement of accessories, follow the user's manual. ·Periodically inspect the cord of the charger, and if it is damaged, ask the shop from which you made a purchase or our sales office to do repair. Electric shock or a short circuit may result, causing ignition. ·When an extension cord is used for charging, inspect it periodically, and if it is damaged, replace it. Electric shock or a short circuit may result, causing ignition. ·Always keep the carrying handle dry and clean and do not allow it to come into contact with oil, grease, etc. | |
| When this product is not used, keep it in proper storage. ·Keep it in a dry, safe place out of the reach of children or in a dry place that can be locked. An accident may result. | |
| Pull out the charger from a power outlet when it is not used for charging. ·Not doing so can cause electric shock, current leakage, or fire due to insulation deterioration. | |
| WARNING | |
| If you notice abnormal heat or other abnormal conditions during charging, pull out the power plug of the charger immediately to stop charging. • If you let charging continue, smoke, ignition, or rupture may result. | |
| CAUTION | |
| Attach accessories securely in accordance with the user's manual. • If they are not attached securely, it can cause injury, damage, or an accident. | |
| When carrying this product, always hold its carrying handle. • Carrying the product while holding other than the carrying handle can cause failure or injury. | |
| Safety precautions for use of the robotic cleaner | |
| WARNING | |
| Do not use this product in a high place with no enclosure or in a place with a narrow width such as stairs. • Doing so can cause injury or failure due to a fall of this product. | |
| Do not use this product in a place where oil components such as edible oil are floating, in a place where sprays and chemicals are used, such as a barber shop, a beauty salon, a cleaning shop, or outdoors. • Doing so can cause failure. | |
| Do not use this product in a place with a person who cannot operate this product properly, a young child, or an infant. • Doing so can cause electric shock, an accident, or injury. | |
| Do not use this product in a place with an animal, etc. • Doing so can cause electric shock, an accident, or injury. | |
| Do not use this product in a place with many people or with people coming and going constantly. • Doing so can cause electric shock, an accident, or injury. | |
| Do not block the exhaust opening and suction opening or put in metals, flammable foreign objects, etc. • Doing so can cause electric shock, ignition, or failure. | |
| Do not use this product near an object that may possibly block the suction opening. • Doing so can cause electric shock, ignition, or failure. | |
| Do not throw this product into fire or heat it. • Doing so can cause a short circuit, ignition, liquid leakage, or explosion. | |
| Do not place this product in a high-temperature place, such as near fire or a space heater, a place exposed to direct sunlight, and the inside of a car under the blazing sun. • Doing so can cause a short circuit, ignition, liquid leakage, or explosion. | |
| Do not put objects over this product. • Doing so can cause overheating, resulting in ignition. | |
| Do not place this product in direct sunlight. • Doing so may cause incorrect response of the LiDAR sensor and infrared sensor, resulting in malfunction or failure. | |
| Do not block sensors of this product or put in foreign objects. • Doing so can cause faulty operation, malfunction, or failure. | |
| Do not affix a sticker or tape on sensors and wheels. • Doing so can cause malfunction or failure. | |
| Do not sit on this product, place a heavy object on it, or give a strong shock to it. • Doing so can cause damage or failure of this product or injury. Pay special attention when children are nearby. | |
WARNING

During operation, do not touch drive wheels or put your hand or foot under this product.
- Doing so can cause injury to a hand, etc. Pay special attention when children are nearby.
Do not allow the product to be used by a child alone. People who cannot express their will and people who cannot operate the product independently should not use this product.
- Doing so can cause electric shock, an accident, or injury.
Do not pour water or a detergent on this product or wash this product (except the main brush, side brush, dust box, and filter).
- Doing so can cause electric shock, a short circuit, or ignition.
Do not touch the product with wet hands.
- Doing so can cause electric shock.
Do not use magnetic boundary line that is torn or deformed or appears to have lost its magnetic force.
Doing so can cause an accident or injury.
Your body parts such as hands and hair and what you are wearing should not be put in the suction opening and exhaust opening of this product.
- Doing so can cause injury.
Your body parts such as hands and hair and what you are wearing should not be allowed to come into contact with a brush that is rotating.
- Doing so may cause injury.
Do not allow this product to suck in the following. Doing so can cause fire, injury, or motor failure.
Flammable substances
Oils (kerosene, gasoline, etc.)
Solvents (benzine, thinner, etc.)
- Burning things such as matches, incense, candles, and hot ash; things that emit smoke such as cigarettes; things with high temperatures.
- Combustibles such as toner
- Paints
- Grinding sparks, metal dust, etc. that are generated in metal cutting and grinding.
- Flammable gas (spray, etc.)
Explosive substances
Nitroglycerin, etc.
- Combustible substances
Aluminum, magnesium, titanium, zinc, red phosphorus, yellow phosphorus, celluloid, and other chemical substances; dust, gas, and vapor thereof
Sharp objects
Glass, edged tools, wood chips, metal, stones, nails, razors, pushpins, needles, etc.
Bubbly things such as carpet detergents
Things that solidify and conductive fine powder (metal powder, carbon) Dehumidifying agents
A large amount of powder (flour, ash, powder in a fire extinguisher, etc.)
Substances that cause symptoms of poisoning
Medicines
Liquid and wet garbage
Excrement and vomit of animals, etc.
Large paper waste, plastic waste, strings
WARNING

Do not use the product in the following conditions, which can be a cause of fire.
Large volume of combustibles are drifting.
The exhaust opening is blocked.
The dust box and filter are not attached.
-Trash gets caught in the main brush, which is locked.
- There are holes and tears in the filter.
The battery is not fully inserted.
Do not cause a short circuit between the terminals of the USB power supply section (for repair).
- Inserting needles or wire into the USB terminal section may result in a short circuit, causing ignition or emission of smoke.
Do not look directly into the laser light (beam).
- Doing so may cause injury to the eyes.
This product complies with the applicable safety regulations, so do not modify this product.
Performing repairs without the knowledge or skill to perform repairs may cause inadequate performance of the laser, as well as accidents or injury.
Do not use rechargeable products near high-voltage power lines.
- There is a risk of malfunction or failure.
WARNING

Stop using the product if it sometimes fails to operate even though the power is turned on.
- Not doing so can cause smoking, ignition, or electric shock.
Stop using the product immediately when it is deformed or is abnormally hot.
- Not doing so can cause smoking, ignition, or electric shock.
Stop using the product when it sometimes stops during operation.
- Not doing so can cause smoking, ignition, or electric shock.
Stop using the product immediately when an abnormal sound is heard during operation.
- Not doing so can cause smoking, ignition, or electric shock.
Stop using the product immediately when it smells like something is burning.
- Not doing so can cause smoking, ignition, or electric shock.
Before use and maintenance, move lighted candles, vases, etc. on tables and shelves.
Not doing so can cause them to fall due to a shock when hit by this product, possibly resulting in an accident.
Before use and maintenance, move rubber bands and other objects that may possibly be dragged by this product.
- Not doing so can cause this product to drag a rubber band, etc. possibly resulting in an accident.
Before use and maintenance, move equipment and devices with a controller located on the same level as this product.
- Not doing so can cause this product to hit and press a controller, possibly resulting in fire, injury, or an accident.
Before maintenance and inspection, be sure to turn off the power of this product and remove the batteries.
- Not doing so can cause electric shock or injury.
During maintenance, be careful not to get your fingers caught.
- Doing so can cause injury.
If you have an implantable cardiac pacemaker or an implantable defibrillator, use this product more than 15 cm away from the implantation site.
- Radio waves may affect the operation of a medical device and can cause malfunction of the medical device.
WARNING

When you use equipment that emits radio waves in a medical institution, follow the instructions by the medical institution. In an area where use is prohibited, turn off the power of this product.
- Not doing so can cause malfunction of medical devices.
CAUTION

During use and maintenance, do not put foreign objects in gaps and openings.
Doing so can cause electric shock, fire, or failure of this product.
Do not use this product on a long-pile (exceeds 7 mm) carpet or other rugs.
- Doing so can cause the side brushes to get caught, resulting in damage to the carpet and side brushes.
Do not use this product on a delicate rug (mouton, felt, etc.), a delicate floor (a plain wood floor, a marble floor, etc.), and a freshly waxed floor.
- Doing so can cause damage or scratches. If damage is caused, stop using the product.
Do not stand or sit on the top surface of this product.
- Doing so can cause this product to move suddenly, resulting in injury such as falling down.
Do not operate this product for long hours with the suction opening blocked.
- Doing so can cause deformation or ignition of this product due to overheating.
Do not put your hand or foot under this product.
- There is a risk that your fingers or toes will get caught, resulting in injury.
Do not continue using this product with the filter being dirty or with dust accumulated.
Doing so can cause reduction in suction power.
Do not hold this product with its front facing downward.
- Dust can fall from the suction opening

CAUTION

To prevent malfunctions, ensure that each sensor is well maintained.
- An incorrect response of a sensor can cause injury or failure due to a malfunction or a fall of this product.
Make sure that the long tassels of rugs such as a carpet and a mat are tucked inside.
- The tassels may get caught in the drive wheels and/or main brush, causing damage to rugs and this product.
When you carry this product, stop the operation first, then turn off the power. Hold the carrying handle firmly so as not to get your hands caught.
- Lifting this product inadvertently can cause injury or failure.
Put away cords and strings to ensure that they do not get caught in this product.
- Not doing so can cause failure or faulty operation due to entanglement of the power cord.
Before cleaning, move objects that break easily, objects that fall down easily, and objects that should not be sucked in. Put away long strings and cords.
Not doing so can cause damage, scratches, or failure of this product.
CAUTION

Use this product with the filter set correctly. Do not use this product with the filter removed, set in a wrong position, or torn.
- Doing so can cause failure such as motor burnout.
Dust may escape and become harmful to health.
Be careful not to get your fingers caught when opening and closing the top cover of the body and the top cover of the dust box, attaching the filter, and connecting and disconnecting the battery.
- There is a risk that your fingers will get caught, resulting in injury.
About handling
-
Use this product indoors. Do not clean a place with a large amount of dust even if it is indoors.
-
Do not clean a floor whose surface is hard and bumpy. Doing so can cause brushes and wheels to wear out early.
-
After cleaning, remove sand dust stuck on the main brush, side brushes, and wheels. If they are left uncleaned, the floor surface may be damaged.
-
Always attach the main brush and its cover when using this product
-
Do not lubricate the movable parts of the main brush, etc. Doing so can cause plastic parts to break.
-
For use on a delicate floor surface, it is recommended to replace with the separately sold items "soft main brush" and "soft side brush." However, scratches may be made depending on the floor surface conditions. In such a case, stop using the product.
-
Do not drag this product. Lift this product when moving it.
-
Do not affix a sticker or tape to sensor parts and wheels, deform the bumper and wheels, or allow the bumper to be pressed forcefully. Doing so can cause malfunction.
-
If fine powder (such as plaster, cement, and chalk) is sucked in, care for the filter, cliff sensor, and LiDAR sensor.
-
Do not allow this product to suck in the following, which can cause scratches on the inside of this product, clogging of dust, or failure. If any of them is sucked in accidentally, stop the operation and discard the dust.
(1) Wet waste (liquid and moist waste)
(2) Excrement of animals, etc.
(3) Large volume of sand and powder
(4) Strings
(5) Sharp-edged objects (glass, cutting tools, pins, etc.)
(6) Large size of rubbish and large volume of rubbish
(7) Objects with poor air permeability (food plastic wrap, vinyl, wrapping film, etc.)
-
If the bottom brush of the suction opening, casters, drive wheels, or the roller part of the main brush cover wears out, stop using this product and consult the shop from which you made a purchase or our sales office. Using the robotic cleaner with worn out parts can cause damage to the floor surface.
-
During operation, noise may occur on a TV screen but does not affect the TV itself.
-
Be careful when operating this product in a place where a security system works. This product may be wrongly detected as an intruder by the security system.
-
Do not do the following.
(1) Non-use for a long period of time with the battery installed
(2) Use with the sensor being dirty or with the filter clogged
(3) Use when you notice a battery error (a strange smell, liquid leakage, heating, deformation, or other abnormal things)
(4) Use without removing sand dust and other foreign matter stuck on the main brush, side brushes, and wheels
(5) Use with some components worn out or exhausted
(6) Use without reading the user's manual
(7) Turning the product upside down and performing maintenance with the battery installed
(8) Use without doing maintenance on the magnetic boundary line
Battery tool use and care
WARNING
Read all safety warnings and instructions. Failure to follow the warnings and instructions may result in electric shock, fire and/or serious injury.
- Recharge only with the charger specified by the manufacturer. A charger that is suitable for one type of battery cartridge may create a risk of fire when used with another battery cartridge.
- Use appliances only with specifically designated battery cartridges. Use of any other battery cartridges may create a risk of injury and fire.
-
When battery cartridge is not in use, keep it away from other metal objects, like paper clips, coins, keys, nails, screws or other small metal objects, that can make a connection from one terminal to another. Shorting the battery terminals together may cause burns or a fire.
-
Under abusive conditions, liquid may be ejected from the battery; avoid contact. If contact accidentally occurs, flush with water. If liquid contacts eyes, additionally seek medical help. Liquid ejected from the battery may cause irritation or burns.
- Do not use a battery cartridge or tool that is damaged or modified. Damaged or modified batteries may exhibit unpredictable behaviour resulting in fire, explosion or risk of injury.
- Do not expose a battery cartridge or tool to fire or excessive temperature. Exposure to fire or temperature above 130^ (265°F) may cause explosion.
- Follow all charging instructions and do not charge the battery cartridge or tool outside the temperature range specified in the instructions. Charging improperly or at temperatures outside the specified range may damage the battery and increase the risk of fire.
- Have servicing performed by a qualified repair person using only identical replacement parts. This will ensure that the safety of the product is maintained.
- Do not modify or attempt to repair the appliance or the battery cartridge except as indicated in the instructions for use and care.
- Prevent unintentional starting. Ensure the switch is in the off position before connecting to the battery cartridge, or picking up or carrying the robotic cleaner. Carrying the robotic cleaner with your finger on the switch or energizing the robotic cleaner with the switch on may cause accidents.
- Disconnect the battery cartridge from the robotic cleaner before making any adjustments, changing accessories, or storing the robotic cleaner. Such preventive safety measures reduces the risk of starting the robotic cleaner accidentally.
- The battery cartridge is not charged sufficiently when factory-shipped. Charge the battery before use.
- When not using the battery cartridge, always put the cover on it.
Important safety instructions for battery cartridge
- Before using battery cartridge, read all instructions and cautionary markings on (1) battery charger, (2) battery, and (3) product using battery.
- Do not disassemble or tamper with the battery cartridge. It may result in a fire, excessive heat, or explosion.
- If operating time has become excessively shorter, stop operating immediately. It may result in a risk of overheating, possible burns and even an explosion.
- If electrolyte gets into your eyes, rinse them out with clear water and seek medical attention right away. It may result in loss of your eyesight.
- Do not short the battery cartridge:
(1) Do not touch the terminals with any conductive material.
(2) Avoid storing battery cartridge in a container with other metal objects such as nails, coins, etc.
(3) Do not expose battery cartridge to water or rain. A battery short can cause a large current flow, overheating, possible burns and even a breakdown.
- Do not store and use the tool and battery cartridge in locations where the temperature may reach or exceed 50^ (122°F).
- Do not incinerate the battery cartridge even if it is severely damaged or is completely worn out. The battery cartridge can explode in a fire.
- Do not nail, cut, crush, throw, drop the battery cartridge, or hit against a hard object to the battery cartridge. Such conduct may result in a fire, excessive heat, or explosion.
- Do not use a damaged battery.
- The contained lithium-ion batteries are subject to the Dangerous Goods Legislation requirements. For commercial transports e.g. by third parties, forwarding agents, special requirement on packaging and labeling must be observed. For preparation of the item being shipped, consulting an expert for hazardous material is required. Please also observe possibly more detailed national regulations. Tape or mask off open contacts and pack up the battery in such a manner that it cannot move around in the packaging.
- When disposing the battery cartridge, remove it from the tool and dispose of it in a safe place. Follow your local regulations relating to disposal of battery.
- Use the batteries only with the products specified by Makita. Installing the batteries to non-compliant products may result in a fire, excessive heat, explosion, or leak of electrolyte.
- If the tool is not used for a long period of time, the battery must be removed from the tool.
- During and after use, the battery cartridge may take on heat which can cause burns or low temperature burns. Pay attention to the handling of hot battery cartridges.
- Do not touch the terminal of the tool immediately after use as it may get hot enough to cause burns.
- Do not allow chips, dust, or soil stuck into the terminals, holes, and grooves of the battery cartridge. It may result in poor performance or breakdown of the tool or battery cartridge.
- Unless the tool supports the use near high-voltage electrical power lines, do not use the battery cartridge near high-voltage electrical power lines. It may result in a malfunction or breakdown of the tool or battery cartridge.
- Keep the battery away from children.
SAVE THESE INSTRUCTIONS.
CAUTION
Only use genuine Makita batteries. Use of non-genuine Makita batteries, or batteries that have been altered, may result in the battery bursting causing fires, personal injury and damage. It will also void the Makita warranty for the Makita tool and charger.
Tips for maintaining maximum battery life
- Charge the battery cartridge before completely discharged. Always stop tool operation and charge the battery cartridge when you notice less tool power.
- Never recharge a fully charged battery cartridge. Overcharging shortens the battery service life.
- Charge the battery cartridge with room temperature at 10^ - 40^ (50°F - 104°F). Let a hot battery cartridge cool down before charging it.
- When not using the battery cartridge, remove it from the tool or the charger.
- Charge the battery cartridge if you do not use it for a long period (more than six months).
For button cell or coin battery

This appliance contains a coin cell battery in compliance with regulation (EU) 2023/1542.
Precautions regarding radio waves
-
Do not use this product in the following locations. - In or near locations with medical equipment
-
Near electronic devices with high precision control or faint signals (Examples of electronic devices that require caution: hearing aids, pacemakers and other medical equipment, fire alarms, automatic doors and other automatically controlled equipment)
-
Inside of a hospital or aircraft (Follow the instructions of the hospital or airline and do not use the product in prohibited areas)
-
Wireless connection and performance are not guaranteed in all environments. The radio waves may not be received or may be interrupted in the following cases.
-
Use in buildings constructed with concrete, rebar, and metal
- Installation near obstacles
- Use in locations where interference occurs with wireless communication devices that use the same frequency
- Use in locations with equipment that produces magnetic fields, static electricity, or radio interference, such as microwave ovens
Respective trademarks and registered trademarks
Trademark notice
- Android and Google Play are trademarks or registered trademarks of Google LLC.
- iPhone and iPad are trademarks of Apple Inc., registered in the U.S. and other countries.
- The iPhone trademark is used under license from Aiphone Co., Ltd.
App Store is a service mark of Apple Inc.
Wi-Fi is a trademark and registered trademark of Wi-Fi Alliance. - The Bluetooth ^ word mark and logos are registered trademarks owned by the Bluetooth SIG, Inc. and any use of such marks by Makita is under license. Other trademarks and trade names are those of their respective owners.
Bluetooth
- All other trademarks in this document are the property of their respective owners.
Note that ^TM and ^ marks are omitted in some of the main text.
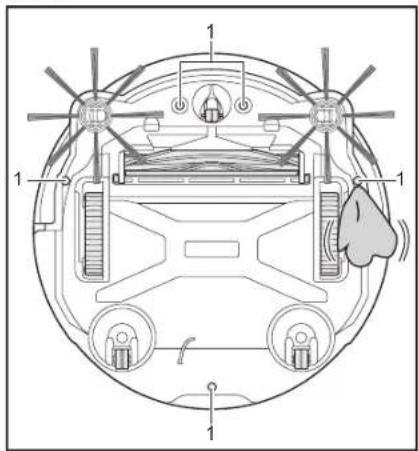
Names of parts
Main unit (top view, lateral view, interior)

- Camera sensor
- Bumper
- Ultrasonic sensor
- Carrying handle (See page 10.)
- Top cover
- Open button
-
Dust box (See page 13.)
-
Operation panel (display) (See page 9.)
- Left-battery insertion slot
- Right-battery insertion slot
11.Exhaust opening - Position LED
- LiDAR sensor
- CLASS1 LASER mark
Main unit (bottom view)
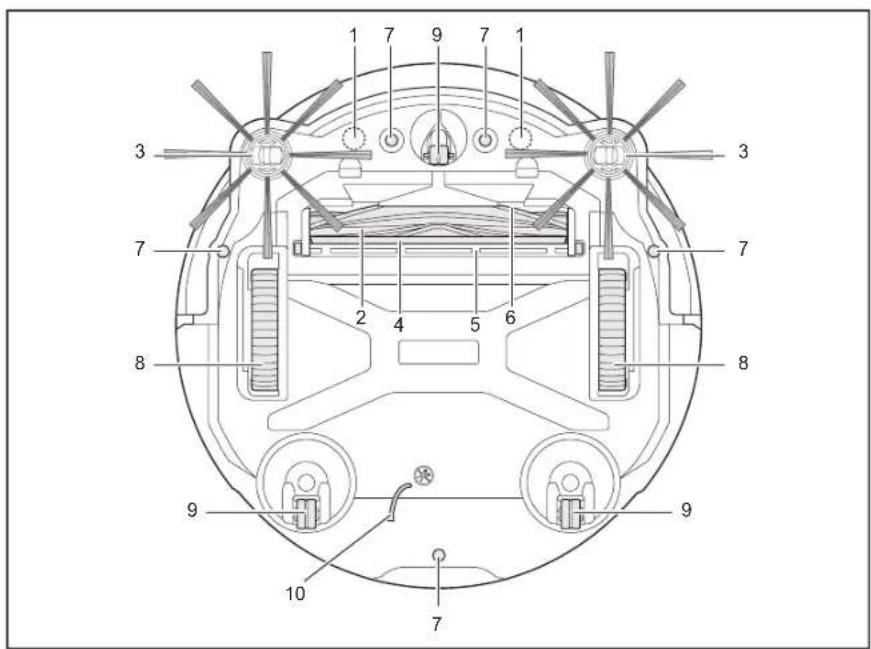
- Magnet sensor for boundary sensing (built-in)
- Main brush
- Side brush
- Bottom brush
-
Main brush cover
-
Suction opening
- Cliff sensor
- Drive wheel
- Caster
- Earthing line
NOTICE
The earthing line reduces the electrical charge on the sensor.

: Do not accidentally pull or cut the earthing line.
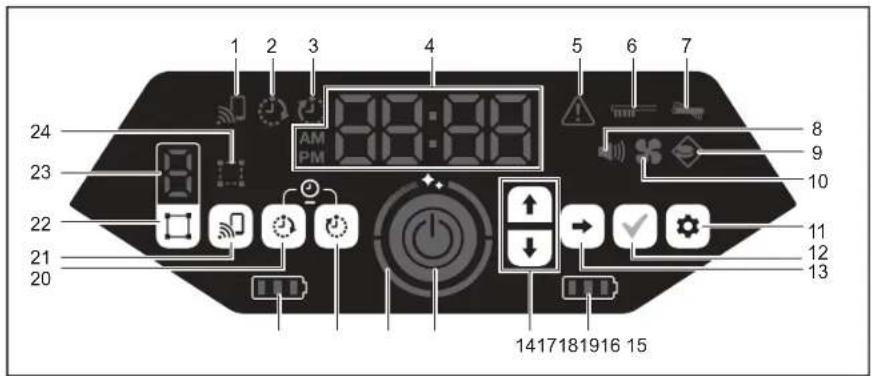
Main unit (operation panel (display))
- Smartphone connection lamp (green)
- ON timer lamp (green) (See page 19.)
- OFF timer lamp (green) (See page 19.)
- Time indicator (green)
- Error lamp (red) (See page 28.)
- Filter care lamp (red) (See page 28.)
- Brush error lamp (red) (See page 28.)
- Sound lamp (green) (See page 22.)
- Boundary-sensing lamp (green) (See page 20.)
- Vacuum fan lamp (green) (See page 18.)
- Setting button
-
Confirmation button
-
Next button
- Up button, down button
- Right-battery power lamp (green) (See page 15.)
- Left-battery power lamp (green) (See page 15.)
17.Start/stop button (See page 15.) - Clean level lamp (white) (See page 17.)
- OFF timer button (See page 19.)
- ON timer button (See page 18.)
- Smartphone connection button
- Mode switch button (See page 16.)
- Mode/room number display (See page 16.)
- Room register lamp (green) (See page 16.)
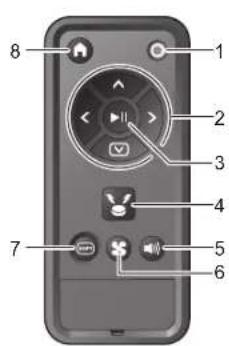
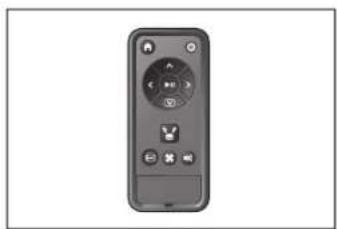
Remote control
- Power OFF button
- Action buttons
- Start/stop button
-
Location beacon buzzer/light button
-
Sound ON/OFF button
- Vacuum fan ON/OFF button
- Shift button
8.Start point button
Standard accessories
- Side brushes (four)
Two are for replacement. Attach two to the robotic cleaner. (See page 13.)
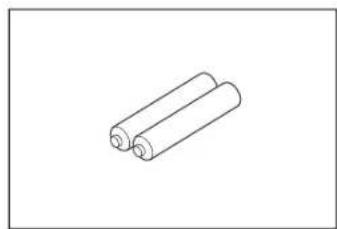
- Remote control - AAA dry batteries (two) * Country specific
Install them in the remote control. (See page 13.)
Prepare Before Cleaning
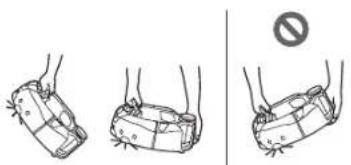
About carrying the robotic cleaner
CAUTION
When you carry the robotic cleaner, stop the operation, then turn the power off, and then hold the carrying handle firmly so as not to get your hand caught.
Not doing so can cause your hand to be caught in the handle.
Keep proper footing and balance at all times when lifting the robotic cleaner.
Not doing so can cause injury or failure.
Do not lift the robotic cleaner carelessly.
Doing so can cause injury or failure.
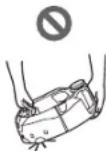
Do not hold the robotic cleaner with its front facing downward.
- Dust can fall from the suction opening.
About cleaning by the robotic cleaner
- The robotic cleaner detects obstacles by its LiDAR sensor and ultrasonic sensor and runs while avoiding those obstacles. It collects and sucks dust with its side brushes and main brush. It may fail to recognize an obstacle depending on the conditions. When it hits an obstacle, the bumper detects the contact and avoid the obstacle.
- The robotic cleaner can climb over a step of up to about 2.0cm . If it is less than 2.0cm , however, the robotic cleaner sometimes fails to climb over it depending on the conditions such as the shape of the step.
- On a slope or an uneven place, the undersurface of the robotic cleaner may be caught and a drive wheel may be lifted, which causes the robotic cleaner to stop due to an error. If the robotic cleaner stops often, do not allow it to enter that place. (See page 20.)
- Where there is an obstacle near a wall, the robotic cleaner may run up onto the wall while trying to avoid the obstacle.
-
The LiDAR sensor may not be able to recognize obstacles with the following characteristics, which may result in inaccurate mapping or bumping into obstacles.
-
Highly reflective obstacles such as mirrors
- Highly transparent obstacles such as glass
- Obstacles made of black, glossy material
-
Slim obstacles such as the legs of a chair or desk
-
When the robotic cleaner enters a narrow space lower than the height of the robotic cleaner, it can get caught and stuck. In such a case, place a screen or something.
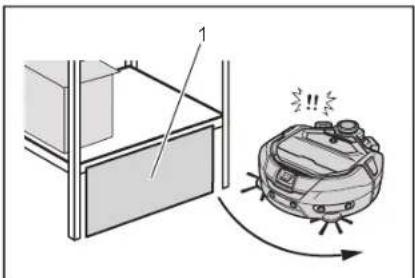
-
Block a gap with a screen or something.
-
A black floor, a transparent floor such as a glass floor, or black areas on the grain of wood flooring may be determined to be a step by the robotic cleaner, which then tries to avoid it.
- The robotic cleaner may not be able to suck dust in an area around a step over which the robotic cleaner can climb, a secluded or narrow space that the robotic cleaner cannot enter, or a place that the side brushes cannot reach.
- The robotic cleaner may kick away a small, hard object such as a small stone.
- The robotic cleaner may climb over a step accidentally if there is an object which can help it climbing up (for example, a board or carpet). Keep such objects away from the steps.
CAUTION
Do not use the robotic cleaner in the following places.
- Do not use the robotic cleaner on places such as a carpet with a pile height of more than 7mm , a rug with piles that fall out easily, and an uneven rug. On such a rug, the robotic cleaner may stop operating, piles may be caught in the side brushes, or the rug or the side brushes may be damaged. If the robotic cleaner cannot run well on a rug other than described above, avoid use on that rug.
- Do not use the robotic cleaner on a mattress, a blanket, a floor cushion, etc.
- Do not use the robotic cleaner in a wet area, a toilet, a bathroom, an attic, outdoors, etc.
- Do not use the robotic cleaner in a wet place, a place that may become wet, or in a hot, humid place.
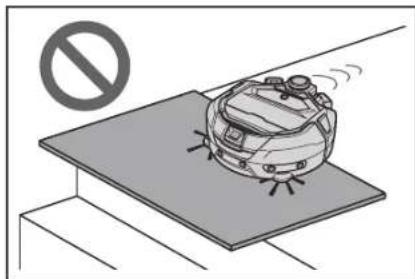
To prevent the robotic cleaner from falling
WARNING
Ensure that the robotic cleaner does not fall.
If it falls, it may cause breakage or injury.
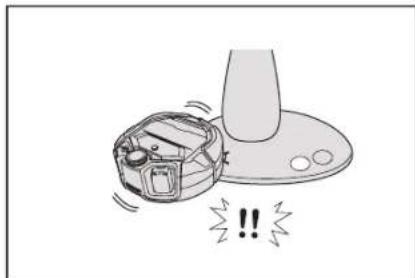
- Do not use the robotic cleaner in a mezzanine floor, a loft, a stairwell, a place without walls, or a place with a slope of 10^ or more.
- In a place where an accident or other dangerous situation may occur due to a fall, place an object that has a height of 25cm or more and can serve as a wall (object that does not move or topple over when hit by the robotic cleaner).

1.Height of 25 cm or higher
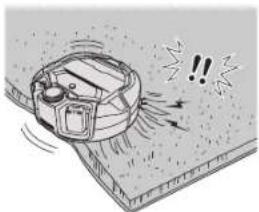
- If dirt or water droplets due to condensation are formed on the cliff sensor on the undersurface of the robotic cleaner, wipe them off with a dry, soft cloth, a cotton swab, etc.
1.Cliff sensor (five places)
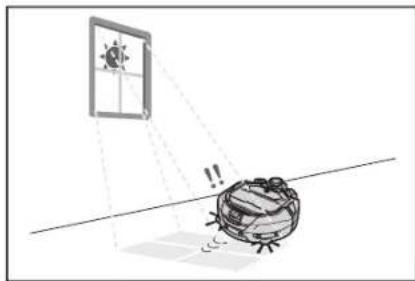
- The robotic cleaner may fail to operate properly when exposed to sunlight or infrared light from other equipment. Ensure that the robotic cleaner is not exposed to infrared light from a halogen heater, a remote control, a sensor, and other equipment and sunlight coming from frosted glass, etc.
- Do not use when there are objects such as carpets, mats, or plates near a step. If an object such as a carpet, mat, or plate is covering the step, the cliff sensor may not recognize the step correctly.
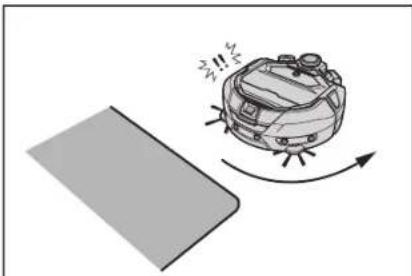
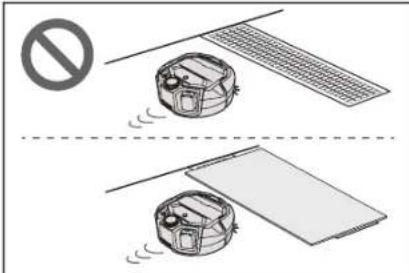
- In such a place that the distance from a wall to a step is less than about 1m , the robotic cleaner may fall while moving backward. Do not use the robotic cleaner where the distance from a wall to a step is less than about 1m .

1. Less than about 1 m
- Where there is a drain cover (grating cover), the cliff sensor may recognize it as a step and the robotic cleaner may not be able to pass over it. If it is necessary to pass over it, cover the grating with a plate or something.
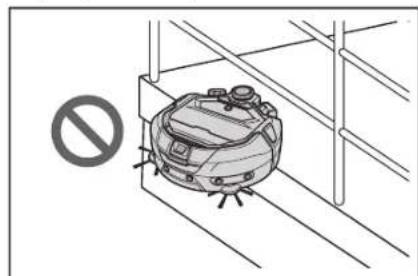
- A step of about 3.0cm or less may not be recognized as a step by the cliff sensor, resulting in the robotic cleaner climbing down the step while going straight. Where there is a step of from about 2.0 to 3.0cm , refrain from using the robotic cleaner.
- Shut any sliding doors, screens, or windows because the level difference of their frames or rails may not be recognized as a step by the bumper sensors.
- Do not use the robotic cleaner on a breakable flooring surface such as glass.
Tidying up a place to clean
WARNING
Move objects that may cause damage or an accident when the robotic cleaner comes into contact with them.
Put away objects that should not be sucked in, objects that hinder the movement of the robotic cleaner, and objects that are likely to get caught in the main brush, wheels, and side brushes.
-
If you leave an object that will obstruct the movement of the robotic cleaner during cleaning, it may cause an accident or injury.
-
Do not use the robotic cleaner near objects that gel hot, such as a heating apparatus (space heater). Doing so can cause an accident, ignition, or failure. (Do not use a heating apparatus during operation.)
- Do not use the robotic cleaner in a place equipped with a retractable outlet. A retractable outlet should be always retracted.

- For walls made of fragile material (e.g., a mud wall, a decorated door or sliding door, or a folding screen), place objects that serve as a wall in front of them so that they will not be damaged.
- Do not use in locations where unstable objects or objects that fall down easily are placed.
Unstable objects and objects that fall down easily should be moved to another room.
- Move equipment and devices with a controller located on the same level as the robotic cleaner.
- Put away burning candles and easily breakable objects.
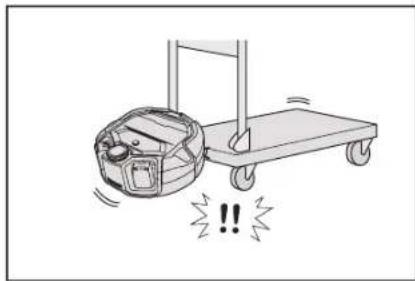
- For objects with casters such as a truck and a wheelchair, and light chairs that move easily, lock the casters or put them away.
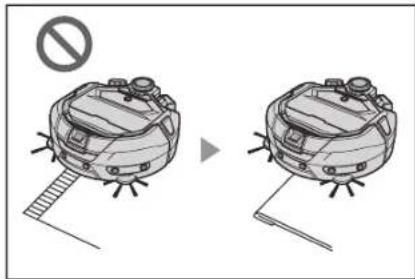
- Do not use with stray cords that may get caught or tangled.
Make sure that power cables are laid alongside a wall so that the robotic cleaner will not be caught in them.
- Put away long, thin objects such as a cord and a belt.
- Put away small goods that are easily sucked in and valuable goods.
- Put away objects that block the passage of the robotic cleaner, such as a work table, a chair, a tool, and a plate.
- If animal excrement or other liquid wastes are sucked in, the robotic cleaner may malfunction. Clean them up.
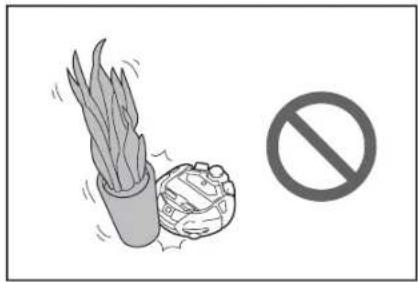
- Make sure that the tassels of a mat or other coverings are tucked inside.
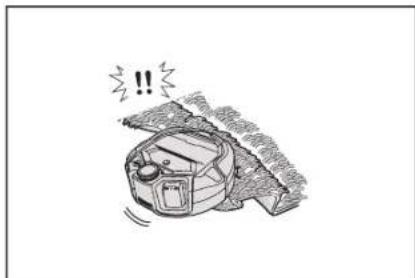
- Lift the hem of a curtain, etc. that hangs down on the floor. The hem may get caught in the main brush, etc.
- Put away thin, slippery rugs, such as a mat and a carpet. The rugs and side brushes may be damaged.
- Put away thin paper and cloth, plastic bags, etc.
- In a place leading to outside, close the doors to prevent the robotic cleaner from going to outside. If the doors cannot be closed, do not use the robotic cleaner. In addition, close the doors of rooms that the robotic cleaner should not enter.
- The robotic cleaner may not be able to run properly on a slippery floor surface. Check the condition of the floor before use.
- Ensure a pathway of 80 cm or more for cleaning
Preparation For Use
Attaching the side brushes
WARNING
Before attaching the side brushes, make sure that the batteries are removed from the robotic cleaner.
- If a battery is left inserted in the robotic cleaner, electric shock or injury may result.
When attaching the side brushes, lay down a mat or something so that the robotic cleaner and the floor surface will not be damaged.
- Turn the robotic cleaner upside down.
- Slide the side brush lock lever to (release mark).
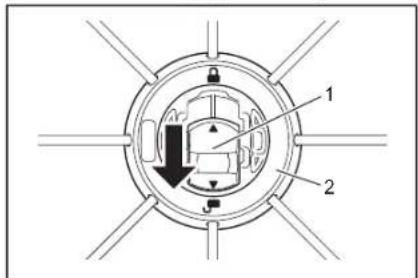
1.Lock lever 2.Side brush
3. Attach the side brush so that the shaft on the underside of the robotic cleaner fits the shape of the hole of the side brush.

-
Push the lock lever of the side brush toward (lock mark) until it clicks. (Push in properly until it reaches the point shown in the drawing.)
-
After installation, lift the side brush slightly to see that it does not detach from the robotic cleaner.
- Attach two side brushes, one on the left and one on the right.
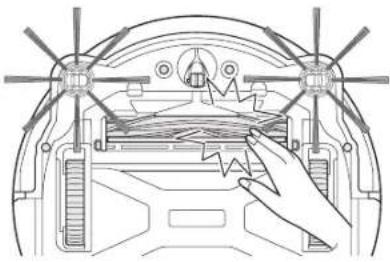
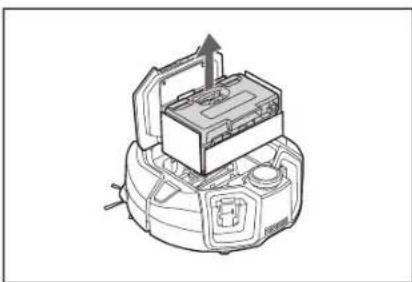
Unpacking the dust box
WARNING
When you open the top cover of the robotic cleaner, make sure that the batteries are removed from the robotic cleaner.
-
If a battery is left inserted in the robotic cleaner, electric shock or injury may result.
-
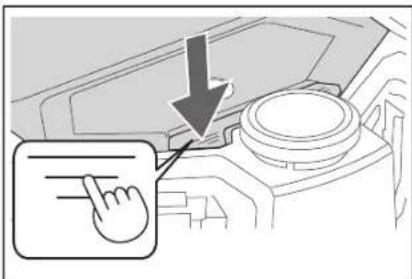
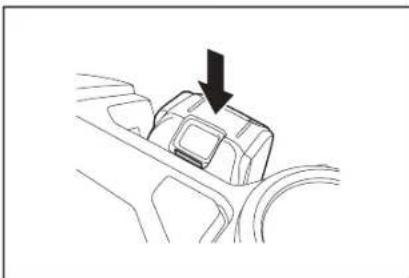
Press the open button ( ) to open the top cover. Be careful because the top cover opens quickly.
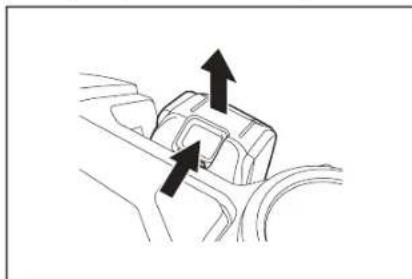
- Remove the dust box.
- Remove the packing material.
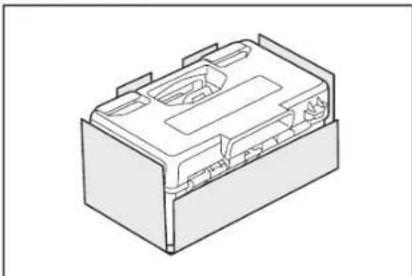
- Put the dust box back in the robotic cleaner and push the top cover to close until it clicks. When closing the top cover, be careful not to get your fingers caught.
Installing batteries in the remote control
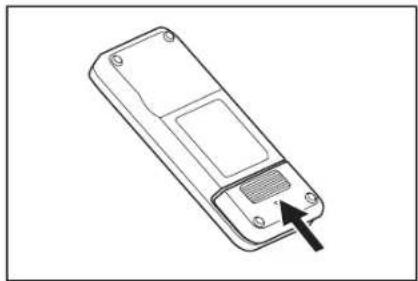
- While pressing on the lid of the remote control, slide the lid in the direction shown by the arrow and remove it.
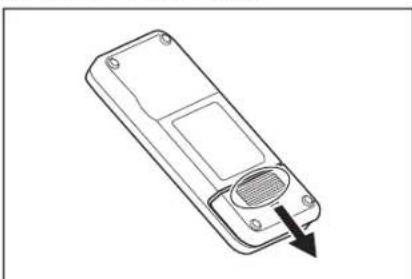
- Insert the batteries in the correct direction.
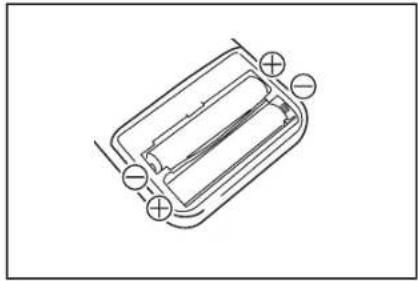
- Attach the lid.
NOTICE
- Be sure to align the polarity of the batteries correctly.
- Two AAA dry batteries are required. The two batteries should be new and of the same type.
- Take out the batteries when you do not use them for a long period of time in order to prevent failure due to liquid leakage and rupture.
- If the solution in a battery gets into your eyes or contacts your skin or clothing, wash it away immediately with clean water.
- Do not subject the remote control to shocks or allow it to get wet with water.
Do not place it in a place under direct sunlight or near a space heater, etc.
Doing so can cause failure.
Indicating the remaining battery capacity
Only for battery cartridges with the indicator
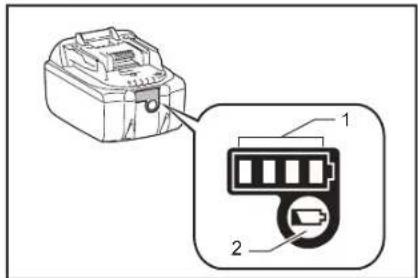
- Indicator lamps 2. Check button
Press the check button on the battery cartridge to indicate the remaining battery capacity. The indicator lamps light up for a few seconds.
| Indicator lamps Remaining | capacity | ||
| Lighted Of | Blinking | ||
| 75 % to 100 % | |||
| 50 % to 75 % | |||
| 25 % to 50 % | |||
| 0 % to 25 % | |||
| Charge the battery. | |||
| The battery may have malfunctioned. | |||
NOTICE
- Depending on the conditions of use and the ambient temperature, the indication may differ slightly from the actual capacity.
- The first (far left) indicator lamp will blink when the battery protection system works.
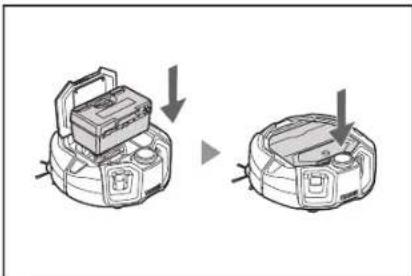
Installing and removing batteries (sold separately)
The robotic cleaner works even with only one battery.
- With two batteries, it can be run for a long period of time.
How to install
WARNING
A battery should be securely inserted as far as it will go. When the red part in the upper section of the button is visible, it means that locking is not complete. Insert a battery fully until the red part becomes invisible.
- If the insertion is not sufficient, the battery may come out, causing an accident or failure.
Do not install the battery cartridge forcibly.
- If the cartridge does not slide in easily, it is not being inserted correctly.
Hold the tool and the battery cartridge firmly when installing the battery cartridge.
Insert a battery securely along the groove of the robotic cleaner as far as it will go. As the battery is locked completely, it clicks.
NOTICE
When installing a battery, be careful not to get your fingers caught in between the robotic cleaner and the battery.
How to remove
WARNING
When you remove a battery, be sure that the power of the robotic cleaner is off. Do not remove a battery when the robotic cleaner is in the standby state. (See "Turning the power on/off" on page 15.)
- Removing a battery with the power on can cause failure.
Hold the tool and the battery cartridge firmly when removing the battery cartridge.
Lift the battery while operating the button of the battery.
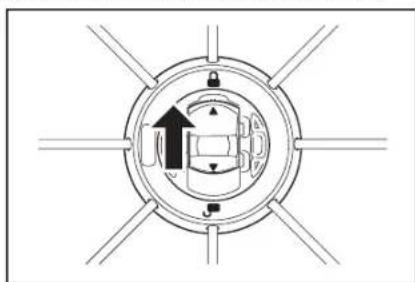
Turning the power on/off
- As the power is turned on, the robotic cleaner enters the stand-by state. In the stand-by state, it is possible to do cleaning, change settings, and establish connection to the app.
- If the robotic cleaner, remote control, or the app have not been operated for approximately 30 minutes in the standby state, the power will shut off. (If the smartphone connection lamp is lit in the above case, the power will not shut off.)
- Turn off the power at the end of operation and at the time of storage.
- When the robotic cleaner is in the sleep state, communication from the app is not possible.
- When the power of the robotic cleaner is off, the robotic cleaner cannot be operated from the remote control or the app.
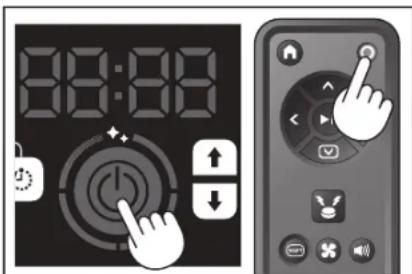
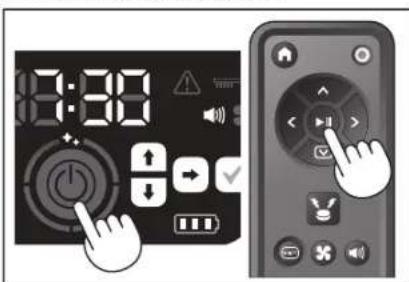
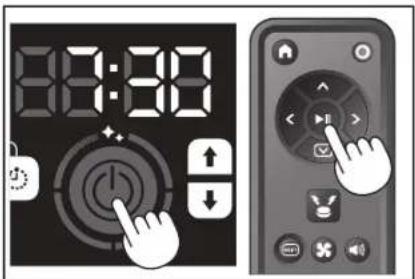
How to turn on the power
- With the power of the robotic cleaner off, press the start/stop button of the robotic cleaner.
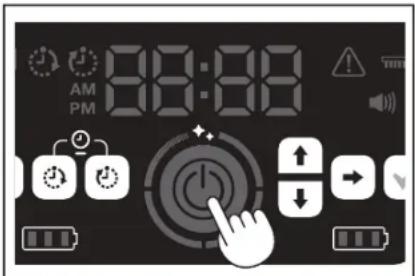
- Wait without operating until the time is displayed.
When the robotic cleaner is used for the first time, time setting is necessary first. Set the time of day. (See page 22.)
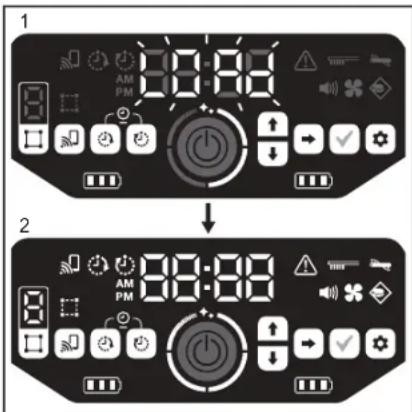
- [LOAd] flashes in the time indicator, and the four clean level lamps turn on and off clockwise. The switching speed of the lamps increases as the startup progresses.
- After all the lamps are lit, the robotic cleaner startup is complete (standby state).
How to turn off the power
Hold down the start/stop button of the robotic cleaner, or press the power OFF button of the remote control.
As the power is turned off completely, the display and lamps of the robotic cleaner turn off. Therefore, wait without removing the batteries.
When finished using the robotic cleaner, or when storing it, turn off the power and remove the batteries.
NOTICE
Do not remove the batteries before the power is turned off completely (before the display and lamps turn off). The saved map information and cleaning history may be deleted.
How to read the battery power lamp of the robotic cleaner
| State of the battery power lamp | Remaining battery capacity |
| About 60 % or more | |
| About 20 to 60 % | |
| Less than about 20 % | |
| No remaining capacity No battery installed |
The remaining capacity is a rough indication and can vary depending on the operating conditions, room temperature, battery type, and battery power consumption, etc.
What to set up before cleaning
Before cleaning, make settings for the robotic cleaner as required.
Switching the vacuum fan on/off
In the case of cleaning of visible large dust only, turning off the vacuum fan allows the running time to be longer. For how to switch the vacuum fan on/off, refer to page 18.
Switching the sound setting on/off
When the sound setting of the robotic cleaner is off, the robotic cleaner cleans silently. (See page 22.)
Setting the boundary-sensing feature
With the boundary-sensing feature on, the robotic cleaner recognizes magnetic boundary line set up on a floor surface. Magnetic boundary line serves as a boundary line, and the robotic cleaner does not go beyond the magnetic boundary line; that is, the running area can be limited. For how to set the boundary-sensing feature, refer to page 20.
How To Use
Cleaning
The robotic cleaner works in three ways:
- free cleaning mode, which does not require map registration.
- mapping cleaning mode (see "Cleaning a room with mapping" on this page), which requires room information to be registered for cleaning, and
- manual operation using the remote control.
- Free cleaning mode is recommended for cleaning in various rooms or in an environment that involves frequent, significant layout changes.
- For a room that cannot be adequately lighted at the time of mapping, use free cleaning mode.
- If the remaining battery charge of the robotic cleaner gets low, the robotic cleaner suspends cleaning and returns to the location cleaning started.
Cleaning a room with the remote control
The robotic cleaner can be operated for cleaning by pressing the action buttons of the remote control.
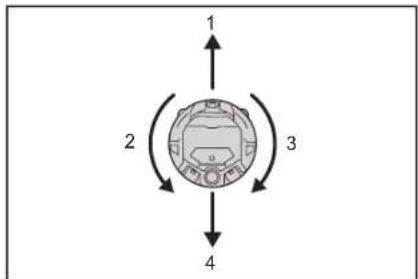
- Move forward: Press

- Turn left: Press

- Tum right: Press

- Move backward: While holding down


NOTICE
- Do not operate the robotic cleaner in a narrow or uneven place.
- When operating the robotic cleaner with the remote control, be careful to avoid collisions or falls.
- If there is an obstacle in front of the moving robotic cleaner, the robotic cleaner reverses to avoid it.
Cleaning a room without mapping (free cleaning mode)
- Place the robotic cleaner beside a wall of the place that you want to clean.
- Put the robotic cleaner into the stand-by state. (See page 15.)
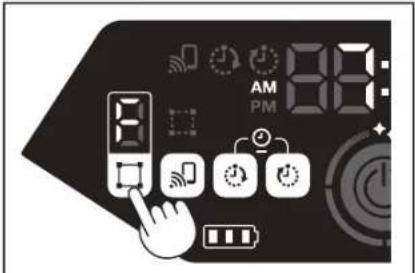
- Press the mode switch button to select [F] (free cleaning mode). Each time the mode switch button is pressed, the displayed character is changed in the order "F, 1, 2, 3, 4, 5, F,..." (each number represents a room number).
- As the start/stop button is pressed, the robotic cleaner produces a sound and starts cleaning. (When the sound setting is on)
-
As the robotic cleaner determines that cleaning is finished, the robotic cleaner returns back to the place from which it started cleaning.
-
When the sound setting is on, completion of cleaning is informed with a sound. (See page 22.)
- The robotic cleaner calculates its own position using the LiDAR sensor and camera sensor. For the camera sensor to function fully, it is recommended to make the room brighter for cleaning. If the room is dark, the robotic cleaner may not be able to clean some area or may fail to return back to the place from which it started cleaning.
Cleaning a room with mapping
Registering room information (mapping)
- When the rooms to clean are already determined, registering room information (registration of mapping information) in the robotic cleaner allows the cleaning to be more efficient. After completion of mapping, it becomes possible to check the cleaning result and set prohibited areas from the app.
The number of rooms that can be registered is five.
Make the room brighter during mapping. - Keep away from the robotic cleaner during mapping.
- Do not pick up the robotic cleaner during mapping.
-
The mapping fails if there are no obstacles with a height of 25cm or more within a radius of about 11m of the robotic cleaner. In this case, cleaning in free cleaning mode is recommended. (See "Cleaning a room without mapping (free cleaning mode)" on this page)
-
Place the robotic cleaner in the place from which you want the robotic cleaner to start cleaning.
-
This starting location will be a location for cleaning to start.
- It is recommended to set the starting location near a wall, a corner of the room, or other point that is easy to identify.
-
Keep a distance of about 30~cm from a wall.
-
Put the robotic cleaner into the stand-by state. (See page 15.)
-
Select an unmapped room number by pressing the mode switch button.
-
[F] is free cleaning mode. (See "Cleaning a room without mapping (free cleaning mode)" on this page.)
- Unmapped room numbers will be displayed blinking, and the room register lamp will be on.
- Mapped room numbers will be displayed lit, and the room register lamp will be off.
-
As the start/stop button is pressed, the robotic cleaner starts mapping. After mapping, the robotic cleaner goes back to where mapping began (starting point of cleaning) and then completes room registration.
-
Upon completion of mapping, the robotic cleaner enters the stand-by state. It may take time for the robot cleaner to enter the stand-by state. Do not turn off the power in this case.
-
When the sound setting is on, completion of mapping is informed with a sound.
-
If the mapping is unsuccessful, add the mapping information manually using the app. (See page 39.)
Cleaning mapped rooms
- In mapping cleaning mode, the robotic cleaner works so that mapped rooms are cleaned more efficiently.
-
The use of mapping cleaning mode requires mapping information to be registered. (See "Cleaning a room with mapping" on page 16.)
-
Place the robotic cleaner at the starting point for mapping. Place the robotic cleaner with the same orientation as at the start of mapping as much as possible. This allows the robotic cleaner to start cleaning more smoothly.
- Put the robotic cleaner into the stand-by state. (See page 15.)
- Select a mapped room number by pressing the mode switch button.
[F] is free cleaning mode. (See page 16.) - Unmapped room numbers will be displayed blinking, and the room register lamp will be on.
- Mapped room numbers will be displayed lit, and the room register lamp will be off.
- Press the start/stop button to begin cleaning.
-
As cleaning ends, the robotic cleaner goes back to where it started cleaning.
-
The clean level lamp indicates what proportion of the whole room has been cleaned.
- When the sound setting is on, completion of cleaning is informed with a sound. (See page 22.)
- If the target cleaning area is too wide to clean all at once, we recommend using the [Continuous Cleaning] setting. (See page 43.)
How to read the clean level lamp
The clean level lamp informs you of the percentage cleaned area in the surface area of the mapped room.
| Clean level lamp status Percentage of completed cleaning area | |
| 90 % or more | |
| 75 % to less than 90 % | |
| 50 % to less than 75 % | |
| 25 % to less than 50 % | |
Deleting mapping information
- Put the robotic cleaner into the stand-by state. (See page 15.)
- Select the room number for which you want to delete mapping information by pressing the mode switch button.
Each time the mode switch button is pressed, the room number is changed in the order "F, 1, 2, 3, 4, 5, F,..." (For [F], deletion of mapping information is not possible since [F] is free cleaning mode.) - A mapped room number will illuminate on the display.
- When the mode switch button is held down, [dEL] is shown for about 10 seconds in the time indicator.
- Press the confirmation button while [dEL] is shown.
- If the confirmation button is not pressed while [dEL] is shown, the robotic cleaner goes back to the stand-by state.
- When mapping information is deleted, the selected room number will blink and become unregistered.
Suspending or ending cleaning
- If the start/stop button is pressed during operation, the robotic cleaner comes to a temporary stop.
If the start/stop button is pressed again, the robotic cleaner starts operating again in the same operating mode as before stopping.
- To quit cleaning during cleaning, press the starting point button of the remote control when the robotic cleaner is in operation or in a temporarily stopped state. The robotic cleaner goes back to where it started cleaning and then enters the stand-by state.
- To quit cleaning immediately, press the mode switch button while the robotic cleaner is in a temporarily stopped state. Then, the robotic cleaner enters the stand-by state.
- When cleaning is ended without going back to the starting point, the cleaning history may not be saved correctly.
Switching the vacuum fan on/off
- When cleaning visible, large dust only, turning off the vacuum fan makes the running time about twice as long.
-
The vacuum fan can be set also from the remote control or the app. (See "Switching the vacuum fan on/off" on this page and "Operating the robotic cleaner with the app" on page 36.)
-
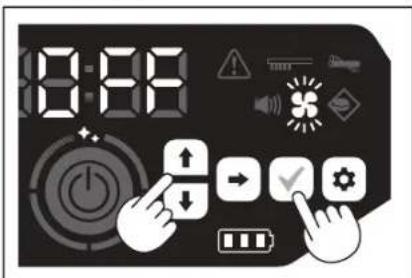
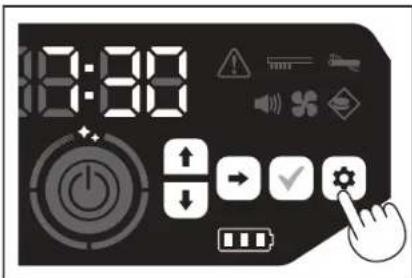
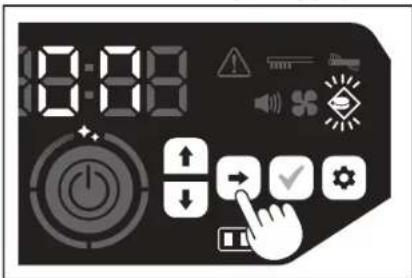
With the robotic cleaner set in the stand-by state, press the setting button to enter the setting selection mode.
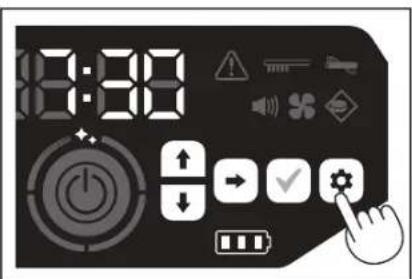
- Press the next button to make the vacuum fan lamp blink.
-
The up/down button can be used to switch between On and Off. After selecting On or Off, press the confirmation button to finalize the setting.
-
On: Vacuum fan lamp turns on.
- Off: Vacuum fan lamp turns off.
NOTICE
With the vacuum fan setting off, the filter care lamp does not light up even when the filter is clogged.
Switching the vacuum fan on/off with the remote control
With the robotic cleaner set in the stand-by state, the vacuum fan can be switched on or off by pressing the vacuum fan ON/OFF button of the remote control. Even during cleaning, the fan can be switched on or off from the remote control.
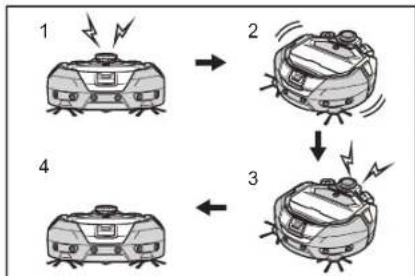
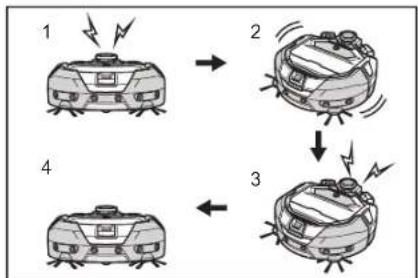
Using the location beacon function
- The robotic cleaner notifies of its own location with a buzzer sound and light. This function is used when the robotic cleaner cannot be found because it is cleaning a wide area or has entered a place where it cannot be found.
- As the location beacon buzzer/light button of the remote control is pressed, a buzzer sounds for about 10 seconds, with the position LED blinking.
- To stop the location beacon function halfway, press the location beacon buzzer/light button again.

NOTICE
The location beacon function cannot be used in the following cases.
- When the power of the robotic cleaner is off.
- When no battery capacity remains.
- When the robotic cleaner is in a position where radio waves do not reach.
- When the battery in the remote control is exhausted.
- Although the location beacon function can be used also from the app, your smartphone and the robotic cleaner must be connected in advance. When the robotic cleaner is in the sleep state, the function cannot be used from the app.
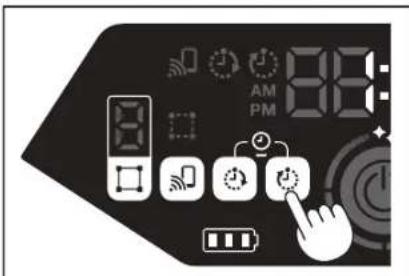
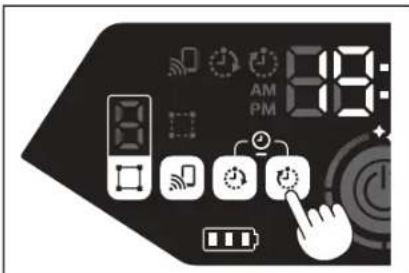
Using the ON timer/OFF timer
The ON timer and OFF timer can be used at the same time.
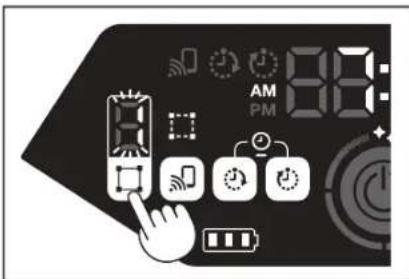
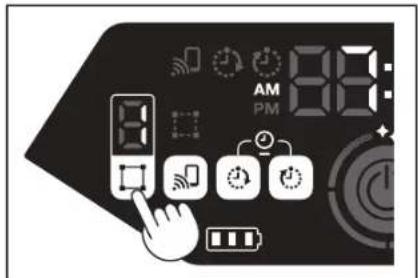
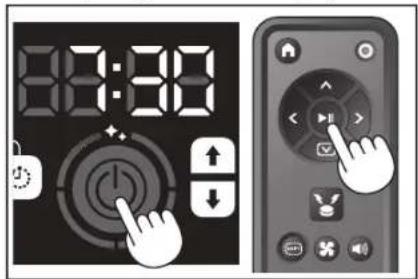
Setting the ON timer
When a preselected time comes, the robotic cleaner starts cleaning in the selected cleaning mode. Before setting the timer, set the time of day. (See page 22.)
-
Put the robotic cleaner into the stand-by state. (See page 15.)
-
Hold down the ON timer button to change the time setting of the ON timer.
-
The changing procedure is the same as the time setting procedure (See page 22).
- The ON timer can be configured in increments of 10 minutes.
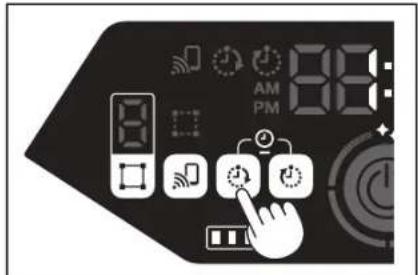
- Press the confirmation button to finalize the time of day.
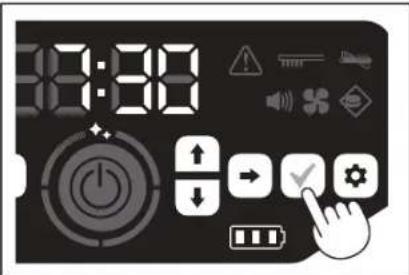
Using the ON timer
-
Press the ON timer button to enable the ON timer function. The ON timer lamp lights up and the setting time blinks twice.
-
To cancel the ON timer function, press the ON timer button again to turn off the ON timer lamp.
- Select the operating mode of the robotic cleaner. (See pages 16 and 17.)
- As the start/stop button is pressed, cleaning by the ON timer function is reserved. (Sleep state) To cancel the ON timer function in the sleep state, press the start/stop button again to put the robotic cleaner into the stand-by state. To see the setting time after reservation, press any button except the start/stop button. Then, the setting time will light up for 3 seconds.
NOTICE
- The reserved information is canceled when the power is turned off or the remaining battery capacity is completely lost.
- When the batteries are low, the robotic cleaner cannot wait for operation by ON timer reservation. For operation by ON timer reservation, it is recommended to bring the batteries to full charge.
- Operation by ON timer reservation is not possible when the power is turned off.
- When the ON timer is set, the operatable time will be somewhat reduced because the robotic cleaner consumes the battery during the sleep state.
Example of use: Make the robotic cleaner clean automatically in the morning. (Set the ON timer at 7:30, and the OFF timer at 9:00.)
- Starts up at 7:30. (ON timer) 2. Cleaning 3. Finishes cleaning at 9:00. (OFF timer) 4. Returns to the starting point.
During adjustment of the hours/minutes, holding down the up/down button results in the hours/minutes changing quickly.
- When the time setting of the timer is already completed, you only have to follow the procedure for "Using the ON timer" on this page.
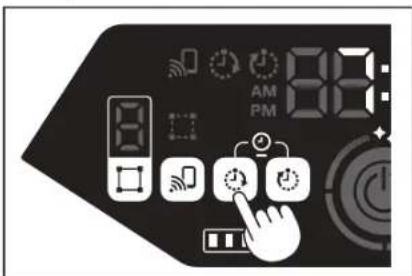
Setting the OFF timer
As a preselected time comes after the start of cleaning, the robotic cleaner ends cleaning and goes back to the starting point. Before setting the timer, set the time of day. (See page 22.)
- Put the robotic cleaner into the stand-by state. (See page 15.)
- Hold down the OFF timer button to change the time setting of the OFF timer.
The changing procedure is the same as the time setting procedure (See page 22).
The OFF timer can be configured in increments of 10 minutes.
- Press the confirmation button to finalize the time of day.

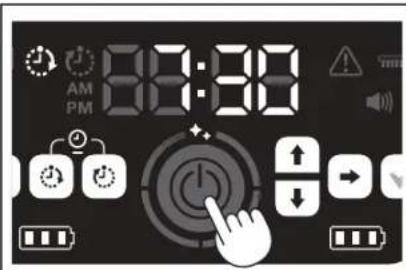
Using the OFF timer
Press the OFF timer button to enable the OFF timer function.
The OFF timer lamp lights up and the setting time blinks twice.
- To immediately start cleaning and use the OFF timer, select the cleaning mode and start cleaning.
To use the OFF timer in combination with the ON timer, refer to page 18. - To cancel the OFF timer, press the OFF timer button again when the robotic cleaner is in the stand-by state.
NOTICE
- The OFF timer setting is disabled when the power is turned off or the remaining battery capacity is completely lost.
- When the remaining battery capacity is low, the robotic cleaner may stop operating before the setting time of the OFF timer.
- Depending on the cleaning environment, it can take time for the robotic cleaner to return back to the starting point. In this case, set an earlier time for the OFF timer.
- Example of use: Make the robotic cleaner clean automatically only for 30 minutes in the evening. (Set the ON timer at 19:00, and the OFF timer at 19:30.)
-
Starts up at 19:00. (ON timer) 2. Cleaning 3. Finishes cleaning at 19:30. (OFF timer) 4. Returns to the starting point.
-
When adjusting the hours/minutes, holding down the up/down button results in the hours/minutes changing quickly.
- When the time setting of the timer is already completed, you only have to follow the procedure for "Using the OFF timer" on page 19.
Controlling the cleaning range
WARNING
Do not use magnetic boundary line as a boundary line of an area where an accident can possibly happen due to intrusion or fall.
- Doing so can cause an accident or injury due to intrusion or fall of the robotic cleaner.
For an area with a risk of intrusion or fall of the robotic cleaner, place an object serving as a wall with a height of 25cm or more (an object that does not move or fall over when hit by the robotic cleaner) on a flat surface.
- The cleaning range can be limited by attaching magnetic boundary line (sold separately) on a floor surface to make a boundary line. The robotic cleaner detects and avoids magnetic boundary line.
- Set the cleaning range for the robotic cleaner in the following cases.
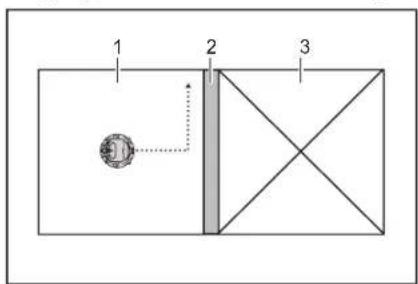
-
Cleaning area 2. Magnetic boundary line 3. Area in which you do not want the robotic cleaner to run
-
When you want to divide a space that is too large to clean at one time into multiple areas for cleaning.
- When there is an area that you do not want the robotic cleaner to enter.
- When there is an area that the robotic cleaner can enter but cannot leave.
- When the robotic cleaner climbs over a low step but falls from it,
-
When the robotic cleaner gets caught in the middle of a step.
-
Lay magnetic boundary line with the following points in mind.
-
Be sure to lay the magnetic boundary line without any gap between it and the floor surface.
- Lay the magnetic boundary line about 15cm away from the area that you do not want the robotic cleaner to enter.
- Place the magnetic boundary line on a floor surface that is as flat as possible so that it does not become unsteady. Not doing so can cause the robotic cleaner to displace the line and fail to recognize the line correctly.
- The robotic cleaner may not recognize a magnetic boundary line placed on a concave or stepped surface.
-
Make sure that the magnetic boundary line is a genuine product. If it is not a genuine product, performance and safety cannot be guaranteed.
-
Some floor surfaces may become dirty. Check the suitability properly before use.
-
Depending on the floor surface and operating environment, the magnet sensor for boundary sensing is likely to fail to recognize magnetic boundary line, or magnetic boundary line is likely to become dirty or tom. Check the suitability property before use.
-
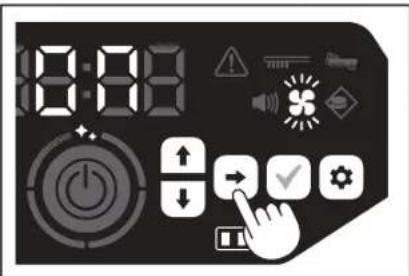
With the robotic cleaner set in the stand-by state, press the setting button to enter the setting selection mode.
- Press the next button to make the boundary-sensing lamp blink.
-
The up/down button can be used to switch between On and Off. After selecting On or Off, press the confirmation button to finalize the setting.
-
On: Boundary-sensing lamp turns on.
- Off: Boundary-sensing lamp turns off.

NOTICE
- The boundary-sensing feature is based on recognition of magnetic boundary line by a magnetic sensor. If there is tearing, lifting, etc. on the magnetic boundary line, the line may not be recognized.
Periodically check for tears, positional deviation, and other problems of magnetic boundary line. If there is a problem such as tears, replace the line with new line.
The boundary-sensing feature may activate near a magnetic object. When you do not want the boundary-sensing feature to work, disable the boundary-sensing feature. - In a place where people and things come and go frequently, magnetic boundary line is stepped on and damaged. If the line deteriorates, replace it with a new line.
- Depending on the floor material, it is recommend to paste the magnetic boundary line onto the floor because the robotic cleaner may move the magnetic boundary line when detecting it.
The magnetic boundary line can be cut with scissors.
How to attach, remove, and use separately sold items
Refer to the pages listed below for how to attach, remove, and use separately sold items.
| Separately sold items Reference page | Remarks | |
| Magnetic boundary line 20 - | ||
| Main brushSoft main brush | 25 The handling procedure is the same as for the supplied main brush. | |
| HEPA filter 24 Same as the supplied HEPA filter. | ||
| Side brushSoft side brush | 25 The handling procedure is the same as for the supplied side brushes. | |
| Battery 14 - | ||
| Main brush cover 25 Same as the supplied cover. | main brush | |
| Bumper cushion - An anti-scratch cushion to be attached to the robotic cleaner to protect the objects. | ||
How to dispose of garbage
WARNING
Be sure to turn off the power and remove the batteries from the robotic cleaner before opening the top cover of the robotic cleaner.
-
If a battery is left inserted in the robotic cleaner, electric shock or injury may result.
-
Pressing the open button ( ) opens the top cover. Be careful because the top cover opens quickly.
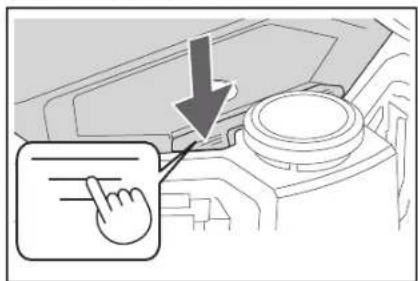
- Remove the dust box. Do not hold the dust box with its opening facing downward. Doing so can cause dust to fall from the opening.
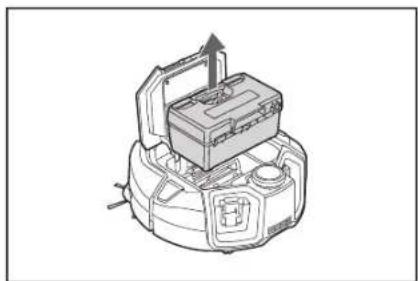
- Release the two locked parts to open the top cover.
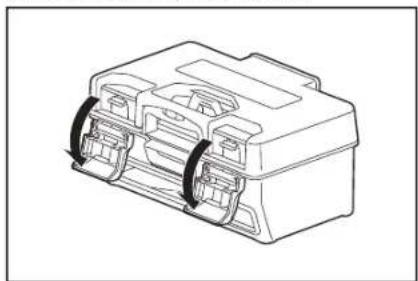
- Take out the dust case. Be careful not to open the top cover on the filter side.

- Disposc of garbage in the dust case and dust box, then remove dirt and dust in the filter. If the filter is too dirty, remove the filter and wash it with water. (See page 24.)
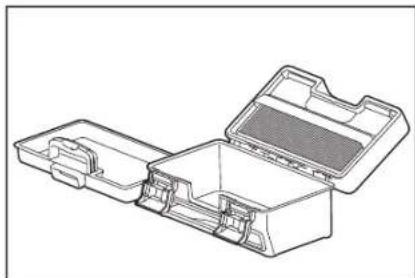
- Put the dust case back in the dust box. Then, close the top cover and lock the two locking parts.
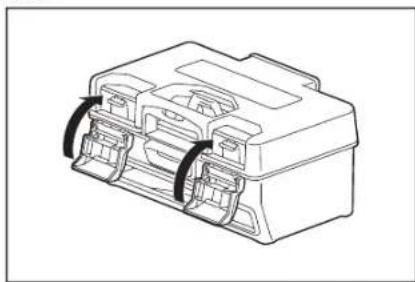
- Put the dust box back in the robotic cleaner and push the top cover to close until it clicks. When closing the top cover, be careful not to get your fingers caught.

NOTICE
- At the end of every cleaning, discard the garbage and care for the filter. If you continue cleaning without discarding garbage, the filter will get clogged and the suction power decreases.
- Correctly attach the dust box and the filter.
Setting the Robotic Cleaner
Setting the time of day
When using for the first time, start by setting the time of day.
- Using the up/down buttons, select the display format from [AM], [PM], or no distinction (in 24-hour notation), then press the next button to accept the selection. As the next button is pressed, the hours will blink.
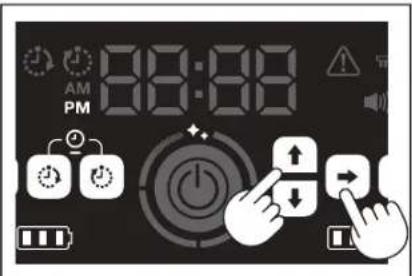
- Select the hours using the up/down buttons, then press the next button to accept the selection. As the next button is pressed, the minutes will blink.
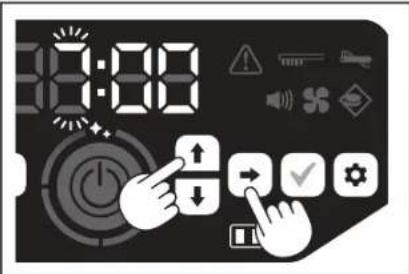
- Select the minutes using the up/down buttons, then press the next button to accept the selection.
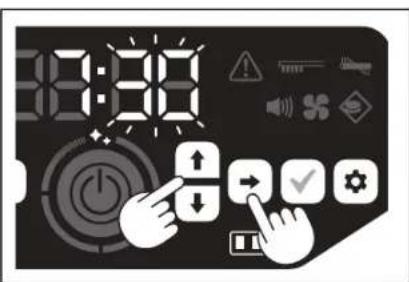
- Press the confirmation button to finalize the time of day.
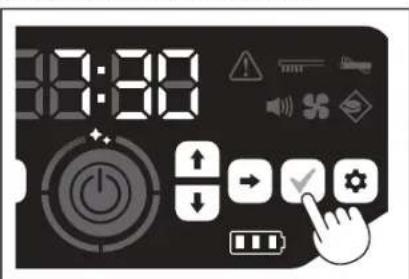
NOTICE
-
During adjustment of the hours/minutes, holding down the up/down button results in the hours/minutes changing quickly.
-
When the robotic cleaner is not used for a long period of time, the time setting may become inaccurate due to the storage temperature or may be reset if the built-in battery power loses its charge.
Setting the time of day again
When the robotic cleaner is not used for a long period of time, the time setting will be inaccurate or reset.
When you connect the robotic cleaner to a smartphone using the app, the time of day on the smartphone is automatically set on the robotic cleaner.
If you want to set the time of day manually, perform the following procedure.
- Put the robotic cleaner into the stand-by state. (See page 15.)
- Hold down the ON timer button and OFF timer button simultaneously to make the time format [AM] or [PM] blink (does not blink when the previous setting was 24-hour notation).
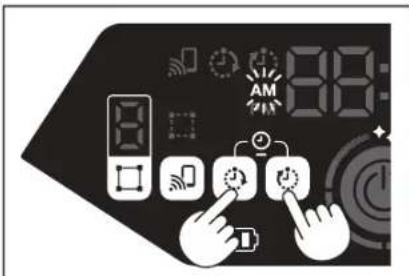
- Set the time of day by following the "Setting the time of day" on this page from step 1.
Setting up Wi-Fi® (robotic cleaner and smartphone)
- To operate the robotic cleaner from the app, make Wi-Fi® settings for the app and robotic cleaner. (See page 33.)
- Install the app in your smartphone in advance.
- The robotic cleaner serves as the access point for the smartphone. When a smartphone is connected to the robotic cleaner, the smartphone will not be connected to any network other than the robotic cleaner.
- To connect a smartphone to the robotic cleaner, press the smartphone connection button to enable the Wi-Fi.
- When not using Wi-Fi, press the smartphone connection button to turn off the smartphone connection lamp.
- Multiple robotic cleaner can be managed with one app. In this case, establish wireless connection with the app one by one.
Making a sound setting
-
You can select whether the robotic cleaner makes sounds or not.
This sound setting is also possible from the remote control. -
With the robotic cleaner set in the stand-by state, press the setting button to enter the setting selection mode.
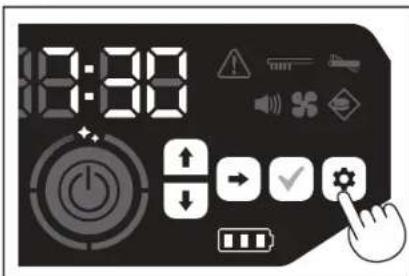
- Press the next button to make the sound lamp blink.
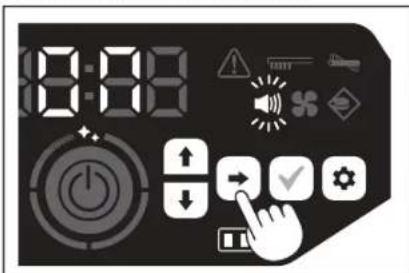
-
The up/down buttons can be used to switch between On and Off. After selecting On or Off, press the confirmation button to finalize the selection.
-
On: Sound lamp turns on (sound enabled).
- Off: Sound lamp turns off (sound disabled).
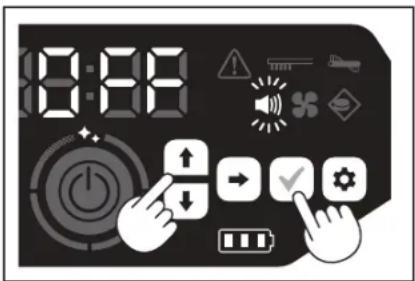
NOTICE
Even if the sound setting is off, the robotic cleaner can sound to notify of an error, etc.
Switching the sound setting on and off with the remote control
With the robotic cleaner set in the stand-by state, pressing the sound ON/OFF button of the remote control allows the sound setting to be switched between on and off.
The sound setting can be switched on and off even during cleaning if it is set from the remote control.
Resetting the settings
You can reset the settings of the robotic cleaner to the factory defaults.
- Put the robotic cleaner into the stand-by state. (See page 15.)
- Hold down the down button and the setting button. [dEL] is displayed on the time indicator, and the icons and lamps other than the error lamp blink.
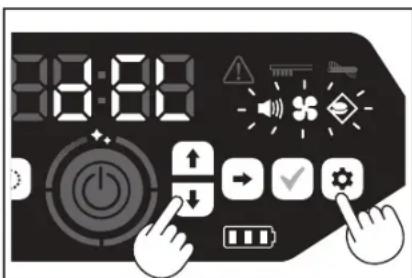
-
Press the confirmation button while [dEL] is displayed (about 10 seconds).
-
If the confirmation button is not pressed while [dEL] is displayed, the robotic cleaner goes back to the stand-by state.
- When the robotic cleaner is executing the reset process, the icons and lamps other than the battery power lamp turn off. Although the robotic cleaner will not work at this time even if you press the buttons on the operation panel, do not touch the buttons. In addition, do not remove the batteries.
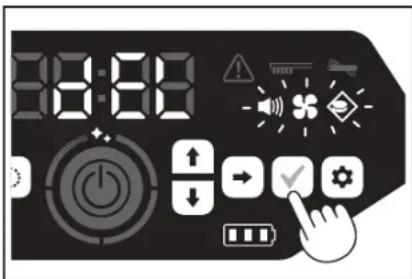
- Upon completion of the reset process, a restart is performed and then the time-of-day setting screen appears.
Pairing the robotic cleaner and the remote control
When the remote control is replaced with a new one, establish a pairing of the robotic cleaner and the remote control.
- Hold down the smartphone connection button and the setting button simultaneously to make [PAIr] appear on the time indicator. [PAIr] is displayed for 10 seconds.
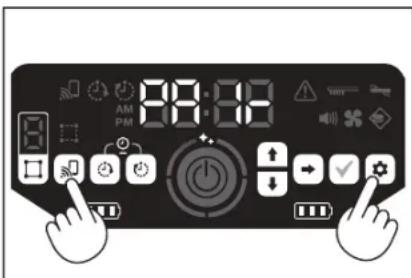
- During the period when [PAIr] is displayed, simultaneously press the action button (down) and the sound ON/OFF button of the remote control. When pairing is successful, the robotic cleaner issues two short beeps and returns to the standby state.
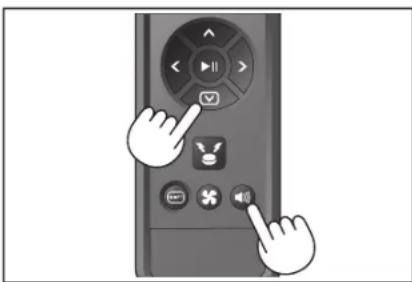
NOTICE
If pairing fails, an error sound is made.
- If the robotic cleaner cannot receive a signal from the remote control during the period when [PAIr] is displayed, the robotic cleaner goes back to the stand-by state.
Care
WARNING
Be sure to turn off the power and remove the batteries from the robotic cleaner before caring for the robotic cleaner.
- If a battery is left inserted in the robotic cleaner, electric shock or injury may result.
CAUTION
To keep optimum performance, periodically perform the maintenance mentioned in this section. If there is a problem, stop using the robotic cleaner and ask the shop from which you made a purchase or our sales office to do inspection and repair.
Maintenance
Caring for and replacing the dust box and the filter
- When the suction power of the robotic cleaner goes down, when the dirt is noticeable, or when the filter care lamp lights up, remove the filter and wash it with water.
- Lay down newspaper or something before caring.
-
Do not use chemicals or hot water with a temperature of 40^ ( 104^ ) or more.
-
Dispos of garbage following steps 1 to 5 of "How to dispose of garbage". (See page 21).
- Put the dust case back in the dust box and close the top cover of the dust box.
- Unhook the hook and open the filter-side top cover.
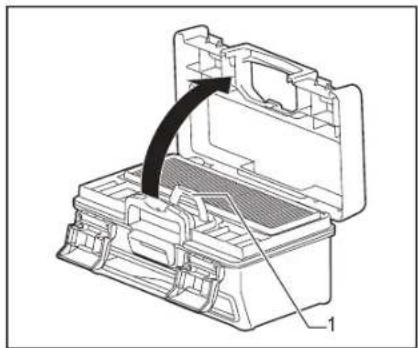

1.Hook
- Remove the filter from the dust box.
When removing the filter, do so slowly to avoid raising dust.
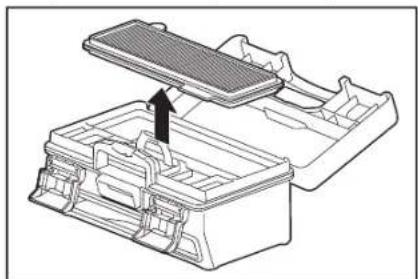
-
Let dirt and dust fall with light taps on the filter.
-
Do not scrub the filter hard or press it down with fingers.
- Do not use a sharp-pointed object (such as a toothpick), which can be a cause of breakage.
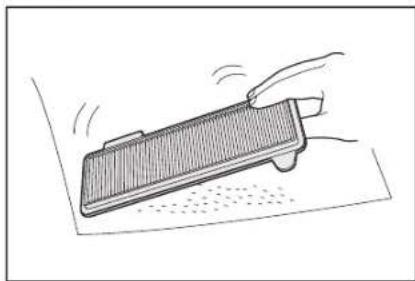
- When the suction power of the robotic cleaner is weak, wash the filter with water.
If the smell bothers you, let the filter stand in diluted neutral detergent for about three hours and then wash it with water.
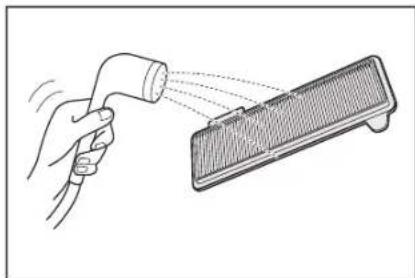
- When the dirt of the dust box is noticeable, wash it with water or diluted neutral detergent.
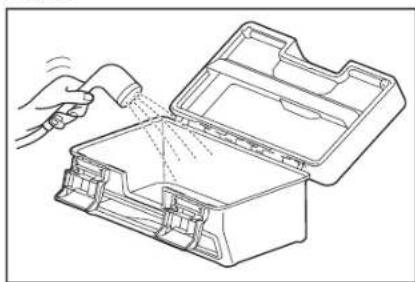
-
When you have washed the filter or the dust box with water, dry it sufficiently in a well-ventilated place out of direct sunlight.
-
Using parts without drying them properly may cause a reduction in suction power, as well as a reduction in motor life.
- Using parts while moisture remains on them may cause an odor or failure.
The drying time should be about one day. -
Avoid drying with a dryer, a blower, etc.
-
Attach the filter to the dust box.
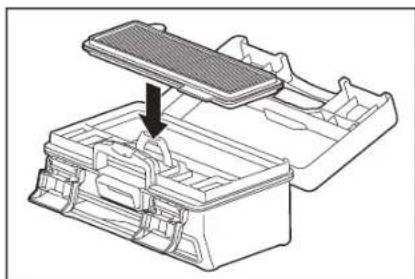
- Close the filter-side top cover and make sure that the hook is hooked. Then, lock the two locking parts.
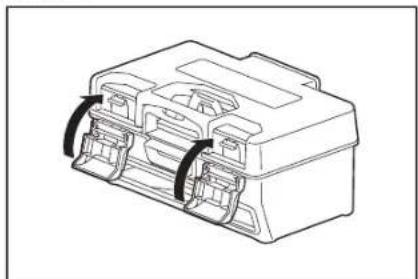
- Put the dust box back in the robotic cleaner and push the top cover to close until it clicks. When closing the top cover, be careful not to get your fingers caught.

NOTICE
- Do not use the robotic cleaner with the filter removed. Do not use the robotic cleaner with the filter damaged or dirty.
- The filter can be washed with water. Wash away the dust with water at regular intervals (every one to two months).
- When the filter deteriorates, replace it with a new filter.
The filter is a consumable and thus it is recommended to prepare a spare. - Do not damage the filter by scouring it with a hard object such as a brush or a spatula.
- Do not clean the HEPA filter with an air blower or a pressure washer because it is easily damaged.
Precautions to take when caring for the underside of the robotic cleaner
Take out the dust box before performing maintenance. (See page 21.) Not doing so can cause dust to fall from the opening.
- Turn the robotic cleaner upside down before caring for the side brushes, main brush, underside of the robotic cleaner, and wheels.
- During maintenance, lay a thick mat or something so that the robotic cleaner and the floor surface are not damaged and so that the LiDAR sensor is not subjected to pressure.
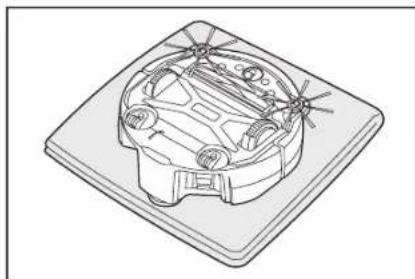
- Do not press the undersurface of the robotic cleaner hard with the robotic cleaner turned upside down. Pressing it hard can cause damage to the robotic cleaner.
Caring for and replacing the side brushes
- If an error indication (see page 28) is made, or dust and hair are caught in a side brush, care for the side brush.
- When the bristles of a side brush are bent or fall out, replace it with a new one.
-
When a side brush does not rotate or is hard to rotate, remove the side brush and then care for it.
-
Tum the robotic cleaner upside down on a mat, etc.
-
Slide the lock lever of the side brush to (release mark).
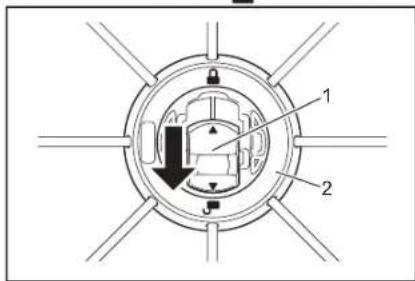
1.Lock lever 2.Side brush
- Remove the side brush.
- Remove hair and dust caught in the side brush using tweezers or other tools.
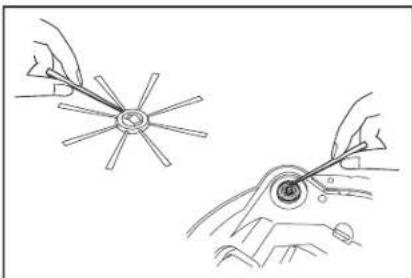
- Attach the side brush to the robotic cleaner. (See page 13.)
Caring for and replacing the main brush
- If an error indication (see page 28) is made, or dust and hair are caught in the main brush, care for the main brush.
- If the bristles of the main brush wear and are becoming shorter, replace the main brush.
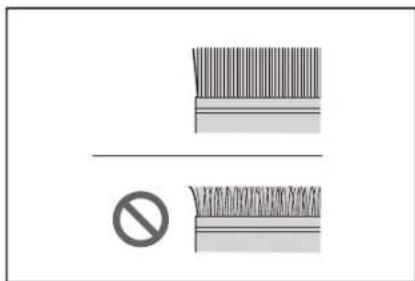
- Turn the robotic cleaner upside down on a mat, etc.
- Unhook the hooks of the main brush cover.
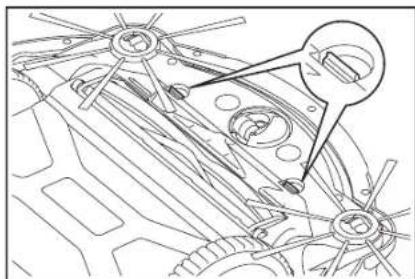
- Remove the main brush cover. Do not disassemble the main brush cover.
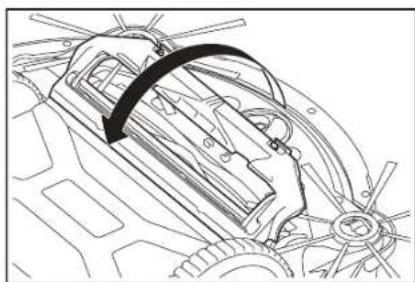
- Remove the main brush.
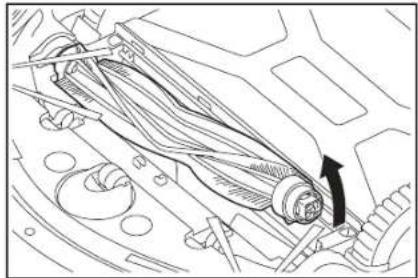
- Care for the main brush, main brush cover, main brush housing, and joints as described below.
| Part How to care | |
| Main brush Remo | ove the bearing cap attached to the main brush and get rid of the trapped dust.For trapped hair and lint, cut them short along the bristles of the brush with scissors and then remove them. For clinging dust, wash it away with water. |
| 1.Bearing cap | |
| Main brush cover | Wipe it clean with a cloth dampened with water or diluted neutral detergent. If the dirt is noticeable, wash it away with water. |
| Main brush housing | Wipe it clean with a cloth dampened with water or diluted neutral detergent.It cannot be washed with water. |
| Joints For the joints | attached to the robotic cleaner, loosen the screw with a screwdriver while holding the joint by hand. After that, pick the joint up.Remove dust caught inside the robotic cleaner.1Joint 2.Screw |
NOTICE
Do not use thinner, benzine, alcohol, etc. because they can be a cause of deterioration or discoloration.
-
Parts washed with water should be dried sufficiently in a well-ventilated place out of direct sunlight.
-
Using parts without drying them properly may cause a reduction in suction power, as well as a reduction in motor life.
- Using parts while moisture remains on them may cause an odor or failure.
The drying time should be about one day. -
Avoid drying with a dryer, a blower, etc.
-
Put the bearing cap back to the original position in the main brush.
-
Fasten the joints to the robotic cleaner using screws.
-
Attach the main brush so that the shape of the main brush holder fits the groove of the joints of the robotic cleaner.
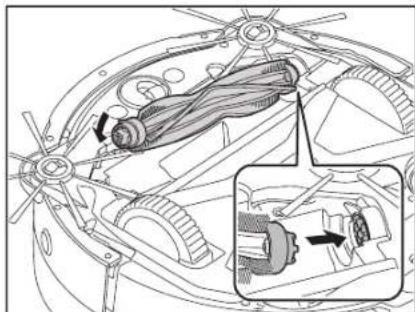
- Rotate the bearing cap to align the orientation, then insert it into the robotic cleaner.
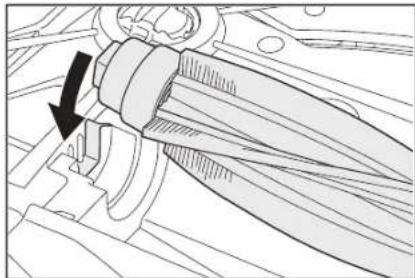
-
Attach the main brush cover (push the hook in until it clicks).
-
Be careful not to get a side brush caught in the main brush cover.
- Make it easier to avoid catching the side brushes by removing the side brushes temporarily or by attaching the main brush cover while rotating the side brush in the direction shown in the figure.
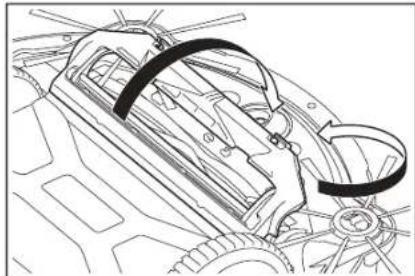
Caring for wheels
- Care for wheels when dust and hair get caught in them.
- Do not remove wheels from the robotic cleaner.
- Get rid of dust caught in the casters. If it is hard to get rid of, use fine-tipped scissors, tweezers, etc.
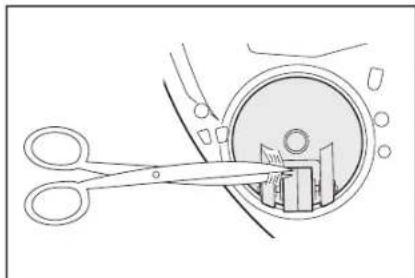
- Remove dirt on both drive wheels while rotating them. In this time, be careful not to get your hand caught.
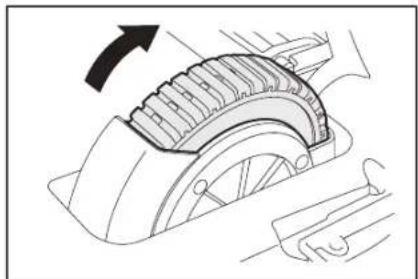
Caring for the robotic cleaner
NOTICE
- Do not use thinner, benzine, alcohol, etc. because they can be a cause of deterioration or discoloration.
- Do not use a sharp-pointed object (such as a toothpick) because it can be a cause of breakage or damage.
Follow the table below in caring for parts of the robotic cleaner.
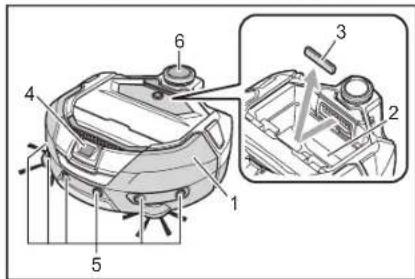
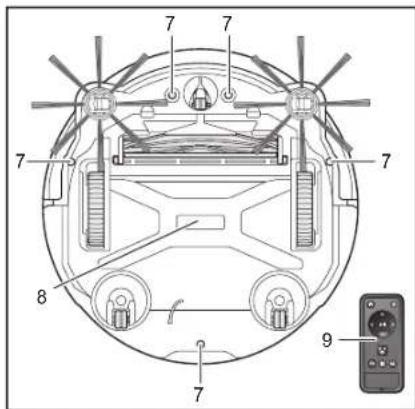
| Number | Part How to care | |
| 1. Robotic | cleaner surface Wipe it clean | with a cloth dampened with water or diluted neutral detergent. |
| 2. Interior | of the robotic cleaner (dust box housing) | Wipe it clean with a cloth dampened with water or diluted neutral detergent. |
| 3. Suction | opening sponge inside the robotic cleaner | Take out the sponge and wash away the dust on the sponge with water. |
| 4. Camera | sensor Wipe dirt off with a soft cloth or a cotton swab while being careful not to cause damage. | |
| 5. Ultrasonic | sensor Wipe it clean with a cloth dampened with water or diluted neutral detergent. | |
| 6. LiDAR | sensor Remove dust and dirt inside the cover of the LiDAR sensor. | |
| 7. Cliff sensor | sensor (5 locations) | Wipe dirt off with a soft cloth or a cotton swab while being careful not to cause damage. |
| 8. Underside of the robotic cleaner | Wipe it clean with a cloth dampened with water or diluted neutral detergent. | |
| 9. Front face of the remote control and its buttons | Wipe dirt off with a dry cloth. | |
About repair
- If it is not possible to resume operation after removing the cause of a notification or error indication (see page 28), turn the power off and then on again.
- If the same notification or error is displayed repeatedly, ask the shop from which you made a purchase or our sales office to do repair.
- Do not do repair by yourself. Be sure to ask the shop from which you made a purchase or our sales office.
- When you ask for repair, bring the robotic cleaner together with the batteries and charger.
Notification and Error Indication
When care is required or an error occurs, a red lamp lights up on the operation panel of the robotic cleaner, with the error number displayed. In addition, there can be a notification with a sound.
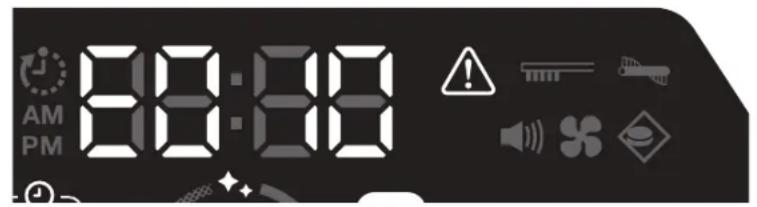
Canceling a notification and error indication
- When a notification for filter care appears, the robotic cleaner can be operated but may not work properly. Remove the cause before using the robotic cleaner.
-
When an error notification appears, the robotic cleaner stops operating. Take action as follows.
-
Check the error number and remove the cause of the error. (See "Notification of a need of care, etc." on this page.)
If you turn off the power or the power runs out due to loss of the battery capacity before removal of the error cause, the robotic cleaner cancels the error temporarily. - Pressing the start/stop button of the robotic cleaner or the remote control cancels the error indication, and the robotic cleaner enters the stand-by state.
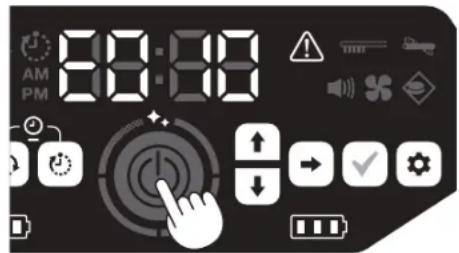
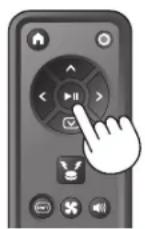
- Check that the error is cleared before using the robotic cleaner.
NOTICE
- Restart the robotic cleaner if you cannot operate the robotic cleaner after removing the cause.
If the same error appears repeatedly, ask the shop from which you made a purchase or our sales office to do repair.
Notification of a need of care, etc.
If the lamp lights up, turn off the power and remove the batteries. Then, take action as described below.
| Notified problem Cause Action | ||
| • Filter care is necessary. | Dust is accumulated or the filter is clogged. Discard the dust and | care for the filter. →See pages 21 and 24. |
| Check to see if dust is accumulated inside the robotic cleaner and at the exhaust opening. | ||
Error notification
Take action according to the error lamp and number on the indicator.
For the error codes in the list, a specific number will be displayed in place of the "X" depending on the error type. Report the error code when contacting the dealer or our sales office.
- When you check the cause or take action, turn off the power and remove the batteries as necessary before taking action.
If an error number other than those listed below is displayed, ask the shop from which you made a purchase or our sales office.
| Number | Cause Action | ||
| Notified problem | |||
| E01X Error of drive wheels | Is foreign matter such as lint or hair caught in the drive wheels? R | remove foreign matter. →See page 26. | |
| When the robotic cleaner goes through a low gap, the robotic cleaner may get caught in the gap, displaying this notification. | It is not failure. | ||
| E02X Error due to loss of a wheel or uplift of the robotic cleaner | Is a drive wheel derailed, or is a wheel separated from the ground? | Move the robotic cleaner to another place. →See page 10. | |
| E030 Error of the main brush | Is foreign matter such as lint or hair caught in the main brush? Remove foreign matter. →See page 25. | ||
| E04XError of the side brushes | Is foreign matter such as lint or hair caught in the side brushes? Remove foreign matter.→See pages 13 and 25. | ||
| E060Non-detection of the dustbox or the filter | The dust box or the filter is not attached. Check that they are attached properly.→See pages 21 and 24. | ||
| E09XCliff sensor error | Is the robotic cleaner exposed to direct sunlight? Move the robotic cleaner to another place.→See page 10. | ||
| Is the robotic cleaner on a black floor surface? | |||
| Are the cliff sensor dirty? | ·Gently wipe off the dirt on the cliff sensor with a dry, soft cloth, a cotton swab, etc. ·Check if the earthing line contacts to the ground.→See pages 8 and 10 and 27. | ||
| E10XBumper sensor error | It is a malfunction of the bumper sensor. Press the bumper with your hand about 10 times.→See page 8. | ||
| E110Motion error | Does the robotic cleaner run on a step, etc. and get stuck there? Move the robotic cleaner to another place.→See page 10. | ||
| E12XDecrease in theremaining batterycapacityTimer setting error | Is the robotic cleaner unable to start operating by ON timer reservation because the remaining battery capacity is insufficient? | When starting operation by ON timer reservation, make sure that the batteries are fully charged. | |
| E140Room setting errorLocation information error | Is the room different from the mapped room, or is the starting point of cleaning different? | Check the mapped room and the starting point of cleaning.→See page 17. | |
| Is the layout of the mapped room changed? Perform mapping again.→See page 16. | |||
| Is the LiDAR sensor blocked by a cloth or dirty? Remove the cloth.→See page 27. | |||
| Are there any obstacles with a height of 25 cm or more that the LiDAR sensor can detect around the robotic cleaner? | The LiDAR sensor requires obstacles taller than 25 cm within the following ranges:·11 m radius from the robotic cleaner for mapping and mapping cleaning mode.·18 m radius from the robotic cleaner for free cleaning mode. Please place some obstacles taller than 25 cm in the area. | ||
| E170Error of the roboticcleaner top cover | Is the top cover of the robotic cleaner open? Close the top cover of the robotic cleaner. | ||
| E190Error due to loss of awheel or uplift of therobotic cleaner | Is a drive wheel derailed, or is a wheel separated from the ground? | Move the robotic cleaner to another place.→See page 10. | |
| E200Error due to failure toreturn back to the startingpointError due to failure to go to the destination | The robotic cleaner failed to return back to the starting point of cleaning. | ·If there are objects that obstruct the running of the robotic cleaner, put the objects away or keep the robotic cleaner away from those objects.→See page 20.·If robotic cleaner frequently fails to return to the starting point, turn on [Prioritize Homing] on the app. The time taken to go back to the starting point can be longer.→See page 43.·Check if there is a pathway of 80 cm or more for cleaning. | |
| The robotic cleaner failed to proceed to the next destination because it is entered a narrow passage. | |||
Troubleshooting
Before asking for repair or making an inquiry, check whether the following apply.
Power supply
| Symptom Cause Action | ||
| • Pressing the start/stop button does not turn on the power.• The lamp does not light up.• Pressing buttons on the robotic cleaner and the remote control results in no response. | Are the batteries installed correctly? Check for proper installation | of the batteries.→See page 14. |
| Is the battery capacity lost? Check the remaining capacity. | ||
| Is the power of the robotic cleaner turned off? | Press the start/stop button of the robotic cleaner to turn on the power.→See page 15. |
Running operation
| Symptom Cause Action | ||
| The robotic cleaner does not run. | Is the error lamp blinking? | The robotic cleaner does not run during an error.→See page 28. |
| Is the robotic cleaner in the waiting mode for operation by ON timer reservation? | When the waiting mode for reserved operation is in effect, the operations other than turning off the power and location notification are not possible.→See page 19. | |
| The robotic cleaner starts moving suddenly even though you perform no operation. | Is the ON timer reservation enabled? | →See page 19. |
| The robotic cleaner stops when running. | Is the robotic cleaner caught in a cord or other object? Is a cloth or a string (for example, a thin towel) entangled around the wheels? | Turn off the power of the robotic cleaner and remove objects that are caught in the robotic cleaner and entangled around the wheels.→See page 26. |
| Is the robotic cleaner stopped without climbing over a step? | Turn off the power of the robotic cleaner, and relocate the robotic cleaner to another place.→See page 10. | |
| Is the OFF timer set up? | →See page 19. | |
| Are there any obstacles with a height of 25 cm or more that the LiDAR sensor can detect around the robotic cleaner? | The LiDAR sensor requires obstacles taller than 25 cm within the following ranges:·11 m radius from the robotic cleaner for mapping and mapping cleaning mode.·18 m radius from the robotic cleaner for free cleaning mode. Please place some obstacles taller than 25 cm in the area. | |
| The speed changes. The robotic cleaner | can slow down when a sensor detects an obstacle or determines the running direction. | It is not abnormal. |
| The robotic cleaner does not go straight. | Is foreign matter caught in the wheels? Turn off the power of the robotic cleaner and remove foreign matter on the wheels.→See page 26. | |
| Are any of the wheels damaged? Request service from the shop from which you made a purchase or our sales office. | ||
| Are the ultrasonic sensor and the LiDAR sensor dirty? Care for them.→See page 27. | ||
| The robotic cleaner collides with an obstacle more often than before. | Are the ultrasonic sensor and the LiDAR sensor dirty? Care for them.→See page 27. | |
| The robotic cleaner fails to avoid a step and then falls. | Are the cliff sensor dirty? Care for them.→See page 27. | |
| The robotic cleaner sometimes climbs down a step with a height of 3.0 cm or less. | It is not failure.→See page 10. | |
| The robotic cleaner continues to perform avoidance behavior even though there are no obstacles or steps. | Are the cliff sensors or LiDAR sensor dirty? Care for them.→See page 27. | |
| Cliff sensor gets dirty quickly. | Is the earthing line cut and not making contact with the ground anymore? | Request service from the shop from which you made a purchase or our sales office. |
| The driving sound is louder than usual. | Is the dust box filled with dust? Is the filter clogged? | Dispose of the dust and care for the filter.→See pages 21 and 24. |
| Is dust caught in the main brush and the side brushes? | Care for them. In addition, check for proper installation of the brushes.→See page 25. | |
| The sound of the vacuum fan becomes louder during operation. | It becomes louder when the robotic cleaner switches the battery cartridge to use. | This is normal. |
| ·The suction power is weak.·Dust is not sucked in. | Is the dust box filled with dust? Is the filter clogged? | Dispose of the dust and care for the filter.→See pages 21 and 24. |
| Is the vacuum fan turned off? | Check the setting.→See page 18. | |
| A side brush comes off. | Is the side brush installed correctly? | Check for proper installation.→See page 13. |
| A side brush or main brush does not rotate, is hard to rotate, or is tangled. | Is foreign matter (such as lint and hair) caught in the side brushes or the main brush? | Care for them. In addition, check for proper installation of the main brush and the main brush cover.→See page 25. |
| The robotic cleaner cannot be used on a rug with a pile length of more than 7 mm. Even if the pile length is 7 mm or less, the robotic cleaner may stop operating or the pile may get caught in the side brushes depending on the pile material or other properties. | →See page 10. | |
| The exhausted air smells. | Is wet garbage or smelly garbage sucked in? | Discard the garbage.→See page 21. |
| Is the filter clogged? | Care for the filter. When you have washed the filter with water, dry it sufficiently before using it.→See page 24. | |
Remote control operation
| Symptom Cause Action | ||
| The remote control does not work. | Are the batteries correctly placed in the remote control? | Check the battery orientation. →See page 13. |
| If the robotic cleaner sometimes does not react when operated with the remote control, a possible cause is that the batteries are at the end of their life. (The criterion for replacement is about one year. A battery can become exhausted in less than one year depending on the battery used and the conditions.) | Replace the batteries with new ones. →See page 13. | |
| Is the power of the robotic cleaner turned off? Press the start/stop | button of the robotic cleaner to turn on the power. →See page 15. | |
| There is a possibility that the distance between the remote control and the robotic cleaner is too long for radio waves to reach properly. | Secure an unobstructed view by narrowing the distance between the remote control and the robotic cleaner and by relocating obstacles. →See page 11. | |
| Operation with the remote control is not possible. | The following equipment that uses 2.4 GHz-band radio waves may possibly be in operation nearby. ·Microwave oven ·Bluetooth®-capable devices ·Wireless LAN devices ·Other equipment that uses 2.4 GHz-band radio waves (such as digital cordless phones and game machines) | Provide a longer distance between the robotic cleaner and the remote control, or discontinue the use of these devices temporarily. |
| When you have replaced the remote control with a new one, establish a pairing with the robotic cleaner. | →See page 23. | |
| If you cannot operate the robotic cleaner with the remote control after examining the possible causes listed above, turn the power of the robotic cleaner off and then on again. | →See page 15. |
Operation panel
| Symptom Cause Action | ||
| The set time is frequently reset. The built-in battery is almost depleted because the robotic cleaner is not used for a long period of time. | Run the robotic cleaner for more than 1 hour, or set it in standby state. (The built-in battery will be recharged.) | |
Timer function
| Symptom Cause Action | ||
| Operation by ON timer reservation does not start at the time specified. | The robotic cleaner does not start operating according to ON timer reservation if any of the following conditions applies at the start of operation by ON timer reservation. • The power is turned off. • When the battery capacity is insufficient | →See page 19. |
| Does the timer lamp light up? If the power is turned off or the battery capacity is used up after reservation is set, the timer lamp turns off. →See page 9. | ||
Mapping
| Symptom Cause Action | ||
| The robotic cleaner stops during mapping. Mapping fails. | Is the room dark during mapping? Make the room brighter until co | completion of mapping. |
| There are no obstacles with a height of 25 cm or more within a radius of about 11 m of the robotic cleaner. | The environment may not be suitable for mapping. Cleaning in free cleaning mode is recommended. →See page 16. | |
| The robotic cleaner starts cleaning instead of mapping. | Is an already registered room number selected? Select an unregistered room number or delete the already registered map. →See pages 16 and 17. | |
| A map is not registered. The map is incomplete. (There is an area that is not registered.) | The shape of the room, the layout of obstacles or other characteristics may be too complex. | Check if there is a pathway of 80 cm or more for cleaning. Tidy up the room. →See page 11. |
| The battery capacity may be insufficient. Make the batteries fully charged and then do mapping. | ||
| You can add the mapping information manually. →See page 39. | ||
| The robotic cleaner was picked up during mapping. Do not pick up | the robotic cleaner during mapping. The room information may not be registered correctly. | |
App
| Symptom Cause Action | ||
| It is not possible to establish connection to the app. | Was the smartphone connection button of the robotic cleaner pressed? | Press the smartphone connection button to connect to the app. →See page 33. |
| Was the Wi-Fi® setting of the smartphone enabled? Enable the Wi-Fi® setting of the smartphone. | Wi-Fi® setting of the smartphone. | |
| There is a possibility that the distance between the smartphone and the robotic cleaner is too long for radio waves to reach properly. | Secure an unobstructed view by narrowing the distance between the smartphone and the robotic cleaner and by relocating obstacles. →See page 11. | |
| The connection to the robotic cleaner failed. For iPhone/iPad: | Go to the iOS setting menu and enable the local network setting for Makita Robotic Cleaner DRC300. For Android: If a pop-up appears to decide whether to keep the connection after establishing the Wi-Fi connection, allow it. | |
| The robotic cleaner may have failed to acquire the location information. (The robot cleaner's name is displayed as "null" in the PIN code entry screen.) | Enable the location information setting of your smartphone. |
Protection function
When any of the following conditions is established while the robotic cleaner is in operation, the motor stops automatically. This is due to the protection function, not failure.
| Protection function |
| The motor stops automatically if the battery reaches a high temperature. |
| • Stop cleaning and remove the batteries from the robotic cleaner. Then, charge and cool the batteries using a charger with cooling system or wait until the batteries have cooled. |
| • If the robotic cleaner does not work even with the batteries cooled, cool the robotic cleaner. |
| • If an error number is displayed on the robotic cleaner, remove the cause of the error. (See page 28.) |
| The robotic cleaner stops automatically if the battery charge becomes weak, enters the sleep mode, and the power turns off completely if the remaining charge runs out. |
| • Remove the batteries from the robotic cleaner and charge the batteries. |
| The robotic cleaner stops automatically if an error is detected. |
| • Check the error number and remove the cause of the error. After removal of the cause, the robotic cleaner can be used again. (See page 28.) |
Storage
Turn off the power and remove the batteries before keeping the robotic cleaner in storage.
Do not store the robotic cleaner in the following places because it is a precision machine. Doing so can cause heating, ignition, failure, deterioration of rubber parts, etc.
- Places where the temperature rises suddenly
- Places where the temperature drops suddenly
- Places where the temperature changes suddenly
- Near a flame, a heater, cooling and heating equipment, etc.
Outdoors - Places exposed to direct sunlight
- Places exposed to moisture or vapor
- Places with much dust and sand
Smoky places - Places with poor ventilation
If the robotic cleaner is kept in storage without being used for a long time, its performance may be impaired. To use the robotic cleaner for many years, occasionally turn on the power of the robotic cleaner and use it.
Optional Accessories
CAUTION
These accessories or attachments are recommended for use with your Makita tool specified in this manual. The use of any other accessories or attachments might present a risk of injury to persons. Only use accessory or attachment for its stated purpose.
If you need any assistance for more details regarding these accessories, ask your local Makita Service Center.
Magnetic boundary line
- Main brush
- Soft main brush
- Side
- Soft side brush
HEPA filter
- Main brush cover
Bumper cushion
- Makita genuine battery and charger
NOTICE
Some items in the list may be included in the tool package as standard accessories. They may differ from country to country.
To avoid false recognition when using the bumper cushion, do not attach the bumper cushion to the following areas: The area in the lateral extension of the ultrasonic sensors, and the upper and lower areas within 28mm of the ultrasonic sensors.
Smartphone App (For the DRC300)
Table of contents
What you can do with the app 33
How to install the app 33
Preparations in advance 33
- Installing the app on a smartphone 33
- Initial setting 33
Home screen 34
- Cleaning with the app 34
- Cleaning a room without mapping (free cleaning mode) -34
-
Cleaning mapped rooms 35
-
Operating the robotic cleaner with the app 36
-
Checking the history of cleaning 37
-
Checking the latest history 37
- Checking the past histories 37
- Exporting the record as a PDF file 37
-
Checking the error histories 38
-
Adding, changing, or deleting mapping information --- 38
-
Adding mapping information 38
- Adding mapping information manually (manual mapping) 39
- Changing the name of mapping information 40
- Limiting the range of cleaning 40
-
Deleting mapping information 41
-
Changing and checking settings 42
-
Changing the name of a registered robotic cleaner 42
- Setting cleaning options 43
- Changing the PIN code 43
- Deleting a registered robotic cleaner's information 43
-
Checking the app information 44
-
Error message/dialogue 44
What you can do with the app
Using a smartphone/tablet with the robotic cleaner-specific app installed, you can do the following things:
- Cleaning
- Remote control operation
- Adding, changing, or deleting mapping information
- Checking the history of cleaning
- Changing robotic cleaner settings
NOTICE
This app is for use on a smartphone/tablet and does not run on PCs.
- A smartphone/tablet and the robotic cleaner are directly connected using the Wi-Fi® function. Note that the Internet is not available during the connection to the robotic cleaner. After using the app, remember to disconnect from the robotic cleaner by pressing the smartphone connection button.
- To use this app, you must give permission to get location information and agree to the terms of use. The user must judge whether to give permission to get location information and to agree to the terms of use.
The application screen images are subject to change without notice.
How to install the app
Preparations in advance
A smartphone or tablet (Android or iOS) is necessary to use the app.
Android: Android Version 6.0 or later is required.
iOS (iPhone/Pad): iOS 12 or later is required.
Installing the app on a smartphone
- Using your smartphone, search for "Makita Robotic Cleaner DRC300" in
Google PlayTM or App Store.
You can also access from the QR code.
Google PlayTM App Store
- Install "Makita Robotic Cleaner DRC300"
- After installation, start up "Makita Robotic Cleaner DRC300"
Initial setting
- As a screen appears to ask whether to permit the acquisition of location information, tap on [OK].
- In the terms of use screen, tap on [Agree].
-
Follow the instructions on the screen:
-
Turn on the robotic cleaner and then press the smartphone connection button on the cleaner. After pushing the smartphone connection button, it takes about 8 seconds for the robotic cleaner to be ready for connection. When the connection is ready, the Wi-Fi LED will blink.
After that, tap on [Go to Settings] to display the Wi-Fi® setting screen of the smartphone.
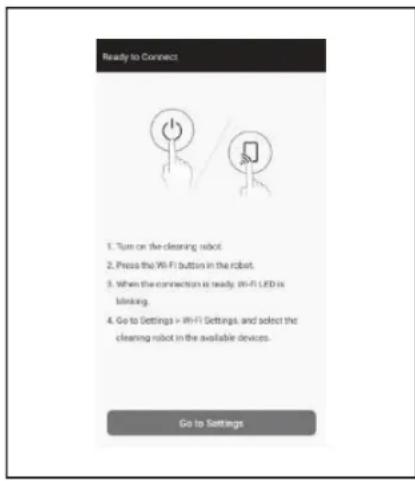
Depending on your device, the following procedures may be required. For iPhone/iPad:
Go to the iOS setting menu and enable the local network setting for Makita Robotic Cleaner DRC300.
For Android:
If a pop-up to decide whether to keep the connection after establishing the Wi-Fi connection is displayed, allow it.
4. Connect the smartphone to the robotic cleaner via Wi-Fi®. (This connection is NOT Bluetooth.)
- Wi-Fi® connection setting (password entry) is required only when connecting to the robotic cleaner for the first time.
- The initial password of the Wi-Fi® connection is set to alphanumeric characters that repeat the last four digits under the robotic cleaner's SSID twice. For example, if the SSID "Robotic Cleaner_012A" is displayed, the password will be "012A012A".
-
Be sure that the smartphone cannot access other Wi-Fi® networks during the connection with the robotic cleaner.
-
Exit from the Wi-Fi® setting screen and display the app screen. After that, enter the PIN code to authenticate the connection and tap on [Send].
-
The factory set PIN code is set to alphanumeric characters that repeat the last four digits under the SSID twice.
- If the SSID is "Robotic Cleaner_012A", the factory set PIN code will be "012A012A."
- The home screen of the app will be displayed when the PIN code is successfully authenticated.
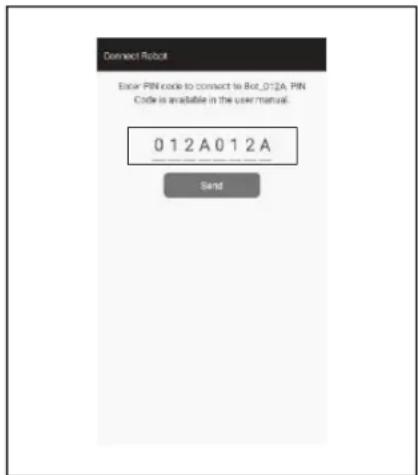
-
Change the PIN code.
-
Be sure to change the PIN code. Do not use the default PIN code. See page 43 for how to change the PIN code.
-
Do not forget the new PIN code you created.
-
Initial setting is complete when "PIN code changed" is displayed. Return to the home screen to use the app.
To disconnect the Wi-Fi connection, press the smartphone connection button on the robotic cleaner. The smartphone connecting lamp will turn off.
NOTICE
If your connection is suddenly disconnected, close the app once and then try to establish connection again.
Home screen
- Menu button (various settings, history check)
- Robotic cleaner name
- Operating state of the robotic cleaner
- Latest record of cleaning (displayed only when there is a record)
- Cleaning (or Mapping) start button
- Remote control button
7.Mode switch button - Robotic cleaner settings and the remaining battery capacity

: The sound setting is on.

: The prioritize homing function setting is on.

: Boundary-sensing feature is on.

The vacuum fan setting is on.

The continuous cleaning setting is on.

: Left-battery's remaining capacity

:Right-battery's remaining capacity
Cleaning with the app
The robotic cleaner works in two modes: free cleaning mode, which does not require map registration, and mapping cleaning mode (see "Cleaning mapped rooms" on page 35), which requires room information to be registered for cleaning.
Cleaning a room without mapping (free cleaning mode)
- Free cleaning mode is recommended for cleaning in various rooms or in an environment that involves frequent, significant layout changes.
- Free cleaning mode is also recommended for a room that cannot be adequately lighted.
-
For cleaning, mapping, and the location to start the robotic cleaner, see page 16.
-
On the home screen, tap on

- Tap on [Free Cleaning Mode], then tap on [OK].
- On the home screen, tap on [Cleaning Start] for the robotic cleaner to start cleaning.
-
You can control the robotic cleaner with the following operations.
-
Tapping on [Pause] results in the robotic cleaner stopping cleaning temporarily.
- Tapping on [Resume] while paused restarts the robotic cleaner.
- Tapping on [Go to Home] while paused results in the robotic cleaner going back to the point where it started cleaning. As the robotic cleaner goes back to the starting point, the app goes to the home screen. This operation can be performed while the cleaning is paused.
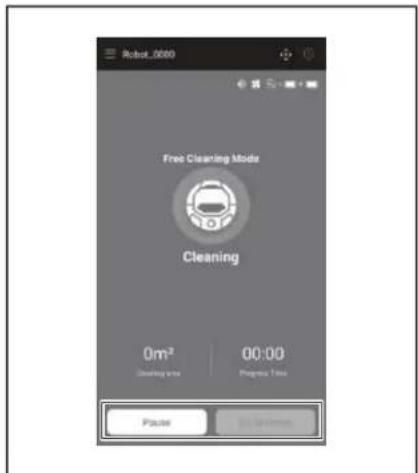
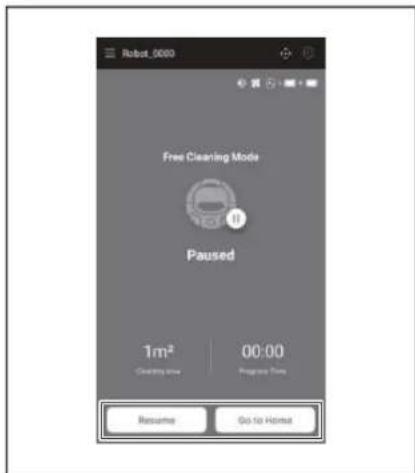
Cleaning mapped rooms
- In mapping cleaning mode, the robotic cleaner works so that a mapped room is cleaned efficiently.
-
The use of mapping cleaning mode requires mapping information to be registered. (See page 38.)
-
On the home screen, tap on

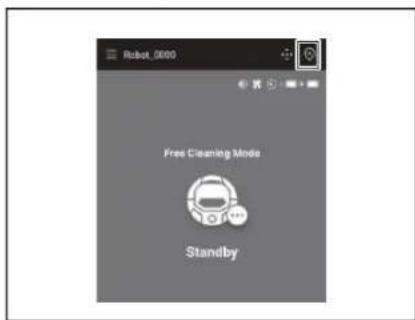
-
Tap on the room you want to clean, then tap on [OK].
-
You can add, change, and delete a map. (See page 38)
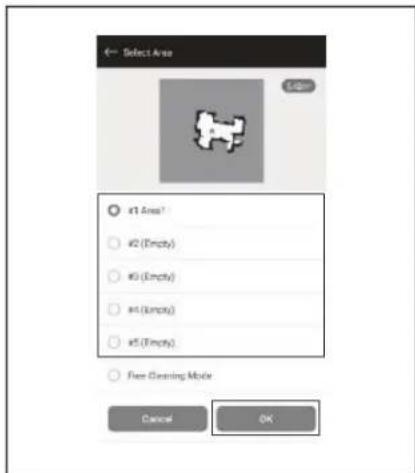
-
Place the robotic cleaner as close as possible to the same orientation as at the start of mapping. This allows the robotic cleaner to start cleaning smoothly.
-
Tap on [Cleaning Start] for the robotic cleaner to start cleaning.

-
You can control the robotic cleaner with the following operations.
-
Tapping on [Pause] results in the robotic cleaner stopping cleaning temporarily.
- Tapping on [Resume] while paused restarts the robotic cleaner.
- Tapping on [Go to Home] while paused results in the robotic cleaner going back to the point where it started cleaning. As the robotic cleaner goes back to the starting point, the app goes to the home screen. This operation can be performed while the cleaning is paused.
- If the shape of the room does not match with the map information, the error screen is displayed and the robotic cleaner stops cleaning. Check if the selected room is correct and place the robotic cleaner at the starting point.
- If the robotic cleaner is placed away from the starting point on the mapping information, the error screen is displayed.
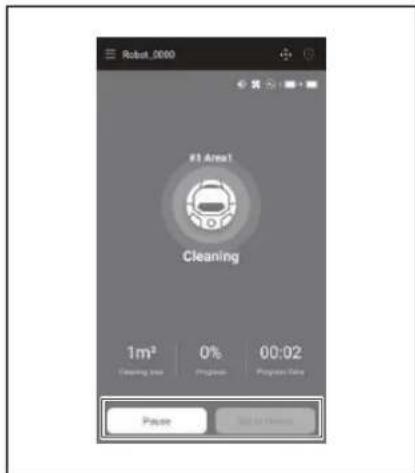
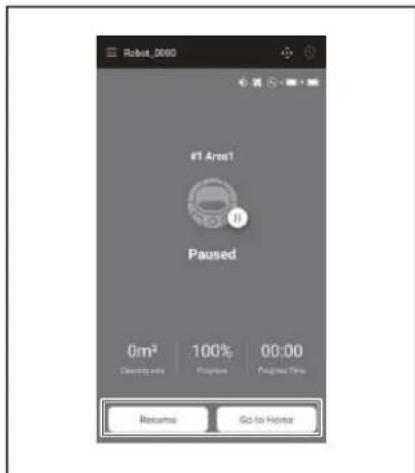
Operating the robotic cleaner with the app
You can operate the robotic cleaner with the app as is the case with the remote control included with the robotic cleaner.
- On the home screen, tap on

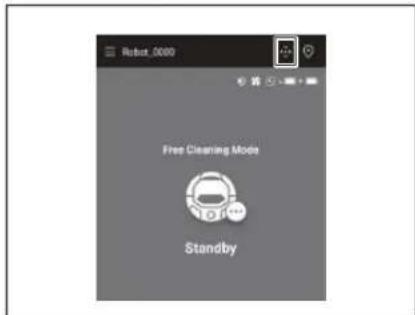
-
Tapping on buttons, operate the robotic cleaner.
-
You cannot make the robotic cleaner move backward from the app.
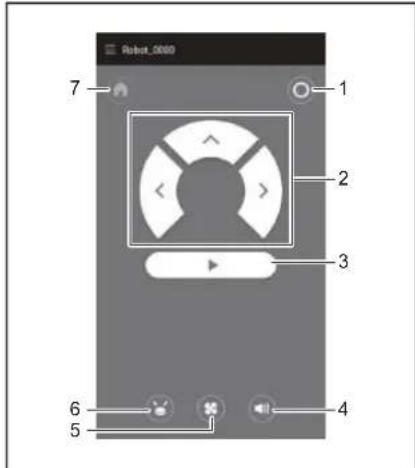
- Power OFF button 2. Action buttons 3. Start/stop button 4. Sound ON/OFF button 5. Vacuum fan ON/OFF button 6. Location beacon buzzer/light button 7. Start point button
Checking the history of cleaning
From the app, you can check the history of cleaning in detail.
- When you launch the app and connect the robotic cleaner, the history records will be transferred to your smartphone.
- The app can store up to 50 records for each robotic cleaner. Once this limit is exceeded, the oldest record will be deleted.
- The robotic cleaner can store up to 15 records. Once this limit is exceeded, the oldest record will be deleted.
Checking the latest history
On the home screen, tap on the icon in [LATEST HISTORY].
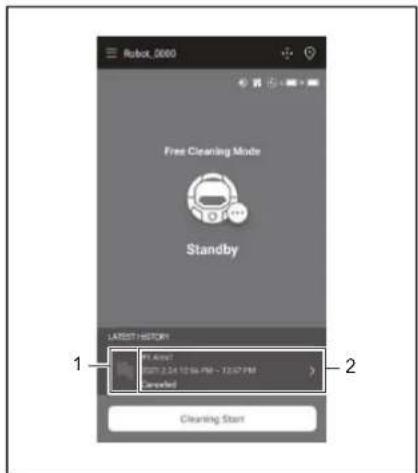
- Icon to show the latest history 2. Article to show the list of histories
Checking the past histories
- On the home screen, tap on LATEST HISTORY]. You can tap on on the home screen and then tap on [Cleaning History] to see the past records.
- Tap on the record you want to check.
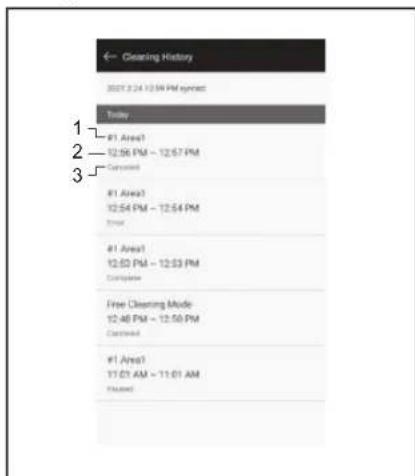
- Cleaned room or cleaning mode 2. Time during which the room was cleaned 3. Cleaning status (complete, stopped, error, etc.)
Tapping on an article shows the detail information of each history.
- Blue-green dash line: The trajectory of the robotic cleaner
- Yellow: The area that the robotic cleaner has cleaned
- Blue: Obstacles detected by bumper sensor
Green: Obstacles detected by the ultra-sonic sensor - Pink: Steps detected by the cliff sensor
Purple: The area that the robotic cleaner has detected the magnetic boundary line - White: The area that the robotic cleaner has not cleaned
- Gray: The walls or obstacles detected by LiDAR sensor
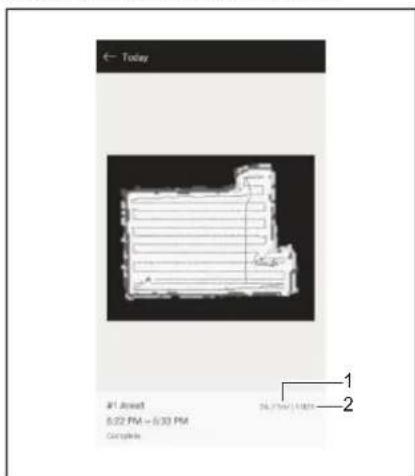
-
Cleaned area size 2. Cleaning coverage (mapping cleaning only)
-
The size and coverage of the cleaned area are not precise values. Use this information as a rough guide.
- You can zoom in and out on the map using a pinch gesture (from 1x to 20x).
Exporting the record as a PDF file
You can export the record as a PDF file and store it in your smartphone's storage. The exported file can be accessed without using the app.
Tap on to export the record as a PDF file.
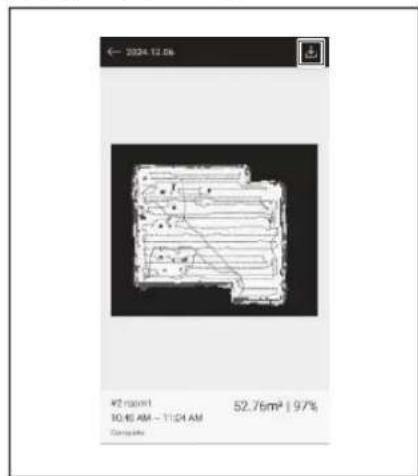

Checking the error histories
- On the home screen, tap on

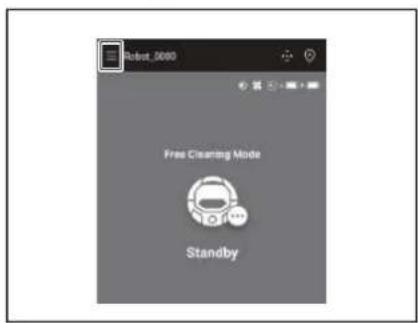
- Tap on [Notification History].
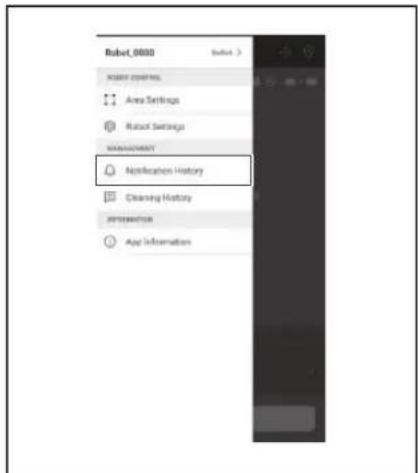
The date, time, and content of the error will be displayed. Up to 10 histories can be recorded. If 10 histories have already been recorded, the oldest history will be erased when a new history is recorded.
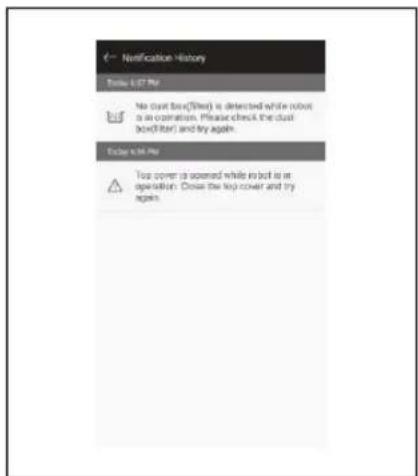
Adding, changing, or deleting mapping information
You can add, change, or delete mapping information from [Area Settings] on the menu window.
- On the home screen, tap on

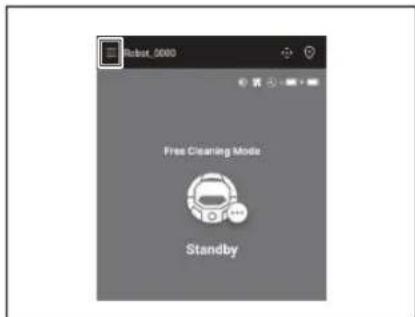
- Tap on [Area Settings].
Adding mapping information
You can save information for up to 5 maps with an area size up to 10,000m^2 The area size does not indicate the actual size of a mapped area but the rectangle area which covers the whole mapped area.
- On the [Area Settings] screen, tap on [Create New Map].
- A notice is displayed. Tap on [OK].
- Select an empty slot in which to save mapping information, then tap on [Next].
- Enter an area name (Up to 8 characters).
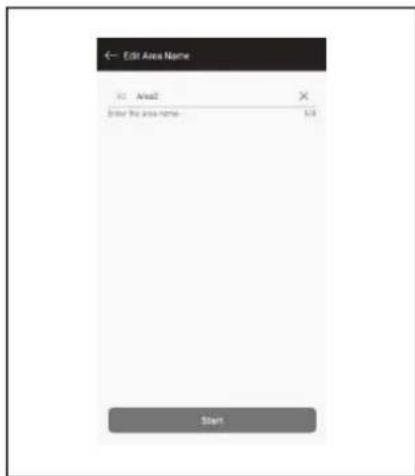
-
Tap on [Start].
-
The robotic cleaner starts mapping.
-
Tapping on [Pause] results in the robotic cleaner stopping mapping temporarily.
- Tapping on [Go to Home] while paused results in the robotic cleaner going back to the point where it started mapping. The mapping information created up to when you tapped is registered. As the robotic cleaner goes back to the starting point, the app goes to the home screen.
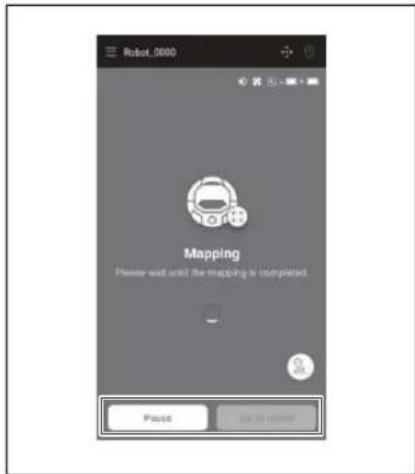
- After the mapping is completed, the dialogue whether to perform area settings is displayed.
- If you want to limit the range of cleaning, tap on [Go to Area Settings]. (See page 40.)

Adding mapping information manually (manual mapping)
During mapping, you can manually add the mapping information with the app. It is recommended when mapping an intricate floor layout.
- Tap on [Pause] and then to display remote control buttons.
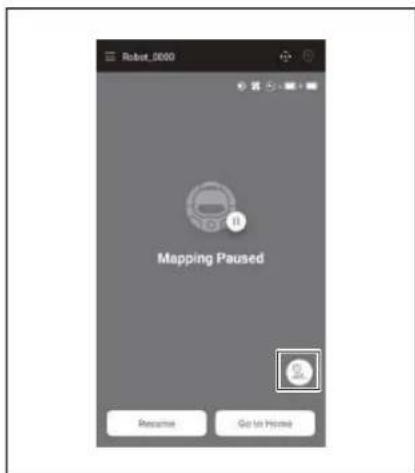
-
Move the robotic cleaner to trace the floor layout using the remote control buttons of the app or the remote controller.
-
After manually adding the mapping information, tap on to resume automatic mapping.
- If you want to quit mapping, tap on [x] and then [Go to Home] or press the start point button on the remote controller.
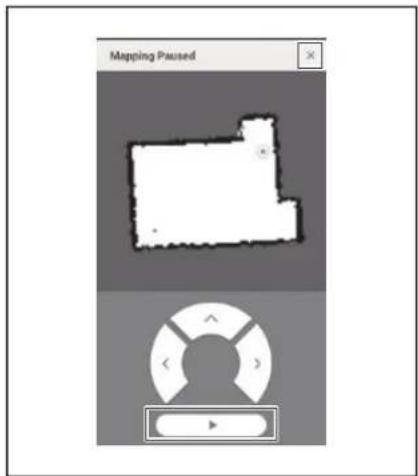
Changing the name of mapping information
On the [Area Settings] screen, tap on the mapping information you want to change.
You can tap on a name to go to the settings screen.
- On the [Area Settings] screen, tap on the mapping information you want to change.
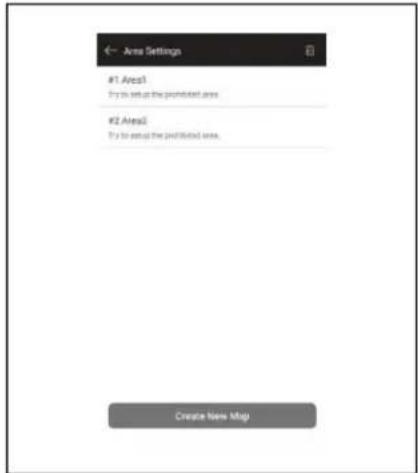
- Tap on [Edit Area Name].
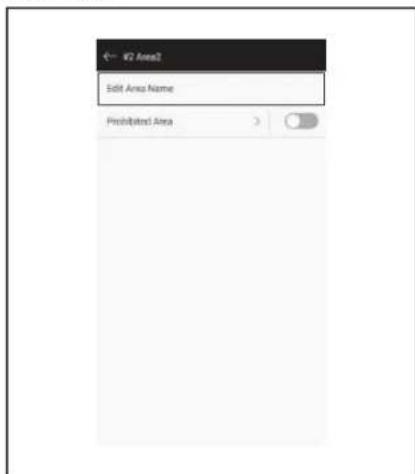
- Edit the name (Up to 8 characters).
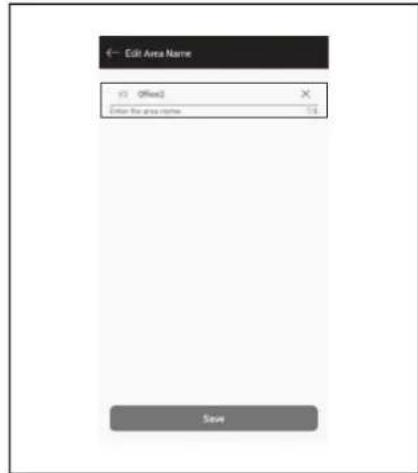
- Tap on [Save] to finalize the name.
Limiting the range of cleaning
WARNING
Do not use the cleaning prohibited area configured by the app as a boundary line of an area where an accident can possibly happen due to intrusion or fall.
- Doing so can cause an accident or injury due to intrusion or fall of the robotic cleaner. The actual trajectory of the robotic cleaner may be slightly different from the cleaning prohibited area setting.
For an area with a risk of intrusion or fall of the robotic cleaner, place an object serving as a wall with a height of 25cm or more (an object that does not move or fall over when hit by the robotic cleaner) on a flat surface. (See page 10.)
- On the [Area Settings] screen, tap on the mapping information you want to change.
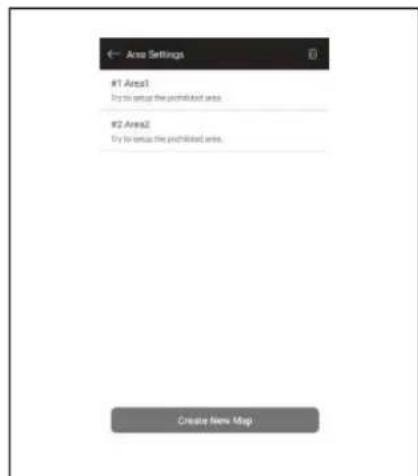
- Tap on > at the side of [Prohibited Area].
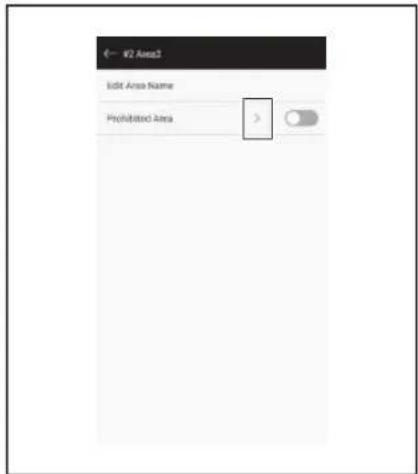
-
Set a cleaning prohibited area.
-
You can tap on at the upper right corner of the screen to add a cleaning prohibited area (up to 100 areas).
- You can drag a cleaning prohibited area to move it.
- You can drag the lower right corner of a cleaning prohibited area to adjust the size.
- You can tap on at the upper left corner of a cleaning prohibited area to delete the cleaning prohibited area.
- You can tap on the upper right corner of the screen to delete all of the cleaning prohibited areas.
- You cannot set a cleaning prohibited area within a 2 m range around the starting point.
- Depending on the environment near a cleaning prohibited area you set, it may not be possible to clean an area around the specified area.
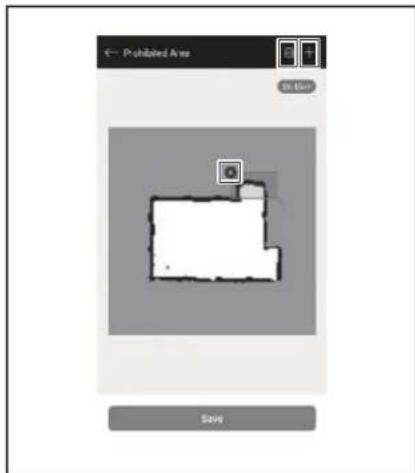
-
Tapping on [Save] results in the modified mapping information being registered.
-
To enable registered cleaning prohibited area, tap on On/Off (colored green when it is On) at the side of [Prohibited Area].
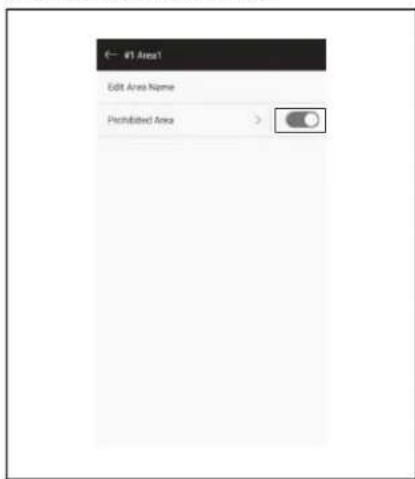
Deleting mapping information
- On the [Area Settings] screen, tap on

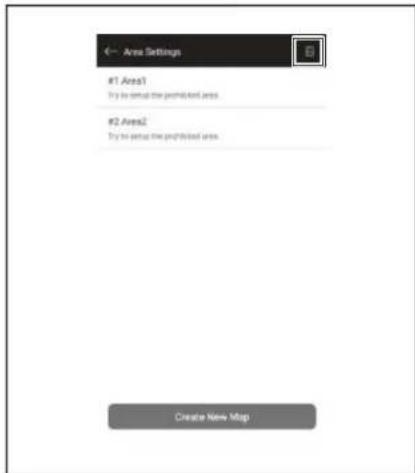
-
Select the mapping information you want to delete.
-
The circle at the head of mapping information is colored when that mapping information is selected.
- You can tap on [Select All] to select all items.
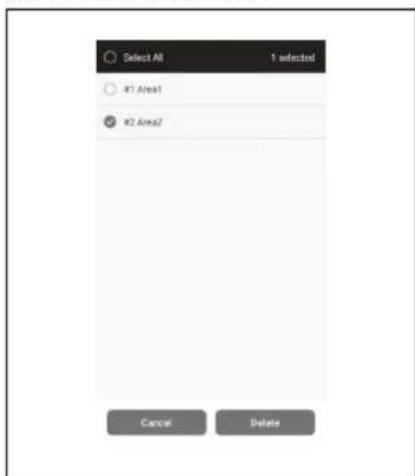
-
Tap on [Delete].
-
A notice is displayed. Tap on [OK].

Changing and checking settings
Settings can be changed and checked from [Robot Settings] on the menu window.
- On the home screen, tap on
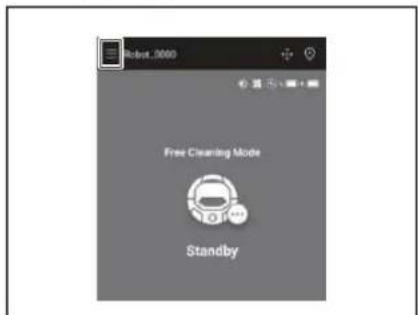
- Tap on [Robot Settings].
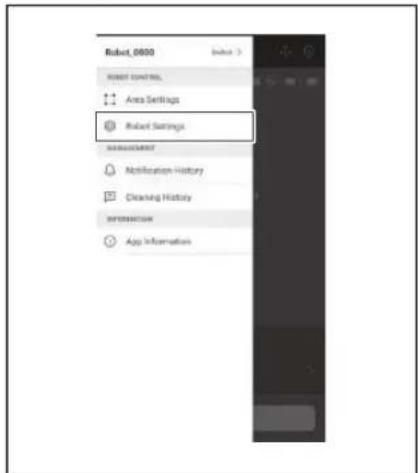
Changing the name of a registered robotic cleaner
This setting only changes the robotic cleaner name in the App. The SSID for Wi-Fi® will not be changed.
- On the [Robot Settings] screen, tap on [Edit Robot Name].
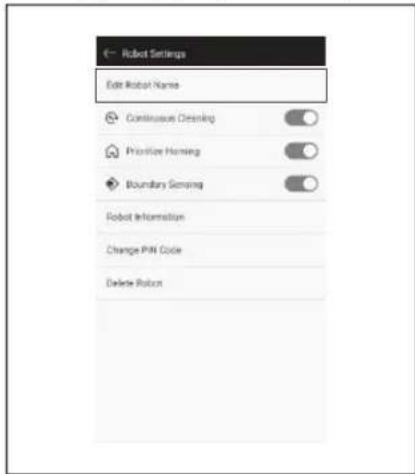
- Enter a new name (Up to 8 characters).
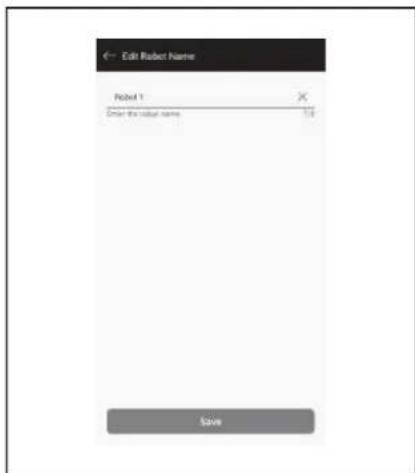
- When you have finished entering the name, tap on [Save].
Setting cleaning options
- On the [Robot Settings] screen, tap on On/Off (colored green when it is On) at the side of [Continuous Cleaning] or [Prioritize Homing] if needed.
- [Continuous Cleaning]: Select this option when the battery capacity is lost before the robotic cleaner cleans all of the cleaning area and you want to resume cleaning the area left uncleaned the next time.
- [Prioritize Homing]: This setting is recommended when the robotic cleaner often fails to go back to the starting point of cleaning. The robotic cleaner begins to return to the starting point of cleaning; provided that there is more remaining battery capacity than usual.
- [Boundary Sensing]: Select this option when using the magnetic boundary line. The robotic cleaner detects the magnetic boundary line as the boundary. (See page 20.)
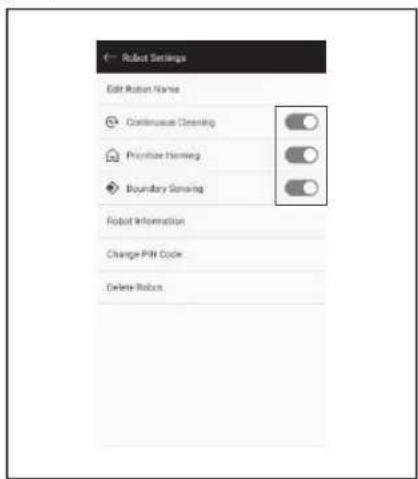
Changing the PIN code
The PIN code of the robotic cleaner can be changed. If you forget the PIN code you set, refer to "Resetting the settings" on page 23 for resetting the robotic cleaner to the factory defaults.
To check the factory default PIN code, refer to "Initial setting" on page 33.
- On the [Robot Settings] screen, tap on [Change PIN Code].
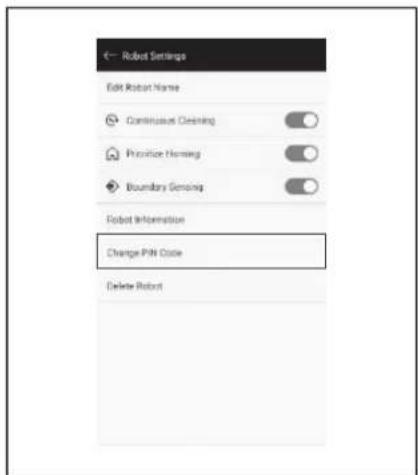
- Enter the current PIN code (eight digits).

- Enter the new PIN code (eight digits) you want to set. Enter the new PIN code two times in a row.
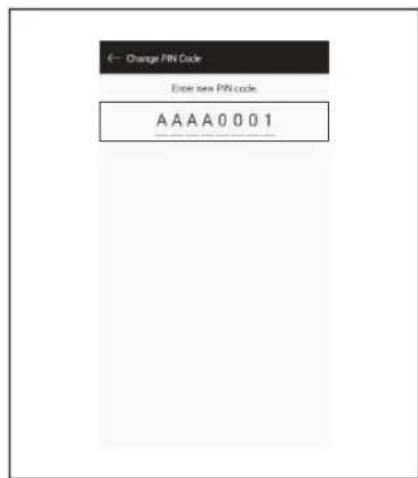
Deleting a registered robotic cleaner's information
- On the [Robot Settings] screen, tap on [Delete Robot].
- A dialog appears to confirm the deletion. Tap on [Delete] to finalize the deletion.
Checking the app information
- On the home screen, tap on

- Tap on [App Information].
- Tap on the information you want to check.
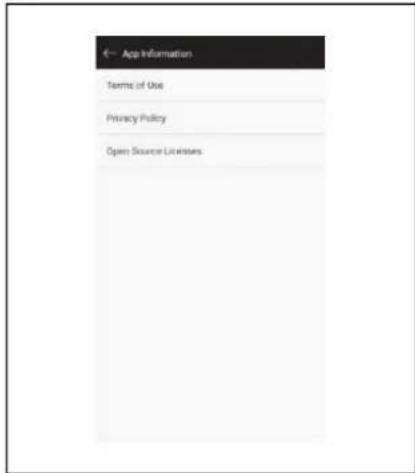
Error message/dialogue
When an error has occurred, an error message or dialogue is displayed. Follow the instruction in the message or dialogue in this case.
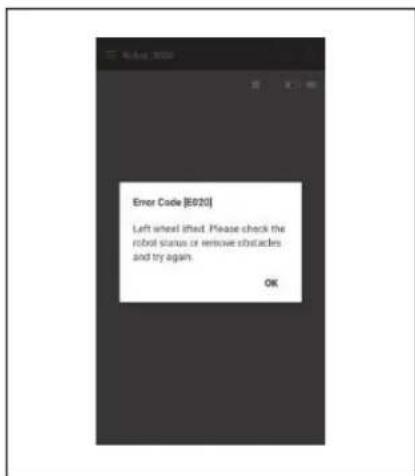
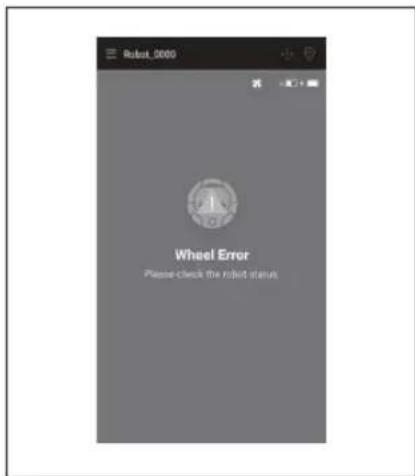
Appendix
Notice Regarding Open Source Software
This product includes open source software (hereinafter referred to as "Open Source Software") under the GNU General Public License (GPL), the GNU Lesser General Public License (LGPL), and other licenses.
Details regarding licenses for the Open Source Software (notification of copyright holders and licenses) are disclosed free of charge on the following website. In addition, the source code for the Open Source Software released by us under these licenses is also disclosed free of charge on the following website.
https://oss.makita.biz/index.html
- Please refrain from making inquiries regarding the source code for the Open Source Software.
We make no warranties of any kind with respect to the Open Source Software. However, this notice does not limit our warranty coverage for product defects (including defects caused by the Open Source Software).
For European countries
| Wi-Fi module Module Name LCW-006 | ||
| Frequency Range/Power 2412.0 - 2462.0 MHz/17.48 dBm (EIRP)2422.0 - 2452.0 MHz/13.75 dBm (EIRP) | ||
| S/W Version V1.0 | ||
| Bluetooth module Module Name T007-MA-MD | ||
| Frequency Range/Power 2402.0 - 2480.0 MHz/7 dBm(EIRP) | ||
| S/W Version V01.03 | ||
| Remote controller Module Name C011 | ||
| Frequency Range/Power 2402.0 - 2480.0 MHz/-4 dBm(EIRP) | ||
| S/W Version V01.04 | ||
This device must be installed and operated to provide a separation distance of at least 20cm from all persons.
FRANÇAIS
FRANÇAIS (Instructions originales)
Table des matieres
Accessoires standards
Brosses laterales (quatre)
Brug违法犯罪 - Brug没法s, but it's a good idea to keep the drugs in the house. - Brug is a good idea to keep the drugs in the house.
Brandfarlige stoffer
- Brug违法犯罪
- Brug isn't a good idea to use it.
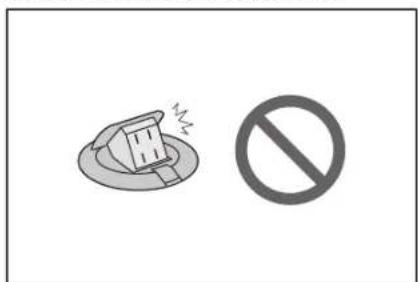
Taend/sluk for strømmen
Brug af ON-timer/OFF-timer
ON-timeren og OFF-timeren kan bruges pa samme tid.
- Slip de to laste dele for at abne topdaekslet.
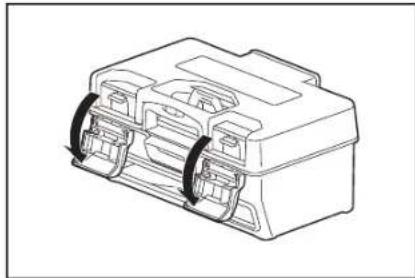
- Tag stovkassen ud.
Pas pa违法犯罪 at abne topdaekslet pa filtersiden.
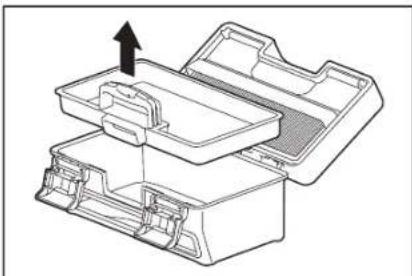
An mataipia dev npaeat an thc n mc to tepa, evexetva by Eewoe eua npokAon npauuatoo u 1
Aev pentevaeykaiaotate nyaKaetaaatapiw e duayn.
Av n Kaetiaev npaotn tBcTnc kokaa, anavce ony rev ny exteo toeiooo
Ppenei va kparate yepa to epyaiaio kai tnv kaoteta ptapiwkata nTv TOTOBETnTNS KAETAC.
Eepaate atatepeia jua nataipia kato uikoc tou aekoiu tnpouotinkie naektpkic akobnac o to terpu. Mucic n nataipia anpaoiae iapioe, ookoyetan yopukpiutiuko Kaik.
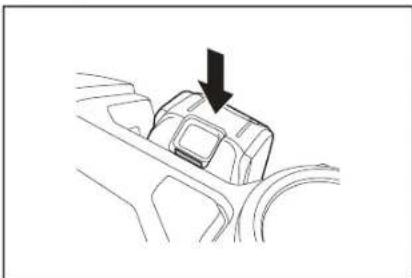
ANAKOINΩEH
Karai nTOnoBtmonuacnpatiaicnpenei va npoaexete uynv ckyawbiotov ta daxtolaac avaceo aTn pOtonik nAektpk ookna kntuv nataopia.
Aiaikacia aqapieoNs
IPOEIADONIOIHSH
OToTe apaipeTe iia mTatapia, pTei va eaiuveote oTn npoTtIK n kEeptikn OKou tivai atepeytoinjevN. Mny apapeTe ia mTatapia otav n pOttotIK n kEeptikn OKoutna Bpioketai Otnv katotaon avauovc. (AvatpEtE OtvN EepeytoinOn/ATEpeytoInOn Tns oukeueic)Otn 0eAio17.)
Av apaperect pa mptarpa ev no nucneiv cveevpyonmey, unqepkiv kovobv npaknBie
IpeTei va Kpatate yepaaleio kai tny kaetra ptatapiuv kata nV Kaipaeon tsKaetac.
EnKwote Tny mntapia xpanoHOTOWTAs TO KOUMTI TNS.
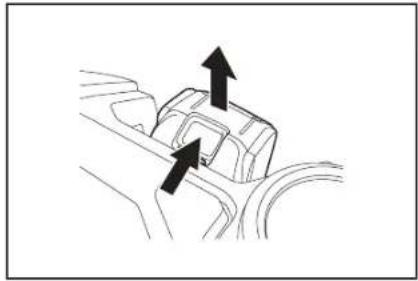
EvpyoioiOn/AeVeypoioiOn Tns oukeun
Molc evpoytoie Tn poutiotikn nAektpkiokouta, Tepva otny kataaota an avovici. Tnv kataraon avavovici mptopeite va kaqapiaete, va aaaaedetpuoiic kai vuaevsefte Jytn epaoyni.
Av npouroTikn kAekpkiokouta, to mExeipiOtnio nepapoyn dev exouv IaoupyoTei TEPIOU 30 5ntv KATDAOTAN aavuync, n Ateuupyia mc ouakeunBt aepatiatei. (Av n Auxvia ouveonsmartphone avaeuiyn TPOVApepeyevn TEPIWUN, n Ateuipuyia nC ouakeunf cEv bTepauiTei.)
PpETei va atTEVEpyOTIOIE TE OUAKEUH OTO TEAO TCS AEIToupyiaC TCS KAI OTOTE TIV ATOnOKeUETE.
OTOTE npoTOTIKn Aekipikn Oaouta BiPiketai otny katataan aovatoans
AeIOUPYiAc,Dev evai duvat n ETIKOVA VIA eowns epapoyns.
OTOTE npoitotnik nAekpiok ookuta eivai attepeytoinmev, dev tnpotei va in theoetie oe aeitoupyia meow tou nlexepipntpiou n ts expapoyns.
Aiaikaciaevepytooinon
- Niote To koumt Evapncdiakotn cienoupyia c n pouttik nektpikn okaun tny wpa tou eivatnevepyoiojevn.
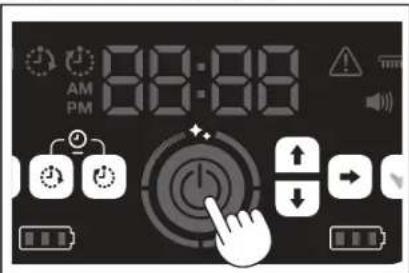
- Pnepivetexwpi vtn thee eae Tne Aenoupyia wotou va epaavntei n evdeign nC wpc
Tny TpOtn 0opA Tou 0ha xpnaioutoioeTe n poutotikn kekptkckokouta, Xpeiaetal Tnpa va puoiieTe nV npa. KaToepiTe nV npa Tnc npesac. (AvatpEte tnt eAil825.)
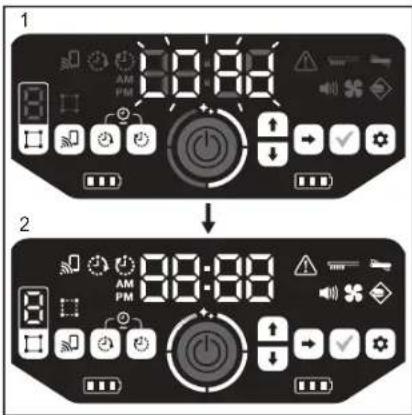
- ByaTe EeW n OKn Okovc.
PnooeTe va mV aovlEeTo kAauuuaTns ETTAVIaEupac aTIO TIV TIAEupaTO qIAPou.
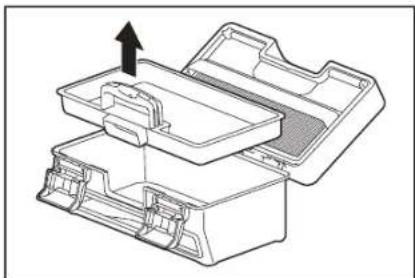
- PteAeTaOkouTlDia aTo Tn OhKn OKovNc KaI To KoutI OKovNc KaI OTePa apaipote Ta oKouTlDia kaI tn OKovn ato To pIATpo. Av to pIATPO evai UtpeBokla eepwEvO, apaipate To kai Nluvete To p IVEpO.AVatpeEe 0r nOeAID27.
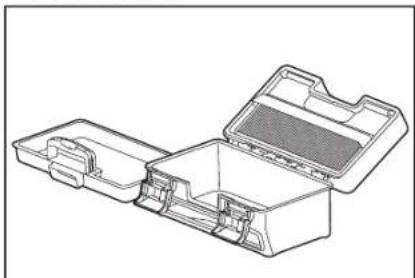
- EtnavatoTOnBtnto Tn BnKn OKnVns Mea aTo Kouti AKnVng. Yotepa kLeiaTe to KaLmu nC tAnuu Naeupac ka aqaaioe ta duo tmnpata Tou kLeiwovv.
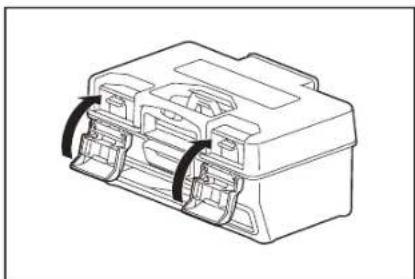
- ETVAVOTTOBETNATE TO KOUTI OKOVNC MEOA OTN POUITOKIK NAKTKIPKIOKAI TIEOTE TO KAUAUMTNS ETAW WIAEUPACVIA VA KAEOEI WOTOU VA KOUOTETO YAPAKTNPIATKO KIK. OTVA BKAIEOTETO KAUAUMTNS ETAW WIAEUPAC, PPOSETE VA EVKAUBIOTOU BA xTAuOa
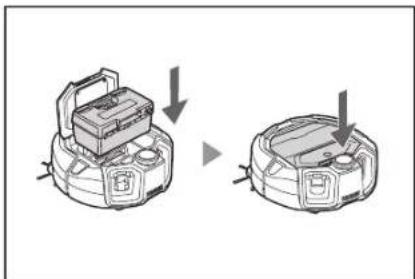
ANAKOINQEH
- AAAAAE TE TOV KWDIO PIN.
MnV ExaTe VA aAaEeTE TOV KwKO PIN. MnXpOIOIOIaTeTOV TPOETIAeYEv KOKO PIN.
Tgva JOBETe TTc uTOpEte VA aAaEeTE TOV KwKO PIN, AVATpeCToN
0eAL647.
Mny Exaotevvo Kwaiko PIN Tnou npynoate.
- H apxikp oBmAn 8a exi oAokLnpoEi otav eApiaTei otyn oOvyn svEbeEuv to iyuva "PIN code changed". EtiotpeTse otyn apxikr oOvyn ia va xpnojoutofTe Tny evapoyn.
Ia va diakopette n ouvdeon meow Wi-Fi, tme To koumtn ouvdeonsmarqphone ot npootiikn aektpiok ooutia. Huxvia ouvdeonsmarqphone 0a 0neoi
ANAKOINΩsH
Av n ouvdeon aac diakotire Eaqvika, kleiote pia fopapv evapauoykai utepa npoataoate va ouvdeoeineva.
Apxikn oOvN
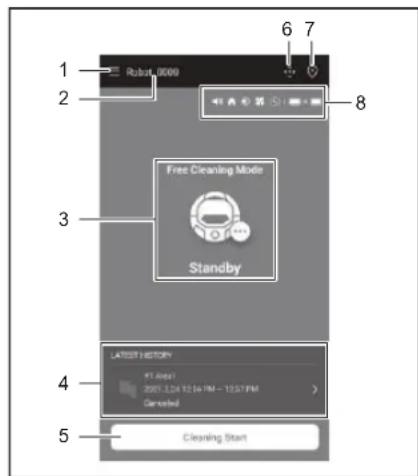
- Kouμπi μενού (διαφρες ρυθμίσεις, ἐλεγχος ΠΤΟβικό)
2.Ovoa pouTOTIKns nAekTpIKns oKoUTtAs - Kaataa an aeoupyiac ts poutiikns nakpikns oountas
4.HTIOIPOOAPATN EYypaqnKαθapiouaTOc (nOTOAεμavicETAI OTNV Θovn EvdeieEwUmoV EPOAOV UAPXeIKAToIA Eyypaqn) - Koupiévapengs kaapiipauotc (xaptoypapno)
- KoumuTnλεχεριστηριο
- Koupié evaalaynpsptwnw aeioupyias
- PoujioeicpoTNIKnsNkEeTIKNGKoUtnacKaiEvatoeVouOaXwpntIKoNTnTa Tns matarapia

HpuoMnTou nXou eivai evpyoToiuevN.

Hpuuian ts aeoupyias npotepaioioinans tsetiatapnpns atny apxik Oean evai evepytoinueyn.
Hduvatotnta avxveuaon oipw eivai evpyoioinjev.

HpuBuiyia tv avmuipnpa aappopnoegival evpyoionmeyn.

Hpuoipn yiaouvexcsKaapiaqivaevpyoiouEvn.

:EvTouevovooxwnpntikotnataipoteps mttapias

:EvatoevoaXwpntikotnTaδiacμatapiac
Eaeyxos twv npoyevotepaw iotopikw
- 2my opox kovovnTnOTo 7y cmoNl (LATEST HISTORY). Mnpoei va nntoTo 2my opox kovovnKoHnOe npoV a nntoTn (ny cmoN) (Cleening history) voi oTe Tpoyevotoc Evopoyce
- Nnne ne neynnnn nn nne ne ne ne

Mx kipko xipoo: Co toxoi Ta eptdoa Tou ayeyuoyov ao tov ouyoipipoLIDAR
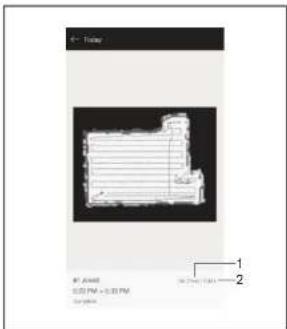
- Méleyro tranyrty rto kaiaprrr.2.Kaumn Kaiaprrnr (mao kato
Oitipcvi to pyeBoc kaiyn kAauyn nTnepoxynou kaBapntkeev
cricipal explic. Xynpnoeumnir, 1392045687, 1392045687, 1392045687, 1392045687, 1392045687, 1392045687, 1392045687, 1392045687, 1392045687, 1401x 1x 20x 20x
Eaywn ts eyypaqns oe npopn apxieou PDF
Mimopoei va npoyoparotjostae eeyeyyiv iys yeyeyiy, o npoyepa epigbiy POK
yoi yei tne 0eepnayr aen yon pohmshre 0s. Oo npocie va onknteere
npocbeia and eeyeyev epogai yeyiyv xepnoepaneroytne npoyepuyi.
Pionpoei are vce yeyeyiy, iys yeyeyiy, o npoyepa epigbiy.
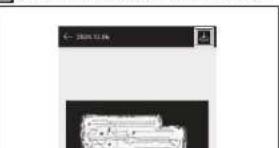
EeYxosTwvIOTopiKwTwvOaAmuTsw
- Pnto to dna oyn moyn [Prohibited Area].
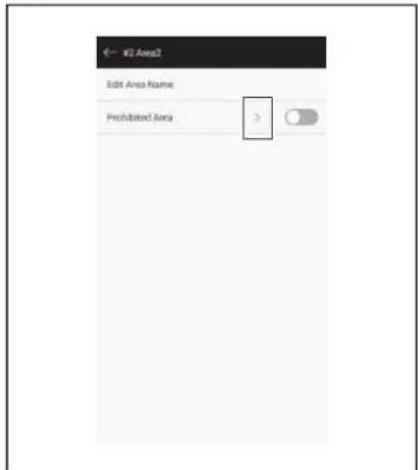
- KaBopioTe iia aTayopeuEv nepioxKabapiaatoc
Mtopeite va natoe to atny enavw deia yvia ts oevns ia v npoaeote ia anayopeuenv nepioxn kaapiaos (ewc kal 100 neipoxcs).
Mtopeite va opete iia atayopeuevn pioxni kaoipoiatoa yia va Tetaekivne.
MTopeite va oupete tvkawdeia ywvia ia atayopeuevnc Tepioxns kaapiaqatoc ia va puogiae to mey0c.
Mntopeite va natnoe to atny enravw apiote np yovia piaac anayopeuevns nepoxns kaapiaipatos vya vbiaypae tnv ev loyepo
MTopeTe va mTnOeTe to Otv EAvw Dgia yvi Tns oovns ia va diaypaWte oae Tc atayopeuEvee nepioxq Kaapiaatos.
utoperte va kaopoeieta ma atayopeuevn pteioxk akapoiatoc de aktiva 2 etpvovwto to oneio evapenc.
Avaoya me to pBakov KVAe aia atayopeuEyn Tepoxn kaopiaatoc Tou exet Kaobipai, avovkrai va niv eivai duvato kaapiaua iaee Tepoxyic yupw anto nvy kaoepiye npxion.
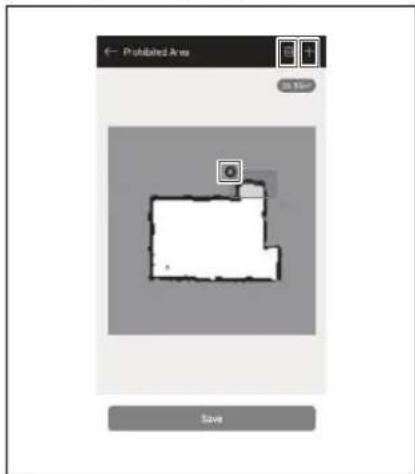
- MoIa TnTnEe TnV EITIAOYn [Save]. Oa KATAxwnpBouv oi TpoTtOInneves PAnpopopiec XApToyPapOnns.
- Ia va Evepyotoiinae tia kataxwnpnvev atayopeuueyn nepioxni Kaapaijao, tainote tn puoiian «Evepytoiogan/Anepeytoiogan» (nt oioia th a eupaviicetai n pe paoiva xpuva av evete emieei tn puoiian «Evepytoiogan») 1mla any emioyn [Prohibited Area].
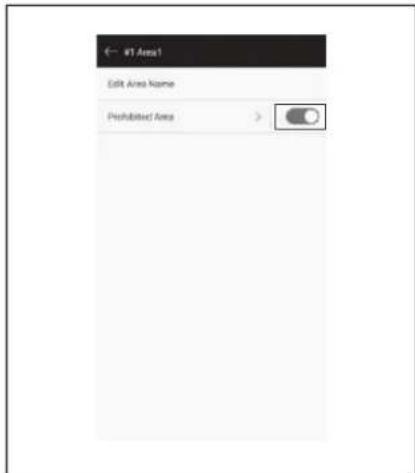
Aiaypaan TAnpoopoiwVxapToypaonns
Kaθoipoos EITIaoywv KaθapiaqatoS
Aaayn Tou Kwoikou PIN
MTopeite va aalaeTe TAV KwDko PIN tspOtonikns NkEeKpnKsOKouTAC.AV
Exaete TAV KwDko PIN TKAOBIOATE, AvatpeTe OTNv ETravapopTuW
puJUeewoNTn ae1b6 26vi n diadikaoia eravaopopac ts pOtonikns
NkEePknKsOKouTAs nEpyoataiakc TPOeTIeYEvEs puBIOeIc.
TIA IN dAiokaia eAeyou Toe yooatoaikou TPOeTIeYEvou KwDko PIN,
avatpeTe tnv Apxkiu pOuian) Otn ae1b6 37.

- ENGLISH (Original instructions)
- Table of Contents
- Warning
- About the Robotic Cleaner
- About cord connected power sources
- Intended use
- Symbols
- Declarations of Conformity
- Safety precautions
- Examples of pictorial signs
- CAUTION
- About handling
- Battery tool use and care
- Important safety instructions for battery cartridge
- SAVE THESE INSTRUCTIONS.
- Tips for maintaining maximum battery life
- For button cell or coin battery
- Precautions regarding radio waves
- Respective trademarks and registered trademarks
- Trademark notice
- Bluetooth
- Names of parts
- NOTICE
- Standard accessories
- Prepare Before Cleaning
- About carrying the robotic cleaner
- About cleaning by the robotic cleaner
- Do not use the robotic cleaner in the following places.
- To prevent the robotic cleaner from falling
- Ensure that the robotic cleaner does not fall.
- 1.Height of 25 cm or higher
- 1.Cliff sensor (five places)
- Less than about 1 m
- Tidying up a place to clean
- Preparation For Use
- Attaching the side brushes
- Unpacking the dust box
- Installing batteries in the remote control
- Indicating the remaining battery capacity
- Installing and removing batteries (sold separately)
- How to install
- How to remove
- Turning the power on/off
- How to turn on the power
- How to turn off the power
- How to read the battery power lamp of the robotic cleaner
- What to set up before cleaning
- Switching the vacuum fan on/off
- Switching the sound setting on/off
- Setting the boundary-sensing feature
- How To Use
- Cleaning
- Cleaning a room with the remote control
- Cleaning a room without mapping (free cleaning mode)
- Cleaning a room with mapping
- Registering room information (mapping)
- Cleaning mapped rooms
- How to read the clean level lamp
- Deleting mapping information
- Suspending or ending cleaning
- Switching the vacuum fan on/off with the remote control
- Using the location beacon function
- Using the ON timer/OFF timer
- Setting the ON timer
- Using the ON timer
- Setting the OFF timer
- Using the OFF timer
- Controlling the cleaning range
- How to attach, remove, and use separately sold items
- How to dispose of garbage
- Setting the Robotic Cleaner
- Setting the time of day
- Setting the time of day again
- Setting up Wi-Fi® (robotic cleaner and smartphone)
- Making a sound setting
- Switching the sound setting on and off with the remote control
- Resetting the settings
- Pairing the robotic cleaner and the remote control
- Care
- Maintenance
- Caring for and replacing the dust box and the filter
- Precautions to take when caring for the underside of the robotic cleaner
- Caring for and replacing the side brushes
- Caring for and replacing the main brush
- Caring for wheels
- Caring for the robotic cleaner
- About repair
- Notification and Error Indication
- Canceling a notification and error indication
- Notification of a need of care, etc.
- Error notification
- Troubleshooting
- Protection function
- Storage
- Optional Accessories
- Smartphone App (For the DRC300)
- What you can do with the app
- How to install the app
- Preparations in advance
- Installing the app on a smartphone
- Initial setting
- Home screen
- Cleaning with the app
- Operating the robotic cleaner with the app
- Checking the history of cleaning
- Checking the latest history
- Checking the past histories
- Exporting the record as a PDF file
- Checking the error histories
- Adding, changing, or deleting mapping information
- Adding mapping information
- Adding mapping information manually (manual mapping)
- Changing the name of mapping information
- Limiting the range of cleaning
- Changing and checking settings
- Changing the name of a registered robotic cleaner
- Setting cleaning options
- Changing the PIN code
- Deleting a registered robotic cleaner's information
- Checking the app information
- Error message/dialogue
- Appendix
- Notice Regarding Open Source Software
- FRANÇAIS
- FRANÇAIS (Instructions originales)
- Table des matieres
- Accessoires standards
- Taend/sluk for strømmen
- Brug af ON-timer/OFF-timer
- ANAKOINΩEH
- Aiaikacia aqapieoNs
- IPOEIADONIOIHSH
- EvpyoioiOn/AeVeypoioiOn Tns oukeun
- Aiaikaciaevepytooinon
- ANAKOINQEH
- ANAKOINΩsH
- Apxikn oOvN
- Eaeyxos twv npoyevotepaw iotopikw
- Eaywn ts eyypaqns oe npopn apxieou PDF
- EeYxosTwvIOTopiKwTwvOaAmuTsw
- Aiaypaan TAnpoopoiwVxapToypaonns
- Kaθoipoos EITIaoywv KaθapiaqatoS
- Aaayn Tou Kwoikou PIN
Brand : MAKITA
Model : DRC300
Category : Robot vacuum