Vamos - Stroller Osann - Free user manual and instructions
Find the device manual for free Vamos Osann in PDF.


User questions about Vamos Osann
0 question about this device. Answer the ones you know or ask your own.
Ask a new question about this device
Download the instructions for your Stroller in PDF format for free! Find your manual Vamos - Osann and take your electronic device back in hand. On this page are published all the documents necessary for the use of your device. Vamos by Osann.
USER MANUAL Vamos Osann
natural_image
Line drawing of a baby stroller and two different household baskets (no text or symbols)DE
ENFRIT
ES
NLPLCZ
SK

osann
Teileliste/Parts list/Liste des pièces/Elenco dei componenti/Onderdelenlijst/Lista de piezas/ Seznam dílů/Katalog części/Zoznam dielov
natural_image
Technical line drawing of a mechanical device with three views: top, side, and front view (no text or symbols)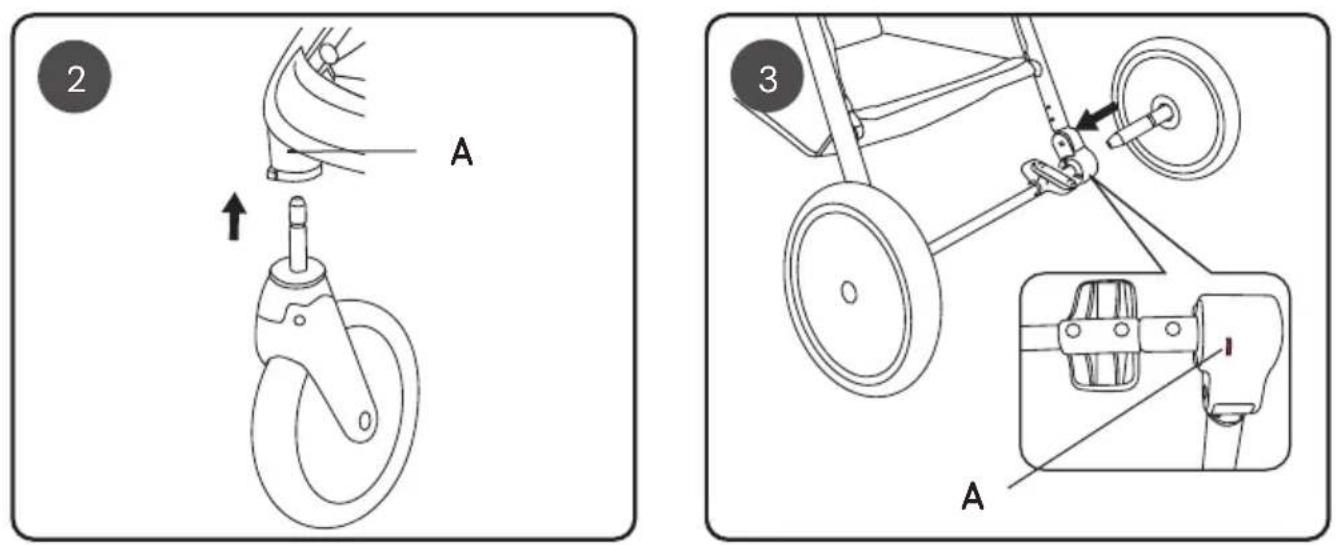
text_image
Technical diagram showing two mechanical assembly steps labeled 2 and 3, with components like a wheel, pulley, and a motor.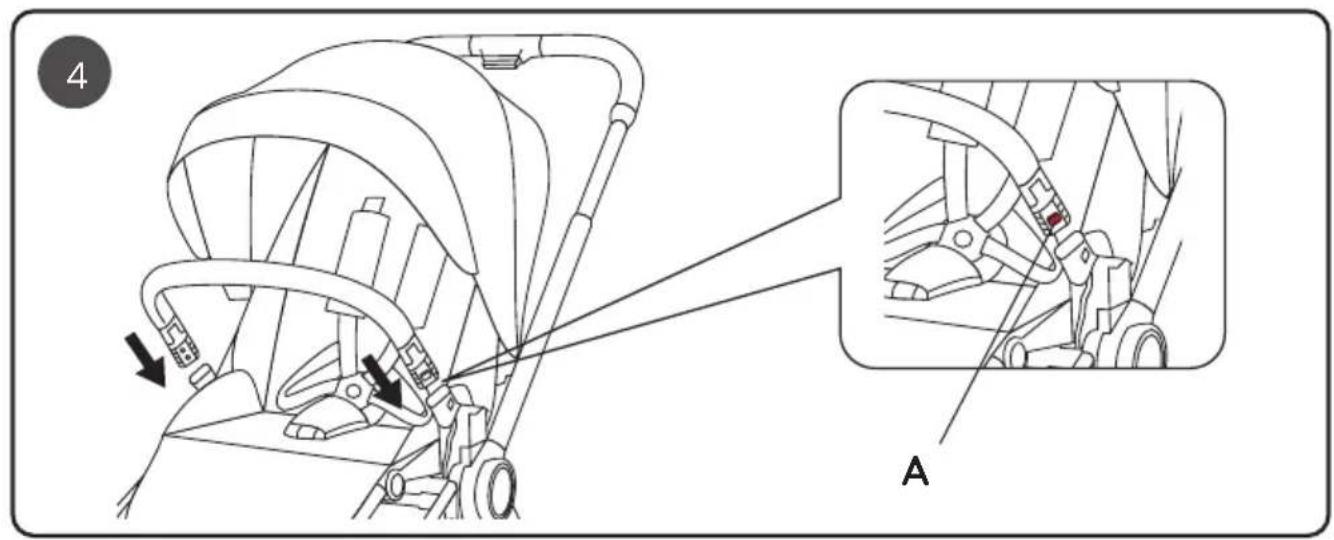
text_image
4 A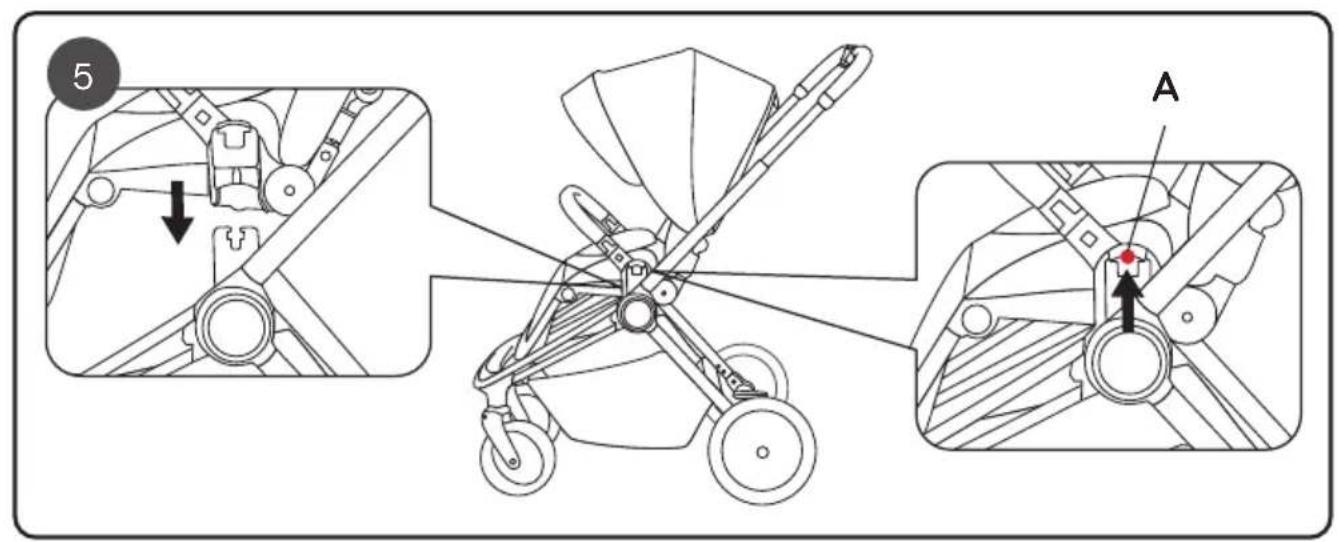
text_image
5 A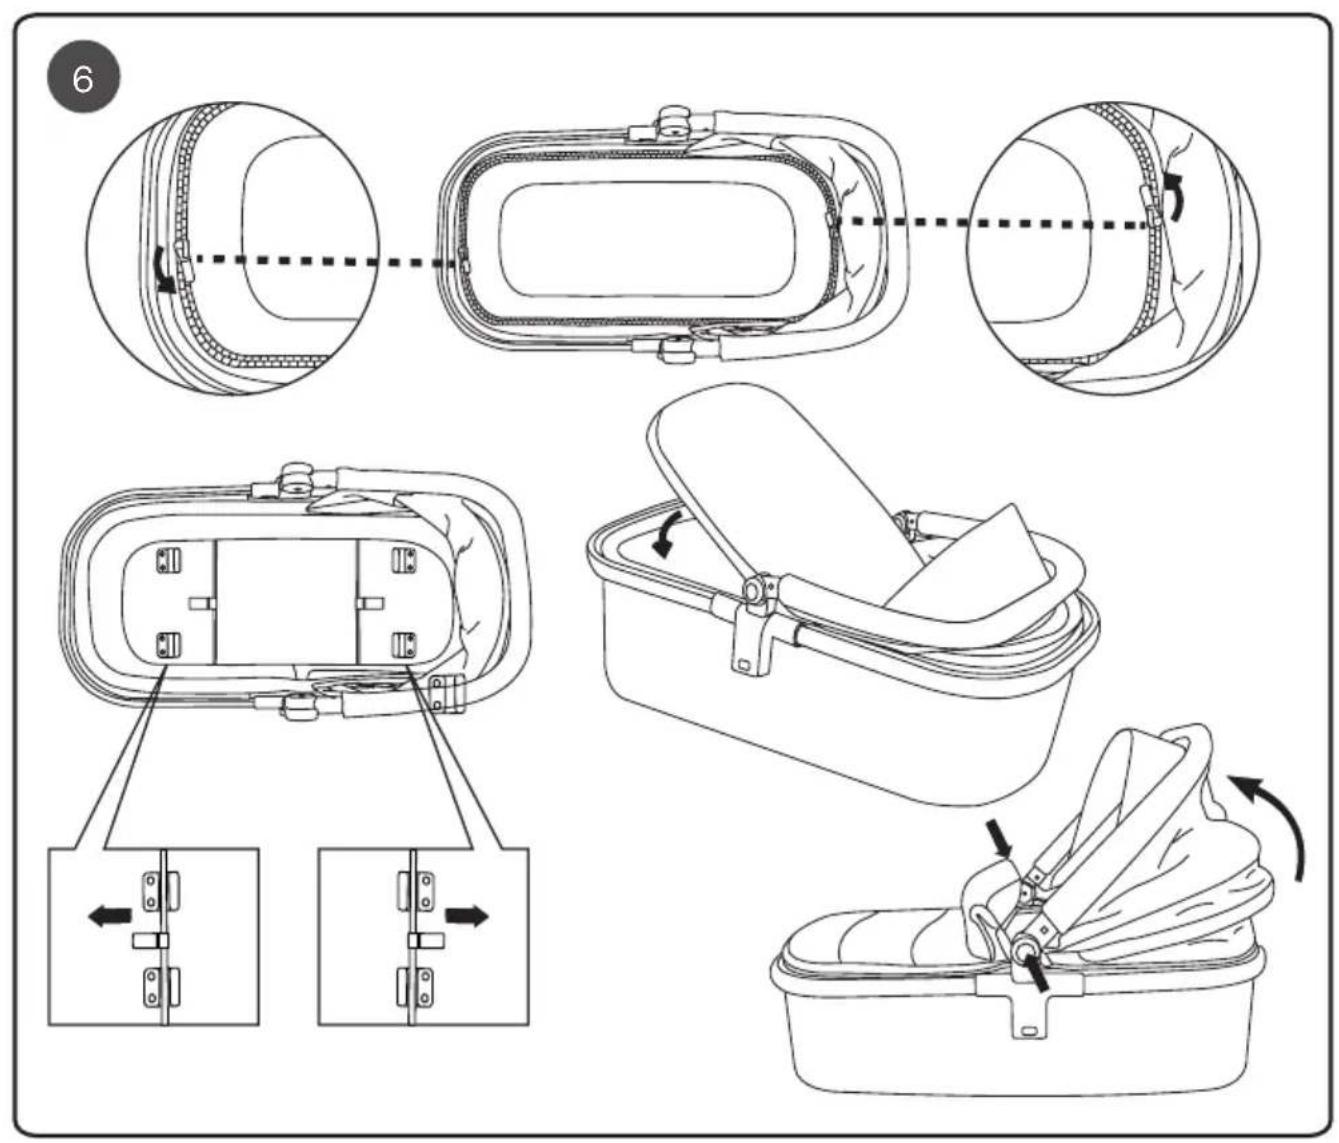
text_image
Technical diagram illustrating the installation and assembly of a device's internal components, with labeled parts and directional arrows.Aufbau- und Bedienungsanleitung/Assembly and operating manual/Manuel de montage et d'utilisation/Manuale di montaggio e d'uso/Montage- en gebruikshandleiding/Manual de montaje y funcionamiento/ Návod k montáži a obsluze/Instrukcja montażu i obsługi/Návod na montáž a obsluhu
text_image
Diagram illustrating three stages of a car seatbelt buckle assembly with numbered parts and directional arrows indicating movement.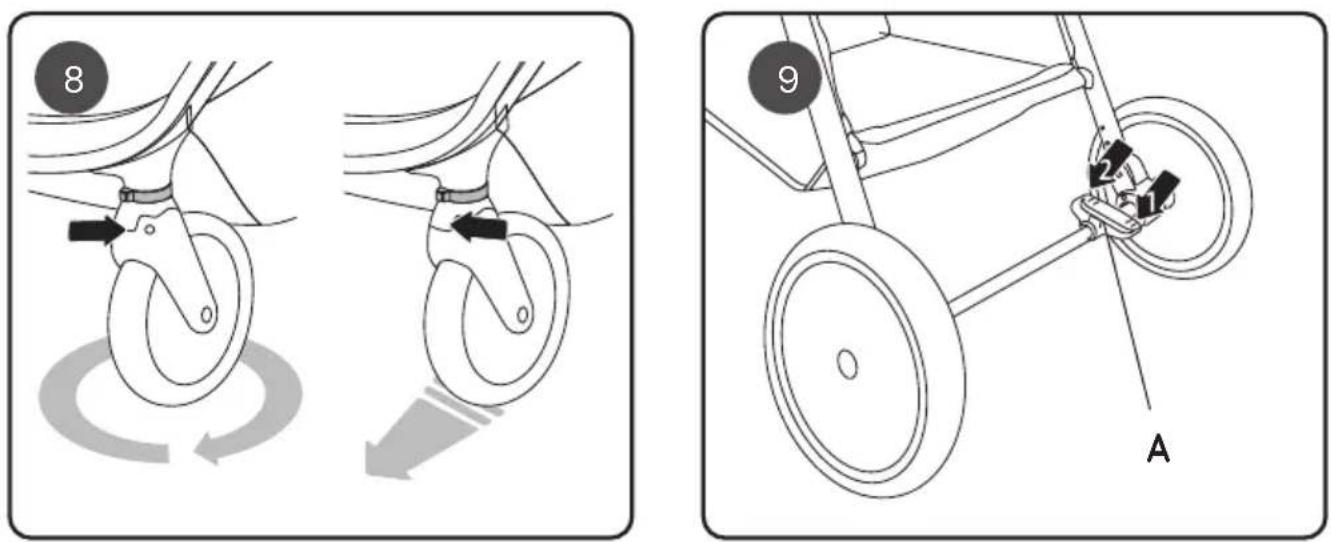
text_image
Diagram illustrating two steps of a bicycle steering wheel, showing clockwise and turn-on states with labeled parts 8 and 9.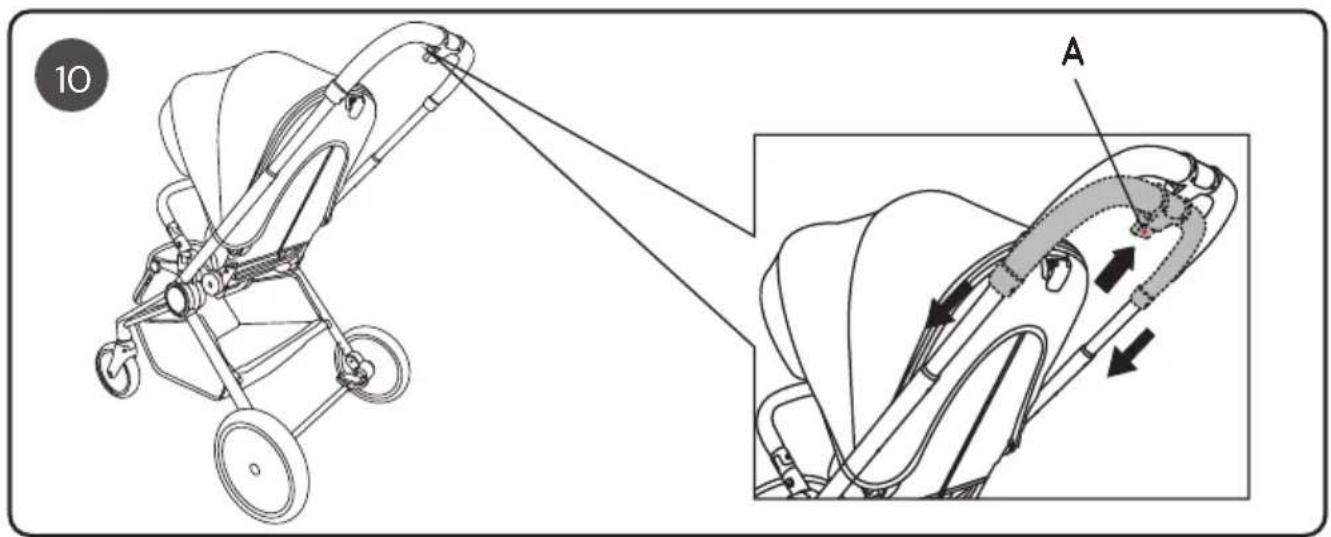
text_image
10 A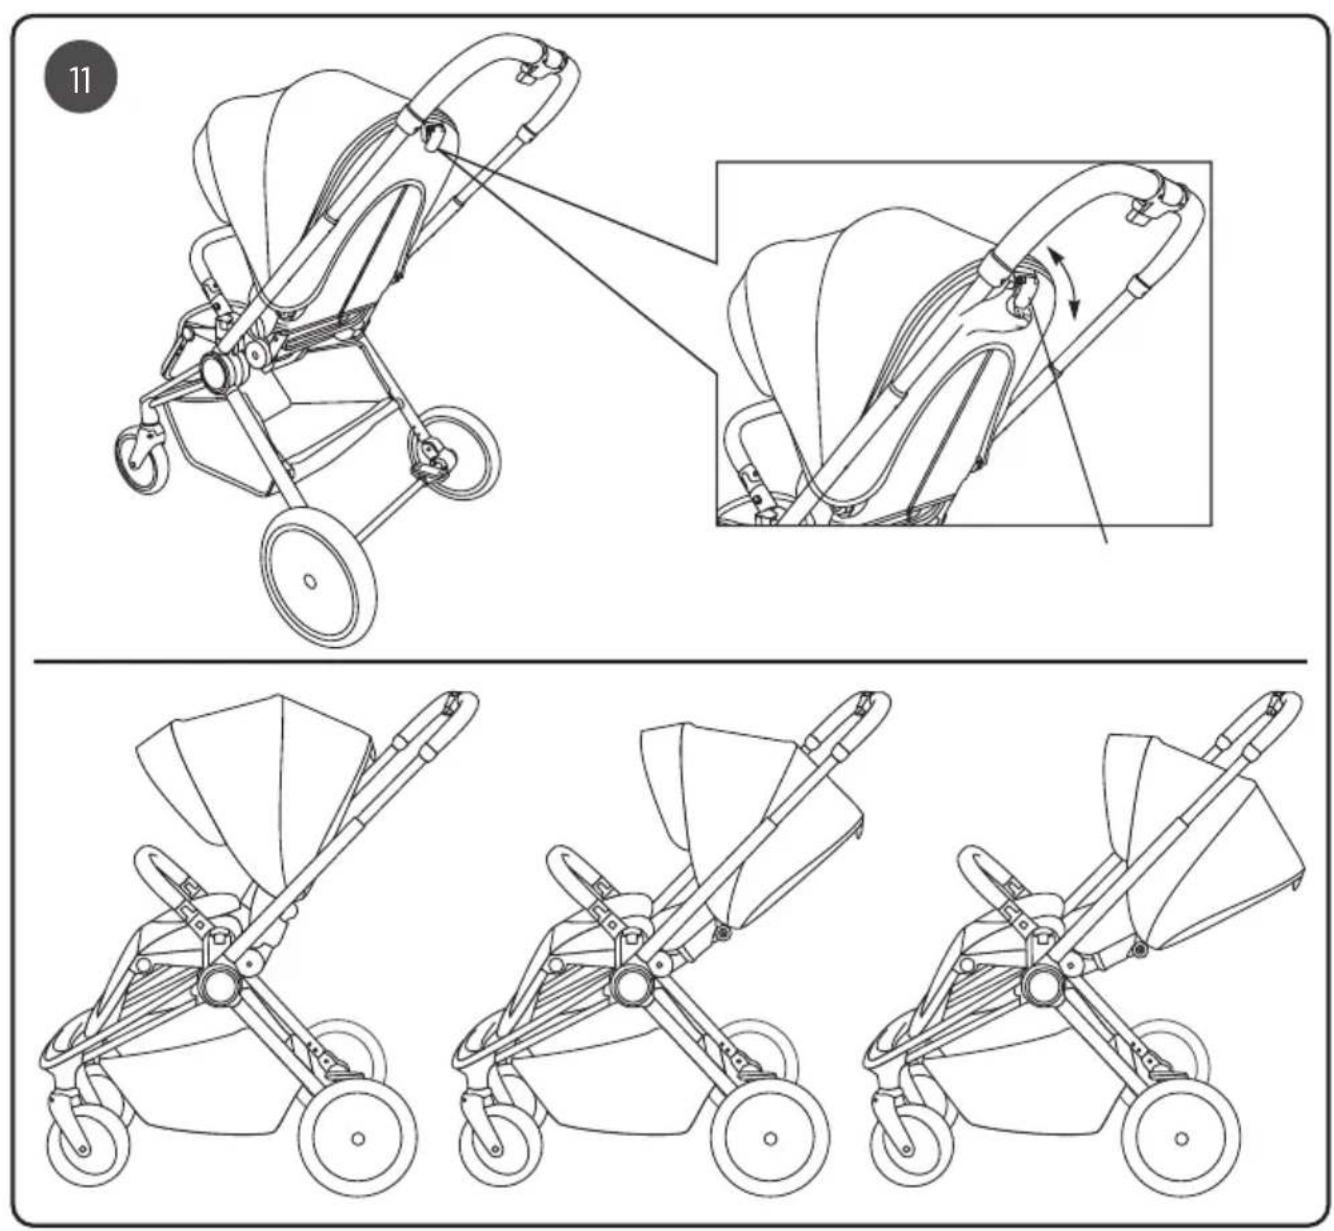
text_image
12 AAufbau- und Bedienungsanleitung/Assembly and operating manual/Manuel de montage et d'utilisation/Manuale di montaggio e d'uso/Montage- en gebruikshandleiding/Manual de montaje y funcionamiento/ Návod k montáži a obsluze/Instrukcja montażu i obsługi/Návod na montáž a obsluhu
text_image
13 A B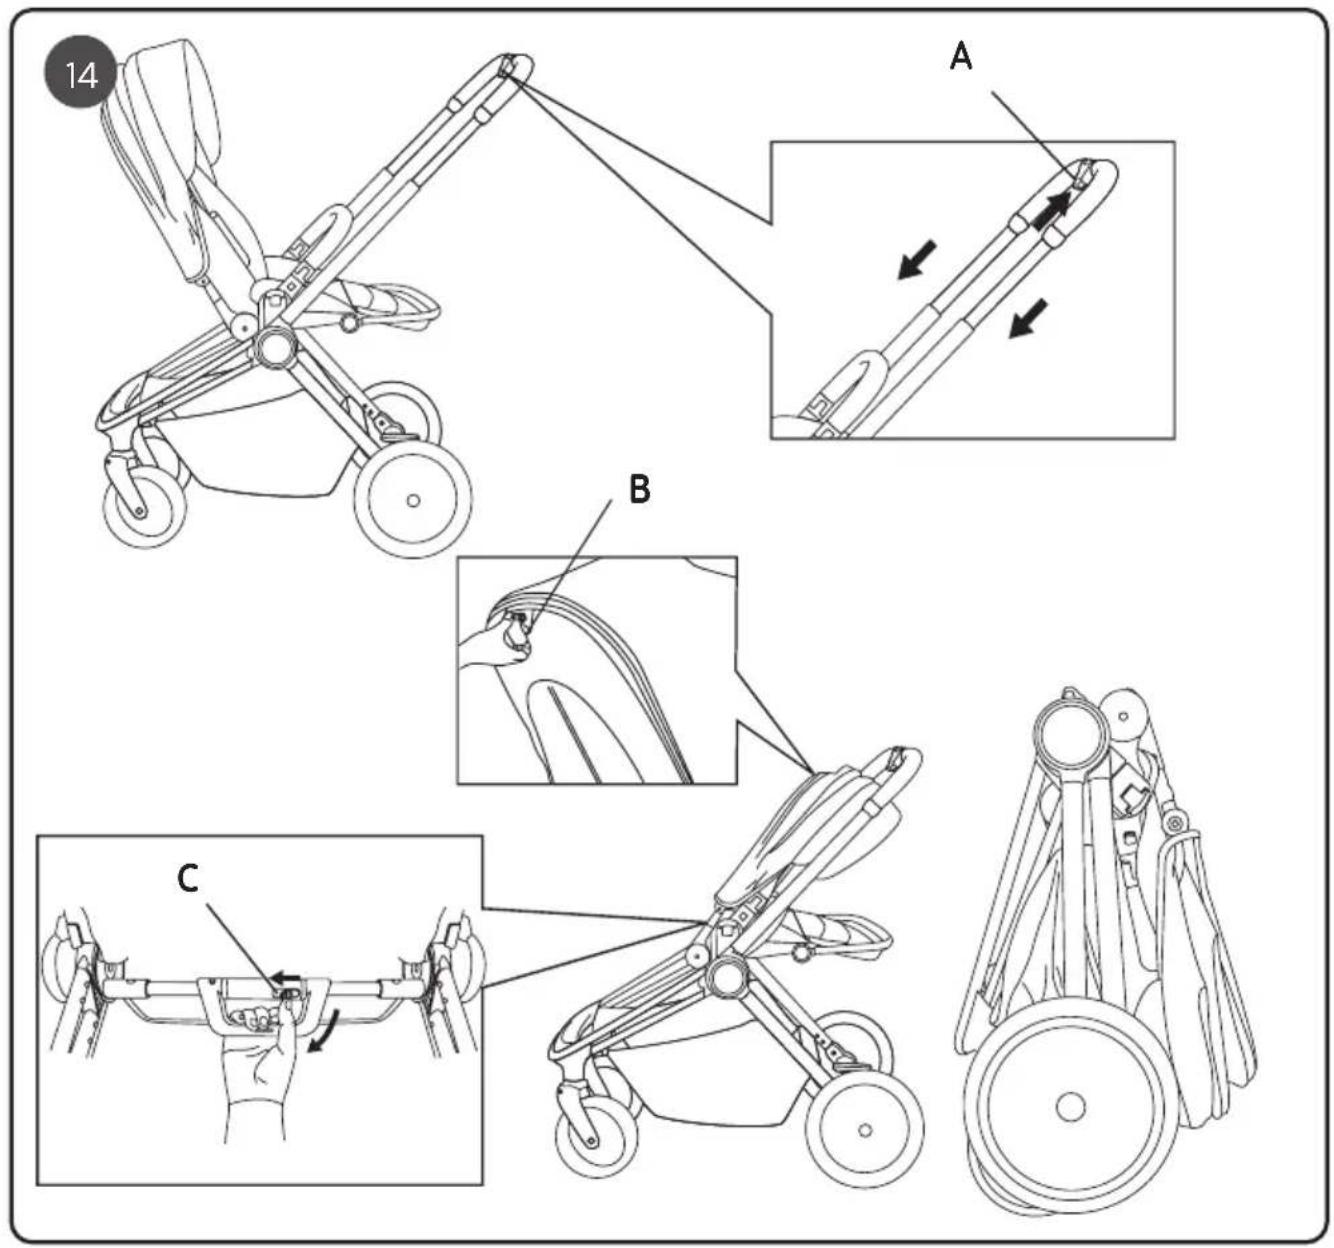
text_image
14 A B CAufbau- und Bedienungsanleitung/Assembly and operating manual/Manuel de montage et d'utilisation/Manuale di montaggio e d'uso/Montage- en gebruikshandleiding/Manual de montaje y funcionamiento/ Návod k montáži a obsluze/Instrukcja montażu i obsługi/Návod na montáž a obsluhu
text_image
15 ① ② ↓ ① ↓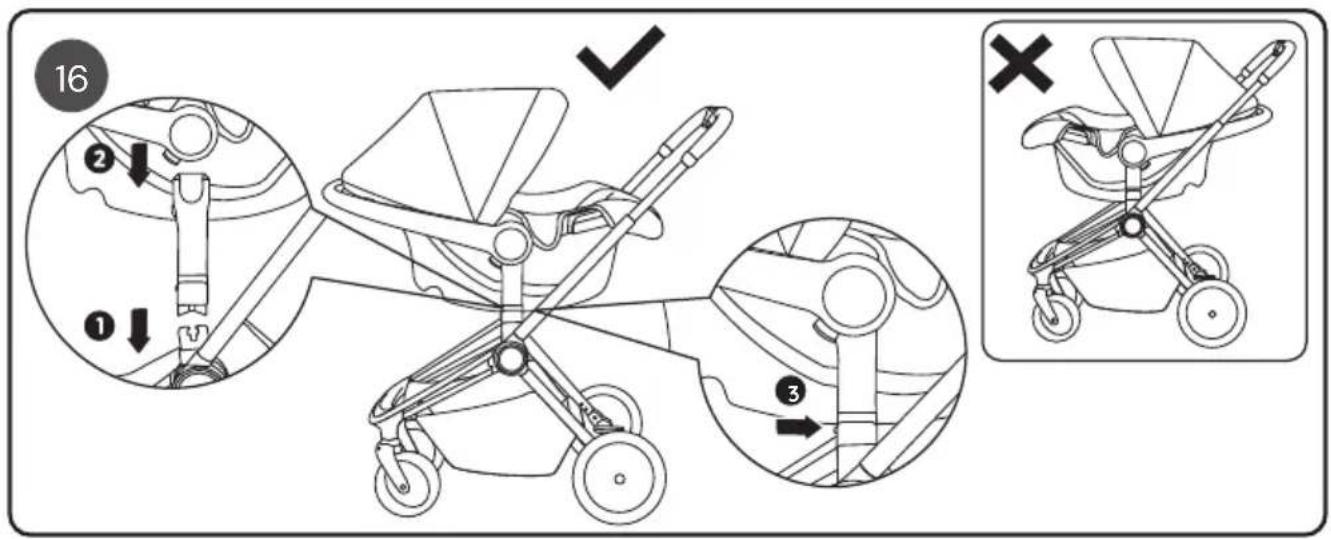
text_image
16 ① ② ✓ ③ ×DE
Thank you for choosing our Vamos combi-pushchair. If you need help with this product, please contact our customer service.
WARNING
- WARNING: Always use the crotch belt in combination with the pelvic restraint. We also recommend using the shoulder belt.
- WARNING: Before use, please ensure that all locking parts are locked.
- WARNING: Do not let your child play with this product.
- WARNING: Before use, please ensure that the push-chair and the seat-holding devices are correctly locked in place.
- The product must be assembled by an adult.
- Use the pushchair only for children who weigh under 22 kg. Otherwise, the pushchair may be damaged. (Please note the respective maximum weight for sports buggy attachment and carrycot).
- Never place more than 4.5 kg in the storage basket, to ensure that the pushchair is not destabilised.
- Do not leave your child unsupervised at any time. Always keep your child in sight.
- Use the pushchair with only one child. Never place bags, shopping bags, packages or accessory parts on the handle or on the cover.
• Overloading, incorrect folding or the use of parts produced by other manufacturers may have a negative effect on the safety of the pushchair or damage it. - Never use the pushchair with accessory parts produced by other manufacturers.
- Read all the information in this manual before using this product. Retain the manual so you can refer to it at a later date. Failure to observe these warnings and instructions may lead to serious injuries or to death.
- The seat belts and the restraining device must be used correctly.
-
Always use the seat belts to prevent serious injuries caused by falling or sliding out.
-
Ensure that your child does not come into contact with moving parts when you set up the pushchair.
- If the belt system is not used, the child may slip into the leg openings and be strangled.
- Do not use the pushchair on stairs or escalators.
- Keep away from hot objects, liquids and electronic devices.
- Do not allow your child to climb onto the pushchair or to sit in the pushchair with their head hanging forwards.
- Do not place the pushchair on roads or on sloping or otherwise dangerous areas.
- Ensure that all mechanical parts are locked before using the pushchair.
- To avoid strangulation, do not place any objects with a band around your child's neck. Remove the bands from such objects or secure them in another way.
- Do not place anything on the handle to prevent the pushchair from tipping over.
- Do not lift the pushchair whilst your child is sitting in it.
- Do not place your child in the storage basket.
- Do not allow your child to climb onto the pushchair, as this may cause it to tip over. Always lift your child into or out of the pushchair.
• Always be careful when folding up or unfolding the pushchair to ensure that nothing gets stuck in it. - Always ensure that the pushchair is fully folded up or unfolded before letting your child come close to it.
- To ensure your child's safety, check that all parts have been assembled and secured before using the pushchair.
- Keep your child away from the cover so that your child does not get tangled in it.
- Always activate the brakes when parking the pushchair.
- Do not use the pushchair if it is damaged.
- The pushchair may be used only at walking pace.
• To avoid choking hazards, remove plastic bags and the packaging materials before using this product. Plastic bags and packaging materials should be kept away from babies and children.
• This product is not suitable for jogging or skating.
- The sports buggy attachment is suitable for children from birth up to a maximum body weight of 22 kg.
- Use the parking brake when placing the child in or taking the child out of the pushchair.
- The carrycot is only suitable for children who cannot sit independently, turn and/or support themselves with their hands and knees. Maximum weight of the child: 9 kg.
- The carrycot is not suitable as a long-term sleeping place or as a substitute for the classic cot/crib.
- Only use the mattress supplied with the carrycot. Do not add another mattress.
- For baby seats with the frame: not suitable for longer walks for ergonomic reasons. The carrycot should be used in this scenario.
- Please make sure that the child's head is never lower than their body in the carrycot.
- Before carrying or lifting, please make sure that the handle is in the correct position for use.
- Do not let other children play unsupervised near the carrycot.
- The pushchair should be checked regularly for damage and signs of wear.
- Tested to EN 1888-1:2018, EN 1888-2:2018 & EN 1466:2014+AC:2015.
CARE INSTRUCTIONS
- Cleaning and maintenance of the sports buggy must be carried out only by adults.
- The cover is not removable. Clean fabric parts with a damp sponge and a neutral cleaning product. Please follow the instructions on the care label.
- Clean the frame of the pushchair only with standard soap and warm water. Do not bleach or clean with any other cleaning products.
- Inspect your pushchair regularly for any loose screws, worn parts, worn materials or ripped seams. Replace or repair the parts if necessary.
- In the event of excessive exposure to sun or heat, parts may fade or become deformed.
- If the pushchair gets wet, open the cover and leave it to dry fully before storing.
- If the wheels squeak, apply a light oil (e.g. silicone spray, anti-rust oil, or sewing machine oil). It is important that the oil penetrates into the axle and the wheel connection.
- If you go for a walk on the beach with your push-chair, you must clean it thoroughly afterwards to remove sand and salt from the mechanism and the wheel connections.
MAINTENANCE
Regularly check the condition of the product for any damage. In the event of damage, do not use the product and keep it out of the reach of children.
In case of any issues, please contact Osann Customer Service on +49 (0) 7731 / 970077.
EN
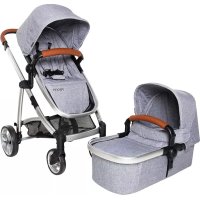
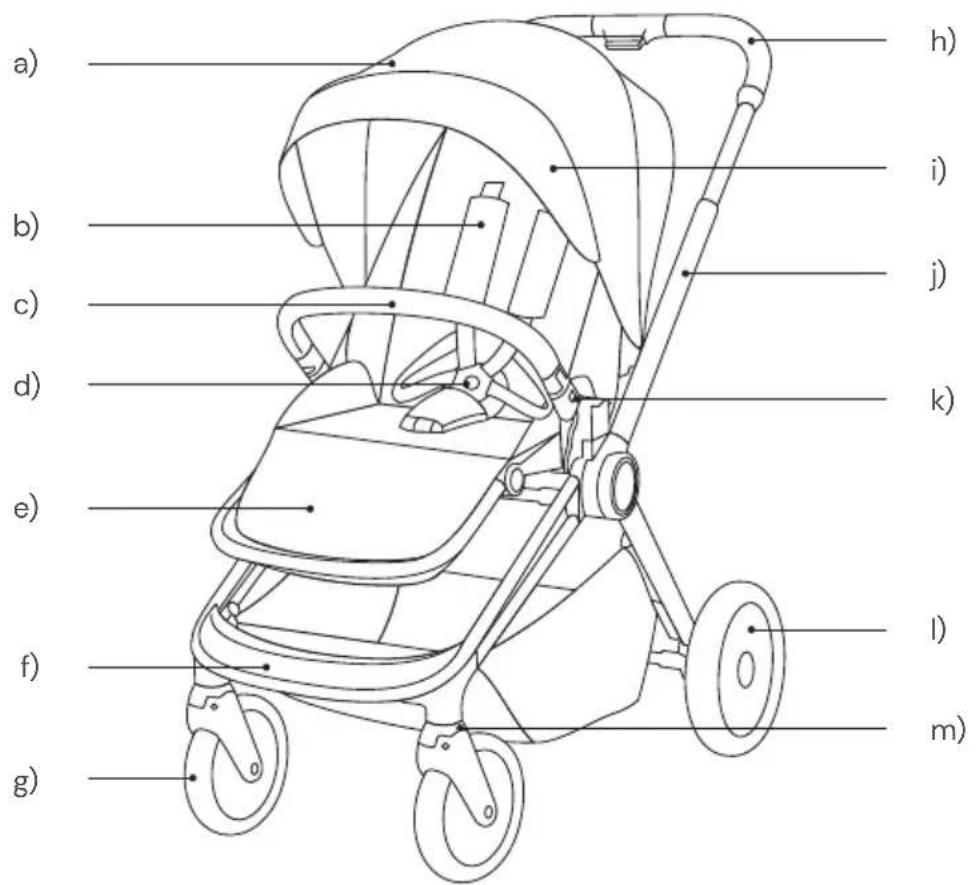
Parts list
a) Sports buggy attachment
b) Shoulder pad
c) Guard bar
d) Belt lock
e) Leg support
f) Footrest
g) Front wheel
h) Push handle
i) Sun visor
j) Frame
k) Release button for guard bar
I) Rear wheel
m) Locking lever for front wheel
n) Sports buggy attachment cover
o) Button for removing the sports buggy attachment
p) Button for adjusting the leg support
q) Button for adjusting the height of the push handle
r) Lever for adjust the seat position
s) Shopping basket
t) Parking brake
u) Carrycot carrying handle
v) Carrycot
w) Carrycot cover
x) Sun visor
y) Carrycot cover
z) Button for adjusting cover
aa) Carrycot adapter set
ab) Carrycot adapter set (optional, may be available as an accessory)
1) Unfold the frame
Unfold the frame by pulling the push handle upwards until you hear a click. Check that the frame is fully engaged.
2) Mount the front wheels
Insert the front wheels into the front axle until you hear a click. Check that the front wheels are fully engaged. To remove the front wheels again, press the button on the front axle (A) and pull the wheels out of the axle.
3) Mount the rear wheels
Insert the rear wheels into the rear axle until you hear a click. Check that the rear wheels are fully engaged. To remove the rear wheels again, press the button on the underside of the respective rear axle (A) and pull the wheels out of the axle.
4) Guard bar for sports buggy attachment
Insert the guard bar into the openings provided on the sports buggy attachment until you hear a click. Check that the guard bar is fully engaged. To remove the guard bar again, press the button (A) on both sides of the guard bar and pull it away from the sports buggy attachment. The guard bar can only be opened and unfolded on one side to make it easy to put your child in.
5) Sports buggy attachment
Insert the sports buggy attachment into the designated sockets on the frame until you hear a click. Check that the sports buggy attachment is fully engaged. The sports buggy attachment can be mounted on the frame either in the direction of travel or facing the pushchair. To dismantle the attachment again, press the buttons (A) on both sides of the attachment and pull it off the frame.
6) Assemble the carrycot
First remove the mattress. Open the inner zip of the carrycot so that you can remove the inner cover. Push the metal brackets from the inside to the outside into the fixings so that the carrycot opens up. Check that the metal brackets are fully engaged in the fixing points. Reinsert the cover and close the zip. Put the mattress back in. Model-dependent: The front sun visor on the cover of the carrycot can be removed for transport reasons. Reattach it to the cover using the zip fastener.
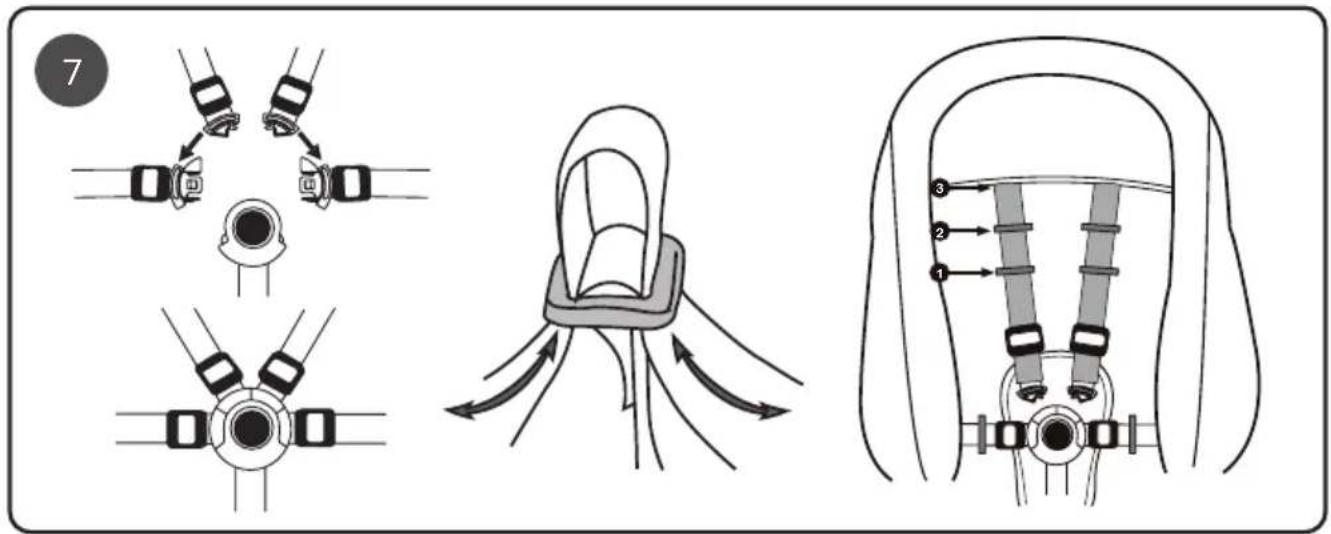
7) Sports buggy attachment belt system
The harness system is individually adjustable in both the shoulder and pelvic areas. In addition, there are three height settings. To adjust the shoulder straps to the lower positions, please thread them through the sewn loops.
Babies and toddlers under 6 months: Please use the lowest height setting and thread the side pelvic straps through the loops in the pelvic area.
8) Front wheel swivel function
You can lock or swivel the front wheels using the lever on the front wheel.
9) Brake
Operate the brake (A) at the front point (1) to lock it or at point (2) to release it.
10) Adjusting the push handle height
Press the button (A) on the push handle, pull or push the push handle to the desired height and release the button. Check that the push handle is fully engaged in the desired position.
11) Adjust the backrest
Pull the lever at the top of the backrest and adjust to the desired position. Check that the backrest is fully engaged in the desired position.
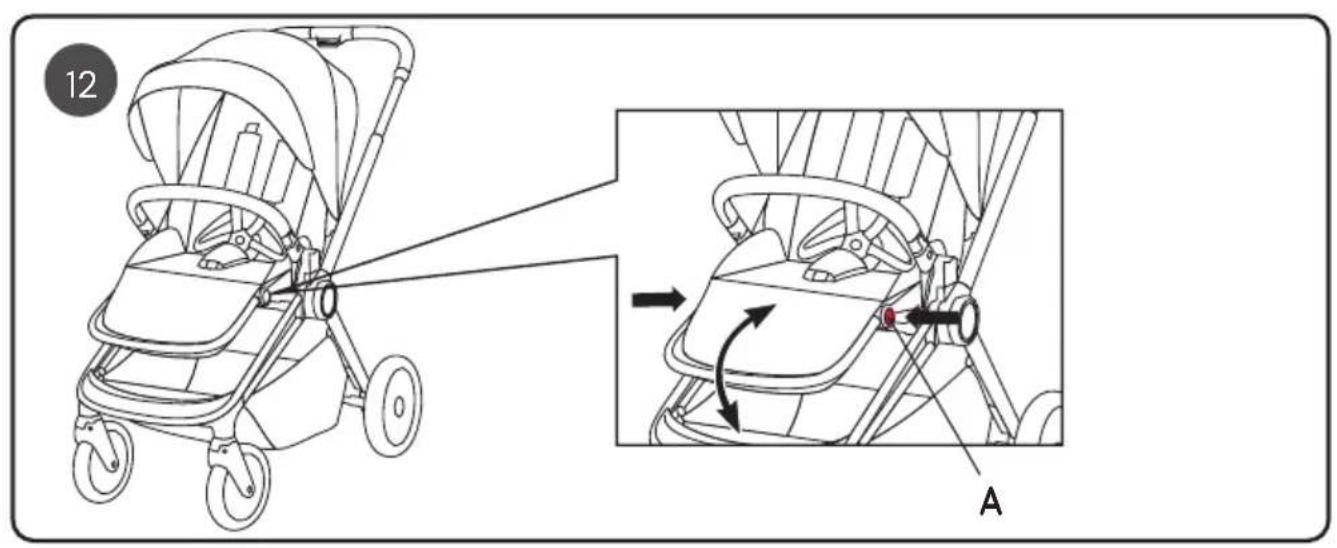
12) Adjust the leg support
Press button (A) on both sides of the leg support and adjust it to the desired position. Check that the leg support is fully engaged in the desired position.
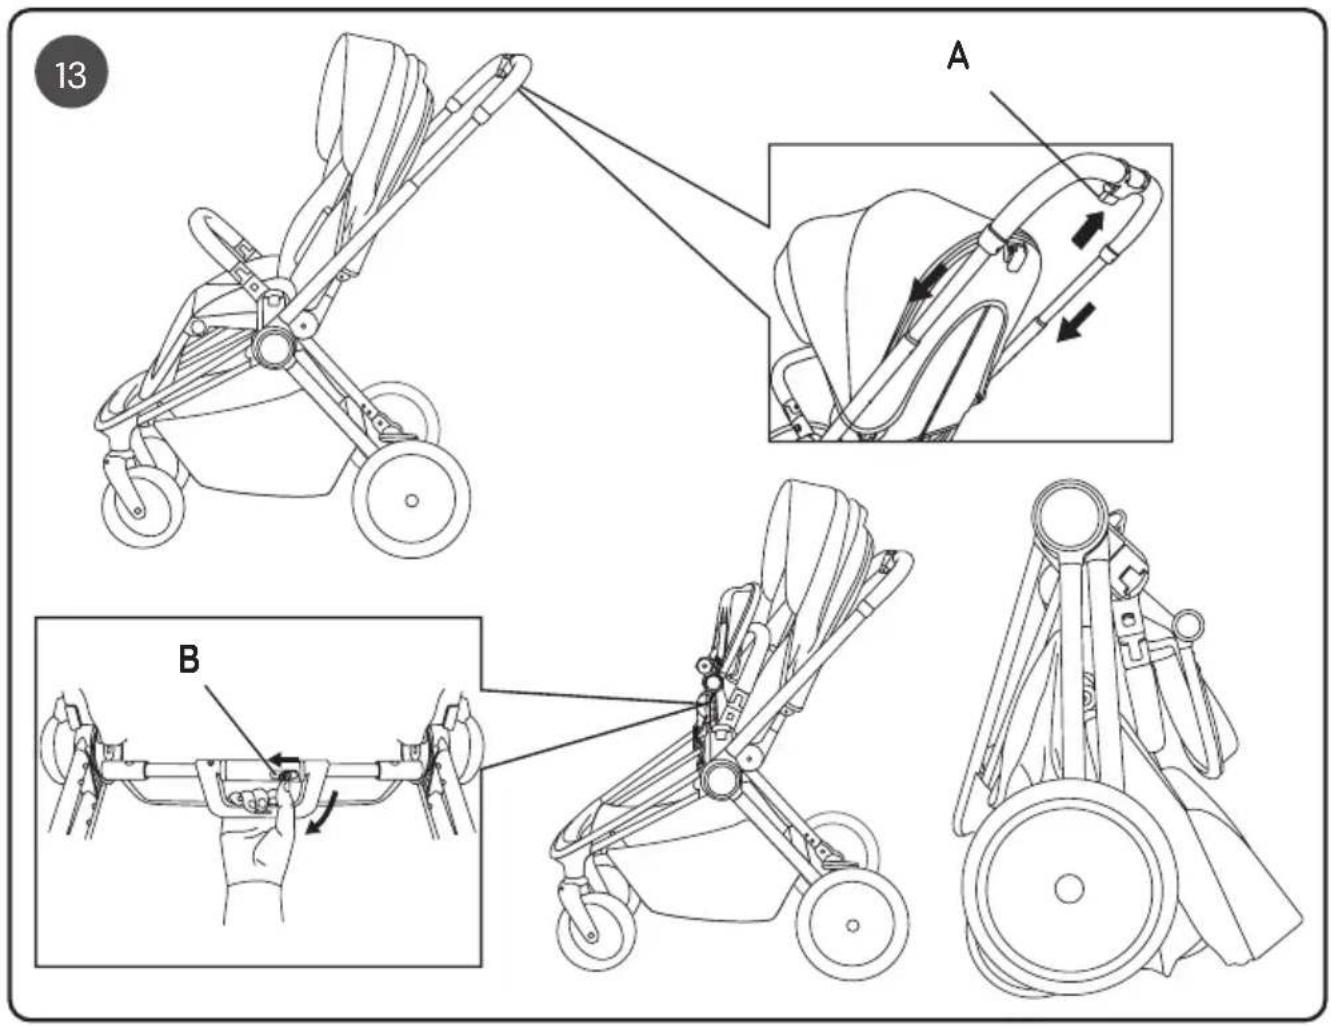
13) Fold the pushchair with sports buggy attachment, forward facing
Note: Always apply the parking brake before folding.
First bring the push handle to the lowest height setting (A). Fold the leg support completely upwards. Push the safety button on the folding lever (B) underneath the sports buggy attachment to the left, pull the lever upwards and lift the pushchair at the same time. It can now be folded.
14) Folding the pushchair with push-chair attachment, rear facing
Hint: Always apply the parking brake before folding.
First bring the push handle to the lowest height setting (A). Use the backrest adjustment lever (B) and push the backrest towards the push handle. Push the safety button on the folding lever (C) to the left, pull the lever upwards and lift the pushchair at the same time. It can now be folded.
15) Use with carrycot
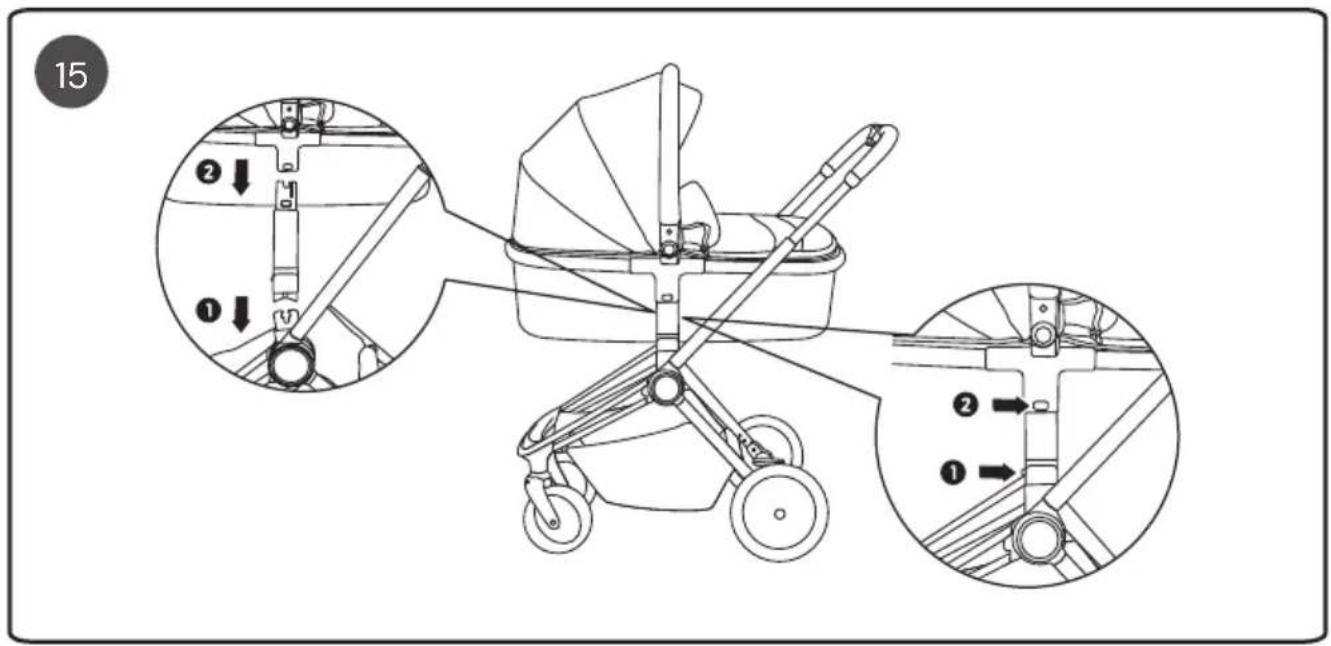
First put the carrycot adapters onto the frame and make sure they are fully engaged. Then put the carrycot on the adapters attached to the frame and make sure that the carrycot is fully engaged.
To detach the carrycot from the frame, press the button (2) on both sides of the frame as shown in the graphic on the right and lift the carrycot out. To detach the carrycot adapters from the frame, press the button (1) and pull the adapter off the frame. Repeat the process on the other side.
Attention: It is not possible to fold the frame with the carrycot. Remove the carrycot and the carrycot adapters before folding.
Note: Always apply the parking brake before folding.
16) Use with baby seat (optional)
First put the baby seat adapters onto the frame (1) and make sure that they are fully engaged. Then place the baby seat (2) on the adapters attached to the frame and again make sure that the baby seat is fully engaged. The baby seat is not included. Please also refer to the baby seat instruction manual for how to install and remove with a pushchair and adapters.
Never use the baby seat with the adapters when facing forwards! The baby seat must always be mounted so that they are facing the push handle.
To detach the baby seat adapters from the frame, press the button (3) on both sides of the frame as shown in the graphic on the right and pull the adapter off the frame. Repeat the process on the other side.
Attention: It is not possible to fold the frame with the baby seat. Remove the baby seat and adapter before folding.