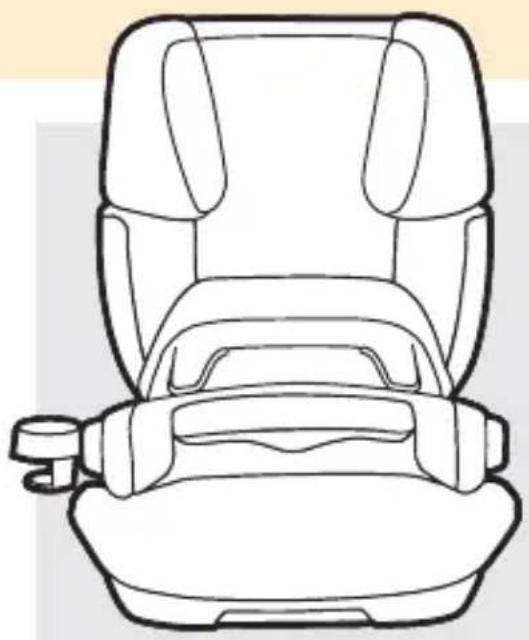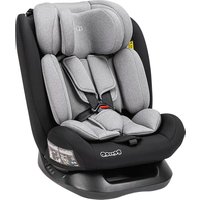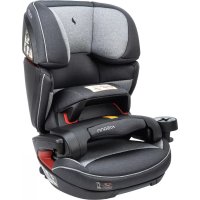
Jazzi PS - High chair Osann - Free user manual and instructions
Find the device manual for free Jazzi PS Osann in PDF.


User questions about Jazzi PS Osann
0 question about this device. Answer the ones you know or ask your own.
Ask a new question about this device
Download the instructions for your High chair in PDF format for free! Find your manual Jazzi PS - Osann and take your electronic device back in hand. On this page are published all the documents necessary for the use of your device. Jazzi PS by Osann.
USER MANUAL Jazzi PS Osann
natural_image
Line drawing of a car seat with front and back compartments (no text or symbols)DE
EN
FR
IT
NL

osann
DE
-2-
natural_image
Diagram of a car with two red objects inside, no text or symbols present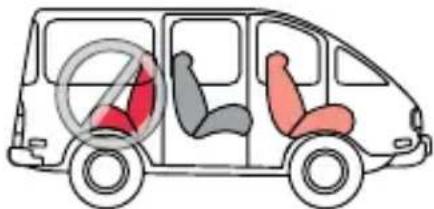
text_image
Diagram of a van with seatbelt and passenger seat, showing no exhaust or no litter inside the cabin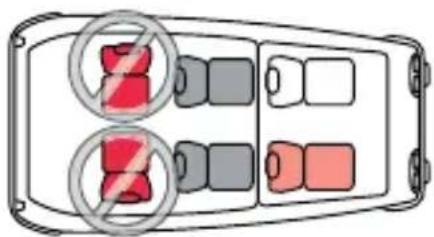
text_image
Diagram showing two switches with red prohibition symbols, one crossed out by a black circle and the other by a white circle.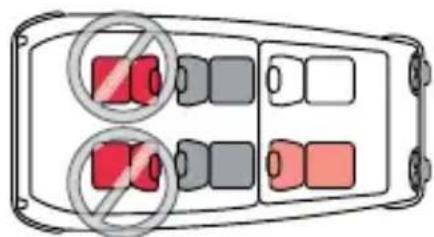
text_image
Diagram of a device control panel with two red indicator lights and no stop symbols, likely indicating no switches or restrictions.natural_image
Line drawing of a car seat assembly with labeled components (no text or symbols)natural_image
Technical line drawing of a mechanical component with no visible text or symbolsnatural_image
Line drawing of a car seat assembly with labeled components (no text or symbols)Kopfteilverstellung
natural_image
Line drawing of a hand holding a small object with a blue arrow pointing to it (no text or symbols)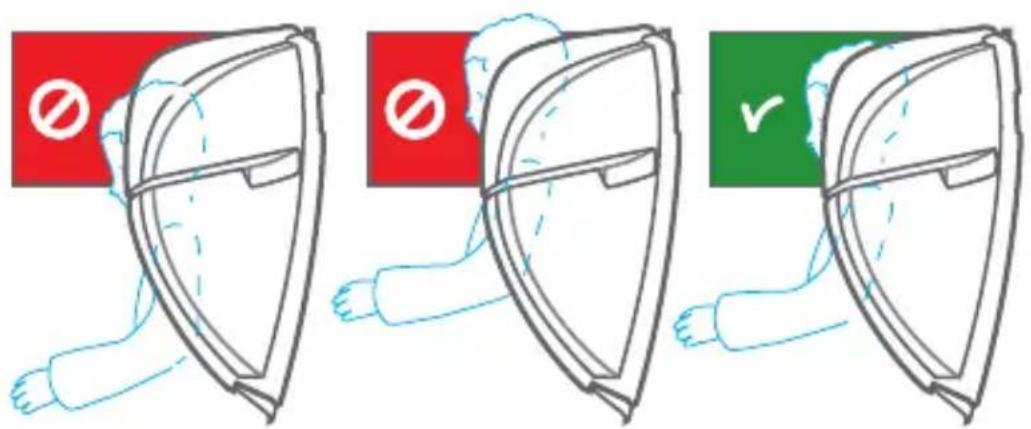
text_image
Diagram showing three steps of a shield with prohibition symbols, including a checkmark and a red background.DE
natural_image
Line drawing of a car seat with open lid and seatbelt, no text or symbols present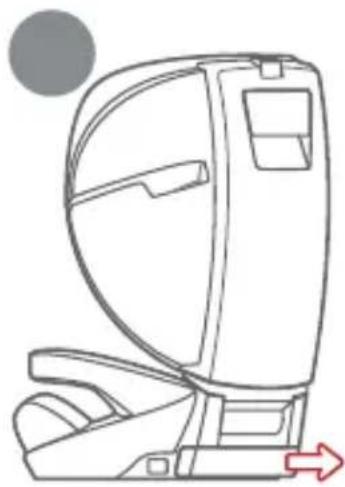
natural_image
Line drawing of a car seat assembly with a red arrow indicating direction (no text or symbols)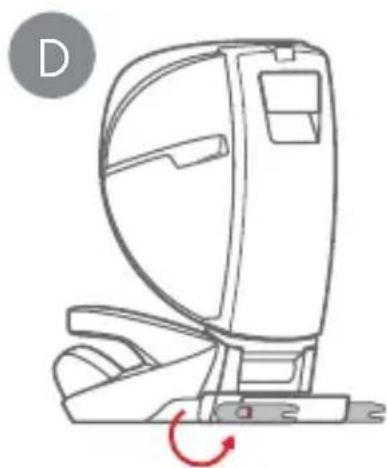
natural_image
Line drawing of a mechanical device with a red circular indicator (D) and a red curved arrow indicating rotation or motion (no text or symbols)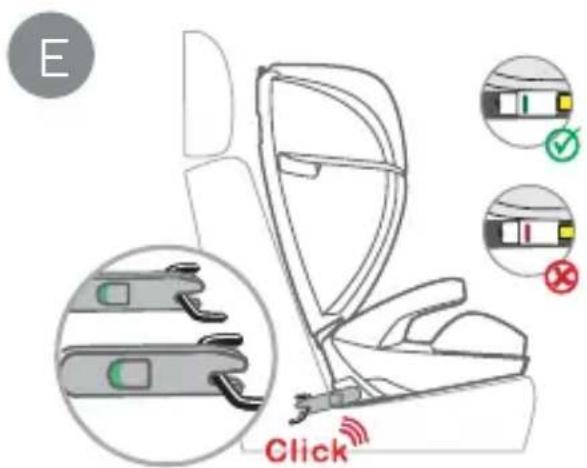
text_image
E ClickDE
natural_image
Line drawing of a car seat with a red arrow indicating a specific seat area (no text or symbols present)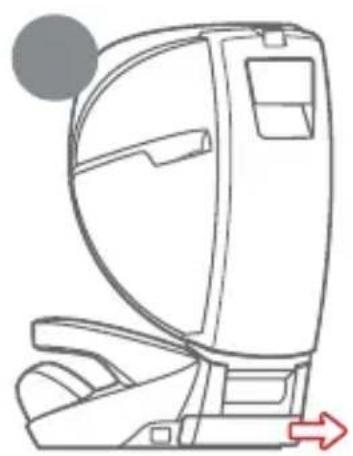
natural_image
Line drawing of a car seat assembly with a red arrow indicating left side (no text or symbols)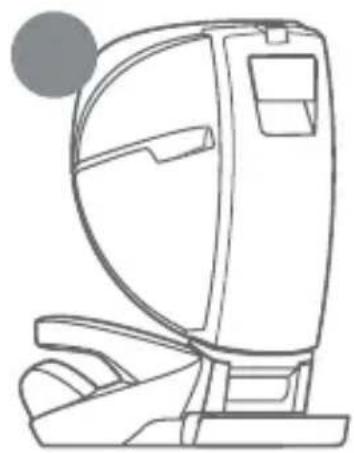
natural_image
Line drawing of a modern office chair with front panel and side arm (no text or symbols)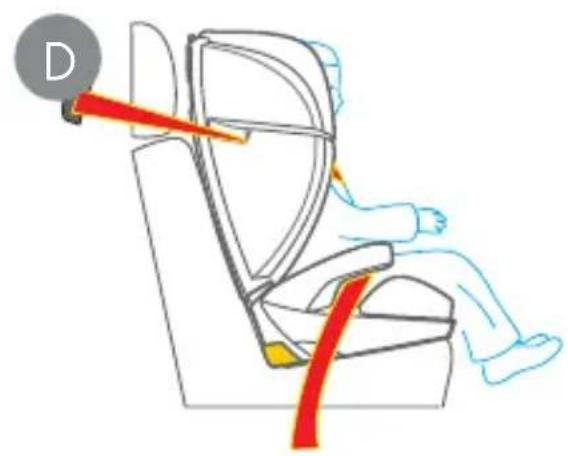
natural_image
Illustration of a person seated in a car seat with a red belt, no text or symbols present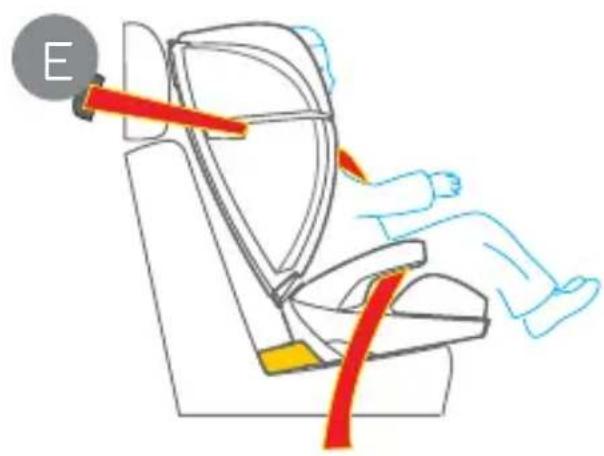
natural_image
Illustration of a person using a red belt on a car seat, no text or symbols presentDE
natural_image
Line drawing of a car seatbelt with red arrows indicating left and right motion (no text or symbols)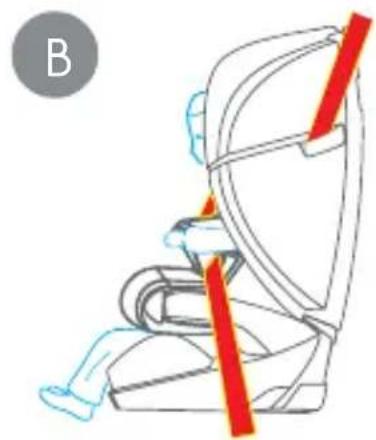
natural_image
Line drawing of a child's seatbelt with red belt, no text or symbols present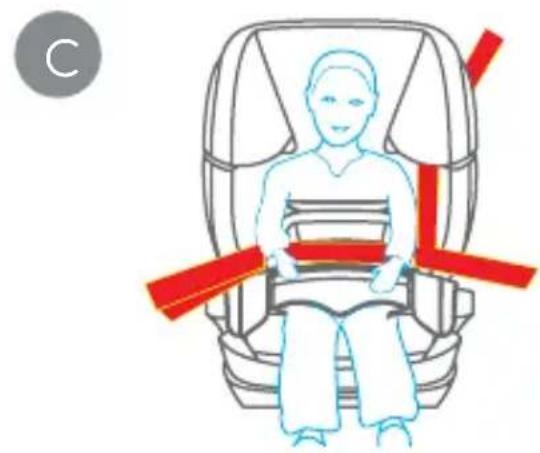
natural_image
Illustration of a person seated in a car seat with red straps, no text or symbols present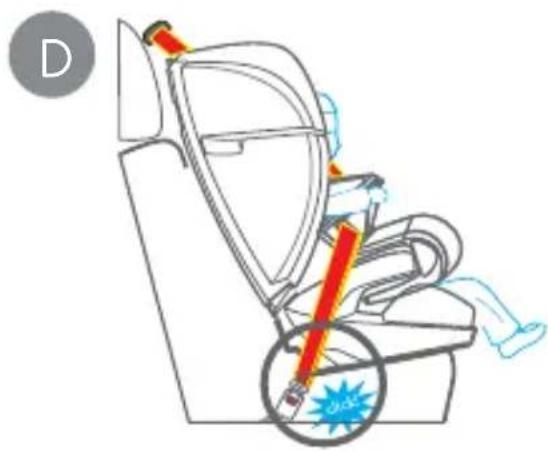
natural_image
Line drawing of a car seatbelt with red and blue stripes, no text or symbols presentnatural_image
Illustration of a person sitting in a car seat with a red belt and green leaf, no text or symbols present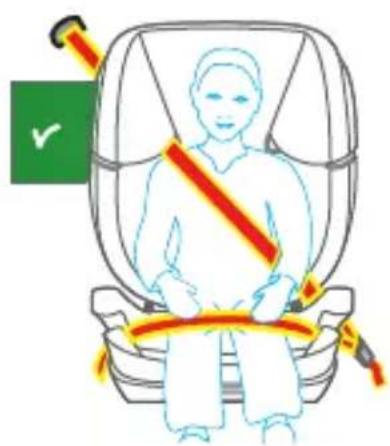
text_image
Diagram illustrating seatbelt usage in a car seat, showing a person seated with red belt and yellow belt, marked with a green checkmark.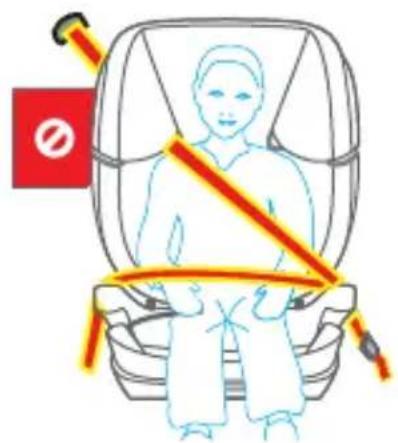
text_image
Diagram illustrating seatbelt usage with a person seated in a car seat, showing no seatbelt and red belt with warning symbolDE
natural_image
Line drawing of a car seat with red safety belt and orange grip, labeled 'A' in top-left corner (no text or symbols on diagram)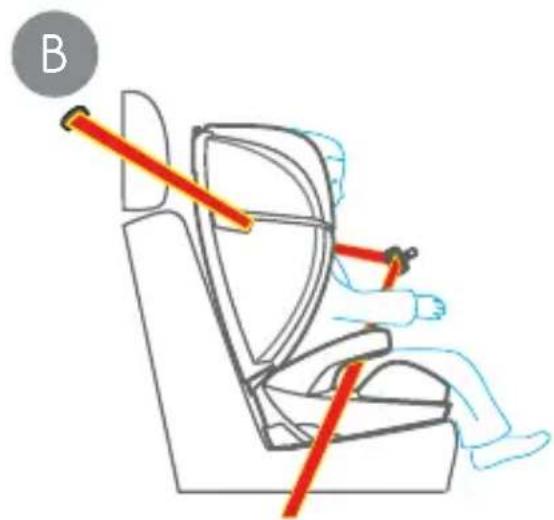
text_image
B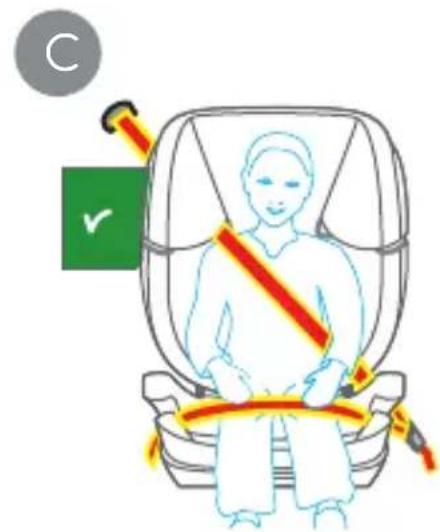
text_image
C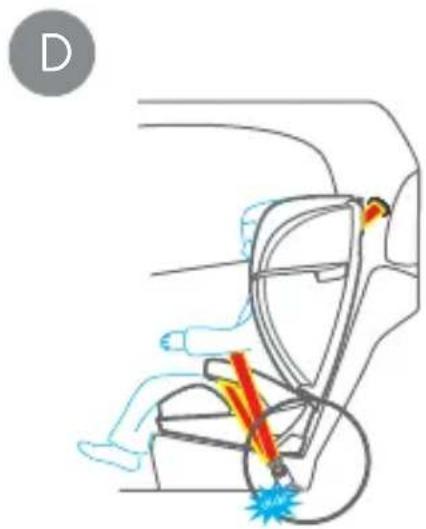
natural_image
Diagram of a person seated in a car seat using a belt drive a wheel, showing red and blue motion lines (no text or symbols)natural_image
Diagram of a car head with red directional arrows indicating motion or force (no text or symbols)DE
REINIGUNG
Thank you for choosing our Jazzi PS child car seat. If you need help with this product, please contact our customer service.
USE
- This product is suitable for children in the ECE Group 1/2/3. Weight range: 9-36 kg. Age range: approx. 9 months to 12 years.
- Group 1 is suitable for children weighing between 9 and 18 kg. The child car seat faces forwards and is secured along with the child and impact shield in the car using the car's 3-point seat belt.
- Group 2/3 is suitable for children weighing between 15 and 36 kg. The impact shield is removed. The child car seat is forward-facing and may be used with Isofix connectors (optional). The child is strapped in with the car's 3-point seat belt.
• We recommend installing the child car seat on the rear seat of the vehicle. - Do not install the child car seat on the passenger seat if it has an active airbag. This could result in death or serious injury. Before installing the seat on the passenger seat, ensure that the airbag can be deactivated.
• Installation with a 2-point seat belt is not permitted.
• The child car seat may only be installed and used on forward-facing seats in cars.
• Installation on side or rear-facing seats in cars is not permitted.
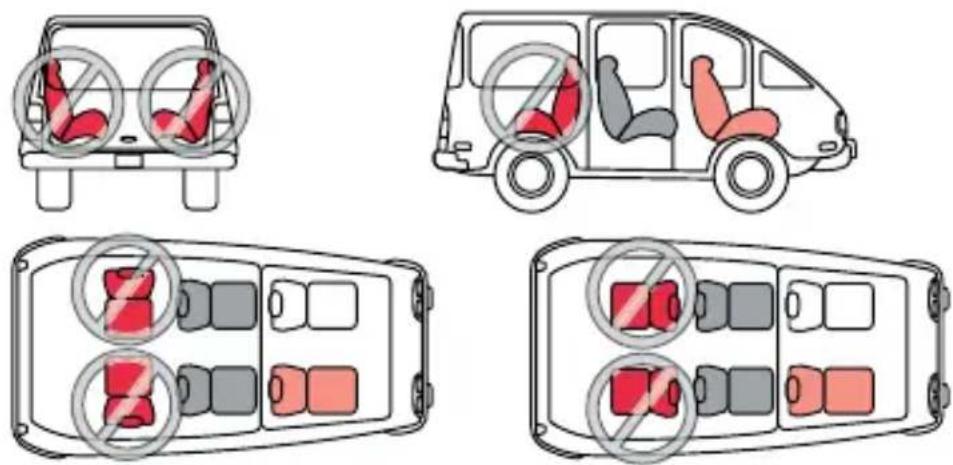
The following table provides information about the fastening devices and methods:
| ECE Group | Installation direction | Installation method Type Isofix size | |
| 1 Forwards | Car's 3-point seat belt + impact shield | Universal – | |
| 2/3 Forwards | Car's 3-point seat belt Universal – | ||
| 2/3 Forwards | Car's 3-point seat belt + Isofix connectors | Semi-universal |
EN
WARNING
Installation with 3-point seat belt & impact shield (ECE Group 1/2/3, 9-36 kg)
- This is a universal child restraint. It has been approved for general use in accordance with UN/ECE Regulation No. 44/04 and is, therefore, compatible with most vehicle seats.
- Correct installation can be expected if the vehicle manufacturer declares in the vehicle manual that the vehicle is suitable for the installation of a universal restraint device for children of the respective age group.
- This child restraint has been classified in the ‘Universal’ category under stricter conditions than previous versions that do not bear this label.
- It is only suitable for vehicles with fixed 3-point safety belts or 3-point safety belts with seat belt retractor, which correspond to the UN/ECE Regulation No. 16 (or an equivalent standard).
- If in doubt, ask the manufacturer of the child restraint or the retailer.
Installation with 3-point seat belt & Isofix connectors (ECE Group 2/3, 15-36 kg)
- This is a semi-universal child restraint system. It is permitted in accordance with UN/ECE Regulation No. 44/04 for general use in vehicles with Isofix anchorage systems.
- The child restraint system fits in vehicles with seats that are marked as Isofix positions (for details see car operating instructions), which varies depending on the category of child seat and attachment.
- It is only suitable for vehicles with fixed 3-point safety belts or 3-point safety belts with seat belt retractor, which correspond to the UN/ECE Regulation No. 16 (or an equivalent standard).
- If in doubt, ask the manufacturer of the child restraint or the retailer.
EN
WARNING
- Please read through these instructions carefully before use and keep them for subsequent reference, in order to guarantee the safety of your child. Non-compliance with the instructions in this manual may result in serious injuries to your child.
- The child seat can only be used with the impact shield for children who weigh up to 18 kg (Group 1).
- The child seat CANNOT be used with the impact shield for children who weigh over 18 kg (Group 2/3).
- For the Isofix installation: Be sure to read the car manufacturer's manual.
- Do not install the child car seat on the passenger seat if it has an active airbag. This could result in death or serious injury. Before installing the seat on the passenger seat, ensure that the airbag can be deactivated.
- Do not use load bearing-contact points other than those described in the instructions and marked in the child restraint system.
- Do not use this child car seat at home. It has not been designed for use at home and should, therefore, only be used in a car.
- Do not leave your child unsupervised in the seat at any time.
- The child seat should be replaced if it is exposed to heavy impact during an accident.
- For safety reasons, the child car seat must be secured in the vehicle even when your child is not sitting in the child car seat.
- Always make sure that all belts that hold the seat holder to the vehicle are secure and that all belts that restrain the child are adjusted to the child's body. Please also ensure that the belts are not twisted.
- Items of luggage or other objects that could cause injury in the event of a collision must be properly secured.
- The rigid items and plastic parts of a child restraint system must be placed and installed so that they cannot get caught by a movable seat or a vehicle door during everyday use.
- It is important that low-lying belts hold the pelvis firmly in place. To avoid the risk of falling, your child should always be strapped in.
- It is dangerous to make changes or additions to the product without approval from the responsible authority. Non-compliance with the installation instructions provided by the manufacturer of the child restraint system is also associated with risks.
- This child seat is designed for children weighing from 9 to 36kg . Never overload the child seat by transporting more than one child or additional loads in it.
- The child restraint system must not be used without the seat cover.
- The seat cover must not be replaced by a cover other than that recommended by the manufacturer as this seat cover is an important component of the restraint performance.
EN
COMPONENTS OF THE CHILD CAR SEAT
Front view
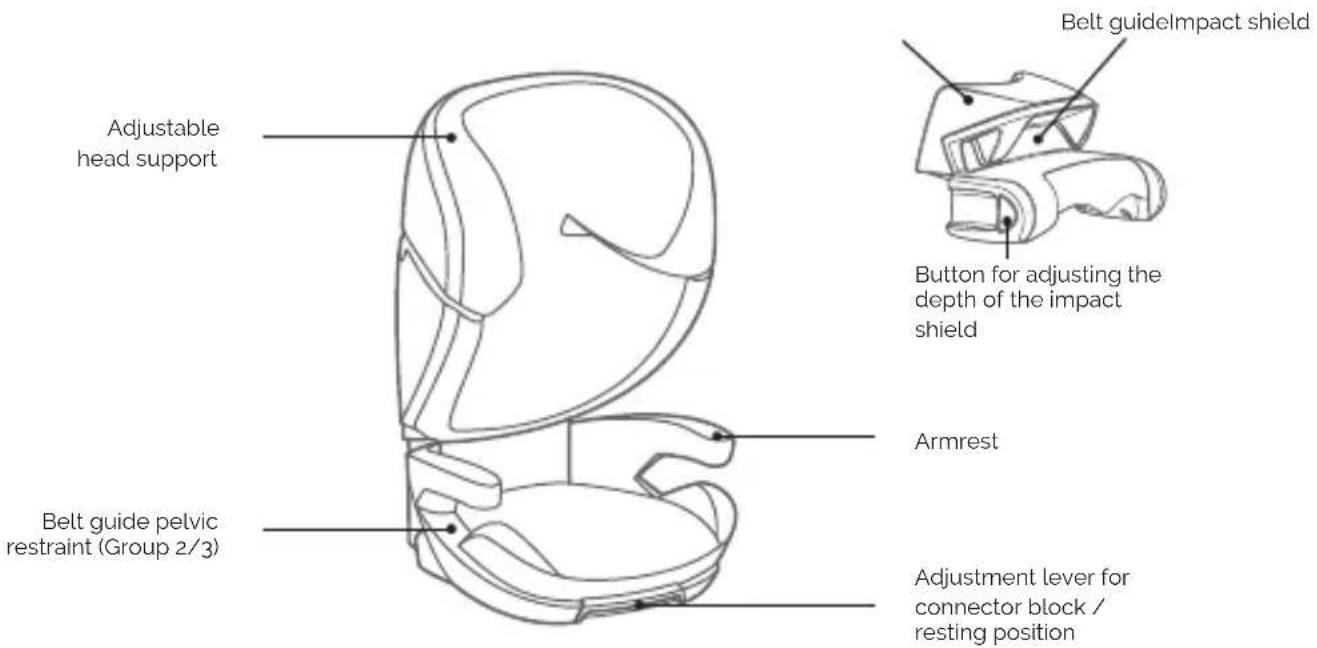
text_image
Adjustable head support Belt guide pelvic restraint (Group 2/3) Armrest Button for adjusting the depth of the impact shield Belt guidelmpact shield Adjustment lever for connector block / resting positionRear view
text_image
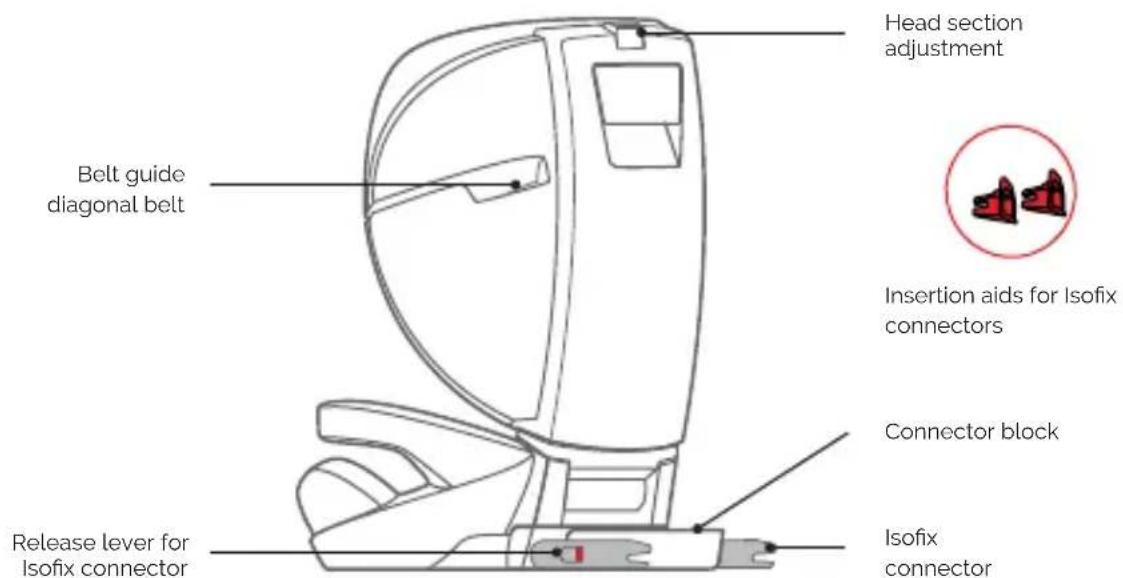
Head section adjustment Belt guide diagonal belt Insertion aids for Isofix connectors Connector block Release lever for Isofix connector Isofix connectorUSING THE CHILD CAR SEAT
Adjusting the head support
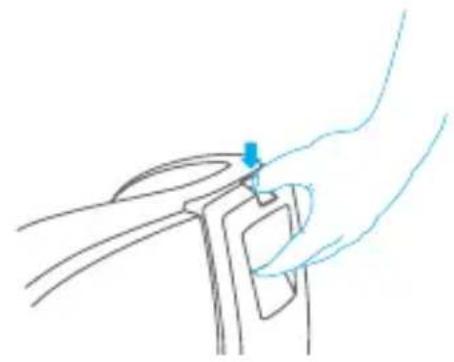
- Move the lever at the back of the head support and pull the head support up until is at the desired height.
- Release the lever and ensure that the headrest is locked in place.
- Ensure that the child's head is fully in the head support. The head support should not be set too low or too high.
natural_image
Line drawing of a hand holding a small object with a blue arrow pointing to it (no text or symbols)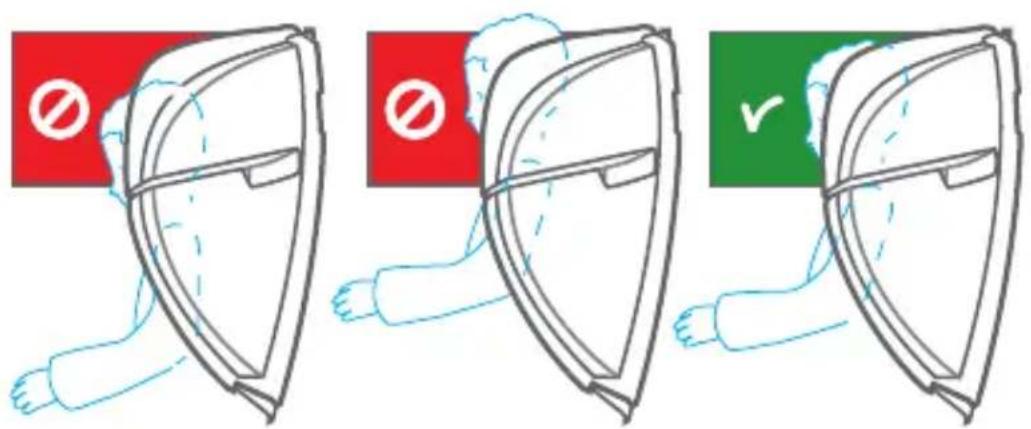
text_image
Diagram showing three steps of a shield with prohibition symbols, including a checkmark and a red background.Isofix connectors
For ECE Group 2/3, 15-36 kg
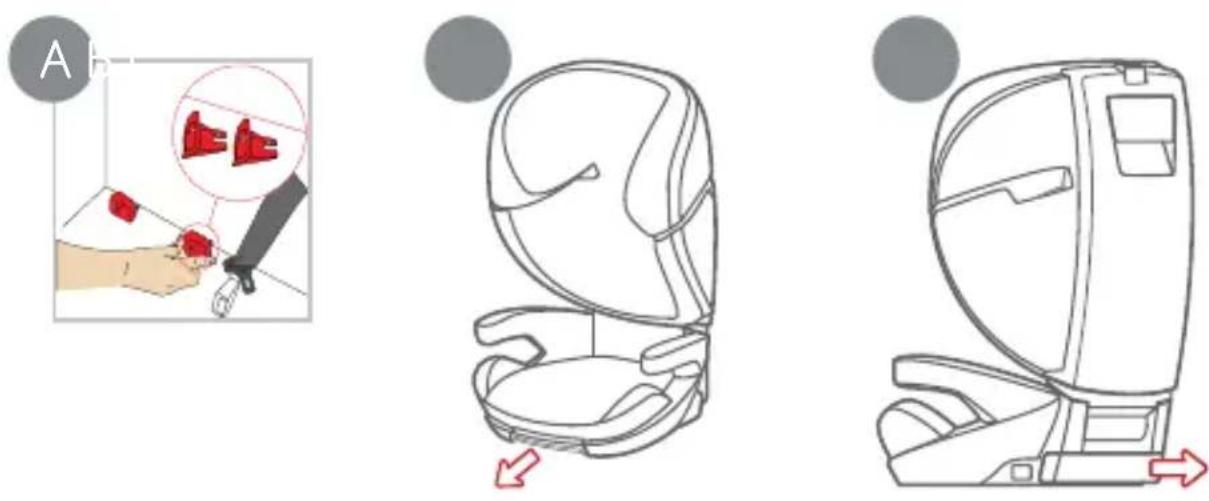
e • Insert the insertion aids into the slit in the cushion between the backrest and seat and into the Isofix holders (Fig. A).
- When doing this, the flat side must be facing downward. This step is not necessary if the vehicle already has firmly installed insertion aids.
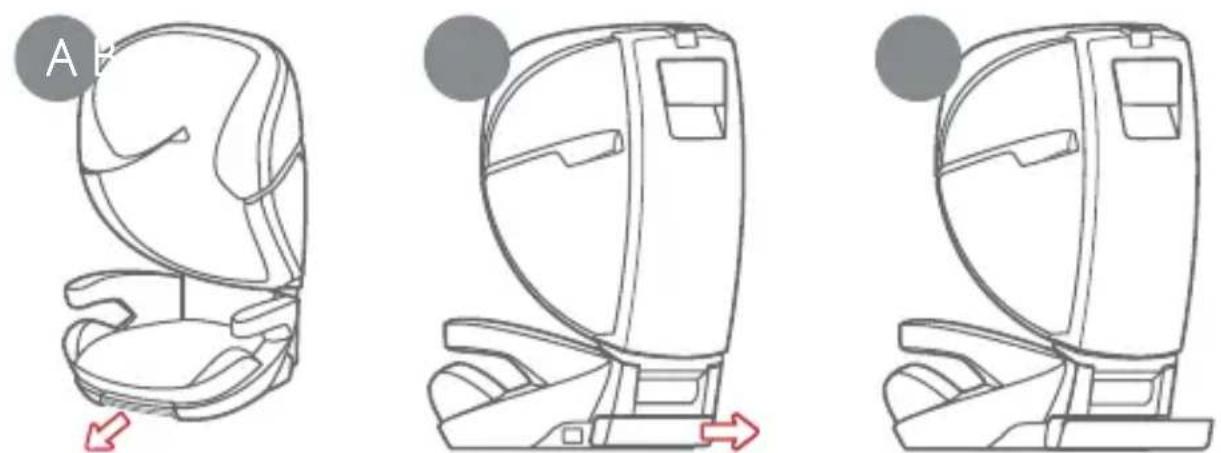
- Pull on the lever at the front underneath the seat to pull out the Isofix connector blocks at the back of the child car seat (Fig. B & C).
- Now unscrew the Isofix connectors from the block (Fig. D).
- Slide the Isofix connectors into the insertion aids and press them in until you hear these lock in place (Fig. E).
- The indicators on both sides only show green when the connections are in place.

natural_image
Line drawing of a car seat assembly with a red circular indicator (D) and arrow, no text or symbols present.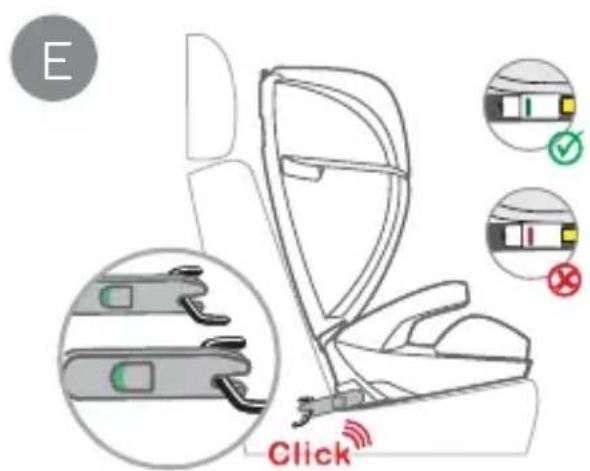
text_image
E ClickUSING THE CHILD CAR SEAT
Adjusting the tilt angle of the car seat
- The child car seat offers a resting position in all age classes.
- Pull the lever at the front underneath the seat to pull out the Isofix connector blocks at the back of the child car seat (Fig. A & B). If you wish to use the child car seat in Group 2/3 with Isofix, unscrew the Isofix connectors from the block as described above.
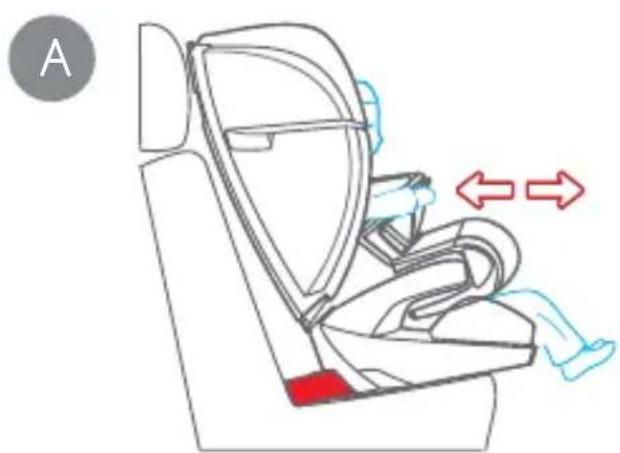
- When the Isofix connector block is pulled out, a gap is created between the child car seat and the backrest of the car's seat, which changes the angle of the child car seat's backrest.
- Ensure that the backrest of the child car seat is resting against the backrest of the car's seat.
• Figure D shows its use in the upright sitting position (block retraced, marked yellow).
• Figure E shows its use in the resting position (block extended, marked yellow).
natural_image
Three-step line drawing of a car seat assembly, showing front, side, and side views with arrows indicating movement (no text or symbols)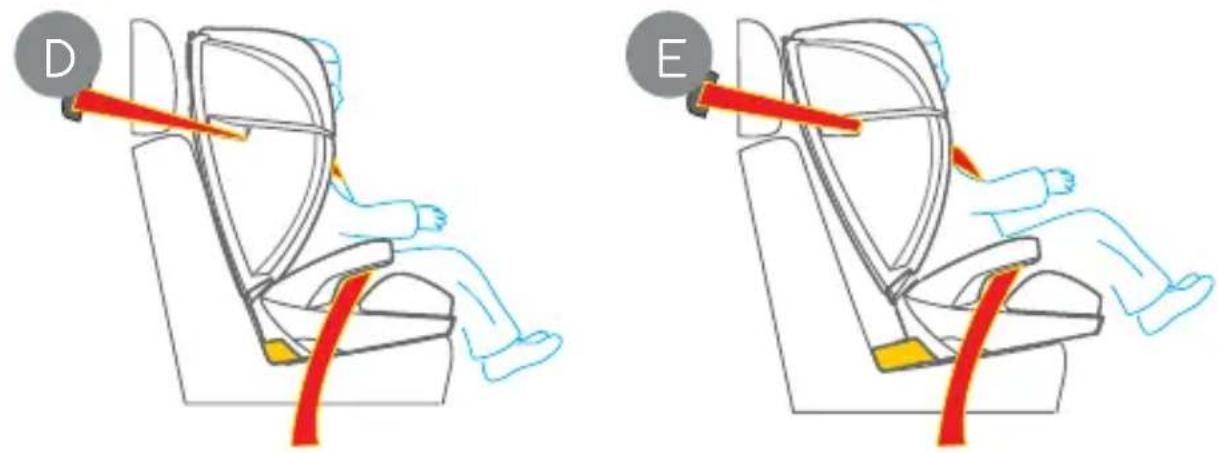
text_image
D EINSTALLATION OF THE CHILD CAR SEAT
Group 1 (forward-facing)
(For children from 9 to 18 kg, installation with 3-point seat belt & impact shield)
e 1. Place the child car seat on the intended seat in the car.
h 2. Put your child in the child car seat.
3. Adjust the head support as described above.
t 4. Position the impact shield and use the two adjustment buttons to adjust it until it is as close to the child's body as possible (Fig. A).
5. Take the car's 3-point seat belt and extend it to the maximum length.
6. Now thread the diagonal belt through the car's 3-point belt guide on the head support of the child car seat (Fig. B).
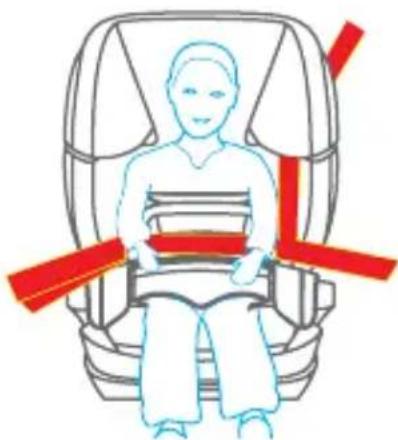
7. Now place the 3-point seat belt around the impact shield, making sure that it is threaded into the belt guide of the impact shield (Fig. C).
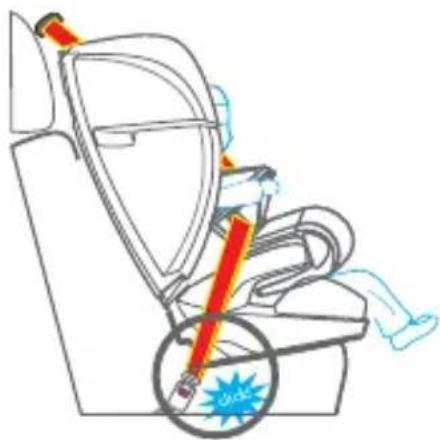
8. Close the belt buckle of the car's 3-point belt again until you hear a click (Fig. B).
9. Now pull the 3-point seat belt as tight as possible and make sure that the child car seat is pressed firmly against the backrest of the car's seat.
natural_image
Line drawing of a car seat assembly with arrows indicating movement or force (no text or symbols)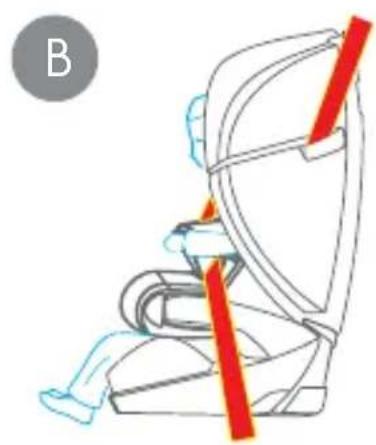
natural_image
Line drawing of a car seatbelt with red straps, no text or symbols present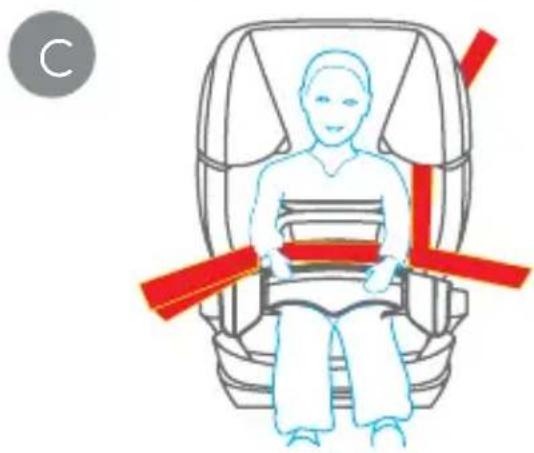
natural_image
Illustration of a person seated in a car seat with red belt bands, no text or symbols present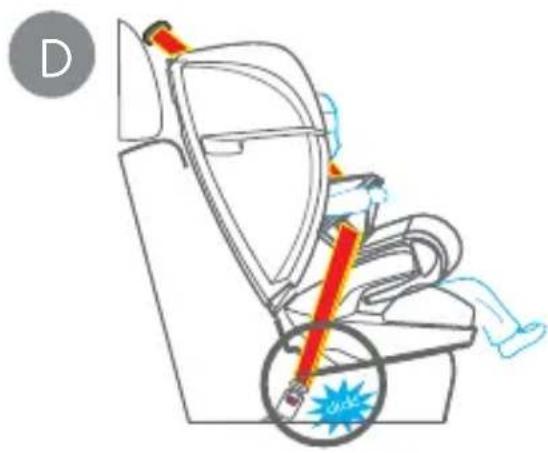
natural_image
Line drawing of a car seatbelt with a red belt and blue starburst symbol (no text or labels)EN
INSTALLATION OF THE CHILD CAR SEAT
Group 2/3 (forward-facing)
(For children weighing 15-36 kg, installation with 3-point seat belt & optionally with Isofix connectors)
First, remove the impact shield. This is not required for Group 2/3.
For Group 2/3, you can fasten the child car seat with the Isofix connectors (optional). Follow the instructions above to do so.
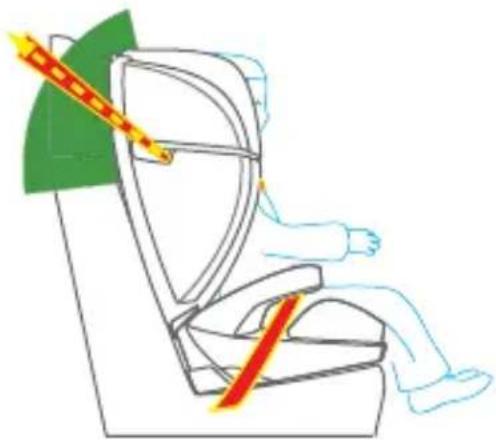
The child is secured with the 3-point seat belt of the car. Make sure that the seat belt is positioned correctly:
- Diagonal belt: Through the red belt guide on the head support within the area marked green in the image and above the armrest
- Pelvic restraint: Underneath each armrest along the red marking
natural_image
Illustration of a person sitting in a car seat with a red belt and green leaf, no text or symbols present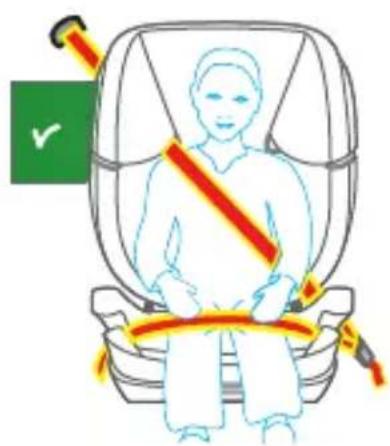
text_image
Diagram illustrating seatbelt usage in a car, showing a person seated with red belt and yellow belt, marked with a green checkmark.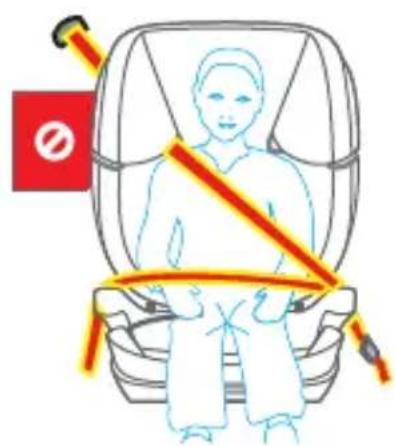
text_image
Diagram illustrating seatbelt usage with a person seated in a car seat, showing no seatbelt and red belt with warning symbolEN
natural_image
Diagram of a car seat with red belt and orange headband, labeled 'A' in top-left corner (no text or symbols on diagram itself)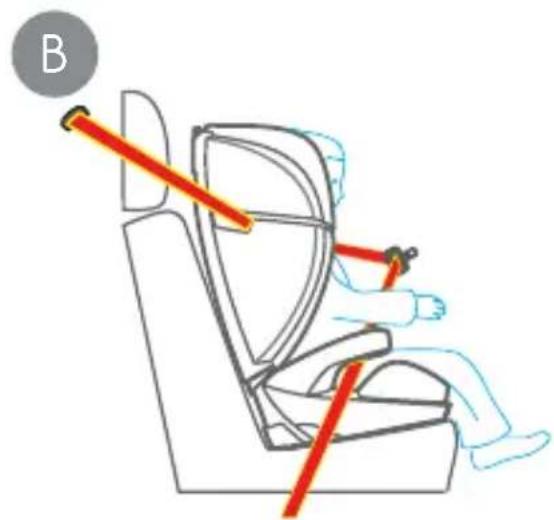
natural_image
Illustration of a person sitting in a car seat with red safety belt, no text or symbols present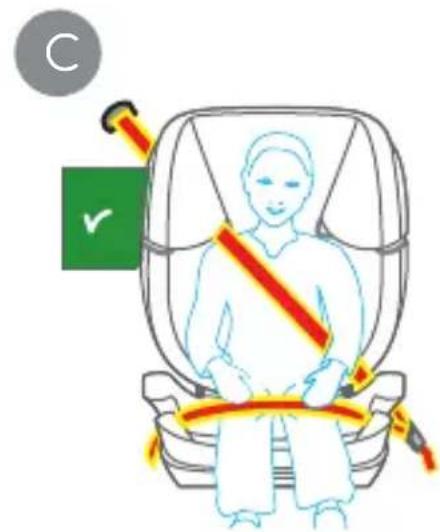
text_image
C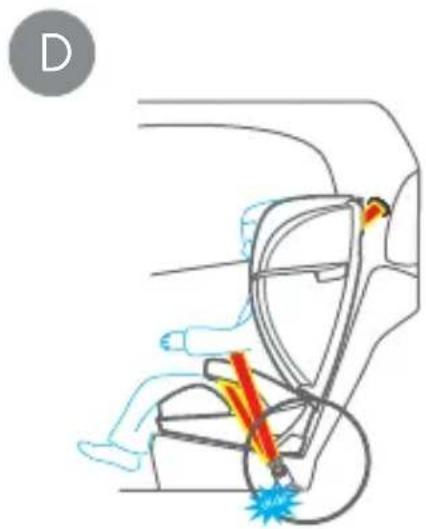
natural_image
Diagram of a person sitting in a car seat with a red and yellow motion lines indicating movement, no text or symbols present.- Fasten the child car seat using the Isofix connectors (optional).
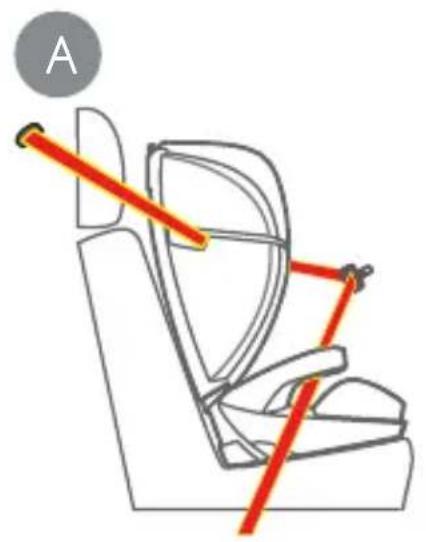
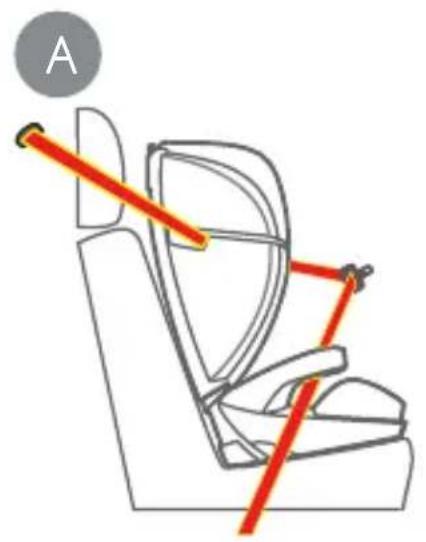
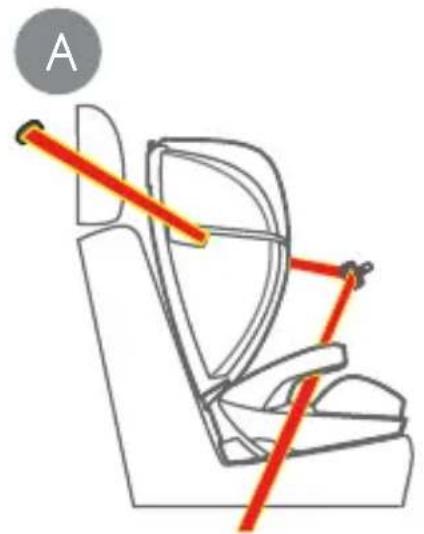
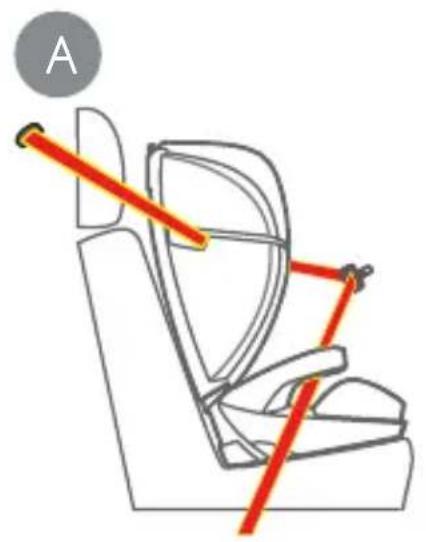
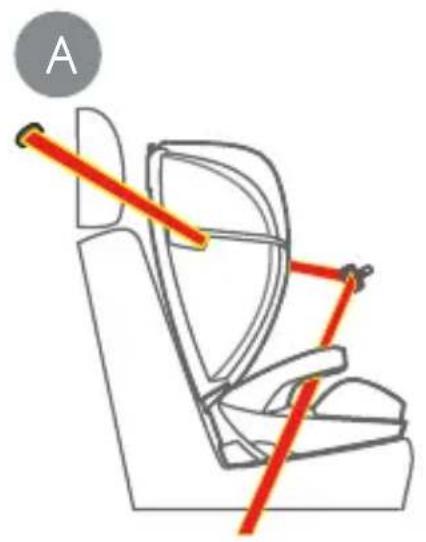
- Now thread the diagonal belt through the car's 3-point belt guide on the head support of the child car seat (Fig. A).
- Put your child in the child car seat(Fig. B).
- Adjust the height of the head support so that the child's head is completely positioned in the head support and the diagonal belt exits the belt guide at the child's shoulder height (Fig. C).
- Close the belt buckle of the car's 3-point belt again until you hear a click. Make sure that the diagonal belt is positioned above the armrest and the pelvic restraint underneath each armrest (Fig. D).
- Pull the diagonal strap in order to tighten it. Ensure that the straps are not twisted.
REMOVING THE SEAT COVER
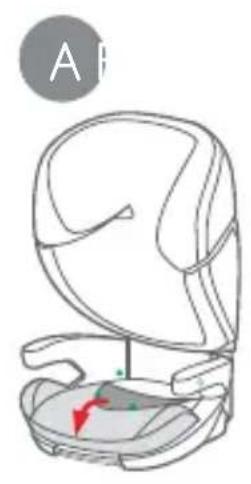
- Release the seat cover from the two buttons and pull it forwards to remove it (Fig. A).
- To remove the backrest cover, carefully pull the cover out of the slots and pull it back towards the head support. Now release the two elastic bands from the seat bucket (Fig. B).
- Now carefully pull the cover completely off the backrest and head support and loosen the other two elastic bands from the head support (Fig. C).
- Carefully pull the cover of the impact guard out of the slits until you are able to remove it completely (Fig. D).
To reattach the seat cover to the child car seat, please follow the steps in reverse order.
natural_image
Line drawing of a car seat with highlighted seat area and red arrow indicating direction (no text or symbols)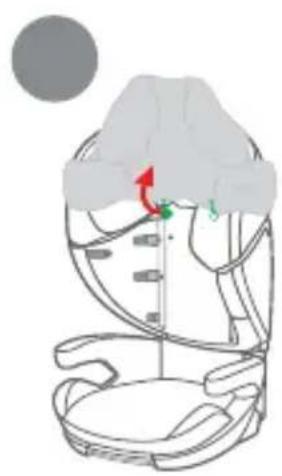
natural_image
Diagram of a medical or anatomical structure with arrows indicating movement or force (no text or labels)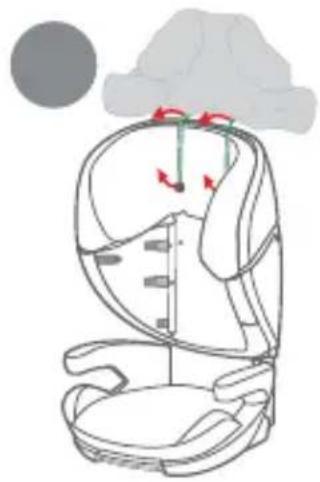
natural_image
Line drawing of a car seat with arrows indicating motion, no text or symbols present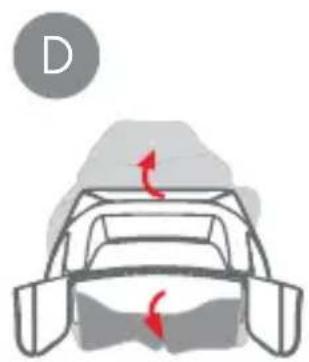
natural_image
Diagram of a car head with red directional arrows indicating motion or force (no text or symbols)CLEANING
This product has been developed taking into account safety, comfort and functionality. Please take the time to read these instructions carefully before using the product and retain these instructions for future reference.
To ensure that your child car seat remains in a good condition for a long time, please refrain from using solvents or abrasive or aggressive cleaning products to clean it. After washing, always check that the fabric and stitching are not damaged. Please only ever wash the cover in accordance with the instructions on the label (see below).
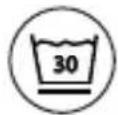
Wash at 30 °C on a delicate cycle
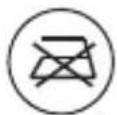
Do NOT iron
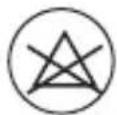
Do NOT bleach
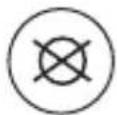
Do NOT dry clean
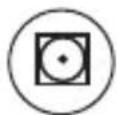
Tumble dry at a low temperature
CARE
Please check the product for any possible damage regularly. Do not use a damaged product and keep it out of the reach of children.
If you have any questions, please contact the
Osann customer service team on +49 (0) 7731/970077.
FR
text_image
Diagram of a van with seatbelt and no-drumed seat, showing red and gray seats and a crossed-out seatbelt symbol.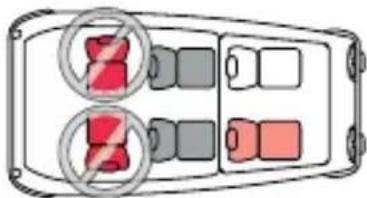
text_image
Diagram showing two red prohibition symbols on a device panel with gray and red blocks, likely indicating no protection or disapproval.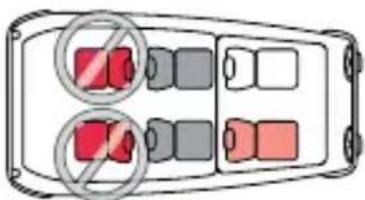
text_image
Diagram showing two switches with red and gray indicators, one marked with a 'no' symbol indicating no resistance.text_image
Technical line drawing of a car seat assembly with labeled componentsnatural_image
Technical line drawing of a mechanical component with no visible text or symbolsnatural_image
Line drawing of a mechanical device with labeled parts (no text or symbols present)natural_image
Line drawing of a hand holding a small object with a blue arrow pointing to it (no text or symbols)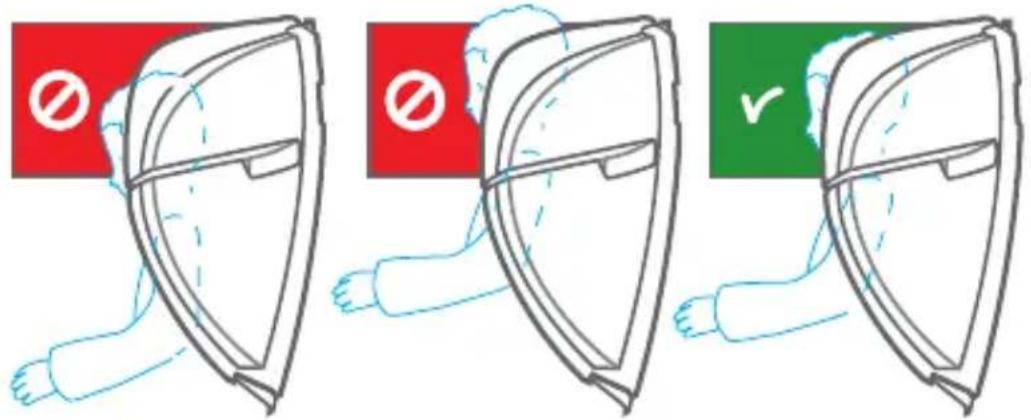
text_image
Diagram showing three stages of a shield with prohibition symbols and checkmark, likely illustrating safety or compliance actions.FR
Connecteurs Isofix
text_image
Diagram illustrating car seat assembly steps with labeled parts and directional arrows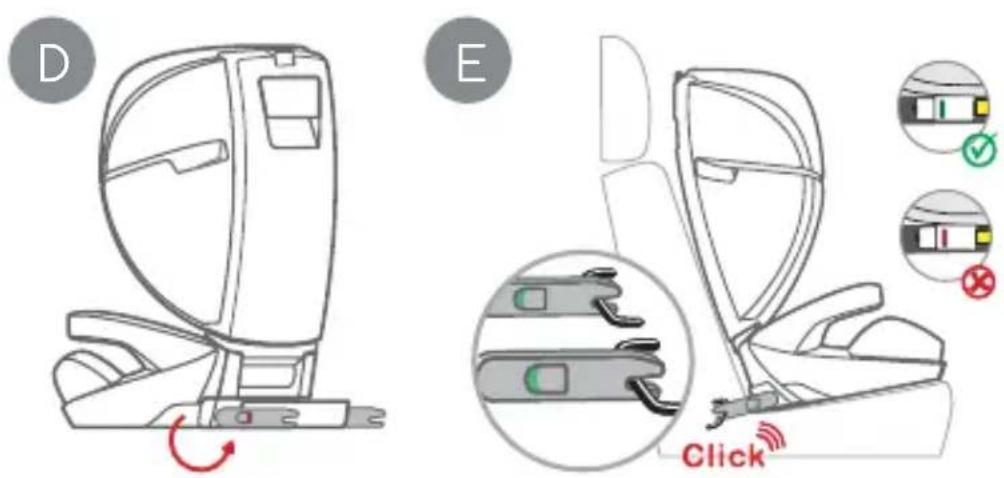
text_image
D E ClickFR
UTILISATION DU SIÈGE AUTO ENFANT
natural_image
Line drawing of a car seat with a red arrow indicating the seat area (no text or symbols)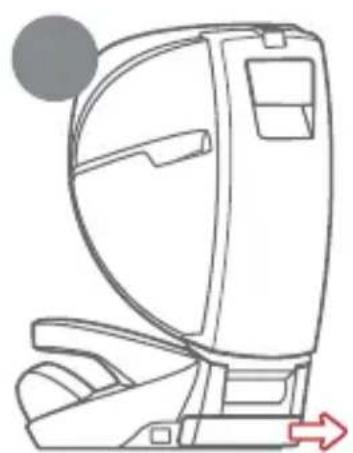
natural_image
Line drawing of a car seat assembly with a red arrow indicating direction (no text or symbols)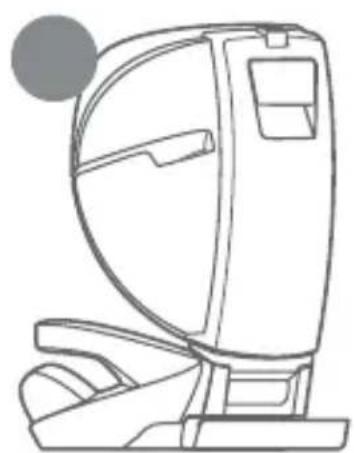
natural_image
Line drawing of a desktop computer with monitor, tower, and keyboard (no text or symbols)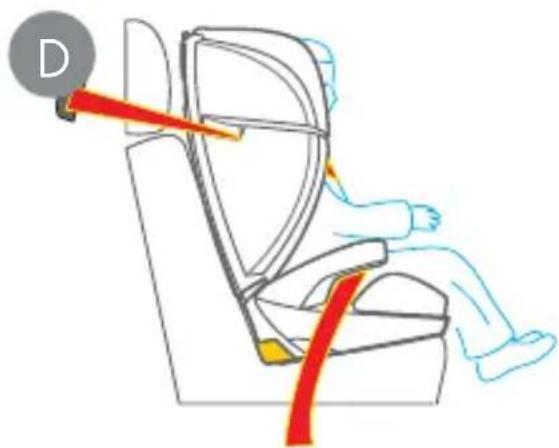
natural_image
Illustration of a person seated in a car seat using a red belt, no text or symbols present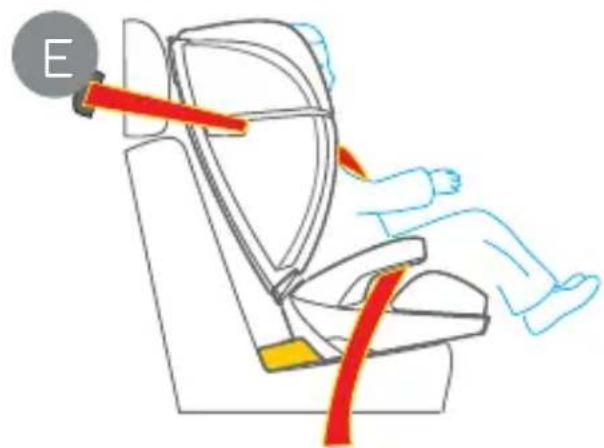
natural_image
Illustration of a person using a red belt on a car seatbelt, no text or symbols presentFR
INSTALLATION DU SIÈGE AUTO POUR ENFANT
natural_image
Line drawing of a car seat with seatbelt and seat, showing two red arrows indicating left and right motion (no text or symbols)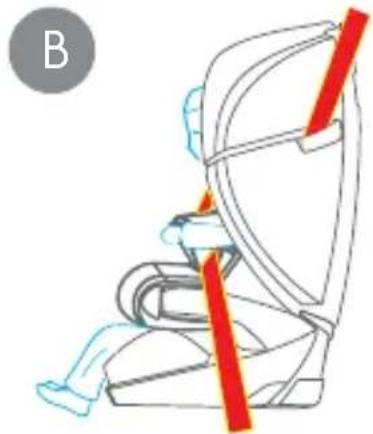
natural_image
Line drawing of a person sitting in a car seat with a red belt, no text or symbols present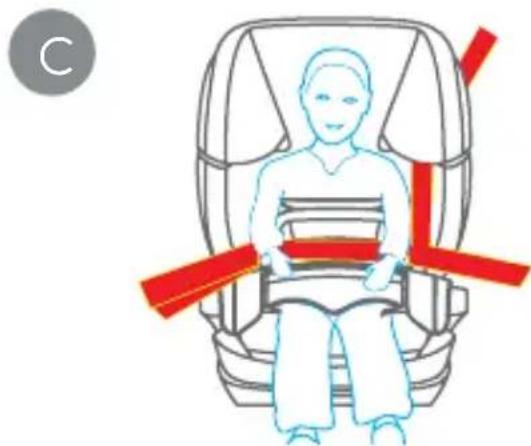
natural_image
Illustration of a person seated in a car seat with red belt bands, no text or symbols present
natural_image
Line drawing of a car seatbelt with a red belt and blue safety ring, no text or symbols presentFR
INSTALLATION DU SIÈGE AUTO POUR ENFANT
natural_image
Illustration of a person sitting in a car seat with a red belt and green leaf, no text or symbols present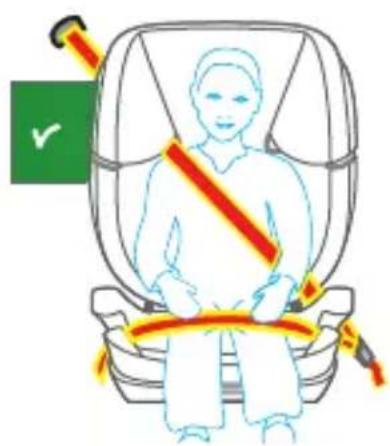
text_image
Diagram illustrating seatbelt usage in a car seatbelt, showing a person seated with red belt and yellow belt, marked with a green checkmark.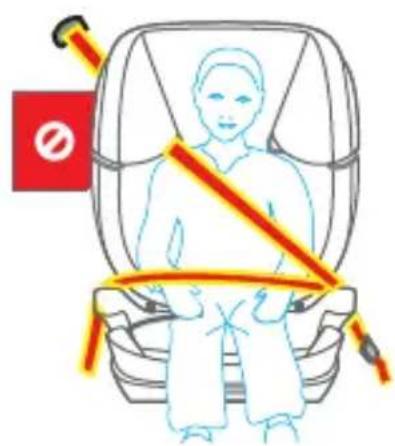
text_image
Diagram illustrating seatbelt usage with a person seated in a car seat, showing no seatbelt and red safety symbolFR
natural_image
Line drawing of a car seat with red safety belt and orange grip, labeled 'A' (no text or symbols on the diagram itself)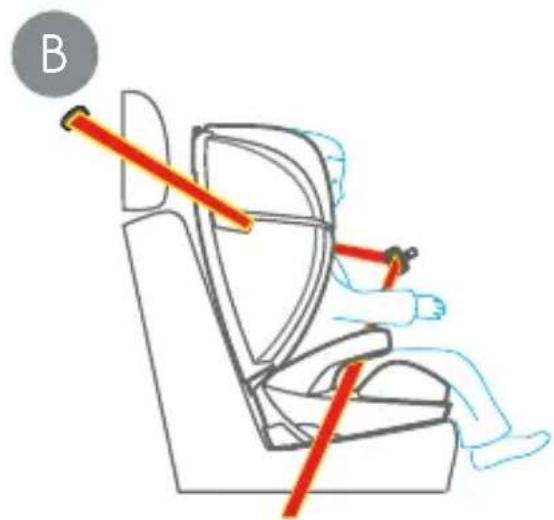
text_image
B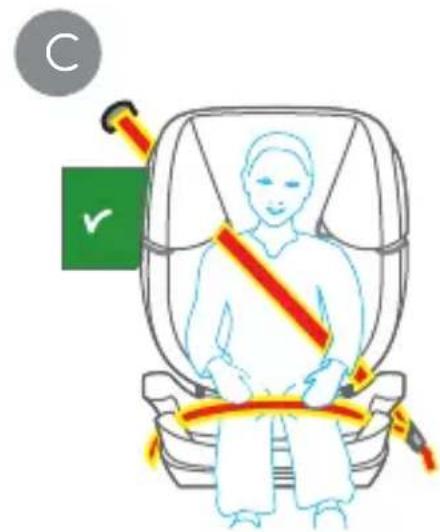
text_image
C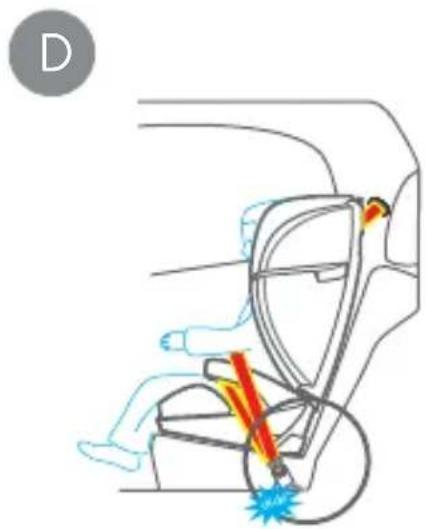
natural_image
Diagram of a person sitting in a car seat with a red and yellow motion lines indicating movement, no text or symbols present.natural_image
Line drawing of a car seat with highlighted seat area and red arrow indicating direction (no text or symbols)
natural_image
Diagram of a medical or anatomical structure with arrows indicating movement or force (no text or labels)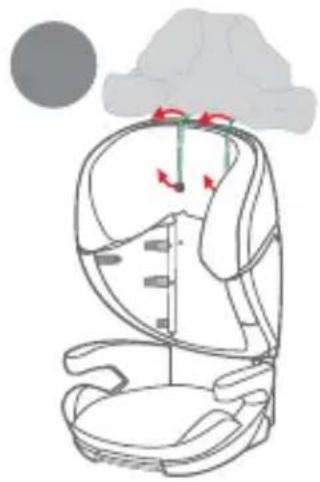
natural_image
Line drawing of a car seat with arrows indicating motion, no text or symbols present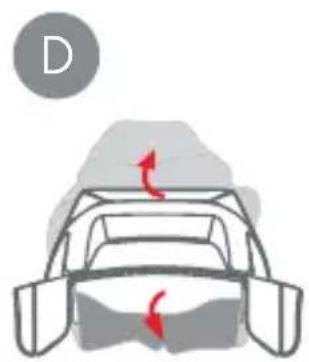
natural_image
Diagram of a car head with red directional arrows indicating motion or force (no text or symbols)FR
NETTOYAGE
natural_image
Line drawing of a hand holding a small object with a blue arrow pointing to it (no text or symbols)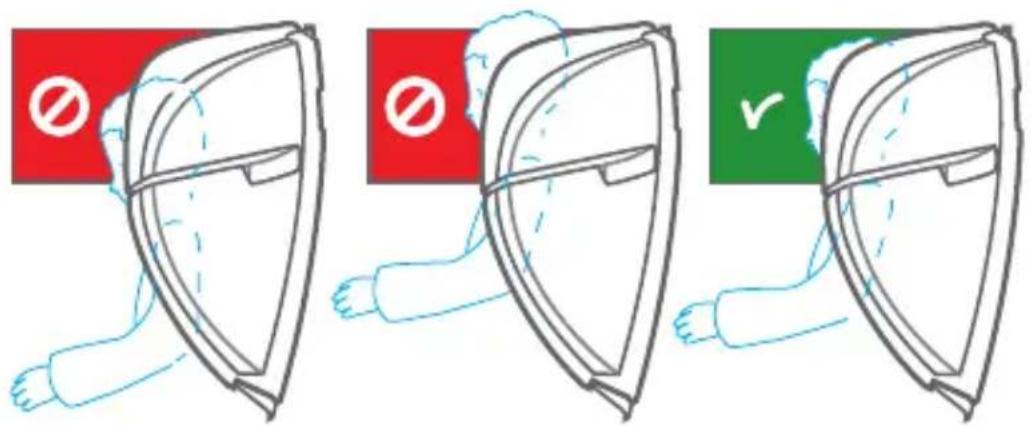
text_image
Diagram showing three stages of a shield defense operation: no protection, no protection with checkmark, and checkmark.IT
natural_image
Line drawing of a car seat with open lid and seatbelt, no text or symbols present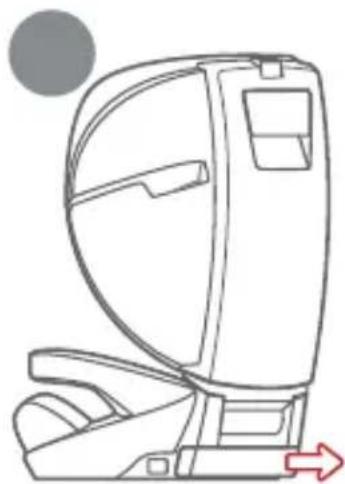
natural_image
Line drawing of a car seat assembly with no text or symbols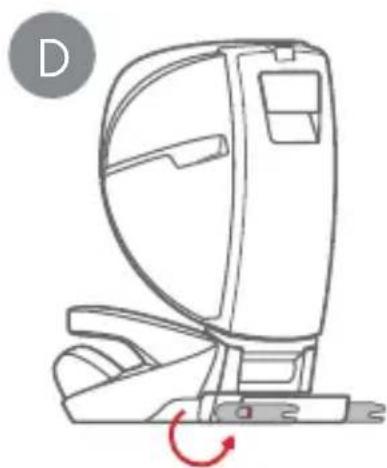
natural_image
Line drawing of a mechanical device with a red circular indicator (D) and a red curved arrow indicating rotation or motion (no text or symbols)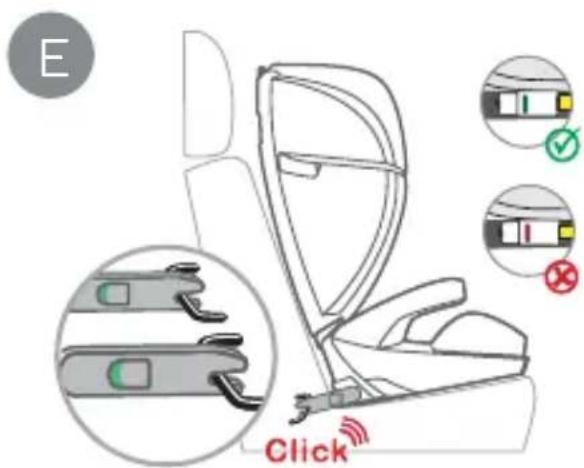
text_image
E ClickIT
UTILIZZO DEL SEGGIOLINO AUTO PER BAMBINI
natural_image
Line drawing of a car seatbelt with two red arrows indicating left and right motion (no text or symbols)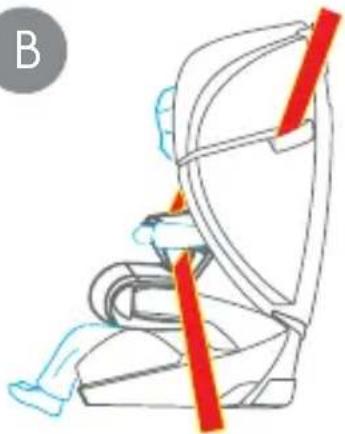
natural_image
Line drawing of a person sitting in a car seat with a red belt, no text or symbols presentC
natural_image
Illustration of a person seated in a car seat with red belt bands (no text or symbols)D
natural_image
Line drawing of a car seatbelt with a red belt and blue starburst symbol (no text or labels)natural_image
Illustration of a person sitting in a car seat with a red belt and green leaf, no text or symbols present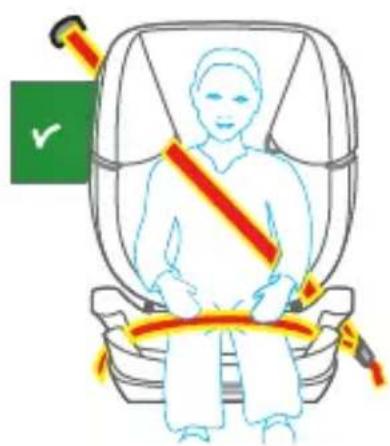
text_image
Diagram illustrating seatbelt usage in a car seat, showing a person seated with red belt and yellow belt, marked with a green checkmark.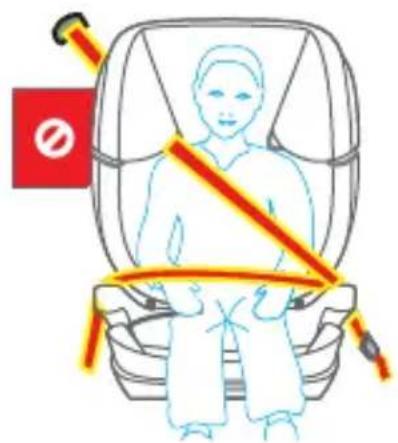
text_image
Diagram illustrating seatbelt usage with a person seated in a car seat, showing no seatbelt and red belt with warning symbolIT
natural_image
Diagram of a car seat with red belt and orange headband, labeled 'A' in top-left corner (no text or symbols on diagram itself)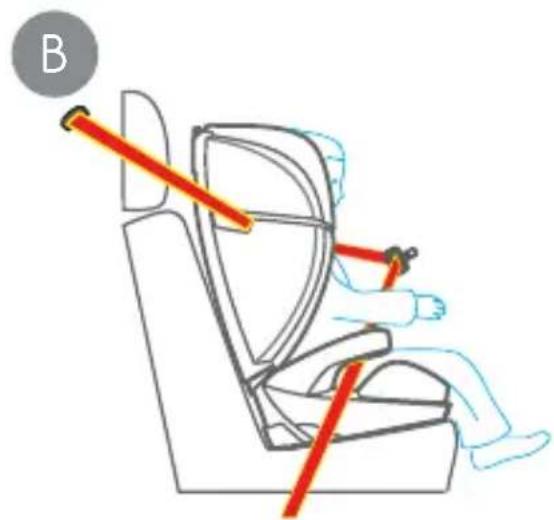
text_image
B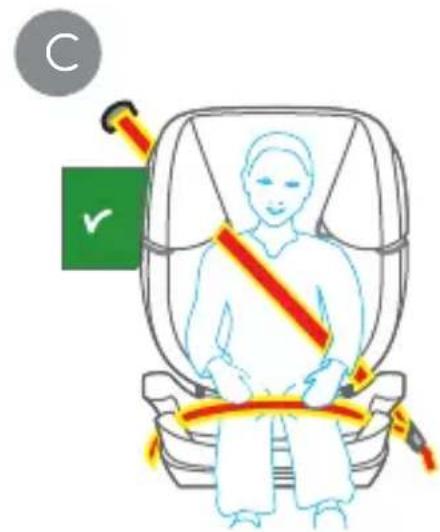
text_image
C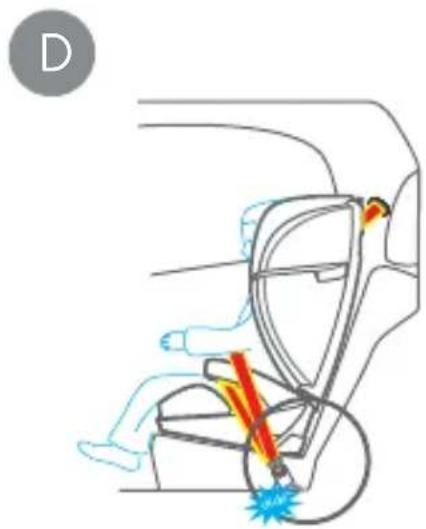
natural_image
Diagram of a person seated in a car seat using a belt drive a wheel, showing red and blue motion lines (no text or symbols)natural_image
Line drawing of a car seat with highlighted internal components (no text or symbols)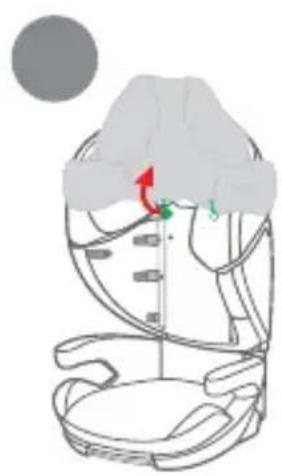
natural_image
Diagram of a medical or anatomical structure with arrows indicating movement or force (no text or labels)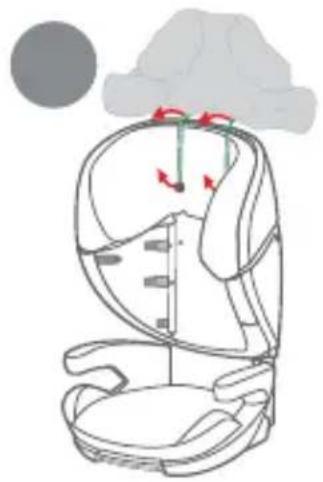
natural_image
Line drawing of a car seat with arrows indicating motion, no text or symbols present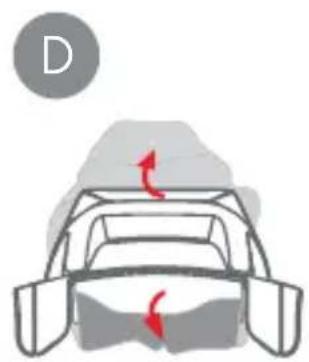
natural_image
Diagram of a car head with red directional arrows indicating motion or force (no text or symbols)IT
PULIZIA
natural_image
Diagram of a car front view showing two circular insets with red shaded areas, no text or symbols present.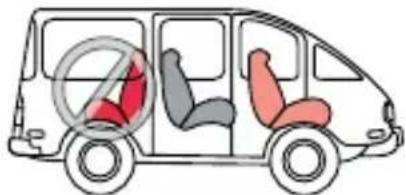
text_image
Diagram of a van with seatbelt and no-drumed seat, showing red and gray seats inside the cabin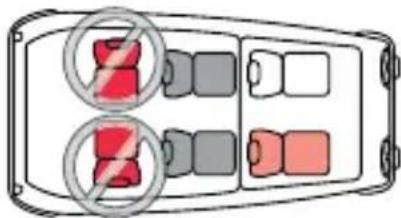
natural_image
Diagram of a device panel with two red prohibition symbols, no text or labels present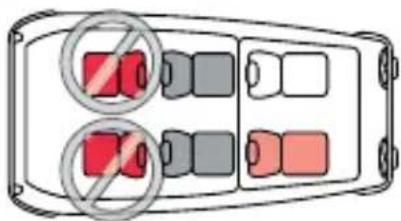
text_image
Diagram showing two sets of switches with red and gray circles, one marked with a 'no' symbol indicating no usage or absence.natural_image
Line drawing of a hand holding a small object with a blue arrow pointing to it (no text or symbols)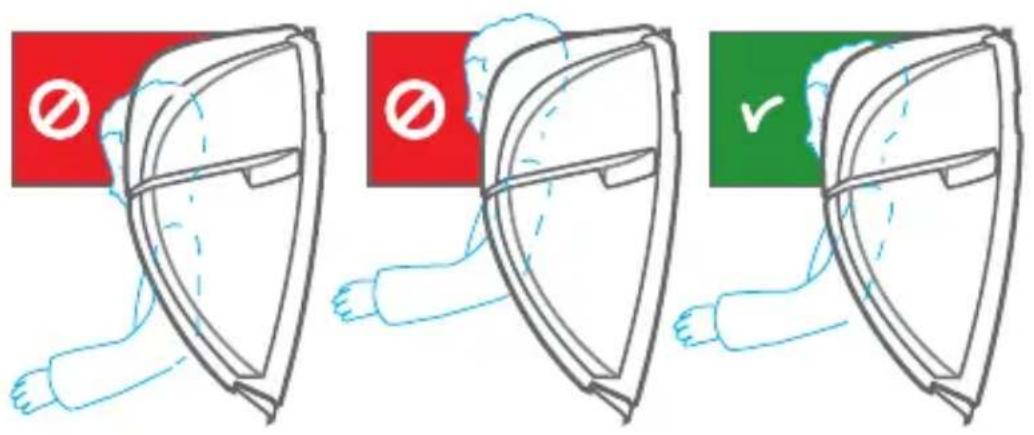
text_image
Diagram showing three steps of a shield with prohibition symbols and checkmark, likely illustrating safety or compliance actions.NL
Isofix-verbindingsstukken
natural_image
Line drawing of a car seat with open lid and seatbelt, no text or symbols present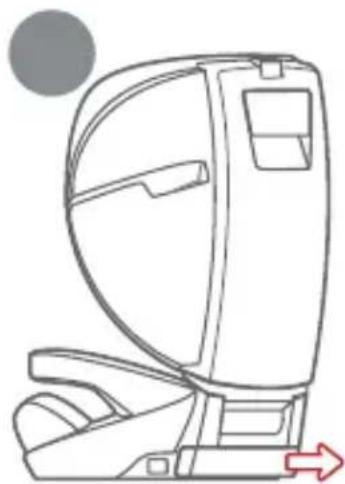
natural_image
Line drawing of a car seat assembly with no text or symbols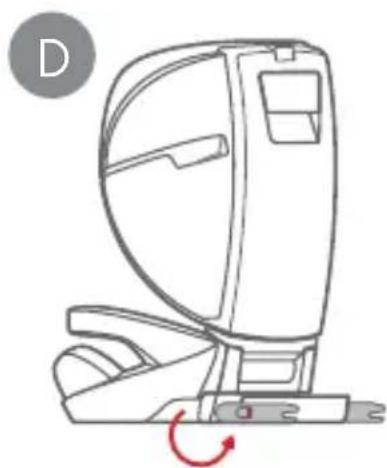
natural_image
Line drawing of a car seat assembly with a red circular indicator (D) and rotation arrow, no text or symbols present.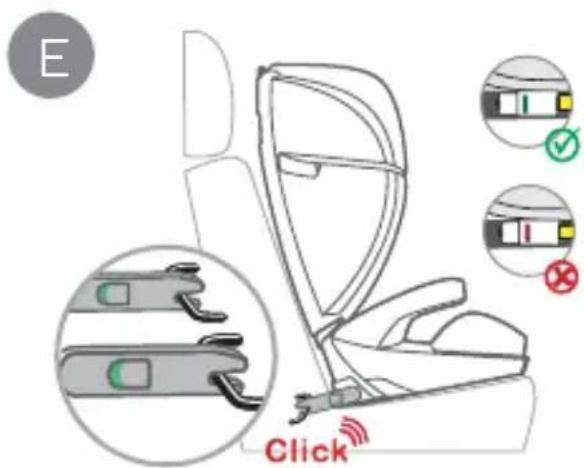
text_image
E Clicknatural_image
Three-step line drawing of a car seat assembly, showing front, side, and side views with no text or symbols.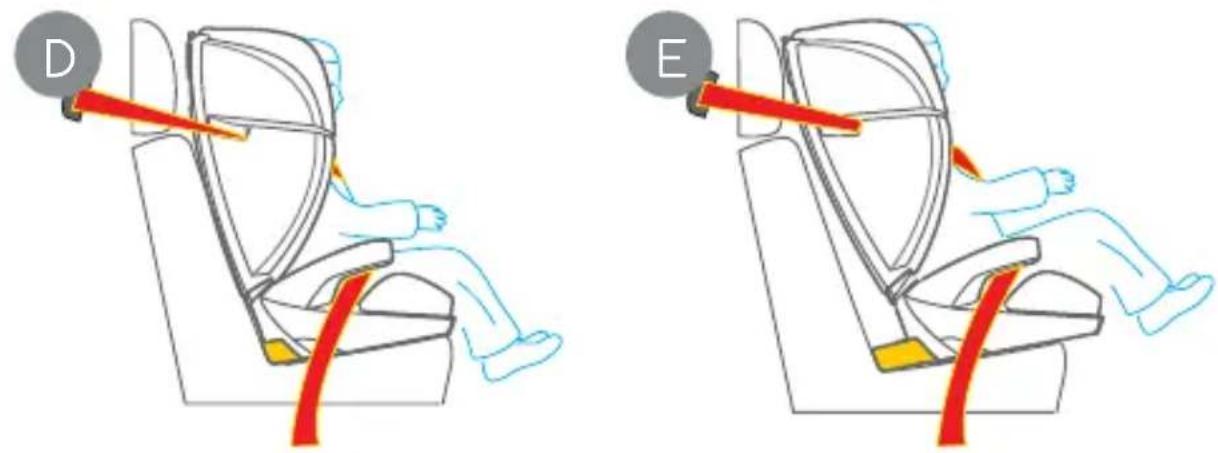
text_image
D ENL
MONTAGE VAN HET AUTOSTOELTJE
natural_image
Line drawing of a car seat with seatbelt and seat, showing two red arrows indicating left and right motion (no text or symbols)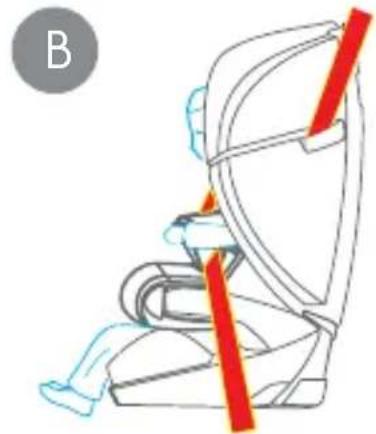
natural_image
Line drawing of a person sitting in a car seat with a red belt, no text or symbols present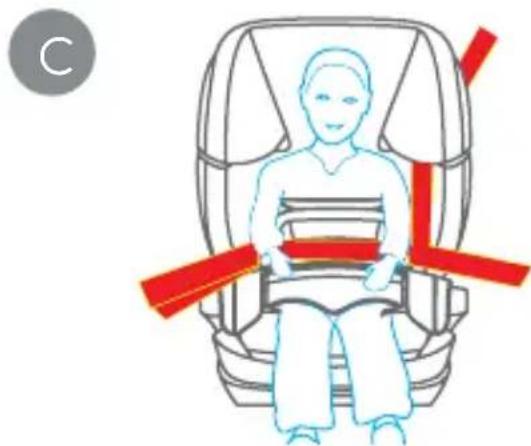
natural_image
Illustration of a person seated in a car seat with red belt bands, no text or symbols present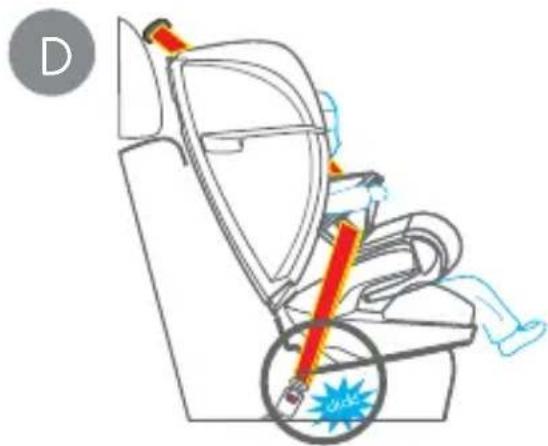
natural_image
Line drawing of a car seatbelt with a red belt and blue safety ring, no text or symbols presentMONTAGE VAN HET AUTOSTOELTJE
natural_image
Illustration of a person sitting in a car seat with a red belt and green leaf, no text or symbols present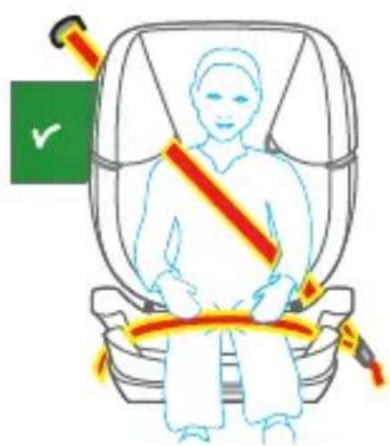
text_image
Diagram illustrating seatbelt usage in a car seat, showing a person seated with red belt and yellow belt, marked with a green checkmark.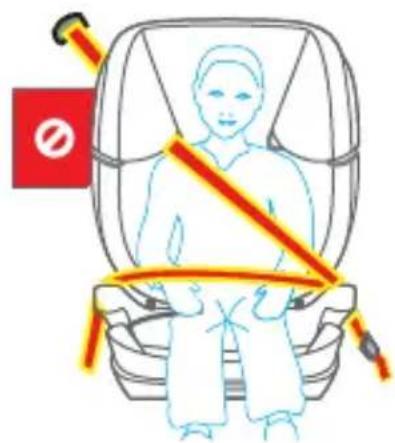
text_image
Diagram illustrating seatbelt usage with a person seated in a car seat, showing no seatbelt and red belt.NL
natural_image
Diagram of a car seat with red belt and orange headband, labeled 'A' in top-left corner (no text or symbols on diagram itself)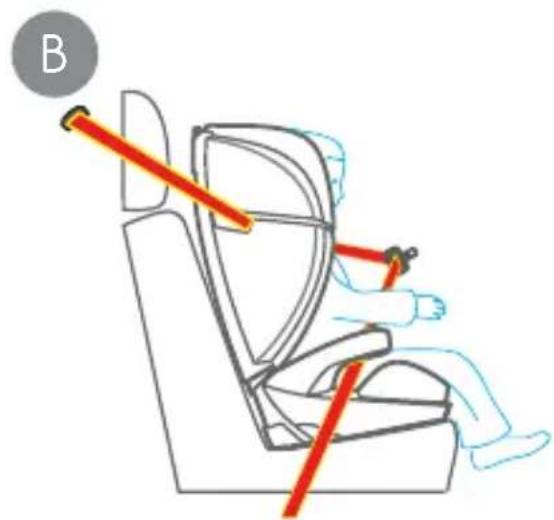
natural_image
Illustration of a person sitting in a car seat with red safety belt, no text or symbols present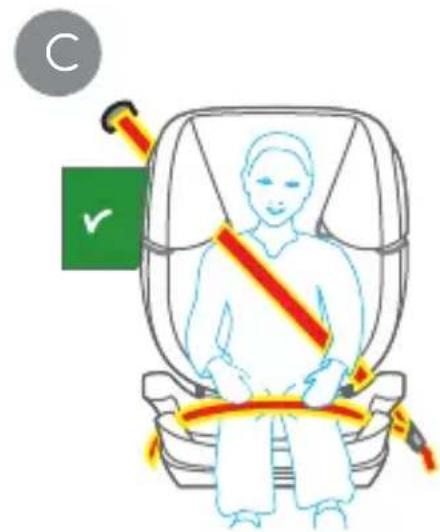
text_image
C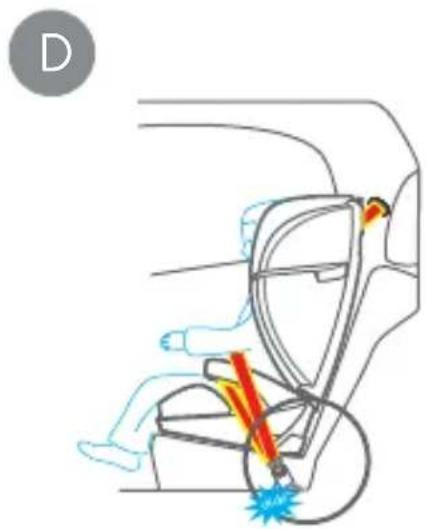
natural_image
Diagram of a person seated in a car seat using a belt drive a wheel, showing red and blue motion lines (no text or symbols)natural_image
Diagram of a car head with red directional arrows indicating motion or force (no text or symbols)NL
REINIGING
Tel: +49(0)7731/970077
Fax: +49(0)7731/970055
E-Mail: info@osann.de