
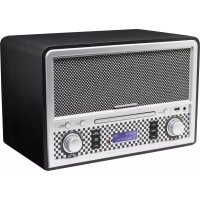
SCD1900 - Mp3 player Soundmaster - Free user manual and instructions
Find the device manual for free SCD1900 Soundmaster in PDF.
| Brand | Soundmaster |
| Model | SCD1900 |
| Product type | MP3/CD player with FM radio |
| Mains power supply | 100-240 V, 50/60 Hz |
| Battery power | 6 x 1.5V C size batteries (not included) |
| FM range | 87.5 - 108 MHz |
| Number of preset stations | 20 |
| Audio output power | 2 x 1 W RMS |
| Playable formats | CD, CD-R, CD-RW, MP3 (on CD and USB) |
| USB devices | MP3 playback via USB port |
| Auxiliary input | 3.5 mm AUX IN jack |
| Headphone output | 3.5 mm stereo headphone jack |
| Antenna | FM telescopic antenna |
| Playback functions | Repeat (track/folder/all), shuffle, program (20 tracks, 99 for MP3) |
| Radio functions | Automatic search (AMS), auto and manual tuning, presets |
| Display | LCD screen with timed backlight |
| CD compatibility | CD, CD-R, CD-RW (readability varies by media) |
| Care and cleaning | Clean with a dry cloth, do not use detergents or abrasive products |
| Safety | Class 1 laser, do not open, use in dry indoor environment, protect from moisture |
| Spare parts and repairability | Repair by qualified personnel only, no user-serviceable parts |
| General information | Importer: Wörlein GmbH, Gewerbestrasse 12, D 90556 Cadolzburg, Germany |
Frequently Asked Questions - SCD1900 Soundmaster
User questions about SCD1900 Soundmaster
0 question about this device. Answer the ones you know or ask your own.
Ask a new question about this device
Download the instructions for your Mp3 player in PDF format for free! Find your manual SCD1900 - Soundmaster and take your electronic device back in hand. On this page are published all the documents necessary for the use of your device. SCD1900 by Soundmaster.
USER MANUAL SCD1900 Soundmaster
natural_image
Gray portable electronic device with a digital display showing 9:79, no visible text or symbols on the device body.DEUTSCH
ENGLISH
FRANÇAIS
NEDERLANDS
ITALIANO
ESPANOL
PORTUGUÊS
SVENSKA
ČEŠTINA
SLOVENSKÝ
Do not dispose of this product with the normal household waste at the end of its life cycle. Return it to a collection point for the recycling of electrical and electronic devices. This is indicated by the symbol on the product, user manual or packaging
The materials are reusable according to their markings. By reusing, recycling or other forms of utilization of old devices you make an important contribution to the protection of our environment.
Please contact your local authorities for details about collection points.
| WARNING | ! | |
| Risk of electric shockDo not open! |
Caution: To reduce the risk of electric shock, do not remove the cover (or back). There are no user serviceable parts inside. Refer servicing to qualified service personnel.

This symbol indicates the presence of dangerous voltage inside the enclosure, sufficient enough to cause electric shock.

This symbol indicates the presence of important operating and maintenance instructions for the device

Used batteries are hazardous waste and NOT to be disposed of with the household waste! As a consumer you are legally obligated to return all batteries for environmentally responsible recycling – no matter whether or not the batteries contain harmful substances*)
Return batteries free of charge to public collection points in your community or shops selling batteries of the respective kind.
Only return fully discharged batteries
*) marked Cd = cadmium, Hg = mercury, Pb = lead
- Only use mercury and cadmium-free batteries.
- Used batteries are hazardous waste and NOT to be disposed of with the household waste!!!
- Keep batteries away from children. Children might swallow batteries.
- Contact a physician immediately if a battery was swallowed.
- Check your batteries regularly to avoid battery leakage.
- Batteries shall not be exposed to excessive heat such as sunshine, fire or the like.
- CAUTION: Danger of explosion if battery is incorrectly replaced
- Replace only with the same or equivalent type

CAUTION - INVISIBLE LASER RADIATION WHEN OPENING THE COVER OR PRESSING THE SAFETY INTERLOCK. AVOID EXPOSURE TO THE LASER BEAM.

To prevent possible hearing damage, do not listen at high volume levels for long periods
- Use the device in dry indoor environments only.
- Protect the device from humidity.
- This apparatus is for moderate climates areas use, not suitable for use in tropical climates countries.
Safety, Environmental and Setup Instructions
- No objects filled with liquids, such as vases, shall be placed on the apparatus.
- The mains plug or an appliance coupler is used as the disconnect device, the disconnect devices shall remain readily operable.
- Connect this device to a properly installed and earthed wall outlet only. Make sure the mains voltage corresponds with the specifications on the rating plate.
- Make sure the mains cable stays dry during operation. Do not pinch or damage the mains cable in any way.
- A damaged mains cable or plug must immediately be replaced by an authorized service center.
- In case of lightning, immediately disconnect the device from the mains supply.
- Children should be supervised by parents when using the device.
- Clean the device with a dry cloth only.
- Do NOT use CLEANING AGENTS or ABRASIVE CLOTHS!
- Do not expose the device to direct sunlight or other heat sources.
- Install the device at a location with sufficient ventilation in order to prevent heat accumulation.
- Do not cover the ventilation openings!
- Install the device at a safe and vibration-free location.
- Install the device as far away as possible from computers and microwave units; otherwise radio reception may be disturbed.
- Do not open or repair the enclosure. It is not safe to do so and will void your warranty. Repairs only by authorized service/ customer center.
- No naked flame sources, such as lighted candles, should be placed on the unit.
- When you are necessary to ship the unit store it in its original package. Save the package for this purpose.
- In case of malfunction due to electrostatic discharge or fast transient (burst), remove and reconnect the power supply.
- If the unit is not using for a long period of time, disconnect it from the power supply by unplugging the power plug. This is to avoid the risk of fire.
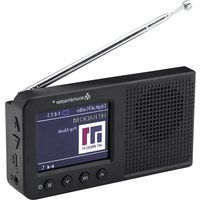
LOCATION OF CONTROLS

1 Play / Pause button 6 Preset + / - 11 Repeat / Random
2 Skip backward 7 Power On/Off 12 Program
3 Skip forward 8 Mode button 13 Volume + / -
4 Stop button 9 Tune -
5 LCD Display 10 Tune +
FRONT VIEW

14 Speaker
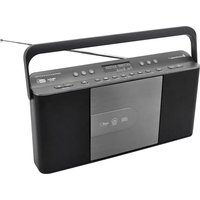
BACK VIEW

15 Earphone 17 USB Port 19 FM antenna
16 Aux-In 18 AC inlet
TOP VIEW

20 Handle
21 CD door
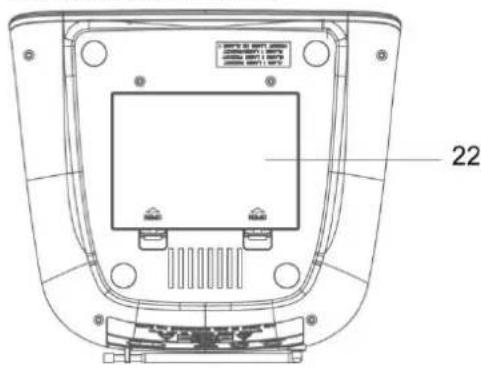
BOTTOM VIEW

22 Battery door
INSTALLATION
AC Operation
- Insert one end of the AC power cord to the AC input socket located at the back of the unit.
- Plug the AC power cord to the AC mains outlet.
- Press the button once to turn the unit on.
DC (Battery) Operation
- Ensure the power cord is disconnected from the AC mains and the unit.
- Installed the batteries (6 X 1.5V C Size) into the battery compartment. Please ensure that the polarity is correct (see the floor of the battery compartment)!
- Press the Button once to turn the unit on.
Note: To obtain the best performance in DC operation, the use of alkaline batteries is highly recommended.
Display Backlight
When the unit is switched on (in AC or DC battery operation) the display backlight will be turned on to full brightness and go to dim after around 10 seconds. Press a key will turn it to full brightness again for around 10 seconds.
NOTE:
When a mains cable is connected the batteries are automatically switched off.
After about 15 minute without a signal, the device will automatically switch to standby.
RADIO
The FM telescopic antenna is located at the left side of the unit, you should fully extend and adjust its position and direction until you find the best reception.
When the unit is powered up and switched to on for the first time, it will automatically enter into the FM Radio mode. The display will show FM and the frequency.
To select the FM mode during other operation modes, repeatedly press the “Mode” button until the display shows FM and the frequency.
Automatic Memory Scan (AMS)
During FM operation, press and hold the “Program” button until it starts to scan the entire frequency band, the found stations will be automatically stored into the preset memories.
Note: Once the AMS is conducted, all previous preset stations in the memory will be overridden.
Automatic Tuning
- Press and hold the “Tune +” or “Tune -” button for longer than 2 seconds to scan up or down the frequency band for stations, and it will automatically stop on the first found station of sufficient signal strength.
- Repeat the above procedure if you want to search for another station.
Manual Tuning
You can use the manual tuning to tune to weak stations or your desired frequency.
- During FM operation, repeatedly press the “Tune +” or “Tune –” button until you read your desired frequency or the reception is at its best.
- The stereo icon will be displayed if a FM stereo station is received. To switch between stereo and mono, press the ■ button.
Programming Preset Stations
You can program stations of your choice and store up to 20 stations into its memories.
- First tune to your desired station, then press the "Program" button once and the display will show "P-01" and flash, press the "Preset +" or "Preset -" button to select the preset number.
- When your desired preset number appears on the display, press the "Program" button again to confirm, the current station will be stored into your desired preset number.
- Repeat the steps 1 and 2 to program more preset stations, storing a new station into a preset location will erase the previous stored station in that location.
Recalling the Stored Preset Stations
To recall the stored preset stations, repeatedly press the "Preset +" or "Preset −" button until you see your desired preset number, the associated frequency will be displayed.
CD
NOTE: Although this CD/MP3 player can read CD-R and CD-RW discs in addition to normal CDs, the playability of CD-R and CD-RW discs may be affected by the type of software that was used to create the discs, as well as the quality and condition of the blank media you are using, 100% playability cannot be guaranteed. This is not an indication of a problem with the player.
Playing the CD
- To select CD mode, repeatedly press the "Mode" button until "CD" is displayed.
- Open the CD door and load the disc with the printed label side facing up and close the CD door. The display will finally show the total number of tracks. If a CD/MP3 disc is being played, the display will show "MP3".
- Press the ▶II button to start playback from the beginning, and you can now press the ▶II button to toggle select between the playback "PAUSE" and "PLAY" function.
- To skip forward or back to other tracks during playback, press the ◀◀ or ▶▶ button.
- To select other folders in the CD/MP3 disc, press the "Preset +" or "Preset -" button.
- To stop playback, press the ■ button.
Repeat and Random Play
During playback, you can press the “Repeat” button to select the repeat and random playback function:
- To repeat the same track, press "Repeat" button once, the display will show "Repeat One icon".
- To repeat the entire disc, press the "Repeat" button again, the display will show "Repeat All icon".
-
If you are playing a MP3 disc, an additional "FOLDER" option will appear. This will repeat the current folder.
-
To start random playback, repeatedly press the "Repeat" button until "RAND" appears in the display.
- To resume normal playback, repeatedly press the "Repeat" button until the "Repeat" or "RAND" icon disappears in the display.
Program Play
You can use the program play feature to play up to 20 tracks on a disc in any desired order. You may also program a particular track to play several times within a programmed sequence.
- Load your disc as usual and wait until the display shows the total number of tracks on the disc.
- Ensue it is in CD stop mode, press the "Program" button once, the display will show "P 01".
- Press the ◀ or ▶ button to select the first track number to be programmed. When your desired track number appears in the display, press the “Program” button to confirm and the first track to play is programmed. The program memory number will advance to “P 02” and ready for the next entry.
- If a MP3 disc is being loaded, press the "Preset +" or "Preset -" button to select folder.
- Repeat the above steps to program other tracks, a maximum number of 20 tracks (99 for MP3) can be programmed. When you have completed programming, press the ▶II button to begin program play, playback will be started on the first track that you have programmed and will continue until the last programmed track has played.
- When the program play is completed, the player stops and it will remain in the program play mode as long as the "Program Play icon" is displayed. Press the ▶II button will play the programmed sequence again.
- To erase the program, press the ■ button once in CD stop mode; and press the ■ button twice during CD play, the "Program Play icon" will disappear in the display.
Repeat Program Play
You may use the program play and the repeat play features together to continuously repeat a programmed playback. First program the desired playback sequence, then press the “Repeat” button to select repeating the current track (Repeat One) or the entire programmed sequence (Repeat All).
USB
- To select USB mode, repeatedly press the "Mode" button until "USb" is displayed.
- Insert your USB memory device into the USB port (located at the back of the unit), the display will show the total track number and you can now start your USB/MP3 playback operation.
- To interrupt or start playback, press the ▶II button.
- To skip forward or back to other tracks during playback, press the ◀◀ or ▶▶ button.
- To select other folders, press the "Preset +" or "Preset -" button.
- To stop playback, press the ■ button.
Repeat, Random and Program Play is the same as in CD-Mode.
AUX-IN
A 3.5mm stereo AUX IN socket is located at the back of the unit. Analogue audio sound signals from other sources can be input to the unit through this socket.
- Use a cable with 3.5mm jack to connect the input to other analogue audio source.
- To select AUX IN, repeatedly press the "Mode" button until "AU" is displayed.
- Press the Volume +/- button to adjust for your desired sound output level.
HEADPHONE
A 3.5mm type stereo headphone jack is located at the back of the unit. Connect a stereo headphone (not included) to this jack for private listening without disturbing others. The speakers are automatically disconnected when the headphones are in use.
IMPORTANT: When using headphones always set the volume to a low level before you put the headphones on. Then insert the headphones and gradually increase the volume to a comfortable listening level.
TECHNICAL SPECIFICATION
| Power input | : 100-240V~ 50/60Hz |
| Battery power | : 6 x 1,5V “C”-size battery (not included) |
| FM range | : 87.5 – 108MHz |
| Preset Stations | : 20 |
| Audio power output | : 2x 1W RMS |
IMPORTER
natural_image
Technical line drawing of a device rear panel with labeled components (no text or symbols beyond basic labels)14 Haut-parleur
VUE ARRIÈRE

natural_image
Technical line drawing of a device rear panel with labeled parts (no text or symbols beyond basic labels)14 Luidspreker
ACHTERAANZICHT

15 Oortelefoon 17 USB-POORT 19 FM-antenne
16 Aux-ingang 18 AC-ingang
BOVENAANZICHT

20 Handgreep
21 Cd-lade
ONDERAANZICHT
22 Batterijklep
INSTALLATIE
AC-VOEDING
*) markerade Cd = kadmium, Hg = kvicksilver, Pb = bly

VARNING - OSYNLIG LASERSTRÅLNING NÄR DU ÖPPNAR LOCKET ELLER TRYCKER PÅ SÄKERHETSSPÄRREN. UNDVIK EXPONERING FÖR LASERSTRÅLEN.

natural_image
Technical line drawing of a vehicle rear bumper with no text or symbols14 Reproduktor
POHLED ZEZADU

natural_image
Technical line drawing of a car rear bumper with no text or symbols14 Reproduktor
POHL'AD ZOZADU

15 Slúchadlo 17 Port USB 19 FM anténa
16 Pomocný vstup 18 Vstup AC
POHL'AD ZHORA

20 Rukovät'
21 Dvierka CD mechaniky
POHL'AD ZOSPODU

22 Kryt priestoru pre batérie
INŠTALÁCIA
D 90556 Cadolzburg, Germany
Tel: +49 9103 71 67 0
Fax: +49 9103 71 67 12
E-Mail: info@soundmaster.de
Internet: www.soundmaster.de
Hereby, Wörlein GmbH declares that this device is in compliance with the essential requirements and other relevant provisions of Directive 2014/53/EU.
A copy of the declaration of conformity can be obtained from the above address.

- LOCATION OF CONTROLS
- INSTALLATION
- AC Operation
- DC (Battery) Operation
- Display Backlight
- NOTE:
- RADIO
- Automatic Memory Scan (AMS)
- Automatic Tuning
- Manual Tuning
- Programming Preset Stations
- Recalling the Stored Preset Stations
- CD
- Playing the CD
- Repeat and Random Play
- Program Play
- Repeat Program Play
- USB
- AUX-IN
- HEADPHONE
- IMPORTER
- INSTALLATIE
- AC-VOEDING
- VARNING - OSYNLIG LASERSTRÅLNING NÄR DU ÖPPNAR LOCKET ELLER TRYCKER PÅ SÄKERHETSSPÄRREN. UNDVIK EXPONERING FÖR LASERSTRÅLEN.
- POHLED ZEZADU
- INŠTALÁCIA
Brand : Soundmaster
Model : SCD1900
Category : Mp3 player