
NR955 - Mp3 player Soundmaster - Free user manual and instructions
Find the device manual for free NR955 Soundmaster in PDF.

| Product type | Clock radio with CD/MP3 player, DAB+, FM, Bluetooth, USB, AUX |
| Brand | Soundmaster |
| Model | NR955 |
| Mains power supply | 230 V AC ~ 50 Hz |
| Remote control | 3 V DC (2 AAA batteries, not included) |
| DAB+/DAB frequency ranges | 174 - 240 MHz |
| FM frequency range | 87.5 - 108 MHz |
| Supported audio formats | Audio CD, MP3 (CD and USB) |
| Main functions | DAB+/FM radio, CD/MP3 player, Bluetooth, USB, AUX input, alarm, auto standby |
| Display | LCD with backlight |
| Speakers | Built-in speaker |
| Auxiliary input | 3.5 mm stereo jack |
| USB port | Yes, for MP3 playback |
| Bluetooth | Yes, unspecified version |
| Antenna | Telescopic |
| Maintenance and cleaning | Clean with a dry cloth. Do not use detergents or abrasive products. |
| Safety | Class 1 laser, do not open, risk of electric shock, unplug during storms. |
| Used batteries | Do not dispose of with household waste, take to a collection point. |
| General information | Importer: Wörlein GmbH, Gewerbestrasse 12, D 90556 Cadolzburg, Germany. Declaration of conformity available. |
Frequently Asked Questions - NR955 Soundmaster
User questions about NR955 Soundmaster
0 question about this device. Answer the ones you know or ask your own.
Ask a new question about this device
Download the instructions for your Mp3 player in PDF format for free! Find your manual NR955 - Soundmaster and take your electronic device back in hand. On this page are published all the documents necessary for the use of your device. NR955 by Soundmaster.
USER MANUAL NR955 Soundmaster
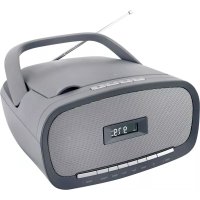
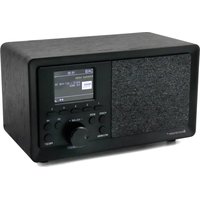
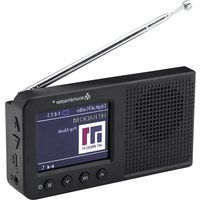
natural_image
Exterior view of a portable electronic radio with control knobs and a digital display (no readable text or symbols)DEUTSCH
ENGLISH
FRANÇAIS
NEDERLANDS
ITALANIO
PORTUGUÊS
NORSK
SVENSKA
DANSK
ČEŠTINA
Date and Time This displays the current date and time.
↓
Frequency → This displays the frequency of the current station.
↓
REP1 → REPA → RAND → Normal
Do not dispose of this product with the normal household waste at the end of its life cycle. Return it to a collection point for the recycling of electrical and electronic devices. This is indicated by the symbol on the product, user manual or packaging.
The materials are reusable according to their markings. By reusing, recycling or other forms of utilization of old devices you make an important contribution to the protection of our environment.
Please contact your local authorities for details about collection points.
CAUTION - INVISIBLE LASER RADIATION WHEN OPENING THE COVER OR PRESSING THE SAFETY INTERLOCK. AVOID EXPOSURE TO THE LASER BEAM.
Caution: To reduce the risk of electric shock, do not remove the cover (or back). There are no user serviceable parts inside. Refer servicing to qualified service personnel.
WARNING
Risk of electric shock Do not open!


This symbol indicates the presence of dangerous voltage inside the enclosure, sufficient enough to cause electric shock.

This symbol indicates the presence of important operating and maintenance instructions for the device.
Safety, Environmental and Setup Instructions
- Use the device in dry indoor environments only.
- Protect the device from humidity.
• Do not open the device. RISK OF ELECTRIC SHOCK! Refer opening and servicing to qualified personnel. - Connect this device to a properly installed and earthed wall outlet only. Make sure the mains voltage corresponds with the specifications on the rating plate.
• Make sure the mains cable stays dry during operation. Do not pinch or damage the mains cable in any way. - Disconnect device warning: Main plug is used as the connection, so it should always remain ready operate.
• The mains plug is used as the disconnect device, the disconnect device shall remain readily operable.
• A damaged mains cable or plug must immediately be replaced by an authorized service center. - In case of lightning, immediately disconnect the device from the mains supply.
• Children should be supervised by parents when using the device. - Clean the device with a dry cloth only.
Do NOT use CLEANING AGENTS or ABRASIVE CLOTHS!
- Do not expose the device to direct sunlight or other heat sources.
• Install the device at a location with sufficient ventilation in order to prevent heat accumulation. - Do not cover the ventilation openings!
• The ventilation should not be impeded by covering the ventilation openings with items, such as newspaper, table-cloths, curtains, etc. - It shall be not be exposed to dripping or splashing and that no objects filled with liquids, such as vases, shall be placed on the apparatus.
• The unit should not be exposed to direct sunlight, very high or low temperature, moisture, vibrations or placed in dusty environment. - Never attempt to insert wires, pins or other such objects into the vents or opening of the unit.
• Install the device at a safe and vibration-free location. - No naked flame sources, such as lighted candles, should be placed on the apparatus.
• Install the device as far away as possible from computers and microwave units; otherwise radio reception may be disturbed. - Do not open or repair the enclosure. It is not safe to do so and will void your warranty. Repairs only by authorized service/ customer center.
- The device is equipped with a "Class 1 Laser". Avoid exposure to the laser beam as this could cause eye injuries.
- Only use mercury and cadmium-free batteries.
- Batteries shall not be exposed to excessive heat such as sunshine, fire or the like.
- Used batteries are hazardous waste and NOT to be disposed of with the household waste!!! Return the batteries to your dealer or to collection points in your community.
- Keep batteries away from children. Children might swallow batteries. Contact a physician immediately if a battery was swallowed.
- Check your batteries regularly to avoid battery leakage.

Used batteries are hazardous waste and NOT to be disposed of with the household waste! As a consumer you are legally obligated to return all batteries for environmentally responsible recycling – no matter whether or not the batteries contain harmful substances ^* .
Return batteries free of charge to public collection points in your community or to shops selling batteries of the respective kind.
Only return fully discharged batteries.
*) marked Cd = cadmium, Hg = mercury, Pb = lead
Remote Control
1. STANDBY
Press to switch on the unit.
Press to switch off the unit.
2. FUNCTION
Press to select different functions.
3. INFO
In radio mode, use this button to review information of the radio station.
4. EJECT
In CD mode, use to button to eject the CD tray.
5. STOP
In CD/MP3/USB mode, press to stop the music.
6. SCAN/ PLAY/PAUSE
In radio mode, use this button to scan the radio station.
In CD/MP3/USB mode, press to play or pause the music.
7. P-Mode
In CD/MP3/USB mode, use this button to select different play mode.
In DAB mode, hold this button to Factory Reset.
8. SKIP-/ TUNE-
Press to skip to the previous track or previous radio station. Hold down for revise backward.
9. MONO/ENTER
Press to confirm the setting or the function
In DAB mode, hold this button to manual tune.
In FM mode, use this button to select Mono or Auto mode.
10. SKIP+/ TUNE+
Press to skip to the next track or previous radio station. Hold down for fast forward.
11. FOLDER-
Press to skip to the previous folder
12. FOLDER+
Press to skip to the next folder
13. 10+
In CD/MP3/USB mode, press to skip 10 tracks forward.
14. MENU
Use this button to prune.
15. MEM
Use button to store and recall preset station.
16. 10-
In CD/MP3/USB mode, press to skip 10 tracks backward.
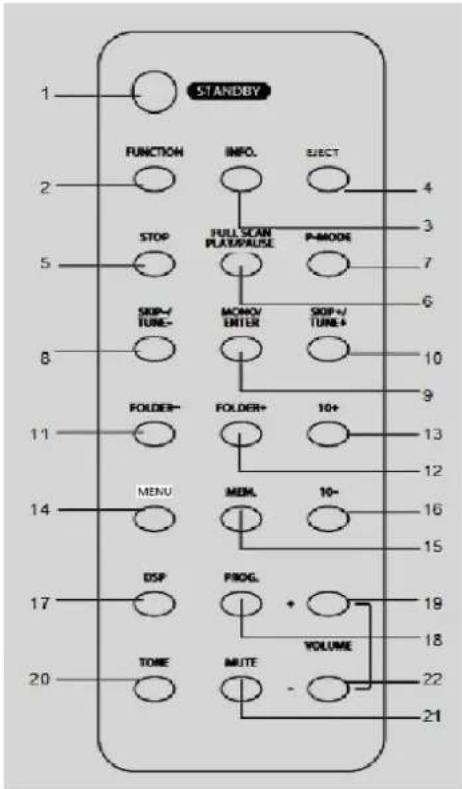
17. DSP
Press to select different EQ system.
18. PROG.
Use button to program the list of tracks
19. VOLUME +
Press to increase the volume
20. TONE
Adjust the Bass And Treble tone controls
21. MUTE
Press to silence the output
22. VOLUME -
Press to decrease the volume
Remote control
Insert two pieces AAA batteries into the battery compartment. Be sure to observe the proper polarity (the "+" and "-" signs) as indicated inside the battery compartment.
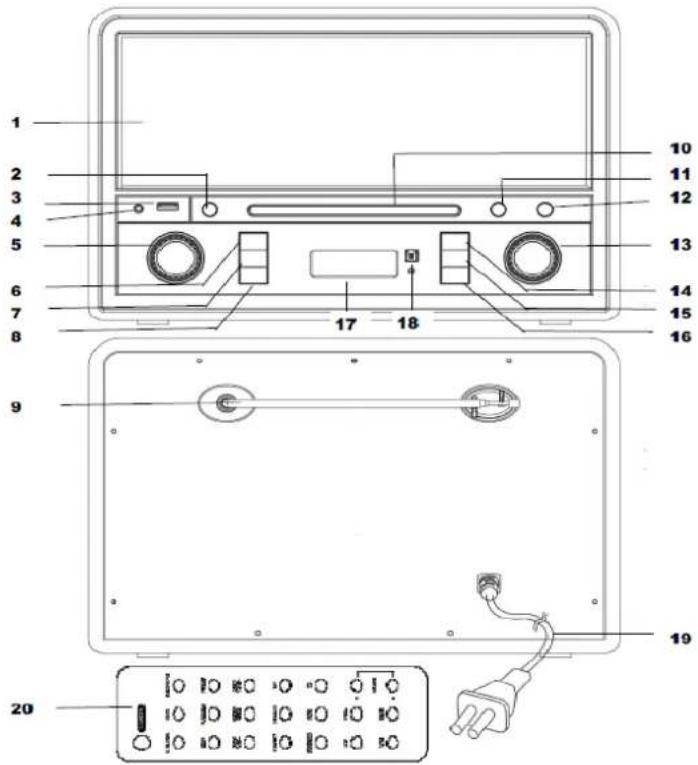
LOCATIONS OF CONTROLS
- Speaker
- STANDBY Button
- USB slot
- AUX-IN Jack
- VOLUME Control
- FUNCTION Button
- P-MODE Button
- SKIP- Button
- Antenna
- CD tray
- EJECT Button
- PRESET/PROG./10+ Button
- TUNNING / ENTER Button
- SCAN/LAY/PAUSE Button
- STOP/INFO Button
- SKIP+ Button
- LCD display
- Remote Sensor
- AC Power Cord
- Remote Control
QUICK GUIDE
| Controls | Mode | |
| DAB+ | FM | |
| Skip -/+ | Press to select the previous and next DAB radio station | Press to decrease or Increase frequency by one step (0.05MHz) accordingly. |
| SCAN | Press to perform a full scan | Press to forward scan for next available station |
| Press and hold 3 seconds to backwards scan for the next available station | ||
| TUNING | Rotate clock wise: Go to the next station/option | Rotate clock wise: Increase frequency by one step (0.05MHz) |
| Rotate anti- clock wise: Go to the previous station/option | Rotate anti- clock wise: Decrease frequency by one step (0.05MHz) | |
| INFO | Press to toggle through various station information | |
| PROGRAM/PRESET | Press and hold to set a preset station | |
| Press to recall a preset | ||
| ENTER | Press to confirm the option | |
| VOLUME CONTROL | Rotate clock wise: increase the volume level | |
| Rotate anti- clock wise: decrease the volume level | ||
AC OPERATION
Before operation, please make sure that the VOLTAGE mentioned on the unit is same as the voltage of your local area. Unravel the AC power cord, insert into a standard AC outlet.
ATTENTION
- Do not plug or unplug the power cable while you have wet hands;
- If you plan not to use the unit for a long time, disconnect the power cable from the wall outlet;
- When disconnecting the power cord from the wall outlet, do not pull on the cord in order to avoid shock risks caused by damaged cable.
BASIC OPERATION
Switching ON / OFF
1: When unit is off, press the "STANDBY" button on the main unit (2) or remote control (21) to switch the unit on.
2: When unit is on, press "STANDBY" button on the main unit (2) or remote control (21) to switch the unit off.
Mute function
1: Press the "MUTE" button on the remote control (21) at any time to silence the output.
2: Press again to resume audio output.
Tone controls
Adjust the Bass & Treble tone controls if required.
1: Press the "TONE" button on the remote control (20).
2: The first adjustment is Bass. Use the "VOLUME +/-" buttons on the remote control (19/22) to adjust.
3: Press the "TONE" button (20) again to edit the Treble. Use the "VOLUME +/-" buttons (19/22) on the remote control to adjust.
DSP effects
Pressing the DSP button on the remote (17) repeatedly cycles through a set of "EQ" presets to alter the sound field. Sequence: "Flat > Classic > Rock > Rock > Pop > Jazz"
Switching modes
Press the "FUNCTION" button on the main unit (6) or remote control (2) to cycle through the options. To switch between the available modes: DAB > FM > BT > AUX IN > CD > USB.
DAB MODE
DAB Full Scan
Press the "FUNCTION" (6) button on the main unit or remote control (2) to select "DAB" mode.
In DAB mode, press the “SCAN” button on the main unit or remote control to perform full scan the available DAB stations. During the scan, the display will show “Searching...” together with a slide bar that indicates the progress of the scan and the amount of stations that have been found so far. Once the scan has completed, to explore and listen to the found stations, press the SKIP-/+ button on the main unit (8/12) or remote control (8/10) or rotate the “TUNNING CONTROL” (13), then press “ENTER” button on the main unit (13) or remote control (9) to confirm.
Manual Tune
You can also manually tune the receiver. This can help when aligning your aerial or when adding stations that were missed while auto tuning.
- In DAB mode, press and hold the "ENTER" button on the main unit (13) or remote control (9) for 3 seconds and it will show MANUAL TUNE.
- Press the SKIP-/+ button on the main unit (8/12) or remote control (8/10) or rotate the TUNNING CONTROL (13) to cycle through the DAB channels, which are numbered from 5A to 13F
- After your desired channel number is reached, press the ENTER button on the main unit (13) or remote control (9) to exit the manual tune.
To Store the DAB Stations in the Memory
- In DAB mode, select the DAB station
- Press and hold the "MEM" button on the remote control (15) for about 3 seconds, the display will show the current DAB station and "P###" (where "###" is the preset station number) will flash, press the "SKIP-/+ " button on the main unit (8/12) or remote control (8/10) or rotate the "TUNNING CONTROL" (13) select the desired preset station number.
- Press "ENTER" button on the main unit (13) or remote control (9) to confirm storing that station in memory.
To Recall the Stored DAB Station
- In DAB mode, press the "MEM" button on the remote control (15), the display will show the current DAB station and P# # (where ## is the current preset station number),
- Press the SKIP- / + button on the main unit (8/12) or remote control (8/10) or rotate the "TUNNING CONTROL"(13) to select the preset station number you want to listen then press "ENTER" (13) button on the main unit or remote control (9) to confirm.
Prune
You may remove all unavailable stations from the list.
- In DAB mode, press "MENU" button on the remote control(14), the display appear the software version number, such as "DAB305 v 1.1"
- Press "MENU" button on the remote control (14) once again and will appear "PRUNE?"
- Press "ENTER" button on the main unit (13) or remote control (9) to confirm.
DAB station information
Press the "INFO" button on the main unit (15) or remote control (3) to display the information of the current DAB station in the sequence below
Programme Type ➔ This describes the "style" or "genre" of the program that is being broadcast.
↓
Ensemble This displays the name of the multiplex that contains the station you are listening to. A multiplex is a collection of radio stations that are bundled and transmitted on one frequency. There are national and local multiplexes. Local ones contain stations that are specific to that area.
↓
Frequency → This displays the frequency of the current station.
↓
Audio Bit Rate ➔ This displays the digital audio bit rate being received.
Signal Strength ➤ This shows a slide bar to indicate the signal strength, the stronger the signal, the longer the bar will be from left to right.
↓
Date and Time This displays the current date and time.
↓
Scrolling Text ➤ This is a scrolling message giving realtime information, e.g. song titles, news; headlines, etc.
FM RADIO OPERATION
Press the "FUNCTION" button on the main unit (6) or remote control (2) to select FM mode.
Note : For best reception, fully extent the FM telescopic antenna to receive FM station.
To Select the FM Station
Auto Scan
- In FM mode, press the "SCAN" button on the main unit (14) or remote control (6) to start searching the forward available FM station. Press and hold the "SCAN" button on the main unit (14) or remote control (6) for 3 seconds to start searching the backward available FM station
- The search operation simply finds stations with strong signals. Stations with weak signal can only be tuned in manually.
Manual tune
Press the “SKIP-/+” button on the main unit (14) or remote control (6) or rotate the “TUNNING CONTROL” (13) the unit will skip 0.05 MHz in the direction of skip.
To Store the FM Stations in the Memory
- In FM mode, select the FM station
- Press and hold the "MEM" button on the remote control (15) for about 3 seconds, the display will show the current FM station and P# (where # is the preset station number) will flash, press the "SKIP-/+” button on the main unit (8/12) or remote control (8/10) or rotate the "TUNNING CONTROL"(13) to select the desired preset station number.
- Press "ENTER" button on the main unit (13) or remote control (9) to confirm storing in memory.
To Recall the Stored FM Station
- In FM mode, press the "MEM" button on the remote control (15), the display will show the current FM station and P# (where # is the current preset station number),
- press the "SKIP-/+ " button on the main unit (8/12) or remote control (8/10) or rotate the "TUNNING CONTROL" (8/10) to select the preset station number you want to listen then press "ENTER" button on the main unit (13) or remote control (9) to confirm.
FM MONO / AUTO Mode
In FM mode, press the "MONO" button on the remote control (9) to select the MONO mode or AUTO mode.
FM Station Information
Press "INFO" button (3) to display the information of the current FM station in the sequence below:
Signal Strength ➤ This shows a slide bar to indicate the signal strength, the stronger the signal, the longer the bar will be from left to right.
↓
Date and Time This displays the current date and time.
↓
Frequency → This displays the frequency of the current station.
↓
Audio Type ➔ This displays if the audio being received is in mono or stereo mode.
↓
Scrolling Text → This is a scrolling message giving real-time information, e.g. song titles, news headlines, etc.
↓
Programme Type ➔ This describes the "style" or "genre" of the programme that is broadcasting.
- Press the "FUNCTION" button on the main unit (6) or remote control (2) to select CD mode.
- Press the "EJECT" button on the main unit (10) or remote control (4) to eject the CD tray and Insert a CD/MP3 disc
- Press the" EJECT" button again and the unit will start reading the disc.
- Press the "PLAY/PAUSE" button on the main unit (14) or remote control (6) to start playing the disc.
- During playing, press the "PLAY/PAUSE" button on the main unit (14) or remote control (6) to temporarily pause playing. To resume, press the "PLAY/PAUSE" button on the main unit (14) or remote control (6) again.
- If your MP3 disc has folders, you can use the FOLDER-/FOLDER+ button on the remote control (11/12) to select the desired folder.
USB OPERATION
- Press the "FUNCTION" button on the main unit (6) or remote control (2) to select USB mode.
- Plug your USB device into the USB port on the unit, the unit will start reading the files in the USB device.
- Press the "PLAY/PAUSE" button on the main unit (6) or remote control (2) to start playing the files.
- During playing, press the "PLAY/PAUSE" button on the main unit (6) or remote control (2) to temporarily pause playing. To resume, press the "PLAY/PAUSE" button on the main unit (6) or remote control (2) again.
- If your MP3 disc has folders, you can use the "FOLDER-/FOLDER+" button on remote control (11/12) to select the desired folder.
Programming
The programming should be done during "STOP" mode
- Press the "PROG." button on the main unit (12) or remote control (18), the display will show 'PROG01'.
- Use the "SKIP-/+ " button on the main unit (8/16) or remote control (8/10) to select the desired track.
- Press the "PROG." button on the main unit (12) or remote control (18), again to store the selected track in the memory, the LCD display will show 'PROG02' and flash continuously.
- Repeat steps 2 to 3 to store more tracks in the memory. You can store up to 20 tracks in the memory for CD disc. You can store up to 99 tracks in the memory for MP3 files.
- Press the "PLAY/PAUSE" button on the main unit (14) or remote control (6) to start playing the disc in the programmed order.
- To stop playing, press the "STOP" button on the main unit (15) or remote control (5).
- To cancel the programming list, press the "STOP" button on the main unit (15) or remote control (5), or open the CD compartment door or select other function.
Repeat Play Mode
Press the "P-MODE" button on the remote control (7) to select repeat play mode with the following sequence.
REP1 → REPA → RAND → Normal
- REP1 – repeat the track being played.
- REPA – repeat ALL the tracks in the storage media.
- RAND – play the tracks in random order selected by the player..
• Normal – play the tracks in sequence.
Skip Mode
- During play mode, press the "SKIP+/TUNE+" button on the main unit (16) or remote control (10) to go to the next track.
- During play mode, press the SKIP-/TUNE- button on the main unit (8) or remote control (8) to go back to the previous track.
- During Play mode, press the "10+" button on the remote control (13) to skip 10 tracks forward.
- During Play mode, press the 10-button on the remote control (16) to skip 10 tracks backward.
AUX IN CONNECTION
- Press the "FUNCTION" button on the main unit (6) or remote control (2) to select AUX mode.
- Insert one side of the audio cable (requires 3.5mm stereo plug, not supplied) into the line-out jack or phones jack on your audio device and the other side to the aux-in jack on the unit.
- Turn on your audio device and follow the playback instruction.
- To stop this function, select other functions or turn off your audio device.
BLUETOOTH STREAMING
- Press the "FUNCTION" button on the main unit (6) or remote control (2) to select BT mode. The LCD display will show "Bluetooth Pairing".
- Turn on your Bluetooth of your Bluetooth device and search this unit for connection. Your Bluetooth device should find "NR955".
- If the connection is successful, The LCD display will show "Bluetooth Paired".
- Select and play the audio files though your Bluetooth device.
- To stop this function, switch to other mode or shut down your Bluetooth of your Bluetooth device
AUTO PAIRING
Once the unit paired with the Bluetooth device, it will automatically pair with that device next time when you turn on the unit and that Bluetooth device.
System Reset
There may be times when you need to reset your unit back to the factory settings especially when you have moved house. If you experience reception problems you may want to reset and try again. If you move to another part of the country and pick up the local and national DAB stations in that area, your previously tuned channels may no longer be available.
- In DAB mode, press and hold "P-MODE" button on the remote control (7) until the display shows "Press ENTER key to Reset".
- Press the "ENTER" button on the main unit (13) or remote control (9) to start reset. The display will show "OK", then it will automatically enter DAB mode and perform auto scan.
3.
Note : After the system reset, all the previous stored DAB+ or FM stations will be erased from the memory.
Important Note
Automatic standby switching
To comply with the ERP2 directive, when the unit receives no signal after approximate 10 minutes, the unit will automatically switch to STANDBY mode. To switch the unit on again, press the "STANDBY" button on the main unit (2) or remote control (1).
TECHNICAL SPECIFICATIONS
Frequency Range: DAB+/DAB 174 - 240 MHz
FM 87.5 - 108 MHz
Power Supply: AC 230V \~ 50Hz
Remote Control: DC 3V (AAA x 2pcs)
Specifications are subject to change without further notice.
Importer
REP1 → REPA → RAND → Normal
REP1 → REPA → RAND → Normal
REP1 → REPA → RAND → Normal
CUIDADO – RADIAÇÃO LASER INVISÍVEL QUANDO ABRIR A TAMPA OU PREMIR O FECHO DE SEGURANÇA. EVITE EXPOSIÇÃO AO FEIXE LASER.
AVISO
REP1 → REPA → RAND → Normal
FORSIKTIG! DET OPPSTÄR USYNLIG LASERSTRÅLING NÄR DEKSLET ÅPNES ELLER SIKKERHETSFORRIGLINGEN TRYKKES. UNNGÅ EKSPONERING FOR LASERSTRÅLEN.
ADVARSEL
REP1 → REPA → RAND → Normal
VARNING - OSYNLIG LASERSTRÅLNING NÄR DU ÖPPNAR LOCKET ELLER TRYCKER PÅ SÄKERHETSSPÄRREN. UNDVIK EXPONERING FÖR LASERSTRÅLEN.
WARNING
*) markerade Cd = kadmium, Hg = kvicksilver, Pb = bly
Fjärrkontroll
1. STANDBY
REP1 → REPA → RAND → Normal
ADVARSEL - USYNLIG LASER RADIATION VED ÅBNING AF COVERET ELLER VED SAMMENPRESNING. UNDGÅ EKSPONERING AF LASER STRÅLEN.
ADVARSEL
Risiko for elektronisk chok
ABEN IKKE!

Advarsel: For at reducere risikoen for elektrisk chok, fjern ikke coveret (eller bagsiden). Der er ingen brugervenlige dele indeni. For serviceeftersyn kontakt kvalificeret personale.

REP1 → REPA → RAND → Normal
UPOZORNĚNÍ – PŘI OTEVŘENÍ KRYTU NEBO STISKNUTÍ BEZPEČNOSTNÍHO ODPOJOVAČE DOCHÁZÍ K NEVIDITELNÉMU LASEROVÉMU ZÁŘENÍ. NEVYSTAVUJTE SE LASEROVÉMU PAPRSKU.
VAROVÁNÍ
REP1 → REPA → RAND → Normal
D 90556 Cadolzburg, Germany
Tel: +49 9103 71 67 0
Fax: +49 9103 71 67 12
E-Mail: info@soundmaster.de
Internet: www.soundmaster.de
Hereby, Wörlein GmbH declares that this device is in compliance with the essential requirements and other relevant provisions of Directive 2014/53/EU.
A copy of the declaration of conformity can be obtained from the above address.

- REP1 → REPA → RAND → Normal
- CAUTION - INVISIBLE LASER RADIATION WHEN OPENING THE COVER OR PRESSING THE SAFETY INTERLOCK. AVOID EXPOSURE TO THE LASER BEAM.
- WARNING
- Safety, Environmental and Setup Instructions
- Remote Control
- STANDBY
- FUNCTION
- INFO
- EJECT
- STOP
- SCAN/ PLAY/PAUSE
- P-Mode
- SKIP-/ TUNE-
- MONO/ENTER
- SKIP+/ TUNE+
- FOLDER-
- FOLDER+
- 10+
- MENU
- MEM
- 10-
- DSP
- PROG.
- VOLUME +
- TONE
- MUTE
- VOLUME -
- LOCATIONS OF CONTROLS
- AC OPERATION
- ATTENTION
- BASIC OPERATION
- Switching ON / OFF
- Mute function
- Tone controls
- DSP effects
- Switching modes
- DAB MODE
- DAB Full Scan
- Manual Tune
- To Store the DAB Stations in the Memory
- To Recall the Stored DAB Station
- Prune
- DAB station information
- FM RADIO OPERATION
- To Select the FM Station
- Auto Scan
- To Store the FM Stations in the Memory
- To Recall the Stored FM Station
- FM MONO / AUTO Mode
- FM Station Information
- USB OPERATION
- Programming
- Repeat Play Mode
- Skip Mode
- AUX IN CONNECTION
- BLUETOOTH STREAMING
- AUTO PAIRING
- System Reset
- Important Note
- Automatic standby switching
- TECHNICAL SPECIFICATIONS
- Importer
- CUIDADO – RADIAÇÃO LASER INVISÍVEL QUANDO ABRIR A TAMPA OU PREMIR O FECHO DE SEGURANÇA. EVITE EXPOSIÇÃO AO FEIXE LASER.
- AVISO
- FORSIKTIG! DET OPPSTÄR USYNLIG LASERSTRÅLING NÄR DEKSLET ÅPNES ELLER SIKKERHETSFORRIGLINGEN TRYKKES. UNNGÅ EKSPONERING FOR LASERSTRÅLEN.
- ADVARSEL
- VARNING - OSYNLIG LASERSTRÅLNING NÄR DU ÖPPNAR LOCKET ELLER TRYCKER PÅ SÄKERHETSSPÄRREN. UNDVIK EXPONERING FÖR LASERSTRÅLEN.
- Fjärrkontroll
- ADVARSEL - USYNLIG LASER RADIATION VED ÅBNING AF COVERET ELLER VED SAMMENPRESNING. UNDGÅ EKSPONERING AF LASER STRÅLEN.
- UPOZORNĚNÍ – PŘI OTEVŘENÍ KRYTU NEBO STISKNUTÍ BEZPEČNOSTNÍHO ODPOJOVAČE DOCHÁZÍ K NEVIDITELNÉMU LASEROVÉMU ZÁŘENÍ. NEVYSTAVUJTE SE LASEROVÉMU PAPRSKU.
- VAROVÁNÍ
Brand : Soundmaster
Model : NR955
Category : Mp3 player